CiscoWorks for Windows
Features
CiscoWorks for Windows 1.0 is a suite of integrated PC-based network configuration and diagnostic tools for small to medium-sized networks or remote workgroups that deploy from 5 to 50 Cisco devices.
This chapter provides the following sections on CiscoWorks for Windows applications and features:
•
Configuration Builder•
Show Commands•
Health Monitor•
CiscoView•
Online HelpThe CiscoWorks for Windows Show Commands, CiscoView, and Health Monitor applications must run under HP OpenView. Configuration Builder can run as a stand-alone application or within the HP OpenView platform. CiscoView and Health Monitor applications use the Simple Network Management Protocol (SNMP) to monitor and control any Cisco device on the network.
Note For detailed information on all CiscoWorks for Windows applications, see the context-sensitive online help system. The comprehensive online help system provides procedures, overview material, and links to related information.
Configuration Builder
Configuration Builder
Configuration Builder allows you to create configuration files for multiple Cisco routers, access servers, and hubs without requiring you to remember complicated command-line language or syntax for the devices. Using Configuration Builder, you can configure Cisco devices with the most common Cisco Internetwork Operating System (Cisco IOS) features. See Table 2-2 through Table 2-6 for a brief overview of supported Cisco IOS features.
Note Advanced features or features added in Cisco IOS releases later than those listed in the “Cisco IOS Versions” section in Chapter 1, “Installation Procedures” are supported through the Configuration Builder Add Commands window—see the online help system for more details.
Configuration Builder provides the following special features:
•
Multiple device configuration windowsYou can configure multiple devices simultaneously for remote source-route bridging and Synchronous Data Link Control (SDLC) Transport. For example, when you configure a new router into an existing remote source-route bridging virtual ring group, configuration files of all devices in the same virtual ring group are automatically updated.
•
Configuration snap-insYou can quickly import predefined priority queuing lists, Internet Protocol (IP) or Internetwork Packet Exchange (IPX) access lists, IPX Service Advertisement Protocol (SAP) filters, and AppleTalk filters into multiple configuration files. This ensures consistency among devices that share common configuration parameters.
•
Duplicate address and configuration checkingYou can check for duplicate IP, IPX, AppleTalk, and DECnet addresses in all open configuration files. You can also check for valid entries for common configuration
•
Guided configurationYou can automatically move through the sequence of dialog boxes that need to be filled to create a configuration file. To do so, complete the initial configuration dialog box and then do one of the following after completing each configuration dialog box:
— Press the F2 key.
— Select the Guided Configuration icon on the toolbar in the main window. — Select the Guided Configuration command from the Global menu.
•
Learn hardware capabilityYou can detect the model, software version and image type, and the number and type of installed interfaces on the router you are configuring. You can also learn the number of lines on an access server, and whether or not a hub is connected to a device. This information is automatically placed in the configuration file.
•
Remote configuration capabilityYou can configure remote devices if the PC is running a Transmission Control Protocol/Internet Protocol (TCP/IP) stack that is WINSOCK-compliant and has access via TCP/IP to the router you are configuring. The router must have the following minimum configuration:
— IP routing enabled
— An IP address assigned to an interface — Enable and virtual terminal passwords
What’s New in this Release
Since the release of Configuration Builder 1.1, several features have been added.
Configuration Builder 2.0 allows you to configure Cisco hubs and access servers as well as routers.
You can perform the following configuration tasks for access servers:
•
Group and ungroup lines.In addition to configuring options for a single access server line, you can quickly configure the same options for a group of lines.
Configuration Builder
•
Use expert mode to quickly configure related features.If you are an expert user and are familiar with access server configurations, you can select expert mode to enable additional paths for configuring global access server features, allowing quick access to dialog boxes where you can complete related configuration tasks.
•
Configure chat scripts.Create and edit modem chat scripts for your access server asynchronous lines or create and edit login chat scripts for dialer rotary groups.
•
Use list boxes to quickly select device features and modem communication parameters.•
Configure lines for IP, IPX, or AppleTalk Remote Access (ARA) protocols to allow flexibility for remote user login.•
Configure terminal services.You can select Telnet, local-area transport (LAT), or rlogin for console, TTY, auxiliary (aux), and virtual terminal (VTY) lines. TN3270 is enabled for all lines. You can also configure XRemote for auxiliary and TTY lines.
•
Set up security.Restrict access to your access server by creating a list of local usernames and passwords, or by assigning line passwords to lines. If your network has a Terminal Access Controller Access System (TACACS) server available, you can enable TACACS to authenticate usernames and passwords.
•
Configure Dial-on-Demand Routing (DDR) to include asynchronous or synchronous serial lines and assign them to a rotary group.•
Configure protocol translation to enable connections between hosts and resources running different protocols.Note For detailed information on all Configuration Builder features, see the
Configuration Builder Files
Configuration Builder generates and stores these files in the \data directory:
•
*.cdf — configuration files (binary)•
*.cfg— configuration files (text)•
*.cbk — configuration backup files•
snmphost.chl— SNMP host names file•
zones.apt— AppleTalk zones fileConfiguration Builder generates and stores these files in the \data\snapin directory:
•
*.aal — AppleTalk access lists•
*.ial — IP access lists•
*.nal — IPX access lists•
*.nsl — IPX SAP filter lists•
*.pql— Priority queuing listsThe \data\srb directory contains files with the extension *.srb. These files define remote source-route bridging (SRB) groups.
The \data\sdlc directory contains files with the extension *.s. These files define synchronous data-link control (SDLC) tunnel groups.
Caution If you create additional Configuration Builder icons through the Windows Program Manager, be sure to include the directory name in which you installed Configuration Builder 2.0 and the ciscocb.exe command. The working directory must specify the \data subdirectory.
Configuration Builder
Configuration Builder Main Window
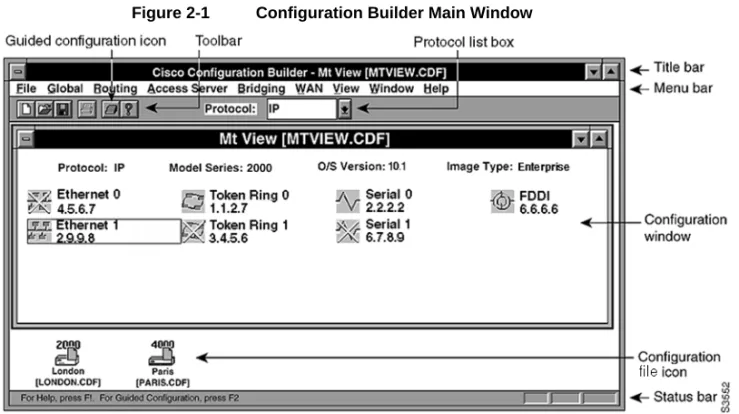
The Configuration Builder main window is illustrated in Figure 2-1. The number and type of network icons displayed in the main window will vary according to your network configuration.
Figure 2-1 Configuration Builder Main Window
The main window consists of the following elements:
•
Title bar—Displays the application name and the name of the currently active router configuration. The active configuration name includes the router host name, followed by the filename in brackets. In Figure 2-1, the host name is Mt View, and the filename is MTVIEW.CDF.•
Menu bar—Provides access to all Configuration Builder dialog boxes. Table 2-1 through Table 2-9 list and explain the options under each menu.•
Toolbar—Provides the Guided Configuration icon in addition to the standard create file, open file, save file, print file, and help icons. You can use the Guided Configuration icon or the F2 key to activate the guided configuration.•
Protocol list box—Used with configuration windows, it lets you select a routing protocol. The configuration window indicates whether interfaces are enabled for the specified routing protocol. In Figure 2-1, IP is the selected protocol. You can double-click on any interface icon to open the IP Routing Configuration window.•
Configuration windows—Appear within the main window and indicate the router model, Cisco software version and image type, and interface status information. In Figure 2-1, the Mt View configuration is for a Cisco 3000 router running Software Release 10.1. Ethernet 1, Token Ring 0, Serial 0, and FDDI 0 are IP-enabled. Serial 1, Ethernet 0, and Token Ring 1 are not IP-enabled as indicated by the yellow cross-out over the interface icon. (A red cross-out over an interface icon would indicate that an interface has been administratively shut down.)•
Configuration file icons—Displayed for any open configuration window that is iconized. In Figure 2-1, the London and Paris configurations are iconized.•
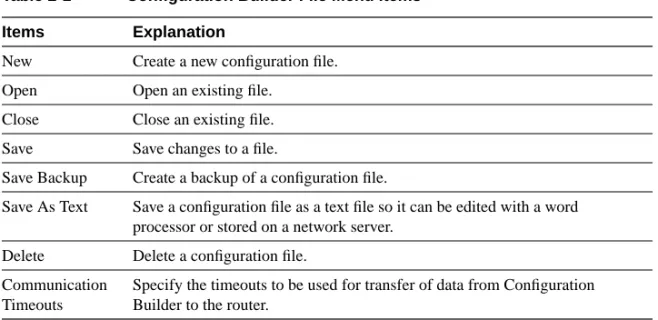
Status bar—Provides a brief description of the currently selected menu item.Table 2-1 Configuration Builder File Menu Items Items Explanation
New Create a new configuration file. Open Open an existing file.
Close Close an existing file. Save Save changes to a file.
Save Backup Create a backup of a configuration file.
Save As Text Save a configuration file as a text file so it can be edited with a word processor or stored on a network server.
Delete Delete a configuration file. Communication
Timeouts
Specify the timeouts to be used for transfer of data from Configuration Builder to the router.
Configuration Builder
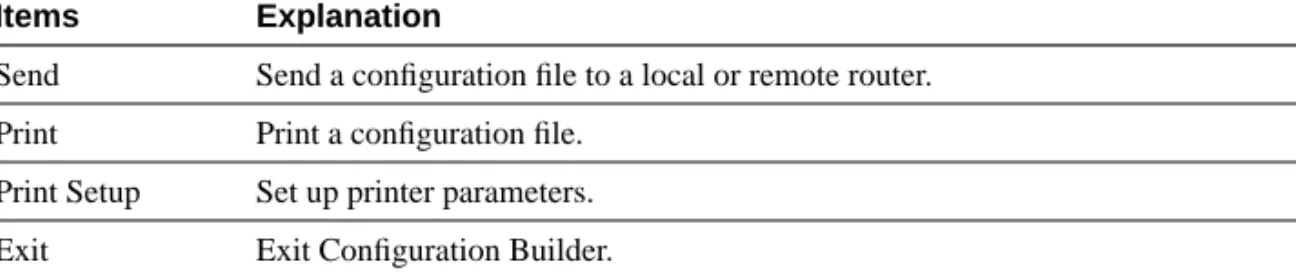
Table 2-2 Configuration Builder Global Menu Items
Send Send a configuration file to a local or remote router. Print Print a configuration file.
Print Setup Set up printer parameters. Exit Exit Configuration Builder.
Item Explanation
Guided Configuration
Step through the guided configuration.
Basic Set basic system parameters, including host names, passwords, and banner. SNMP Specify Simple Network Management Protocol (SNMP) parameters for
network management data, set community strings, and restrict SNMP access to the router.
Priority Queuing Create new priority output queuing lists or import snap-in lists. Modify
Interfaces
Add or delete router interfaces and specify router type, software version, and image type. Specify device interfaces and lines. Change the sequence of the guided configuration.
Add Commands Configure advanced features and features added in later Cisco IOS releases. Hub Enable hub configuration features.
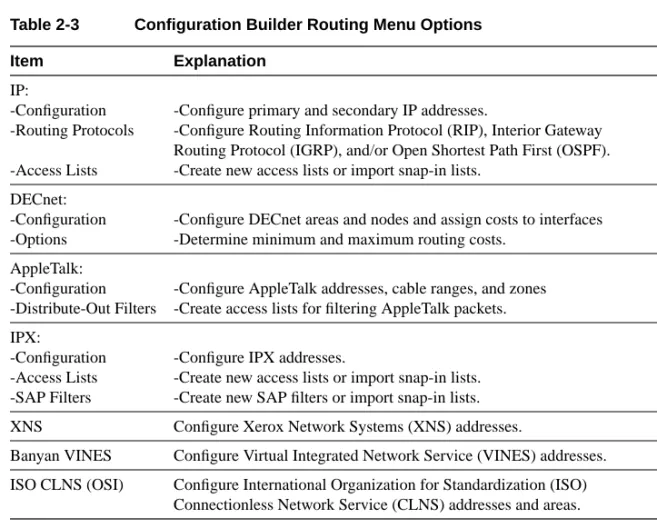
Table 2-3 Configuration Builder Routing Menu Options
Table 2-4 Configuration Builder Access Server Menu Options
Item Explanation
IP:
-Configuration -Routing Protocols -Access Lists
-Configure primary and secondary IP addresses.
-Configure Routing Information Protocol (RIP), Interior Gateway Routing Protocol (IGRP), and/or Open Shortest Path First (OSPF). -Create new access lists or import snap-in lists.
DECnet: -Configuration -Options
-Configure DECnet areas and nodes and assign costs to interfaces -Determine minimum and maximum routing costs.
AppleTalk: -Configuration -Distribute-Out Filters
-Configure AppleTalk addresses, cable ranges, and zones -Create access lists for filtering AppleTalk packets. IPX:
-Configuration -Access Lists -SAP Filters
-Configure IPX addresses.
-Create new access lists or import snap-in lists. -Create new SAP filters or import snap-in lists. XNS Configure Xerox Network Systems (XNS) addresses.
Banyan VINES Configure Virtual Integrated Network Service (VINES) addresses. ISO CLNS (OSI) Configure International Organization for Standardization (ISO)
Connectionless Network Service (CLNS) addresses and areas.
Item Explanation
Line Characteristics: -Chat Script Manager -Line Configuration
-Configure modem or login chat scripts
-Configure line characteristics for TTY and auxiliary lines. Remote Node:
-Extended BootP Manager -ARA
-Line Configuration
-Configure an access server for BootP to allow SLIP and PPP requests from clients.
-Configure AppleTalk Remote Access (ARA). -Configure remote nodes for TTY and auxiliary lines.
Configuration Builder
Table 2-5 Configuration Builder Bridging Menu Items
Terminal Services: -LAT Manager -XRemote Manager -Line Configuration
-Configure Local Area Transport (LAT) -Configure XRemote protocol.
-Configure terminal services for console, TTY, auxiliary, and virtual terminal lines.
Security:
-Local User Name Manager -TACACS Manager -Line Configuration
-Assign user names and passwords.
-Configure login method, line passwords, PPP authentication, and assign IP access lists.
-Configure security for console, TTY, auxiliary, and virtual terminal lines.
Dial-on-Demand: -Dialer Rotary Group -IP
-IPX
-Configure the dialer rotary group.
-Configure dial-on-demand routing (DDR) for IP. -Configure DDR for IPX.
Protocol Translation Configuration protocol translation features.
Item Explanation
Transparent Bridging: -Configuration -Bridge Groups
-Configure transparent bridging.
-Create bridge groups and set spanning-tree and circuit options. Source-Route:
-Simple -Remote
- Configure simple source-route bridging (SRB) options. - Configure remote SRB options. Remote source-route bridging provides multiple router configuration capability. That is, equivalent statements in the configuration files of devices in the same virtual ring are automatically updated.
SR/TLB Configure source-route translational bridging (SR/TLB).
Table 2-6 Configuration Builder WAN Menu Items
Table 2-7 Configuration Builder View Menu Items
Table 2-8 Configuration Builder Window Menu Items
Item Explanation
Wide-Area Protocols
Configure wide-area network (WAN) protocols, including High-Level Data Link Control (HDLC), Point-to-Point Protocol (PPP), X.25, Frame Relay, and Switched Multimegabit Data Service (SMDS).
Dial-on-Demand Configure dial-on-demand routing (DDR) destination subnet, subnet mask, telephone numbers, destination router IP address, and timers.
Dial Backup Configure dial backup interfaces and delay options.
SDLC Transport Configure devices for SDLC transport, a subset of serial tunneling (STUN). Provides multiple router configuration capability. That is, equivalent statements in the configuration files of other SDLC devices are automatically updated.
Item Explanation
By Protocol Display configuration commands grouped by protocol type. By Interface Display configuration commands grouped by interface. Configuration Display the configuration as a text file.
Toolbar Display or hide the toolbar. Status Bar Display or hide the status bar.
Expert Mode Select expert mode to enable an additional path for configuring global access server features.
Item Explanation
Cascade Resize and layer windows so that each title bar is visible. Tile Resize and arrange windows side by side.
Arrange Icons Evenly arrange icons.
Show Commands
Table 2-9 Configuration Builder Help Menu Items
Show Commands
Show Commands allows you to quickly display detailed system and protocol information for Cisco devices without requiring you to remember complicated command-line language or syntax.
What’s in this Release
You can display the following system information for Cisco devices:
•
Software version•
Device configuration (running memory and nonvolatile random-access memory [NVRAM])•
Controller status•
Buffer status•
Device voltage and temperature status•
Flash memory statusItem Explanation
Contents Open the Configuration Builder help system table of contents. Cisco Support
Information
Find out how to contact Cisco Systems for product support and how to obtain additional documentation.
Using Help Learn how to use the online help system. About
Configuration Builder
You can display detailed information about Cisco device interfaces that are configured to support the following protocols:
•
IP•
IPX•
AppleTalk•
DECnet•
CLNS•
Frame Relay•
X.25•
VINESNote For detailed information on all Show Commands features, see the context-sensitive online help system. The comprehensive online help system provides procedures, overview material, and links to related information.
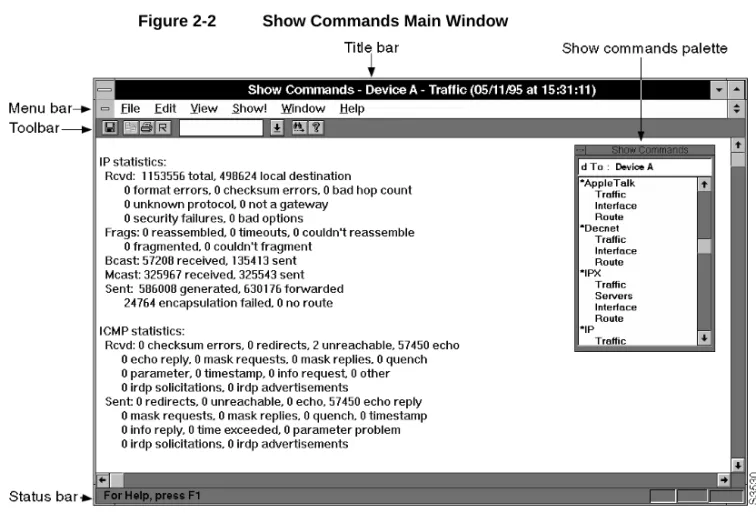
Show Commands Main Window
Show Commands
Figure 2-2 Show Commands Main Window
The Show Commands main window consists of the following elements:
•
Title bar—Displays the Show Commands application name, the active device name, and the name of the current show command window.•
Menu bar—Provides access to all Show Commands dialog boxes. Table 2-10 through Table 2-15 list and explain the items under each menu.•
Toolbar—Provides save file, copy text, print file, window refresh, enter text for searching, find entered text, and help contents icons.Table 2-10 Show Commands File Menu Items
Table 2-11 Show Commands Edit Menu Items
Table 2-12 Show Commands View Menu Items Items Explanation
Close Closes Show Commands window. Save Save changes to a file.
Save As Save Show Commands output to a new filename. Connect Connect to a specific device.
Print Send a Show Commands screen display to a printer. Print Preview View the file before printing. Zoom in or out and scan pages. Print Setup Set printing options.
Exit Exit the Show Commands application.
Items Explanation
Copy Copy text from an active window. Select All Select all text within an active window. Find Find a keyword within an active window.
Items Explanation
Toolbar Display or hide the toolbar. Status Bar Display or hide the status bar. Show Command
Palette
Show Commands
Table 2-13 Show Commands Show! Menu Items
Table 2-14 Show Commands Window Menu Items
Table 2-15 Show Commands Help Menu Items Items Explanation
Show! Use the Show! command to display the Show Commands window. From the Show Commands window, execute and display output from a specific show command.
Item Explanation
Cascade Resize and layer windows so that each title bar is visible. Tile Resize and arrange windows side by side.
Arrange Icons Evenly arrange icons.
Close All Close all open Show Commands windows.
Refresh Refresh the active Show Commands window. The time and date are updated.
window selection Select a previously opened Show Commands window.
Item Explanation
Contents Open the Show Commands help system table of contents. Help for Current
Show Command
Open the help window specific to the active show command window.
Cisco Support Information
Find out how to contact Cisco Systems for product support and how to obtain additional documentation.
Using Help Learn how to use the online help system. About Show
Commands
Health Monitor
Health Monitor is a dynamic fault and performance management tool that provides real-time statistics on device characteristics, interface status and utilization, and protocol utilization.
Health Monitor allows you to customize feedback on device and interface status via settings in the Preferences dialog box:
•
Choose fatal and warning thresholds for CPU load and interface types.Fatal and warning indications are provided by color changes. Color indications include:
— Green (up) — Yellow (warning) — Red (fatal)
Color indications are provided within the IfErrors, IfUtilization, IfStatus, and Environment tabs. And, for the overall health of a device, color indication is provided within the Health Monitor application icon.
•
Select polling frequency value to control when you receive device and interface feedback.•
Set the no-response timeout value to control the duration of time Health Monitor will wait for a reply from a monitored device.Health Monitor
What’s in this Release
Health Monitor provides the following device and interface information:
•
SystemProvides device name, type, Cisco IOS version, location, and device contact information. Lists total and available random access memory (RAM), flash memory, and nonvolatile random-access memory (NVRAM). Also provides a reason for the last restart of the device.
•
Interface errorsGraphs interface error rates and provides warning and fatal threshold color indications for interface error rates.
•
Interface utilizationGraphs interface utilization and provides warning and fatal threshold color indications for interface utilization.
•
Interface statusGraphs number of bytes per protocol that an interface has sent or received. Provides interface status by color indication: up (green), test (magenta), dormant
(cyan)—waiting for an external event, administratively down (brown), and operational failure (red).
•
ProtocolsGraphs number of packets per protocol that the device has forwarded.
•
CPUGraphs device CPU utilization in 5-second, 1-minute, and 5-minute intervals.
•
Environmental card status (Cisco 7000 series and AGS+ only)Depicts air temperature and power supply voltage readings for a device. Provides warning and fatal threshold color indications for these readings.
Note For detailed information on all Health Monitor features, see the context-sensitive online help system. The comprehensive online help system provides procedures, overview material, and links to related information.
Health Monitor Main Window
The Health Monitor main window is illustrated in Figure 2-3.
Health Monitor
The Health Monitor main window consists of the following elements:
•
Title bar—Provides the Health Monitor application name and the name of the current connected device.•
Menu bar—Provides access to all Health Monitor dialog boxes. Table 2-16 through Table 2-19 list and explain the items under each menu.•
Tabs—Provide access to all Health Monitor tabs. See Table 2-20.•
Status bar—Provides a brief description of the currently selected menu item.Table 2-16 Health Monitor File Menu Items
Table 2-17 Health Monitor View Menu Items
Table 2-18 Health Monitor Interface Menu Items Items Explanation
Connect Connect to a specific device.
Preferences Set threshold value, interface sorting, polling frequency, and timeout preferences.
Exit Exit the Health Monitor application.
Items Explanation
Status Bar Display or hide the status bar.
Items Explanation
Utilization View interface utilization.
Protocols Determine interface protocol usage. Errors View interface error rates.
Table 2-19 Health Monitor Help Menu Items
Table 2-20 Health Monitor Tabs
Item Explanation
Contents Open the Health Monitor help system table of contents. Help on Current
Tab
Open the help window specific to the active Health Monitor tab.
Cisco Support Information
Find out how to contact Cisco Systems for product support and how to obtain additional documentation.
Using Help Learn how to use the online help system. About Health
Monitor
Display Health Monitor software release and copyright information.
Tab Explanation
System View information on restarts, device identification, contact information, and memory usage.
IfErrors View interface error rates. IfUtilization View interface utilization.
IfStatus Determine interface status (up, down, dormant, failure, test). Determine interface protocol usage.
Protocols View traffic forwarded per protocol for a device. CPU Measure the device CPU load.
CiscoView
CiscoView
CiscoView provides a physical view of a device’s back panel with real-time status indicated through message feedback in the status bar area and through changes in port colors. See the section “CiscoView Main Window” later in this chapter for more details.
You can select cards and ports and instantly obtain system information, device characteristics, interface statistics, configuration settings, and real-time operational statistics.
What’s in this Release
CiscoView provides the following features:
•
View of device back panel providing:— Device type and operational status
— System information (Cisco IOS version and CPU utilization) — Card types, number, and status
— Port types, number, and status
•
Port reset capability•
Launch points from selected CiscoView devices, interfaces, and ports to the main window of these CiscoWorks for Windows applications:— Show Commands — Health Monitor — Configuration Builder
Note For detailed information on all CiscoView features, see the context-sensitive online help system. The comprehensive online help system provides procedures, overview material, and links to related information.
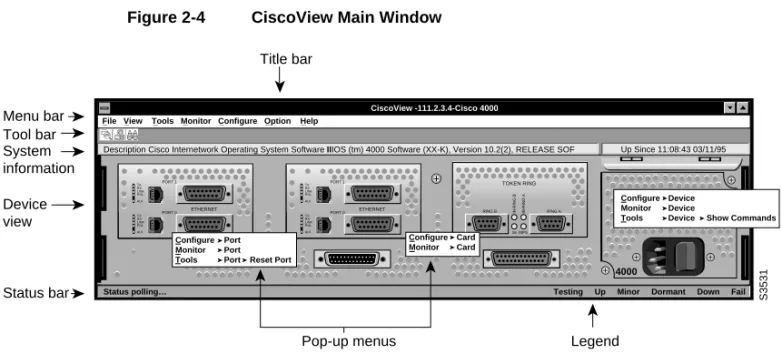
CiscoView Main Window
The CiscoView main window is illustrated in Figure 2-4.
Figure 2-4 CiscoView Main Window
The main window consists of the following elements:
•
Title bar—provides the CiscoView application name and the name of the currently connected device.•
Menu bar—Provides access to all CiscoView dialog boxes. Table 2-21 through Table 2-27 list and explain the items under each menu.Note Menu items may vary slightly depending upon device type and interface/port configuration. _ _ _ _ _ _ _ S3531 4000 CiscoView -111.2.3.4-Cisco 4000 TOKEN RING RING B
Status polling… Testing Up Minor Dormant Down Fail
Description Cisco Internetwork Operating System Software IIIOS (tm) 4000 Software (XX-K), Version 10.2(2), RELEASE SOF Up Since 11:08:43 03/11/95
Title bar Tool bar System information Status bar Legend
File View Tools Monitor Configure Option Help
Menu bar Pop-up menus Device view TX RX LINK POL AUI TX RX LINK POL AUI ETHERNET PORT 1 PORT 0 Configure Monitor TX RX LINK POL AUI TX RX LINK POL AUI ETHERNET PORT 1 PORT 0 RING A 16 MPS IN-RING B IN-RING A Configure Monitor Tools Device Device
Device Show Commands Card Card Configure Monitor Tools Port Port Port Reset Port
CiscoView
•
Toolbar—Provides launch points for Health Monitor, Configuration Builder, and Show Commands applications.•
Device view—provides a view of the device’s back panel.•
System information—Provides a brief description of the device type and the Cisco IOS version.•
Status bar—Provides a brief description of the currently selected device, interface, or port and provides ongoing operational status, including polling and error message information.•
Legend—Provides port status as follows: up (green), testing (magenta), minor alarm (yellow), dormant (cyan)—the port is waiting for an external event (such as having packets to transmit or dialing a remote site), administratively down (brown), and operational failure (red).•
Pop-up menus—launch Configuration Builder, Health Monitor, and Show Commands and open the main windows for these applications. To access the pop-up menus, press the right mouse button over devices, cards, or ports. From the device back panel, you can launch Configuration Builder, Health Monitor, and Show Commands applications. From specified interface cards and their ports, you can launch Configuration Builder and Health Monitor. From auxiliary and console ports, you can launch Configuration Builder.Table 2-21 CiscoView File Menu Items Items Explanation
Open Device Display the back panel of a new device. Print Print the back panel display.
Printer Setup Set printer options.
device selection Select a previously opened device.
Table 2-22 CiscoView View Menu Items
Table 2-23 CiscoView Tools Menu Items
Table 2-24 CIscoView Monitor Menu Items
Table 2-25 CiscoView Configure Menu Items Items Explanation
Refresh Refresh the current display. Rear View Display the back panel of a device.
Items Explanation
Device -Show Commands
Launch Show Commands application for this device.
Port: --Reset Port
Reset this port.
Items Explanation
Device Open the Health Monitor application for a specific device. Card Open the Health Monitor application for a specific interface card. Port Open the Health Monitor application for a specific port.
Item Explanation
Device Open an existing or new Configuration Builder file for a specific device. Card Open an existing or new Configuration Builder file for a specific interface
card.
CiscoView
Table 2-26 CiscoView Option Menu Items
Table 2-27 CiscoView Help Menu Items
Item Explanation
Show Toolbar Display or hide the toolbar. Show System
Information
Display or hide system information.
Show Legend Display or hide the legend.
Device Property Set the read-write community string and polling interval.
Item Explanation
Contents Open the CiscoView help system table of contents. Cisco Support
Information
Find out how to contact Cisco Systems for product support and how to obtain additional documentation.
Using Help Learn how to use the online help system. About
CiscoView
Online Help
Context-sensitive online help provides you with step-by-step instructions on how to use CiscoWorks for Windows applications. The online help system also provides a glossary and keyword search capability.
Dialog Box Help Button
Each dialog box has a Help button. Select the Help button to open a help window describing the purpose of the dialog box and the procedures to complete tasks specific to the dialog box. Links to overview material and related information may also be available, depending on the dialog box information requirements.
F1 Key and Context-Sensitive Help
Select a data-entry field within a Configuration Builder dialog box and then press the F1 key to open a context-sensitive help window with information about the selected field. The Health Monitor and Show Commands applications provide F1 key functionality for general dialog box or tab information only. In CiscoView, press the F1 key while the mouse is positioned over a device to view information about that device type.
Help Window Menu and Button Bars
Each help window has a menu bar and a button bar. The menu bar provides standard MS Windows help functions for printing help topics, copying and pasting text from help topics, making online notes about particular help topics, and placing bookmarks. The button bar provides the following buttons:
•
Contents—Opens the help table of contents. Help topics are highlighted and underlined. Select a help topic to open a help screen specific to the underlined topic. Some topics open popup windows which contain a list of subtopics. Select a help subtopic to open a help screen specific to the underlined subtopic.•
Search—Allows you to open a window in which you can enter keywords to find topics and go directly to help screens on those topics.Online Help
•
History—Allows you to see the sequence of help windows you have opened and to jump to any of them.•
Browse—Allows you to browse through sets of related help screens, providing quick access to overviews of particular Configuration Builder help topics.•
Main—Opens a help window that provides a top-level list of help contents with links to help on all applications, including Configuration Builder, Show Commands, Health Monitor and CiscoView. You can keep the top-level help contents open while you are navigating through other help windows.•
Glossary—Opens a help window that provides a list of terms that are arranged in alphabetical order. Select a term to open a pop-up window that gives an explanation of the term. You can keep the glossary window open while you are navigating through other help windows. Popup definitions are also available within most help screens.Overview and See Also Buttons
Many help windows have Overview and See Also buttons in the help window topic caption area. You can select the Overview button to obtain background information for the procedure described in the current help window. Select See Also to view a list of related topics and to go directly to those topics from the current help window.