Symantec Mail Security for
SMTP
Installation Guide
The software described in this book is furnished under a license agreement and may be used only in accordance with the terms of the agreement.
April 17, 2006
Copyright notice
Copyright © 1998-2006 Symantec Corporation. All rights reserved. Symantec, the Symantec logo, Brightmail, LiveUpdate, SESA, and Norton AntiVirus are U.S. registered trademarks or registered trademarks of Symantec Corporation or its affiliates in other countries. Other names may be trademarks of their respective owners.
Symantec Mail Security for SMTP 5.0 is protected under U.S. Patent Nos. 6,052,709; 5,999,932; and 6,654,787.
The product described in this document is distributed under licenses restricting its use, copying, distribution, and decompilation/reverse engineering. No part of this document may be reproduced in any form by any means without prior written authorization of Symantec Corporation and its licensors, if any.
THE DOCUMENTATION IS PROVIDED “AS IS” AND ALL EXPRESS OR IMPLIED CONDITIONS, REPRESENTATIONS AND WARRANTIES, INCLUDING ANY IMPLIED WARRANTY OF MERCHANTABILITY, FITNESS FOR A PARTICULAR PURPOSE OR NON-INFRINGEMENT, ARE DISCLAIMED, EXCEPT TO THE EXTENT THAT SUCH
DISCLAIMERS ARE HELD TO BE LEGALLY INVALID. SYMANTEC CORPORATION SHALL NOT BE LIABLE FOR INCIDENTAL OR CONSEQUENTIAL DAMAGES IN CONNECTION WITH THE FURNISHING PERFORMANCE, OR USE OF THIS DOCUMENTATION. THE INFORMATION CONTAINED IN THIS DOCUMENTATION IS SUBJECT TO CHANGE WITHOUT NOTICE.
The Licensed Software and Documentation are deemed to be “commercial computer software” and “commercial computer software documentation” as defined in FAR Sections 12.212 and DFARS Section 227.7202.
Symantec Corporation 20330 Stevens Creek Blvd. Cupertino, CA 95014 http://www.symantec.com
Printed in the United States of America. 10 9 8 7 6 5 4 3 2 1
Technical support
As part of Symantec Security Response, the Symantec global Technical Support group maintains support centers throughout the world. The Technical Support group’s primary role is to respond to specific questions on product feature/ function, installation, and configuration, as well as to author content for our Web-accessible Knowledge Base. The Technical Support group works
collaboratively with the other functional areas within Symantec to answer your questions in a timely fashion. For example, the Technical Support group works with Product Engineering as well as Symantec Security Response to provide Alerting Services and Virus Definition Updates for virus outbreaks and security alerts.
Symantec technical support offerings include:
■ A range of support options that give you the flexibility to select the right amount of service for any size organization
■ Telephone and Web support components that provide rapid response and up-to-the-minute information
■ Upgrade insurance that delivers automatic software upgrade protection ■ Content Updates for virus definitions and security signatures that ensure
the highest level of protection
■ Global support from Symantec Security Response experts, which is available 24 hours a day, 7 days a week worldwide in a variety of languages for those customers enrolled in the Platinum Support Program
■ Advanced features, such as the Symantec Alerting Service and Technical Account Manager role, offer enhanced response and proactive security support
Please visit our Web site for current information on Support Programs. The specific features available may vary based on the level of support purchased and the specific product that you are using.
To receive the latest product information by email, go to: http://www.symantec.com/techsupp/bulletin/enterprise.html and join our support bulletin mailing list.
Licensing and registration
If the product that you are implementing requires registration and/or a license key, the fastest and easiest way to register your service is to access the
Symantec licensing and registration site at www.symantec.com/certificate. Alternatively, you may go to www.symantec.com/techsupp/ent/enterprise.html, select the product that you wish to register, and from the Product Home Page, select the Licensing and Registration link.
Support group via phone or online at http://www.symantec.com/techsupp/ enterprise/ .
Customers with Platinum support agreements may contact Platinum Technical Support via the Platinum Web site at http://www-secure.symantec.com/ platinum/ .
When contacting the Technical Support group, please have the following: ■ Product release level
■ Hardware information
■ Available memory, disk space, NIC information ■ Operating system
■ Version and patch level ■ Network topology
■ Router, gateway, and IP address information ■ Problem description
■ Error messages/log files
■ Troubleshooting performed prior to contacting Symantec ■ Recent software configuration changes and/or network changes
Customer Service
To contact Enterprise Customer Service online, go to www.symantec.com, select the appropriate Global Site for your country, then choose Service and Support. Customer Service is available to assist with the following types of issues: ■ Questions regarding product licensing or serialization
■ Product registration updates such as address or name changes
■ General product information (features, language availability, local dealers) ■ Latest information on product updates and upgrades
■ Information on upgrade insurance and maintenance contracts ■ Information on Symantec Value License Program
■ Advice on Symantec's technical support options ■ Nontechnical presales questions
Contents
Chapter 1
Introducing Symantec Mail Security for SMTP
About Symantec Mail Security for SMTP ... 8
What’s new in Symantec Mail Security for SMTP ... 8
New features for all users ... 9
Changes for Symantec Mail Security for SMTP users ... 10
Changes for Symantec Brightmail Antispam users ... 12
Components of Symantec Mail Security for SMTP ... 13
How Symantec Mail Security for SMTP works ... 15
Where to get more information ... 16
Chapter 2
Installing Symantec Mail Security for SMTP
Before you install ... 18Before you install on any platform ... 18
Before you install on Windows ... 21
Before you install on Solaris or Linux ... 21
System requirements ... 23
Hardware requirements ... 23
Supported browsers ... 23
Supported LDAP servers ... 24
System requirements for Windows ... 24
System requirements for Solaris ... 24
System requirements for Linux ... 25
Installing on Windows ... 25
Installing on Solaris and Linux ... 27
Setting up ... 30
Logging in ... 30
Registering your system ... 31
Configuring your system ... 32
Setting up a Scanner ... 35
Completing setup ... 38
Accessing the Control Center ... 40
Logging out ... 43
Areas of localization ... 43
Importing configuration files ... 44
Configuring system locale ... 44
Uninstalling Symantec Mail Security for SMTP ... 46
Uninstalling from Windows ... 46
Uninstalling from Linux and Solaris ... 46
Appendix A
Integrating Symantec Mail Security with Symantec
Security Information Manager
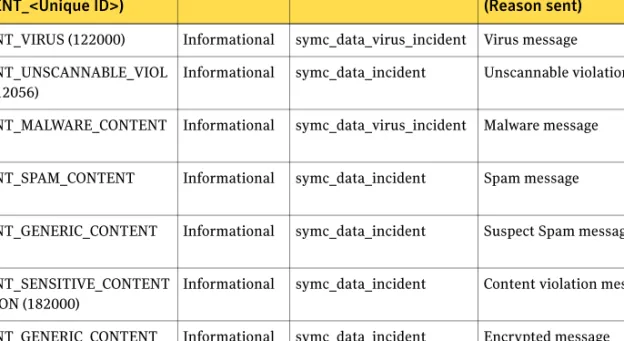
About Symantec Security Information Manager ... 49Interpreting events in the Information Manager ... 50
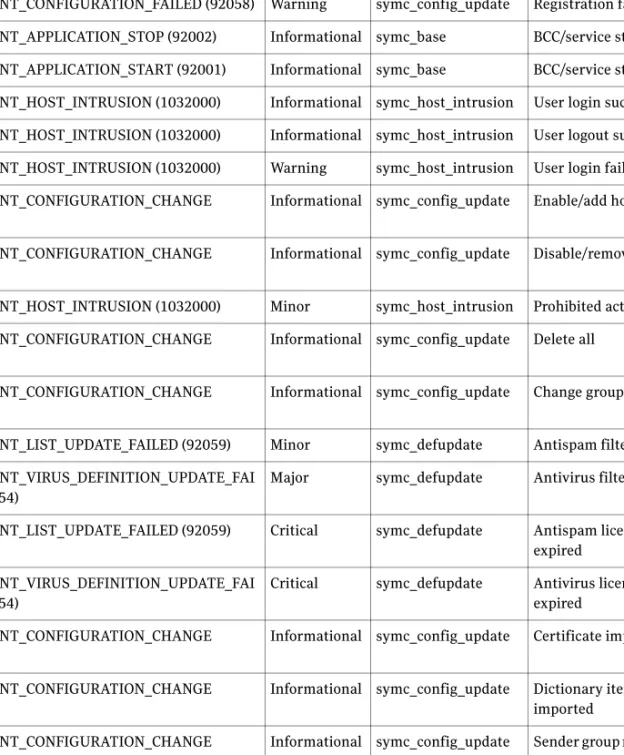
Firewall events that are sent to the Information Manager ... 51
Definition Update events that are sent to the Information Manager ... 51
Message events that are sent to the Information Manager ... 52
Administration events that are sent to the Information Manager ... 52
Installing and configuring event logging to the Information Manager ... 54
Configuring the Information Manager ... 55
Installing the local SSIM Agent ... 57
Installing the Collector ... 58
Configuring data sources ... 58
Uninstalling Information Manager components ... 60
Uninstalling the Collector ... 60
Uninstalling the Information Manager Agent ... 60
Appendix B
Sample options file
Index
Chapter
1
Introducing Symantec Mail
Security for SMTP
This chapter includes the following topics:
■ About Symantec Mail Security for SMTP ■ What’s new in Symantec Mail Security for SMTP ■ Components of Symantec Mail Security for SMTP ■ How Symantec Mail Security for SMTP works ■ Where to get more information
About Symantec Mail Security for SMTP
Symantec Mail Security for SMTP offers enterprises an easy-to-deploy, comprehensive gateway-based email security solution through the following: ■ Antispam technology – Symantec’s state-of-the-art antispam filters assess
and classify email as it enters your site.
■ Email Firewall – This early response feature can vastly improve message throughput by analyzing incoming SMTP connections and enabling you to refuse connections or email messages from hosts it perceives to be hostile. ■ Antivirus technology – Antivirus definitions and engines protect your
users from email-borne viruses.
■ Content Compliance – These features help administrators enforce corporate email policies, reduce legal liability, and ensure compliance with regulatory requirements.
■ Group policies and filter policies – An easy-to-use authoring tool lets administrators create powerful and flexible ad hoc filters for individuals and groups.
What’s new in Symantec Mail Security for SMTP
All users will find significant new features in this release of Symantec Mail Security for SMTP. You will also find familiar features, in many cases improved and expanded. In some cases the names of features are the same; in some cases the names have changed, and the changes are noted in this chapter.
Note: By default, inbound and outbound messages containing a virus or mass-mailing worm, and unscannable messages, including malformed MIME messages, will be deleted. You may want to change the default setting for unscannable messages if you are concerned about losing important messages.
9 Introducing Symantec Mail Security for SMTP What’s new in Symantec Mail Security for SMTP
New features for all users
Table 1-1 lists features that are new for both Symantec Mail Security for SMTP users and Symantec Brightmail Antispam users.
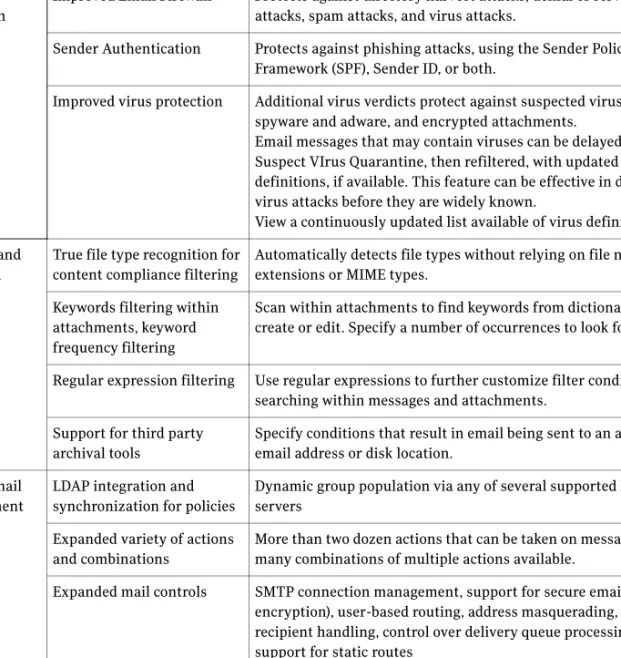
Table 1-1 New features for Symantec Mail Security for SMTP and Symantec Brightmail Antispam
Category Features Description
Threat protection features
Improved Email Firewall Protects against directory harvest attacks, denial of service attacks, spam attacks, and virus attacks.
Sender Authentication Protects against phishing attacks, using the Sender Policy Framework (SPF), Sender ID, or both.
Improved virus protection Additional virus verdicts protect against suspected viruses, spyware and adware, and encrypted attachments.
Email messages that may contain viruses can be delayed in the Suspect VIrus Quarantine, then refiltered, with updated virus definitions, if available. This feature can be effective in defeating virus attacks before they are widely known.
View a continuously updated list available of virus definitions. Inbound and
outbound content controls
True file type recognition for content compliance filtering
Automatically detects file types without relying on file name extensions or MIME types.
Keywords filtering within attachments, keyword frequency filtering
Scan within attachments to find keywords from dictionaries you create or edit. Specify a number of occurrences to look for.
Regular expression filtering Use regular expressions to further customize filter conditions by searching within messages and attachments.
Support for third party archival tools
Specify conditions that result in email being sent to an archival email address or disk location.
Flexible mail management
LDAP integration and synchronization for policies
Dynamic group population via any of several supported LDAP servers
Expanded variety of actions and combinations
More than two dozen actions that can be taken on messages, with many combinations of multiple actions available.
Expanded mail controls SMTP connection management, support for secure email (TLS encryption), user-based routing, address masquerading, invalid recipient handling, control over delivery queue processing, support for static routes
Aliasing Distribution lists automatically expanded, mail filtered and delivered correctly for each user
Changes for Symantec Mail Security for SMTP users
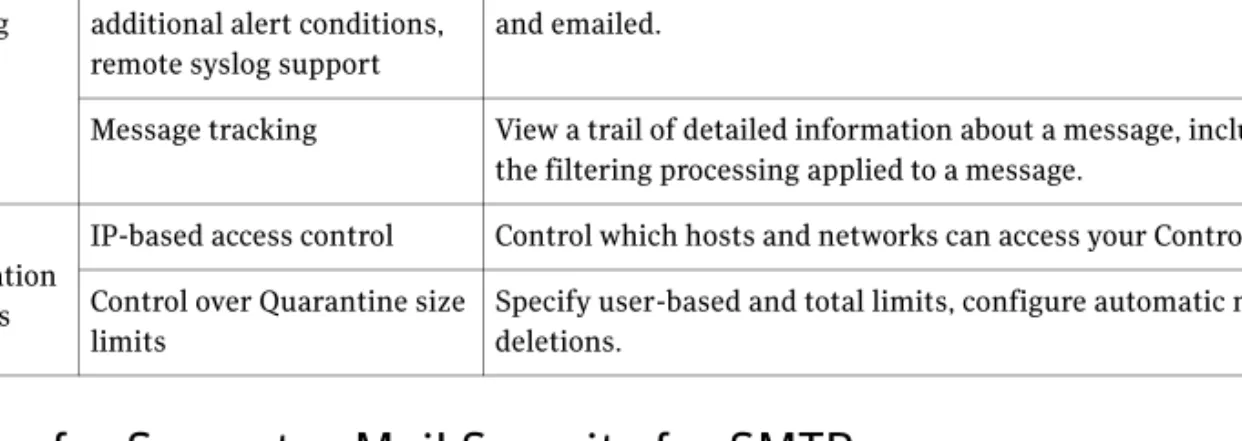
For users of Symantec Mail Security for SMTP 4.1, Version 5.0 provides a host of expanded and improved capabilities. In addition to the new features listed in Table 1-1, additional new features for Symantec Mail Security for SMTP users only are listed in Table 1-2.
Improved reporting and monitoring
Extensive set of pre-built reports, scheduled reporting, additional alert conditions, remote syslog support
More than 50 graphical reports that you can generate ad-hoc or on a scheduled basis. Reports can be exported for offline analysis and emailed.
Message tracking View a trail of detailed information about a message, including the filtering processing applied to a message.
Expanded administration capabilities
IP-based access control Control which hosts and networks can access your Control Center. Control over Quarantine size
limits
Specify user-based and total limits, configure automatic message deletions.
Table 1-1 New features for Symantec Mail Security for SMTP and Symantec Brightmail Antispam
Category Features Description
Table 1-2 New features for Symantec Mail Security for SMTP users
Category Features Description Flexible mail
management
Centralized, Web-based administration
Use the Control Center to manage all aspects of email management and spam, virus, and content filtering across all servers with one interface. Group Policies Create separate inbound and outbound policies for an unlimited number
of groups of users. You can specify groups of users based on email addresses, domains, LDAP groups, or IP addresses. For each category of email, you can specify custom message handling for each group. Expanded
notification capabilities
Automatically send emails notifying specific persons or groups when certain message conditions are encountered during message filtering. Create different notifications for different conditions or user groups. Inbound and
outbound content controls
Improved
attachment blocking
Strip attachments within container files. Search within attachments using regular expressions.
Improved reporting and monitoring
Aggregated logging and reporting
Access logs for all messages from all servers via the Control Center. Manage reports for all servers via the Control Center. Note that many of the reporting features in SMS for SMTP 4.1 have been replaced in SMS for SMTP 5.0 by the message tracking feature.
11 Introducing Symantec Mail Security for SMTP What’s new in Symantec Mail Security for SMTP
Group Policies introduce expanded flexibility in mail filtering and message handling. Group Policies enable you to specify groups of users, based on email addresses, domains, or IP addresses, and customize mail filtering for each group. See the Symantec Mail Security for SMTP Administration Guide for more information.
In addition, if you were using Version 4.1 without Premium AntiSpam, Version 5.0, with or without Premium AntiSpam provides much more extensive capabilities for customizing both message filtering and the actions taken on filtered messages.
New feature names
Most features in Version 5.0 have similar names to the corresponding Version 4.1 features. Table 1-3 provides a cross-reference between selected Symantec Mail Security for SMTP 4.1 features and Symantec Mail Security for SMTP 5.0 features that have different names.
Discontinued features
The following Symantec Mail Security for SMTP 4.1 features are not included in Symantec Mail Security for SMTP 5.0:
■ Auto-generated whitelist ■ Logging of SMTP conversations
■ Hold Queue, automatic reordering of the Slow Queue Expanded
administration capabilities
Delegated administration
Multiple administrator roles with view only or modify access to different portions of the management interface.
Table 1-2 New features for Symantec Mail Security for SMTP users
Category Features Description
Table 1-3 Version 4.1 to Version 5.0
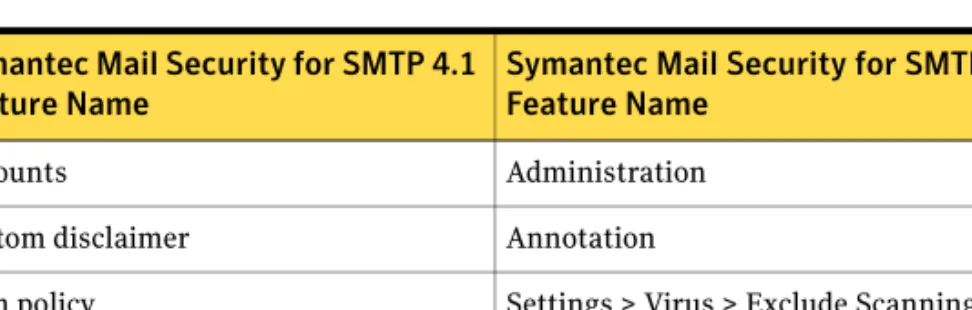
Symantec Mail Security for SMTP 4.1 Feature Name
Symantec Mail Security for SMTP 5.0 Feature Name
Accounts Administration
Custom disclaimer Annotation
Scan policy Settings > Virus > Exclude Scanning tab Routing Settings > Hosts > Edit > SMTP tab
■ Return code support for DNS Blacklists
■ Configurable administrator timeout for the management interface
Changes for Symantec Brightmail Antispam users
Although the product name has changed, if you were a Symantec Brightmail Antispam user you will find the user interface for Symantec Mail Security for SMTP 5.0 quite familiar. Most features are named similarly, and the organization of the user interface is quite similar. Most of the changes are new features. For users of Symantec Brightmail Antispam, Symantec Mail Security for SMTP Version 5.0 provides significant new and expanded capabilities. In addition to the new features listed in Table 1-1, additional new features for Symantec Brightmail Antispam users only are listed in Table 1-4.
Table 1-4 New features for Symantec Brightmail Antispam users
Category Features Description Threat
protection features
Improved virus processing
LiveUpdate support for virus definitions, list of file types to exclude from virus scanning, expanded container limit controls
Outbound filtering Provides spam, virus, and content compliance filtering on outbound email messages. Specify different outbound and inbound policies for each user group.
Flexible mail management
More flexible Group Policies
Use LDAP groups to populate groups for Group Policies.
Multiple actions Specify more than one action to take on specific categories of messages to specific groups of recipients.
Inbound and outbound content controls Expanded content compliance filtering capabilities
Expanded set of actions available on filtered messages, support for multiple actions on the same messages
Attachment blocking Create lists of attachment types to remove. Strip attachments within container files.
Annotations Automatically append or prepend text, such as legal disclaimers or marketing tag lines, to messages.
Notifications Automatically send emails notifying specific persons or groups when certain message conditions are encountered during message filtering. Create different notifications for different conditions or user groups. Improved
reporting and monitoring
Expanded virus monitoring
Virus outbreak alerts, expanded logging of virus events
13 Introducing Symantec Mail Security for SMTP Components of Symantec Mail Security for SMTP
While the names of features are largely the same, you will find some changes to the organization of menus. Most importantly, you will now find a Policies menu at the top level, breaking out Group Policies (under the Settings menu in Symantec Brightmail Antispam 6.0.3), and including other items as well. See the
Symantec Mail Security for SMTP Administration Guide for an updated explanation of how settings and policies interact.
Note: With this release, the default action for an Unscannable verdict, including those due to malformed MIME content, has been changed from markup to
delete. This was done to to provide the strongest possible level of protection against external threats. If desired, you can change this action on a per group basis. You may want to change the default setting for unscannable messages if you are concerned about losing important messages.
Components of Symantec Mail Security for SMTP
You can deploy Symantec Mail Security for SMTP in different configurations to best suit the size of your network and your email processing needs.
Each Symantec Mail Security for SMTP host can be deployed in the following ways:
■ Scanner – Deployed as a Scanner, a Symantec Mail Security for SMTP host filters email. Your installation can have one or many Scanners. Symantec Mail Security for SMTP runs alongside your existing email or groupware server.
■ Control Center – Deployed as a Control Center, a Symantec Mail Security for SMTP host is a Web-based configuration and administration center. Use it to configure and manage email filtering, SMTP routing, system settings, and all other functions. Your enterprise-wide deployment of Symantec Mail Security for SMTP can have multiple Scanners but only one Control Center, from which you configure and monitor all the Scanner hosts.
The Control Center provides status for all Symantec Mail Security for SMTP hosts in your system, system logs, and extensive customizable reporting. Use it to configure both system-wide and host-specific details.
Expanded administration capabilities
Global reject or pause of message scanning
During a virus outbreak, you can temporarily pause scanning until new virus filters are in place.
Table 1-4 New features for Symantec Brightmail Antispam users
The Control Center also hosts the Spam and Suspect Virus Quarantines, for storage of spam and virus messages respectively. End users can access the Control Center to view their quarantined spam messages and set their preferences for language filtering and blocked and allowed senders. You can also configure the Spam Quarantine for administrator-only access.
■ Scanner and Control Center – A single Symantec Mail Security for SMTP host performs both functions.
Note: Symantec Mail Security for SMTP does not provide mailbox access for end users or message storage, and is not intended for use as the only MTA in your email infrastructure.
Note: Symantec Mail Security for SMTP does not filter messages that don’t flow through the SMTP gateway. For example, when two mailboxes reside on the same MS Exchange Server, or on different MS Exchange Servers within an Exchange organization, the messages will not pass through the Symantec Mail Security for SMTP filters.
15 Introducing Symantec Mail Security for SMTP
How Symantec Mail Security for SMTP works
How Symantec Mail Security for SMTP works
Your Symantec Mail Security for SMTP installation processes a email message as follows. For the sake of discussion, our sample message passes through the Filtering Engine to the Transformation Engine without being rejected.
■ The incoming connection arrives at the inbound MTA via TCP/IP. ■ The inbound MTA accepts the connection and moves the message to its
inbound queue.
■ The Filtering Hub accepts a copy of the message for filtering.
■ The Filtering Hub consults the LDAP SyncService directory to expand the message’s distribution list.
■ The Filtering Engine determines each recipient’s filtering policies. ■ The message is checked against Blocked/Allowed Senders Lists defined by
administrators.
■ Virus filters and configurable heuristic filters determine whether the message is infected.
■ Content Compliance filters scan the message for restricted attachment types or keywords, as defined in configurable dictionaries.
■ Spam filters compare message elements with current filters published by Symantec Security Response to determine whether the message is spam. At this point, the message may also be checked against end-user defined Language settings.
■ The Transformation Engine performs per-recipient actions based on filtering results and configurable Group Policies.
Where to get more information
In addition to this Installation Guide, your Symantec Mail Security for SMTP product comes with the following documentation:
■ Symantec Mail Security for SMTP Planning Guide
■ Symantec Mail Security for SMTP Administration Guide
■ Symantec Mail Security for SMTP Getting Started
Symantec Mail Security also includes a comprehensive help system that contains conceptual and procedural information. If you want more information about features that are associated with the page, select a More Information link in the Help page, or use the Table of Contents, Index, or Search tabs in the Help viewer to locate a topic.
Chapter
2
Installing Symantec Mail
Security for SMTP
This chapter includes the following topics:
■ Before you install ■ System requirements ■ Installing on Windows ■ Installing on Solaris and Linux ■ Setting up
■ Accessing the Control Center ■ Areas of localization
Before you install
Before you install Symantec Mail Security for SMTP, you must perform some pre-installation tasks.
Before you install on any platform
The following are pre-installation tasks for both Windows and Linux/Solaris: ■ Disable other antivirus programs
■ Ensure no other programs are using the port that you want to use for the inbound MTA (usually port 25)
■ Ensure no Tomcat or MySQL installations are present ■ Establish an alternate MTA for alerting (optional)
■ Save whitelist, blacklist, local domain, and Anti-Relay list data (optional, for users of Symantec Mail Security for SMTP 4.x only)
Disabling other antivirus programs
If you have other antivirus programs installed on your computer, it is
recommended that you uninstall them to prevent any installation or operational errors. At a minimum, you must configure any other antivirus program to exclude the following directories from scanning:
■ The MTA data directory (which you can specify during the Symantec Mail Security for SMTP installation process – to do this, you must specify a ‘custom’ installation)
■ On Windows, the C:\windows\tmp directory ■ On Linux and Solaris, anything under /var/tmp
For information on excluding directories from scanning, see the user documentation that came with the antivirus program.
Ensuring no other programs or services are running on the
MTA port
Stop, disable, or reconfigure any services running on the port you plan to use for your MTA (usually port 25) on the installation host if you are installing a Scanner. This is most likely an MTA such as sendmail or postfix. Optionally, you can configure the MTA to listen on another port when you add it to the Control Center.
19 Installing Symantec Mail Security for SMTP
Before you install
netstat -an | grep
'
:25'
You can also telnet to port 25 and see if it answers. ■ To check on Solaris, use the following command:
netstat -an | grep
'
\.25'
You can also telnet to port 25 and see if it answers. ■ To check on Windows:
Launch a Command window and type:
netstat -an | find ":25 "
This will list the status of port 25 for this system. If it is listed as LISTENING or ESTABLISHED, it is in use.
Note: If the port is in use by the IIS SMTP Virtual Server, you do not need to remove it, as it is required for, and operates compatibly with Symantec Mail Security for SMTP.
To determine whether the port is in use by IIS SMTP Virtual Server, click Programs>Administrative Tools>Internet Information Services, then expand the server name. Right click Default SMTP Virtual Server, select Properties, then from the General Tab, click Advanced. The currently bound TCP port will be listed there.
Checking for Tomcat or MySQL installations
Ensure that there are no installations of Tomcat or MySQL on the machine before you begin the installation process.
To check on Linux, type: rpm -qa | egrep ‘mysql|tomcat’
If any RPMs match, you must remove them.
To check on Solaris, type: pkginfo | egrep -i 'mysql|tomcat'
If any packages match, you must remove them.
Note: These two methods will only find installations that were installed using the native packages, and not a manual installation.
To check on Windows, navigate to the Services panel and look for Tomcat and MySQL services.
If you find either product installed, you must uninstall it.
Designating an alternate MTA for alerting
(optional)
Once you have installed Symantec Mail Security for SMTP and have begun filtering email, you can configure it to send email alerts for certain conditions or
events. However, if you stop the filter-hub or the MTA service, these alerts cannot be sent. To ensure that you continue receiving alerts, it is useful to establish and maintain an alternate MTA; you can specify its IP address in the settings for the Control Center. For more information, refer to the Symantec Mail Security for SMTP Administration Guide.
For information on deployment planning and options, refer to the Symantec Mail Security for SMTP Planning Guide.
Saving data from Symantec Mail Security for SMTP 4.x
(
optional
)
If you wish to keep data from your existing installation of Symantec Mail Security for SMTP 4.x for use in this version, you must save the data files from your existing installation before you uninstall it.
You can save the following data: ■ Whitelist and blacklist data ■ Local Routing list data ■ Anti-Relay list data
The custom whitelist data is stored in the file named SMSSMTP_cw.txt file. THe autogenerated whitelist data is stored in SMSSMTP_aw.txt. The blacklist, Local Routing list, and Anti-Relay list data is stored in the file named SMSSMTP.cfg. You can search for these files under the directory in which you installed Symantec Mail Security for SMTP 4.x.
Table 2-1 provides the default locations for these files. The location will be different if you installed into a non-default location.
Table 2-1 Default locations for data files
Platform Location
Windows C:\Program Files\Symantec\SMSSMTP\local Solaris /var/opt/SMSSMTP/local
21 Installing Symantec Mail Security for SMTP
Before you install
Before you install on Windows
You must ensure that the following tasks is completed before you begin the installation procedure:
■ The IIS SMTP Virtual Server is installed
Installing IIS SMTP Virtual Server
Symantec Mail Security for SMTP is integrated with IIS SMTP Virtual Server on Windows. You must install this Windows Component before you run the Symantec Mail Security for SMTP installer.
To install the IIS SMTP Virtual Server
◆ On your Windows server, click Control Panel > Add/Remove Programs >
Add/Remove Windows Components > Internet Information Services (IIS)
> Details > Select SMTP Service.
The service is installed.
Before you install on Solaris or Linux
Ensure the following tasks are completed before you begin the installation procedure:
Creating the necessary users and groups
You must create the users and groups that Symantec Mail Security for SMTP will use. These users require a shell, but do not require login access, so you do not have to define a password for them.
Note: The instructions given in this section are only for adding users to the local passwd file; the method you use for user and group creation may vary depending on how your system is configured to manage users.
Users and groups for a Control Center installation ■ users: mysql, postfix
■ groups: mysql, postfix, postdrop The mysql user must be in the mysql group. The postfix user must be in the postfix group. There is no user for the postdrop group.
To create this user and these groups on Solaris
$ su
Password: <your_root_password> # groupadd mysql
# useradd -c "MySQL user" -g mysql mysql # groupadd -r postdrop
To create this user and these groups on Linux
$ su
Password: <your_root_password> # groupadd -r mysql
# useradd -c "MySQL user" -r -g mysql mysql # groupadd -r postdrop
Users and groups for a Scanner installation: ■ users: mailwall
■ groups: bmi, avdefs
The mailwall user must be in the bmi and avdef groups.
To create users and groups on Solaris
◆ Use the following commands:
$ su
Password: <your_root_password> # groupadd bmi
# groupadd avdefs
# useradd -c "dummy user for SMS for SMTP" -d /opt/Symantec/ SMSSMTP/scanner -m -g bmi mailwall
To create users and groups on Linux
◆ Use the following commands:
$ su
Password: <your_root_password> # groupadd -r bmi
23 Installing Symantec Mail Security for SMTP
System requirements
# useradd -c "dummy user for SMS for SMTP" -d /opt/Symantec/ SMSSMTP/scanner -m -r -G bmi,avdevs mailwall
Note: If you are reinstalling this version of Symantec Mail Security for SMTP on this machine, and did not explicitly remove the users and groups that you created for the previous installation, you do not have to recreate them.
System requirements
This section lists system requirements for running Symantec Mail Security for SMTP.
■ If you plan to install and configure this Symantec Mail Security for SMTP as a Scanner that will process both inbound and outbound traffic, two IPs (NICs) are required, one each for for inbound and outbound mail traffic. The inbound IP should be on your external network and the outbound IP should be on your internal network. Optionally, you can use one NIC and two MTA ports (inbound and outbound). For example, port 25 for inbound and port 26 for outbound.
If you will not be processing both inbound and outbound mail, only one IP is required.
■ A fully qualified domain name is required for each computer running Symantec Mail Security for SMTP.
■ A UTF8-capable application for reading logs and other exported files.
Hardware requirements
Symantec Mail Security for SMTP has the following hardware requirements: ■ Intel Pentium 4 Processor or compatible (Windows and Linux)
■ UltraSPARC (Solaris)
■ 1GB RAM (2GB Recommended)
■ 512 MB disk space minimum (2 GB or more recommended)
Supported browsers
The following browser versions are supported for Control Center access: ■ Internet Explorer 6.0
Note: You must enable cookies in your browser for Control Center to function correctly.
Supported LDAP servers
Symantec Mail Security for SMTP supports the following LDAP directory types: ■ Windows 2000 Active Directory
■ Windows 2003 Active Directory
■ Sun Directory Server 5.2 (formerly known as the iPlanet Directory Server) If you are using version 5.2 of the SunOne LDAP server, you must update to patch 4.
■ Exchange 5.5
■ Lotus Domino LDAP Server 6.5 ■ OpenLDAP (for authentication only)
System requirements for Windows
Symantec Mail Security for SMTP is supported on the following versions of Windows:
■ Windows 2000 Server SP4 ■ Windows Server 2003 SP1
■ Windows Server 2003 (Japanese) SP1
System requirements for Solaris
Symantec Mail Security for SMTP is supported on the following versions of Solaris:
■ Solaris 9
If you are running Solaris 9, you must apply patch 115697-02. The patch is available here:
http://sunsolve.sun.com/search/document.do?assetkey=urn:cds:docid:1-21-115697-02-1
■ Solaris 10
Because the tar file names exceed the 40-character file name limit of native Solaris tar, GNU tar is required to install Symantec Mail Security for SMTP. GNU tar for Solaris is available from http://www.sunfreeware.com and other Web sites.
25 Installing Symantec Mail Security for SMTP
Installing on Windows
System requirements for Linux
Symantec Mail Security for SMTP is supported on the following versions of Linux:
■ Red Hat AS 3.0 Update 5 ■ Red Hat ES 3.0 Update 5
For Linux installations, the installer requires the compat-libstdc++ library. This library is available on your Red Hat distribution CD.
Installing on Windows
This procedure describes the installation process for Windows. You can install the Control Center, Scanner, or both on the same machine.
Note: If you plan to install both the Control Center and a Scanner on the same machine, you must install them at the same time, running the installation program only once.
Warning: If you are reinstalling Symantec Mail Security for SMTP after
uninstalling it on this machine, ensure that you have completely removed all of the files and directories as described at the end of “Uninstalling from Windows” on page 46 before proceeding.
To install Symantec Mail Security for SMTP on Windows 1 Double-click the installer icon.
The installer will prepare the installation and the InstallShield Wizard welcome panel is displayed. This may take a few moments.
Note: You can run the installer using an options file. For more information about using an options file, refer to “Sample options file” on page 63.
2 Click Next.
The Subscription Software License Agreement is displayed.
3 Read the licensing agreement, select the radio button to indicate that you accept the licensing agreement, and then click Next.
The Installation Type panel is displayed.
You can choose to install Symantec Mail Security for SMTP in the following configurations:
■ Typical, which installs both the Scanner and Control Center on the same machine in a location you specify, with subcomponents under that location, or
■ Custom, which allows you to install a Scanner or the Control Center individually, as well as specify locations for the MTA data and log directories (if you are installing a Scanner), and/or the port number for your Tomcat installation (if you are installing the Control Center). 4 Select a configuration option and click Next.
The Installation Directory panel is displayed.
5 Click Browse to specify an alternate location, or accept the default value, and then click Next.
The default value is
C:\Program Files\Symantec\SMSSMTP
■ If you selected the default configuration in step 4, the Installation Parameters Summary panel is displayed. Proceed to step 12. ■ If you selected the custom installation configuration in step 4, the
Feature Selection panel is displayed. Proceed to step 7.
6 If you are installing both a Scanner and the Control Center, click Next, otherwise, uncheck the box for the component you are not installing, and then click Next.
7 If you are installing the Control Center only, proceed to step 11.
If you are installing a Scanner, the MTA Data Directory panel is displayed. This is the directory used for message queue data. The default location for this directory is
C:\Program Files\Symantec\SMSSMTP\mta
8 Click Browse to specify an alternate location, or accept the default value, and then click Next.
The Log Directory panel is displayed. All log data for this Scanner will be stored in the directory you specify. The default location for this directory is C:\Program Files\Symantec\SMSSMTP\logs
9 Click Browse to specify an alternate location, or accept the default value, and then click Next.
■ If you are installing both a Scanner and the Control Center on this machine, proceed to step 12.
■ If you are installing a Scanner individually (with no Control Center on this machine), the Control Center IP panel is displayed. You must provide either the specific IP address (or CIDR range of IP addresses) of a Control Center allowed to access this Scanner, or you can allow access to this Scanner from any computer.
27 Installing Symantec Mail Security for SMTP
Installing on Solaris and Linux
Warning: Selecting the Any computer option means that any machine can access this Scanner. This could represent a security risk. Please consult your organization’s network security team before you select this option.
10 Enter an IP address or select Any Computer and click Next.
11 If you are installing the Control Center, the Tomcat Port panel is displayed. Accept the default value (41443), or enter an alternate value, and then click
Next.
The Installation Parameters Summary panel is displayed.
Note: The port number you specify for Tomcat to use must be higher than 1024.
12 Verify the list of installation parameters and click Install.
The installation completes, and the components you have installed are started automatically.
A log of the installation is placed in
C:\Program Files\Symantec\SMSSMTP\install_log.txt
Installing on Solaris and Linux
The following section describes how to install Symantec Mail Security for SMTP on Solaris and Linux.
Note: If you plan to install both the Control Center and a Scanner on the same machine, you must install them at the same time, running the installation program only once.
Warning: If you are reinstalling Symantec Mail Security for SMTP after
uninstalling it on this machine, ensure that you have completely removed all of the files and directories as described at the end of “Uninstalling from Linux and Solaris” on page 46 before proceeding.
To install Symantec Mail Security for SMTP on Solaris or Linux 1 As root, or using sudo, type
./install
The installer begins running. If the correct version of the required JRE is not present, it will unpack its own copy.
Note: You can run the installer using an options file. For more information about using an options file, refer to “Sample options file” on page 63.
2 Type 1 to proceed.
The license agreement is displayed.
3 Use the Enter key to page through the license agreement text.
4 Type 1 to accept the license agreement, then type 0 and then 1 to proceed.
The Installation Type screen is displayed.
You can choose to install Symantec Mail Security for SMTP in the following configurations:
■ Typical , which installs both the Scanner and Control Center on the same machine in a location you specify, with subcomponents under that location, or
■ Custom, which allows you to install a Scanner or the Control Center individually, as well as specify locations for the MTA data and log directories (if you are installing a Scanner), or the port number for your Tomcat installation (if you are installing the Control Center).
5 Type the number of the option you want to select or deselect it, then type 1
to proceed.
The Installation Directory screen is displayed.
6 Specify an alternate location, or type 1 to accept the default value, and then
then type 0 to proceed.
The default value is /opt/Symantec/SMSSMTP/
■ If you selected the default installation configuration in step 5, the Installation Parameters Summary screen is displayed. Proceed to step 13.
■ If you selected the custom installation configuration in step5, the Feature Selection panel is displayed. Proceed to step 7.
7 If you are installing both a Scanner and the Control Center, type 0 to
proceed, otherwise, type the number for the component you are not installing to deselect it, and then type 0 to proceed.
8 If you are installing the Control Center only, proceed to step 12.
If you are installing a Scanner, the MTA Data Directory screen is displayed. This is the directory used for message queue data. The default location for this directory is
29 Installing Symantec Mail Security for SMTP
Installing on Solaris and Linux
9 Specify an alternate location, or type 1 accept the default value, and then
then type 0 to proceed.
The Log Directory screen is displayed. All log data for this Scanner will be stored in the directory you specify. The default location for this directory is / opt/Symantec/SMSSMTP/logs .
10 Specify an alternate location, or type 1 to accept the default value, and then
then type 0 to proceed
■ If you are installing both a Scanner and the Control Center on this machine, proceed to step 13.
■ If you are installing a Scanner individually (with no Control Center on this machine), the Control Center IP panel is displayed. You must provide either the specific IP address (or CIDR range of IP addresses) of a Control Center allowed to access this Scanner, or you can allow access to this Scanner from any computer.
Warning: Selecting the Any computer option means any machine can access this Scanner. This could represent a security risk. Please consult your organization’s network security team before you select this option.
11 Enter an IP address or select Any Computer and type 0 to proceed.
12 If you are installing the Control Center, the Tomcat Port screen is displayed. Accept the default port value (41443), or enter an alternate value, and then type 0 to proceed.
Note: The port number you specify for Tomcat to use must be higher than 1024 , as it does not run as root (or setuid root).
The Installation Parameters Summary screen is displayed.
13 Verify the list of installation parameters and type 3 to complete the
installation.
The installation completes, and the components you have installed are started automatically.
A log of the installation is placed in /opt/Symantec/SMSSMTP/install_log.txt
Setting up
If you installed Control Center, you will now log into the Control Center and run the Setup Wizard. Many of the site-wide settings that you will specify as you use the Setup Wizard are actually site defaults that you can later vary for each Scanner you add.
If you are setting up the Control Center and a Scanner on the same machine, the Setup Wizard will not show a summary as described in step 7 of this procedure, instead you will proceed directly to the Add Scanner Wizard.
Note: If you have installed both the Control Center and a Scanner on one machine, you must add the Scanner on that machine to the Control Center before adding other Scanners.
Note: None of the settings you specify using the wizard are final until you click Finish at the end of the wizard. If you step through all the panels of the wizard and do not click Finish, configuration settings will be unchanged.
Logging in
Before you can register and set up your system, you must log in to the Control Center.
To log in as an administrator
1 Access your Control Center from a browser. The default login address is:
https://<hostname>:41443/brightmail/
where <hostname> is the hostname of the machine on which you installed
the Control Center. You can also use the IP address in place of <hostname>.
You may see a security alert message.
2 If you see a security alert message, accept the self-signed certificate to continue.
The Control Center log in page is displayed.
3 You may choose the language in which you want to operate the Quarantine and end user views of the Control Center.
Select the language you wish to use from the drop-down list on the login page.
31 Installing Symantec Mail Security for SMTP
Setting up
Note: To display Quarantine and other end-user pages correctly when using a non-English locale setting, you must install language-specific fonts on the computer used to access these pages. These fonts must support UTF-8.
4 Enter the default username and password, which are admin/symantec, and
then click Login.
Registering your system
The first time you access the Control Center, you will see the License Registration panel. If you have installed Control Center but have not yet installed a Scanner, you will see the Administrator Settings panel described in “Configuring your system” on page 32.
To complete registration, you need one or more license files (.slf files) provided to you by Symantec (depending on the product features you have purchased, you may receive multiple license files). Place the file(s) on the computer from which you are accessing the Control Center. Each time you add a Scanner, you must confirm your license(s) or register again. However, you can use the same .slf file(s) for each Scanner.
To register your license(s)
1 On the License Registration page, click Browse to find your .slf file.
2 Select your .slf file and click Open to return to the License Registration page. 3 If your installation will be using a proxy server for communications with
Symantec, check the Use HTTP Proxy box and complete the proxy configuration fields.
4 Click Register.
If registration was successful, the License Registration page is redisplayed. If there was an error, you will see error text at the top of the page.
Note: For registration and ongoing operations, Symantec Mail Security for SMTP communicates with Symantec Security Response over a secure connection. If registration has failed, ensure that your network is configured to permit outbound connections to Symantec on port 443.
5 If you have another .slf file for a different feature, repeat this procedure. 6 When all your .slf files are successfully registered, click Next.
Configuring your system
When you have registered your license(s), the Setup Wizard is launched.
Configure your system
Proceed through the Setup Wizard as described in this section to configure your system.
Note: None of the settings you specify using the wizard are final until you click Finish at the end of the wizard. If you step through all the panels of the wizard and do not click Finish, you will not make any changes to configuration settings.
To specify administrator, local domain, and locale settings
1 On the Administrator Settings panel, specify an email address for the administrator and click Next.
You can use the Control Center to specify that the system send alerts and other information to this address after you have completed this procedure. 2 On the Local Domains panel, add the domains for which you accept
incoming mail.
You can also add specific email addresses.
To delete a domain or email address from the list, check it and click Delete. 3 For each domain or email address you add, optionally specify that messages
should be routed to a specific host and port. You can optionally check Enable MX Lookup.
You can click Import to import a text file containing a list of local domains, one domain per line.
4 Click Next.
The System Locale panel is displayed.
5 Specify the locale that Symantec Mail Security for SMTP should use for formatting numbers, dates, and times, and then click Next.
If you are setting up a Control Center-only installation, you will now see the Setup Wizard Summary panel. If you are setting up a Control Center and a Scanner on the same machine, you will see the Mail Filtering panel, the first panel in the Add Scanner Wizard.
6 Do one of the following:
■ If you are setting up a Control Center-only installation, review the information on the Setup Wizard Summary panel. Click Back to make changes, or Finish to complete. You must set up a Scanner before you can filter mail. To set up a Scanner on another machine you must
33 Installing Symantec Mail Security for SMTP
Setting up
install a Scanner on that machine, and then follow the procedure described in “Setting up a Scanner” on page 35.
■ If you are setting up a Control Center and a Scanner on this machine, continue with To specify mail filtering settings in the next section.
To specify mail filtering settings
1 On the Mail Filtering panel, specify how you will use this Scanner. You can choose to filter inbound mail, outbound mail, or both.
■ If you choose to filter inbound mail, you will see the Inbound Mail Filtering panel. Proceed with step 2.
■ If you choose to filter outbound mail only, you will see the Outbound Mail Filtering panel. Proceed with “To specify outbound mail filtering settings” on page 34.
2 On the Inbound Mail Filtering panel, choose the IP address to use for inbound mail.
You can use the Test button to ensure that the mail server responds. 3 If desired, change the port specification for inbound mail, and then click
Next.
Note: Be sure not to use a port already in use on your system.
4 On the Inbound Mail Filtering - Connections panel, specify the mail servers from which this Scanner will accept inbound mail.
You can choose All IP addresses or specify IP addresses or hostnames. A typical choice would be All IP addresses, thus allowing the Scanner to accept mail from any MTA on the Internet.
If you specify one or more IP addresses, you must include the IP address of the Control Center so that Spam Quarantine and Suspect Virus Quarantine can release messages.
After you add the first entry, the IP address of the Control Center is added automatically and selected. If you are using a different IP address for the Control Center, or have the Control Center and Scanner installed on different machines, you must add the new IP address and disable the one that was added automatically.
Warning: If you are deploying this Scanner behind a gateway, and are specifying one or more IP addresses instead of All IP addresses, you must add the IP addresses of ALL upstream mail servers in use by your
organization. Upstream mail servers that are not specified here may be classified as spam sources.
5 On the Inbound Mail Filtering - Local Relay panel, specify the internal host to which this Scanner will relay inbound mail after filtering is complete. You can define a new host or select a host from the list. A typical value is a downstream mail server such as your corporate mail server.
You can also specify a port. If you check Enable MX lookup for this host, you must specify a host name (not an IP address) for that server.
6 If you chose to filter only inbound mail, click Next and proceed to step 8 in “To specify outbound mail filtering settings” in the next section.
If you chose to filter inbound and outbound mail, click Next and proceed to step 1 in “To specify outbound mail filtering settings” in the next section.
To specify outbound mail filtering settings
1 On the Outbound Mail Filtering panel, choose the IP address to use for outbound mail.
2 If desired, change the port specification for outbound mail, and then click
Next.
In most cases this should be left as port 25.
If you are using one NIC but wish to support both inbound and outbound filtering, you must set this to an alternate port so that it does not conflict with the port used for inbound filtering.
You can use the Test button to ensure that the mail server responds. 3 On the Outbound Mail Filtering - Connections panel, specify by IP address
the internal mail servers from which this Scanner will accept outbound mail.
A typical value is the IP address of your corporate outbound mail server. If you chose to filter only outbound mail, you will see the Outbound Mail Filtering - Local Relay panel next. Click Next and proceed to step 4. If not, click Next and skip to step 6.
4 On the Outbound Mail Filtering - Local Relay panel, specify the internal host to which this Scanner will relay outbound mail after filtering is complete. You can select a host from the list or define a new host. A typical value is a downstream mail server such as your corporate mail server.
You can also specify a port. If you check Enable MX lookup for this host, you must specify a host name (not an IP address) for that server.
5 Click Next.
6 On the Outbound Mail Filtering - Nonlocal Relay panel, specify how you want to relay outbound mail after filtering is complete.
You can use default MX lookup, select a host from the list, or define a new host.
35 Installing Symantec Mail Security for SMTP
Setting up
You can also specify a port. If you check Enable MX lookup for this host, you must specify a host name (not an IP address) for that server.
For outbound mail addressed to a non-local domain, there is typically no relay host to specify. If you choose Use default MX lookup, the Scanner will use Internet MX records to deliver the mail.
7 Click Next.
8 On the Setup Wizard Summary panel, review the settings shown. 9 If you are satisfied with the settings, click Finish to save them.
If not, click Back to revise your settings, or Cancel to end without saving any changes.
When the configuration is complete, the Scanner will contact Symantec to download the latest antispam filters and antivirus definitions, and the default antivirus definition download schedule will be in place (if you have installed an antivirus license). You can alter this schedule from the Control Center. Refer to the Symantec Mail Security for SMTP Administration Guide
for more information.
Setting up a Scanner
The instructions in this section only apply if you are adding a Scanner on a machine different from the one hosting your Control Center.
Add a Scanner
Use the Add Scanner Wizard to set up a Scanner.
Note: None of the settings you specify using the wizard are final until you click Finish at the end of the wizard. If you step through all the panels of the wizard and do not click Finish, you will not make any changes to configuration settings.
To configure host IP settings
1 If you are adding your first Scanner, you will now see the Add Scanner Wizard. Skip to step 3. If you’re adding a subsequent Scanner, from the Control Center, click Settings > Hosts.
2 On the Hosts page, click Add and then click Next.
3 On the Scanner Host Settings panel, identify your new Scanner by typing a description and a name or IP address.
To register the Scanner
1 On the License Registration page, click Browse to find your .slf file.
2 Select your .slf file and click Open to return to the License Registration page. 3 If your Scanner will be using a proxy server for communications with
Symantec, check the Use HTTP Proxy box and complete the proxy configuration fields.
4 Click Register.
If registration was successful, the License Registration page is redisplayed. If there was an error, you will see error text at the top of the page.
Note: For registration and ongoing operations, Symantec Mail Security for SMTP communicates with Symantec Security Response over a secure connection. If registration has failed, ensure that your network is configured to permit outbound connections to Symantec on port 443.
5 If you have another .slf file for a different feature, repeat this procedure. 6 When all your .slf files are successfully registered, click Next.
7 Continue with “To specify mail filtering settings” in the next section.
To specify mail filtering settings
1 On the Mail Filtering panel, specify how you will use this Scanner.
You can choose to filter inbound mail, outbound mail, or both inbound and outbound mail.
■ If you choose to filter inbound mail, you will see the Inbound Mail Filtering panel. Click Next and proceed with step 2.
■ If you choose to filter outbound mail only, you will see the Outbound Mail Filtering panel. Click Next and proceed with “To specify outbound mail filtering settings” on page 37.
2 On the Inbound Mail Filtering panel, choose the IP address to use for inbound mail.
You can use the Test button to ensure that the mail server responds. 3 If desired, change the port specification for inbound mail, and then click
Next.
4 On the Inbound Mail Filtering - Connections panel, specify the mail servers from which this Scanner will accept inbound mail.
You can choose All IP addresses or specify IP addresses or hostnames. A typical choice would be All IP addresses, thus allowing the Scanner to accept mail from any MTA on the Internet.
37 Installing Symantec Mail Security for SMTP
Setting up
If you specify one or more IP addresses, you must include the IP address of the Control Center so that Spam Quarantine and Suspect Virus Quarantine can release messages.
After you add the first entry, the IP address of the Control Center is added automatically and selected. If you are using a different IP address for the Control Center, or have the Control Center and Scanner installed on different machines, you must add the new IP address and disable the one that was added automatically.
Warning: If you are deploying this Scanner behind a gateway, and are specifying one or more IP addresses instead of All IP addresses, you must add the IP addresses of ALL upstream mail servers in use by your
organization. Upstream mail servers that are not specified here may be classified as spam sources.
5 Click Next.
6 On the Inbound Mail Filtering - Local Relay panel, specify the internal host to which this Scanner will relay inbound mail after filtering is complete. You can select a host from the list or define a new host. A typical value is a downstream mail server such as your corporate mail server.
You can also specify a port. If you check Enable MX lookup for this host, you must specify a host name (not an IP address) for that server.
7 If you chose to filter only inbound mail, click Next and proceed to step 9 in To specify outbound mail filtering settings”.
If you chose to filter inbound and outbound mail, click Next and proceed to step 1 in “To specify outbound mail filtering settings”.
To specify outbound mail filtering settings
1 On the Outbound Mail Filtering panel, choose the IP address to use for outbound mail.
2 If desired, change the port specification for outbound mail.
In most cases this should be left as port 25. If you are using a single NIC and IP for both inbound and outbound mail, ensure that this port is different from the one you specified for inbound mail.
You can use the Test button to ensure that the mail server responds. 3 Click Next.
4 On the Outbound Mail Filtering - Connections panel specify by IP address or CIDR range the internal mail servers from which this Scanner will accept outbound mail.
If you chose to filter only outbound mail, you will see the Outbound Mail Filtering - Local Relay panel next. Click Next and proceed to step 5. If not, click Next and skip to step 7.
5 On the Outbound Mail Filtering - Local Relay panel, specify the internal host to which this Scanner will relay outbound mail after filtering is complete. You can define a new host or select a host from the list. A typical value is a downstream mail server such as your corporate mail server.
You can also specify a port. If you check Enable MX lookup for this host, you must specify a host name (not an IP address) for that server.
6 Click Next.
7 On the Outbound Mail Filtering - Nonlocal Relay panel, specify how you want to relay outbound mail after filtering is complete.
You can use default MX lookup, select a host from the list, or define a new host.
You can also specify a port. If you check Enable MX lookup for this host, you must specify a host name (not an IP address) for that server.
For outbound mail addressed to a non-local domain, there is typically no relay host to specify. If you choose Use default MX lookup, the Scanner will use Internet MX records to deliver the mail.
8 Click Next.
9 On the Setup Wizard Summary panel, review the settings shown. 10 If you are satisfied with the settings, click Finish to save them.
If not, click Back to revise your settings, or Cancel to end without saving any changes.
When the configuration is complete, the Scanner will contact Symantec to download the latest antispam filters and antivirus definitions, and the default antivirus definition download schedule will be in place (if you have installed an antivirus license). You can alter this schedule from the Control Center. Refer to the Symantec Mail Security for SMTP Administration Guide
for more information.
Completing setup
Your installation is now nearly ready to use, with a set of default policies designed for most enterprise installations. Review the following sections to determine what additional setup tasks you need to perform.
Adding more Scanners
39 Installing Symantec Mail Security for SMTP
Setting up
Setting mail filtering policies
When you set up Symantec Mail Security for SMTP, a set of ready-made default message filtering policies are in place. You can use these policies or customize them.
The initial default policies are as follows:
■ The default group policy includes all users, and specifies use of default filtering policies for spam, suspected spam, virus, content compliance, and end user settings.
■ The default spam policy is to modify the subject line by prepending [Spam] and deliver the message to the inbox, and only applies to inbound mail traffic.
■ The default suspected spam policy is to modify the subject line by prepending [Suspected Spam] and deliver the message to the inbox. ■ The suspected spam threshold is set to 72 (see Symantec Mail Security for
SMTP Administration Guide for more information). ■ The default virus policy is to clean the message. ■ The default worm policy is to delete the message. ■ No default content compliance policies are in place. ■ No end user configuration capabilities are in place.
For more information on these policies and instructions on adjusting them to meet your needs, see the Symantec Mail Security for SMTP Administration Guide.
Note: With this release, the default action for an Unscannable verdict, including those due to malformed MIME content, has been changed from markup to
delete. This was done to provide the strongest possible level of protection against external threats. If desired, you can change this action on a per group basis. You may want to change the default setting for unscannable messages if you are concerned about losing important messages.
Testing Scanners
For instructions on testing Scanners, see the Symantec Mail Security for SMTP Administration Guide.
Accessing the Control Center
Follow these instructions to begin using the Control Center.
To log in as an administrator
1 Access your Control Center from a browser. The default login address is:
https://<hostname>:41443/
where <hostname> is the hostname of the machine on which you installed
the Control Center. You can also use the IP address in place of <hostname>.
You may see a security alert message.
2 If you see a security alert message, accept the self-signed certificate to continue.
The Control Center log in page is displayed.
3 You may choose the language in which you want to operate the Quarantine and end user views of the Control Center.
Select the language you wish to use from the drop-down list on the login page.
4 In the User name box, type the user name given to you by your system administrator.
If you are the first administrator to log in, type: admin
5 In the Password box, type your administrative password.
The initial default password is symantec. Contact your system administrator if you do not know the password.
6 Click Login.
Warning: Do not create an account for an administrator that is identical to a user account name. Do not create an end user account that is identical to an
administrator account name. If a naming conflict occurs, the administrator will take precedence and the end user will be denied access to their account. In the unlikely event that both the username and the password for an administrator and an end user are identical, the end user will be granted access to the administrator account.
41 Installing Symantec Mail Security for SMTP
Accessing the Control Center
To log in as an end user with an iPlanet or Sun ONE Directory Server
Note: To do this, LDAP authentication must be enabled. Refer to the Symantec Mail Security for SMTP Administration Guide for more information on LDAP support.
1 Access your Control Center from a browser. The default login address is:
https://<hostname>:41443/
where <hostname> is the hostname of the machine on which you installed
the Control Center. You can also use the IP address in place of <hostname>.
You may see a security alert message.
2 If you see a security alert message, accept the self-signed certificate to continue.
The Control Center log in page is displayed.
3 If necessary, choose the language in which you want to operate the Control Center.
Below the text entry fields you will see a list of names of languages. The name of the language currently in use is displayed in normal text. The names of other languages are displayed underlined and highlighted. Click the name of another language to use that language instead.
4 In the User name box, type your full email address (for example,
5 In the Password box, type the password you normally use to log in to your system.
6 Click Login.
To log in as an end user with an Active Directory account 1 Access your Control Center from a browser.
The default login address is: https://<hostname>:41443/
where <hostname> is the hostname of the machine on which you installed
the Control Center. You can also use the IP address in place of <hostname>.
You may see a security alert message.
2 If you see a security alert message, accept the self-signed certificate to continue.
The Control Center log in page is displayed.
3 If necessary, choose the language in which you want to operate the Control Center.