WebAdmin Guide
Manage Filtering with the Netsweeper Policy
Server and the Client Filter
104 Dawson Road
Guelph, Ontario N1H 1A7 Canada
Phone: +1 519-826-5222 Fax: +1 519-826-5228 41 Marlowes
Hemel Hempstead, Herts HP1 1LD United Kingdom
Phone: 01442-355-160 No. 23/35 18th Ave. Ashok Nagar, Chennai 600 083 India
Phone: 9144-43054005 Fax: 9144-43054006
We have made every effort to ensure the accuracy of this guide. However, Netsweeper Inc. makes no warranties with respect to the accuracy of this
documentation and disclaims any implied warranties of merchantability and fitness for a particular purpose. Netsweeper Inc. shall not be liable for any incidental or consequential damages in connection with the furnishing, performance, or use of this guide or the included examples. The information in this documentation is subject to change without notice.
Netsweeper™ and Netsweeper Inc.™ are trademarks or registered trademarks
of Netsweeper Incorporated in Canada and/or in other countries. Other product names mentioned in this guide may be trademarks or registered trademarks of their
respective companies and are the sole property of their respective manufacturers. ______
Netsweeper WebAdmin Guide
About this User Guide
The chart below lists what tasks each user account would probably perform.
Account Holder Common Tasks
Master Admin Manages installation of Netsweeper Policy Server and deployment of the client filters
Monitors and manages the distribution of system resources Manages the System Tools
Has overall management responsibility for the admins, sysops, and users
Has access to all of the WebAdmin tools. Admin Has no access to the WebAdmin System Tools
Manages one or more groups, with their assigned users and policies Creates sysop accounts and manages one or more sysops
Sysop Has less WebAdmin access than his or her supervising admin
Manages policies, users, and groups only for those groups to which he or she is assigned, under the guidance of an admin.
He or she typically has somewhat limited access to the WebAdmin tools. Sysops can only report on groups and clients assigned to them. User Has very limited WebAdmin access, if at all
May be assigned very limited sysop-like duties, such as the review of reports. Generally, a user can only access his or her own account. Contacting Technical Support
Netsweeper Inc. is committed to providing exceptional service worldwide. If you require assistance during the installation, configuration, or use of any Netsweeper product, please contact the Netsweeper Technical Support team.
Before you call Technical Support, please have: Your Netsweeper product license key
Physical access to the server hardware used in your content-filtering solution Familiarity with your network architecture and server specifications
You can email Support 24 hours a day. Email: [email protected]. We will respond during regular business hours (8am-5pm Eastern Time), Monday through Friday. You can also telephone Netsweeper Support during regular business hours, Monday through Friday.
Telephone the Technical Support Centre nearest you: North America: 1-519-826-5222
United Kingdom: +44 20 71 93 1044 India: 9144-43054005
Contents
About this User Guide i
Contacting Technical Support ... i
Introduction to the WebAdmin 1 Logging into the WebAdmin ... 1
The WebAdmin Dashboard ... 2
Tool Menus on the WebAdmin Menu Bar ... 4
Managing Policies 7 About Policy Management ... 8
About Groups ... 8
About Policies ... 8
About Clients ... 8
About Time Segments ... 8
Using the Policy Management Tools ... 9
Creating a Group ... 9
Deleting a Group ... 11
Surf Using Group ... 11
Assigning Policies to a Group ... 12
Assigning Time Segments to a Policy ... 12
Changing a Time Segment ... 13
Viewing a Time Calendar ... 14
Modifying a Policy‘s Category and Protocol Filtering ... 22
Deleting a Client ... 23
Adding Clients to Groups ... 24
Using Search Keywords ... 28
Using the Request Servers Tool ... 29
Managing Accounts 31 Using the Account Manager ... 31
Adding an Account ... 31
Resetting a Password ... 33
Resetting a Password from the Client Filter Manager ... 33
Suspending an Account ... 34
Using the Client Filter Manager ... 34
Resetting a Password from the Client Filter Manager ... 35
Generating an Uninstall Key ... 35
Managing URL and Protocol Categories 37
Category Management ... 37
Custom Category Manager ... 37
Category URL List ... 37
Category Definitions ... 38
Adding a Custom Category ... 38
Adding URLs to the Category URL List ... 39
What Are the Built-In Netsweeper Categories? ... 39
Creating a New Category... 53
Adding URLs to the Category URL List ... 54
Using the Reporting Tools 55 Creating Quick Reports ... 56
Types of Quick Reports ... 56
Using Quick Reports to Monitor Your Network ... 57
Using Quick Demand Reports ... 66
Using Quick Search ... 69
Creating Custom Reports ... 74
Choosing a Report Type ... 75
Creating a Demand Report ... 76
Creating a Scheduled Report ... 81
Creating a Continuous Report ... 87
Using the Request Log ... 92
Using Advanced Reporting Features ... 93
Using Report Filters ... 93
Creating Simple Report Filters ... 93
Using Report Groups ... 97
Choosing Detail Groups ... 99
Sorting a Report ... 100
Using Graphs and Tables ... 102
Using Email Options... 109
Configuring the Reporter ... 111
Setting Report Restrictions ... 112
Allowing Others to Use Quick Reports ... 116
Using Logs 119 WebAdmin Log ... 120
URL Alerts Log ... 120
Message Log ... 121
Remote Admin Log ... 122
Directory Sync Log ... 123
Using URL Tools 125
Managing the URL Lists ... 126
Deny Page Allow URL List ... 126
System URL Lists ... 127
Local URL/Keyword Lists ... 127
Global URL Lists ... 127
Category URL List ... 128
Parsing a URL ... 128
How Netsweeper Processes the Lists ... 130
Creating URL Lists ... 131
Adding a URL to a URL Lists ... 131
Importing a URL list... 132
Adding URLs or Words to the Allow or Deny Lists ... 133
Importing URL Lists ... 134
Creating URL Alerts ... 134
Using the Web Proxy ... 135
Using the ‘Your Account’ Tools 137 Changing your Password ... 137
Changing your Theme (User Interface) ... 138
Choosing a Theme ... 138
Changing the WebAdmin Display Language ... 140
Changing the WebAdmin Time Zone ... 141
Setting the Default Paper Size for Printing ... 142
Logging Out ... 142
Deploying the Client Filters 143 Differences between the Two Client Filter Editions ... 143
Organizing Filtering Profiles or Policies ... 144
Residential Edition or Enterprise Edition? ... 144
Residential Edition vs. Enterprise Edition ... 145
Deploying the MSI version of the Client Filter ... 145
Adding Multiple Clients ... 146
Filtering Multiple Organizations ... 146
Task Summary... 146
Creating a DNS Entry for Each Company ... 147
Testing the DNS changes ... 147
Filtering More than One Organization ... 147
Deploying the MSI version of the Client Filter ... 148
Deploying the Executable Version of the Client Filter ... 148
Delegating Administration 149
Duties of the Master Admin ... 149
Creating an Admin Account ... 150
Creating a Sysop Account ... 151
Managing Sysop Access to the WebAdmin ... 152
Standard Sysop Access ... 152
Possible Additional Sysop Permissions ... 153
Recommended Sysop Access to the WebAdmin ... 159
Permissions for the Client Filter Residential Edition ... 159
Permissions for the Client Filter Enterprise Edition and the Enterprise Filter ... 160
Changing Sysop Permissions... 161
Suspending an Account or Setting an Expiry Date ... 161
Assigning a Range of IP Addresses to a Sysop ... 162
Assigning a Group to an Account ... 162
Removing a Group from a Sysop‘s Control ... 163
Using the System Tools 165 Modifying a Global Deny Page ... 166
Using the Remote Admin Tool to Test the Policy Servers ... 167
Testing Deny Pages ... 168
Applying Settings ... 168
Managing System Configuration ... 168
Using the Monitoring Tools 173 Viewing System Status ... 173
Viewing Monitoring Graphs ... 174
Introduction to the WebAdmin
The Netsweeper WebAdmin is browser-based software that the Netsweeper masteradministrator (master admin), administrators (admins) or system operators (sysops)
use in managing the Netsweeper Internet content-filtering system. The WebAdmin is the dashboard or control centre for your Netsweeper policy server.
This user guide explains how to use the Netsweeper WebAdmin software to create user groups, filtering policies, time segments, logs, and reports for managing your Netsweeper Internet content-filtering solution. It also explains how the master administrator can delegate some tasks to admins and sysops.
Figure 1 WebAdmin, Business Theme
Logging into the WebAdmin
You will access the WebAdmin software a web browsers, such as Internet Explorer, Netscape, Safari, or Firefox.
The address of your Netsweeper policy server has this format:
http://$HOST:8080/webadmin/start/
Instead of $HOST, substitute either the host and domain names or the IP address of your Netsweeper policy server.
Your network administrator or a Netsweeper user with admin privileges can provide the URL for the Netsweeper policy server, along with your user ID and password. You can save this address as a Favorite or Bookmark in your browser.
To log in to the WebAdmin software:
1. Use your web browser to navigate to the URL of the WebAdmin/start page for your Netsweeper Policy Server.
2. Type in your username and password.
If you are logging in for the first time, your default username is admin and your password is internet.
3. After you have logged in, the software will prompt you to change your password. Change it to the password you wrote down in your Installation Checklist.
Figure 2 Change Admin’s Password box displays after first login
4. Click Login.
The WebAdmin Dashboard
Below are two typical WebAdmin Dashboards. Depending on which Netsweeper product you are using, which theme you have applied, and which user privileges you have, you may not see some of these features or they may display in a somewhat different location.
Figure 4 WebAdmin Dashboard, School Theme
Note Instructions in this guide assume that you are using one of these user Themes (interfaces): Business, School, and SMB. Some of the other Themes are no longer in common use, and we would recommend that you avoid using them.
Table 1 Elements of the WebAdmin Dashboard
Dashboard Object Function
Menu bar
When you click one of these nine tool buttons, the menu options for that tool set will display as a dropdown list. Some of the interface Themes display all 44 of the tool buttons at once instead of as part of nine tool sets. Others show the menus in a frame on the left side of the page. You must use the scroll bar to display the menu you want to select.
In each of these cases, you will click a tool button to open the page for that tool.
Quick Links bar
The Quick Links bar allows quick access to three areas of the WebAdmin: Reports, Status, and WebAdmin Log. Just click the link to view the appropriate page.
Task bar
The WebAdmin task bar, located at the top right corner of the page, has three buttons: Home, Apply Settings, and Logout.
Click Home to display the WebAdmin home page. Click Apply Settings to have the WebAdmin apply changes you have made to the various settings. Click Logout to log out of the WebAdmin.
Dashboard Object Function
Splash screen
The splash screen is strictly a design element. However, when you click an option on either the Menu Bar or the Quick Links bar, the page for that tool or option displays in this general area.
Link to Netsweeper Technical Support
Click SUPPORT at the bottom of each WebAdmin page to go to the Netsweeper Support website.
Tool Menus on the WebAdmin Menu Bar
See Managing Policies.
See Managing Accounts. See Managing Categories.
See Using System Tools.
See Using Monitoring Tools.
See Using Logs. See Using URL Tools. See Using 'Your Account' Tools
Managing Policies
Rather than creating individual filtering policies for each user, it is more efficient to create groups of users who share the same filtering requirements – affinity groups – and then create one or more policies for each group.Table 2 Possible affinity groups
Parents Young students Teenagers
Office workers Parolees or persons under lawful monitoring Compulsive gamblers
Teachers Library patrons Law enforcement workers
This chapter describes how to create clients (users), groups, policies, and time segments and use them in managing your users and their Internet activity.
About Policy Management
Groups, policies, clients and time segments are key concepts used in managing your
users and applying filtering policies to them.
About Groups
Grouping clients (Internet users) with similar filtering requirements offers greater efficiency for filtering management. A group can contain any number of users (called
clients) and must contain at least one active filtering policy.
About Policies
A policy defines acceptable or unacceptable Internet content a group of clients.
About Clients
If you are using an external authentication system, you can use the users‘ Windows ID or account user name as their Netsweeper account name.
If you are not using an external authentication system, you will create a client account for each computer on your network, based on each computer's IP address.
For roaming or off-network devices with a Netsweeper Client Filter installed, you will create a client based on the user's Windows Login name. Netsweeper
automatically assigns Windows user names without a matching client in the WebAdmin to the default group.
Note Never delete the default group from the WebAdmin. However, you can select a group of your creation to designate as the default group.
Tip Assign limited or no Internet access to your default group. This ensures that all new clients are protected from offensive Internet content until you can assign them to the appropriate filtering group. You can only assign a client to one group at a time; however, you can change a client’s group assignment later, if needed.
About Time Segments
A time segment is the period of time in which a policy governs the group members‘
Internet activity. A group may have multiple policies, each with its own time segment. The time segments feature allows you to set more or less restrictive Internet filtering at different times of the day or night for a group of users. Only one policy is active at any time, and the active policy governs all clients in the group for its time segment.
Using the Policy Management Tools
The five Policy Management tools are all accessed from the Policy Management menu in the WebAdmin.
Policy Management Function
Group Manager Create and manage user groups
Policy Manager Create and manage filtering policies on a user or per-group basis
Client Manager Create and manage users
Search Keywords Allows you to prevent Search Engine results from displaying for searches of specific objectionable keywords or phrases. Request Servers Allows you to add remote request servers to those devices
that Netsweeper allows to make URL requests through a Netsweeper filtering system.
By default the Netsweeper does not allow categorization requests from remote request servers.
Creating a Group
You must create your groups before you can assign clients to them or create filtering policies for them.
To create a group:
1. In the WebAdmin, select Group Manager from the Policy Management menu. 2. Click Add New Group.
3. On the Add New Group page, type in a name1 for the group (for example, ―library patrons‖) and a description of the group.
Figure 5 Add New Group page
4. Select the Add default time policy2 box.
1 Group names can only contain alphanumeric characters without spaces. If the group names you create do not conform to this standard, Netsweeper will display an error message.
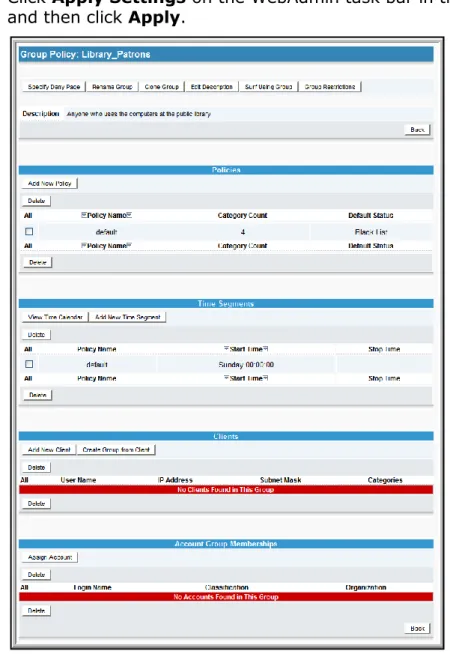
5. Click Submit. The Group Policy page for this new group displays.
6. Click Apply Settings on the WebAdmin task bar in the top right corner of the page and then click Apply.
Figure 6 Group Policy page
You can also choose the group you want to serve as the default group3, the group that Netsweeper will use for filtering any user not assigned to a group.
After you create a group, you can clone the group, including all policies, by clicking
Clone Group from the Group menu. Since clients can only belong to one group, Netsweeper does not copy clients to a cloned group.
Deleting a Group
To delete a group, select the check box for the group from the Group Manager and then click Delete.
Surf Using Group
For information on the Surf Using Group feature, see the Web Proxy Tech Note on the support site, at http://support.netsweeper.com.
You can restrict the group to a range of IP addresses. Select Group Restrictions
from the Group menu and type in the range of IP addresses to which you would like this group to apply.
Assigning Policies to a Group
A policy defines the filtering rules for every client (user) assigned to a specific group. To create a policy and assign it to a group:
1. Select Group Manager from the Policy Management menu. 2. Select the group name.
3. In the Policies section, click Add New Policy. 4. Type in a policy name and then click Submit. 5. Click Modify Categories.
6. Select the box by each category to which you want to block this group‘s access. 7. Click Submit.
8. Click Apply Settings on the WebAdmin task bar in the top right corner of the page and then click Apply.
Assigning Time Segments to a Policy
Time segments are blocks of time in a week. You can create multiple policies for one
group, each with different degrees of Internet access, and assign them to become active at different time segments during the week.
When you add a policy, you must apply time segments to it or the default time segments will apply.
A color-coded time calendar in the WebAdmin displays a week with all the time segments with their policy assignments. See
To assign time segments to a policy:
1. Select Group Manager from the Policy Management menu. 2. Select the group name.
3. Click Add New Time Segment in the Time Segments section.
4. Select the day and the time that you want this time segment4 to start. You can also choose when you want the time segment to end, but this is not required. 5. Click Submit.
6. Click Apply Settings on the WebAdmin task bar in the top right corner of the page and then click Apply.
Figure 8 Add time segments
Changing a Time Segment
To change the start time(s) or end time(s) for a policy: 1. Click Policy Management on the WebAdmin menu bar. 2. Click Group Manager on the drop-down menu.
3. Select the name of the group you want to modify.
4. Find the existing time segment in the Time Segments section and select the policy name.
5. Set the new start time or end time and then click Submit.
6. Select Apply Settings on the WebAdmin task bar in the top right corner of the page and then click Apply.
Viewing a Time Calendar
The Time Calendar is a visual representation of when your policies are active. It is an excellent tool to verify that you have set up the Time Segments to your liking.
To view a group‘s time calendar:
1. Select Group Manager in the Policy Management menu. 2. Select the name of the group you want to modify.
3. Click View Time Calendar.
Sample Calendar for a Group with One Time Segment
If you want to use one policy at all times, you only need to create one policy. By default, new policies start at midnight on Sunday and remain active all the time.
Sample Calendar for a Group with Two Time Segments
If you want to run one policy during the week and another on weekends, you can set the Weekdays policy to start Monday at 0:00:00 and set the Weekends policy to start Saturday at 0:00:00. The following screen capture is the Time Calendar for this
example:
Sample Calendar for a Group with Three Policies
If you want to create a group with policies for limited access during business hours, moderate access during lunch, and unrestricted access after business hours, you can set up something like the following:
1. Limited access on Monday through Friday from 8:00 to 17:00. 2. Moderate access on Monday through Friday at 12:00 to 13:00.
3. Unrestricted access beginning the first day of the week (0:00 on Sunday). This arrangement of three policies and their time segments would look like this:
Changing the Filtering for a Policy
To change the categories or protocols filtering for a policy: 1. Click Policy Management on the WebAdmin menu bar.
2. Click Policy Manager from the drop-down Policy Management menu. 3. Select the name of the policy you want to modify.
4. Find the Default Status to confirm the policy uses black list filtering. This is the recommended mode.
If the policy uses white list filtering, confirm with the master admin that white list
is the intended mode.
5. Click Modify Categories in the Categories section. 6. Select the option of which policies you want to change.
7. If you are using black list filtering, select all categories and protocols to which you want to block access. If you are using white list filtering, select all categories and protocols to which you want to allow access.
8. Click Submit.
9. Click Apply Settings on the WebAdmin task bar in the top right corner of the page and then click Apply.
10.Now you have a choice:
If you click Specify Deny Page in the Policy Manager, choose whether to use the Global Deny Page, the Group Deny Page, a Custom Deny Page or to log only.
If you click Custom Deny Page, you can modify the Deny Pages for each group separately. You also can choose what you want to log for the policy.
Cloning a Policy
5To clone a policy:
1. On the WebAdmin menu bar, click Policy Management and then select Policy Manager from the Policy Management dropdown menu.
2. Click the name of the policy you want to clone in the Policy Name column. This displays the page for that policy. At the top of the page, click Clone Policy.
Figure 13 Clone Policy button at top of Policy page for Policy 141_Blocked_Domains
3. The cloned policy page displays. In the Policy Name box, type a name for the cloned policy and then click Submit.
4. A notice will describe what has been copied from the old policy. Time segments are not cloned, but the deny page, local allow and deny lists, and the Protocol and URL category list are all copied into the new policy. Click Continue.
5. The detail page for the cloned policy now displays. You can modify the policy, changing the Deny Page, Default Status, Categories, Global URL Lists, Local URL/Keyword List, and so on.
Deleting a Policy
6To delete a policy. select the checkbox beside the policy name in the Policy Manager
and then click Delete.
For more information on the Surf Using Policy feature, see the Web Proxy Technical Note on the support site, at http://support.netsweeper.com.
You could also change the status to white list (Allow selected categories) or black list (Deny selected categories) of the categories chosen.
If you clear the check box by Global Denyand Allow Lists, then the lists will not apply to this policy.
Adding Clients by User Name
For each Netsweeper Client Filter user, create a client within a group. This client should be based on the Windows user name. You must first log into the WebAdmin before you can create a client.
To create a client within a group:
1. Select Group Manager from the Policy Management menu. 2. Select the group7 to which you want to add this client.
3. In the Clients section, click Add New Client.
4. If you want this to be a temporary client, type in an expiry date. 5. Click Authorized By Client Name.
6. Type the user's Windows login name in lowercase as the Client Name. 7. Select any categories you want to block for this client only.
8. Click Submit.
9. Click Apply Settings on the WebAdmin task bar in the top right corner of the page and then click Apply.
6 Do not delete the default policy, as this may cause filtering errors. You can, however, change the policy that is designated as the default policy.
7 If there are a number of groups, use the Search box or advance through the pages by clicking the page number. You can also sort a page alphabetically by group clicking the first letter in the Group name below the Search box.
Adding Clients by Password
This option is for use with the Enterprise Filter, more specifically with Squid. To add a client to a group by password:
1. Select Group Manager from the Policy Management menu. 2. Select the group8 to which you want to add this client.
3. In the Clients section, click Add New Client.
4. If you want this to be a temporary client, type in an expiry date. 5. Click Authorized By Password.
6. Type in the user's exact Windows login name as the Client Name and type in a password for the user.
7. Select any categories you want to block only for this client. 8. Click Submit.
9. Click Apply Settings on the WebAdmin task bar in the top right corner of the page and then click Apply.
Adding Clients by IP address
If you are using the Enterprise Filter and not using any external authentication methods, such as Radius or Active Directory, you can assign clients based on the IP address of their computer.
To add clients to a group by their computer IP address:
1. In the WebAdmin, create a client account for each user based on the user‘s Windows user ID.
2. Select Group Manager from the Policy Management menu. 3. Select the group to which you want to add this client.
Use the Search box or advance through the pages by clicking the page number. Pages can also be sorted alphabetically by clicking the first letter in the group name below the Search box.
4. In the Clients section, click Add New Client.
5. If you want this to be a temporary client, type in an expiry date. 6. Click Computer Address.
8 Use the Search field or advance through the pages by clicking the page number. You can sort pages alphabetically by Group name by clicking the first letter in the
7. Type in the user's exact Windows login name as the Client Name and the computer‘s IP Address.
8. Select any categories you want to block for this client only. 9. Click Submit.
10.Click Apply Settings on the WebAdmin task bar in the top right corner of the page and then click Apply.
Adding Clients by Network Subnet
This option is for use with the Enterprise Filter. If you have many users in a range of IP addresses that you would like to filter in the same group, you can add them all at once using a network subnet.
To add clients to a group by their network subnet:
1. In the WebAdmin, select Group Manager from the Policy Management menu. 2. Find the group that you want to add this client to and then click it. If you don't
have a lot of groups created yet, you should be able to scroll down to find the group. If you do have many groups created, you may need to use the Search box or advance through the pages by clicking the page number. Pages can also be sorted alphabetically by clicking the first letter in the group name below the Search box.
3. In the Clients section, click Add New Client.
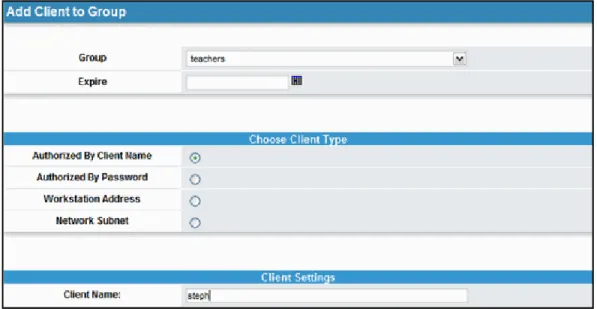
4. If you want this to be a temporary client, type in an expiry date. 5. Click Network Subnet.
6. Type in the user's exact Windows login name as the Client Name, the user‘s IP Address, and the Subnet Mask.
7. Select any categories you only want to block for this client. 8. Click Submit.
9. Click Apply Settings on the WebAdmin task bar in the top right corner of the page and then click Apply.
Figure 14: Add client to the group Teachers
Adding Multiple Clients
In many businesses, it is important to be able to identify specific users in reports, such as employees, managers, administrators, or visitors.
If you use an authentication service, such as Microsoft Active Directory, you can assign users to groups and then replicate those group names on the Netsweeper Policy Server. Netsweeper supports Microsoft Active Directory, LDAP, Novell, and Radius authentication methods and has a robust API to integrate with other authentication systems.
For more information on synchronizing from Active Directory, go to the Netsweeper support site at http://support.netsweeper.com.
Modifying a Policy’s Category and Protocol Filtering
To change the categories or protocols blocked for a particular policy: 1. Select Policy Manager from the Policy Management menu. 2. Find the policy you want to modify and then click the policy name.3. Find the Default Status to confirm the policy uses black list filtering (the recommended mode for filtering). If the policy instead uses white list filtering, confirm with the master admin that white list is the intended mode.
4. Click Modify Categories in the Categories section. 5. Select the option of which policies you want to change.
6. If you are using black list filtering, select all categories and protocols to which you want to block access. If you are using white list filtering, select all categories and protocols to which you want to allow access.
8. Click Apply Settings on the WebAdmin task bar in the top right corner of the page and then click Apply.
9. If you click Specify Deny Page in the Policy Manager, you are given the choice whether to use the Global Deny Page, the Group Deny Page, a Custom Deny Page or to log only.
10.If you click Custom Deny Page, you can modify the Deny Pages for each group separately. You are also given the choice of what you want to log for the policy.
Deleting a Client
To delete a client from a group:
1. Select Client Manager from the Policy Management menu. 2. Select the checkbox beside the client name you want to delete. 3. Click Delete.
To move a client to another group:
1. Select Client Manager from the Policy Management menu. 2. Select the client name.
3. Choose the new group from the Group menu and then click Submit.
4. Click Apply Settings on the WebAdmin task bar in the top right corner of the page and then click Apply.
Adding Clients to Groups
There are four methods for adding clients to groups – by user name, password, IP address, or network subnet. The instructions for adding a client by user name are below. See the Netsweeper WebAdmin Guide for details on the other methods. You can also add multiple clients. See Adding Multiple Clients in the Netsweeper
WebAdmin Guide.
Adding Clients by User Name
For each Netsweeper Client Filter user, create a client within a group. This client should be based on a user‘s Windows user name.
To add a client by Windows user name:
1. On the WebAdmin menu bar, select Group Manager from the Policy Management menu.
2. Select the group to which you want to add this client.
If there are a number of groups, use the Search box or advance through the pages by clicking the page number. You can also sort a page alphabetically by group clicking the first letter in the Group name below the Search box. 3. In the Clients section, click Add New Client.
4. If you want this to be a temporary client, type in an expiry date. 5. Click Authorized By Client Name.
6. Type the user's Windows login name in lowercase as the Client Name. 7. Select any categories you want to block for this client only.
8. Click Submit.
9. Click Apply Settings on the WebAdmin task bar in the top right corner of the page and then click Apply.
Adding Clients by Password
This option is for use with the Enterprise Filter, more specifically with Squid. You must first log into the WebAdmin to create a client.
To add a client to a group by password:
1. On the WebAdmin menu bar, select Group Manager from the Policy Management menu.
2. Select the group to which you want to add this client.
If there are a number of groups, use the Search box or advance through the pages by clicking the page number. You can also sort a page alphabetically by group clicking the first letter in the Group name below the Search box.
4. If you want this to be a temporary client, type in an expiry date. 5. Click Authorized By Password.
6. Type in the user's exact Windows login name as the Client Name and type in a password for the user.
7. Select any categories you want to block only for this client. 8. Click Submit.
9. Click Apply Settings on the WebAdmin task bar in the top right corner of the page and then click Apply.
Adding Clients by IP Address
If you are using the Enterprise Filter and not using any external authentication methods, such as Radius or Active Directory, you can assign clients based on the IP address of their computer.
To add clients to a group by their computer IP address:
1. Create a client account for each user based on the user‘s Windows user ID. 2. Select Group Manager from the Policy Management menu.
3. Select the group to which you want to add this client.
Use the Search box or advance through the pages by clicking the page number. Pages can also be sorted alphabetically by clicking the first letter in the group name below the Search box.
4. In the Clients section, click Add New Client.
5. If you want this to be a temporary client, type in an expiry date. 6. Click Computer Address.
7. Type in the user's exact Windows login name as the Client Name and the computer‘s IP Address.
8. Select any categories you want to block for this client only. 9. Click Submit.
10.Click Apply Settings on the WebAdmin task bar in the top right corner of the page and then click Apply.
Adding Clients by Network Subnet
This option is for use with the Enterprise Filter. If you have many users in a range of IP addresses that you would like to filter in the same group, you can add them all at once using a network subnet.
To add clients to a group by their network subnet:
1. In the WebAdmin, select Group Manager from the Policy Management menu. 2. Find the group that you want to add this client to and then click it.
If you don't have a lot of groups created yet, you should be able to scroll down to find the group. If you do have many groups created, you may need to use the Search box or advance through the pages by clicking the page number. Pages can also be sorted alphabetically by clicking the first letter in the group name below the Search box.
3. In the Clients section, click Add New Client.
4. If you want this to be a temporary client, type in an expiry date. 5. Click Network Subnet.
6. Type in the user's exact Windows login name as the Client Name, the user‘s IP Address, and the Subnet Mask.
7. Select any categories you only want to block for this client. 8. Click Submit.
9. Click Apply Settings on the WebAdmin task bar in the top right corner of the page and then click Apply.
Adding Multiple Clients
In many businesses, it is important to be able to identify specific users in reports, such as employees, managers, administrators, or visitors.
If you use an authentication service, such as Microsoft Active Directory, you can assign users to groups and then replicate those group names on the Netsweeper Policy Server. Netsweeper supports Microsoft Active Directory, LDAP, Novell, and Radius authentication methods and has a robust API to integrate with other authentication systems.
For more information on synchronizing from Active Directory, go to the Netsweeper support site at http://support.netsweeper.com.
Modifying a Client
To delete a client from a group:
1. Click Policy Management on the WebAdmin‘s menu bar. 2. Select Client Manager from the Policy Management menu. 3. Select the checkbox beside the client name you want to delete. 4. Click Delete.
Moving a Client to Another Group
To move a client to another group:1. In the WebAdmin, select Client Manager from the Policy Management menu. 2. Select the client name.
3. Choose the new group from the Group menu and then click Submit.
4. Click Apply Settings on the WebAdmin task bar in the top right corner of the page and then click Apply.
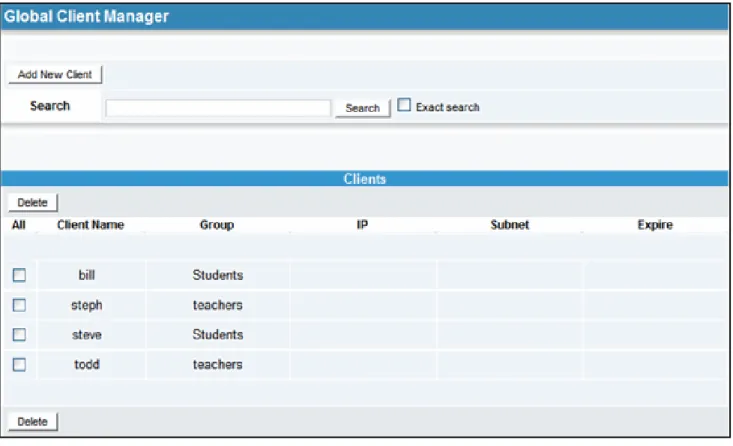
Figure 17: Global Client Manager
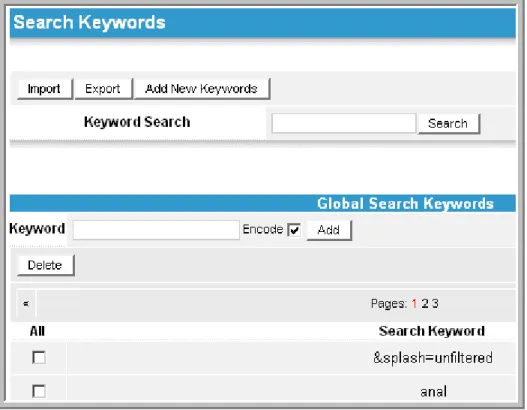
Using Search Keywords
9Search Keywords is an application listed on the Policy Management menu. To open the Search Keywords page, click Policy Management on the WebAdmin menu bar and then click Search Keywords from the resulting dropdown menu. The Search Keywords tool allows you to create a list of objectionable words or phrases on which you want to prevent users from performing Internet searches. If a user visits a Search Engine and searches for one of these words, the page will be denied.
This only works for URLs that have been categorized as a search engine site. The filter will block sites like http://www.google.com or http://www.altavista.com if a URL contains any of the search keywords.
Use the Category URL List to assign a Search Engine site to a URL, if you want the search keywords to apply. For example: http://com as a search engine site would enforce search keywords on all http://*.com/* websites.
Figure 18: Search Keywords tool, page 1 (partial) of 3
The Add New Keyword function will add a new search keyword, which will be blocked in Search Engine Site URLs. You can create two different types of keywords:
regular and encoded.
If you copied the keyword a browser URL address bar, it is encoded. Encoding the keyword replaces any non-alphanumeric characters, except the hyphen (-), underline (_), and period (.), with a percent (%) sign followed by the character‘s 2-digit hex equivalent. Spaces are replaced by plus (+) signs. You cannot add a word already in the list.
You can also importing a list from a comma- or tab-delimited text file. Export the current list by clicking Export.
Using the Request Servers Tool
Request servers are those devices that Netsweeper allows to make URL requests
through a Netsweeper filtering system.
By default, Netsweeper does not allow categorization requests from remote request servers.
If you want to allow access to remote request servers, you must use the Request Servers tool to notify the Policy Server of their existence. This is the same as the
request_server entries in the file nsd.conf. You will add both the Site Name and IP Address or IP Range information to register a Request Server with the Netsweeper Policy Server. Optionally, you can indicate a range of IP addresses by typing CIDR /XX
Allowing any IP Address as a Request Server
To allow any IP address to serve as a request server, add the address 0.0.0.0.
Note When possible, type in a more restrictive mask than “0.0.0.0” to increase the security of the policy server.
To add a Request Server:
1.
Select Request Servers from the Policy Management menu.2.
Click Add New Request Server.3.
Type in a descriptive site name to identify the IP or IP range you are adding, such as Netsweeper Client FilterUsers.4.
Type 0.0.0.0 as the IP address.5.
Select the Active check box. Clear all of the check boxes below this box.6.
Click Add New.7.
Click Apply Settings from the WebAdmin task bar in the top right corner of the page and then click Apply.Managing Accounts
The Account Management tools allow you to create sysop and admin users andassign them groups to delegate administration tasks. They also allow you to manage the Netsweeper Client Filter accounts.
Account Management menu
Account Management10 Function
Account Manager Manage client accounts (including resetting passwords), create
admin and sysop accounts and delegate administration tasks,
Client Filter Manager Manage client filters
Customer Manager Manage customers
When you create an account, you have the option to give an expiry date. You can also suspend an account.
Using the Account Manager
Adding an Account
To add an account:1. Click Account Management on the WebAdmin menu bar. 2. Select Account Manager from the drop-down list.
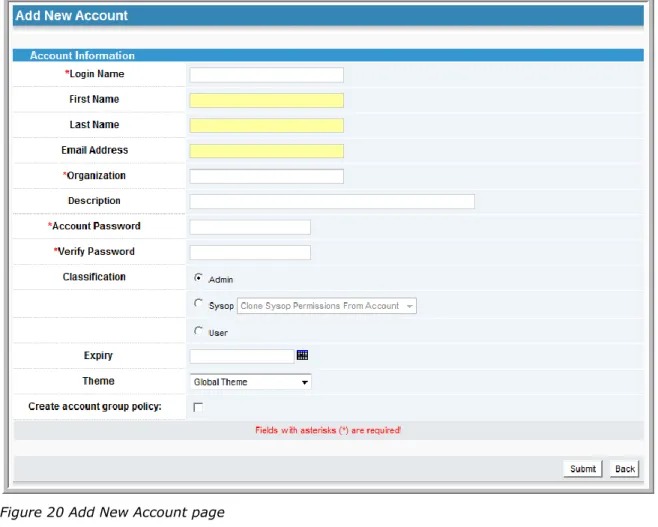
3. Click Add New Account.
The Add New Account page displays.
10 For more information on delegating administrative tasks to system operators
Figure 20 Add New Account page
4. Complete the Account Information on the Add New Account page, making sure that you complete the Login Name, Organization, Account Password, and Verify
Password boxes.
5. Select a classification for the user: Admin, Sysop, or User.
6. If the new account is for a sysop, you can clone the sysop permissions from
another account, if another sysop account has been created. Click the down arrow in the box to the right of Sysop and select an option from the resulting list.
7. Set an expiry date for the account by clicking the calendar tool and selecting a date.
8. Select a theme (interface) for the account by clicking the down arrow in the box to the right of Theme and selecting an option from the resulting list.
9. If this account will have its own group policy and not use one you have previously created, select the box by Create Account Group Policy.
10.Click Submit.
11.A message will display at the top of the page advising you that the account has been added.
12.Click Apply Settings on the taskbar to load the new account into all of the policy servers.
Resetting a Password
To reset an account password:1. Click Account Management on the WebAdmin menu bar. 2. Select Account Manager from the drop-down list.
3. Find the account name in the Accounts list and click the Edit button beside it (in the Actions column).
Figure 21 Account Manager window with Accounts list.
The Account Information page for that account will display.
4. Create a new password for the account and type it in both the Account Password and Verify Password boxes.
5. Click Submit.
6. Click Apply Settings on the taskbar to load the new account into all of the policy servers.
7. Click Apply.
You can also reset a password in the Client Filter Manager.
Resetting a Password from the Client Filter Manager
To reset a password in the Client Filter Manager:1. On the WebAdmin menu bar, click Account Management and select Client Filter Manager from the drop-down list.
2. Find the account Login Name in the Accounts list, and Click Modify in the
Actions column, to the left of the account name.
4. Click Change Password beside the Actions box.
5. On the Change [Login Name]’s Password page, type the new password in the
New Password and New Password Again box and then click Submit.
6. Click Apply Settings on the taskbar to load the new account into all of the policy servers.
7. Click Apply.
Suspending an Account
To suspend an account:1. In the WebAdmin, select Account Manager from the Account Management
menu.
2. Click Edit beside the account you want to suspend. 3. Click Suspend/Resume Account.
4. Select the checkbox beside the option you want to disable and then click Submit. (To resume an account, clear the checkboxes and then click Submit.)
5. Click Apply Settings on the WebAdmin task bar in the top right corner of the page and then click Apply.
Using the Client Filter Manager
On the Client Filter Management page, you can:
1. Reset or remove installs once an account has reached its install limit. 2. Reset a user account password.
3. Upload a new version of the Netsweeper Client Filter.
4. Generate uninstall keys, used to uninstall the Netsweeper Client Filter when a user has forgotten a password and the affected computer has no Internet
connection to use in retrieving a new password.
With the Client Filter Management permission, you can uninstall any Netsweeper Client Filter using the same Policy Server, even those outside of its group it belongs to. You can also install the Netsweeper Client Filter on virtually an unlimited
number of computers under the same account. For these reasons, we recommend that only admin users have access to these advanced functions.
The Client FilterManager allows you to assume the identity of the account for testing purposes. You can adjust the maximum number of installs, maximum number of profiles, set an expiry date for the account, or change the password, by clicking
Modify beside the account. You can reset the number of installs to zero for an account by clicking Reset Installs. You can reset the accounts preferences for the Profile Manager by clicking Reset Preferences.
Resetting a Password from the Client Filter Manager
To reset a password in the Client Filter Manager:1. On the WebAdmin menu bar, click Account Management and select Client Filter Manager from the drop-down list.
2. Find the account Login Name in the Accounts list, and Click Modify in the
Actions column, to the left of the account name.
3. This displays the Client Filter Manager page for that account. 4. Click Change Password beside the Actions box.
5. On the Change [Login Name]’s Password page, type the new password in the
New Password and New Password Again box and then click Submit.
6. Click Apply Settings on the taskbar to load the new account into all of the policy servers.
7. Click Apply.
Generating an Uninstall Key
When a user wants to remove or reinstall a client filter on his computer, the software will generate a security key and notify the user to contact his or her admin or sysop
for an uninstall key. The admin or sysop will then generate an Uninstall Key in the
Client Filter Manager.
However, if a user forgets his or her password and does not intend to uninstall the client filter, the admin or sysop merely resets the password in the Account Manager. To generate an uninstall key:
1. Click Account Management on the WebAdmin menu bar. Select Client Filter Manager from the resulting dropdown menu.
2. Click Uninstall Key Generator.
3. Type in the six-digit Security key that the user provides. 4. Click Generate Key.
Using the Customer Manager
Managing URL and Protocol Categories
Figure 23 Category Management menu options
Category Management
The Category Management tools allow an admin or sysop to manage the blocked or allowed URL and protocol categories and create custom categories.
Table 3 Category Management Menu Options
Category Management
Tool Function
Custom Category Manager This tool allows you to create or redefine filtering categories
and assign URLs to these categories
Category URL List This tool lists the built-in and custom URL and protocol filtering
categories.
Category Definitions This is a list of the category definitions for all the built-in
categories used by Netsweeper. You can sort the category definitions by category name, group or number or search the category definition list.
Custom Category Manager
The Custom Category Manager allows the addition and maintenance of custom categories. Any category you create will show up in your Category Definitions. It will also show up in the logs and reports for your users when they try to access a URL that you have added as part of a new category.
Category URL List
Netsweeper allows you to override the categories assigned to a particular site by adding that URL to an Allow or Deny list.
Category Definitions
The Category Definitions page contains Netsweeper‘s official definitions of what type of content a page must contain to be included into each of the available categories. Additionally, if you create a new category, it will also show up in the Category Definitions page in the WebAdmin.
You can sort the definitions by name, number, or group. If you are looking for a particular category, you can search the list by keyword.
Figure 24: Add a Custom Category
Adding a Custom Category
It is possible for you to create your own custom categories. These are categories that you want to filter or monitor, that are not in the Netsweeper default categories. The maximum number of custom categories is seven.
To add a custom category:
1. Select Custom Category Manager from the Category Management menu. 2. Click Add New Category.
3. Type in the Category name and a short description of the category. 4. Click Submit.
5. Click Apply Settings on the WebAdmin task bar in the top right corner of the page and then click Apply.
Adding URLs to the Category URL List
If there are URLs that you want to filter as part of a category, or URLs that you feel are incorrectly categorized, you can add them to the Category URL List and choose the category to which they belong.
To add a URL to the Category URL List:
1. Select Category URL List from the Category Management menu, or click
Custom Category Manager from the WebAdmin menu bar and then click Modify Category URL List.
2. Click Add New URL.
3. Type in the URL (See How URL Lists???, for proper syntax.) and select the
checkbox by any categories to which you want it assigned. Custom categories are at the bottom.
4. Click Submit.
5. Click Apply Settings on the WebAdmin task bar in the top right corner of the page and then click Apply.
6. Click the created link to check the URL address. 7. To edit the URL, click Edit beside the URL address.
Tip If you have many URLs to add, import a list. Use the Categories Definitions page to find the category numbers, which are the keywords in this case.
What Are the Built-In Netsweeper Categories?
Internet filtering fundamentally revolves around a filtering company‘s ability to
categorize a URL. Netsweeper provides more than 50 different URL categories for you to use in filtering Internet content.
The following pages list the Netsweeper categories visible to the user/administrator. There are also a number of internal categories that are generally invisible to the user/administrator that are used to manage error conditions and internal processing. It is possible for a URL to belong to more than one category.
The Netsweeper categories can be filtered in ―black list‖ or ―white list‖ mode. In ―black list‖ mode, when you choose a category, users will be blocked from going to or seeing any URL that has been determined to belong to that category. For example, when you select the Sports category, users are not allowed to go to URLs that are determined to be sports websites.
In ―white list‖ mode, when you select a category, you are only allowed to go to URLs in that category. A common question is whether Netsweeper has a Child Safe
category. This is an example of a white list category. To achieve this goal, you can import a list of acceptable websites and block all others.
The following list contains the categories that Netsweeper currently filters. The URLs listed are representative but not a complete list. Example websites were active at the time of writing.
Adult Filtering Group
This group includes URLs that reference, discuss, or show pornography, pictures, videos, or sexually oriented material. It includes nudity, soft and hard-core pornography, sadomasochism, bestiality, child porn, fetishes, stories, adult magazines, toys, or sex-related products or purchases.
Table 4 Adult Filtering Group Categories
Adult
Category No. Description
Adult Image 230 This category is similar to Pornography, but based on the content of images
instead of text.
Alcohol 160 This category includes URLs that reference alcohol, including wine, spirits,
beer, cocktail recipes, homemade alcohol, or any other alcoholic drink. It also includes information about bars, pubs, nightclubs, bartending, liquor sales, as well as hangovers and other side effects of alcohol.
Examples
Ontario Wine Society - http://www.ontariowinesociety.com/
The Beer Store - http://www.thebeerstore.ca/
Cocktail Recipes - http://supercocktails.com/
Alternative
Lifestyles 41 This category includes URLs that reference habits or behaviors related to social relations, dress, or recreation. These behaviors are typically important enough to significantly influence the lives of a sector of the population and hence can be used as a basis of social classification. Websites assigned to this category are not pornographic, but may deal with lifestyle choices that are sexual in nature.
Examples
Euro Naturist - http://www.euronaturist.com/
American Vegan Society - http://www.americanvegan.org/ EatVeg - http://www.eatveg.com/
Criminal
Skills 4 This category includes URLs that reference instructions or methods that promote, encourage, or provide the skills to do anything that is generally considered to be illegal, criminal, harmful to the general public, and/or that are forbidden by laws. This category does not necessarily reflect the laws of any particular region or country. This category includes websites that promote academic cheating or software hacking/key breaking. It typically excludes any website that deals with the prevention of criminal activity.
Examples
Lock Picking - http://www.kickthefog.com/how_works.htm
Adult
Category No. Description
Extreme 9 Extreme websites contain things that are considered far from normal. These
URLs are categorized as such for their degree of intensity. The pages are usually violent and may depict or promote torture, mutilation, eating
disorders, or other dangerous or disturbing activities. This category does not include pornographic fetishes or widely accepted "extreme sports", such as rock climbing, skiing, or other achievements.
Examples
Rate my Poo - http://www.ratemypoo.com/ratemy/poo
World of Death - http://www.everwonder.com/david/worldofdeath/
Faces of Death - http://facesofdeath.com/
Gambling 10 This category includes websites that directly provide the ability to place a bet
or to determine the outcome of a bet, as well as websites that promote or facilitate gambling. It also includes websites that range from purely factual to strategic to cheating, websites related to lotteries or looking up winning numbers, bingo websites, and websites that are for sports betting. This category excludes websites that are clearly support websites for gambling addiction.
Examples
Casinos Online - http://www.casinochoice.co.uk/
Online Gambling - http://www.onlinegambling.com/
Poker - http://www.poker.com/
Hate Speech 13 Hate Speech is the portrayal (written, verbal, illustrated, etc) of views that
are intentionally overwhelmingly critical or offensive to a person. It is intended to degrade, intimidate, or incite violent or prejudicial actions
against someone based on race, ethnic affiliation, nationality, gender, sexual orientation, religion, disability, or profession. Any description of one of these groups or group members that uses strong or crude language, explicit sexual references, or obscene gestures is considered Hate Speech.
Examples
KKK - http://kkklan.com
Symbols of Hate - http://gbgm-umc.org/umw/anti-hate/symbolsofhate.html
Match
Making 6 Match Making is the process of introducing people for the purpose of dating, mating, and friendship. The URLs in this category include topics related to dating services, dating advice and tips, relationships, listings or personal advertisements, and on-line dating services.
Examples
Lavalife - http://www.lavalife.com
Speed Dating Toronto - http://www.singleinthecity.ca/
Adult
Category No. Description
Occult 5 This category includes websites involving the study of secret or hidden
knowledge such as: cults, supernatural forces and events, occult lore, vampires, astrology, witchcraft, mysterious symbols, and other phenomena beyond ordinary understanding. It includes websites about these topics that are historical or factual in nature and/or promote such practices.
Examples
Occult Books, Ritual Magic Books, Spell Books - http://anathemabooks.com/
Wicca Occult Witchcraft - http://www.robotz.com/~wicked/
Pornography 23 This category includes URLs that reference, discuss, or show pornography,
pictures, videos, or sexually oriented material. This category includes nudity, soft and hard-core pornography, sadomasochism, bestiality, child porn, fetishes, stories, adult magazines, toys, or any sexual related purchase. This category excludes sex education websites.
Examples
Playboy - http://www.playboy.com/
Hustler - http://www.hustler.com/
Profanity 170 This category includes websites with words that are generally considered
obscene, vulgar, or derogatory. This includes sexual and racist slang.
Examples
Profane Lyrics - http://lyricpapa.com/artist_5510_T.I
Profane Spoof of MADD - http://www.mapsu.org/
Substance
Abuse 7 This category includes URLs that provide information on illegal drugs used for recreational rather than medical purposes, or URLs that promote the abuse of legal drugs. This category includes websites that promote the use of any substance that produces a hallucinated effect on self or others. It excludes informational websites that are clearly intended to provide description of drugs and substances, their negative effects, and addiction potential.
Example
Marihuana - http://www.marihuana.com/
Weapons 166 This category includes websites with information related to the promotion,
sale, or discussion of weapons. Weapons are any form of device used in combat that can injure or kill, such as guns, knives, or swords. Websites with information on how to build weapons or bombs are included in Criminal Skills.
Examples
Nuclear Weapons - http://nuclearweaponarchive.org/
Guns & Ammo - http://gunsandammomag.com/
Advanced Filtering Group
The advanced group includes Internet functions such as file sharing and instant messaging, as well as categories specific to Netsweeper.
Table 5 Advanced Filtering Group Categories
Advanced
Category No. Description
Email 152 Email is a protocol that allows you to send and receive text, HTML,
images, and other data files.
File Sharing 150 File sharing is the sharing and delivery of user specified files among
groups of people who are logged on to a file sharing network. Napster was the first mainstream peer to peer software that enabled large-scale file sharing.
General 45 This category includes URLs that do not belong to any other category.
The majority of the Internet is assigned to this category. Do not block this category unless you are filtering in an ―allow list only‖ mode.
Example
University of Alberta Library - http://www.library.ualberta.ca
Global List 105 Global List is a list category that indicates the requested URL was found in
a global allow or deny list. This is a list of systemwide URLs that have been deemed by the administrator of the Policy Server as appropriate or inappropriate. The global lists are set on the Policy Server and are applied for all users using that Policy Server.
Images 253 The Images category includes URLs for an image file, determined by file
name extension (Example: www.netsweeper.com/images/logo.jpg). Generally, Images should not be blocked.
Instant
Messaging 151 Instant Messaging is a form of electronic communication that involves immediate correspondence between two or more users who are online simultaneously. This includes text-based clients, as well as voice and video capable Instant Messaging clients.
Invalid Serial 100 The Netsweeper Distribution Server returns the Invalid Serial category
when it detects the serial number of the Policy Server is invalid. (The Policy Server sends its serial number to the NDS with each categorization request.) The Policy Server then displays an Invalid Serial Number deny page to the user. All pages will be denied until the Policy Server serial number is corrected or properly registered with the Distribution Server network.
IWF 108 Websites in this category have been identified by the Internet Watch Foundation as containing potentially illegal child abuse images. URLs in this category are omitted from all reports. This list is not managed by Netsweeper. For more information, see IWF's website at
http://www.iwf.org.uk/
Local List 104 Local List is a list category that indicates the requested URL was found in
a local allow or deny list. (For the Client Filter Residential Edition, this is the allow/deny list for the account as set in the Profile Manager. For the Enterprise Filter and the Client Filter Enterprise Edition, it is the
allow/deny list set for each specific Group.)
Advanced
Category No. Description
Network
Timeout 246 The Network Timeout category indicates that the Policy Server could not obtain a category due to network latency or congestion. The New URL category is always assigned to the categorization request made when a Network Timeout occurs.
Network
Unavailable 252 The Network Unavailable category indicates the Policy Server could not communicate with the Category Naming Service. This can be caused by Internet connectivity issues or other technical reasons. Categorization of new content will be unavailable until the problem has been corrected. The New URL category is always assigned to the categorization request made when the Network is unavailable.
New URL 254 New URL is a temporary category assigned to a URL that has not been
categorized before or whose categorization has expired. Blocking the New URL blocks any URL that has not already been categorized or whose categorization has timed out. Normally, revisiting a URL immediately after being denied as New URL will return the appropriate category for the URL (it takes about one second to categorize a URL). If you block New URL you are failing closed (deny) on any new URL; if you do not block New URL you are failing open (allow) on any new URL.
No Text 248 No Text is used when the file extension of this page is not recognizable by
the Categorization Engine. Blocking is entirely based on the file extension. Generally, No Text pages should not be blocked.
Override
Filtering 103 Override Filtering is a system category indicating that filtering for this user/group is disabled and access is allowed to URLs that would otherwise be blocked. All requests are still logged and sent to the Reporting Server.
Redirector Page 47 This category indicates a URL that redirects the user to another page. Do
not block this category unless you are filtering in an ―allow list only‖ mode.
Streaming
Media 155 These are application protocols like Shoutcat, iTunes, RealPlayer, Winamp, etc.
System List 107 System List is a list category that indicates the requested URL was found
in a system allow or system deny list. This is a list of systemwide URLs that have been deemed by the administrator of the Policy Server as appropriate or inappropriate. The system lists are set on the Policy Server and are applied for all filters using that Policy Server. The System List overrides the Global and Local Lists.
Unauthorized
Access 101 Unauthorized Access is a system category used when the Policy Server can not assign the user to a Group Policy and there is no default Group defined. It is also known as Unknown IP since the request cannot be associated with a filtering group.
Unknown
Category 106 Any categories that the Reporter does not recognize are reassigned to 'Unknown Category'. If this category starts to appear in your reports, Netsweeper has changed some of its categories or has made some new categories available. If this occurs, we recommended that you contact Netsweeper to upgrade the categories on your Policy Server.