Cornfed SIP User Agent
User's Guide
Version 1.1.7
Table of Contents
1 Introduction...4 2 Product Overview...5 2.1 Features...5 2.2 Requirements...6 3 Installation...7 4 Config Files...11 5 SIP/RTP Basics...12 5.1 SIP Addressing...12 5.2 Network Address Translation...13 6 GTK Graphical Client Operations...14 7 Command Line Interface (CLI) Client Basic Operation...17 7.1 Registering with a Service Provider...18 7.2 Initiating a Call...20 7.3 Answering an Incoming Call...21 7.4 Ending a Call...22 8 CLI Client Details...23 8.1 Help...25 8.2 Answer...26 8.3 Debug...28 8.4 Dial...29 8.5 Dialog...31 8.6 Do Not Disturb...33 8.7 DNS...34 8.8 Hangup...35 8.9 History...36 8.10 Local...37 8.11 Log Settings...38 8.12 Network Address Translation (NAT)...39 8.13 Outbound Proxies...40 8.14 Playing and Recording .wav Files...41 8.15 Register...43 8.16 Refuse...47 8.17 Remote...48 8.18 Ringtones...50 8.19 RTP...511 Introduction
Welcome and thank you for choosing the Cornfed SIP User Agent! The Cornfed SIP User Agent is a Session Initiation Protocol (SIP) based softphone for your IBMcompatible Personal Computer running the Linux operating system. The Cornfed SIP User Agent allows you to make Internetbased telephone calls using an Advanced Linux Sound Architecture (ALSA) or Open Sound System (OSS) sound card with speakers and microphone as your telephone handset. The Cornfed SIP User Agent is provided as a binary distribution only. The binary executable program is provided free of charge for personal use for users of the Linux operating system. For other terms of use, including any commercial applications, please contact Cornfed Systems.The Cornfed SIP User Agent includes a webbased monitoring facility. The client logs errors and warnings to the Cornfed Systems web server to assist us in debugging. Every effort is made to insure that no personal information of any kind, including but not limited to, domain names, IP addresses, user information, and passwords, is accessed or transmitted. However, Cornfed Systems cannot be held liable for the transmission of any data deemed inappropriate in any way by you either purposefully or accidentally. Your use of this client gives Cornfed Systems consent to transmit debugging information.
2 Product Overview
This section provides a highlevel view of the Cornfed SIP User Agent product. It specifies the available features and the set of software and hardware requirements that a user must meet in order to run the client.2.1 Features
• Supported RFCs: RFC 2617: HTTP Authentication: Basic and Digest Access Authentication RFC 2778: A Model for Presence and Instant Messaging RFC 2833: RTP Payload for DTMF Digits, Telephony Tones and Telephony Signals RFC 3261: The Session Initiation Protocol RFC 3264: An Offer/Answer Model with the Session Description Protocol RFC 3265: SIPSpecific Event Notification RFC 3489bis: Session Traversal Utilities for NAT (STUN) RFC 3550: A Transport Protocol for RealTime Applications RFC 3863: Presence Information Data Format (PIDF) RFC 3856: A Presence Event Package for SIP RFC 4566: Session Description Protocol • Supports Digest authentication for registrations and outbound INVITEs • Support for loose proxy routing using RecordRoute and Route headers • Handles forking of outbound INVITEs by proxies • Support for G.711 muLaw and ALaw voice codecs • Support for G.729a voice codec for commercial use • Supports SIP compact header forms • A flexible and scriptable commandline interface client • A simple GTK based graphical client • Multithreaded implementation2.2 Requirements
• An IBMcompatible (Intel x86based) Personal Computer running the Linux operating system • An ALSA or OSS compatible sound card. The OSS programming interface is used. An ALSA installation must include the OSS emulation library • A highspeed Internet connection. This will most likely take the form of aLocalArea Network (LAN) or Cable or Digital Subscriber Line (DSL) broadband connection
3 Installation
The Cornfed SIP User Agent is distributed in two forms: 1) an RPM binary file and 2) a TAR binary file. For the RPM distribution, a file with name similar to cornfedsipua-1.1.6-1.i386.rpm contains the binary executable files and other files including this document. To extract the files, type following command: $ rpm -Uvh cornfedsipua-1.1.6-1.i386.rpm The resulting installation installs a number of files. There are two binaries calledcornfedsip and cornfedsip_cli. The first binary file is the GTK graphical
client and the second binary file is Command Line Interface client. Another file is the default ringtone .wav file, ring.wav. Another file is called cornfedsipua.pdf which contains this documentation file. There may be other
files installed as well.
For the TAR distribution, a file with a name similar to
cornfedsipua-1.1.6.tar.gz contains the binary executables and installation
scripts along with other files including this document. To extract the files, type the following command:
$ tar xzvf cornfedsipua-1.1.6.tar.gz
The result is a directory called cornfedsipua. You should cd into this directory
and run the install script. Read the README file in this directory for specific
instructions. This completes the installation process. To run the client program, type either of the client executable commands at the Linux shell prompt. A menu item entry is also available for the GTK client under the Applications > Internet menu. Both clients accept a set of command line arguments. The full specification of the command line arguments is given as:
( cornfedsip | cornfedsip_cli ) [ -intf intf ] [ -sport sip_port ] [ -rport rtp_port ] [ -stun host ] [ -soundcard device ] [ -ringdevice device ] [ -ringfile filename ] [ -dns ] [ -nodns ] [ -config file ] [ -noconfig ]
The -intf argument allows you to set the network interface used for SIP and
RTP traffic. The following example illustrates the use of this command line argument:
$ sip -intf eth1
In this example, the eth1 interface is used rather than the default eth0 interface.
Note the interface is specified as eth1, not /dev/eth1.
The -sport argument allows you to specify what UDP port the client will use for
SIP messaging. The following example illustrates the use of this argument:
$ sip -sport 5061
In this example, the 5061 UDP port is used rather than the default 5060 port.
The -rport argument allows you to specify what UDP port the client will use for
RTP media. The following example illustrates the use of this argument:
$ sip -rport 5005
The -stun argument allows you to set the STUN server used for NAT traversal.
The host argument is the domain name or IP address of the desired STUN server.
The -soundcard argument allows you to set the media soundcard device which is
used to carry out the voice part of a phone call. The /dev/dsp device is assumed
if this argument is not present. The following example shows the use of this command line argument:
$ sip -soundcard /dev/dsp2
Note that this argument uses the full path, /dev/dsp2. The device must have an
Open Sound System API available for it, either using the Open Sound System or the OSS emulation associated with the Advanced Linux Sound System (ALSA). The device, /dev/null, is treated differently. If this device is specified, the
soundcard is essentially disabled. /dev/null can be specified whether the system
you are running the client on has a soundcard or not.
The -ringdevice argument allows you to set the ringtone soundcard device
which is used to alert the user of an incoming call request. The /dev/dsp device
is assumed if this argument is not present. The following example shows the use of this command line argument:
$ sip -ringdevice /dev/dsp2
Note that this argument uses the full path, /dev/dsp2. The device must have an
Open Sound System API available for it, either using the Open Sound System or the OSS emulation associated with the Advanced Linux Sound System (ALSA).The device, /dev/null, is treated a bit differently. If this device is
specified, the ringtone is essentially disabled. This ringtone device can be specified whether the system you are running the client on has a soundcard or not. The -ringfile argument allows you to specify a .wav file that will serve as your
ringtone. When a call is received, the client will play the ringtone to alert you of the incoming call request.
The dns and -nodns arguments turns DNS lookups on and off, respectively. If
DNS lookups are turned on, any field where network addressing is used or modified during client operations can use domain names or IP addresses. If DNS lookups are turned off, fields containing network addressing must use IP addresses only. DNS lookups can manipulated only using the command line arguments. There is no CLI command available to turn DNS lookups on or off. The -config and -noconfig arguments are discussed in the section on Config
4 Config Files
The Cornfed SIP User Agent uses a config file to maintain state between client runs. The default location for the config file is the .cornfed/ directory created
and stored in your user home directory. The default config file location can be
overridden using the -config command line option. The following example
illustrates the use of this argument:
$ cornfedsip -config ~/myconfig
In this example, the specified config file would be read instead of the default. When the client exits, this file would also be updated rather than the default. This means that users will need to have permission to update this file. The -noconfig command line option can be used to prevent the client from reading a config file at startup and writing to a config file on exit. The config file is maintained automatically by the client program. It need not and should not be edited by hand, despite the fact that the file is human readable. When the client starts for the first time, the config file is created with default values. If you change any of these values during the course of the client execution, they will be saved to the config file when you exit the client program. When the client program is started, the config file is read before any of the command line arguments are parsed. This means the the command line arguments override the config file settings. The two command line arguments to which this does not apply are the -config and -noconfig arguments.
5 SIP/RTP Basics
The Cornfed SIP User Agent implements a VoiceOverIP (VoIP) endpoint on your personal computer. This client programs turn your PC into a telephone that can use the Internet to speak to other people that are also running VoIP client software. The Cornfed SIP User Agent is based on Internet Engineering Task Force (IETF) open standards. Specifically, the clients use the Session Initiation Protocol (SIP) for signaling (e.g. to setup and teardown voice calls) and the Real Time Transport Protocol (RTP) for media (i.e. to carry your voice across the network).5.1 SIP Addressing
A SIP endpoint is generally labeled by a Uniform Resource Indicator (URI) that looks something like this: sip:[email protected]:5060The sip: element is a prefix indicating that standard SIP signaling is to be used.
The other elements comprise an endpoint label. The 613 element is called the
user, the fwd.pulver.com element is called the host, and the 5060 element is
called the port. In some circumstances, the user portion of the URI corresponds to a telephone number. The host and port portions correspond to familiar DNS names or IP addresses and UDP port numbers.
In general, the host part of the URI can be specified as either an IP address or a Fully Qualified Domain Name (FQDN). Note that if DNS lookups are disabled, you must use an IP address for the host part rather than an FQDN. In the
example, the FQDN fwd.pulver.com is used. An IP address like
192.246.69.223 could also be used. It is not absolutely necessary to specify the
port number. If no port number is specified in a URI, the Cornfed SIP User Agent assumes the use of the wellknown SIP port 5060.
5.2 Network Address Translation
In many cases, the Cornfed SIP User Agent will be used by a computer that is behind a Network Address Translation (NAT) device. For instance, you might be running the client on a corporate network that is firewalled from the Internet and also makes use of NAT. You might also be on a home computer that has some sort of small router that sits between you and your broadband connection. The Cornfed SIP User Agent uses the STUN protocol to assist with traversal of the NAT. The clients will periodically send STUN messages to a STUN server. The responses returned by the STUN server allow the client to manipulate addressing information in the SIP signaling to allow SIP and RTP traffic to flow between your machine and others on the Internet. If STUN does not work, e.g. if your network blocks STUN response packets, the clients will not be able to traverse the NAT properly.6 GTK Graphical Client Operations
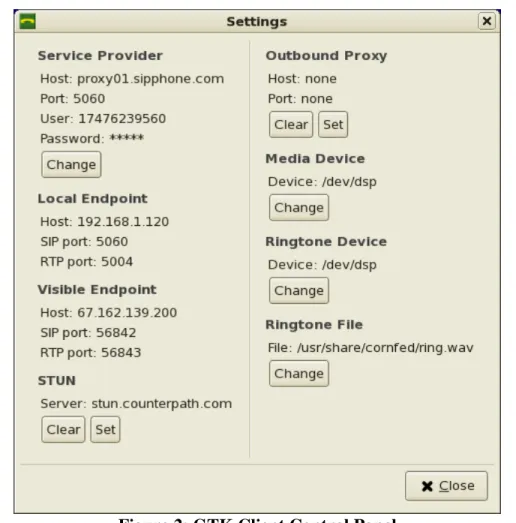
The first of the Cornfed SIP User Agent implementations is a simple GTK based graphical client that is described in this section. In all the screenshots provided in this documentation, the Fedora Core 6 Clearlooks theme is used, however, the GTK client is theme able. If you switch your basic desktop theme, the GTK client will respond to the change. Figure 1 introduces the graphical interface. The main window is dominated by a text display, a dialpad, and four control buttons. At the bottom of the window is the Status Bar that provides feedback about the client operations. Figure 1: The GTK Graphical Client Main WindowThe text display shows the dialed digits. When you type in the text display or use the dialpad buttons, the dialed digits are updated. This text is used as the remote party phone number when you make a call. The digit buttons also provide you the capability to send DTMF when you have a call connected. If you press one of the dialpad buttons during a call, the labeled digit is sent into the call. This capability allows you to navigate voice prompt menus. The four control buttons handle setting up and tearing down calls and configuring the client. The Dial button initiates a call and the Hangup button terminates a connected call. The Clear button clears the text display when no call is connected. When the client is not idle, pressing the Clear button will “reset” the client to the idle state. This means clearing any call in whatever state of progress. The Setting button brings up the client control panel. There are a series of items that can be configured using this control panel. Figure 2 illustrates the elements that can be manipulated. The first element is the Service Provider. If you press the Change button, you can set your Service Provider information. If you change the Service Provider, the client will try to register with the new Service Provider. The Local Endpoint and Visible Endpoint elements provide information about your IP addressing. The Visible Endpoint information will be different than the Local Endpoint if your client is behind a NAT. The STUN Server element allows you to specify the IP addressing of the STUN server. STUN is used to determine the Visible Endpoint addressing information and to keep port bindings alive in a NAT environment.
Figure 2: GTK Client Control Panel The Outbound Proxy element allows you to set of clear an Outbound Proxy. If an Outbound Proxy is specified, all SIP messaging is routed through the Outbound Proxy. The Media Device and Ringtone Device elements allow you to specify which soundcard device is to be used for media and ringtones. These devices can be different. The addressing assumes the OSS device naming. The Ringtone File element is used to change the file containing your ringtone.
7 Command Line Interface (CLI) Client Basic
Operation
The second Cornfed SIP User Agent client is CommandLine Interface (CLI) client. Once the program is started you will see something similar to the following output:
$ cornfedsip
Cornfed SIP User Agent
Copyright (C) 2004-2007 Cornfed Systems LLC Written by Frank W. Miller
sip>
Any time you see the sip> prompt, you can enter any of the available commands.
If you type the local command you will get a list of the local endpoint URI
parameters. An example is given below: sip> local local host : [192.168.1.120] local port : 5060 visible host : [67.162.139.200] visible port : 3313
This command provides you with local and visible network addressing information for your client. The local network address consists of the IP address and UDP port used by your local network adapter on your local machine. The visible network address consists of the IP address and UDP port that are seen by other clients and servers on the Internet if your client is behind a NAT. Other clients and servers will use the visible network address to reach your client if you are behind a NAT device.
By default, the executable program is distributed with debugging turned on. When debugging is enabled, a significant amount of output is dumped to the screen when placing phone calls, primarily dumps of incoming and outgoing SIP messages. Debugging can be turned off by executing the following command:
sip> debug off If you want to turn debugging back on, execute this command: sip> debug on If you want to see whether debugging is turned on or off, type this command: sip> debug Debugging is on
7.1 Registering with a Service Provider
Registering with your service provider (e.g. SIPPhone.com) allows others to call you. You can use the register command to manage your client's SIP
registration. Type the following command to see to whom your registrations are being sent:
sip> register
user : [17476239560] password : []
domain name : [proxy01.sipphone.com] host : [198.65.166.131] port : 5060 interval : 300 buffer : 10 re-register : yes expires : -1 You will need to enter a password before you can send this registration. The user
and password usually correspond to the phone number and password issued to
you by your Service Provider. To enter a password, execute the following command:
sip> register passwd secret sip> register
user : [17476239560] password : [secret]
domain name : [proxy01.sipphone.com] host : [198.65.166.131] port : 5060 interval : 300 buffer : 10 re-register : yes expires : -1
Note that the password field has been updated. You can now register with the
service provider by typing the following command:
sip> register send
If you type the register command again, you'll see some information about your client's registration with the Service Provider:
sip> register
user : [17476239560] password : [secret]
domain name : [proxy01.sipphone.com] host : [198.65.166.131]
port : 5060 interval : 300 buffer : 10 re-register : yes
expires : 4 minutes 57 seconds
Note the expires value has changed. The current registration will expire in 4
minutes and 57 seconds. Also note however that the re-register value is set to
yes. This means that the CLI will automatically reregister with the Service
Provider when buffer seconds are left before the registration expires.
The user and password are also relevant when making outbound calls. Some
the user and password associated with the Register Address of Record to
perform the authentication.
A registration can also be removed. To remove a previous registration issue the following command:
sip> register remove
7.2 Initiating a Call
Once you have registered, you can receive incoming calls. To initiate an outbound Internet phone call to another client, you set the remote endpoint with the identification of the endpoint you want to talk to and then dial. Use the remote command to see the current remote endpoint settings, type the following command: sip> remote user : [14104048790]
domain name : [proxy01.sipphone.com] host : [198.65.166.131]
port : 5060
The user field contains the SIP URI user element, the domain name field
contains the Internet domain name of the host to which you want to make a call, the host field contains the IP address to be used as the SIP URI host element, and
the port field contains the SIP URI port element. All of these fields can be
changed at the command line. To change the user field to 13035551212, type the
following commands:
sip> remote user 13035551212 sip> remote
user : [13035551212]
domain name : [proxy01.sipphone.com] host : [198.65.166.131]
Observe that the user field has been changed to 13035551212. The port field
can be changed similarly:
sip> remote port 5061 sip> remote
user : [13035551212]
domain name : [proxy01.sipphone.com] host : [198.65.166.131]
port : 5061
Observe that the port field has been changed to 5061.
The host element of the SIP URI can be specified using either an FQDN or an IP
address. If an FQDN is specified, the client immediately looks up the associated IP address and places the IP address in the host field. If an IP address is
specified, the client will clear the domain name field.
Once the remote endpoint is set, you simply issue a dial command to initiate a
phone call.
sip> dial
This command initiates a call to the specified remote endpoint. If the other side answers, the call is connected and you can begin a conversation with the other party.
7.3 Answering an Incoming Call
It is also possible for another IP phone user to call your client. If they know the network address at which you have registered, they can make calls to you. You can use the local command to see the local endpoint settings. Similar to the remote command, the following command shows the local endpoint settings: sip> local
local host : [192.168.1.120] local port : 5060
This output shows both a local and a visible network address for your client. If you try to make or receive calls through a Network Address Translation (NAT) box, such as a Residential Gateway, The Cornfed SIP User Agent will use the visible network address information so that other parties on the Internet can reach you. When another party calls your client, you will see a line similar to the following displayed periodically on your terminal:
Incoming call from sip:[email protected]
In addition, you will hear an audible ringback. When you hear the ringback and/or see this line appear, you have two choices, you can answer the call or refuse the call. If you answer the call, a voice connection is made and you can begin your conversation. If you refuse the call, the other party is told that you are not currently available to take the call. To answer the call use the following command: sip> answer To refuse the call, use the following command: sip> refuse
7.4 Ending a Call
To end a call in progress, use the hangup command. At the command line, issue
the following command:
sip> hangup
The call is terminated and the conversation in progress is ended, i.e. the speakers go silent and the microphone becomes inactive. If the other party hangs up, the only indication is the conversation being discontinued.
8 CLI Client Details
This chapter provides detailed descriptions of all the Cornfed SIP User Agent CLI
commands. The CLI is designed to be scriptable. This means that the commands
and the responses the CLI provides have been designed to be controlled by automated means. Specifically, the CLI is designed to make scripting using the
expect scripting language easy.
At the command line, you can type a ? (or any other invalid command) and a list
of all available commands will be displayed:
sip> ?
about : Cornfed SIP User Agent version information answer : Answer an incoming call
debug : Debug settings
dial : Initiate an outbound call dialog : Dialog information
dnd : Do not disturb dns : DNS settings
hangup : Terminate a connected call help : Help information
history : Call history
local : Local SIP endpoint settings log : Log settings
nat : NAT settings
outbound : Outbound proxy settings play : Play .wav file
record : Record .wav file
register : Register with a SIP server refuse : Refuse an incoming call remote : Remote SIP endpoint settings reset : Reset client
ringtone : Ringtone settings rtp : RTP settings soundcard : Soundcard settings subscribe : Subscription information
wav : List of queued .wav files to be played 0123456789ABCD#* : Send DTMF digit during a connected call
Several of these commands were introduced previously. Detailed descriptions of all the commands, including hints for how they can be scripted, are provided in
An important command to be aware of is the reset command. This command
simply clears the client state. This is useful when your client and the other endpoint have gotten out of sync. Any retransmissions or waiting that your client
is doing will be ended. In addition, it may be necessary to use the soundcard
flush command, which causes the sound card input buffer to be cleared. These
two commands can generally be issued as often as needed in order to return the client to an idle state. Note that a reset command will not clear a completed registration that is counting down towards a reregistration.
8.1 Help
The Cornfed SIP User Agent CLI has an online help system. If you type the help
command at the CLI prompt, you will get the list of commands shown at the beginning of this chapter. In addition, you can get a summary of the syntax associated with all the commands by typing the following command:
sip> help syntax
about : about answer : answer
debug : debug [ (on | off) ] dial : dial
dialog : dialog
dnd : dnd [ (on | off) ] dns : dns
hangup : hangup
help : help [ (syntax | command) ] history : history
local : local
log : log [ (info | event | connection | warning | error) ] nat : nat [ (on | off | stun address) ]
outbound : outbound [ (host address | port number) ] play : play filename
record : record [ (start | stop | file filename) ]
register : (register | reg) [ (user name | host address | port number | passwd password | send | remove | interval seconds | buffer seconds | rereg | norereg) ]
refuse : refuse
remote : remote [ ( user name | host address | port number ) ] reset : reset
ringtone : ringtone [ (file filename | device devicename) ] rtp : rtp [ stats ]
soundcard : soundcard [ (device devicename | flush) ] subscribe : (subscription | sub) [ uri ]
wav : wav [ flush ]
0123456789ABCD#* : (0 | 1 | 2 | 3 | 4 | 5 | 6 | 7 | 8 | 9 | A | B | C | D | # | *)+
Finally, you can type the help cmd command where cmd is one of the CLI
commands. Each command has more detailed description information available when you look at them specifically.
8.2 Answer
When another party calls your client, you will see a line similar to the following displayed periodically on your terminal:
Incoming call from sip:[email protected]
In addition, you will hear an audible ringback. When you hear the ringback and/or see this line appear, you can answer the call and a voice connection is made and you can begin your conversation.
The answer command connects an incoming call request. For scripting, the answer command outputs several strings. If the current dialog has taken on a bad
state, the client will print the output:
Bad dialog state
If there is no incoming call request, the client will print the output: No incoming call If the call fails to completely connect after the answer command is typed, the client prints: Connection failed Finally, if the call connects successfully, the client prints: Connected An example expect script that handles this output is given as:
expect Incoming call { send answer\n
expect {
Bad dialog state { ... } No incoming call { ... } Connection failed { ... } Connected { ... }
} }
8.3 Debug
The debug command manages the amount of debugging output that is sent to the
user terminal. By default, the executable program is distributed with debugging turned on. When debugging is enabled, a significant amount of output is dumped to the screen when placing phone calls, primarily dumps of incoming and outgoing SIP messages. Debugging can be turned off by executing the following command:
sip> debug off
If you want to turn debugging back on, execute this command: sip> debug on If you want to see whether debugging is turned on or off, type this command: sip> debug Debugging is on The amount of debugging information that is sent to the screen when debugging is turned on is controlled by the log command.
8.4 Dial
The dial command initiates a call. Before issuing the dial command, you
should make sure the remote endpoint settings are set correctly. When you issue the dial command, the client starts a call setup. If the call setup completes, the
result is a connected call and you can speak to the called party using your microphone and speakers.
While the dial command is quite simple to issue, the resulting output can be complex due to a number of possible outcomes with the call setup attempt. For scripting, the dial command outputs several strings. If the current dialog has
taken on a bad state, the client will print the output:
Bad dialog state
If the client already has a call in progress, the client will print:
Not idle
If the remote endpoint addressing information is not set correctly, the client will print the output:
Remote address not set correctly
If the call setup attempt fails, the client prints:
Call setup failed
If the call setup initiates correctly, the client prints:
Calling sip:[email protected]
In this example, the called party is sip:[email protected]. This SIP URI
information will vary based on the remote endpoint settings.
At some point, if the call setup is successful, a connection message will be printed by the client:
Connected Another possibility is that the call setup attempt times out with no response from the called party. In this case, the client prints: Timed out An example expect script that handles this output is given as: send dial\n expect {
Bad dialog state { ... } Not idle { ... }
Remote address not set correctly { ... } Call setup failed { ... }
Calling { ... expect {
Call setup failed { ... } Timed out { ... } Connected { ... } } ... } }
8.5 Dialog
The dialog command can be used to show the current state of the SIP dialog
between your client and another SIP endpoint. In the following example, output from just after a call that has been initiated by your client and connected is shown. In the example, the state field indicates the call is connected. The branch tag
value and local and remote tag values are stored as well as the CallID. The local and remote CSeq numbers are stored. The local and remote URIs, used in the From and To headers, respectively, are shown. There are various other fields here as well including the route set determined by the RecordRoute headers, a set of Via headers, and authorization information.
The << Dialog 1 >> label just prior to the dialog fields shows that this is the
first session dialog that is currently being maintained. There are a variety of reasons why you may see multiple dialogs listed when you issue the dialog command. An outbound call may have been forked, a registration may be in progress, or there may be subscription and notification dialogs in progress.
sip> dialog << Dialog 1 >> state : SIPS_CONNECTED route_set : [<sip:198.65.166.131;ftag=de5Fu0tG;lr>] via_hdrs :
host [] port -1 branch [z9hG4bKbm04ingm1] transport UDP call_id : [vhLYASGotgxm] local_tag : [de5Fu0tG] remote_tag : [as6dba46a3] local_seq : 2 remote_seq : -1 local_uri : [sip:192.168.1.120] remote_uri : [sip:[email protected]] reg_uri : [sip:17476239560:[email protected]] remote_target : [sip:[email protected]]
authorization : [Authorization: Digest username="17476239560", realm="proxy01.sipphone.com", nonce="4622437f7eaa74c875a435b5b46536832b7c105c", uri="sip:proxy01.sipphone.com", response="853e05e043cee72422f8d510fdab3c12" ] last_resp : []
8.6 Do Not Disturb
You can place the Command Line Client into a Do Not Disturb state by typing the following command: sip> dnd on Do not disturb is on This state causes a 486 Busy Here response to be returned to any incoming INVITE. To turn Do Not Disturb off, type the following command: sip> dnd offDo not distrub is off
If you want to check whether Do Not Disturb is turned on or not, type the command with no argument:
sip> dnd
8.7 DNS
The dns command is used to determine whether DNS lookups are enabled. You
can look at whether dns lookups are being performed by typing the dns command
with no arguments:
sip> dns
8.8 Hangup
To end a call in progress, use the hangup command. At the command line, issue
the following command:
sip> hangup
The call is terminated and the conversation in progress is ended, i.e. the speakers go silent and the microphone becomes inactive. If the other party hangs up, the only indication is the conversation being discontinued.
8.9 History
You can display the call activity for your client with the history command. Just
type history at the command line and you will see output that looks something
like this:
sip> history
Apr 15 09:27:46 Hangup [sip:[email protected]] Apr 15 09:17:43 Connected [sip:[email protected]] Apr 15 09:17:40 Initiated [sip:[email protected]] Apr 13 20:23:01 Hangup [sip:[email protected]]
Apr 13 20:22:12 Connected [sip:[email protected]] Apr 13 20:22:12 Connected [sip:[email protected]] Apr 13 20:22:05 Received [sip:[email protected]]
Apr 13 20:19:39 Connected [sip:[email protected]] Apr 13 20:19:37 Initiated [sip:[email protected]] Apr 13 20:19:07 Initiated [sip:[email protected]]
Apr 13 20:18:12 Initiated [sip:[email protected]]
This list of call events is in reverse chronological order. Your client maintains a history file that tracks all of these events. There are four types of historical events, 1) Initiated, 2) Received, 3) Connected, and 4) Hangup. The Initiated and Received events indicated the initiation of a call, for outbound and inbound calls, respectively. The Connected event indicates that a call has been connected and the Hangup event indicates that a call has been terminated.
8.10 Local
The local endpoint settings are used to identify the network addressing information associated with your client. To see the current local endpoint settings, type the following command: sip> local local host : [192.168.1.120] local port : 5060 visible host : [67.162.139.200] visible port : 3515
This command provides you with local and visible network addressing information for your client. The local network address consists of the IP address and UDP port used by your local network adapter on your local machine. The visible network address consists of the IP address and UDP port that are seen by other clients and servers on the Internet if your client is behind a NAT. Other clients and servers will use the visible network address to reach your client if you are behind a NAT device.
8.11 Log Settings
You can control how much logging information is dumped to the console when the debug setting is on. There are five possible value and they are ordered from most critical to least critical: error (highest, least information) warning connection event info (lowest, most information) In general, the lower your log setting, the more logging output will be dumped to the console. In the following example, the user sets only error and warning log messages:sip> log warning Log level warning
You can see the current logging level by just typing the log command as follows: sip> log
8.12 Network Address Translation (NAT)
The Cornfed SIP User Agent has the ability to operate behind a Network Address Translation (NAT) device. NAT detection is automatic and uses the Simple Traversal of UDP over NAT (STUN) protocol to determine visible network address information.
You can see the specified STUN server address with the nat command. Just type
nat at the command line and you should get output similar to the following:
sip> nat
domain name : [stun.counterpath.com] host : [64.69.76.23]
nat : on
To change the STUN server use the following command:
sip> nat stun host
This command changes the STUN server to the specified host address. The host
can be either an IP address or an FQDN. When you change this address, the client will begin querying the new server for visible network address information. By default, the client program is distributed with NAT translation capability turned on. It may be necessary to disable this feature for your environment. NAT translations can be turned off by executing the following command:
sip> nat off
If you want to turn NAT translations back on, execute this command:
8.13 Outbound Proxies
The Cornfed SIP User Agent can be configured to use an outbound SIP proxy. When configured this way, all SIP messages are sent first to the outbound proxy rather than to their configured request or response addresses. To see the currrent outbound proxy setting, type the following command: sip> outboundoutbound proxy host : [168.143.113.40] outbound proxy port : 5060
You can change both the host and port numbers. To configure the outbound
proxy host to fwd.pulver.com, type the following command:
sip> outbound host fwd.pulver.com
domain name : [fwd.pulver.com] host : [192.246.69.223]
sip> outbound
outbound proxy host : [192.246.69.223] outbound proxy port : 5060
In this example, a domain name is specified. This domain is immediately converted to its dotted decimal IP address that is stored as the outbound proxy host address. To configure the port number, use the following command:
sip> outbound port 5061 sip> outbound
outbound proxy host : [192.246.69.223] outbound proxy port : 5061
Observe the oubound proxy port number has been changed to 5061. For the
outbound proxy address to be used, both host address and port number must be specified.
You can use the outbound host clear and outbound port clear commands
8.14 Playing and Recording .wav Files
The Cornfed SIP User Agent CLI has the ability to play and record .wav files. Playing .wav files will cause a specified .wav file contents to be played out of a connected call. To play a .wav file, execute the following command:
sip> play sound.wav
The .wav file must be of a certain format. Specifically, it must be a valid .wav file that includes the “RIFF”, “WAVE”, “fmt “, and “data” strings in the
appropriate .wav header fields. In addition, the .wav file must be a PCM audio file sampled at 8 Khz using a single channel and 8 bits per sample.
To record a .wav file, a call must be connected. The incoming audio only of the connected call is recorded during the time that recording is enabled. To enable recording, you must first set the name of the file to which the audio is to be recorded using a command like this:
sip> record file test.wav
You can check which file is currently selected for recording by simply typing
record with no parameters, as follows: sip> record
Record file [test.wav] Recording length 0 bytes
After connecting a call, you can initiate a recording using the following command:
sip> record start
After executing this command, the incoming audio stream is recorded to the specified .wav file in addition to being played to your phone speakers. To stop recording, execute the following command:
This command causes recording to be stopped. You can then look at the size of the recording file by executing the record command again with no parameters:
sip> record
Record file [test.wav]
Recording length 35876 bytes
If you begin another recording, the old recording file is deleted. If you want to save the recording you made, either change the recording file name or rename the recording file you just made to another file name. If the recording file does not exist when you start recording, the client will create a new file.
8.15 Register
Registration is the process of notifying a Service Provider (e.g. SIPPhone.com) that your softphone client is available to receive calls. Registrations have an expiration associated with them. Once your client is registered, it watches the expiration timer. The client will automatically reregister with the Service Provider just before the timer expires. This way, your client enjoys uninterrupt incoming call service.
To initiate a registration, you use the register command. Type the following
command to see to whom your registrations are being sent:
sip> register
user : [17476239560] password : []
domain name : [proxy01.sipphone.com] host : [198.65.166.131] port : 5060 interval : 300 buffer : 10 re-register : yes expires : -1
In this case, the Service provider is SIPPhone.com with its host name of
proxy01.sipphone.com. SIPPhone.com has provided you with a user id which
is a phone number, in this case, 17476239560. The user id can be changed with
the register user command, the host can be changed with the register host
command, and the port at which the Service Provider server is can be changed
with the register port command. To see how to specify the user, host, and
port commands, type help register at the command line.
You will need to enter a password before you can send this registration. The user
and password usually correspond to the phone number and password issued to
you by your Service Provider. To enter a password, execute the following command:
sip> register passwd secret sip> register
user : [17476239560] password : [secret]
domain name : [proxy01.sipphone.com] host : [198.65.166.131] port : 5060 interval : 300 buffer : 10 re-register : yes expires : -1
Note that the password field has been updated. You can now register with the
service provider by typing the following command:
sip> register send
If you type the register command again, you'll see some information about your client's registration with the Service Provider:
sip> register
user : [17476239560] password : [secret]
domain name : [proxy01.sipphone.com] host : [198.65.166.131]
port : 5060 interval : 300 buffer : 10 re-register : yes
expires : 4 minutes 57 seconds
Note the expires value has changed. The current registration will expire in 4
minutes and 57 seconds. Also note however that the re-register value is set to
yes. This means that the CLI will automatically reregister with the Service
Provider when buffer seconds are left before the registration expires.
The user and password are also relevant when making outbound calls. Some
the user and password associated with the Register Address of Record to
perform the authentication.
Control of reregistrations is provided by four commands. register rereg turns
reregistrations on and register norereg turns reregistrations off. If re
registrations are turned off, the client will not try to reregister as the registration
expiration expires. The interval and buffer are controlled with the register
interval and register buffer commands. The interval is the suggested
amount of time the client sends to the server for registration expirations. The buffer is the duration that remains in the expiration timer when the client attempts to reregister.
A registration can also be removed. To remove a previous registration issue the following command:
sip> register remove
This command provides basic response strings. When you issue a register send command the client will return a message indicating the registration request has been sent:
Registration request sent
When a positive response is received that contains the actual expiration, the client indicates that with the following output:
Registration expires in 5 minutes
If the registration fails, no output is provided by the client. A script should use a timeout to determine failure. An example expect script that handles the positive output is given as:
send reg send\n expect {
Registration request sent { ... expect { Registration expires { ... } } ... } }
8.16 Refuse
When another party calls your client, you will see a line similar to the following displayed periodically on your terminal:
Incoming call from sip:[email protected]
In addition, you will hear an audible ringback. When you hear the ringback and/or see this line appear, you can refuse the the call by issuing the refuse command.
For scripting, the refuse command outputs several strings. If the current dialog
has taken on a bad state, the client will print the output:
Bad dialog state
If there is no incoming call request, the client will print the output:
No incoming call
If the call is successfully refused, the client prints:
Call refused
An example expect script that handles this output is given as:
expect Incoming call { send refuse\n
expect {
Bad dialog state { ... } No incoming call { ... } Call refused { ... } }
8.17 Remote
To initiate an outbound Internet phone call to another client, you set the remote endpoint with the identification of the endpoint you want to talk to and then dial.
Use the remote command to see the current remote endpoint settings, type the
following command:
sip> remote
user : [14104048790]
domain name : [proxy01.sipphone.com] host : [198.65.166.131]
port : 5060
The user field contains the SIP URI user element, the domain name field
contains the Internet domain name of the host to which you want to make a call, the host field contains the IP address to be used as the SIP URI host element, and
the port field contains the SIP URI port element. All of these fields can be
changed at the command line. To change the user field to 13035551212, type the
following commands:
sip> remote user 13035551212 sip> remote
user : [13035551212]
domain name : [proxy01.sipphone.com] host : [198.65.166.131]
port : 5060
Observe that the user field has been changed to 13035551212. The port field
can be changed similarly:
sip> remote port 5061 sip> remote
user : [13035551212]
domain name : [proxy01.sipphone.com] host : [198.65.166.131]
Observe that the port field has been changed to 5061.
The host element of the SIP URI can be specified using either an FQDN or an IP
address. If an FQDN is specified, the client immediately looks up the associated IP address and places the IP address in the host field. If an IP address is
8.18 Ringtones
A ringtone is played to alert you when an incoming call request is received. A ringtone is implemented by the .wav file that contains the sounds you want to hear when the phone is ringing and the device out which the ringtone is played. You can see the current Ringtone settings by typing: sip> ringtoneRingtone device [/dev/dsp]
Ringtone .wav file [/usr/share/cornfed/wav/ring.wav]
You can change the ringtone device by using the following command:
sip> ringtone device /dev/dsp2
Ringtone device [/dev/dsp2]
Ringtone .wav file [/usr/share/cornfed/wav/ring.wav]
You can change the ringtone file using the following command:
sip> ringtone file ../wav/ring.wav
Ringtone device [/dev/dsp2]
Ringtone .wav file [../wav/ring.wav]
The current implementation supports .wav files with a single channel, 8 Khz sample and byte rates, and 8 bits per sample only.
8.19 RTP
The rtp command shows information regarding the RTP audio transport
associated with a call. The following shows an example output of the rtp
command: sip> rtp local host : [192.168.1.120] local port : 5004 visible host : [67.162.139.200] visible port : 5574 remote host : [130.94.88.94] remote port : 18716 codec : G.711 mu-law In this example, a call is in progress between 192.168.1.120:5004 (our local host IP address and port) and 130.94.88.94:18716 (the remote host IP address and port). The remote host is actually sending its RTP packets to the visible IP address at 67.162.139.200:5574 since this client is behind a NAT. The codec being used for the call is also listed as G.711 muLaw in this example. The Cornfed SIP User Agent uses port 5004 by default for its local RTP port. The remote party specifies the IP address and port of its side of the voice call in the SDP associated with the SIP signaling for the call.
The local RTP port number can be changed as desired. To change the local
port field to 7078, type the following commands: sip> rtp port 7078 sip> rtp local host : [192.168.1.120] local port : 7078 visible host : [67.162.139.200] visible port : 5575 remote host : [] remote port : -1 codec : -1
Observe that the local port field has been changed to 7078. Note also that the visible port has changed to 5575. The NAT device has in this case allocated a
new visible UDP port for the different local port.
You can also observe a variety of statistics that are maintained with respect to the media streams. The statistics are broken into two sections, one keeping stats for the life of the client, i.e. across multiple calls, and one for the current (or last) session. The statistics track connect time, packets and bytes in and out and missing packets on the input stream. In addition, a throughput is calculated for each section by taking a simple division of the bytes over the connect duration for both the input and output streams. The following command dumps the current RTP statistics:
sip> rtp stats
total connect duration : 3 min 43 sec
total throughput in : 20343 bits per sec total packets in : 3297
total bytes in : 567084 total packets missing in : 1
total throughput out : 63873 bits per sec total packets out : 11128
total bytes out : 1780480 session connect duration : 0 min 18 sec
session throughput in : 69640 bits per sec session packets in : 911
session bytes in : 156692 session packets missing in : 0 session accumulated jitter in : 0
session throughput out : 65208 bits per sec session packets out : 917
8.20 Sound Card
In addition to flushing the sound card using the soundcard flush command,
information about the soundcard status can be obtained. Issue a simple
soundcard command to generate this data: sip> soundcard
soundcard device [/dev/dsp2]
soundcard input buffer avail fragments : 2 total fragments : 256 fragment size : 256 avail bytes : 512
soundcard output buffer avail fragments : 9 total fragments : 9 fragment size : 256 avail bytes : 2304 This information describes the parameters associated with the input and output channels of the sound card device. You can set the Sound Device by using the following command:
8.21 .wav File Queue
The client queues any .wav files that you tell it to play out a connected call. To see the contents of the queue, type the wav command:
sip> wav
Apr 16 22:04:55 <1.1.2c> wav_rec 1 len 160010 frame_size 160 pos 102880
Apr 16 22:04:55 <1.1.2c> wav_rec 2 len 41227 frame_size 160 pos 0 Apr 16 22:04:55 <1.1.2c> wav_rec 3 len 160010 frame_size 160 pos 0 Apr 16 22:04:55 <1.1.2c> wav_rec 4 len 41227 frame_size 160 pos 0
The files are listed in the order in which they will be played out. You can clear
8.22 Generating DTMF Tones
The Cornfed SIP User Agent can generate DTMF tones. The feature is useful if you want to need to navigate voicemail system or an autoattendant. When you have a call connected, simply type a series of DTMF digits at the command prompt. Each of the digits in the list you type will be played out in sequence. There is no delay between the playing of the digits. The following example shows the user sending an 8 DTMF digit to the other party. sip> 8 sip>The following example shows how to quickly navigate a menu system by executing a series of digits in sequence.
sip> 113* sip>