
Mango Information Kit. Agrilink, your growing guide to better farming guide
59
0
0
Full text
(2) G ro w i n g t h e c ro p. Growing THE CROP. 1. This section is our recipe for growing and marketing a commercial crop of mangoes. To keep this section as brief as possible and easy to follow, we provide little explanation with the recommendations. Where more information may help, we refer you to other sections of the kit. Symbols on the left of the page will help you make these links.. Getting the crop started. 3. How to get ready for planting, and planting the crop. Managing young trees. 14. Things to do from planting to when the trees start to bear. Managing bearing trees. 22. How to look after bearing trees including fertilising, watering, pruning and pest and disease control. Harvesting and handling. 39. The steps from postharvest to marketing. Marketing. 55. Marketing the crop. Mango.
(3) 2. G r o w i n g t h e c ro p. Some important mango terms. Figure 1. Parts of the mango tree and fruit. Mango.
(4) G ro w i n g t h e c ro p. 3. Getting the crop started A mango orchard can last a long time, so it is important to plan the orchard and prepare the land carefully. Setting up an orchard that will be profitable in the long-term requires careful planning and attention to detail. Mistakes made at this stage are difficult and costly to correct. The following steps tell you what to do to give your orchard the best possible start.. Plan the orchard layout ............................................................ 3 Choose varieties ....................................................................... 6 Tree spacing .............................................................................. 7 Order trees ............................................................................... 8 Clear the land, leaving appropriate windbreaks ......................... 9 Mark out the rows .................................................................... 9 Deep rip along the rows ........................................................... 9 Build drains to control runoff .................................................. 10 Plant windbreak trees ............................................................. 11 Do a soil analysis and apply required pre-plant fertilisers ........ 11 Cultivate strips along the tree rows ........................................ 11 Grow a green manure crop and grass the interrow .................. 11 Mark out the tree plant sites .................................................. 12 Install the irrigation system .................................................... 12 Plant the trees ........................................................................ 12. Plan the orchard layout Planning the orchard layout is a complex procedure and you may need to get some expert assistance. Conservation extension officers with the Queensland Department of Natural Resources provide advice and can help you prepare a farm plan. T HIN e of ntag ing a v nn e ad Tak ard pla ll save h c w or e. It i n the i ic adv money . n u u r yo long. The preparation of a farm plan using a photographic base map can be useful. Farm features such as topography and soil type can be shown on overlays that are easy to change until the best farm layout is obtained. Your aim is to enable easy, all-weather access to the orchard, minimise soil erosion yet provide good surface drainage of water, and achieve a planting arrangement which makes trees easy to manage and gets the best possible production from a given area of land. Mango.
(5) 4. G r o w i n g t h e c ro p. A well-planned orchard layout should include: • safe all-weather access roads • row direction to suit light interception (in most situations north/ south is the preferred orientation), runoff control, drainage and machinery operation • conveniently positioned buildings and sheds • windbreaks • specialised erosion control and drainage structures • irrigation design, including dam sites. Here are some important points for planning and designing your farm layout.. On-farm access Safe all-weather access on the farm is essential. There are two key areas. Heavy vehicle access from the road to the shed. These roads should be capable of carrying trucks transporting fertilisers, chemicals, cartons and fruit to and from the farm in all weather conditions. Orchard access roads. These roads are best located in dry areas such as ridge lines or on contours. They are used for moving machinery and spray equipment between sheds and the orchard and for trailers carrying fruit. These roads should have well-formed crowns and adequate side drains to allow access in all weather. Any roads that are used for transporting fruit should be smooth to minimise bumping and damage to the fruit while transporting it to the packing shed.. Control erosion Even if your orchard is situated in a relatively flat area, it is still important to consider erosion and runoff control. Uncontrolled water runoff erodes valuable topsoil and exposes the surface roots to desiccation. It may also pool within the orchard, causing waterlogging. Diversion banks. These are built to prevent runoff water flowing in from outside the orchard. They are usually built directly above the orchard to divert excess runoff into a stable watercourse or grassed waterway. Diversion banks should be established before the orchard is developed. Contour drains and v-drains. Build contour drains and v-drains to direct runoff safely through the orchard and into stable waterways. Do not plant orchard trees where runoff naturally concentrates in gullies or depressions. Water courses and dams. Gullies, creeks and depressions should be disturbed as little as possible. Leave trees along gullies and creek banks to keep them stable. Seek professional advice on siting and constructing dams. Water extension advice may be available from some offices of the Department of Natural Resources. Mango.
(6) G ro w i n g t h e c ro p. 5. Row direction and length T TAN R O I M P fficient m An e n syste r g fo atio irrig allowin ore and e is m an slop rtant th hrt o imp g a no tion. in direc v a h w th ro sou. Although it is preferable to run rows in a north/south direction, row direction and length should suit the design needs of the orchard plan. Try to have long rows with intersecting roadways every 200 m for efficient use of machinery. On slopes of up to 4%, rows can be run across the slope or up and down the slope without any structures to control soil erosion within the orchard. On slopes of 4 to 15%, rows can be run across the slope or up and down the slope provided surface drains are built within the orchard to control runoff water. If rows are run across the slope, locate the rows and drains as close to the contour as possible and with a fall of 2 to 5% to safely remove water. If rows are run up and down the slope, build contour drains at least every 150 m down the slope. A 15% slope is the safe maximum limit for working a two-wheel-drive tractor across the slope. Try to avoid slopes greater than 15%. If trees are planted on these slopes, run rows up and down the slope for safe use of machinery. Contour drains are required at least every 150 m down the slope.. Mounding Where there is a limited depth of good topsoil, low profile mounds may be built to improve soil depth and if they are constructed correctly, they can be used to drain off excess water. These mounds are suitable for slopes of up to 15%. They are best run on the contour across the slope where the slope is even, or up and down the slope where the slope is uneven or broken.. Irrigation Plan the irrigation system to make sure that you can supply enough water to the trees during critical times for fruit production. Mature trees require 1500 litres of water each week during hot weather in November and December. You should allow for a total water usage of 6 ML per hectare in hot dry areas in north Queensland. Orchards in central and southern Queensland will use less. Check your water quality at the same time. A conductivity of over 2 deciSeimens per metre will be detrimental to tree growth.. Windbreaks ING. RN WA very o d is mang n i W g to agin s so a d m rchard s are o reak b t. wind portan m i. Windbreaks are important for mango orchards as wind damages fruit and reduces its quality. Even minor wind damage predisposes leaves and fruit to infection by bacterial black spot. Use existing stands of timber where possible; otherwise plant windbreaks well before the orchard is established. Seek expert advice on windbreak design and development from land vegetation management officers of the Queensland Department of Natural Resources. An example of how these factors are integrated into an orchard design plan is shown in Figure 2. Mango.
(7) 6. G r o w i n g t h e c ro p. Figure 2. An example of an orchard design plan.. Choose varieties Mango varieties Section 4 page 22. T n HIN mai the rket t c a a m ont To c ets and fer to k e r ma ents r 6 for ag t i o n ils. Sec ct deta ta con. Maturity times Section 4 page 39. Mango. Although some varieties are more sensitive to cold than others, every variety can be grown in each of the mango growing regions. More importantly, despite the large number of mango varieties available, only a few are well established in the domestic market. Australians prefer the flavour of Kensington Pride, but other varieties such as R2E2 and Keitt are well accepted by Australian consumers. R2E2 in particular, is rapidly gaining favour on the domestic market and extensive areas of this variety are being planted. Mango processors prefer Kensington Pride and may not accept other types. This limits the market options you have for some varieties. There are two main factors to consider when making your decision. The market you wish to target with your crop. Each market has preferences for certain varieties or sizes of fruit. You may choose to send most of your crop to Hong Kong for instance. This market likes large, highly coloured fruit such as R2E2. Talk to the agents, resellers and retailers at each of the markets to find out what type of fruit they prefer. If you wish to grow for a niche market you can consider other varieties, for example the Thai lines favoured for green eating. The maturity time. The maturity of mangoes, even within a variety, varies with longitude and latitude. As a general rule, the closer orchards are to the coast and the further north, the earlier the fruit matures. Check the maturity time in your region and see how it will compare with the intake and average prices at the market at that time. This information will let you compare varieties on the basis of the returns you can expect for your harvest time and market. Prices tend to be higher both early and late in the mango season. In a large orchard you can consider planting more than one variety to spread harvesting over a longer period..
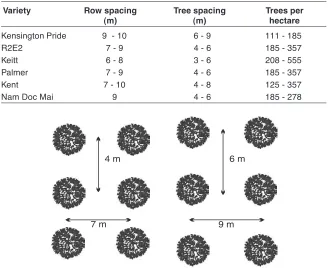
(8) G ro w i n g t h e c ro p. 7. New varieties are now becoming more widely available. They are worth including in your consideration. They include Celebration from the Northern Territory and Kensington Red, Honey Gold, Pearl and B74 (yet to be named) in Queensland. These varieties are under Plant Breeder’s Rights and have restrictions on propagation or marketing arrangements, that must be considered by the intending grower. Mango breeding programs in tropical Australia and subtropical Queensland are currently developing varieties suited to Australian conditions that combine the flavour of Kensington Pride with better shelf life, disease resistance and more reliable cropping. As the rootstocks and scions of most of the mango varieties grown are compatible, the variety of existing trees can be changed by topworking those trees to a new variety if this is required.. Tree spacing. T HIN y fact t arie ble go v availa as n a e M s ar d I an et she the DP on the from I Notes site: DP I web ov.au DP i.qld.g .dp www. Topworking Section 4 page 46. The tree spacing you choose should optimise the potential yield per hectare while allowing for good machinery access for management operations such as spraying and harvesting. In old orchards mango trees were planted at relatively wide spacings such as 12 m x 12 m (70 trees per hectare) or 10 m x 10 m (100 trees per hectare). This allowed the mango tree to grow to its full size. Changes in management and different varieties mean that trees are now kept smaller and can be planted much closer together. Although smaller trees do not yield as much fruit per tree as a larger tree and must be pruned regularly, this is offset by the larger number of trees that can be planted per hectare and the easier and cheaper management and harvesting of smaller trees. Make sure the row spacings are wide enough to allow for machinery access and for sunlight to penetrate the trees from the top to the bottom of the exposed side. Tree spacing will vary according to the variety. In general trees within the row should have their canopies just touching or be separated by a small gap between the trees to allow for air movement around the canopy when they reach their maximum size. Once trees have reached their maximum desired size you will need to prune every year to keep the trees at this size.. Common spacings. Canopy management This section page 27. A typical medium density Kensington Pride mango orchard is planted at 9 m between rows and 6 m between trees, making 185 trees per hectare. Other varieties are less vigorous so you can choose to plant them much closer together. Table 1 gives the range of plant spacings suitable for each of the major mango varieties and Figure 3 shows two possible tree spacing arrangements for R2E2. Choose the wider spacing in wetter areas or if you do not want to prune your trees to the extent needed to maintain the higher densities.. Mango.
(9) 8. G r o w i n g t h e c ro p Table 1. Suitable plant spacings for some mango varieties Variety Kensington Pride R2E2 Keitt Palmer Kent Nam Doc Mai. Row spacing (m) 9 - 10 7-9 6-8 7-9 7 - 10 9. Tree spacing (m) 6-9 4-6 3-6 4-6 4-8 4-6. Trees per hectare 111 - 185 185 - 357 208 - 555 185 - 357 125 - 357 185 - 278. Figure 3. Two possible tree spacing arrangements for R2E2. Hedgerows T HIN I Call P 23 to eD g th 13 25 t n i R on lates tre Cen find the tion on . rma info angoes m. An alternative option for orchard design is hedgerowing. Hedgerowing is relatively new in mango culture in Australia. Trees are planted close together in the row and mechanically pruned to produce a slightly vase-shaped hedge, with fruit hanging free of the foliage. As tree growth is strictly controlled, interrow spacings need only be wide enough to allow a year’s growth as well as vehicle access and penetration of sunlight. In most instances trees are trained to a maximum height and diameter spread of 4 m. Minimum spacings within the row should be 3 m for R2E2 and 4.5 m for Kensington Pride. Before deciding to grow trees as a hedgerow, investigate the latest results and talk to a grower who has been using the system.. Order trees. Nurseries Section 6 page 5. Propagation Section 4 page 9. Mango. Once you have chosen the varieties and worked out the row and tree spacing, calculate the total number of trees you will need. You can grow your own trees or buy the trees from a nursery. Order the trees 12 months before you intend planting to make sure they are ready when you need them. If you plan to grow your own trees you also need to plan well in advance. Nursery production is a specialist job and takes time and effort, particularly if you are going to produce grafted trees. There is detailed information on how to propagate and graft your own trees elsewhere in this kit..
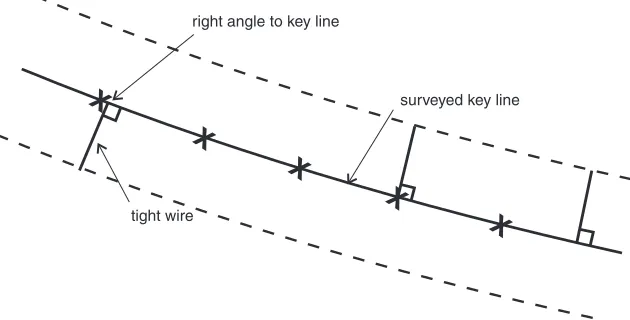
(10) G ro w i n g t h e c ro p. 9. Clear the land, leaving appropriate windbreaks. T HIN es for elin geguid mana le. w e n N tatio ab ll vail a e veg t are a DPI C r a n e e f h m act t 3 o t 25 2 Con re, 13 ls. i t deta Cen. Start any clearing at least 12 months before planting. First identify and mark strategically placed existing stands of timber to act as perimeter windbreaks. Before clearing, get professional advice from land vegetation management officers of the Queensland Department of Natural Resources. Also check your local authority for any tree clearing ordinances that may exist. Then clear and stickrake the land to remove roots larger than 5 cm in diameter. Allow smaller roots time to break down before planting. Stack the timber into windrows for burning; don’t push it into gullies and depressions. Leave gaps in the windrows every 30 m to allow safe removal of runoff water.. Mark out the rows On slopes, rows across the slope are marked parallel to a surveyed key line. Wire is tightly stretched between two people at right angles to the key line and points marked every 20 m along the row (Figure 4). Rows up and down the slope are usually marked at right angles to the contour or parallel to the longest row.. Figure 4. Marking out parallel rows across a slope. Deep rip along the rows On land that has been previously cultivated or grazed, deep rip to a depth of at least 60 cm along the rows. This is important to improve soil aeration and to break up any compaction layers that have developed in the soil. Ripping will also assist with the drainage of wet areas. If ripping downhill, lift the toolbar every 30 to 40 m to avoid subsequent scouring by water down the rip lines.. Mango.
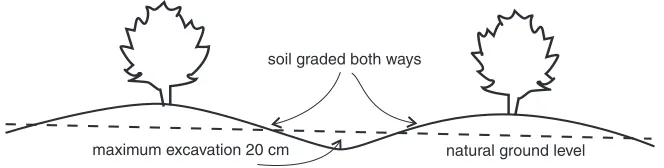
(11) 10. G r o w i n g t h e c ro p. Build drains to control runoff Main diversion drain above orchard On sloping land, construct a major contour diversion drain above the orchard to divert water into a stable waterway or dam. The drain should be at a gradient of 1 to 5% and large enough to handle the water from the catchment above. Keep the steeper sections of the drain furthest from the waterway or dam unless you have very stable clay soils. Establish a creeping grass such as carpet grass, couch or African star grass in the drain channel to prevent scouring.. Contour drains and/or v-drains within the orchard Within the orchard, there are two options to control water flow and provide drainage. The first is to build major contour drains at least every 50 m or so down the slope. These are built to similar specifications to the main diversion drain above the orchard. The other option is to build shallow wide v-drains in the centre of the interrow area. V-drains have a maximum excavation of 20 cm and are usually built by a grader or tractor-mounted blade. For rows across the slope, v-drains are constructed every second or third row (Figure 5). Soil from the drain is moved to the proposed downhill tree line.. Figure 5. Across slope rows (cross-section view). For rows up and down the slope, v-drains are constructed in every interrow area to control side slope runoff and to prevent water scouring down the tree rows (Figure 6). Soil from the drain is moved both ways on to the proposed tree lines.. Figure 6. Down slope rows (cross-section view). Immediately after building v-drains, grass all disturbed areas to minimise erosion. Carpet grass and couch are commonly used but consider a taller growing grass such as Rhodes grass as this can later be a valuable source of mulch for under the trees. Mango.
(12) G ro w i n g t h e c ro p. 11. Plant windbreak trees Where it is necessary to plant windbreak trees to supplement natural timber, plant at least 10 m from the closest orchard rows to allow machinery access and to minimise competition for water and nutrients. Seek advice from land vegetation management officers from the Queensland Department of Natural Resources. When planting windbreak trees, first deep rip rows to a depth of at least 60 cm before planting. If ripping downhill, lift the toolbar every 30 m to prevent scouring by water down the rip lines. Plant the trees 4 m apart. Mulch well with coarse straw. Install a separate irrigation line to keep the trees well watered. Regular applications of small quantities of a mixed tree fertiliser will promote rapid growth. Maintain a weedfree area around the trees.. Do a soil analysis and apply required pre-plant fertilisers Buy a soil sampling kit from your local farm supply store. Follow the sampling instructions and send the sample away for analysis. Results should be back in about two weeks and will be interpreted by the laboratory analysing your sample. Samples should be analysed at least six months before planting. Discuss the results with your local farm supply agent and work out what pre-plant fertilisers are required. Fertilisers such as phosphorus, gypsum, lime, dolomite and some trace elements, are applied before planting. Apply nitrogen and potassium fertilisers to the trees after planting when they show signs of growth.. Cultivate strips along the tree rows Cultivate one-metre wide strips along the tree rows. Cultivation along the tree rows aids tree establishment and reduces initial weed competition, as well as incorporating any fertiliser applied. It is very important that fertilisers of low solubility are well incorporated before planting. Tyned implements or a Turbo-rota are preferred for cultivation. Don’t overuse a rotary hoe as it can lead to soil compaction and soil structural problems as well as causing later settling of the tree row below ground level. This settling may cause subsequent soil erosion from water movement along the row.. Grow a green manure crop and grass the interrow The interrow area is usually planted to a grass to minimise erosion. A low spreading grass such as carpet grass or couch is most commonly used but a taller growing grass such as Rhodes grass can provide a source of mulch for under the trees.. Mango.
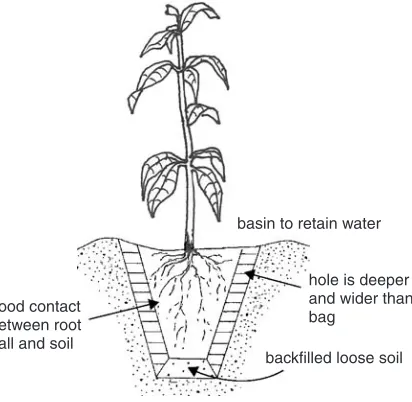
(13) 12. G r o w i n g t h e c ro p. If possible grow a green manure crop in the cultivated strips. Use a hybrid forage sorghum that will give a large bulk of green material. A side dressing of urea or nitram after crop emergence will help to promote good growth. Fertile soils will not need extra nitrogen. Slash before the green manure crop seeds and disc into the soil.. Mark out the tree plant sites Mark out the tree sites with a peg. Don’t spread mulch at this stage. If you are going to mulch the young trees do it after planting. NT RTA signer O de nd IMP a ion igat ystem r r r i n s fo a r Get lan you u allow n o o i p t y to sure riga e en icient ir eet th suff ity to m of the s ac cap re need d. u a fut orch r. Install the irrigation system Install an irrigation system on the basis of a design plan prepared by a qualified irrigation designer. Most mango orchards use minisprinklers rather than trickle systems or large diameter throw sprinklers. Low profile sprinklers are best to avoid wetting the canopy. Minisprinklers with a microspray feature are useful when starting the orchard. The microspray feature is used for the first two years to limit water throw. Use sprinklers with an output of 80 to 250 L per hour. Remember in the design of the irrigation system to allow capacity for the extra sprinklers to water your windbreak trees. Do not bury irrigation lines as tree roots can block pipes through strangulation.. Plant the trees Before you plant the trees make sure they are healthy, disease-free and have been hardened to full sunlight. Condition trees by spacing them wider apart in the nursery and gradually removing shading. If the trees are not hardened they can easily be sunburnt. Cut off any side branches to leave a straight stem. Diseases such as bacterial black spot and mango scab can be introduced into an orchard through diseased nursery stock. Don’t plant trees that are stunted, root bound or very yellow.. When to plant March to May and September are the best times for planting mango trees as the mild weather is ideal for tree establishment. If there is danger of frosts, plant in September after the frost danger is over.. Planting procedure One or two days before planting, water thoroughly to wet tree sites to a depth of 30 cm. Follow these planting steps. 1. Dig a hole slightly deeper and wider than the plant container. If you are using a posthole digger or auger, roughen the sides of the hole with a crowbar before planting. Do not place fertilisers or organic materials into the hole.. Mango.
(14) G ro w i n g t h e c ro p. 13. 2. Remove the tree from the container. Examine the root ball, straighten any large roots and prune off badly twisted ones. Trees with damaged roots can die. Gently tease out some of the roots at the bottom of the root ball and remove a little of the potting mix around the edge of the root ball to expose some of the roots. 3. Place the tree in the hole. Half-fill the hole with soil, pressing it into contact with the root ball using your hands. Fill the hole with water and let it drain before completing filling. 4. Firm the soil down gently with your hands, and leave a slight basin around the tree to hold water (Figure 7). Water again. 5. Mulch the tree with coarse mulch, such as sorghum stubble, 10 to 15 cm deep. 6. Where light frosts are possible, wrap the trunk in sisalation or similar insulating material and put plastic or hessian over the top of the tree during winter nights and early mornings. It is usually not necessary to stake young mango trees (Figure 8). 7. Water the tree regularly until it is well established and the roots are growing into the surrounding soil. Depending on weather conditions, you may need to water at least twice a week for the next four weeks.. Figure 7. A correctly planted tree Figure 8. When tree guards are not used, wrap the trunk in either a polythene tree protector sleeve or one thickness of sisalation to protect it against light frosts and animal and herbicide damage. Mango.
(15) 14. G r o w i n g t h e c ro p. Managing young trees The main focus of management at this time is to build a strong healthy tree that can carry plenty of fruit when it starts to bear. Fruit production should not be permitted until after the second or third year of growth, depending on the development of the tree. Correct fertilising, watering, pruning and pest and weed management all help to produce a healthy and productive tree.. Fertilising ............................................................................... 14 Watering ................................................................................ 15 Training and pruning ............................................................... 17 Control flowering ................................................................... 19 Control weeds and apply mulch ............................................. 19 Control pests and diseases ..................................................... 20 Prevent frost damage .............................................................. 21. Fertilising Nutrition Section 4 page 35. After planting do not apply any extra fertiliser until the trees have shown signs of growth and the first flush has started to harden. The preplant application based on the initial soil test should have corrected any existing nutrient deficiencies. Then apply small but regular quantities of fertiliser to the young trees (Table 2). Excessive quantities can lead to root burn or over-vigorous shoot growth. These branches may break off from the main trunk as they mature. Table 2. Fertiliser program for young mango trees Years from planting 1 2 3 4. Timing Every 6 - 8 weeks Every 6 - 8 weeks December or after crop removal March December or after crop removal March. Amount of fertiliser per tree (N:P:K – 15:4:11) 30 - 60 g 80 - 120 g 500g plus 500 g gypsum 250g 750 g plus 1000 g gypsum 400 g. Apply fertiliser in a broad ring around the young trees as shown in Figure 9. Do not apply closer than 20 cm to the tree trunk.. Mango.
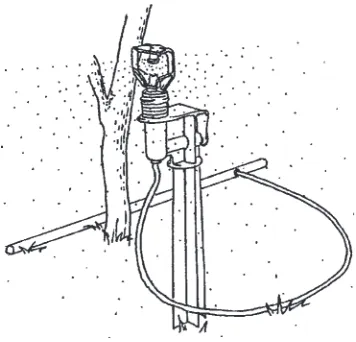
(16) G ro w i n g t h e c ro p. 15. Figure 9. Fertiliser application for young trees. Watering. Irrigation management Section 4 page 25. Although the mango tree is considered to be drought-hardy, a good water supply is still important to ensure good growth and high quality fruit. Too much water can lead to waterlogging and root rot and too little can stress the tree and stunt growth. Young trees need to be watered regularly. Table 3 is a guide to the amount of water a young tree may need each week. The figures are only a guide as soils vary widely and rainfall is ignored. Sandy soils hold less water than heavier loams and clay loams, so you will need to apply less water each time, but water more frequently, to ensure that the trees have an even supply of water. Be sure to water the whole root zone. If you are not sure how deeply you are watering, dig down with a soil auger and check. The soil should be moist for at least 30 cm after planting. Increase watering depth as the roots grow down. Mulching around the trees with coarse straw will help conserve water and reduce the frequency of irrigation. However, remember that even if the trees are mulched it is still important not to allow the roots to dry out as many of the feeder roots will be closer to the surface. Table 3. A guide to the water needs of a young mango tree Years from planting 1 2 3. Amount of water (litres per week) May to August September to April 20 100 200. 50 250 350. Low profile minisprinklers are best suited for mango irrigation because water can be kept off the foliage (Figure 10). During the first two years place one minisprinkler beside each tree and set it in the microspray mode to limit the spread of water. Towards the end of the second year, change it to minisprinkler mode to increase the diameter of the wet area and encourage the roots to spread.. Mango.
(17) 16. G r o w i n g t h e c ro p. Figure 10. Minisprinkler watering system for young trees. Monitoring soil moisture. T AN g RT O orin IMP onit ctually m a e ut not stur Moi s may r use b cue ac at tem sys duce w ill more sonal re ing w e sea . es th er wat ly suit the tre f rate eds o ne. Once the trees are established, water management can be greatly improved by basing watering rates and frequency on a soil moisture monitoring system. There are five main options, each with its advantages and disadvantages. The choice will depend on the degree of accuracy required and the available budget. The choices are: • tensiometers • soil moisture sensors • neutron probes • capacitance probes such as Gopher, Diviner or Enviroscan • evaporation pan readings. Place the sensors for your monitoring system in a position under the dripline of the tree where most of the feeder roots will be. The position should receive an even water application and the soil type should be representative of the block. Tensiometers Position two tensiometers, one 30 cm long and the other 60 to 90 cm long, in each irrigated block to the depths shown in Figure 11. Place on the north-eastern side of a healthy tree, inside the dripline and where they will receive water from sprinklers. Read tensiometers before 8 a.m. Start watering when the shallow tensiometer reads 20 cb (on sandy soils) and 30 to 40 cb (on loam and clay loam soils). Stop watering when the reading on the deep tensiometer falls to 10 cb. Reposition tensiometers every second year in winter to the new dripline position.. Mango.
(18) G ro w i n g t h e c ro p. 17. Figure 11. Tensiometers in place, (a) in the major root zone and (b) below most roots. Moisture monitoring systems Section 4 page 28. Other monitoring systems In most cases the system will be set up by an irrigation consultant who will advise you how to interpret the readings. With the neutron probe, advice on watering will be provided by the consultant who takes the neutron probe readings. The Enviroscan probe comes with a software program that helps you to schedule your irrigation. Scheduling watering using evaporation pan readings is based on the fact that tree water use is related to evaporation. To use this system effectively you will need to understand the water holding capacity of your soil and be prepared to regularly spend time to calculate water use from weather data. This system does not easily account for watering efficiency factors such as the need to account for runoff from intense rainfall.. Training and pruning Young mango trees are pruned to ensure that the tree develops a strong framework with plenty of branches. As the mango tree is a terminal bearer (it flowers from the ends of the branches), the more branches. Mango.
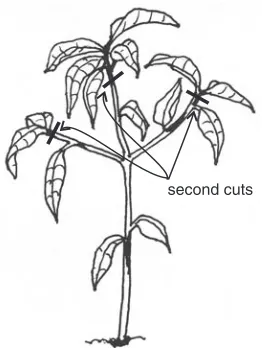
(19) 18. G r o w i n g t h e c ro p. the tree has the better the potential yield. The aim of tree training is to develop a mature tree that is 4 to 4.5 m tall with a spreading inverted umbrella shape, or a square appearance if trees are managed as a hedgerow or mechanically pruned. Start training young trees as soon as they are established, normally six to eight weeks after planting. Trees planted in late autumn or winter should not be pruned until spring growth starts. Then follow these steps: 1. Cut the young tree to a single trunk about 80 to 90 cm above the ground (Figure 12). Keitt trees should be cut to encourage the first branches at 100 to 120 cm. Make a cut just below a node to encourage the development of numerous side shoots. 2. Select three side shoots to become the main branches. These selected side shoots should come from slightly different heights on the trunk to avoid the risk of a weak union developing later. Prune the side shoots after they have produced two to three flushes, again cutting below the node area (Figure 13). Shorten the selected side shoots to a length where they have grown about 1 to 1½ flushes or about 60 to 80 cm, once again cutting below the node area. The side shoots selected, as well as being well-spaced around the tree and emerging at different levels, should also arise at about a 30 to 45° angle to the main stem. This has a two-fold effect of helping to keep the centre of the tree open and delaying the time taken for the lower branches to reach too close to the ground (Figure 13). 3. New shoots will grow from the pruned side shoots. Select two or three of these shoots and repeat the pruning procedure of step 2. Remove all other shoots (Figure 14). 4. Continue pruning in this way until you obtain the desired framework or until flowering. Figure 15 shows the plan view of the framework. In all systems, keep the insides of the tree clean of sucker growth and do not allow shoots to develop below the graft union.. Mango.
(20) G ro w i n g t h e c ro p. 19. Figure 12. First cuts. Figure 13. Second cuts. Figure 14. Continue pruning new shoots. Figure 15. Plan view of tree framework. Control flowering Do not allow fruit production until after the second or third year of growth, depending on the development of the tree. If flowers do emerge, let them fully develop and set small fruit before cutting them off at the base. If they are cut off too early, the tree may re-flower. Removal of flowers promotes further vegetative growth.. Control weeds and apply mulch Weed control around young trees is particularly important because they find it difficult to compete with weeds for water and nutrients. Weeds are controlled by mulching or applying a herbicide under the trees. Coarse hay or straw such as sorghum stubble is good mulch. The interrow area can be a valuable source of mulch, especially when planted to a tall-growing grass that can be slashed several times. Mulch in late winter to about 10 to 15 cm deep and extending just beyond the Mango.
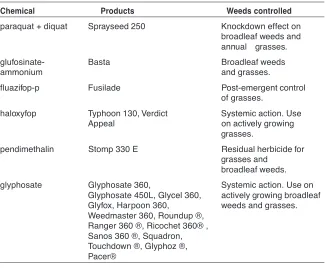
(21) 20. G r o w i n g t h e c ro p. dripline of the canopy. To avoid collar rots do not let mulch contact the trunk. Mulching is mainly used for young trees. A few growers do mulch mature trees but most growers rely solely on herbicides to maintain a weed-free area under the canopy. If you are using herbicides do not allow the herbicide to contact any green part of the tree, including the trunk. Use a shielded, lowpressure fan or flood nozzle or a rope wick applicator. Herbicides are usually applied in a strip along the tree row extending to just outside the dripline. Table 4 lists herbicides that are registered to control weeds in mango orchards. If you are cultivating to control weeds, do not cultivate within 1 m of the tree. Table 4. Herbicides registered for use in mango orchards Chemical. Products. Weeds controlled. paraquat + diquat. Sprayseed 250. Knockdown effect on broadleaf weeds and annual grasses.. glufosinateammonium. Basta. Broadleaf weeds and grasses.. fluazifop-p. Fusilade. Post-emergent control of grasses.. haloxyfop. Typhoon 130, Verdict Appeal. Systemic action. Use on actively growing grasses.. pendimethalin. Stomp 330 E. Residual herbicide for grasses and broadleaf weeds.. glyphosate. Glyphosate 360, Glyphosate 450L, Glycel 360, Glyfox, Harpoon 360, Weedmaster 360, Roundup ®, Ranger 360 ®, Ricochet 360® , Sanos 360 ®, Squadron, Touchdown ®, Glyphoz ®, Pacer®. Systemic action. Use on actively growing broadleaf weeds and grasses.. Control pests and diseases Young mango trees are susceptible to a range of pests and diseases but none require routine treatment. Inspect the trees regularly for signs of pests and diseases and apply control measures only when necessary. T HIN s of ture se c i p e r in of th k fo Loo ptoms eases r s i e m d v y l s and lem so s t pes Prob on 5 the Secti. Mango. Pests The main problems to look for are mango tipborer, mango shoot caterpillar, leafminer, fruitspotting bug and mango scale. Mango tipborer can kill young shoots and should be controlled to encourage maximum growth in young trees. If the young growing tips are affected, diagnose the cause of the problem and then spray with an appropriate chemical from the Problem solver handy guide..
(22) G ro w i n g t h e c ro p. 21. Diseases Look for anthracnose, bacterial black spot and mango scab on young leaves during growth flushes. Wet, humid conditions are the most favourable for disease development. You should spray new growth with a protectant fungicide if these diseases are a problem in your trees. Bacterial black spot and mango scab in particular, will require regular spraying to keep under control. Prune out dead branches to keep the trees clean and minimise disease pressure.. Prevent frost damage Young trees can be killed by frosts. The protective insulation materials recommended at planting will give adequate protection in mild frosts. You can also take extra precautions: • In small orchards, wrap a thick bundle of dry straw around the trunk and fasten with twine. The straw should extend from the ground up past the main branching area into the foliage. Some foliage damage is acceptable as long as the main trunk and scaffold branching area is not damaged. • A copper spray just before winter will limit damage by reducing the number of nucleation bacteria around which the ice crystals form. • The bare herbicide strip along the young tree line, provided it is moist and firm, gives added protection against frost. • The grassed interrow area increases the frost hazard in newly planted orchards if the grass is left to grow long and then dry off during winter. Mow the grass to keep it short. • Dry mulches can also increase the severity of frost damage. Keep the mulch wet but do not over water the root zone in winter. • Turn the irrigation on before the frost settles. Frost-damaged trees lose leaves, branches and roots and will need less fertiliser and irrigation than undamaged trees of the same age. Frost damage may not show up until several months after the damage was inflicted. It will show on the trunk as a corky rotting area. Don’t start removing frost-damaged wood until about October when the full extent of damage should be visible.. Mango.
(23) 22. G r o w i n g t h e c ro p. Managing bearing trees Mango trees come into commercial production in the third or fourth year after planting. Once the trees begin to bear the focus of management changes. Before bearing, the aim is to develop a strong healthy framework with the maximum fruit-bearing surface. When trees are bearing the aim is to produce the maximum production of quality fruit. The market demands only top quality, highly coloured mango fruit. This type of fruit can be achieved by applying sound management practices and following key steps.. Fertilising ............................................................................... 22 A general fertiliser program..................................................... 23 Watering ................................................................................ 25 Pruning and canopy management ........................................... 27 Propping fruiting branches ...................................................... 28 Growth regulators .................................................................. 29 Pest and disease management ................................................ 30 Insect and mite pests ............................................................. 31 Diseases ................................................................................. 35 Fruit disorders ........................................................................ 37 Vertebrate pests ..................................................................... 37 Bagging fruit ........................................................................... 38 Weed control and mulching.................................................... 38. Fertilising Once trees are bearing, the timing of fertiliser applications is as important as the quantity applied. Vegetative growth should not be encouraged at the expense of flower and fruit production. Too much fertiliser at the wrong time can also affect fruit quality. Nutrition Section 4 page 35. Mango. Of the nutrients, timing the nitrogen and potassium applications is the most critical. Most of the nitrogen and potassium needs are applied as soon as harvesting is completed and at the end of the wet season, with a small supplementary amount before flowering. Extra potassium can also be applied during active fruit development. Phosphorus can be applied at any time. Calcium, magnesium and boron are best applied after harvest during the vegetative growth stage and/or immediately before floral bud break. Micro-nutrients such as iron and zinc are best applied as a foliar spray on young developing foliage..
(24) G ro w i n g t h e c ro p. 23. The rate of fertiliser you apply should be guided by leaf and soil analysis results. If leaf nutrient levels fall within the optimum range, the fertiliser program from the previous season can be repeated with a small allowance for tree growth. If leaf nutrient levels fall outside the optimum range, adjust your program for that nutrient, targeting the optimum range.. Leaf and soil analysis. T HIN ial c mer will Com tories iser ra r til labo e a fe ation d i d s. prov mmen result t o s c re ur te yo with. The best time to do soil and leaf analysis is in May or June before the flower buds break. Do an analysis for each of the varieties and blocks in your orchard that are treated differently. Buy the analysis kits from your local farm supply store and follow the instructions to send the sample away for analysis. In most cases the results will be back in two weeks. Take leaves from the most recently matured shoots. It is best to take the third or fourth leaf down from the tip of the shoot. Avoid terminals that have not flushed with the rest of the tree. Take leaves that are healthy and disease-free. You will need between forty and fifty leaves. Take leaves from all four sides of about 15 trees spaced throughout the block. Do not sample leaves that have been sprayed with foliar nutrients as the result will be contaminated with the residue. Most soil samples are taken in the 0 to 15 cm zone. It is a good idea to take a sample from deeper in the profile as well to get a better picture of the nutrients available. Sometimes nutrients can accumulate at lower depths in the profile. A test between 30 and 50 cm will show what is happening lower in the soil. Sample about 10 sites in each block, using a soil auger or a spade to take the samples. Mix the samples in a clean bucket and take a subsample to send to the laboratory. If lime or other fertilisers have been applied recently, scrape the top soil away to avoid sample contamination.. A general fertiliser program The fertiliser needs of mango trees will vary according to soil type, irrigation, rainfall, climate, cropping history and tree size. Because mango trees are large plants that are able to store energy reserves from one season to another, tree growth, health and cropping is influenced by changes to any of these over the past one to three years. No single fertiliser program will suit all trees in all situations, however, as a general guide, the following program is a good starting point and can be refined with the use of leaf and soil analysis and orchard cropping history.. The major nutrients In most soils mango trees require regular applications of nitrogen, phosphorus and potassium. The other nutrients that are needed on a regular basis are calcium, magnesium and boron. Table 5 lists the Mango.
(25) 24. G r o w i n g t h e c ro p. quantities of each fertiliser required for three different tree sizes. The trees are divided into groups based on the size of the tree. There is a range of rates for NPK application. Use the lower figure for trees that have had a light crop and the higher figure for trees that are cropping heavily. Use the lower rates on fertile soils and higher rates on sandy soils or where heavy rain has leached nutrients. Then follow the timing guidelines below. Immediately after harvest Two-thirds of the total NPK requirement is applied as soon as possible after harvest to stimulate the postharvest leaf flush. This fertiliser application should coincide with the recommencement of irrigation to move the fertiliser into the root zone and stimulate tree growth. Two to four weeks after the first fertiliser application The other major nutrients, calcium, magnesium and boron, are applied to the soil during the wet season. Apply the first of three boron applications after the calcium/magnesium application. If soil pH is below 6.5 you may choose to apply the calcium and magnesium as a lime/granomag blend. If trees are zinc or iron deficient, apply nutrients as a foliar spray on the new leaf flush. Before flowering Apply the remaining one-third of the calculated NPK requirement towards the end of the wet season between early March to early May. A second calcium application is recommended at this time. Apply another 3.5 to 4 kg of gypsum per tree in May or June. A foliar application of a 1% boron spray (10g of Solubor® per litre of water) is applied just before flowering. At floral bud break or early fruit set Apply an extra potassium application of potassium sulphate. If nitrogen levels are low use potassium nitrate. Monitor leaf colour during September and apply an extra 100 g to 300 g of potassium nitrate only if the trees are looking yellow. Apply a second boron application of 0.75 g/sq. m of canopy area of Solubor® (Table 5).. Mango.
(26) G ro w i n g t h e c ro p. 25 Table 5. General fertiliser program for mango trees. T HIN ial c mer will Com tories iser ra r til labo e a fe ation d i d v n pro mme test o r c u e r yo with sults. re. Canopy diameter 1–3 m small Keitt. 2–6 m Kent, large Keitt, Palmer, small KP, small R2E2. 4–8 m large KP*, Haden, large R2E2. After harvest NPK mixture (12:2:13). 350 – 650 g. 650 – 2000 g. 2000 – 2700 g. Four weeks later gypsum magnesium sulphate Solubor. 1 – 2 kg 500 g 10 g. 2 – 3 kg 500 g 20 g. 3 – 4 kg 500 g 40 g. Before flowering NPK mixture (12:2:13) gypsum foliar boron. 100 – 350 g 2 – 3kg 1%. 350 – 1000 g 3 – 4 kg 1%. 1000 – 1300 g 4 – 5 kg 1%. At budbreak Foliar potassium nitrate Solubor® potassium sulphate. 1% 10 g 500 g. 1% 20 g 1 kg. 1% 40 g 2 kg. *KP = Kensington Pride. Other nutrients Although deficiency symptoms are rare, several other nutrients are occasionally required. Zinc and iron are the main nutrients to check. Use leaf analysis to see if the application is necessary. Apply these nutrients on the postharvest leaf flush. Zinc sulphate heptahydrate and iron chelate can be applied as foliar sprays.. Watering Although the mango is a drought-hardy tree, water management is essential for good fruit production in most mango growing areas. The most critical period for watering is from floral bud break to just before harvest. A good water supply is also important for the postharvest flush. After the postharvest flushes have matured, withholding water from the trees will help to ensure that they enter a dormant phase. Both cooler weather and low soil moisture during winter encourage dormancy, which is very important for flower induction.. Water requirements Flowering Irrigation should be started at flowering. Water use while the trees are flowering is extremely high due to the increased surface area of the flowers (inflorescences). The best time to restart irrigation is when most of the inflorescences have half emerged. The amount of water required will depend on the tree size. You should aim to keep the top 60 to 80 cm of soil moist. The total amount of water you need will depend on the size of the tree. Trees Mango.
(27) 26. G r o w i n g t h e c ro p. that are 6m in diameter may use 1500 L of water each week. After flowering the water requirements reduce slightly before increasing as the fruit begins to grow. Any water stress during this period can result in heavy fruit drop. Fruit development to harvest Continue irrigation throughout the fruit development period until one to two weeks before harvest. Again depending on tree size and climatic conditions, up to 2000 L per tree per week may be required. Reduce watering slightly one to two weeks before the anticipated harvest date to increase fruit dry matter levels. Reducing watering sooner or cutting it off completely could result in smaller fruit and the risk of fruit splitting if it rains during this period. Irrigation Section 4 page 25. Regular irrigation throughout the fruit development period is essential for good uptake of nutrients, especially calcium. Throughout the fruit growth period the soil under trees should not be allowed to dry out completely between irrigations. Postharvest vegetative growth Mango trees require irrigation immediately after harvest to move applied fertiliser into the root zone and encourage an early vegetative flush to prepare the tree for the next crop. If growth regulators have been used the soil must be kept wet for good uptake. Irrigation to supplement rainfall should continue until one to two vegetative flushes have matured after harvest. Dormancy After one or two vegetative flushes have matured, irrigation should be greatly reduced or stopped to prevent further vegetative flushing and to encourage the tree to enter a dormant phase in preparation for flowering. Table 6 shows some suggested irrigation rates for mature mango trees. These rates can vary, depending on locality, variety, plant density and soil type. Soil moisture monitoring is the best way to make sure that your trees receive the right amount of water. Table 6. Irrigation rates (litres per tree per week) for mature mango trees Time of year January to mid April Late April to mid July Late July to September October to mid February November to March. Mango. Growth stage. Vegetative flush. 4 m canopy diameter. 6 m canopy diameter. 400. 1000. Dormancy. 0. 0. Flowering. 600. 1500. Fruit growth. 800. 2000. Harvest. 400. 1000.
(28) G ro w i n g t h e c ro p. 27. Pruning and canopy management The aim of canopy management is to develop and maintain a productive fruit-bearing surface. Mangoes flower from the tips of branches (apical flowering). If these tips are pruned off in winter, mangoes can also produce flowers from leaf buds (axillary flowering) just below the tips. This means that the more terminal branches a tree has, the greater the possible yield. However, a tree that has very dense foliage is harder to spray, so growers must balance fruit bearing potential with ease of management. Better light penetration also assists fruit colour development. Early pruning after harvest can also help to synchronise shoot growth to achieve more uniform flowering. Trees that have had a heavy crop can be slow to flush after harvest and the flush is often uneven. Slow postharvest flushing can delay the carbohydrate energy build up which supports the next season’s crop. Uneven flushing results in a canopy with a spread of shoot ages that leads to a spread of flowering in the following season. An ideal tree has an open canopy, is small enough to pick easily and has many fruiting terminals. This can be achieved by pruning and the use of chemical growth regulators. In summary, mango trees are pruned to: • control tree size • maintain an open tree to improve spray and light penetration • maximise fruiting terminals • improve fruit colour • synchronise and encourage flushing • remove dead and diseased wood • make it easy to use machinery under and around the tree. Trees can be pruned by hand or mechanically.. Hand pruning Hand pruning techniques will vary, depending on the variety grown and the tree’s condition. Pruning is best done each year immediately after harvest. This involves the following steps: 1. Cut back branch terminals to behind a growth node. Remove all but two or three well-spaced shoots from branch tips. Keep the trees to a diameter that allows machinery to travel between the rows and allows trees to just touch within the rows. 2. Cut upward growing branches at a height of 4 to 4.5 m. 3. Remove any low growing branches that are likely to interfere with under-tree access or watering. 4. Open up the interior of the tree by removing some of the branches where growth is crowded. Remove shoots that are not exposed to sunlight. Thin out the canopy in dense trees to allow spray penetration and to improve light penetration and air circulation. Mango.
(29) 28. G r o w i n g t h e c ro p. 5. To maintain tree size and encourage a well branched canopy, branches should be cut back behind a node. This is particularly important for varieties that have strong apical dominance such as Keitt and Brooks. The branches on these varieties must be cut back regularly to improve tree shape. 6. Remove dead or diseased branches and dead inflorescences. 7. Paint the top side of all exposed branches with white water-based or plastic paint to prevent sunburn. A light secondary pruning can be done in late April or May, at the beginning of the winter dormancy period, to remove internal sucker growth.. Mechanical pruning Pruning costs can be greatly reduced if you use mechanical saws. These saws are mounted on a tractor and can be set to cut at any angle or height. Usually only the tip growth is removed. Trees that are mechanically pruned have a square or rectangular shape, with the four sides and the top trimmed flat (Figure 16). Some hand pruning is still necessary after machine pruning, particularly on the inside of the tree.. Figure 16. Mechanical pruner/tractor. Propping fruiting branches Despite your best pruning efforts, some trees will require extra support for branches that are heavily laden with fruit. Fruit that touch the ground are unsaleable as they develop blemishes and rots from rubbing on the soil. Varieties such as Keitt and Brooks which have a lanky growth habit and long inflorescences, often require support, particularly when the trees are young (Figure 17).. Mango.
(30) G ro w i n g t h e c ro p. 29. Figure 17. Young Keitt tree with supports. The most common system for support is a single stake about 1 m long with a hole in the top to which you can tie the branch. Support each branch with an individual stake. The supports will need to go on to the branches when they start to hang down from the weight of the fruit. This will be as the fruit starts to size up four to five weeks before harvest.. Growth regulators Chemical growth regulators are used for canopy management in mangoes. The most commonly used growth regulator is paclobutrazol, sold as Cultar®. It is mainly applied to the trees to induce flowering, but it has a positive side effect in reducing the size and number of vegetative growth flushes. This helps to build up carbohydrate reserves before flowering, which results in stronger more consistent flowering, leading to a higher yield. The other benefits are earlier flowering and less crowding of the canopy as trees take longer to fill the space available. Treated trees can flower up to three weeks earlier than untreated trees. This early flowering is undesirable in the cooler subtropics where temperatures around flowering can be too cool for successful pollination. The growth regulator acts against the naturally occurring plant hormone, gibberellin, and reduces the length of shoots. It is the restriction of growth that lets the tree direct more energy into carbohydrate storage. Mangoes at tropical latitudes that have a short dormant period in winter benefit most from Cultar®. Trees in cooler, subtropical areas tend to have stronger and more regular flowering, with earlier flowering seen as a disadvantage with respect to fruit set.. When should you apply Cultar® Once tree canopies are more than 3 m in diameter you can start using Cultar® as part of your management program. Cultar® should be Mango.
(31) 30. G r o w i n g t h e c ro p. applied within four weeks after harvest, before vegetative flushing starts. T AN RT O tar® I M P se Cul re a u hat not Do trees t from on fering suf tress. s. Rate The rate of Cultar® to apply is determined by tree size and soil type. Experience on soils other than sand shows that the best rate per tree is 1 mL of Cultar® per square metre of canopy area. Sandy soils require a slightly lower rate. The canopy area is calculated by multiplying the tree height in metres by the canopy width, also in metres. For example, a tree 4 m high and 4 m wide has a canopy area of 16 sq. m. The rate of Cultar® would be 16 mL per tree for a loamy soil. In a sandy soil use 12 mL per tree or 0.75 mL per square meter of canopy area.. How to apply Cultar® Dilute the Cultar® in enough water to ensure an even distribution around the trunk. This will give an even distribution of the chemical throughout the tree. It is best to use a minimum of 1 L of water and apply the solution around the trunk at a height of 20 cm above the soil (Figure 18). Endeavour to keep the solution as close to the trunk as possible. Cultar® is absorbed mainly through the bark of the large roots. The soil must be wet for several weeks around the treated trees to maximise the rate of uptake. It is also advisable to remove all weeds before its application to avoid uptake by weeds.. Special considerations Trees need to be actively growing to absorb Cultar®. Do not use Cultar® on trees suffering from disease or any other stress, such as drought, salt, waterlogging or frost. Figure 18. Method of applying Cultar® to a tree. If the rate of Cultar® is too high, inflorescences are likely to become tight and compact. If this occurs they can harbour flower eating caterpillars and predispose the flowers to diseases such as anthracnose and powdery mildew, so additional sprays may be necessary. Cultar® can be used every year. Adjust the rate depending on the flowering response from the previous year.. Pest and disease management The essential components of an effective pest and disease control program are: • regular calibration and set-up of sprayers to ensure that each tree. Mango.
(32) G ro w i n g t h e c ro p. T s ook HIN se b ons e h t ti get lica can PI Pub 46 u 1 o Y ox :D 400 from GPO B QLD 1 NE 6 54 SBA 800 81 9 6509 I R B h: 1 3 P 07) 32 l: ( .au : ai x Fa E-m qld.gov dpi. ks@ boo. ChemSmart Section 6 page 7. 31. receives the correct volume of spray and that the whole tree receives good even coverage • pruning to allow penetration of sprays into the canopy • routine orchard monitoring based on a good understanding of the pests, their life cycle, crop stage and the weather • knowledge of pesticides, their appropriate rate and safe use. The pests of mangoes are described in detail in the DPI publication Mango pests and disorders. Advice on sprayer calibration is available from chemical resellers or DPI offices. Growers will need to obtain chemical accreditation to buy and use some chemicals. The ChemSmart accreditation course will also cover spray calibration and the principles of chemical use. It is a legal requirement that you only use chemicals that are registered for use on mangoes and that you observe the withholding periods specified on the label. Spray equipment must be well maintained and calibrated regularly. The Pesticide application manual available from DPI, gives information on sprayer calibration and how to adjust your sprayer to give good coverage of trees.. Insect and mite pests. Problem solver handy guide. Proper identification and early intervention are essential for successful insect pest management. Pests can be managed by a mixture of appropriate cultural methods, natural predators and the strategic use of pesticides. The overuse of pesticide can result in the pest developing resistance, further adding to costs. Some pesticides affect beneficial insects too, so their overuse can result in the build up of other pest problems. Regular monitoring, careful pesticide selection and good timing are the keys to good pest management with minimal adverse side effects.. Major pests Mango scale Mango scale is a widespread and a serious pest in mangoes. Females are round, while males have a rectangular white covering. They feed on plant sap and infested areas on leaves turn yellow and die. Heavy infestation on stems can result in stem death. Infestation on fruit causes a distinctive pink spot, which will downgrade fruit quality. Heaviest infestation generally occurs inside the tree on the shadiest areas. The female lays eggs under the round scale covering and when they hatch the young scales (crawlers) move to a new feeding site. The critical times to control mango scale are when the young crawlers are most active. This is usually from September to late November and after harvest. The postharvest treatment should be applied after pruning to improve coverage.. Mango.
(33) 32. G r o w i n g t h e c ro p. T HIN s of ture se c i p e r in of th k fo Loo ptoms eases r s sym and di solve m s t e pes Probl on 5 the Secti. Fruit fly Fruit flies are major quarantine pests that are more active during the hot and humid wet season. Because some late varieties mature during this period, they are most at risk from fruit fly attack and may require stringent control measures. Adult female flies sting the fruit to lay their eggs. Bacteria introduced with the eggs start to rot the fruit and the larvae feed in the decomposing flesh. If you are following the interstate certification arrangement ICA-19, which includes field spraying for fruit fly control, you will need to apply a minimum of three cover sprays in the six weeks before harvest. Mango planthopper (flatids) Planthoppers only cause minor direct damage from their feeding on shoots, leaves and fruit. The more severe problem is from the growth of sooty mould that develops on the exudate produced by these sucking insects. Egg pods and nymphs are covered in a white powdery excretion. Both nymphs and adults jump when disturbed. Fruitspotting bugs Usually not a severe pest of mango, fruitspotting bugs can cause significant damage, especially where other susceptible crops are grown near mangoes. Bug feeding on very small fruit can result in fruit drop and feeding on the tender new shoots will result in severe cracking of the shoots and distortion and wilting similar to tip borer. Helopeltis A bug that causes damage similar to fruitspotting bug is Helopeltis or tea mosquito bug. The stings from this bug are smaller and more numerous than from fruitspotting bugs and the damage occurs on very young fruit soon after fruit set. Mango seed weevil Mango seed weevil can be an important pest because it is a quarantine pest for some export markets. The insect causes only minor blemish on the fruit skin but the larvae feeding within the seed destroy the cotyledons, making it unviable. Mango shoot caterpillar The larvae of mango shoot caterpillar feed on the new flush leaves and can severely set back the growth of young trees. The post pruning flush in January and February is most at risk. Mango tipborer Mango tipborer larvae tunnel through the newly developed shoots, causing wilting and shoot death. Loss of terminals can reduce yield and restrict development in young trees.. Mango.
(34) G ro w i n g t h e c ro p. 33. Flower eating caterpillars Flower eating caterpillars can be a problem when flowers are heavily compacted after use of growth regulators.. Minor pests Pink wax scale Conspicuous pink wax scale insects can cause severe sooty mould development on leaves, giving trees a blackened appearance. Redbanded thrips Severe infestations of redbanded thrips can cause silvering on the underside of leaves. Fruit can also be damaged. Mango leafminer Leafminer larvae feeding below the leaf epidermis of newly developed leaves give the upper leaf areas a blistered appearance. Damage is usually confined to young trees. It is becoming a major pest in Mackay, Bowen and some parts of the Burdekin. It causes severe damage to young foliage and new shoot growth. All ages of trees are affected. Fruitpiercing moths Adult fruitpiercing moths feed at night and pierce the skin of ripe fruit with their strong proboscis. Juices are sucked out and the internal injury resembles a honeycomb. Tea red spider mite Usually controlled by predatory mites and other predators, the presence of tea red spider mites generally indicates an overuse of pesticides. Damage is confined to the leaf tissue adjacent to leaf veins. Mango bud mite Rarely a problem in commercial plantations, mango bud mite causes stunted development and terminal malformation in neglected trees.. Monitoring for insect and mite pests A program of routine calendar sprays is not recommended because: • It is a waste of money if the pests are absent. • Even when pests are present, it disregards the fact that plants can tolerate small numbers of pests without significantly affecting yield and quality. In these cases, the cost of spraying is much greater than the benefit gained by controlling the pest. • It can kill many of the beneficial predatory insects that naturally keep pest populations under control. • It increases the risk of chemical burn to the fruit. • It increases the amount of chemical residue in both the fruit and the environment. • It provides a greater risk of pests developing resistance. Mango.
(35) 34. G r o w i n g t h e c ro p. A better approach to insect control involves checking the crop regularly to determine when pests are present. Only when they are present and at damaging levels, are chemicals or other control measures applied. The systematic process of checking the crop for the presence of pests, their damage, and the presence of beneficial species to determine the need for control, is called monitoring. The system is based on predetermined pest action levels or economic thresholds. These levels indicate the pest populations at which damage is roughly equivalent to the cost of control. With crop monitoring, pest levels are measured and compared with the action levels. Control measures are applied only when pest populations approach or reach these action levels. Monitoring then continues to manage pest populations at or below this action level. The beneficial insects and mites that naturally attack the pests are also monitored. In some cases, they are sufficient to keep the pest populations in check without additional chemical controls. Most of the threshold or action levels for the major insect pests of mangoes have not yet been established. Table 7 gives a guide to possible threshold levels. Table 7. Pest monitoring schedule and a guide to action levels for mangoes Pest. How to monitor. Possible action levels. Mango scale. Check five leaves or fruit from 20 fruit trees in each 5 ha block. Leaves must be less than 12 months old.. If more than 25 leaves have more than one mature female or three immature female scales.. Fruit fly. Use Dak pots or fruit fly traps. Monitor the number of fruit flies caught each week when the weekly fruit are three-quarters grown onwards.. When numbers increase significantly, apply either a fortnightly cover spray or bait sprays using chemicals from the Problem solver handy guide.. Flower eating caterpillars. Inspect two inflorescences from 20 trees in each 5 ha block.. Only apply sprays if whole inflorescences are being destroyed. Apply any insecticides in late evening.. Mango planthopper (flatids). Nymphs or egg pods Check five leaves from 20 trees.. Spray if more than 20 stalks (one in five) have one or more planthoppers. Spray if more than 20 stalks (one in five) have one or more planthoppers.. Adult planthoppers For every 5 ha of orchard, check five fruit stalks from 20 trees.. Mango. Mango tipborer. Monitor young vegetative shoots. Mature trees can cope with a reasonable level of shoot death without affecting yield.. Spray if any damage is observed on young trees.. Mango seed weevil (for quarantine markets). Monitor the skin of fruit from early fruit development (pea size) until three-quarters grown for the presence of larvae.. If more than five larvae/eggs are found, apply two sprays 14 days apart.. Fruitspotting bug. Monitor the skin of fruit from early development (pea size) until three-quarters grown.. Spray if any damage is observed..
(36) G ro w i n g t h e c ro p. 35. Growers can develop their threshold levels themselves or in consultation with a pest consultant. The key is to keep detailed records of pest infestation levels and estimate the level of yield loss that is occurring. You can estimate some yield loss from reject analysis in the packing shed. It is much more difficult to estimate yield loss from damage to shoots or flowers before harvest. This is because trees are able to compensate for this early damage with lower fruit drop or even by putting on a secondary flowering or flushing. For monitoring, you need a x10 hand lens and a pin or needle to turn over scales to check if they are alive.. Diseases. Disease control Problem solver handy guide. The approach to disease control is different to that for insect and mite pests. As disease organisms are microscopic, they cannot be seen and their arrival and build-up in the crop cannot be as easily monitored. In most cases, disease control requires routine preventative spraying to protect the crop from possible infection. The major diseases controlled through spraying are anthracnose, stem-end rot, mango scab and bacterial black spot (which damage fruit and shoots), and powdery mildew (which affects flowers). A broad program for disease control is in the Problem solver handy guide.. Anthracnose Anthracnose is a fungus that affects most parts of the mango tree. It grows on leaves, young shoots, flowers and fruit. The fungus spreads from spores that are produced on dead twigs, branches and leaves. These spores are spread by water splash onto new growth. Infection on the flowers and young fruit can cause severe flower and fruit drop, but on larger fruit the infection can lie dormant until the fruit starts to ripen, when the fungus develops into large black areas. Infection can be controlled by protectant sprays. During flowering, spray fortnightly with a protectant fungicide. If wet conditions occur during flowering (more than two to three wet days), use a systemic fungicide in place of the protectant to provide better control. Between fruit set and harvest apply the protectant spray every 14 to 28 days. Use the shorter interval if the weather is very humid or if it rains.. Stem-end rot Stem-end rot is caused by several fungi. The main one is Dothiorella dominicana. The fungus is a natural inhabitant of the mature branches of the mango tree. The fungus colonises new growth as it matures and it grows into the stem end of the fruit before harvest. The fungus develops in the fruit and the typical brown decay starts at the stem end as the fruit ripens. Water stress is believed to favour the development of this disease. Infection can also occur from spores landing on the fruit from dead twigs and bark. This infection results in small spotty lesions all over the skin of the fruit. This type of infection is more of a problem Mango.
Figure
+7


Related documents
Table 2 Willingness to be involved in different teaching formats on campus or at own practice (within the group of those physicians who are basically interest ed in being involved
The natural interval extension of the likelihood function over labeled boxes in the tree space allows us to employ the Moore rejection sampler to rigorously draw inde- pendent
The results show that BCR provides means to identify metabolites contributing to class separation in a manner that a statistical method by false discovery rate or statistical
37/20 were predicted by PicTar/TargetScanS for the independent set; (2) DIANA-MicroT is shown to provide the lowest sensitivity and low number of predictions; (3) TargetScanS
brasiliensis for immune response in humans, we used the TEPI- TOPE algorithm to select several different sequences that were predicted to bind to multiple HLA-DR molecules
Despite mounting evidence that brain size is linked to behavioral plasticity (Öst and Jaatinen 2015 ; Jaatinen and Öst 2016 ), we found no significant association
Following Marchetti ( 1998 ), we used the first egg date as a quantitative measure of female mate preference (i.e., females preferred the characteristics of males who supported
Methods: Integrative analyses including functional annotations, enrichment analysis, and protein-protein interaction analyses were performed on all reported CCT GWAS lead SNPs,
