BFISD 5045D
Basic Four®
System 200/410
The information contained herein is proprietary to and considered a trade secret of Management Assistance Inc.
All rights reserved. No part of this publication may be reproduced,
recorded or stored in a retrieval system, or transmitted, in any form or by any means, whether electronic, mechanical, photographical, or.
otherwise, without prior written permission of the Basic Four Information Systems Division of Management Assistance Inc.
All Rights Reserved
SF/SO 50450
Copyright © 1980 by Management Assistance Inc. Revised 2/81·
All specifications are subject to change without notice.
Introduction Purpose
Beginner or Experienced?
Computer Hardware and Computer Programs Helping You Learn
Contents Objectives
Getting Ready
Beginning Your Training
Section 1: System 200/410 Components Hardware
Basic Components Video Display Terminal Central Processing Unit
Magnetic Tape Cartridge Drive Unit Printer
Software
What Makes It Work? The BOSS Two Memories
Section 2: Basic Operating Procedures How The System Works
Turn-On Sequence
Video Display Terminal Central Processirlg Unit Disc Drive
Magnetic Tape Cartridge and Drive Unit Printer
Summary: Turn-On Sequence Summary: Turn-Off Sequence Cautions
VDT CPU Tape Unit Printer
Section 3: Data Processing--Video Display Terminal VDT Keyboard
Frequently Used Keys Infrequently Used Keys Common Typing Errors
CONTENTS
Section 4: General Purpose Programs--Utilities System 200/410 Utilities
Print Di rectory Listing-- * A
Display Disc Directory on VDT--*L Display File Information on VDT--*F Section 5: Backup Procedures
Importance of Backup Terms You Should Know Two Operating Systems
Beginning Backup Procedure
Communicating With the Computer During Backup Backup Files
Backing Up Information from Disc to Tape Cartridge Error Condition
General Error Conditions Helpful Hints
Section 6: Procedural Errors Turning On Equipment Other Errors
Section 7: General Maintenance and Re-Supply Cleaning Video Display Terminal
Cleaning Central Processing Unit
Cleaning Magnetic Tape Cartridge Drive Unit Magnetic Head
Motor Capstan
Optional Tape Cleaner Cleaning Printer
Handling Printer Paper Loading the Paper
Adjusting Paper to Start at Top of New Page Reloading Paper During Operation
Adjusting for Forms Thickness and Other Special Situations Replacing Printer Ribbon
Figure 1. Figure 2. Figure 3. Figure 4. Figure 5. Figure 6. Figure 7. Figure 8. Figure 9. Figure 10. Figure 11. Figure 12. Figure 13. Figure 14. Figure 15. Figure 16. Figure 17. Figure 18. Figure 19. Figure 20. Figure 21. Figure 22. Figure 23. Figure 24. Figure 25. Figure 26. Figure 27. Figure 28. Figure 29. Figure 30. Figure 31. Figure 32. Figure 33. Figure 34. Figure 35. Figure 36. Figure 37. Figure 38. Figure 39. Figure 40. Figure 41. Figure 42.
FIGURES AND TABLES
System 200/410
Video display terminal Central processing unit
Magnetic tape cartridge drive unit Printer
System 200/410 components: working relationship VDT front controls
Central processing unit CPU control panel
CPU operational message
Magnetic tape cartridge drive unit Tape cartridge safety lock
Tape cartridge drive power switch Inserting tape cartridge
Inserting tape cartridge Printer
Printer controls
Printer head (unit cover open) VDT keyboard
Common typing errors Choosing utility program * A
Entering disc i.d. to print disc directory
Choosing sequence of directory listing: unsorted Directory listing: unsorted
Display disc directory, utility *L
Choosing sequence of listing: by location Directory listing displayed continuously Display file information, utility *F
Identifying file needed File information displayed Backup and restore
Two operating systems
Backup files: son - father concept Two sets of backup files
VDT back controls
Removing tape drive unit cover Cleaning head surfaces
Cleaning head guides Cleaning motor capstan
FIGURES AND TABLES
Figure 43. Figure 44. Figure 45. Figure 46. Figure 47. Figure 48. Figure 49. Figure 50. Figure 51. Figure 52. Figure 53. Figure 54. Figure 55. Figure 56. Figure 57. Figure 58.
Table 1. Table 2. Table 3. Table 4.
Tractor holding paper in place Threading paper between rods Threading paper under platen
Placing paper holes on opened tractor Tractor covers closed
Adjusting for paper width Paper aligned incorrectly
Threading paper back over top rack Adjusting paper with platen knob
Adjusting for forms of different thickness Printed report stacker
Lifting new ribbon over lefthand tension arm Threading ribbon around roller 2 and slot 3 Threading ribbon around printer head
Lifting new ribbon over righthand tension arm Printer test pattern
Backup procedures Disc error
PURPOSE
Beginner or Experienced?
Computer Hardware and Computer Programs
Helping You Learn
CONTENTS
INTRODUCTION
The purpose of this training guide is to provide you, the computer operator, with the specialized information and tools you need to become a successful System 200/410 operator. The guide presents a practical self-paced course of instruction designed with two goals in mind
--• KEEPING YOUR INTEREST • GETIING RESULTS
Don't worry if you haven't had any experience using a computer. You should be able to operate the System 200/410 after reading the in-structions. If you've had some computer experience, then move through the material at your own pace to learn specifically about the System 200/410.
To use the System 200/410, you must be able to operate both the com-puter hardware and comcom-puter programs.
• Computer hardware consists of the equipment components that make up the computer. This guide tells you how to operate the System 200/410 hardware.
• Computer programs consist of the sets of instructions within the computer that tell it what you want it to do. (These programs are also called software.) A separate guide will be available to explain computer programs.
When your System 200/410 arrives, one of our Basic Four Customer Service Representatives should work with you to explain the system. Before the Customer Service Representative comes, you may want to read through this guide.
INTRODUCTION
System 410 Users
OBJECTIVES
Getting Ready
Beginning Your Training
Operating procedures and instructions for the System 200 and System 410 are almost identical. But some differences do exist. For example, the System 200 user calls the Customer Service Representative for help when needed, whereas the System 410 user calls a Sorbus Ser-vice Representative or a programmer. And the System 410 offers more choices in some procedures, which are noted in the text. Other-wise, this manual is planned to serve users of both systems equally well.
After reading the guide, you should be able to:
• Identify the equipment components that make up the System 200/410
• Turn each piece of equipment on and off • Operate each piece of equipment
• Determine what computer programs and data files are stored in your computer
• Back up your data in case of an emergency • Respond to common errors that might occur
To go through this guide, you will need: • System 200/410
• Box of paper for the printer • Comfortable location
• Desk or work table • This Operator's Guide • Pen or pencil
The preliminary instructions should take approximately 1 hour to study. As you proceed, you'll be referred to the computer to perform certain steps.
HARDWARE
Basic Components
SECTION 1: SYSTEM 200/410 COMPONENTS
Four of the five basic hardware components (the physical equipment) of the System 200/410 are pictured below (Figure 1).
1. Video display terminal (VDT) 2. Central processing unit (CPU)
3. Disc (not pictured here--Iocated inside the central processing unit) 4. Magnetic tape cartridge drive unit
5. Printer
MAGNETIC TAPE CARTRIDGE DRIVE UNIT
CENTRAL PROCESSING UNIT
\r1llllillll!J
VIDEO DISPLAY TERMINAL/
PRINTER\
"
SYSTEM 200/410 COMPONENTS
Video Display Terminal
Central Processing Unit
[image:10.816.231.669.572.823.2]The VDT or video display terminal is your method of communicating with the System 200/410. You'll use the keyboard to enter information which appears on the TV-like screen. The VDT also displays informa-tion coming from the computer (Figure 2).
Figure
2.
Video display terminalThe Basic Four System 200/410 central processing unit is a compact general purpose computer. It handles all computing for the entire system and is responsible for directing the information between each of the other components (Figure 3).
Magnetic Tape Cartridge Drive Unit
Printer
SYSTEM 200/410 COMPONENTS
The disc is a rotating metal platter having two magnetized surfaces for storing data. Discs are usually stored in sets of 4 in a disc pack. The disc pack drive, not pictured here, operates inside the central processing unit housing.
The magnetic tape cartridge drive unit holds the tape cartridge that stores a copy of the operating instructions and copies of the program and data on the disc (Figure 4).
Figure
4.
Magnetic tape cartridge drive unitThe printer produces Single page and multipart invoices, statements, checks, and reports. It can also give you a written record of your data processing activities (Figure 5).
,
SYSTEM
200/410 COMPONENTSSOFTWARE
What Makes It Work? The BOSS
Executive
Interpreter
Configura tor
TWO MEMORIES
Operating system memory
User memory
BOSS is the Basic Operating System Software. The operating system of any computer consists of programs that monitor and control all the computer's activities. The Basic Four System 200/410 operating system is known formally as "BOSS Level 3." Three important elements within BOSS exist for special purposes, but function in con-junction with one another.
The EXECUTIVE is the traffic director of the operating system. It schedules all input/output operations, including printer access and video display terminal communication, and keeps track of the data stored on disc, magnetic tape cartridges, and other storage media. The I NTERPRETER, another component of BOSS, converts the written
English you enter through the video display terminal keyboard into machine-level language to allow you to communicate with the central processing unit.
The CONFIGURATOR is the portion of BOSS that lets the Executive know what hardware and software components are attached to and controlled by the central processing unit. These components include the video display terminals, magnetic tape cartridge drive, the printer, and memory.
The central processing unit has two major memory divisions.
The operating system, BOSS, resides in an area in the CPU called "protected" memory.
HOW THE SYSTEM WORKS
CPU directs traffic
VD T gives you access
Disc operates automatically
You start the printer
You prepare the magnetic tape unit
SECTION 2: BASIC OPERATING PROCEDURES
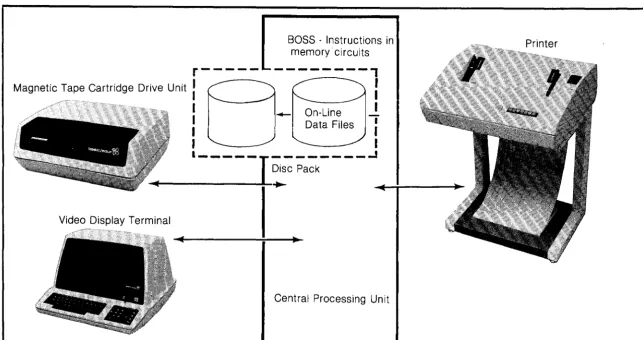
The System 200/410 hardware components are connected to the cen-tral processing unit rather than directly to each other (see Figure 6). This relationship means that all information goes through the CPU. When the system is turned on and the CPU is ready to operate (in a RUN status), all instructions necessary to run the computer programs and all information to be processed are entered into the system through the VDT. You enter instructions and information by using the VDT keyboard.
When a program is being run, the CPU automatically transfers infor-mation to and from the disc and the printer without any special re-quests from you via the VDT. You do not need to operate the disc drive independently, because the disc is automatically brought to a ready state when you tu rn on the CPU.
You'll need to place the printer "on-line" to the CPU--connect it logically--to be able to print. The printer receives your instructions via the CPU.
You'll need to insert the magnetic tape cartridge properly into the tape drive unit so that information can be transferred to and from the disc via the CPU.
r
-BOSS - Instructions in memory· circuits
---,
Magnetic Tape Cartridge Drive Unit : I
I I
Video Display Terminal
I I I
On-Line Data Files
I I
1 - - -
I
~-;; ;a~
- - - -
.J .... -T-_ _----l~
[image:13.822.72.715.492.832.2]Central Processing Unit
BASIC OPERATING PROCEDURES
TURN·ON SEQUENCE
Video Display Terminal
Power
Cursor
Screen brightness
Always turn on the System 200/410 in the following order: Step 1. Video display terminal (VDT)
Step 2. Central processing unit (CPU) Step 3. Magnetic tape drive unit Step 4. Printer
Turn on the video display terminal ON-OFF switch. Within about 20 seconds you'll hear a "beep" and see a small white box--the cursor--appear in the upper left corner of the screen (Figure 7).
The cursor serves to indicate where the next character will appear on the screen.
The brightness of the screen is controlled by a knob to the left of the on-off switch on the VDT. If you don't see the cursor and the entire display is blank, try adjusting the BRIGHTNESS control (Fig.7): turn the knob clockwise to make the screen brighter, counterclockwise to make the screen darker. If you turn the knob too far clockwise, a series of lines will appear on the screen; this is normal, simply adjust the knob back the other direction.
No visible cursor
Central Processing Unit
CPU control panel
BASIC OPERATING PROCEDURES
If the cursor still doesn't appear, turn off the VDT and call your Customer Service Representative (410 users call Sorbus Represen-tative).
On the central processing unit (CPU), the front control panel contains a number of switches and status lights. You won't actually see the switches, which are behind the panel (Figures 8 and 9).
Figure 8. Central processing unit
BASIC OPERATING PROCEDURES
Reserve indicator
No visible reserve light
Loading the CPU
Power
Disc ready
Load, run
Red halt light
Message on VD T screen
Make sure the yellow light is on above the RESERVE indicator. If the yellow RESERVE light is not on, make sure the computer is plug-ged into an electrical outlet that is providing power. If there's still no response, call your Customer Service Representative (or Sorbus). To turn on, or load, the central processing unit's operating system, follow the steps below:
1. Lightly touch the switch marked POWER, just beneath the word "power." A faint green light will appear.
2. A green light will also show over DISC READY.
3. Then touch the LOAD switch for 1 second. This causes the entire BOSS operating system to be loaded from disc to memory. A green light will appear above RUN, and you'll hear a beep.
If a red light appears over HALT instead of a green light over RUN, repeat Step 1. If there's still no green light response, call your Customer Service Representative (or Sorbus).
CPU ready to use
Summary: CPU controls
BASIC OPERATING PROCEDURES
5. System 410 users: DO YOU WANT SPOOLING (CR/N)? Press RETURN for yes, "N" for no; ask your software programmer whether you should select spooling or not. The VDT will then display', "START WITH 30 PAGES. READY."
Your central processing unit is now ready to use. It will wait for your in-structions.
CAUTION
If the load procedure from disc is not successful after several at· tempts, call your Customer Service Representative or Sorbus Representative. The operating system may need to be reinstall·
ed, or a hardware problem may exist.
CAUTION
Do not move the CPU cabinet. Only qualified service personnel should relocate the CPU cabinet because mishandling could seriously damage the unit.
POWER--Turns power to the CPU on and off
DISC READY--This green display light indicates that the disc inside the CPU is ready.
LOAD--Tells the computer to load all the information needed to pro-cess (or run) your accounting activities
TEST--Used to load the alternate operating system for backup (see Section 5)
BASIC OPERATING PROCEDURES
Backup battery
RUN--Green light indicates the computer is ready to run. HAL T--Red light indicates the CPU has stopped.
RESERVE--Yellow light indicates that the backup battery supply is available if it should be needed.
The yellow RESERVE indicator will normally always be lit, indicating the battery is in a charged state. Interruption of AC power to the system activates battery backup circuits, which then supply power to the main memory for three to four hours. (Turning the CPU on or off with the POWER switch does not activate the backup battery.)
CAUTION
When AC power to the system is interrupted, the battery will sup· ply power to maintain CPU main memory circuits for three to four hours. You'll need to make sure that regular AC power is restored within that three·four hour period, because after the battery is discharged, the RESERVE indicator will go off and contents of
the CPU memory will be lost. This total loss of power, however, will not cause loss of disc storage memory or data backed up on
Disc Drive
Disc drive functions
Disc drive operation
Data storage disc
Magnetic Tape Cartridge and
Drive Unit
Function
Operation
Safety lock
BASIC OPERATING PROCEDURES
One disc drive comes with each System 200/410 and is enclosed in the same cabinet with the CPU. Associated with the disc drive is a microprocessor-based controller that performs selected error check-ing and correctcheck-ing routines and controls data transfers between the CPU and the disc.
The disc drive operates unattended and is activated when the system is started up. Electrical power to the disc drive is controlled by the main POWER switch on the front of the CPU.
WARNING
Avoid touching the disc drive mechanism. Ordinarily this mechanism is never accessible to the operator. If by chance the CPU cabinet should be opened,
do
not touch the disc drive mechanism becausean
electrical hazard exists. Simply close the cabinet before operating the system.The System 200/410 uses a disc pack containing four platters (discs). The two center discs are used for data storage; the top and bottom discs serve as protective surfaces.
CAUTION
Do not touch the discs. The data storage disc pack must not be removed except by
an
authorized service representative.The tape cartridge provides an economical means of storing medium volumes of data. The tape cartridge is used to store a copy of the operating system and copies of the programs and data contained on the System 200/410 disc. This capability gives you a backup should any portion of the disc or disc drive malfunction and require reloading. Basic Four Corporation thus recommends that you copy (or back up) your files daily onto a magnetic tape cartridge (Figure 11).
The tape cartridge drive unit has been designed to permit easy opera-tion. After you turn on the unit, its operation is controlled by the CPU. The unit can conveniently be placed on top of the CPU.
READ-BASIC OPERATING PROCEDURES
ONLY status. Use a thin coin or screwdriver to turn the lock on or off. When the lock is off (arrow pointing away from SAFE), you can enter new data on the tape.
Figure 11. Magnetic tape cartridge drive unit
Turning on the tape cartridge drive
Tape cartridge drive not work-ing
Inserting cartridge
Rewinding
Removing cartridge
BASIC OPERATING PROCEDURES
Turn on the tape cartridge drive unit by turning up the POWER switch at the rear of the unit (Fig. 13). You'll see a light come on in the car-tridge loading area and hear the unit's fan motor start.
Figure 13. Tape cartridge drive power switch
If the unit's fan or light doesn't come on, make sure the unit is plugged in. If there's still no response, call your Customer (or Sorbus) Service Representative.
Place the tape cartridge at the front opening of the drive unit, clear plastic side up and the edge with the small hinged plastic door pointing toward the rear of the drive unit. Slide the cartridge into the drive unit until a firm stopping point is felt. Press firmly into position (Figures 14 and 15).
As a tape system operation ends, the CPU automatically issues a re-wind command without operator participation. A photo sensing unit detects a stop signal at the beginning of the tape so that rewinding stops before the tape is pulled completely from the take-up hub. Then the tape drive advances the tape briefly. Similar signals occur on the tape at the "Load Point," "Early Warning," and "End-of-Tape" posi-tions.
BASIC OPERATING PROCEDURES
Backup procedures
Oust-proof container
Extra dust protection
Figure 14. Inserting tape cartridge
Figure 15. Inserting tape cartridge
Your Customer (or Sorbus) Service Representative will explain how to carry out the procedures needed to back up information from disc to tape. For your reference these instructions are also included as Sec-tion 5 in this guide.
When the tape cartridge is not in use, protect it against dust by storing in the plastic dust-proof container and special cardboard container that come with the cartridge.
PRINTER
Turning power on
Head test
BASIC OPERATING PROCEDURES
Control switches are on top of the printer at the right front side (Figu res 16 and 17).
Figure 16. Printer
Figure 17. Printer controls
Press the POWER switch on. The POWER indicator light will come on, and you'll hear a beep and the sound of the printer motor.
BASIC OPERATING PROCEDURES
Printer head not moving
Top of form and ready 'switches
Paper loading
On-line switch
Other printer controls
Forms
Test
Error
Figure 18. Printer head (unit cover open)
Turn to Section 6, Procedural Errors.
The TOP OF FORM and READY lights will come on. Briefly pressing the TOP OF FORM switch causes the paper to advance to the top of form (page). (This switch doesn't function when the ON-LINE light is on.)
If the printer doesn't have paper in it, load paper at this point. See Sec-tion 7 for instrucSec-tions on loading paper and changing the printer rib-bon.
Press the ON-LINE switch, and the lights will come on. The printer, now able to receive instructions from the CPU, is ready for you to use.
The FORMS indicator light comes on when the paper supply runs out. See Section 7 on loading paper.
SUMMARY: TURN·ON SEQUENCE
Video display terminal
Central processing unit
Magnetic tape cartridge drive unit
Printer
SUMMARY: TURN·OFF SEQUENCE
Video display terminal
Central processing unit
Magnetic tape cartridge drive unit
Printer
BASIC OPERATING PROCEDURES
• Turn on the VDT.
• Press ON-OFF switch to ON. • The VDT speaker will beep.
• A small WHITE box (the cursor) will appear on the screen. • Turn on the CPU.
• Make sure YELLOW RESERVE light is on. • Touch POWER switch.
• GREEN lights come on over POWER, RUN, and DISC READY. • Touch LOAD switch.
• The VDT speaker will beep.
• A message will print quickly on the VDT screen.
• Another beep sounds; then a second printed message appears. (410 users answer the spooling question contained within the first message.) The START and READY messages appear.)
• Turn on the MAGNETIC TAPE DRIVE UNIT. • Flip ON-OFF switch UP to ON position.
• A light comes on in the cartridge loading area. • The unit fan comes on.
• Turn on the PRI NTER. • Press POWER.
• POWER light comes on. • PRINTER speaker beeps.
• PRINTER HEAD moves left-right-Ieft, first slowly, then quickly. • TOP OF FORM and READY lights come on.
• Press ON-LINE.
• ON-LINE light comes on.
• Press the ON-OFF switch to OFF.
• The VDT speaker beeps, the image disappears from the screen. • Press the POWER switch.
• All lights go off except the yellow reserve light. • The fan in the unit goes off.
• Remove the tape cartridge if it is still in the unit. Failure to do so can result in erasure of information on the tape.
• Flip the POWER switch to the DOWN position for OFF. • The light and the fan go out.
BASIC OPERATING PROCEDURES
CAUTIONS
VDT
CPU
TAPE UNIT
PRINTER
DO: Turn the power on before you try to use the terminal. Make sure the plug is plugged into the wall outlet.
Clean the VDT screen with glass cleaner and a soft cloth. DON'T: Drink any beverages over the keyboard.
Eat over the keyboard.
Leave the terminal turned on overnight unless you h~lVe some specific reason.
Hit the VDT screen.
Remove the cover from the VDT. Lean on the terminal keys.
Use rough materials to clean the screen - it's easily scratched.
DO: Make sure the CPU is plugged in.
Make sure the Yellow RESERVE light is on. DON'T: Leave any beverages on the CPU.
Hit the CPU. The disc inside is sensitive to movement. Move the CPU while it is running.
Remove or open CPU panels or cabinets.
DO: Make sure the tape unit is plugged into the wall outlet. Keep tape cartridges in a clean area.
Keep tape cartridges in a safe area--dry, moderate temperatures. DON'T: Blow smoke at the tape cartridge.
Drop the tape cartridge.
Spill any liquids on a cartridge. Store cartridges near heat.
Play with the small hinged door in the back of the cartridge. DO: Make sure the printer is plugged in, using a 3-wire grounded outlet.
Make sure you have enough paper before you start printing. Make sure the front of the paper (with blue bars showing) faces you when loading.
Make sure all covers are closed and secured during operation. DON'T: Spill any beverages in the ON-OFF Switches.
Change ribbon with the power ON.
Let ties, necklaces, long hair, or loose clothing, etc., dangle near the printing mechanism.
Operate without paper.
Let the printer run unattended.
VDT KEYBOARD
Typewriter-like keyboard
Control keys
FREQUENTLY USED KEYS
3
1. CR/ENTER 2. BACKSPACE 3. SPACE BAR
4. I - FI RST CONTROL KEY 5. II - SECOND CONTROL KEY
SECTION 3: DATA PROCESSING-VIDEO DISPLAY TERMINAL
In this section you'll read in detail about how to use the video display terminal to communicate with the computer. The System 200/410 display terminal keyboard has two distinct sections: the TYPEWRITER keyboard and the NUMERIC keyboard. These are shown in Figure 19. Continue to refer to this illustration as you learn the VOT keys.
The keys on the VDT keyboard operate as do the keys on your office typewriter--with a few exceptions. Usually all the letter keys produce capital letters, and all the number keys produce regular numbers on the VOT and on the printer. You can use the number keys on the typewriter keyboard interchangeably with the number keys on the numeric keyboard.
In addition to the letter and number keys, the VOT keyboard has cer-tain keys that control the information that is input and displayed on the screen. Some of these control keys are used frequently, some infre-quently.
You'll read in detail about the following nine keys in the next few pages. As you read about each key, note its purpose and its location in the illustration. DO NOT PRESS the key until instructed to do so.
1. CR/ENTER 4. I - FIRST CONTROL 7. IV - FOURTH CONTROL 2. BACKSPACE 5. II - SECOND CONTROL 8. DECIMAL POINT
3. SPACE BAR 6. III - THIRD CONTROL 9. SHIFT KEY
7 8
4 5
2
o
8
6. III - THIRD CONTROL KEY 11. BACKSLASH 7. IV - FOURTH CONTROL KEY 12. ESCAPE
8. DECIMAL POINT 13. CLR
9. SHIFT KEY 14. PRINT
10. CTRL 15. MODE
DATA PROCESSING - VIDEO DISPLAY TERMINAL
1. CRIENTER key
Use of CRIENTER key
CRIENTER key and cursor
2. Backspace key
3. Space bar
Control keys on numeric keyboard
4. I -first control key
5. 1/ -second control key
6. 11/ - third control key 7. IV - fourth control key
This is the CARRIAGE RETURN/ENTER key. When you enter informa-tion into the computer, you can type anything you wish. What you type appears on the screen, where you review it. If needed, you can then correct errors or make changes, because the computer program won't act on your input UNTIL YOU TELL IT TO DO SO.
Use the CR/ENTER key to tell the computer that you are ready for it to act on the data just typed (entered). If you enter something and nothing happens, you may have forgotten to press the CR/ENTER key. REMEMBER TO PRESS THE CR/ENTER KEY after entering informa-tion on the keyboard.
Use the CR/ENTER key to move the cursor down to the beginning of the next line (field) before beginning to enter information or continuing to enter information.
Use the BACKSPACE key to move the cursor to the left on a line or to correct a typing error. Each time the cursor is moved to the left, ANY LETTER REPLACED BY THE CURSOR IS DELETED and must be retyped to be re-entered into the computer.
Use the SPACE BAR to move the cursor to the right, one space at a time. As on a standard typewriter, it is used to position letters properly on a line.
8. Decima/ point key
9. Shift key
INFREQUENTLY USED KEYS
10. CTRL key
11. Backs/ash
12. ESCAPE key
13. CLR key
DATA PROCESSING-VIDEO DISPLAY TERMINAL
The decimal point is found on both the typewriter and numeric keyboards. On both it functions as a "period" to end a sentence and as a decimal point in decimal arithmetic, as in dollars and cents ($4.15).
The SH I FT key is used in conjunction with the letter and number keys to print special characters that appear ABOVE certain letters and numbers. For instance, both the dollar sign $ and the number 4 appear on one key. To type "$" hold down the SHIFT key and depress the 4/$ key.
You normally will not use the group of keys described below. But you should be aware of what they do and where they are located on the keyboard. Sometimes your Customer (or Sorbus) Service Represen-tative might ask you to use one for diagnostic purposes. Refer to
Figure 19 for key locations.
10. CTRL 13. CLR
11. BACKS LASH 14. PRINT
12. ESCAPE 15. MODE
The CTRL or CONTROL key, when held down while you press any other typing key, causes an unprintable character to be created. Nothing will be printed on the screen. Do not use this key unless in-structed to do so by your Customer (or Sorbus) Service Represen-tative.
Do not use the BACKSLASH key on the System 200/410.
Do not use the ESCAPE key on the System 200/410 except under the direction of a qualified programmer.
DATA PROCESSING - VIDEO DISPLAY TERMINAL
14. PRINT key
15. MODE key
Mode option
COMMON TYPING ERRORS
Do not use the PRINT key on the System 200/410.
The position of the MODE key determines whether letters print in the upper or lower case. With the key up, upper case letters are displayed. If the upper case-lower case option has been implemented, normal lower case letters display when the key is pressed down (otherwise, reverse print letters display).
If you have chosen this option to be available on your system, you'll select lower case letters by pressing the MODE key down.
Figure 20 shows some examples of numbers and letters that look alike on the VDT screen. They are NOT interchangeable, and errors can oc-cur if you mistakenly type one instead of another. Note that the printed zero has a slash through it although the keyboard zero does not.
The number 0 (zero) and the letter
a
The number 1 and the letter IThe number 2 and the letter z
[image:30.822.248.664.445.784.2]SYSTEM
200
UTILITIESThree utilities
PRINT DISC DIRECTORY· *A
What happens?
Your response
What happens?
SECTION 4: GENERAL PURPOSE PROGRAMS··UTILITIES
A UTILITY program is a general purpose computer program used to determine the contents or status of certain parts of the system. You need to know about utilities so you can run them for your Customer (or Sorbus) Service Representative to assist in solving some problems. The three programs described in this section help you get general directory or file information from the computer. They provide three dif-ferent types of listing:
• Print disc directory on the printer--program * A • Display disc directory on the VDT--program *L • Display file information on the VDT--program *F
The disc directory includes every program and file on the disc. To ob-tain a printed copy of this directory, you must choose utility program
*A (Figure 21):
1. Type on the VDT keyboard: RUN "*A". Type as shown, including the quote marks. The asterisk appearing on the screen will look more like this-- * --than a typewriter asterisk.}
2. Press the CR/ENTER key.
3. Type 0 (zero) to enter the disc number. 4. Press the CR/ENTER key again.
The VDT screen displays the following message, asking for your response (note the slash mark to the right) (Figure 22): Enter Disc 10
(CR
=
NONE).Type your name or some other short message. Make sure your message doesn't extend beyond the righthand slash mark. Press CR/ENTER key.
GENERAL PURPOSE PROGRAMS - UTILITIES
Figure 21. Choosing utility program *A
Figure 22. Entering disc i.d. to print disc directory
The system asks you which of the three listing sequences you want: • Location--Type L to have the listing sorted in numerical order of
program location on the disc.
• Name--Type N to have the listing sorted in alphabetical order by program name.
What happens?
DISPLAY DISC DIRECTORY ON VDT··*L
GENERAL PURPOSE PROGRAMS: UTILITIES
Figure 23. Choosing sequence of directory listing: unsorted
The computer sorts all programs and files acording to your input (L, N, or U). The sorting process can take as much as 5 minutes before ac-tual printing begins. Then the printer begins printing the directory in the sequence you selected (Figure 24). When the listing is complete, the printer stops automatically.
DIRECTORY LISTING FOR OISC 0 S40129 11/10/78 8 * AVAILABLE SECTORS
FILE FILE FIRST LAST TOTAL NO. OF BYTES 1 KEY AVAIL PROGRAM PROGRAM NAME TYPE SECTOR SECTOR SECTORS RECORDS RECORD SIZE RECORDS SIZE IDENTIFICATION *SRCFL INO 37 61 25 200 128
BB I ITC INO 62 103 42 168 256 OSBBII INO 104 145 42 168 256
OSMNTC PGM 146 146 1 1 1024 230 "OSMNTC "SPEC IALTAPECAR OSMONR PGM 147 147 1 1 1024 386 "OSMON "": (04/03178 SS FORMT2 PGM 148 150 3 1 3072 2284 10"FORMT2""2400 DISK F *MTC PGM .151 154 4 I 4096 3436 "*MTC""4-F'""MTC BACKUP *MTCRI PGM 155 158 4 1 4096 2241 *MTCRI-4/6/78@1620-GTM *MTCR2 PGM 159 160 2 1 2048 909 "*MTCR2" "4-F" "SELECTIV *MTCR3 PGM 161 162 2 1 2048 1551 "*MTCR3"" 4-F" "OIRECTOR *MTCBI PGM 163 164 2 I 2048 830 "*MTCBI""4-F""MTC BACK *MTCB2 PGM 165 167 3 1 3072 2909 "*MTCB2""4-F""MTC BACK SLA02 OIR 168 176 9 100 47 22 80
177 667 491*
,-OOF INO 668 673 6 6 1024
%020 PGM 674 679 6 I 6144 5233 "'-020" "4-F" "09/27177"" %021 PGM 680 684 5 I 5120 4025 10",-D21""4-F""07/28177 %022 PGM b85 689 5 1 5120 4145 10"'-022" "4-F""07/11177
'-023 PGM 690 693 4 I 4096 3190 10"%023" "4-F" " 12/29177 %023-1 PGM 694 697 4 1 4096 3224 10"7.023-1 ''''4-F'' "04-14-7.023-2 PGM 698 702 5 I 5120 4175 10",-023-2""4-F""04-14-%023-3 PGM 703 70b 4 1 4096 3258 10"7.023-3""4-F""12/291
7.023-4 PGM 707 710 4 1 4096 3525 10"7.023-4""4-F""12/291
%D24 PGM 711 714 4 1 4096 3849 10",-024""4-F""01/03178
7.024-1 PGM 715 718 4 1 4096 3481 10",-024-1""4-F""01/031
7.024 2 PGM 719 723 5 I 5120 4690 10"'-024-2" "4-F" "07,
Figure 24. Directory listing: unsorted
To view the directory listing on the VDT without obtaining a printed copy, you must choose utility program *L (Figure 25):
1. Type on the VDT keyboard: RUN "*L"
GENERAL PURPOSE PROGRAMS - UTILITIES
What happens?
What happens?
Your Response?
What happens?
3. Type 0 (zero) to enter the disc number. 4. Press the CR/ENTER key again.
The VDT screen displays the following message asking you to select which listing you want:
• Data files--Type 0 to have only the data files listed. • Program files--Type P to have only the programs listed.
• Available sectors--Type A to have only the available sectors ("empty spots") on the disc listed. (You may need to know where you can enter a new file on the disc.) After entering your choice, press the CR/ENTER key.
Figure 25. Display disc directory, utility *L
The directory listing can be sorted in one of two sequences. The system asks you which of the two you want (Figure 26):
• Location--Type L to have the listing sorted by numerical order of items on the disc (Figure 27).
• Unsorted--Type U to have the listing displayed without being sorted.
After entering your choice, press the CR/ENTER key.
DISPLAY FILE INFORMA· TION ON VDT··*F
What happens?
GENERAL PURPOSE PROGRAMS: UTILITIES
Figure 26. Choosing sequence of listing: by location
Figure 27. Directory listing displayed continuously
To view specific file information on the VDT, you must choose utility program *F (Figure 28):
1. Type on the VDT keyboard: RUN "*F".
2. Press the CR/ENTER key.
GENERAL PURPOSE PROGRAMS - UTILITIES
Your response
Figure 28. Display file information, utility * F
Enter the file name and other identifying information. Then press CR/ENTER. (Figure 29)
What happens?
Your response
What happens?
GENERAL PURPOSE PROGRAMS··UTILITIES
The VDT displays the file information requested (Figure 30).
Figure 30.
File information displayed
GENERAL PURPOSE PROGRAMS - UTILITIES
IMPORTANCE OF BACKUP
TERMS YOU SHOULD KNOW
Backup
Restore
SECTION 5: BACKUP PROCEDURES
BACKUP procedures are performed as a safety precaution. You'll duplicate, or back up, the information about each day's business ac-tivities from the disc onto a magnetic tape cartridge. The reasons for this precaution are many: data may be lost through fire, theft, hard-ware failure, a new program that did not function" correctly, or even an operator error. If a problem occurs that results in destruction of infor-mation on the disc, you can restore that same inforinfor-mation from the backup tape and continue processing.
Backup refers to the method by which the information maintained on a computer system (on the disc) is duplicated and stored separately from the computer (Figure 31).
Restore refers to the method by which the duplicated backup informa-tion is loaded from the tape cartridge back onto the disc. This opera-tion is necessary only if you have had a problem with data on the disc. as noted above. Contact your Customer Service Representative (410 users contact programmer) for help if for any reason you need to restore data from your backup tape cartridges onto the disc.
Disc Drive
Magnetic Tape Cartridge Drive
Data Transfer
Restore
Data Transfer
BACKUP PROCEDURES
TWO OPERATING SYSTEMS
Basic Operating System Soft-ware (BOSS)
Alternate operating system us-ed for backup
Basic Four computers have two operating systems: the Basic Operating System Software and the Alternate Operating System. The Basic Operating System Software, or BOSS, is used during normal system operations for running the application programs that direct your data processing activities (Figure 32).
The Alternate Operating System is used in backing up data from disc to tape. The procedures for loading this system and for backing up your data are described in this section (Figure 32).
BOSS
Basic Operating System Software
B-"
-8
+rinterl
/~
B
--'
DiscI
CPU Drive I
-_
....
Alternate Operating System
Backup~4-- Alte. Op. Sys. _ _ ... Restore
BEGINNING BACKUP PROCEDURE
Video display terminal
Central processing unit
Tape cartridge drive
Preparing tape cartridge
Inserting tape cartridge
COMMUNICATING WITH THE COMPUTER DURING BACKUP
Ending your response with 'CR'
BACKUP FILES
BACKUP PROCEDURES
The system must be operational, with power on, in order for you to back up your files.
Turn on the video display terminal power switch below the right front corner of the screen. The cursor appears in the upper left corner of the screen after about 20 seconds.
Turn on the central processing unit by touching the POWER switch lightly.
Turn on the tape cartridge drive by flipping up the power switch on the back of the unit.
Before inserting a tape cartridge into the drive unit, turn OFF the safe key on the cartridge. Use a thin coin or screwdriver to turn the arrow on the plastic key away from the word SAFE. You can only back up data onto tape if the safe key is turned off.
After you turn off the safe key, insert cartridge into the tape drive unit. The tape will automatically rewind, advance briefly, and stop.
As part of the normal question-response sequence, the computer may offer you a choice of options, one of which is 'CR' to instruct the com-puter to act on the response you have just entered. If you do not want to rewind the tape, press 'CR' only. The computer will respond as if to
a
"no."DO YOU WISH TO RETENSION THE TAPE? (Y/'CR')
If you want to rewind the tape, select Y for "yes" and also press 'CR' to instruct the computer to act on the response you have just entered. If you do not want to rewind the tape, press 'CR' only. The computer will respond as if to a "no."
BACKUP PROCEDURES
Son-Father files
Reusing tape cartridge
After you finish the second day's processing, back up that day's infor-mation onto another tape cartridge. Refer to this new tape as the SON file. And yesterday's tape? Refer to that one as the FATHER file.
Day
Fri.
Mon. 2
Figure 33. Backup files: son - father concept
At the end of the third day's processing, simply reuse the tape car-tridge from the first day. Enter your third day's information to make a new SON fine. The second day's file now becomes the new FATHER file. This sequence continues, always ensuring two complete sets of backup information (Figure 34).
Day
Fri.
Mon. 2
Tues. 3
Wed. 4
Daily backup files
Extra protection
Backup storage
Dust-proof container
Extra dust protection
BACKING UP INFORMATION FROM DISC TO TAPE CARTRIDGE
BACKUP PROCEDURES
Information on the computer should be backed up on a daily basis. The main reason is to keep your information safe from day to day; for example, the inventory master file that is updated daily should be backed up daily. Another reason for daily backup is to prevent the workload that would occur if you waited to duplicate a week's worth of information at one time.
You may even want to maintain multiple generations of backup tape cartridges so that the last week (or period) and the last month end are available in addition to the current data. Color-coded backups are common in computer installations as they are easily identified by operators; the tape cartridge can then be stored with similarly iden-tified paperwork files supporting the data.
Backup tape cartridges are normally kept in an area removed from the computer room, preferably in a fireproof safe or cabinet.
When the tape cartridge is not in use, protect it against dust by storing in the plastic dust-proof container and special cardboard container that come with the cartridge.
A hinged plastic door on the tape cartridge drive unit gives additional protection against contamination of the tape cartridge. When you remove the cartridge from the drive unit, the plastic door closes, preventing dust from entering the tape head/tape operation area.
BASIC OPERATING PROCEDURES
COMPUTER DISPLAY OR PROMPT
BASIC FOUR CORPORATION THE OPERATING SySTEM ... . ALT/LOAD INITIALIZATION
MAKE ENTRY TO OVERRIDE DEFAULT
CANNOT FIND ALT/LOAD PLEASE RELOAD
ENTER PROGRAM NAME
Table 1. Backup procedures
YOUR
ACTION EXPLANATION
The first step is to make sure the central processing unit POWER and DISC READY switches are on and the tape cartridge drive power is on.
On the CPU, To begin the backup procedure, press and hold you need to load the Alternate TEST and LOAD Operating System.
switches unti I AL T/LOAD message ap-pears on VDT screen.
'CR'
Press and hold TEST and LOAD switches. When AL T/LOAD message ap-pears, press 'CR' quickly.
BBIITC 'CR'
The ALT/LOAD message begins with the Basic Four Corporation proprietary message, then in-structs you to "make entry." You will have 20 SECONDS to respond by pressing the carriage return, or
'CR' key, on the VDT keyboard. (Message not shown in entirety.)
The system will display this message only if you do not press 'CR' within 20 seconds after the ALT/LOAD message first appears. Simply repeat the loading pro-cedure described above.
CAUTION
You must type this correctly. Any entry other than BBIITC may result in possible damage to
your files. (You cannot correct a
COMPUTER DISPLAY OR PROMPT ENTER PGM NAME (*MTC or BASS)
BACKUP PROCEDURES
YOUR ACTION EXPLANATION
*MTC 'CR' Enter *MTC (for magnetic tape car-tridge) and press 'CR' to cause the main menu selector to appear on the screen. (BASS is a diagnostic program used only by service per-sonnel.)
~---+---~---PLEASE SELECT AN OPTION: 1. FULL BACKUP
2. SELECTIVE BACKUP
3. FULL RESTORE
4. SELECTIVE RESTORE
5. DIRECTORY RESTORE 6. INSTALL SYSTEM
7. UPDATE SYSTEM
ENTER AN OPTION NUMBER DISC NO?
OK? (Y/'CR') PLEASE WAIT LOAD TAPE CARTRIDGE
DO YOU WISH TO RETENSION THE TAPE? (Y/'CR')
2 'CR'
o
'CR'Y'CR'
Y'CR'
Menu of available backup/restore options appears. You will normally use only option number 2, Selec-tive Backup. If you occasionally need to use option 4, Selective Re-store, ask your Customer Service Representative for information.
CAUTION
The other options listed are
to
be used by service personnel only.
Enter option 2, Selective Backup. Enter 0 (zero). This refers to the disc in the computer system. Respond Y for yes, then 'CR'. If you have not already inserted a tape cartridge into the tape drive unit, the system will now ask you to do so. Remember to turn off the safety lock. If the tape cartridge is· inserted already, the system will proceed to the next question. The Y (yes) response tells the system to rewind the tape. This process takes about 2 minutes; it allows for temperature stabiliza-tion and ensures proper tension, particularly important for a new tape.
'CR' If not rewinding the tape, press 'CR'.
BACKUP PROCEDURES
COMPUTER DISPLAY OR PROMPT
DO YOU WANT TO BACKUP PROGRAMS, DATA, OR BOTH? (P/D/B):
*MTC WILL BACKUP DATA FILES ONLY NOW BACKING UP LOADER
NOW BACKING UP DIRECTORY
BACKUP A RANGE OF FILES, OR ENTER THE NAMES OF SELECTED FILES?
(RIS/'CR' TO END)
ENTER THE NAME OF THE FIRST FILE TO BE BACKED UP OR 'CR' TO START WITH THE FIRST FILE IN THE DIRECTORY
ENTER THE NAME OF THE LAST FILE TO BE BACKED UP OR 'CR' TO FINISH WITH THE LAST FILE IN THE DIRECTORY
NOW BACKING UP file name (Beginning Sector - Ending Sector) Current Sector
YOUR ACTION EXPLANATION
D 'CR' Enter D (and 'CR') for backup of data only. Ordinarily only your Customer (or Sorbus) Service Representative will use the P (for Program) and B (for both) options.
R 'CR'
BGNFL 'CR'
'CR'
Two messages will display, the se-cond overlying the fi rst.
Since backup' is a method of pro-tecting your files, you'll generally choose R for a range of files (in-stead of just selected files). Your . Customer (or Sorbus) Service Representative may instruct you otherwise.
Enter the name of the first fne, "BGNFL" (beginning file).
Specific file names may be provid-ed by your software vendor for the purpose of backup.
Press 'CR' to end with the last file in the directory.
Be sure that the file names you enter are the first and last in the desired group. If you enter an in-valid file name, the computer will ask you for another input.
BACKUP PROCEDURES
COMPUTER DISPLAY OR PROMPT
YOUR
ACTION EXPLANATION
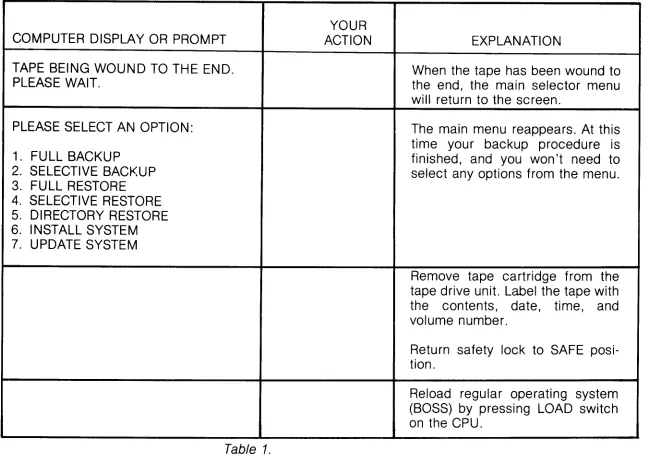
TAPE BEING WOUND TO THE END.
PLEASE WAIT. When the tape has been wound to the end, the main selector menu will return to the screen.
PLEASE SELECT AN OPTION: 1. FULL BACKUP
2. SELECTIVE BACKUP 3. FULL RESTORE
4. SELECTIVE RESTORE 5. DIRECTORY RESTORE 6. INSTALL SYSTEM 7. UPDATE SYSTEM
ERROR CONDITION
Disc Error··call Customer Service Representative
Table 1.
The main menu reappears. At this time your backup procedure is finished, and you won't need to select any options from the menu.
Remove tape cartridge from the tape drive unit. Label the tape with the contents, date, time, and volume number.
Return safety lock to SAFE posi-tion.
Reload regular operating system (BOSS) by pressing LOAD switch on the CPU.
During backup a hardware failure may occasionally occur, or the disc or tape may be damaged. The computer will alert you to the condition by displaying an error message on the VDT screen. Certain error situa-tions should be handled only by your Customer (or Sorbus) Service Representative, as listed below.
[image:47.816.71.719.149.609.2]BACKUP PROCEDURES
COMPUTER DISPLAY OR PROMPT NOW BACKING UP FSG01
(3909-3962) 3937
FSG01 WILL NOT BE BACKED UP
BECAUSE OF DISC ERRORS. PRESS 'CR' TO CONTINUE
YOUR
RESPONSE EXPLANATION
Normal backup is in progress. The numbers identify the file and location on the disc.
DO NOT DO ANYTHING! Contact your Customer (or Sorbus) Service Representative and explain the situa-tion. If your CSR is not available and processing must be continued, write down the infor'mation found in the statement immediately above the er-ror message:
FILE NAME
BEGINNING AND ENDING SECTOR NUMBERS
SECTOR NUMBER WHERE ERROR OCCURRED (current sector)
In this example, the file name where the error occu rred is "FSGO 1 ." The file's beginning sector is 3909, and the ending sector is 3962. The sector where the error occurred is 3937. 'CR' After you write down the information
needed to help your CSR analyze the problem, you can continue by press-ing 'CR'. The backup process will continue with the next file.
[image:48.818.62.666.146.664.2]BACKUP PROCEDURES
GENERAL ERROR CONOI TIONS The situations described below can usually be corrected by the
System 200/410 operator. If preliminary steps do not correct the error, contact your Customer (or Sorbus) Service Representative for help. COMPUTER DISPLAY OR
PROMPT
CANNOT FIND file name PLEASE RELOAD
ERROR 17 PRESS oCR'
file name WILL NOT BE FUL-L Y BACKED UP BECAUSE OF DISC ERRORS. PRESS oCR' TO CONTINUE
Runaway tape (no actual screen message)
SSN ERROR
EXPLANATION
This message arises during initial operation when you are asked to enter a program name (BBIITC) and the name that you enter is not valid. Be aware that even a backspace over an erroneous letter will make the name invalid to the system. If this message is displayed, you must perform the alternate load sequence again.
This message arises when you have specified an invalid disc number. (On the System 200/410 the only valid disc number is 0 zero). Press oCR' to return the system to the main menu that lists available backup/restore options.
This message is displayed during backup procedures when the system cannot read the disc. Generally the message indicates an ER-ROR 3, which may mean damage, misalignment, or faulty data. Please note the file name, then press oCR' to allow the backup procedure to continue, skipping the file that generated the error message.
Then attempt to load or access the file again. If an ERROR 3 message is generated, try to restore the file from another tape cartridge (if available) with help from your Customer (or Sorbus) Service Represen-tative. If another error is generated or there is no file backup, call your CSR; the disc alignment may need to be checked.
CAUTION
A restore operation will not reflect these disc errors.
This situation results when the system searches through an entire track of tape attempting to locate a particular file. This is evident when the screen display stops updating sector numbers during an update or restore, but the tape continues spinning. (On 4-track tapes, do not con-fuse this with the tape rewind to position at the next track.)
An error will result when the tape reaches the end of the track. If this situation occurs, you may try to repeat the operation, or repeat it using a new tape (if possible). Upon further failures, please contact your Qustomer (or Sorbus) Service Representative.
This error results when the serial number on the tape does not match that on the disc. Please be sure that you are using your correct tape· cartridge.
BACKUP PROCEDURES
YOUR
COMPUTER DISPLAY OR PROMPT ACTION EXPLANATION
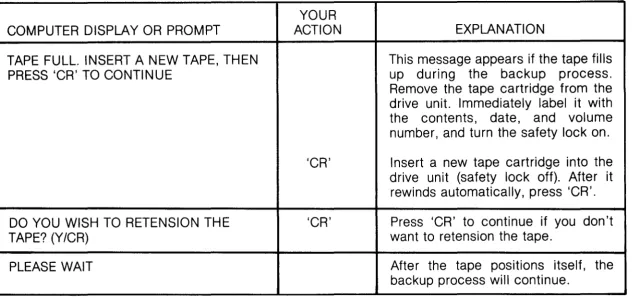
TAPE FULL. INSERT A NEW TAPE, THEN This message appears if the tape fills
PRESS oCR' TO CONTINUE up during the backup process.
Remove the tape cartridge from the drive unit. Immediately label it with the contents, date, and volume number, and turn the safety lock on. oCR' Insert a new tape cartridge into the
drive unit (safety lock off). After it rewinds automatically, press 'CR'. DO YOU WISH TO RETENSION THE oCR' Press oCR' to continue if you don't TAPE? (Y ICR)
PLEASE WAIT
HELPFUL HINTS
Selective backup
Protecting data--restore
Protecting data--backup
Cartridge requirements
Restoring data
want to retension the tape.
After the tape positions itself, the backup process will continue.
Table 4. Tape full condition
Keep in mind that even a selective backup will write over any data on the tape cartridge.
To protect data on the tape when restoring, make sure that the arrow on the tape cartridge safety lock is pointing to the word SAFE.
When backing up data, make sure that the arrow on the safety lock points away from the word SAFE, or an ERROR 0 will result
Larger megabyte disc systems may require more than one cartridge for backup. *MTC will ask the operator to change tapes. Be aware that internal (software) tape sequence numbers are assigned and checked during a restore procedure.
[image:50.818.35.668.154.452.2]TURNING ON EQUIPMENT
Video display terminal
SECTION 6: PROCEDURAL ERRORS
• Make sure the VDT is plugged into an electrical outlet. Is there power at the outlet? Turn on the ON-OFF switch.
• Turn the BRIGHTNESS KNOB clockwise as far as it will turn. • If there's still no response from the VDT, please call your
Customer (or Sorbus) Service Representative.
Back Controls: Ordinarily the DUPLEX and RATE controls on the back of the unit are set when the unit is installed for you. These should not be changed. If you are having a problem with the VDT, however, make
su~e the settings are as follows (Figure 35):
• DUPLEX switch must be in the" F" (full duplex) righthand position for normal operation. (This switch determines the operating mode.) • RATE switch must be in the "9600" middle position for normal
[image:51.818.299.710.453.766.2]operation. (This switch determines the transmission rate of the VDT.)
PROCEDURAL ERRORS
Central processing unit
Magnetic tape cartridge drive unit
Printer
OTHER ERRORS
Your response
Serial number locations
• Make sure the CPU is plugged into an electrical outlet that is providing power. Press the POWER switch on and listen for the fan in the rear of the unit. If you don't hear the fan, the outlet may be dead.
• If power is being supplied to the CPU, but the green power light is not on, if the green DISC READY and RUN lights are not on, or the VDT screen displays no messages, please call your Customer (or Sorbus) Service Representative.
• Make sure the tape drive unit is plugged into an electrical outlet that is providing power. Flip the ON-OFF switch to turn the unit on, and listen for the fan motor. If you don't hear the fan, the outlet may be dead.
• If power is being supplied, but the tape drive unit still does not res-pond, please call your Customer (or Sorbus) Service Represen-tative
• Make sure the printer is plugged into an electrical outlet that is providing power. Press the POWER switch to turn the unit on. The printer head should move left-right-Ieft slowly, then quickly. If it does not, press the POWER switch off.
• Wait about 15 seconds, then turn the power on again and wait for the printer head to move. If the printer still doesn't respond, call your Customer (or Sorbus) Service Representative.
If an error occurs in the System 200/410, a message will appear on the VDT screen indicating the program being run, line number where the error occurred, and an error number and/or description.
Write down the entire error message and call your Customer (or Sor-bus) Service Representative.
CLEANING VIDEO DISPLAY TERMINAL
General cleaning
Dust
Light dirt coating
Heavy dirt coating
CLEANING CENTRAL PROCESSING UNIT
General cleaning
Dust
Light dirt coating
SECTION 7: GENERAL MAINTENANCE AND RE·SUPPLY
The VDT is no more difficult to care for than a conventional electric typewriter. Keep it clean; keep its connectors plugged in; and keep its immediate area clear of all food or beverages and of stacked paper, books, and other items that might interfere with free air circulation. Pay particular attention to the display screen, where any residual dirt film will later block the character display, and to the key tops on the keyboard, which receive the largest deposit of dirt.
Wipe or brush off dust, lint, and smudges whenever they become noticeable, being careful not to wipe or brush dust into the keyboard through the spaces between and around the keys. For wiping, use a soft, clean dust cloth or commercial lint-free tissue.
For stubborn accumulations, dampen the cloth or tissue slightly, but only with plain water or a cleaning fluid suitable (safe) for use on plastic and painted surfaces, such as one of the commercially available antistatic cleaning fluids or with 91 % isopropyl alcohol. The cloth or tissue should not be wet, just damp, so that it will pick up dust or dirt readily.
The occasional light cleaning described above will not always prevent the gradual accumUlation of a coating of varnish-like dirt, particularly on the key tops, and a more thorough cleaning will usually be necessary about once a month. For this cleaning, wipe all external surfaces with the antistatic cleaning fluid and use a succession of soft cloths or lint-free tissues. As each cloth becomes dirty, discard it and continue with a clean one. Use enough fluid to moisten each cloth or tissue thoroughly so that very little wiping pressure will be needed, but not enough to allow dripping under the wiping pressure. After cleaning each surface, wipe off the fluid and dissolved dirt with a dry cloth or tissue.
Keep the immediate work area clear of stacked papers, books, food, and other items that might cause contamination or interfere with free air circulation and prevent proper cooling of the unit.
GENERAL MAINTENANCE AND RE·SUPPLY
Heavy dirt coating
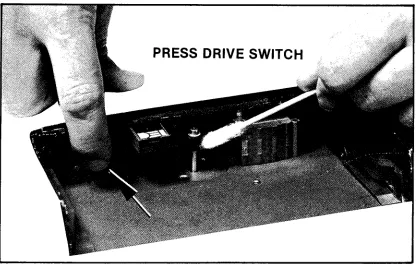
CLEANING MAGNETIC TAPE CARTRIDGE DRIVE UNIT
General cleaning
Oust
Ught dirt coating
Heavy dirt coating
The occasional light cleaning described above will not always prevent the gradual accumulation of a coating of varnish-like dirt, and a more thorough cleaning will usually be necessary about once a month, even in the cleanest offices. For this cleaning, wipe all external surfaces with the antistatic cleaning fluid and use a succession of soft cloths or lint-free tissues. As each cloth or tissue becomes dirty, discard it and continue with a clean one. Use enough fluid to moisten each cloth or tissue thoroughly so that very little wiping pressure will be needed, but not enough to allow dripping under the wiping pressure. After cleaning each surface, wipe off the fluid and dissolved dirt with a dry cloth or tissue. Do not try to clean the inside of the CPU.
Proper and regular maintenance of the tape cartridge unit will assure operation at the high levels of data and mechanical reliability that have been designed into the system. Particularly important are the operator maintenance functions intended to keep the system free of dirt and contaminants. At the high densities of data on tapes written or read, extremely small particles of dust or oxide from the tape can cause data errors. Careful attention