DAVIX
The Data Analysis and Visualization Linux
®Version 0.5.0
Authors:
Jan P. Monsch, jan döt monsch ät iplosion döt com Raffael Marty, raffy ät secviz döt org
Contents
1. DAVIX - Visualize Your Logs!...4
1.1. Introduction ...4
1.2. Roadmap ...4
2. Quick Start Guide...5
2.1. Download ...5
2.2. Burn ...6
2.3. Boot...8
2.4. Analyze ...9
2.5. What to Do Next? ...10
3. Tools - Showing You the Ropes ...12
3.1. AfterGlow (PV) ...13 3.2. ChartDirector (V) ...15 3.3. Cytoscape (V)...16 3.4. EtherApe (V) ...18 3.5. GGobi (V) ...19 3.6. glTail (V)...21 3.7. GNUplot (V)...22 3.8. Graphviz (V)...24 3.9. GUESS (V)...26 3.10. InetVis (V)...28
3.11. Large Graph Layout - LGL (V)...30
3.12. Mondrian (V)...35 3.13. MRTG (V)...37 3.14. NVisionIP (V)...39 3.15. Parvis (V) ...42 3.16. Ploticus (V)...44 3.17. p0f (C) ...45 3.18. R Project (V)...46 3.19. RRDtool (V) ...49 3.20. RT Graph 3D (V)...50 3.21. rumint (V)...52 3.22. Scapy (CPV)...54 3.23. Shell Tools (P) ...57
3.24. Shoki Packet Hustler (V)...58
3.25. tcpdump (C)...60 3.26. Timesearcher 1 (V) ...61 3.27. tnv (V) ...63 3.28. Treemap (V) ...65 3.29. Tulip (V)...67 3.30. Walrus (V)...69 3.31. Wireshark (C) ...71
4. Customizing DAVIX ISO Image ...73
4.1. Windows ...73
4.2. Linux ...74
4.3. Adding and Removing Modules...75
4.4. Overriding Files with rootcopy ...75
4.6. Boot Cheat Codes ...76
5. Creating and Modifying Modules ...77
5.1. Leverage Existing SLAX Modules...77
5.2. Create New Modules from Slackware Packages...77
5.3. Customize Existing SLAX or DAVIX Modules ...78
6. Deployment Options...79
6.1. VMware ...79
6.1.1. Virtual Machine Setup ...79
6.1.2. CD-ROM based Boot...80
6.1.3. Installation on Virtual Hard Drive ...80
6.2. Other Virtualization Environments...81
6.3. USB Stick...82
6.3.1. On Windows with VFAT Formatted USB Stick ...82
6.3.2. On Linux with VFAT Formatted USB Stick...85
6.3.3. On Linux with xfs Formatted USB Stick ...86
6.4. Hard Drive...89
7. Hardware...93
7.1. Physical Machines ...93
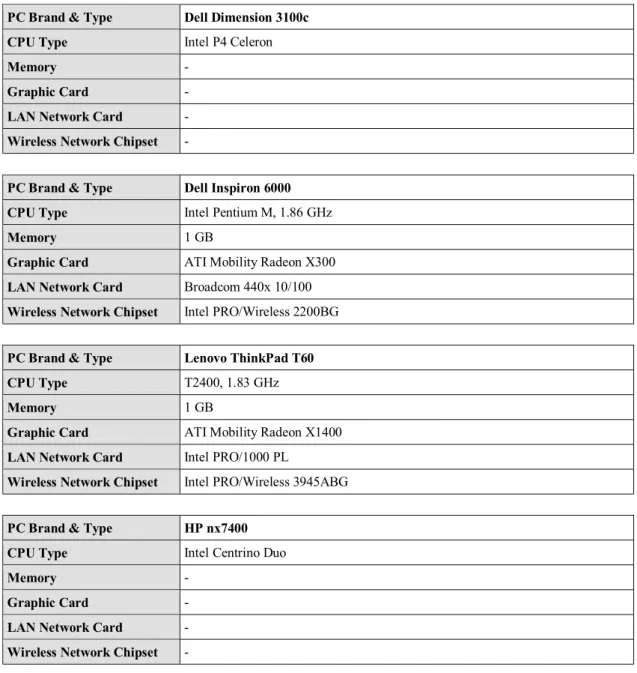
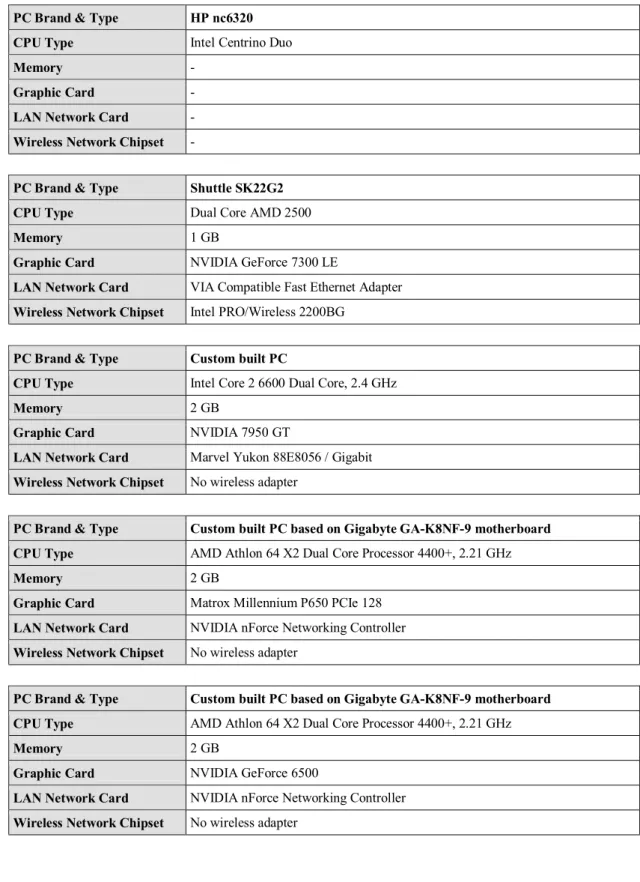
7.1.1. Hardware Known to Work ...93
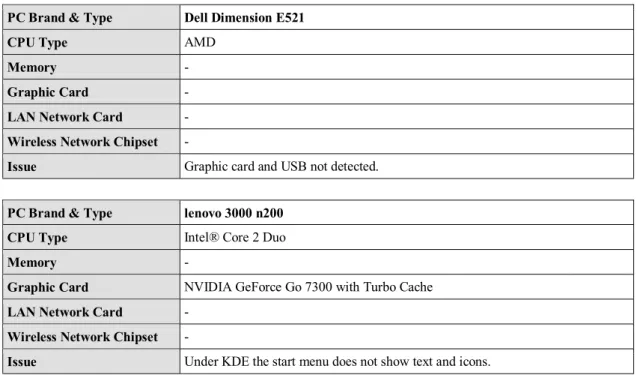
7.1.2. Incompatible Hardware ...95
7.2. Virtual Machines ...96
8. Networking ...97
8.1. LAN networking...97
8.2. Wireless Networking ...97
8.2.1. Kernel Supported Drivers...97
8.2.2. NDISwrapper...99 9. Graphic Cards...100 9.1. OpenGL...100 9.2. Multi-Head Support ...100 10. FAQ ...101 11. Acknowledgements ...102 12. Licenses...103 12.1. Software ...103 12.2. Sublicense Attribution...103 12.3. Documentation...103 13. Disclaimer ...104 14. Versioning ...105
1.
DAVIX - Visualize Your Logs!
1.1. Introduction
Need help understanding gigabytes of logs? Your OS performance metrics do not make sense? You want to analyze your SAP user permissions? Then DAVIX, the live CD for visualizing IT data, is your answer!
DAVIX - the Data Analysis & Visualization Linux® - brings the most important free tools for data processing and visualization to your desk. There is no hassle with installing an operating system or struggle to build the necessary tools to get started with visualization. You can completely dedicate your time to data analysis.
The DAVIX CD is based on SLAX 6.0.x1 by Tomáš Matějíček and features broad out-of-the-box hardware support for graphic cards and network adapters. SLAX is based on Slackware and follows a modularized approach. Thus, the SLAX ISO image can easily be customized for various purposes. It can even be installed on USB sticks and provide you with mobile analysis capabilities.
The product is shipped with a comprehensive manual that gives you a quick start for all tools and provides information on how-to tailor DAVIX to your needs. All tools are accessible through the KDE start menu and accompanied with links to external manuals and tutorials. Therefore, all information to get started with the tools is available at a click of a button.
DAVIX is also part of Raffael's upcoming book Applied Security Visualization that will be published by Addison Wesley Professional2.
1.2. Roadmap
The first release of DAVIX is just the start. In the future, we would like establish DAVIX as the number one choice for log analysts. In particular we will improve following areas:
· More parser support for specific log formats,
· Data format converters for the visualization tools,
· More visualization tools,
· Support for distributed log processing,
· Integrated UI that will allow easy orchestration of the different tools.
1 SLAX: http://www.slax.org/
2.
Quick Start Guide
Starting to use DAVIX is as simple as counting from 1 to 4: 1. Download the ISO image,
2. Burn it onto a CD-ROM or DVD, 3. Boot the CD on your PC,
4. Analyze your data.
2.1. Download
The DAVIX ISO image can be downloaded from several locations around the world. Please select one of the mirrors closest to you. Since web browsers on occasion corrupt large downloads, we recommend using wget3 for downloading the ISO. Main Server:
· Switzerland: http://82.197.185.121/davix/release/davix-0.5.0.iso.gz Mirrors
· Germany: http://bastard.codenomad.com/davix/davix-0.5.0.iso.gz
· United States: http://depot.unixfoo.ch/davix/davix-0.5.0.iso.gz
· United States: http://www.noaccess.com/davix/davix-0.5.0.iso.gz
· United States: http://www.geekceo.com/davix/davix-0.5.0.iso.gz As a nice side effect of using wget, you can resume downloads by using the -c
command line option when the connection got interrupted:
wget -c http://mirror.foo.bar/ davix-0.5.0.iso.gz
After download check the size and the integrity4 of the ISO image. The MD5 hash and the file size are published on the DAVIX homepage5.
3 For Win32 wget can found as part of the GNU utilities for Win32: http://unxutils.sourceforge.net/
4 The UNIX tool md5sum can be used to calculate the MD5 hash. The utility is also part of the GNU utilities for Win32. 5 DAVIX Homepage: http://davix.secviz.org/
2.2. Burn
Utilize any CD or DVD burning software of your liking and burn the ISO image on to a CD-ROM or DVD. The following screenshots show how to use Nero Burning ROM6 for this task.
· Open Nero Burning ROM from the Windows start menu.
· In the Windows menu choose Recorder\Burn Image... and select in the file dialog the ISO image you want to burn.
· Select the burn options and press the button Burn.
6 Nero Burning ROM: http://www.nero.com/
· When the burning progress dialog is shown, select the option Verify written data.
2.3. Boot
After CD creation reboot the computer. On some systems the BIOS is configured to boot directly from CD or DVD when a disk is located in the drive. On other systems it might be necessary to press a key during the BIOS boot screen for a displaying a boot menu, e.g. on a Dell Inspiron 6000 or Lenovo ThinkPad T60 you have to press F12. If you do not like the default boot behavior you can change it in the BIOS setup menu.
When DAVIX starts a boot menu is displayed. Here you can select the boot option. In most cases the first option DAVIX Graphics mode (KDE) will be the one to go for. It will take you directly to the KDE desktop.
2.4. Analyze
To find out what tools are available on DAVIX, take a look at the KDE start menu. The top four entries contain the modules provided by DAVIX. To simplify
documentation access we have provided the links to the tool homepages and tutorials in the KDE start menu. Additionally, each tool menu offers direct access into DAVIX manual for a quick start example.
You can access the manual through the desktop short cut:
If you see a console symbol next to the tool it means that selecting the menu will cause a console to open and some form of help is shown. The tool it self is not executed. You will be required to do that yourself.
It is your turn now to find out what all these tools can do and start analyzing your logs. If you do not know what you can analyze or visualize, check the tool tutorials or get inspired by visiting secviz.org7. We have included usage examples for each of the tools in the chapter Tools - Showing You the Ropes.
2.5. What to Do Next?
The chapter Tools - Showing You the Ropes gives an overview of the most important tools found on the DAVIX CD as well as a quick start example for each tool.
If you are requiring information on an intermediate level, we recommend reading Raffael's book Applied Security Visualization8. A rough cuts version of the book is available on the Internet9. The book gives a very good introduction to visualization and introduces a use-case driven approach. It offers various case examples and shows you hands-on how to get from the log file to the visualization. Another good book on the topic is Greg Conti's book Security Data Visualization10. It shows you many samples on how security data can be visualized.
7 SecViz - Security Visualization: http://www.secviz.org/
8 Applied Security Visualization: http://www.informit.com/store/product.aspx?isbn=0321510100
9 Rough Cuts Version of the book Applied Security Visualization: http://safari.informit.com/9780321585530 10 Security Data Visualization:
Most likely you will stumble over a thing or two in DAVIX that you would like to tweak. Or some of your favorite tools are not included with DAVIX. Well then it is time to read the following chapters Customizing DAVIX ISO Image and Creating and Modifying Modules.
3.
Tools - Showing You the Ropes
The important tools in DAVIX are organized in three categories depending on their use within the analysis process:
· Capture (C)
· Process (P)
· Visualize (V)
Some tools have the ability to cover several parts of the analysis process. In the following chapters the tool and its categories are noted in the chapter title.
All tools described in this manual are accessible through the system PATH. Therefore it is generally not required to know the install location. To run a tool open a console and then enter the first character of the tool's name and then press the tabulator key for auto completion.
root@slax:~# ru<TABULATOR>
ruby rumint run-with-aspell rubyforge run-parts runlevel
The entry point binaries of most tools are installed in /usr/local/bin. For others see the section important install locations in the following tool chapters.
3.1. AfterGlow (PV)
Purpose· Tool to convert CSV input to a DOT graph description. AfterGlow takes a configuration file that configures how the nodes and edges are represented in the DOT file. The DOT file can then be graphed via Graphviz.
· In addition to the main tool, AfterGlow ships a set of tools to convert CSV data into data formats that can be used with other visualization tools.
· Includes capper.pl script from Raffael Marty's book "Applied Security Visualization".
Links
· Homepage http://afterglow.sourceforge.net/
· Manual http://afterglow.sourceforge.net/manual.html Important installation locations
· /usr/local/bin
· /usr/local/share/afterglow
Example11
· Open a console.
· First a CSV file of sniffed network traffic has to be generated using the command:
tcpdump -vttttnneli eth0 | tcpdump2csv.pl "sip dip dport" > sniff.csv · Open Firefox and do some extended surfing.
· Press Ctrl-C in the console window where tcpdump is running.
· To transform the CSV file to a GraphViz dot file execute:
cat sniff.csv | afterglow.pl > sniff.dot
· To render the sniff.dot into a GIF file use the command:
neato -Tpng -o sniff.png sniff.dot
3.2. ChartDirector (V)
Purpose· Programming library to generate a wide variety of charts. Links
· Homepage http://www.advsofteng.com/
· Manual file:///usr/local/share/chartdirector/doc/cdperl.htm Important install locations
· /usr/lib/perl5/site_perl/5.8.8
· /usr/local/share/chartdirector
Example
· To generate a pie chart create a Perl script test.pl with the following contents:
#!/usr/bin/perl use perlchartdir; my $data = [10,20,25,10,5,40]; my $label = ["Dogs","Cats","Birds","Spiders","Rats","Mice"]; my $c = new PieChart(400, 300); $c->setPieSize(200, 150, 75); $c->setData($data, $label); $c->makeChart("test.png");
· Then execute the script with the command: perl test.pl · To view the result open GQview with the command: gqview
3.3. Cytoscape (V)
Purpose· Generation and display of two-dimensional link graphs. Links
· Homepage: http://www.cytoscape.org/
· Tutorial: http://cytoscape.org/cgi-bin/moin.cgi/Presentations Important install locations
· /usr/local/bin
· /usr/local/lib/cytoscape
· /usr/local/share/cytoscape
Example
· Start Cytoscape through the KDE start menu.
· In the file open dialog navigate to: /usr/local/share/cytoscape/sampleData · Open one of the graphs in this directory, e.g. galFiltered.cys
3.4. EtherApe (V)
Purpose· Real-time visualization of network traffic. Links
· Homepage: http://etherape.sourceforge.net/ Important install locations
· /usr/local/bin
· /usr/local/etc/etherape
· /usr/local/share/etherape
Example
· Start EtherApe through the KDE start menu.
· EtherApe will go directly into monitoring mode.
· Open Firefox and generate some network traffic. EtherApe will then visualize your network connections.
3.5. GGobi (V)
Purpose· Visualizes data with different graphs and allows brushing. Links
· Homepage: http://www.ggobi.org/
· Manual: /usr/local/share/ggobi/manual/manual.pdf
· XML Input Format: /usr/local/share/ggobi/manual/xml.pdf Important install locations:
· /etc/xdg/ggobi
· /usr/local/bin
· /usr/local/share/ggobi
Example
· Start GGobi through the KDE start menu.
· Open one of the graphs in this directory, e.g. Shipman.csv
· In the window menu select Display\New Parallel Coordinate Display.
· Activate the scatter plot window and the select Interaction\Brush in the main window menu.
· Now you can move the yellow box around in the scatter plot and see how the selection behaves in the other graph.
3.6. glTail (V)
Purpose· Real-time visualization of web server traffic. Links
· Homepage: http://www.fudgie.org/ Important install locations
· /usr/bin/
· /usr/lib/ruby/gems/1.8/doc/gltail-0.0.7
Example
· Execute the following command to generate a configuration file template:
gl_tail --new foobar.yaml
· Adjust the configuration file to your needs.
servers: foobar: host: foobar.com port: 22 user: foo password: topsecret command: tail -f -n0 files: /var/log/apache/access_log parser: apache color: 0.2, 1.0, 0.2, 1.0 config: ...
· Execute the following command to start the visualization: gl_tail foobar.yaml · Either wait for web server traffic or generate your own with Firefox.
3.7. GNUplot (V)
Purpose· Generation of various types of charts. Mainly used for simple charting.
Links
· Homepage: http://www.gnuplot.info/
· Tutorial: http://t16web.lanl.gov/Kawano/gnuplot/intro/basic-e.html
· Manual: http://www.gnuplot.info/docs/gnuplot.html Important install locations
· /usr/local/bin
· /usr/local/libexec/gnuplot
· /usr/local/share/gnuplot
Example
· Change to the following directory: cd /usr/local/share/gnuplot/demo/ · Execute the following command: gnuplot
root@slax:/usr/local/share/gnuplot/demo# gnuplot
G N U P L O T
Version 4.2 patchlevel 2 last modified 31 Aug 2007 System: Linux 2.6.24.4
Copyright (C) 1986 - 1993, 1998, 2004, 2007 Thomas Williams, Colin Kelley and many others Type `help` to access the on-line reference manual.
The gnuplot FAQ is available from http://www.gnuplot.info/faq/
Send bug reports and suggestions to <http://sourceforge.net/projects/gnuplot>
· In the gnuplot command line enter: load "all.dem"
gnuplot> load "all.dem"
******************** file simple.dem ******************** Hit return to continue
· You can step through the different examples by pressing ENTER in the gnuplot command line window. You can stop the interactive tour by pressing
3.8. Graphviz (V)
Purpose· Generation of two-dimensional of link graphs. Links
· Homepage http://www.graphviz.org/
· Manual http://www.graphviz.org/Documentation.php
· Tutorial dot /usr/local/share/graphviz/doc/pdf/dotguide.pdf
· Tutorial neato /usr/local/share/graphviz/doc/pdf/neatoguide.pdf Important install locations
· /usr/local/bin
· /usr/local/lib/graphviz
· /usr/local/share/graphviz
Example
· Generate a sample afterglow file with:
echo -e "a,b\nc,d\nc,e" | afterglow.pl > test.dot
· Execute the following command to start the interactive mode of neato: lneato · Right click on the window and select load graph.
· In the file open dialog navigate to test.dot and open it.
· Then the link graph is displayed.
3.9. GUESS (V)
Purpose· Display and interaction with two-dimensional link graphs. Has a capability to use a scripting language to process graphs.
Links
· Homepage http://graphexploration.cond.org/documentation.html
· Tutorial http://guess.wikispot.org/Tutorial
· Manual http://guess.wikispot.org/manual Important install locations
· /usr/local/bin
· /usr/local/lib/guess/lib
· /usr/local/share/guess
Example
· Start GUESS through the KDE start menu.
· Click the button Load GDF/GraphML.
· In the file dialog click the browse button (the one with the three dots) and navigate to: /usr/local/share/guess/
· Open one of the graphs in this directory, e.g. sample.gdf.
3.10. InetVis (V)
Purpose· Real-time visualization of network traffic as a three-dimensional scatter plot. Links
· Homepage http://www.cs.ru.ac.za/research/g02v2468/inetvis.html Important install locations
· /usr/local/bin
· /usr/local/share/inetvis
Example
· Start InetVis through the KDE start menu.
· In the InetVis Control Panel select the menu Mode\Monitor Local Host. Due to a bug in the application you have to select the menu even when the flag is already set. Otherwise you will not be able to monitor live traffic.
· Then open the browser and do some surfing in the Internet. In the 3D scatter plot window you will see dots appear.
3.11. Large Graph Layout - LGL (V)
Purpose· Generation of two- and three-dimensional link graphs. Links
· Homepage http://lgl.sourceforge.net/ Important install locations
· /usr/lib/perl5/site_perl/5.8.8 · /usr/local/bin · /usr/local/etc · /usr/local/lib/lgl · /usr/local/share/lgl Example 2D
· First a space separated file with the data has to be prepared:
echo -e "a b\nc d\nc e\ne d\nb e" > test.ncol
· Then the graph can be generated using the following command:
lgl2d test.ncol
root@slax:~# lgl2d test.ncol
LGLBREAKUP: /usr/local/bin//lglbreakup -d ./lgl/1210511733 ./lgl/test.lgl Loading ./lgl/test.lgl...Done.
5 : Total Vertex Count 5 : Total Edge Count
Determining connected sets... Found 1 connected sets.
Writing ./lgl/1210511733/0.lgl 5 : Vertex Count
5 : Edge Count
LGLAYOUT: /usr/local/bin//lglayout2D o ./lgl/1210511733/0.coords e
-l ./-lg-l/12 10511733/0.lgl
Reading in Graph from ./lgl/1210511733/0.lgl... Vertex Count: 5
Edge Count: 5
Outer radius is set to 2.23607 Initializing 5 particles...Done.
Initializing grid and placing particles...Done. Initializing handlers...Done.
Generating Tree and checking for root. Nodes Checked: 6
Root Node: e
There are 2 levels.
Initializing 1 thread(s)...Done.
Iteration: 303 Dx: 0.724267 Level: 2 Final Settle
Iteration: 455 Dx: 0.745508 Level: 2
LGLREBUILD: /usr/local/bin//lglrebuild o ./lgl/final.coords
-c ./lgl/-coordFile List
Total Total Connected Sets : 0 root@slax:~#
· To view the graph start LGL Viewer through the KDE start menu.
· In the window menu select File\Open .lgl file.
· From the directory where your test.ncol is located navigate down to the subdirectory lgl and select test.lgl.
· In the window menu select File\Open 2D Coords file.
· From the directory where your test.ncol is located navigate down to the subdirectory lgl and select final.coords.
· To display the node ids press in the tool bar section the radio button Show All IDs.
Example 3D
· First a space separated file with the data has to be prepared:
echo -e "a b\nc d\nc e\ne d\nb e" > test.ncol
· Then the graph can be generated using the following command:
lgl3d test.ncol
root@slax:~# lgl3d test.ncol
LGLBREAKUP: /usr/local/bin//lglbreakup -d ./lgl/1210512148 ./lgl/test.lgl Loading ./lgl/test.lgl...Done.
5 : Total Vertex Count 5 : Total Edge Count
Determining connected sets... Found 1 connected sets.
Writing ./lgl/1210512148/0.lgl 5 : Vertex Count
5 : Edge Count
LGLAYOUT: /usr/local/bin//lglayout3D o ./lgl/1210512148/0.coords e -l ./-lg-l/1210512148/0.-lg-l
Reading in Graph from ./lgl/1210512148/0.lgl... Vertex Count: 5
Edge Count: 5
Outer radius is set to 1.70997 Initializing 5 particles...Done.
Initializing grid and placing particles...Done. Initializing handlers...Done.
Generating Tree and checking for root. Nodes Checked: 6
Root Node: e
There are 2 levels.
Initializing 1 thread(s)...Done.
Iteration: 303 Dx: 0.731679 Level: 2 Final Settle
Iteration: 455 Dx: 0.747695 Level: 2 - Done -
LGLREBUILD: /usr/local/bin//lglrebuild o ./lgl/final.coords -c ./lgl/-coordFileList
Total Total Connected Sets : 0 Current Connected Set : 1
· To generate the VRML file use the following command:
genVrml.pl lgl/test.lgl lgl/final.coords
root@slax:~# genVrml.pl lgl/test.lgl lgl/final.coords
Loading coords...Done.
Generating node/text coordinates in VRML...Done. Loading edges from file...Done.
Generating lines in VRML...Done.
· To view the result start FreeWRL:
3.12. Mondrian (V)
Purpose· Generation and display of a variety of charts that are linked. Links
· Homepage http://rosuda.org/Mondrian/ Important install locations
· /usr/local/bin
· /usr/local/lib/mondrian
· /usr/local/share/mondrian
Example
· Start Mondrian through the KDE start menu.
· From the window menu select File\Open and open any one of the files found in the directory /usr/local/share/mondrian/, e.g. Pollen.txt.
· In the Mondrian main window select any columns you like.
· In the window menu select Plot\Histogram. Two histogram windows should appear.
· In the window menu select Plot\Scatterplot. A graph with a scatter plot should appear.
· You can now select a bar in the histogram and see how the selected data is represented in the other graphs.
3.13. MRTG (V)
Purpose· Visualization of traffic load on network devices using SNMP queries. Links
· Homepage http://oss.oetiker.ch/mrtg/
· Installation Guide http://oss.oetiker.ch/mrtg/doc/mrtg-unix-guide.en.html Important install locations
· /usr/local/bin
· /usr/local/lib/mrtg2
· /usr/local/share/mrtg2
Example
· First you have to create a configuration file for you network device you want to monitor. In our example we have chosen 192.168.16.5.
cfgmaker global 'WorkDir: /tmp' global 'Options[_]: bits,growright' --output /tmp/mrtg.cfg [email protected]
· To initialize the database we have to run the following mrtg command a couple of times. The error messages during the first two runs are normal.
mrtg /tmp/mrtg.cfg mrtg /tmp/mrtg.cfg mrtg /tmp/mrtg.cfg
· Create a cron job which calls mrtg every now and then using the command:
· After a couple of runs open file:///tmp/192.168.16.5_1.html in Firefox to view the graph.
3.14. NVisionIP (V)
Purpose· Animated two-dimensional scatter plot of ARGUS files. Links
· Homepage
http://security.ncsa.uiuc.edu/distribution/NVisionIPDownLoad.html
· Quick Start Guide
http://security.ncsa.uiuc.edu/distribution/NVisionIPDownLoad.html#Run Important install locations
· /usr/local/bin
· /usr/local/lib/NVisionIP
· /usr/local/share/NVisionIP
Example
· Start NVisionIP through the KDE start menu.
· In the file open dialog navigate to: /usr/local/share/NVisionIP/samples
· Open one of the file in this directory, e.g. ArgusData_178_78.
· In the window MultiDataSetChooser enter into the field ClassB IP Header the following value: 178.78.
· Press the button OK.
· Move the slider bar at the bottom of the window to advance the scatter plot across the time line.
3.15. Parvis (V)
Purpose· Rendering of data as parallel coordinate display. Links
· Homepage http://home.subnet.at/flo/mv/parvis/
· Introduction http://home.subnet.at/flo/mv/parvis/introduction.html
· User Manual http://home.subnet.at/flo/mv/parvis/documentation.html Important install locations
· /usr/local/bin
· /usr/local/lib/parvis
· /usr/local/share/parvis
Example
· Start Parvis through the KDE start menu.
· In the window menu select File\Open.
· In the file open dialog navigate to: /usr/local/share/parvis/data · Open one of the graphs in this directory, e.g. voyager.stf.
· In the toolbar press the Brush button.
· Now you can select lines you want to inspect in more detail. When you select you do not select single lines. Instead you define an angle.
3.16. Ploticus (V)
Purpose· Generation of all kinds of charts. Links
· Homepage http://ploticus.sourceforge.net/doc/welcome.html
· Prefab Handbook http://ploticus.sourceforge.net/doc/prefabs.html Important install locations
· /usr/local/bin
· /usr/local/share/ploticus
Example
· Open a console.
· Create a file data.csv with following content:
Dogs,10 Cats,20 Birds,25 Spiders,10 Rats,5 Mice,40
· To generate a pie chart execute the command:
3.17. p0f (C)
Purpose· Identification of a remote host's operating system. Links
· Homepage http://lcamtuf.coredump.cx/p0f.shtml Important install locations
· /etc/p0f
· /usr/sbin
Example
· Open a console.
· Execute command: p0f
· Open Firefox and surf to some site.
· The output of p0f reads as follows:
p0f - passive os fingerprinting utility, version 2.0.8
(C) M. Zalewski <[email protected]>, W. Stearns <[email protected]>
p0f: listening (SYN) on 'eth0', 262 sigs (14 generic, cksum 0F1F5CA2), rule: 'all'.
192.168.16.220:36390 - Linux 2.6 (newer, 2) (up: 4 hrs) -> 216.92.151.5:80 (distance 0, link: ethernet/modem) 192.168.16.220:35442 - Linux 2.6 (newer, 2) (up: 4 hrs) -> 216.92.177.115:80 (distance 0, link: ethernet/modem) 192.168.16.220:50819 - Linux 2.6 (newer, 2) (up: 4 hrs)
-> 209.85.161.147:80 (distance 0, link: ethernet/modem) ...
3.18. R Project (V)
Purpose· Tool for statistical analysis that offers a great variety of graphing capabilities. Links
· Homepage http://www.r-project.org/
· Introduction http://cran.r-project.org/doc/manuals/R-intro.html
· Manual http://cran.r-project.org/manuals.html Important install locations
· /usr/local/bin
· /usr/local/lib/R
Example
· Start R Project through the KDE start menu.
· After receiving the R command prompt you can start the demo by executing:
demo(graphics())
· When you are back on the R command prompt you can start R Commander by executing the command: library("Rcmdr")
· To load some sample data set select in the window menu Data\Data in packages\Read data set from an attached package...
· Double click on the entry datasets.
· In the Histogram configuration dialog select the variable you want to visualize, e.g. height, and then acknowledge the dialog.
3.19. RRDtool (V)
Purpose· A tool for graphing time series data. Links
· Homepage http://oss.oetiker.ch/rrdtool/
· Tutorial http://oss.oetiker.ch/rrdtool/tut/rrdtutorial.en.html Important install locations
· /usr/local/bin
· /usr/local/lib
· /usr/local/rrdtool-1.2.26
· /usr/local/share/rrdtool
Example12
· To set up the round robin database use the following command:
rrdtool create test.rrd --start 920804400 DS:speed:COUNTER:600:U:U RRA:AVERAGE:0.5:1:24 RRA:AVERAGE:0.5:6:10
· To update the database with data use the following commands:
rrdtool update test.rrd 920804700:12345 920805000:12357 920805300:12363 rrdtool update test.rrd 920805600:12363 920805900:12363 920806200:12373 rrdtool update test.rrd 920806500:12383 920806800:12393 920807100:12399 rrdtool update test.rrd 920807400:12405 920807700:12411 920808000:12415 rrdtool update test.rrd 920808300:12420 920808600:12422 920808900:12423
· The following command generates a PNG file with the graph:
rrdtool graph speed.png --start 920804400 --end 920808000 DEF:myspeed=test.rrd:speed:AVERAGE LINE2:myspeed#FF0000
· Open GQview and view image speed.png
3.20. RT Graph 3D (V)
Purpose· Real-time 3D visualization of linked graphs. Links
· Homepage http://www.secdev.org/projects/rtgraph3d/ Important install locations
· /usr/local/bin
· /usr/local/lib/rtgraph3d
Example
· Start RT Graph 3D Server through the KDE start menu.
· Wait until the window named RealTime Graph 3D appears.
· Start RT Graph 3D Client through the KDE start menu.
· On the RTG prompt of the client enter: edge a b
· The linked graph should now be shown.
3.21. rumint (V)
Purpose· Visualization of real-time and recorded network captures. Since rumint is running in Wine sniffing of real-time traffic is not supported.
Links
· Homepage http://www.rumint.org/ Important install locations
· ./root/.wine/drive_c/Program Files/rumint
Example
· Since rumint is running in Wine, it is not possible to capture live network traffic. Therefore you have to capture the traffic with Wireshark or tcpdump.
· Start rumint through the KDE start menu.
· In the window menu select File\Load PCAP Dataset.
· In the file open dialog navigate to your capture file and open it.
· In the window Scatter Plot select Source IP in the X-axis and Dest IP in the Y-axis.
· In the window Parallel Coordinate Plot select TCP Source Port on the left hand side and TCP Dest Port on right hand side.
3.22. Scapy (CPV)
Purpose· Capture and manipulation of TCP/IP traffic.
· Visualization of traceroutes. Links
· Homepage http://www.secdev.org/projects/scapy/
· Tutorial http://www.secdev.org/projects/scapy/demo.html Important install locations
· /usr/lib/python2.5
· /usr/local/bin
Example traceroute
· Open a console.
· Execute the command: scapy
· Execute the following command to traceroute a series of hosts:
res,unans = traceroute(["www.microsoft.com","www.cisco.com"], dport=[80,443],maxttl=20,retry=-2)
root@slax:~# scapy
Welcome to Scapy (1.2.0.2)
>>> res,unans = traceroute(["www.microsoft.com","www.cisco.com"],
... dport=[80,443],maxttl=20,retry=-2)
Begin emission:
**********************************************************************Finish ed to send 80 packets.
*******Begin emission: Finished to send 3 packets. *Begin emission:
Finished to send 2 packets. Begin emission:
Finished to send 2 packets.
Received 78 packets, got 78 answers, remaining 2 packets
198.133.219.25:tcp443 198.133.219.25:tcp80 207.46.19.190:tcp443 207.46.19.190:tcp80 1 192.168.16.1 11 192.168.16.1 11 192.168.16.1 11 192.168.16.1 11 2 212.254.136.1 11 212.254.136.1 11 212.254.136.1 11 212.254.136.1 11 ...
· To plot the graph use the command: res.graph()
Example Sniffing
· Open a console.
· Execute the command: scapy
· Sniff some network traffic: p=sniff(count=50)
root@slax:~# scapy
Welcome to Scapy (1.2.0.2) >>> p=sniff(count=50)
· Plot some statistics using the command: p.plot(lambda x:len(x))
>>> p.plot(lambda x:len(x))
<Gnuplot._Gnuplot.Gnuplot instance at 0x84cf0ec>
3.23. Shell Tools (P)
Purpose· Common UNIX tools for processing text files. Links
· Tutorial awk: http://www.grymoire.com/Unix/Awk.html
· Tutorial grep: http://www.panix.com/~elflord/unix/grep.html
· Tutorial sed: http://www.grymoire.com/Unix/Sed.html Important install locations
· /usr/bin
Example
· To extract the first column of a colon separated text file use:
awk -F\: '{print $1}' /etc/passwd
root@slax:~# awk -F\: '{print $1}' /etc/passwd root bin daemon adm lp ...
· To grep a single line from a text file use:
grep "^root" /etc/passwd
root@slax:~# grep "^root" /etc/passwd root:x:0:0::/root:/bin/bash
· To egrep lines for multiple patterns use:
egrep "^root|^apache" /etc/passwd
root@slax:~# egrep "^root|^apache" /etc/passwd root:x:0:0::/root:/bin/bash
3.24. Shoki Packet Hustler (V)
Purpose· Visualization of network traffic as a three-dimensional scatter plot. Links
· Homepage http://shoki.sourceforge.net/
· Manual http://shoki.sourceforge.net/hustler/manual.html Important install locations
· /usr/local/shoki
Example
· First you have to create a capture file with Wireshark.
· Next, Start Shoki Packet Hustler through the KDE start menu.
3.25. tcpdump (C)
Purpose· Command line tool for sniffing network traffic. Links
· Homepage: http://www.tcpdump.org/
· Manual: http://www.tcpdump.org/tcpdump_man.html Important install locations
· /usr/sbin
Example
· Open a console.
· To capture network traffic into a file from the network interface eth0, use the following command: tcpdump -s0 -i eth0 -w test.cap
3.26. Timesearcher 1 (V)
Purpose· Analysis of time series data. Links
· Homepage http://www.cs.umd.edu/hcil/timesearcher/
· Manual http://www.cs.umd.edu/hcil/timesearcher/docs/index.html Important install locations
· /usr/local/bin
· /usr/local/lib/timesearcher1
· /usr/local/share/timesearcher1
Example
· Start Timesearcher 1 through the KDE start menu.
· In the file dialog click the browse button and navigate to:
/usr/local/share/timesearcher1/data
3.27. tnv (V)
Purpose· Time based analysis of network traffic. Links
· Homepage http://tnv.sourceforge.net/
· Tutorial http://tnv.sourceforge.net/start.php Important install locations
· /usr/local/bin
· /usr/local/lib/tnv
· /usr/local/share/tnv/
Example
· Start tnv through the KDE start menu.
· Acknowledge the startup dialog by pressing the button Begin using TNV.
· In the upcoming dialog set your local network IP range, in our example it is
192.168.16.0 with the network mask 255.255.255.0.
· In the window menu select Capture\Capture Packets...
· In the Capture Packets dialog select the network interface you want to monitor, e.g. eth0.
· Open Firefox and do some surfing.
· When you are done press the Stop capture button in tnv.
3.28. Treemap (V)
Purpose· Visualization of hierarchical data as treemaps. Links
· Homepage http://www.cs.umd.edu/hcil/treemap/
· Manual http://www.cs.umd.edu/hcil/treemap/doc4.1/toc.html Important install locations
· /usr/local/bin
· /usr/local/lib/treemap
· /usr/local/share/treemap
Example
· Start TreeMap through the KDE start menu.
· The tool gives give a license warning that it can only be used for non commercial purposes. If you agree to the license conditions press Agree, otherwise Exit.
· In the file open dialog navigate to: /usr/local/share/treemap/data.
· The treemap is then rendered.
3.29. Tulip (V)
Purpose· Visualization tool for linked graphs that supports several layout algorithms. Links
· Homepage http://www3.labri.fr/perso/auber/projects/tulip/
· Manual http://www3.labri.fr/perso/auber/projects/tulip/userHandbook.php
Important install locations
· /usr/local/bin
· /usr/local/lib
· /usr/local/lib/tlp
· /usr/local/share/tulip
Example
· Start Tulip through the KDE start menu.
· In the window menu select File\Import\Graphs\Uniform Random Binary Tree.
· To layout the graph, use the window menu Algorithm\Layout\Tree\Bubble Tree.
3.30. Walrus (V)
Purpose· Visualization hierarchical data as three-dimensional link graphs. Links
· Homepage http://www.caida.org/tools/visualization/walrus/ Important install locations
· /usr/local/bin
· /usr/local/lib/walrus
· /usr/local/share/walrus
Example
· Start Walrus through the KDE start menu.
· In the window menu select File\Open.
· In the file open dialog navigate to: /usr/local/share/walrus/samples · Open one of the graphs in this directory, e.g. champagne.graph.
3.31. Wireshark (C)
Purpose· Capturing and dissecting network traffic. Links
· Homepage: http://www.wireshark.org/
· Manual: http://www.wireshark.org/docs/wsug_html/ Important install locations
· /usr/local/bin
· /usr/local/lib
· /usr/local/lib/wireshark
· /usr/local/share/wireshark
Example
· Start Wireshark through the KDE start menu.
· Select menu Capture\Options.
· Press the Start button.
· The network traffic is now recorded.
· To stop recording select the window menu Capture\Stop.
· In the center window frame you can now navigate through the dissected protocol layers.
4.
Customizing DAVIX ISO Image
You will most likely get quickly to a point where you want to modify the DAVIX image to suite your particular requirements. Thanks to SLAX customizing your CD with your own configuration and adding or removing modules is really easy. This chapter shows you how to do that. Customizing can either be done under Linux or Windows.
4.1. Windows
The general steps for modifying the DAVIX ISO under Windows are the following:
· Create a new directory on your hard drive, e.g. D:\mydavix\ · Copy the boot and slax directory to the newly created directory.
· Make your changes according to the instructions in the following chapters.
· Open a DOS prompt.
· Navigate to the slax directory on your hard drive using the command:
cd /d D:\mydavix\slax\
· Execute the following command to build the ISO image:
make_iso.bat d:\mydavix\mydavix.iso D:\mydavix\slax>make_iso.bat D:\mydavix\mydavix.iso mkisofs 2.01 (i686-pc-cygwin) Scanning . Scanning ./boot Scanning ./boot/dos Scanning ./boot/isolinux
Excluded by match: ./boot/isolinux/isolinux.boot Scanning ./boot/syslinux Scanning ./slax Scanning ./slax/base Scanning ./slax/devel Scanning ./slax/modules Scanning ./slax/optional Scanning ./slax/rootcopy ... Scanning ./slax/rootcopy/usr/share/wallpapers Scanning ./slax/tools Scanning ./slax/tools/WIN ...
Writing: Initial Padblock Start Block 0 Done with: Initial Padblock Block(s) 16 Writing: Primary Volume Descriptor Start Block 16 Done with: Primary Volume Descriptor Block(s) 1 Writing: Eltorito Volume Descriptor Start Block 17 Size of boot image is 4 sectors -> No emulation
Done with: Eltorito Volume Descriptor Block(s) 1 Writing: Joliet Volume Descriptor Start Block 18
Done with: Joliet Volume Descriptor Block(s) 1 Writing: End Volume Descriptor Start Block 19 Done with: End Volume Descriptor Block(s) 1 Writing: Version block Start Block 20 Done with: Version block Block(s) 1 Writing: Path table Start Block 21 Done with: Path table Block(s) 4 Writing: Joliet path table Start Block 25 Done with: Joliet path table Block(s) 4 Writing: Directory tree Start Block 29 Done with: Directory tree Block(s) 82 Writing: Joliet directory tree Start Block 111 Done with: Joliet directory tree Block(s) 69 Writing: Directory tree cleanup Start Block 180 Done with: Directory tree cleanup Block(s) 0 Writing: Extension record Start Block 180 Done with: Extension record Block(s) 1 Writing: The File(s) Start Block 181 1.74% done, estimate finish Thu May 1 17:23:51 2008
...
99.16% done, estimate finish Thu May 1 17:23:34 2008 Total translation table size: 2048
Total rockridge attributes bytes: 48022 Total directory bytes: 166354
Path table size(bytes): 860
Done with: The File(s) Block(s) 287089 Writing: Ending Padblock Start Block 287270 Done with: Ending Padblock Block(s) 150 Max brk space used 64000
287420 extents written (561 MB) New ISO should be created now. Press any key to continue . . .
· Either burn the created ISO image mydavix.iso to a CD-ROM/DVD or use any other deployment method as document in the chapter Deployment Options.
4.2. Linux
The general steps for modifying the DAVIX ISO under Linux are the following. Note that hdc is used here as a sample. On you system it could be on another device ID.
· Open a console.
· Insert DAVIX CD into your CD or DVD drive. On some Linux system the CD will automatically be mounted into /mnt/hdc.
· If DAVIX CD or DVD does not mount automatically you can mount it manually: mount /dev/hdc /mnt/hdc
· Create a new directory on your hard drive, e.g.: mkdir -p /tmp/mydavix · Copy the boot and slax directory to the newly created directory:
cp -pvR /mnt/hdc/boot /mnt/hdc/slax /tmp/mydavix
· Navigate to the slax directory on your hard drive using the command:
cd /tmp/mydavix/slax
· Execute the following command to build the ISO image: ./make_iso.sh /tmp/mydavix/mydavix.iso
· Either burn the created ISO image mydavix.iso to a CD-ROM/DVD or use any other deployment method as document in the chapter Deployment Options.
4.3. Adding and Removing Modules
After copying all the SLAX files to the hard drive you can customize the SLAX content. Modules can be found in following directories:
· slax\base SLAX core modules. Will be loaded on every boot.
· slax\modules Standard modules. Will be loaded on every boot.
· slax\optional Optional modules which can be specified in the boot menu. You can add or remove modules from these directories as you like.
4.4. Overriding Files with rootcopy
If you just want to override a specific file in one of the modules you can use the
slax\rootcopy directory. The content of rootcopy will be applied to the union file system as the last step and it allows you to override any file in the file system. This feature is very useful when you want to tweak single configuration files, like
/etc/X11/xorg.conf. But for larger changes the use modules is encouraged.
4.5. Modifying Boot Menu
The boot menu can be modified through the file slax.cfg, which can be found in the
boot directory. Here you can add or remove additional entries in the boot menu. To add a new one just append following section to the file:
LABEL myconf
MENU LABEL DAVIX Graphics mode (KDE) KERNEL /boot/vmlinuz
APPEND initrd=/boot/initrd.gz ramdisk_size=6666 root=/dev/ram0 rw changes=slax autoexec=xconf;kdm
TEXT HELP
Help for currently selected: Run DAVIX the max, try to
autoconfig graphics card and use the maximum allowed resolution. ENDTEXT
Due to the width limitation in this document the line with the keyword APPEND is wrapped to form two lines. In your slax.cfg it needs to be on one line to work correctly.
The available boot options are documented in the chapter Boot Cheat Codes.
4.6. Boot Cheat Codes
SLAX comes along with many useful boot options which allow you to tweak boot and kernel behavior. The following list shows an extract of the most important ones. For a complete list check the SLAX boot parameter page13.
· nodma Disable DMA for CD-ROM and hard drives.
· noauto Hard disk are not mounted automatically.
· nohd Hard disks are not mounted.
· nocd CD-ROMs are note mounted.
· nosound Disable sound.
· password=foobar Set root password to foobar.
· password=ask Ask for new password during boot.
· changes=/dev/hdx Stores changes to the specified device.
· changes=/foo/bar Stores changes to the specified directory.
· changes=/foo.dat Stores changes to the specified file.
· toram Copy all CD files to RAM
· copy2ram Same as toram
· load=module Loads the specified module from slax\optional.
· noload=module Disable loading of specified module
· autoexec=xconf;kdm After boot auto-configures X and starts KDM.
5.
Creating and Modifying Modules
This chapter shows you the different ways for getting your hands on additional SLAX modules for DAVIX.
5.1. Leverage Existing SLAX Modules
The easiest way to get a new SLAX module is by checking the SLAX website itself. The modules page offers a wide range of contributed ready to use SLAX modules14. These modules in general come with all the required libraries and should work right away.
5.2. Create New Modules from Slackware Packages
Another fast way to get additional modules is to search and download existingSlackware packages15 and convert them to SLAX modules using following command:
tgz2lzm foo-bar-1.0.tgz foo-bar-1.0.lzm
14 SLAX modules: http://www.slax.org/modules.php 15 Search Slackware Packages: http://packages.slackware.it/
This approach does no dependency checking and requires you to investigate the package dependencies yourself and convert all required packages to SLAX modules as well. The pragmatic approach is to convert the particular module you want to run and integrate it into the DAVIX ISO. Then you boot DAVIX and try to execute one of the binaries in your module. If there is an error that a specific library is missing then you have found an unsatisfied dependency. You then have to identify the Slackware package where the library can be found and convert it to a SLAX module. And then the testing starts again...
5.3. Customize Existing SLAX or DAVIX Modules
If you want to tweak a single SLAX or DAVIX package a just little. It is possible to extract a SLAX module using following command:
lzm2dir foo-bar-1.0.lzm /foo/bartarget/dir
You can then modify the extracted files to your needs and repack the directory to a SLAX module with following command:
6.
Deployment Options
The following instructions show you different ways how to install DAVIX on different types of media. The step-by-step guides are very generic and do also apply for other SLAX distributions.
6.1. VMware
DAVIX can be run inside VMware without any problems. Even OpenGL is supported. The procedures were successfully tested with:
· VMware Workstation 6.0.3 Build 80004
6.1.1. Virtual Machine Setup
For all the described VMware deployments the following procedure is common to all:
· Start VMware Workstation.
· Through the Windows menu File\New...\Virtual Machine... start the New Virtual Machine Wizard.
· In the Virtual machine configuration step select Custom.
· In the Virtual machine hardware compatibility step select Workstation 6.
· As guest operating system select Linux and select Other Linux 2.6.x kernel.
· Choose virtual machine name and storage location.
· Choose One as the number of processors.
· Allocate at least 512 MB of memory. The optimal value is 1024 MB.
· Select Use bridged networking.
· Select I/O adapter type SCSI adapter LSI Logic.
· Select Create a new virtual disk.
· Choose disk size of 8 GB without allocating disk space.
· Choose disk file name and press Finish.
The basic virtual machine is now setup. Continue with one of the chapters CD-ROM based Bootor Installation on Virtual Hard Drive.
6.1.2. CD-ROM based Boot
Before continuing with this chapter please setup the basic virtual machine as described in chapter Virtual Machine Setup.
Edit virtual machine settings:
· Select tab Hardware · Select CD-ROM drive.
· Select option Use ISO image and browse for the DAVIX image.
· Close the settings dialog.
On first startup the CD-ROM will not boot as default. Therefore following steps have to be taken:
· Start virtual machine.
· When the BIOS screen is shown press F2.
· Navigate to menu Boot.
· Move the entry CD-ROM Drive to the first position in boot order.
· Press F10 and confirm changes by selecting Yes.
6.1.3. Installation on Virtual Hard Drive
Before continuing with this chapter please setup the basic virtual machine as described in chapter Virtual Machine Setup.
6.2. Other Virtualization Environments
Our testers have reported that DAVIX works with following other virtualization suites:
· Parallels 3.0 Build 5584
· QEMU 0.9
· VirtualBox 1.6.0
· VMware Fusion 1.1.2 Build 87978
For the exact environments, which the virtualization suites have been tested with, see chapter Virtual Machines.
6.3. USB Stick
It is possible to run DAVIX from a USB stick. This has the advantages that booting from stick in general is faster and it allows for changes to be made persistent. The following step-by-step instructions will help you to achieve this.
The procedures were successfully tested with following USB sticks:
· SanDisk Cruzer TITANIUM, 4GB
· SanDisk Cruzer Micro, 4 GB
· SONY Micro Vault, 1 GB
· Pretec 02GB Cha Cha, 2 GB A word of warning:
· To avoid data loss the system should be shutdown properly before removing the USB stick. In particular the VFAT is quite prone to such abuse. If you want to have a robust solution use xfs as file system instead. For details see xfs instruction below.
6.3.1. On Windows with VFAT Formatted USB Stick
· First of all you have to get a USB stick currently a USB stick with at least 1 GB is recommended. If you have more it should work as well.
· If the USB is supports U3 it is necessary to uninstall the U3 feature using the tool provided by following web-site: http://www.u3.com/uninstall/.
· Then open the MMC console and add the Disk Management Snap-in.
· Copy from the DAVIX CD/DVD the directories boot and slax to the USB stick.
· Writing to the flash memory will take a while. So grab a coffee. J
· Open the DOS prompt and navigate to the boot directory on the USB stick.
· Execute bootinst.bat and acknowledge the messages. The USB stick is now made bootable.
· Reboot your system and boot from USB stick. When you are seeing the DAVIX boot menu you are done!
6.3.2. On Linux with VFAT Formatted USB Stick
Although VFAT is supported by the SLAX kernel the mkfs.vfat is missing on the SLAX image. Therefore the first steps have to done in Windows.
· First of all you have to get a USB stick currently a USB stick with at least 1 GB is recommended. If you have more it should work as well.
· If the USB is supports U3 it is necessary to uninstall the U3 feature using the tool provided by following web-site: http://www.u3.com/uninstall/.
· Then open the MMC console and add the Disk Management Snap-in.
· Format the USB stick partition with FAT32 and the default allocation size.
· Leave the USB inserted in the computer.
· Boot DAVIX from CD-ROM.
· Open a console.
· The USB should have been mounted automatically to /mnt/sda1. Execute
mount to cross-check.
root@slax:~# mount aufs on / type aufs (rw) proc on /proc type proc (rw) sysfs on /sys type sysfs (rw)
usbfs on /proc/bus/usb type usbfs (rw)
/dev/sda1 on /mnt/sda1 type vfat
(rw,noatime,quiet,umask=0,check=s,shortname=mixed)
root@slax:~# .
· Then copy the directories boot and slax to the USB stick.
cp -pvR /mnt/live/mnt/hdc/boot /mnt/live/mnt/hdc/slax /mnt/sda1 · Writing to the flash memory will take a while. So grab a coffee. J
· Change to the boot directory on the USB stick: cd /mnt/sda1/boot
· Execute ./bootinst.sh and acknowledge the messages. The USB stick is now made bootable.
-=-=-=-=-=-=-=-=-=-=-=-=-=-=-=-=-=-=-=-=-=-=-=-=-=-=-=-=-=-=-=-=-=-=-=-=-=- Welcome to Slax boot installer
-=-=-=-=-=-=-=-=-=-=-=-=-=-=-=-=-=-=-=-=-=-=-=-=-=-=-=-=-=-=-=-=-=-=-=-=-=- This installer will setup disk /dev/sda1 to boot only Slax.
Warning! Master boot record (MBR) of /dev/sda will be overwritten.
anymore. Only Slax will boot from this device. Be careful!
Press any key to continue, or Ctrl+C to abort...
Flushing filesystem buffers, this may take a while... Setting up MBR on /dev/sda...
The Master Boot Record of /dev/sda has been updated. Activating partition /dev/sda1...
No partition table modifications are needed. Updating MBR on /dev/sda...
Setting up boot record for /dev/sda1...
Disk /dev/sda1 should be bootable now. Installation finished.
Read the information above and then press any key to exit...
· Reboot your system and boot from USB stick. When you are seeing the DAVIX boot menu you are done!
6.3.3. On Linux with xfs Formatted USB Stick
· First of all you have to get a USB stick currently a USB stick with at least 1 GB is recommended. If you have more it should work as well.
· If the USB is supports U3 it is necessary to uninstall the U3 feature using the tool provided by following web-site: http://www.u3.com/uninstall/.
· Leave the USB inserted in the computer.
· Boot DAVIX from CD-ROM in KDE mode.
· Open a console.
· To find out which device ID your hard disk has execute the command:
sfdisk --list. For simplicity of this example sda has been chosen. Your device ID may be different. So watch out!
root@slax:~# sfdisk --list
Disk /dev/sda: 1019 cylinders, 127 heads, 62 sectors/track
Units = cylinders of 4031488 bytes, blocks of 1024 bytes, counting from 0 Device Boot Start End #cyls #blocks Id System
/dev/sda1 * 0+ 1018 1019- 4011772 83 Linux /dev/sda2 0 - 0 0 0 Empty /dev/sda3 0 - 0 0 0 Empty /dev/sda4 0 - 0 0 0 Empty
· Use mount to make sure that all file systems on the USB stick are unmounted.
root@slax:~# mount
aufs on / type aufs (rw) proc on /proc type proc (rw) sysfs on /sys type sysfs (rw)
usbfs on /proc/bus/usb type usbfs (rw)
/dev/hda1 on /mnt/hda1 type ext3 (rw,noatime) /dev/hda3 on /mnt/hda3 type ext3 (rw,noatime)
/dev/sda1 on /mnt/sda1 type xfs (rw,noatime)
· If there is still a file system (e.g. sda1) mounted then unmount it:
umount /dev/sda1
· Wipe the USB stick to avoid later problems when installing the boot loader:
dd if=/dev/zero of=/dev/sda bs=1M
root@slax:~# dd if=/dev/zero of=/dev/sda bs=1M
dd: writing `/dev/sda': No space left on device 3920+0 records in
3919+0 records out
4110227968 bytes (4.1 GB) copied, 557.438 s, 7.4 MB/s
· Then we have to partition the hard drive. Execute: fdisk /dev/sda
root@slax:~# fdisk /dev/sda
Device contains neither a valid DOS partition table, nor Sun, SGI or OSF disklabel
Building a new DOS disklabel with disk identifier 0x66b7eb5d. Changes will remain in memory only, until you decide to write them. After that, of course, the previous content won't be recoverable. Warning: invalid flag 0x0000 of partition table 4 will be corrected by w(rite)
· Create partition according to the options below:
Command (m for help): n
Command action e extended
p primary partition (1-4)
p
Partition number (1-4): 1
First cylinder (1-1019, default 1): {ENTER}
Using default value 1
Last cylinder or +size or +sizeM or +sizeK (1-1019, default 1019): {ENTER}
Using default value 1019
· Activate the partition as bootable:
Command (m for help): a
Partition number (1-4): 1
· Create xfs file system on first partition: mkfs.xfs /dev/sda1 · Create a mount point for the third partition: mkdir /mnt/sda1
· Mount the third partition to the newly created mount point:
mount /dev/sda1 /mnt/sda1
· Copy the boot and slax directory to the newly created directory:
cp -pvR /mnt/live/mnt/hdc/boot /mnt/live/mnt/hdc/slax /mnt/sda1 · Writing to the flash memory will take a while. So grab a coffee. J
· Change to the boot directory on the USB stick: cd /mnt/sda1/boot
· Execute ./liloinst.sh and acknowledge the messages. The USB stick is now made bootable.
-=-=-=-=-=-=-=-=-=-=-=-=-=-=-=-=-=-=-=-=-=-=-=-=-=-=-=-=-=-=-=-=-=-=-=-=-=-=-=-
Welcome to Slax boot installer
-=-=-=-=-=-=-=-=-=-=-=-=-=-=-=-=-=-=-=-=-=-=-=-=-=-=-=-=-=-=-=-=-=-=-=-=-=-=-=-
This installer will setup disk /dev/sda to boot only Slax from /dev/sda1. Warning! Master boot record (MBR) of /dev/sda will be overwritten.
If you use /dev/sda to boot any existing operating system, it will not work anymore. Only Slax will boot from this device. Be careful!
Press any key to continue, or Ctrl+C to abort...
Flushing filesystem buffers, this may take a while... Updating MBR to setup boot record...
Warning: /dev/sda is not on the first disk
Warning: The initial RAM disk is too big to fit between the kernel and the 15M-16M memory hole. It will be loaded in the highest memory as though the configuration file specified "large-memory" and it will be assumed that the BIOS supports memory moves above 16M.
Added Slax ? *
Disk /dev/sda should be bootable now. Installation finished. Read the information above and then press any key to exit...
· Reboot your system and boot from USB stick. When you are seeing the DAVIX boot menu you are done!
6.4. Hard Drive
DAVIX can also be installed on hard disk where all SLAX modules have been extracted. These instructions are based in parts on the paper published by Offensive Security16.
A word of warning:
· According to BackTrack the BackTrack Installer is experimental and has not yet been tested! It is therefore highly recommended to work with an empty hard drive or use VMware.
Here is the procedure for installing DAVIX on hard disk:
· Boot DAVIX from CD or DVD in KDE mode. Make sure there are no other hard drive devices attached than the one you want DAVIX onto.
· To find out which device ID your hard disk has execute the command: sfdisk --list. For simplicity of this example hda has been chosen. Your device ID may be different. So watch out!
root@slax:~# sfdisk --list
Disk /dev/hda: 9733 cylinders, 255 heads, 63 sectors/track
Units = cylinders of 8225280 bytes, blocks of 1024 bytes, counting from 0 Device Boot Start End #cyls #blocks Id System
/dev/hda1 0 - 0 0 0 Empty /dev/hda2 0 - 0 0 0 Empty /dev/hda3 0 - 0 0 0 Empty /dev/hda4 0 - 0 0 0 Empty
· First we have to partition the hard drive. Execute: fdisk /dev/hda
root@slax:~# fdisk /dev/hda
The number of cylinders for this disk is set to 9733.
There is nothing wrong with that, but this is larger than 1024, and could in certain setups cause problems with:
1) software that runs at boot time (e.g., old versions of LILO) 2) booting and partitioning software from other OSs
(e.g., DOS FDISK, OS/2 FDISK)
· Create first partition according to the options below:
Command (m for help): n
Command action e extended
p primary partition (1-4)
p
Partition number (1-4): 1
First cylinder (1-9733, default 1): {ENTER}
Using default value 1
Last cylinder or +size or +sizeM or +sizeK (1-9733, default 9733): +50M
· Create second partition according to the options below:
Command (m for help): n
Command action e extended
p primary partition (1-4)
p
Partition number (1-4): 2
First cylinder (8-9733, default 8): {ENTER}
Using default value 8
Last cylinder or +size or +sizeM or +sizeK (8-9733, default 9733): +512M
· Create third partition according to the options below:
Command (m for help): n
Command action e extended
p primary partition (1-4)
p
Partition number (1-4): 3
First cylinder (71-9733, default 71): {ENTER}
Using default value 71
Last cylinder or +size or +sizeM or +sizeK (71-9733, default 9733): {ENTER}
Using default value 9733
· Activate the first partition as bootable:
Command (m for help): a
Partition number (1-4): 1
· Change the partition type of partition #2 to 82 for Linux Swap:
Command (m for help): t
Partition number (1-4): 2
Hex code (type L to list codes): 82
Changed system type of partition 2 to 82 (Linux swap)
· Now we have to write the partition table to disk:
Command (m for help): w
The partition table has been altered! Calling ioctl() to re-read partition table. Syncing disks.
root@slax:~#
· Now we have to initialize the swap partition: mkswap /dev/hda2
Setting up swapspace version 1, size = 518184 kB no label, UUID=4964f425-7308-4f41-bc1a-b7b6c2ff4a3c
· Create ext3 file system on first partition: mkfs.ext3 /dev/hda1
root@slax:~# mkfs.ext3 /dev/hda1
mke2fs 1.40.8 (13-Mar-2008) Filesystem label=
OS type: Linux
Block size=1024 (log=0) Fragment size=1024 (log=0) 14056 inodes, 56196 blocks
2809 blocks (5.00%) reserved for the super user First data block=1
Maximum filesystem blocks=57671680 7 block groups
8192 blocks per group, 8192 fragments per group 2008 inodes per group
Superblock backups stored on blocks: 8193, 24577, 40961
Writing inode tables: done
Creating journal (4096 blocks): done
Writing superblocks and filesystem accounting information: done This filesystem will be automatically checked every 24 mounts or 180 days, whichever comes first. Use tune2fs -c or -i to override.
· Create ext3 file system on third partition: mkfs.ext3 /dev/hda3
root@slax:~# mkfs.ext3 /dev/hda3
mke2fs 1.40.8 (13-Mar-2008)
Warning: 256-byte inodes not usable on older systems Filesystem label=
OS type: Linux
Blo