© 2012 EMS Database Management Solutions
InterBase/Firebird
User's Manual
All rights reserved.
This manual documents EMS SQL Query for InterBase/Firebird
No parts of this work may be reproduced in any form or by any means - graphic, electronic, or mechanical, including photocopying, recording, taping, or information storage and retrieval systems - without the written permission of the publisher.
Products that are referred to in this document may be either trademarks and/or registered trademarks of the respective owners. The publisher and the author make no claim to these trademarks.
While every precaution has been taken in the preparation of this document, the publisher and the author assume no responsibility for errors or omissions, or for damages resulting from the use of information contained in this document or from the use of programs and source code that may accompany it. In no event shall the publisher and the author be liable for any loss of profit or any other commercial damage caused or alleged to have been caused directly or indirectly by this document.
Use of this documentation is subject to the following terms: you may create a printed copy of this documentation solely for your own personal use. Conversion to other formats is allowed as long as the actual content is not altered or edited in any way.
Document generated on: 27.03.2012
User's Manual
Table of Contents
Part I Welcome to EMS SQL Query!
7
...8 What's new ...9 System requirements ...10 Installation ...11 Registration ...13 How to register SQL Query
...15 EMS SQL Query FAQ
Part II Getting Started
18
...20 First time started
...21 Database navigation
...23 Working with queries
...24 Using context menus
... 24 Host context m enu
... 25 Database context m enu
... 26 Query context m enu
...27 Importing settings
...28 Selecting program language
Part III EMS SQL Query Tools
30
...31 Database Explorer
... 32 Managing database registration info
... 33 Connecting to databases
... 33 View ing brief DB info
... 34 View ing query history
... 36 SQL Assistant
...38 Database management tools
... 40 Register Database Wizard
... 40 Setting connection properties
... 43 Setting registration options
... 44 Database Registration Info dialog
... 44 Editing connection properties
... 46 Setting database options
... 47 Setting log options
... 48 Host Registration Inform ation
... 48 Editing connection properties
... 49 Setting SSH tunnel options
...51 Query management tools
... 52 SQL Editor
... 52 Working w ith SQL editor area
... 53 Using the context menu
... 54 Find Text dialog
... 56 Replace Text dialog
... 58 Executing queries
... 60 Visual Query Builder
... 60 Working w ith Query Builder area
... 62 Joining tables
... 63 Setting criteria
... 65 Setting output fields
... 67 Setting grouping criteria
... 68 Setting sorting parameters
... 70 Working w ith the editor area
... 71 Query execution ... 73 Query History ... 73 Query Plan ... 74 Favorite Queries ...76 Data management tools
... 76 Data View ... 76 Grid View ... 77 Grouping data ... 78 Filtering records ... 80 Printing data ... 81 Exporting results ... 82 Using the context menu
... 83 Form View
... 84 BLOB View
... 85 View ing as Hexadecimal
... 86 View ing as Text
... 87 View ing as Rich text
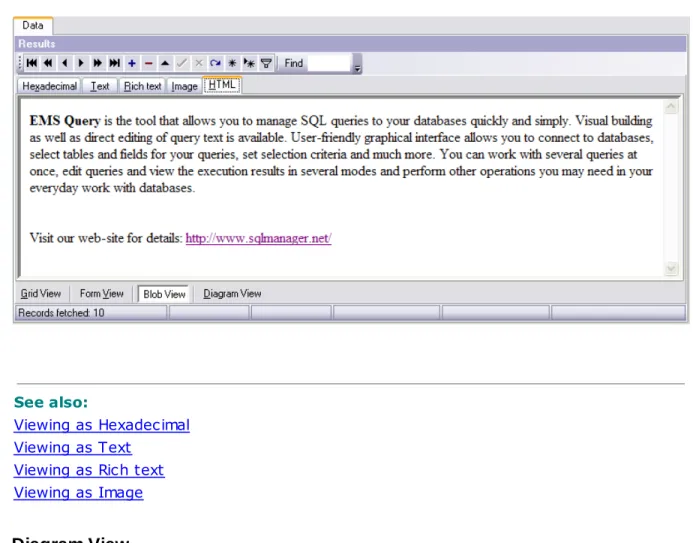
... 88 View ing as Image
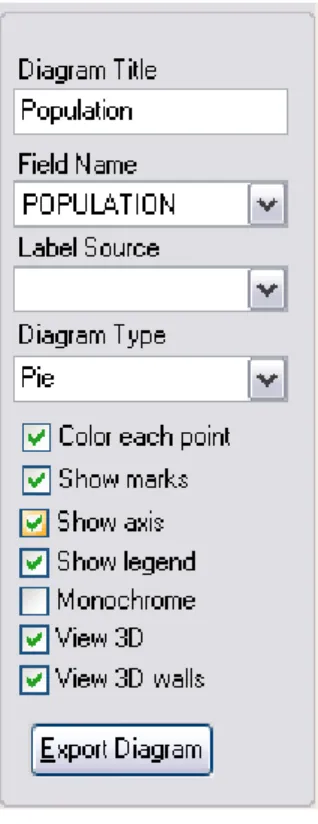
... 88 View ing as HTML ... 89 Diagram View ... 90 Selecting fields ... 90 Setting diagram properties
... 92 Editing Chart dialog
... 93 Chart ... 93 Series ... 95 General ... 96 Axis ... 97 Titles ... 98 Legend ... 98 Panel ... 99 Paging ... 100 Walls ... 100 3D ... 101 Series ... 103 Data ... 104 Export ... 105 Print ... 106 Exporting diagram as image
... 107 Setting file name and format
... 107 Export Diagram options
... 108 Custom Filter
... 109 Filter Builder dialog
... 110 Invoking the Filter Builder dialog
... 110 Adding a new condition
... 111 Setting filter criteria
... 112 Setting filter operator
... 113 Setting filter criteria values
... 114 Adding a new group
... 115 Setting group operator
... 116 Applying filter conditions
Part IV Personalization
119
...120 Options
... 120 Environm ent options
... 120 Preferences ... 122 Default Sheet ... 123 Confirmations ... 124 DB Explorer ... 126 Query Builder ... 128 Color Palette ... 131 Fonts ... 132 Grid ... 134 Report ... 135 Localization ... 137 Editor options ... 137 General ... 138 Display ... 140 Color ... 141 Quick code ... 142 Visual options ... 143 Bars and Menus
... 144 Trees and Lists
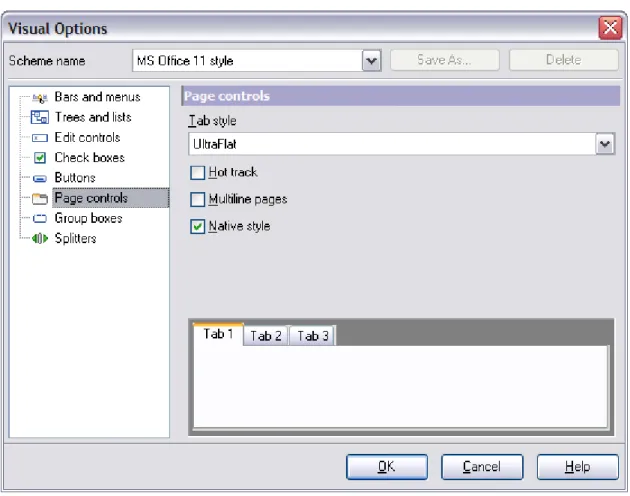
... 146 Edit controls ... 148 Check boxes ... 149 Buttons ... 151 Page controls ... 152 Group boxes ... 154 Splitters ... 155 Save Settings ... 155 Specifying destination file
... 156 Selecting settings ... 157 Selecting databases ...159 Keyboard templates ...161 Localization
Part V Appendix
163
...163 SSH tunneling options ...164 Customize toolbars and menusPart
1
Welcome to EMS SQL Query!
EMS SQL Query for InterBase/Firebird is the tool that allows you to manage SQL queries to your InterBase/Firebird databases quickly and simply. Visual building as well as direct editing of query text is available. User-friendly graphical interface allows you to connect to databases, select tables and fields for your queries, set selection criteria and much more. You can work with several queries at once, edit queries and view the
execution results in several modes and perform other operations you may need in your everyday work with InterBase/Firebird databases.
Visit our web-site for details: http://www.sqlmanager.net/
Key features:
User-friendly graphical interface
Connect through SSH tunnel: establish connection to an intermediate SSH server and forward all InterBase/Firebird commands through the secure tunnel
Charsets and collations support for databases and tables provided
Using drag-and-drop operations when selecting tables and fields for a query visually Working simultaneously with several queries in separate windows
Registering databases for working with the required databases only Multiple database connections
Navigation within recently used queries and selecting the required queries
Syntax highlight, "quick code" and keyboard templates for faster editing query text Tools for data grouping and filtering
The ability to create queries with unions and subqueries visually The ability to create diagrams based on queries
Capabilities for viewing query plans
Flexible personalization of graphical user interface Multi-language GUI support
Product information:
Homepage: http://www.sqlmanager.net/en/products/ibfb/query
Support Ticket System:
http://www.sqlmanager.net/support
1.1
What's new
Version Release date
SQL Query for InterBase/Firebird 3.4 March 26, 2012
What's new in SQL Query?
Now the Help file is opened in the selected language of the program; SSH connection settings were not saved. Fixed now;
After executing the SELECT query, a dataset could not be switched to the "Load all rows" mod. Fixed now;
The sequence of such actions as: the execution of the correct query, which cannot be parsed; the transition to the Builder tab; the transition to the SQL Editor tab - caused the query text removal. Fixed now;
Some other improvements and bugfixes.
We hope you’ll enjoy working with our products.
See also:
1.2
System requirements
System requirements for SQL Query for InterBase/Firebird
300-megahertz (MHz) processor; 600-megahertz (MHz) or faster processor recommended
Microsoft® Windows NT4 with SP4 or later, Microsoft® Windows 2000, Microsoft® Windows 2000 Server, Microsoft® Windows XP, Microsoft® Windows 2003 Server, Microsoft Windows 2008 Server, Microsoft® Windows Vista, Microsoft® Windows 7. 64MB RAM or more; 128MB or more recommended
20MB of available HD space for program installation
Super VGA (800x600) or higher-resolution video adapter and monitor; Super VGA (1024x768) or higher-resolution video adapter and monitor recommended
Microsoft® Mouse or compatible pointing device InterBase/Firebird client
Possibility to connect to any local or remote InterBase/Firebird server
Supported InterBase and Firebird server versions: InterBase - up to 2007; Firebird - up to 2.1
1.3
Installation
If you are installing SQL Query for InterBase/Firebird for the first time on your PC: download the SQL Query for InterBase/Firebird distribution package from the download page available at our site;
unzip the downloaded file to any local directory, e.g. C :\unzippe d;
run IbQ ue r y Se t up.e xe from the local directory and follow the instructions of the installation wizard;
after the installation process is completed, find the SQL Query for InterBase/Firebird shortcut in the corresponding group of Windows Start menu.
If you want to upgrade an installed copy of SQL Query for InterBase/Firebird to the latest version:
download the SQL Query for InterBase/Firebird distribution package from the
download page available at our site;
unzip the downloaded file to any local directory, e.g. C :\unzippe d; close SQL Query application if it is running;
run IbQ ue r y Se t up.e xe from the local directory and follow the instructions of the installation wizard.
Also you can use the full distribution package to upgrade your current version of SQL Query for InterBase/Firebird. In this case, you should repeat the steps you have made for the first-time installation. Note that the full distribution package is larger than a single executable file.
See also:
1.4
Registration
To make it easier for you to purchase our products, we have contracted with share-it! registration service. The share-it! order process is protected via a secure connection and makes on-line ordering by credit/debit card quick and safe. The following information about share-it! is provided for your convenience.
Share-it! is a global e-commerce provider for software and shareware sales via the Internet. Share-it! accepts payments in US Dollars, Euros, Pounds Sterling, Japanese Yen, Australian Dollars, Canadian Dollars or Swiss Franks by Credit Card (Visa, MasterCard/ EuroCard, American Express, Diners Club), Bank/Wire Transfer, Check or Cash.
If you have ordered EMS software online and would like to review your order information, or if you have questions about ordering, payments, or shipping procedures, please visit our Customer Care Center, provided by Share-it!
Please note that all of our products are delivered via ESD (Electronic Software Delivery) only. After purchase you will be able to immediately download the registration keys or passwords and download links for archives of full versions. Also you will receive a copy of registration keys or passwords by e-mail. Please make sure to enter a valid e-mail address in your order. If you have not received the keys within 2 hours, please, contact us at
Product
distribution
SQL Query for InterBase/Firebird (Business license) + 1-Year Maintenance*
Register Now!
SQL Query for InterBase/Firebird (Business license) + 2-Year Maintenance*
SQL Query for InterBase/Firebird (Business license) + 3-Year Maintenance*
SQL Query for InterBase/Firebird (Non-commercial license) + 1-Year Maintenance*
SQL Query for InterBase/Firebird (Non-commercial license) + 2-Year Maintenance*
SQL Query for InterBase/Firebird (Non-commercial license) + 3-Year Maintenance*
SQL Query for InterBase/Firebird (Trial version) Download Now!
*EMS Maintenance Program provides the following benefits:
Free software bug fixes, enhancements, updates and upgrades during the maintenance period
Free unlimited communications with technical staff for the purpose of reporting Software failures
Free reasonable number of communications for the purpose of consultation on operational aspects of the software
technical support. To protect your investments and have your software up-to-date, you need to renew your maintenance.
You can easily reinitiate/renew your maintenance with our on-line, speed-through
Maintenance Reinstatement/Renewal Interface. After reinitiating/renewal you will receive a confirmation e-mail with all the necessary information.
See also:
1.5
How to register SQL Query
If you have not registered your copy of SQL Query for InterBase/Firebird yet, you can do it by pressing the Enter Registration Code... button and entering your registration information in the Register SQL Query for InterBase/Firebird dialog.
To register your newly purchased copy of EMS SQL Query for InterBase/Firebird, perform the following steps:
receive the notification letter from Share-it! with the registration info; enter the Registration Name and the Registration Key from this letter;
make sure that the registration process has been completed successfully – check the registration information in the About SQL Query for InterBase/Firebird dialog (use the Help | About menu item to open this dialog)
See also:
1.6
EMS SQL Query FAQ
Please read this page attentively if you have questions about SQL Query for InterBase/ Firebird.
Table of contents
Product questions
What is EMS Query for InterBase/Firebird?
What do I need to start working with EMS Query for InterBase/Firebird? What is the difference between the Query Builder module in SQL Manager for InterBase/Firebird and the standalone SQL Query application?
Are there any limitations implied in the trial version as compared with the full one?
Troubleshooting
I cannot figure out how I can use the Export dataset function. Why I press the Export Data toolbar button, nothing happens.
Question/answer list Product questions
Q : Wha t is EM S Q ue r y fo r Int e r Ba se /F ir e bir d?
A: EMS SQL Query for InterBase/Firebird is a utility that lets you quickly and simply build SQL queries to InterBase/Firebird databases. Visual building as well as direct editing of a query text are available. User-friendly graphical interface allows you to connect to databases, select tables and fields for a query, set the selection criteria and much more. You can work with several queries at once, edit queries and view the execution results in one of the available modes and perform any other operations you may need in your work with database queries.
Q : Wha t do I ne e d t o st a r t w o r king w it h EM S SQ L Q ue r y ?
A: First of all, you must have a possibility to connect to some local or remote InterBase/ Firebird server to work withSQL Query. You can download InterBase/Firebird database server from http://www.codegear.com/interbase (the latest commercial version of InterBase server) or Firebird client and server from http://www.firebirdsql.org
(download is free). Besides, you need your workstation to satisfy the system requirements of SQL Query for InterBase/Firebird.
Q : Wha t is t he diffe r e nc e be t w e e n t he Q ue r y Builde r m o dule in SQ L M a na ge r fo r Int e r Ba se /F ir e bir d a nd t he st a nda lo ne SQ L Q ue r y a pplic a t io n?
A: First of all, SQL Query for InterBase/Firebird works faster as it is a considerably lighter application. Besides, it provides additional features for query building, namely:
"favorite" queries to find and execute often used queries quickly;
saving query history which allows you to rollback to any of the previous queries; various interface improvements for easier and more productive work.
Q : Ar e t he r e a ny lim it a t io ns im plie d in t he t r ia l v e r sio n a s c o m pa r e d w it h t he full o ne ? A: Actually the trial version of the utility does not differ from the full version as far as the
functionality is concerned. That is, you can test all the features implemented in SQL Query for InterBase/Firebird within the 30-day trial period.
Scroll to top
Troubleshooting
Q : I c a nno t figur e o ut ho w I c a n use t he Expo r t da t a se t func t io n. Why I pr e ss t he Expo r t Da t a t o o lba r but t o n, no t hing ha ppe ns.
A: Please make sure that you have the latest version of EMS Data Export for InterBase/ Firebird installed on your system. Note that the export utility should be registered and run at least once before you use the Exporting results function.
Scroll to top
Part
2
Getting Started
SQL Query for InterBase/Firebird gives you an opportunity to contribute to efficient InterBase/Firebird server administration and development by building SQL queries easily and quickly.
The succeeding chapters of this document are intended to inform you about the tools implemented in the utility. Please see the instructions below to learn how to perform various operations in the easiest way.
First time started Database navigation Working with queries Using context menus Importing settings
Selecting program language
Enjoy your work with SQL Query for InterBase/Firebird!
EMS SQL Query Tools Personalization
2.1
First time started
This is how SQL Query for InterBase/Firebird looks when you start it for the first time.
The main menu allows you to perform various Database operations, Edit your queries effectively, activate/deactivate Database Explorer, SQL Assistant and toolbars for
Database operations, Options, Query management tools, etc. within the View menu, manage your SQL queries using items of the Query menu, customize the application using the Options menu, manage SQL Query Windows, access Registration information and product documentation using the corresponding items available within the Help menu.
To start working with your InterBase/Firebird database server you should register one or several databases using Register Database Wizard.
By default the corresponding Register Database button is available on the toolbar and within the Database menu.
When the database connection settings are specified, you can set connection to your database and proceed to Database navigation and working with SQL queries.
See also:
Using context menus
Selecting program language Importing settings
2.2
Database navigation
After you have registered the required database(s) the corresponding node(s) appear in the DB Explorer tree on the left. If the Show Hosts option is checked on the Environment Options | DB Explorer page, the host nodes are also displayed in the tree (alternatively, you can use the Show Hosts item of the Database context menu for the same purpose).
To connect to a database, simply double-click its node (or select the database node in DB Explorer and press Enter). If the connection is successful, the database node expands into a tree of objects. Now you can navigate within the database objects and queries. Use SQL Assistant to get extended information about the currently selected object.
Working with queries Using context menus
Selecting program language Importing settings
2.3
Working with queries
Nodes of the DB Explorer tree allow you to access the corresponding objects of the database. Double-click an object (or select its node in DB Explorer and press Enter) to create a query for it. Right-click an object to display the context menu which allows you to perform various operations over the selected object or over the entire database.
See also:
Database navigation Using context menus
Selecting program language Importing settings
2.4
Using context menus
The context menus are aimed at facilitating your work with SQL Query for InterBase/ Firebird: you can perform a variety of operations using context menu items.
Select an object in DB Explorer and right-click its node to open the context menu.
Host context menu Database context menu Query context menu
See also:
Database navigation Working with queries
Selecting program language Importing settings
2.4.1
Host context menu
The context menu of a registered host in the DB Explorer tree allows you to: register a new database using Register Database Wizard;
view/edit the selected host info within the Host Registration Information dialog; search for an object within the tree;
configure objects representation in Database Explorer.
Database context menu Query context menu
2.4.2
Database context menu
The context menu of a registered database in the DB Explorer tree allows you to:
connect to the selected database (if connection to the database is not active yet); disconnect from the selected database (if connection to the database has been already activated);
register a new database using Register Database Wizard; unregister the selected database;
view/edit the selected database registration information within the Database Registration Info dialog;
search for an object within the tree;
configure objects representation in Database Explorer; reopen one of recently saved queries from file.
See also:
Query context menu Host context menu
2.4.3
Query context menu
The context menu of a query in the DB Explorer tree allows you to perform various common operations:
for queries within the Query History node:
activate the selected query, i.e. open it in SQL Editor; view the text of the query;
clear history;
for Favorite Queries:
activate the selected query, i.e. open it in SQL Editor; view the text of the query;
rename the query; delete the query;
delete all the queries within the node.
See also:
Database context menu Host context menu
2.5
Importing settings
When your copy of SQL Query is launched for the first time, the application checks whether SQL Manager for InterBase/Firebird is installed on the machine and prompts you to apply SQL Manager database repository for SQL Query for InterBase/Firebird as well.
If necessary, you can also import some of SQL Manager settings to your SQL Query for InterBase/Firebird. The Import settings from SQL Manager dialog allows you to specify groups of settings to be applied for your copy of SQL Query.
To open this dialog, select the Options | Import settings from SQL Manager... main menu item.
See also:
Database navigation Working with queries Using context menus
2.6
Selecting program language
The Select Language dialog allows you to select one of the available interface localizations to be applied for SQL Query for InterBase/Firebird.
To open this dialog, use the Options | Select Language main menu item.
The window contains the list of available languages according to the directory specified within the Localization section of the Environment Options dialog.
See also:
Database navigation Working with queries Using context menus Importing settings
Part
3
EMS SQL Query Tools
SQL Query for InterBase/Firebird provides you with a number of GUI tools for efficient working with your InterBase/Firebird databases.
Please see the chapters below to learn how to use SQL Query tools effectively.
Database Explorer
Database management tools Query management tools Data management tools
See also:
Getting Started Personalization
3.1
Database Explorer
Database Explorer (or DB Explorer) is the basic window of SQL Query for InterBase/ Firebird for navigation within databases and working with queries. The tree-like structure of DB Explorer allows you to manage the databases, database objects and your SQL queries quickly and easily.
The following list contains the most frequently used features provided by Database Explorer.
Managing database registration info Connecting to databases
Viewing brief DB info Viewing query history SQL Assistant
To view/hide the Database Explorer window, use the View | DB Explorer main menu item or press the F11 key.
See also:
Database management tools Query management tools Data management tools
3.1.1
Managing database registration info
After you have registered your database in SQL Query for InterBase/Firebird, you can perform a number of operations with the database using the context menu.
If you need to view and/or edit the registration information of a database, right-click the database node in DB Explorer and select the Database Registration Info... context menu item to open the Database Registration Info dialog.
See also:
Connecting to databases Viewing brief DB info Viewing query history
SQL Assistant
3.1.2
Connecting to databases
When the database registration is complete, you can establish connection to your database.
The simplest way to connect to a database is to double-click its node in the Database Explorer tree. The same operation can be performed by selecting the Connect to Database item of the database node context menu, or by using the Database | Connect to Database main menu item.
Alternatively, you can use the Shift +C t r l+C shortcut to connect to your database.
See also:
Managing database registration info Viewing brief DB info
Viewing query history SQL Assistant
3.1.3
Viewing brief DB info
Database Explorer allows you to view brief registration info of your database quickly without using the database context menu.
If you have several registered databases, and if there is no necessity to open the
Database Registration Info dialog, you can select a database alias in DB Explorer and hold the cursor for a while - in this case the ToolTip containing the database registration settings popups after a short delay.
See also:
Managing database registration info Connecting to databases
Viewing query history SQL Assistant
3.1.4
Viewing query history
Use the Query History node in Database Explorer to access the list of recently executed queries. This list contains queries within the currently selected database. Each of the registered databases has its own Query History list.
Double-click a query to open it in SQL Editor.
If you have many queries in the Query History list, and you need to browse them quickly, you can select each query in DB Explorer and hold the cursor for a while - in this case the ToolTip containing the text of the query popups after a short delay.
For your convenience the Favorite Queries list is implemented in SQL Query for
InterBase/Firebird. This list is available within the Favorite Queries node of Database Explorer and allows you to store the most frequently used SQL queries in one location.
To add a query to the Favorite Queries list, use the Add Query to Favorites toolbar button in SQL Editor or Visual Query Builder.
Managing database registration info Connecting to databases
Viewing brief DB info SQL Assistant
3.1.5
SQL Assistant
SQL Assistant which is located at the bottom of the Database Explorer window helps you to work with your database objects. Depending on the current selection in DB Explorer, the SQL Assistant area displays additional information about the selected object.
If you select a host in DB Explorer, SQL Assistant displays the list of the r e gist e r e d da t a ba se s. The databases you are connected to are displayed in color, whereas all the rest database aliases are grayed out.
If you select a database in DB Explorer, SQL Assistant displays the list of the database o bje c t gr o ups and t he num be r o f o bje c t s in each group.
Selecting an object group in the DB Explorer displays the list of the o bje c t s in SQL Assistant.
If you select a table or a view in DB Explorer, SQL Assistant displays the list of the fie lds, their t y pe s and fie ld c o m m e nt s.
If you select a query in DB Explorer, SQL Assistant displays t he da t e a nd t he t im e when the query was created.
If you select a procedure in DB Explorer, SQL Assistant lists its parameters.
You can also use SQL Assistant to work with your queries quickly. You can drag-and-drop object aliases to the SQL Editor or Visual Query Builder working area, in the same way as this operation is performed in Database Explorer.
See also:
Managing database registration info Connecting to databases
3.2
Database management tools
SQL Query for InterBase/Firebird provides a number of tools you may need to manage your InterBase/Firebird databases. Find the list of common database management
operations for working in SQL Query below.
Registering Databases
In order to register a single database in SQL Query for InterBase/Firebird: select the Database | Register Database... main menu item or use the corresponding toolbar button;
check the Register a single database option and set all the necessary options using Register Database Wizard which guides you through the whole process of Database registration.
Unregistering Databases
In order to unregister a single database in SQL Query for InterBase/Firebird: select the database to unregister in the DB Explorer tree;
select the Database | Unregister Database main menu item or use the corresponding toolbar button;
confirm unregistering in the corresponding dialog window.
Connecting to Databases
In order to connect to a database in SQL Query for InterBase/Firebird: select the database to connect to in the DB Explorer tree;
double-click its alias or
select the Database | Connect to Database main menu item or use the corresponding toolbar button
or
right-click its alias and select the Connect to Database context menu item.
Disconnecting from Databases
In order to disconnect from a database in SQL Query for InterBase/Firebird:
select the alias of the database to disconnect from or any of its objects in the DB Explorer tree;
select the Database | Disconnect from Database main menu item or use the corresponding toolbar button
or
right-click its alias or any of its objects and select the Disconnect from Database context menu item.
See also:
Database Explorer
3.2.1
Register Database Wizard
Register Database Wizard allows you to register one or several databases at one host.
To open the wizard, select the Database | Register Database... main menu item, or use the Register Database button on the main toolbar. You can also use the Shift +Alt +R shortcut for the same purpose.
Setting connection properties Setting registration options
See also:
Database Registration Info dialog
Setting connection properties
First of all you should specify the database location: Database is located on already registered host or Database is located on a new host.
Host name
Type in, or use the drop-down list to specify the host name of the InterBase/Firebird server.
If the database is located on a new host you need to specify connection settings.
Host name
Type in, or use the drop-down list to specify the host name of the InterBase/Firebird server.
Network protocol.
Use the drop-down list to select the communication protocol to be used for the connection. Possible values are: Lo c a l, T C P/IP, No v e ll SPX, Ne t BEUI, Em be dde d.
Afterwards you should specify authorization settings: User name and Password. The default superuser name is 'SYSDBA' and the default password is 'masterkey'.
You can also define the user role in Role field.
You also need to specify the path to the Library in the corresponding field. For
successful connection to the server it is crucial to use the appropriate client library - the one that is compatible with the server you are using: gds32.dll for InterBase and fbc lie nt . dll for Firebird. Please note that the client library file must be located on your local
machine (e.g. in the directory where the utility is installed).
Use this field to specify a port or service to connect through. By default it is "gds_db" for InterBase and port 3050 for Firebird.
Click the Next button to proceed to the Setting registration options step of the wizard.
Setting registration options
Select the database name from the corresponding drop-down list and specify its alias.
If necessary, select the Font charset.
Login prompt before connection
Check this option if you wish to be prompted for authorization information (Use r na m e and Pa ssw o r d) each time you connect to the database.
Show system objects
If this option is checked, system objects of the database are displayed in DB Explorer.
Autoconnect at startup
Setting this option enables connection to the database automatically when the application is started.
Enable log of SQL Editor queries
Use this option to enable/disable SQL queries log.
Log file
can specify the path to the *.sql file where SQL queries are logged.
If necessary, you can return to any of the previous steps using the Back button and make the appropriate changes for the currently registered InterBase/Firebird database.
When done, click the Finish button to complete the Database registration process and start working with the newly registered database in SQL Query for InterBase/Firebird.
3.2.2
Database Registration Info dialog
Use the Database Registration Info dialog to view and/or edit the properties of the registered database which have been set on its creation.
To open the dialog, select the database in the DB Explorer tree, then right-click its alias and select the Database Registration Info... context menu item, or use the Database | Database Registration Info... main menu item. You can also use the Database
Registration Info button on the main toolbar for the same purpose.
Editing connection properties Setting database options Setting log options
See also:
Register Database Wizard
Editing connection properties
The Connection section of the Database Registration Info dialog allows you to view and edit the connection properties.
Host name
Type in, or use the drop-down list to specify the host name of the InterBase/Firebird server.
Network protocol.
Use the drop-down list to select the communication protocol to be used for the connection. Possible values are: Lo c a l, T C P/IP, No v e ll SPX, Ne t BEUI, Em be dde d.
Authorization settings: User name and Password.
You can also define the user role in Role field.
You also need to specify the path to the Library in the corresponding field. For
successful connection to the server it is crucial to use the appropriate client library - the one that is compatible with the server you are using: gds32.dll for InterBase and fbc lie nt . dll for Firebird. Please note that the client library file must be located on your local
machine (e.g. in the directory where the utility is installed).
Specify a Port/Service to connect through..
If necessary, you can also select a different Database name or edit the Database alias - an optional name to display the database in the DB Explorer tree and all SQL Query
tools.
This section of the Database Registration Info dialog also allows you to modify the Font Charset for the InterBase/Firebird database.
See also:
Setting database options Setting log options
Setting database options
The Options section of the Database Registration Info dialog allows you to set various options for the database.
Customize database options according to your needs. The detailed description is given below.
Login prompt before connection
Enables SQL Query for InterBase/Firebird to prompt for user name and password each time you connect to the database.
Autoconnect at startup
Check this option to specify that SQL Query for InterBase/Firebird automatically establishes connection to the registered database at application startup.
Show all system objects
This option determines whether InterBase/Firebird system objects are displayed in the DB Explorer tree.
See also:
Editing connection properties Setting log options
Setting log options
The Logs section of the Database Registration Info dialog allows you to set SQL Query logging parameters.
Enable log of SQL Editor queries
SQL Editor log file
This field is enabled if the Enable log of SQL Editor queries option is selected. Here you can specify the path to the *.sql file to store the logs of SQL queries.
See also:
Editing connection properties Setting database options
3.2.3
Host Registration Information
Use the Host Info dialog to view and/or edit the properties of the registered host which have been set on its registration.
To open the dialog, select the host in the DB Explorer tree, then right-click its alias and select the Show Host Info... context menu item. You can also use the Host Info button on the main toolbar for the same purpose.
Editing connection properties Setting SSH tunnel options
See also:
Register Database Wizard
Database Registration Info dialog
Editing connection properties
The Connection section of the Host Registration Information dialog allows you to view and edit the connection properties in the corresponding boxes: Ho st na m e, Ne t w o r k pr o t o c o l (Lo c a l, No v e ll SPX, Na m e d Pipe, T C P/IP), Use r na m e, Pa ssw o r d, Ro le, the path to
the C lie nt libr a r y and Po r t /Se r v ic e.
See also:
Setting SSH tunnel options
Setting SSH tunnel options
The SSH Tunneling section of the Host Registration Info dialog allows you to enable/ disable SSH tunneling for connection to the databases on the host, and set all the necessary SSH tunneling parameters.
Connect through the Secure Shell (SSH) tunnel
Select this option to establish connection to an intermediate SSH server and forward all InterBase/Firebird commands through the secure tunnel.
Specify SSH Host name, SSH port, SSH user name, SSH password, the path to the SSH key file (if necessary) in the corresponding boxes.
See SSH connection properties for details.
Please note that you can only use SSH t unne ling if the connection is established via TCP/ IP network protocol.
See also:
3.3
Query management tools
When using SQL Query for InterBase/Firebird, you are provided with two basic tools you may need to manage your SQL queries: SQL Editor for editing SQL query text directly and Visual Query Builder for building queries visually. Find the list of common SQL query management operations below.
Creating new queries
In order to create a new query in SQL Query for InterBase/Firebird:
select the Query | New Query main menu item or use the corresponding toolbar button;
specify a name for the new query within the New Query dialog; proceed to the Edit tab and use SQL Editor to edit the SQL query text or
proceed to the Builder tab and use Visual Query Builder to build the SQL query visually.
Editing queries
In order to open a query in SQL Query for InterBase/Firebird: select the query in the DB Explorer tree;
right-click the query and select the Activate Query context menu item or
double-click the query in the DB Explorer tree.
In order to load a query from an *.sql file:
select the Query | Load... main menu item or use the corresponding toolbar button;
specify the query file within the Load SQL File dialog.
Executing queries
In order to execute a query in SQL Query for InterBase/Firebird: c r e a t e a ne w que r y or o pe n a n e xist ing o ne;
select the Query | Execute main menu item or use the corresponding toolbar button
or
use the F9 hot-key to execute the query.
Saving queries
In order to save a query in SQL Query for InterBase/Firebird: c r e a t e a ne w que r y or o pe n a n e xist ing o ne;
select the Query | Save... or the Query | Save as... main menu item or
use the Ctrl+S shortcut to save the query or
use the Query | Save all queries main menu item if you need to save all the queries at a time.
See also:
Database Explorer
Database management tools Data management tools
3.3.1
SQL Editor
SQL Editor is the basic SQL Query for InterBase/Firebird tool for creating and executing queries. The tool allows you to create and edit the SQL text of a query, prepare and execute queries and view the results of execution.
To open SQL Editor, select the Query | New Query main menu item, or use the New Query button on the main toolbar. You can also use the C t r l+N shortcut for the same purpose.
See also:
Visual Query Builder
Working with SQL editor area
The Editor area of SQL Editor is available within the Edit tab and is provided for working with SQL queries in text mode.
For your convenience the syntax highlight, code completion and a number of other features are implemented. If necessary, you can enable/disable or customize most of SQL Editor features using the Editor Options dialog.
The example of code completion is illustrated in the picture below. You can set the delay within the Quick code section of the Editor Options dialog or manually activate the completion list by pressing the C t r l+Spa c e shortcut.
If necessary, you can print the SQL text of your query using the corresponding item of the context menu or the Print SQL button on the main toolbar. You can also use the C t r l+P shortcut for the same purpose.
See also:
Using the context menu Find Text dialog
Replace Text dialog Executing queries
Using the context menu
The context menu of SQL Editor area contains most of the standard text-processing functions (C ut, C o py, Pa st e, Se le c t All) and functions for working with the query as a whole, e.g. you can m o v e t he c ur so r t o a pa r t ic ula r line, c ha nge t he c a se of selected text, view the query pr o pe r t ie s or pr int the text of the query. Each of these operations
can be also performed with the corresponding hot keys used.
Implementation of the Find Text and the Replace Text dialogs contributes to more efficient work with the SQL code.
See also:
Working with SQL Editor area Find Text dialog
Replace Text dialog Executing queries
Find Text dialog
The Find Text dialog is provided for quick and flexible searching for specified text within the SQL Editor working area.
Text to find
input box allows you to select any of the previously entered search strings.
Options
Case Sensitive
This option can be used to differentiate uppercase characters from lowercase ones during the search process.
Whole words only
Use this option to search for words only (with this option off, the search string might be found within longer words.)
Regular Expressions
Recognizes regular expressions in the search string.
Direction Forward
Searches from the current position to the end of the SQL Editor area.
Backward
Searches from the current position to the beginning of the SQL Editor area.
Scope Global
Searches within the entire SQL Editor working area, in the direction specified by the Dir e c t io n setting.
Selected text
Searches only within the currently selected text, in the direction specified by the Dir e c t io n setting. You can use the mouse or block commands to select a block of text.
Origin
The search starts at the cursor's current position, and then proceeds either forward to the end of the scope, or backward to the beginning of the scope depending on the Dir e c t io n setting.
Entire scope
The search covers either the entire block of selected text or the entire script (no matter where the cursor is in the Editor area) depending upon the Sc o pe options.
See also:
Working with SQL Editor area Using the context menu Replace Text dialog Executing queries
Replace Text dialog
The Replace Text dialog is provided for searching and replacing text within the SQL Editor
working area.
Text to find
Enter a search string in this box. The Arrow-Down button which can be found next to the input box allows you to select any of the previously entered search strings.
Text to replace
This box allows you to enter a string to replace the search string. The Arrow-Down button which can be found next to the input box allows you to select any of the previously entered strings. To replace the search string with an empty string, leave this input box blank.
Options
Case Sensitive
This option can be used to differentiate uppercase characters from lowercase ones during the search process.
Whole words only
Use this option to search for words only (with this option off, the search string might be found within longer words.)
Regular Expressions
Recognizes regular expressions in the search string.
Replace with template
This option requires the Regular expressions option selection.
Enable this option to use regular expressions in the Text to replace field. Expression used in this field will be applied to each string that matches the Text to find expression.
Note: The syntax of regular expressions that can be used in the Text to find and the Text to replace fields is similar to that used in Perl regular expressions. Comprehensive
http://perldoc.perl.org/perlre.html#Regular-Expressions.
Prompt on replace
Check this option if you wish to be prompted before replacing upon each occurrence of the search string. When this option is off, the search string is replaced automatically.
Direction Forward
Searches and replaces from the current position to the end of the SQL Editor area.
Backward
Searches and replaces from the current position to the beginning of the SQL Editor area.
Scope Global
Searches and replaces within the entire SQL Editor working area, in the direction specified by the Dir e c t io n setting.
Selected text
Searches and replaces only within the currently selected text, in the direction specified by the Dir e c t io n setting. You can use the mouse or block commands to select a block of text.
Origin
From cursor
The search and replace process starts at the cursor's current position, and then proceeds either forward to the end of the scope, or backward to the beginning of the scope
Entire scope
The search and replace process covers either the entire block of selected text or the entire script (no matter where the cursor is in the Editor area) depending upon the Sc o pe options.
Click the Replace All button to replace every occurrence of the search string. If you have checked the Prompt on replace option, the confirmation dialog box appears upon each occurrence of the search string.
See also:
Working with SQL Editor area Using the context menu Find Text dialog
Executing queries
Executing queries
When all the query parameters are set, you can immediately execute the query in SQL Editor.
To execute a query, select the Query | Execute main menu item, or use the Execute query button on the main toolbar. You can also use the F 9 hot key for the same purpose.
If the SQL syntax is correct, the query is executed and, in case the query statement is supposed to return data (e.g. as SELECT statement), the Results area containing the returned data appears within the Data tab. The position of the tab depends on the Query results on separate tab option selection (see Environment options | Preferences
). If SQL syntax of the query contains any errors, the query execution is stopped and the corresponding error message is displayed in the status bar area at the bottom of the editor window.
By default, data returned by a query are displayed as a grid (see Data View for details).
See also:
Working with SQL Editor area Using the context menu Find Text dialog
3.3.2
Visual Query Builder
Visual Query Builder is implemented in SQL Query for InterBase/Firebird for building queries visually. The tool allows you to create and edit queries without deep knowledge of SQL. You can also prepare and execute queries, and view the results of their
execution.
To open Visual Query Builder, select the Query | New Query main menu item, or use the New Query button on the main toolbar (you can also use the C t r l+N shortcut for the same purpose), and proceed to the Builder tab of the editor window.
See also:
SQL Editor
Working with Query Builder area
The main working area of Visual Query Builder is the Builder area. Here you can create a query by placing the database tables and views onto the area, and edit it by selecting the required data fields and setting links between objects.
To add an object to the query, you can simply drag it from the DB Explorer tree to the Builder area.
T o inc lude a fie ld in the query, check the corresponding box located to the left from the field name in the list, or just double-click it. To include all fields of the table/view, check the box located to the left of the table/view caption. If you do not check any fields, the SQL statement is generated as SELECT * FROM <table/view_name>, i.e. all the fields are included in the query.
T o e xc lude a fie ld from the query, uncheck the respective box. In order to remove the entire table/view from the query, close it by clicking the corresponding cross-button at the object caption, or select the object and press the Del key.
Note: Depending on which query type you need to execute, you can select one from the drop-down list at the left: Se le c t, Inse r t, Upda t e, or De le t e.
To create a Union or a Subquery use the Builder context menu.
Creation of a Union is reflected in UNIO N statement in the query text or UNIO N ALL statement if the Union all by defaultoption is enabled. Union is used to combine several queries.
See also:
Joining tables Setting criteria Setting output fields Setting grouping criteria Setting sorting parameters Working with the editor area Query execution
Joining tables
The Builder area allows you to associate two objects by their fields: this operation is performed by dragging a field from one object list to another. This will set a link between these objects by the selected fields. It is indicated by a bidirectional arrow between the linked fields.
You can v ie w t he link pr o pe r t ie s of objects association: set the mouse cursor over the linking arrow, and a hint containing the association condition will popup after a short delay.
T o e dit t he link pr o pe r t ie s, double-click the linking arrow or right-click it and select the Property popup menu item. The Link properties dialog allows you to change the association condition by choosing it from the drop-down list (=, >, <, >=, <=, <>).
For your convenience the Include all option is available for each object of the association.
If left Include all option is checked the LEF T O UT ER JO IN statement will be added to the query.
If right Include all option is checked the RIGHT O UT ER JO IN statement will be added to the query.
If both Include all options are checked the F Ull O UT ER JO IN statement will be added to the query.
If none of the include options is selected then the INNER JO IN statement will be added to the query.
Click OK to apply the changes you have made.
T o r e m o v e a link between objects, right-click the linking arrow and select the Delete link popup menu item.
T o a dd a po int t o t he link line, right-click the linking arrow and select the Insert point popup menu item. Using the point you can move the link line easily. The point does not cause any changes to the query, it is only used for the diagram representation and makes visual building handy and more comprehensible.
See also:
Working with Query Builder area Setting criteria
Setting output fields Setting grouping criteria Setting sorting parameters Working with the editor area Query execution
Setting criteria
Use the Criteria tab to set the selection conditions.
popup menu item.
Edit t he c o ndit io n by clicking the elements of the condition pattern and setting the necessary values. Clicking the numbered button to the left of the condition string
activates the popup menu which allows you to a dd a ne w c o ndit io n of the same enclosure level, a dd a ne w e nc lo sur e le v e l, de le t e t he c ur r e nt c o ndit io n, e xpa nd or c o lla pse
enclosure levels of the condition (if the condition is composite).
A simple condition pattern contains three elements: a n a r gum e nt, a c o ndit io n o pe r a t o r and a se c o nd a r gum e nt (if required for the condition).
Clicking each element field allows you to set its value. When clicking the argument field, you can edit the argument as a text string: set an object name or a certain value in this field. Right-clicking the field in the edit mode activates the popup menu with the Insert field function (also called by Shift +Ent e r shortcut). This function allows you to select a field from the list of all the table fields.
Clicking the condition operator field activates the popup menu where you can specify the condition you need.
No t a ll o f t he fo llo w ing a r e m e t). Click the green link to change it.
See also:
Working with Query Builder area Joining tables
Setting output fields Setting grouping criteria Setting sorting parameters Working with the editor area Query execution
Setting output fields
The Selection tab displays the output fields of the query as a grid.
If you check this option, the duplicate records (if any) are not included into the query result (i.e. the DISTINCT keyword is added to the SQL query text).
To reorder fields in the list, use the buttons.
The grid allows you to edit the names of the query output fields, specify their displaying order and set the aggregate functions (SUM, M IN, M AX, AV G, and C O UNT) for each field. To remove a field from the list, right-click the field row and select the Delete current row popup menu item.
To change the input query field, double click it and then type the field name on the keyboard or choose it from the drop-down list.
To change the output query field name, set the cursor at the corresponding column and type the required field name.
To set an aggregate function for a field, click the field row within the Aggregate column, and then type in the function name or select one from the drop-down list.
The Grouping column displays the grouping state for each of the output fields.
The popup menu also allows you to inse r t a ne st e d que r y and add a C ASE clause. To edit the CASE clause, use the CASE END AS dialog.
Name
Use the drop-down list to define field to which the condition will be applied.
Alias
Use WHEN and THEN fields to define actual column values and their substitutions respectively. Empty WHEN clause states for all non-specified actual values. Such values will be substituted by the corresponding value specified in the THEN list.
See also:
Working with Query Builder area Joining tables
Setting criteria
Setting grouping criteria Setting sorting parameters Working with the editor area Query execution
Setting grouping criteria
The Grouping criteria tab allows you to set the conditions for grouping query records.
The grouping condition pattern fields are set in the same way as those of the Criteria
These conditions will be included in the HAVING statement of the generated SQL query.
See also:
Working with Query Builder area Joining tables
Setting criteria Setting output fields Setting sorting parameters Working with the editor area Query execution
Setting sorting parameters
The Sorting tab allows you to set the sorting parameters for the records returned by the query.
The working area contains the Output fields list (at the left) which represents all the output query fields, and the Sorted fields list (at the right) which contains the fields to sort records by.
To move a field from one list to another, drag the selected field or use the Add and Remove buttons.
To change the sorting order for a sorted field, select the field in the Sorted fields list and move it using the Up and Down buttons.
To change the sorting direction, select the field in the Sorted fields list and switch the direction (Asc e nding, De sc e nding) using the corresponding A..Z/Z..A button.
See also:
Working with Query Builder area Joining tables
Setting criteria Setting output fields Setting grouping criteria
Working with the editor area Query execution
Working with the editor area
The Editor area of Visual Query Builder is available within the Edit tab and is provided for working directly with the SQL query text which is generated automatically while you build the query visually.
You can edit this text according to the rules of SQL, and all the changes will be displayed within the Builder tab respectively.
with SQL Editor area.
See also:
Working with Query Builder area Joining tables
Setting criteria Setting output fields Setting grouping criteria Setting sorting parameters Query execution
Query execution
When all the query parameters are set, you can execute the query in Visual Query Builder.
To execute a query, select the Query | Execute main menu item, or use the Execute query button on the main toolbar. You can also use the F 9 hot key for the same purpose.
The query execution may be interrupted by pressing the Cancel button.
If the query parameters are specified correctly, the query is executed and, in case the query statement is supposed to return data (e.g. as SELECT statement), the Results area containing the returned data appears within the Data tab. The position of the tab
depends on the Query results on separate tab option selection (see Environment options | Preferences). If any of the query parameters contain errors, the query
execution is stopped and the corresponding error message is displayed in the status bar area at the bottom of the Builder window.
By default, data returned by a query are displayed as a grid (see Data View for details).
See also:
Working with Query Builder area Joining tables
Setting criteria Setting output fields Setting grouping criteria Setting sorting parameters Working with the editor area
3.3.3
Query History
Use the History tab to access the list of recently executed queries.
The working area contains the grid where query names and the execution dates are listed, and the corresponding SQL text for each of the selected queries.
The context menu of the grid allows you to perform various operations over the
currently selected query: a c t iv a t e, r e na m e or de le t e the selected query, a dd t he que r y t o t he F a v o r it e Q ue r ie s list, c le a r t he hist o r y list or choose to displa y hist o r y fo r t he c ur r e nt que r y o nly.
See also:
SQL Editor
Visual Query Builder Query Plan
3.3.4
Query Plan
Using SQL Query for InterBase/Firebird, you can view the plan for each of the queries created and executed in the application. The query plan is available within the
corresponding Plan tab.
To view the Plan of a query, open the query in SQL Editor or Visual Query Builder and use the Explain Query button on the main toolbar, proceed to the Results tab, and then to the Plan tab there.
If you wish to make the Query Plan tab enabled by default for each executed query, select the Queries with explain plan option within the Preferences section of the
Environment options dialog.
See also:
SQL Editor
Visual Query Builder Query History
3.3.5
Favorite Queries
Select a query to preview it at the right part of the window. You can also manage the list of queries using the context menu: to open a query for editing - Activate query, to Rename Query, to Delete Query from Favorites and to Clear Favorites.
See also:
SQL Editor
Visual Query Builder Query Plan
3.4
Data management tools
SQL Query for InterBase/Firebird provides a number of tools you may need to manage data returned by your SQL queries.
The following list contains the most frequently used features implemented in SQL Query for efficient data management.
Data View Custom Filter Filter Builder dialog
See also:
Database Explorer
Database management tools Query management tools
3.4.1
Data View
SQL Query for InterBase/Firebird provides you with powerful tools for viewing, editing and printing data from tables and queries.
Upon a query execution the Results area containing the returned data appears within the Data tab. The position of the tab depends on the Query results on separate tab option selection (see Environment options | Preferences).
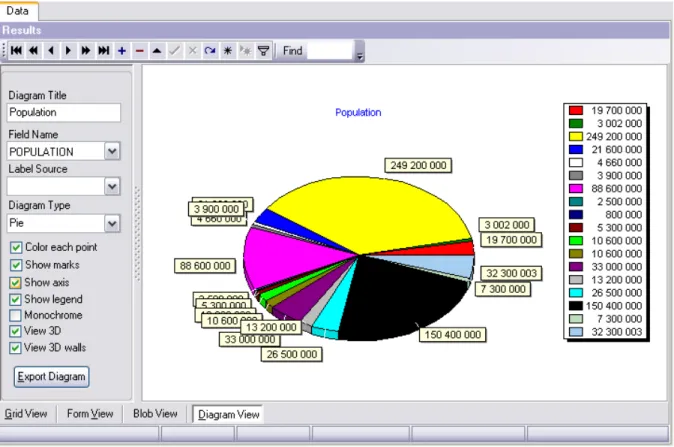
The data can be displayed in one of four available modes: Gr id V ie w, F o r m V ie w, Blo b V ie w and Dia gr a m V ie w. The status bar at the bottom displays the number of records in the current dataset, the time the records were fetched by the application and the status of the records (whether the data are read-only or editable).
Please see the succeeding chapters to learn how to work with your data in the simplest and most efficient way.
Grid View Form View BLOB View Diagram View See also: Custom Filter Filter Builder dialog
Grid View
By default, data returned by a query are displayed as a grid. It is indicated by the Grid View tab selected on the View mode panel at the bottom of the Results area of the
window.
When in the Grid View mode, the columns correspond to the fields and the rows correspond to the records. Clicking the column caption sorts data by the values of this column in the ascending or the descending mode. The navigation pane at the top of the grid allows you to browse the data quickly, to insert, update and delete records, add bookmarks, and to set a filter for the records using the Filter Builder dialog. Within the Find field you can quickly set filter for the selected column.
The context menu of the grid provides additional functions, namely those used to show/ hide the Group Box for easier work with the grid, to print data or to view/edit the column summary. See also: Form View BLOB View Diagram View
Grouping data
This operation is performed by dragging the column header to the gray Group Box area at the top. In order to display this area, you can right-click the grid and select the Show Group Box item of the context menu.
When grouping by a column is applied to the grid, all the records are displayed as subnodes to the grouping row value as displayed in the screenshot below. To reverse grouping, just drag the column header back.
See also:
Filtering records Printing data Exporting results
Using the context menu
Filtering records
A number of filtering facilities are implemented in the grid for your convenience. You can filter records in the grid in either of the following ways:
click the arrow-down button next to the column caption to display the drop-down list and select any of the column values to filter records by this value of the selected column