Site Configuration
SETUP GUIDE
Linux Hosts
Shared File Server Installation
May08
trademarks referenced are the property of their respective owners. For further information regarding Wind River trademarks, please see:
http://www.windriver.com/company/terms/trademark.html
This product may include software licensed to Wind River by third parties. Relevant notices (if any) are provided in your product installation at the following location:
installDir/product_name/3rd_party_licensor_notice.pdf.
Wind River may refer to third-party documentation by listing publications or providing links to third-party Web sites for informational purposes. Wind River accepts no responsibility for the information provided in such third-party documentation.
Corporate Headquarters Wind River Systems, Inc. 500 Wind River Way Alameda, CA 94501-1153 U.S.A.
toll free (U.S.): (800) 545-WIND telephone: (510) 748-4100 facsimile: (510) 749-2010
For additional contact information, please visit the Wind River URL: http://www.windriver.com
For information on how to contact Customer Support, please visit the following URL: http://www.windriver.com/support
Contents
1
Overview ...
1
1.1 Introduction ... 1
2
Host System Requirements ...
3
2.1 Supported Host Types for Wind River Products ... 3
2.2 Host System Hardware Requirements ... 4
2.2.1 Requirements for Eclipse-Based Products ... 4
2.2.2 Command-Line Users ... 5
2.2.3 Optional Hardware ... 5
2.3 Host System Software Requirements ... 5
2.3.1 Requirements for Eclipse-Based Products ... 5
2.3.2 Optional Software and Resources ... 6
3
License Management Workflow ...
7
3.1 How Licensing Works ... 7
3.1.1 Types of Workstation License ... 8
Unique User License ... 8
3.2 Installation and Licensing Tasks for License Servers ... 9
3.3 Installation and Licensing Tasks for Workstations ... 10
4
Generating Server License Files ...
13
4.1 Before You Begin ... 13
4.2 What Is a License Server? ... 13
4.2.1 Do You Need to Install a License Server? ... 14
4.3 Generating Server License Files ... 14
4.4 License Maintenance and Management Tasks ... 18
Single License Server ... 19
Multiple License Servers ... 19
5
Generating Workstation Licenses ...
21
5.1 Workflow for Generating Workstation Licenses ... 22
5.2 Generating a Node-Locked License File ... 22
5.3 Generating a Floating or Unique User License File ... 25
5.4 Editing License Files ... 27
6
Shared Installations ...
29
Contents
6.4 Non-Typical Installations ... 32
6.4.1 Installing Workbench into an Existing Eclipse Environment ... 33
6.4.2 Incremental Installation ... 33
6.4.3 Parallel Installation ... 33
7
Post-Installation Tasks ...
35
7.1 Installing Patches ... 35
7.2 Downloading and Installing Board Support Packages ... 36
7.2.1 When Should You Download a BSP? ... 36
7.2.2 Navigating the BSP Web Site ... 37
Locating a Specific BSP ... 37
7.2.3 Downloading and Installing a BSP ... 38
The BSP Download Page ... 38
Installing a BSP with the Maintenance Tool ... 38
7.3 Building the VxWorks Run-Time Source ... 39
7.3.1 The Kernel and Platform Build Processes ... 39
Building VxWorks Kernel Source Code ... 40
Building Wind River VxWorks Platforms Source Code ... 40
7.3.2 Where to Find Additional Information ... 41
7.4 Building the Linux Target Run-Time Source ... 41
7.4.1 When Is It Necessary to Build Linux Source Code? ... 41
7.4.2 Choosing a Build Method ... 42
7.4.3 Where to Find Additional Information ... 42
7.5 Uninstalling Wind River Products ... 42
Archiving Downloaded Plug-Ins ... 43
Preserving Workbench Project Files ... 43
8
Installing and Configuring a License Server ...
45
8.1 Before You Begin ... 45
8.2 Installing License Administrator Tools ... 46
8.2.1 What Tools Are Installed? ... 46
Wind River License Server and Utilities ... 46
Wind River License Reporting Agent ... 46
8.3 Configuring a License Server ... 47
8.3.1 Configuring a License Server from the Command Line ... 47
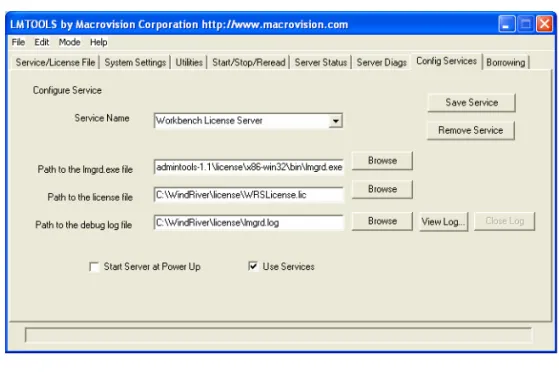
8.3.2 Configuring a License Server Using the LMTOOLS Utility ... 47
8.4 Starting a License Server ... 50
8.4.1 Starting the License Server from the Command Line ... 50
8.4.2 Starting the License Server Using the LMTOOLS Utility ... 51
8.4.3 Starting the License Server from a Startup Script ... 52
8.5 Stopping a License Server ... 52
8.5.1 Stopping the License Server from the Command Line ... 52
8.5.2 Stopping the License Server Using the LMTOOLS Utility ... 53
8.6 Deactivating a License Server ... 54
8.7 Uninstalling a License Server ... 54
8.8 Troubleshooting License Server Problems ... 55
9
Setting Up a Single License Server for Multiple Products ...
57
Contents
9.4 Controlling Access to Products Using the Options File ... 61
9.4.1 Controlling Access with the INCLUDE and EXCLUDE Keywords . 61 Restricting Access to a Single Product ... 62
Restricting Access to a Single License Type ... 64
9.4.2 Controlling Access with PROJECT and LM_PROJECT ... 67
9.4.3 Using the Options File for Debugging ... 70
9.5 Removing Wind River Products from Merged License Files ... 70
10
Wind River Environment Utility (wrenv) ...
71
10.1 What Is wrenv? ... 71
10.2 When Are You Required to Invoke the wrenv Utility? ... 72
10.2.1 Invoking the wrenv Utility ... 72
10.3 wrenv Command Options ... 73
10.4 wrenv Usage Examples ... 73
Creating a Development Shell ... 73
Setting the Development Environment Without Spawning a Shell . 73 10.5 How Does wrenv Create a Unified Environment Setting? ... 74
10.6 What Is the Installation Properties File? ... 75
10.6.1 Package Descriptor ... 77
10.7 Advanced wrenv Topics ... 77
10.7.1 Using Packages from Multiple Installation Locations ... 77
10.7.2 Special Packages ... 79
Initializer Packages ... 79
11
Configuring Wind River Products for a Workgroup ...
81
11.1 Multiple Users and Installations of Workbench ... 81
Single User with Single Installation ... 81
Multiple Users with Multiple Installations ... 82
Multiple Users with a Single Installation ... 82
Single User with Multiple Installations ... 82
Eclipse Team Features ... 82
11.2 Configuring a Wind River Registry for a Workgroup ... 83
What Is the Wind River Registry? ... 83
Wind River Registry Resources ... 83
12
Configuring a Remote Build Server ...
85
12.1 Do You Need to Set Up a Remote Build Server? ... 85
12.2 Performing Remote Builds with Wind River Workbench ... 85
12.3 General Requirements for Remote Builds ... 86
13
FLEXlm Command Reference ...
87
13.1 What Does This Reference Cover? ... 87
13.2 License Manager Daemon Command-Line Syntax ... 88
13.2.1 lmgrd Command-Line Options ... 88
13.3 License Administration Tools ... 89
Contents
13.3.7 lmstat ... 94
13.3.8 lmswitchr ... 95
14
FLEXlm Options File Reference ...
97
14.1 What Does This Reference Cover? ... 97
14.2 Options File Syntax ... 99
14.2.1 Comments ... 99
14.2.2 Feature Specification ... 99
14.2.3 Type Specification ... 100
14.2.4 Order of Precedence in the Options File ... 101
14.3 Action Keywords ... 102
14.3.1 BORROW_LOWWATER ... 102
14.3.2 DEBUGLOG ... 103
14.3.3 EXCLUDE ... 103
14.3.4 EXCLUDE_BORROW ... 104
14.3.5 EXCLUDEALL ... 104
14.3.6 GROUP ... 105
14.3.7 HOST_GROUP ... 105
14.3.8 INCLUDE ... 106
14.3.9 INCLUDE_BORROW ... 107
14.3.10 INCLUDEALL ... 108
14.3.11 MAX_BORROW_HOURS ... 108
14.3.12 NOLOG ... 109
1
Overview
1.1
Introduction
This document guides you through the process of installing and configuring Wind River products on a Linux file server for shared use by a workgroup. You, or someone in your organization, may need to complete the following site configuration tasks:
■ Installing the product.
■ Permanently activating your product installation. ■ Obtaining node-locked licenses.
■ Installing and configuring a license server. ■ Configuring license usage reporting. ■ Compiling run-time source code.
What This Guide Does Not Cover
The workflow outlined in this document does not describe: ■ single workstation installations
■ isntallations for Windows and Solaris workstations
You can find documentation for these topics, as well as the most current version of this document, at
2
Host System Requirements
2.1 Supported Host Types for Wind River Products 3 2.2 Host System Hardware Requirements 4
2.3 Host System Software Requirements 5
2.1
Supported Host Types for Wind River Products
Wind River products support development on either Windows, Solaris, or Linux hosts (in many cases, all three host types are supported). This chapter outlines a recommended host system configuration for your chosen host type (both hardware and software) that is applicable to most Wind River products. Product-specific information on supported host types, as well as minimum and recommended host system hardware and software requirements, are provided in your product release notes.
NOTE: The guidelines in this chapter are generalized for all Wind River products. Your host system may require more resources or less, depending on what product you have purchased and your performance requirements. For more specific information, see your product release notes.
2.2
Host System Hardware Requirements
This section provides a set of Wind River-recommended host system hardware requirements for development using a typical Wind River product. The recommended configuration is expected to provide good performance for development on a typical user system. Primarily, this section addresses
development using Wind River Eclipse-based products. It also briefly addresses command-line user requirements and optional hardware recommendations. For more information on specific host system requirements for your product, see your product release notes.
For information on host software requirements, see 2.3 Host System Software Requirements, p.5.
2.2.1
Requirements for Eclipse-Based Products
This section lists the recommended host hardware configuration for development using a Wind River Eclipse-based product (such as Workbench).
Linux Host Hardware Requirements
Wind River recommends the following hardware configuration for typical development with an Eclipse-based product on a Linux host:
■ Intel Pentium 4 class processor, 1.7 GHz or higher recommended. ■ 1 GB of RAM.
■ Disk space:
The amount of disk space required for a typical installation varies from
NOTE: The following requirements do not represent a minimum configuration. Depending on your development requirements and any other third-party software that you are running, you may require more or less than this configuration.
2 Host System Requirements 2.3 Host System Software Requirements
2.2.2
Command-Line Users
If you are a command-line user, you may achieve acceptable performance from a host system with fewer resources than the recommended configuration provided in 2.2.1 Requirements for Eclipse-Based Products, p.4. However, note that even a small amount of development in the Eclipse-based environment requires that you meet the minimum configuration for your product. For product-specific information on minimum host system requirements, see your product release notes.
2.2.3
Optional Hardware
The following hardware is optional but may be useful to you during your development:
■ A network interface card for debugging over a network is recommended.
2.3
Host System Software Requirements
This section provides a set of Wind River-recommended host system software requirements for development using a typical Wind River product. The recommended configuration is expected to provide good performance for development on a typical user system. Primarily, this section addresses
development using Wind River Eclipse-based products. For more information on specific host system requirements for your product, see your product release notes. For information on host hardware requirements, see 2.2 Host System Hardware Requirements, p.4.
2.3.1
Requirements for Eclipse-Based Products
This section lists the recommended host software configuration for development using a Wind River Eclipse-based product (such as Workbench).
NOTE: Software requirements for Wind River products vary considerably from one product to another. Be sure to check your product release notes for additional
Linux Host Software Requirements
Wind River recommends the following OS version and software for typical development with an Eclipse-based product on a Linux host:
■ One of the following host operating systems:
– Red Hat Enterprise Linux Workstation 4.0 (Update 5)
– Red Hat Enterprise Linux 5 Desktop with Workstation option (32- or 64-bit)
– SUSE Linux/openSUSE 10.2
– Novell SUSE Linux Enterprise Desktop 10 (Service Pack 1) – Fedora 7
■ Additional required packages for the development host, as listed in the installDir/wrlinux-2.0/wrlinux/required-host.txt files.
■ The X Window System, with the GNOME, KDE, or other desktop of your choice.
■ A current version of a standards-compliant browser.
■ TCP/IP must be installed on the host system, even if it is being used as a standalone computer with a serial connection to the target.
2.3.2
Optional Software and Resources
The following software and resources are optional but may be useful to you during your development:
■ An active Internet connection is recommended during initial installation to access patches, documentation, and other important information from the Wind River Online Support Web site.
3
License Management Workflow
3.1 How Licensing Works 7
3.2 Installation and Licensing Tasks for License Servers 9 3.3 Installation and Licensing Tasks for Workstations 10
3.1
How Licensing Works
Many Wind River products are license-managed. This means that your
organization buys a license that allows your developers to run a certain number of copies (also known as seats) of a Wind River product simultaneously.
When a developer launches a license-managed product, the product requests a license. If the computer is configured to use a node-locked license, the license request and allocation all transparently happen on the local computer (node). If the computer is configured to use floating or unique-user licenses, the product requests a license, and that request is transmitted (through a TCP/IP network) to a license server. If that license server has available seats for the requesting product, it allocates a seat for the requesting node, and sends it to the node over the network. The license server runs as a daemon process on the network, listening for license requests from developer computers. This means that a development computer configured for a floating or unique user license must be connected to the network
3.1.1
Types of Workstation License
Your organization has a choice of three different types of workstation license:
Node-locked License
Node-locked licenses are best for products installed on a single development computer. The products are not shared over the network, but they can be used by anyone with physical access to the computer. The products can function when the computer is disconnected from the network.
Floating License
Floating licenses allow you to share a pool of license seats among a group of users. For example, suppose 30 developers use Wind River Workbench, but only ten copies of Workbench are running at any given time. In this scenario, you only require ten floating license seats of Workbench. When all ten seats are allocated, no other instances of Workbench can start.
Your organization buys a specific number of seats for each product, and when they are all in use, no other developers can use that product until someone else finishes. The development computer must be connected to the network to request a license from the license server.
Unique User License
Unique user licenses are similar to floating licenses in that they allow you to share
NOTE: You do not have to report node-locked license usage of these products to Wind River.
3 License Management Workflow 3.2 Installation and Licensing Tasks for License Servers
Once the number of unique users reaches the server’s maximum allocation, no additional unique users may start Workbench (though user A can start additional new instances of Workbench if desired).
Like floating licenses, your organization buys a specific number of seats of each product, but unlike floating licenses, the license server tracks usage and allows (and charges for) more seats of a product if they are needed.
For this license type, the development computer must be connected to the same subnet as the license server.
3.2
Installation and Licensing Tasks for License Servers
Before you can get a license server up and running, you (or someone in your organization) must complete several tasks, described briefly in this section. For more details, see the sections referenced in each topic.
Step 1: Log in to the Wind River licensing Web site.
Before you can activate and use your Wind River product, you must log in to and create an account on the Wind River licensing Web site:
http://www.windriver.com/licensing
For more information, see Generating Server License Files, p.14.
Step 2: Add a license server to your account.
You must add information about each computer that will act as a license server for your organization. For details, see Generating Server License Files, p.14.
Step 3: Generate a server license.
To make a license-managed product available to your developers, you must decide how many seats of that product to assign to the license server on a particular host, then you must download a server license from the licensing Web site that contains that information. For instructions, see Generating Server License Files, p.14.
NOTE: You must report unique user usage of these products to Wind River on a quarterly basis.
Step 4: Install the license server software.
Once you have a server license in hand, you must install and configure a license server on the license server computer, copy the license to the correct location, and start up the license server. For details, see 8. Installing and Configuring a License Server.
Step 5: Manage license files.
If your organization uses more than one license-managed Wind River product, or FLEXlm-managed products from other vendors, you may find it convenient to merge the server licenses so that one license server can assign licenses for all products. For more information about how to merge license files, see 9. Setting Up a Single License Server for Multiple Products.
Step 6: Set up borrowing of license files.
If your developers will use license-managed products while travelling or
otherwise disconnected from the network, you must configure their computers to borrow a license for a set period of time.
Step 7: Configure usage reporting tools.
If your organization has purchased any unique user (UU) licenses, you must report the usage levels of license-managed products to Wind River each quarter. For instructions on how to configure your license server for license reporting, see 8. Installing and Configuring a License Server.
Step 8: Uninstall a license server.
You may discover that you must uninstall a license server from its host computer, for example if the computer is being decommissioned and you want to move the license server to a new system. For instructions on how to uninstall a license server, see Uninstalling a License Server, p.54.
3 License Management Workflow 3.3 Installation and Licensing Tasks for Workstations
Step 1: Generate Product Activation files.
Your organization may have purchased any of the three license types (or some combination thereof), and you generate Product Activation files differently depending on the type of license you have. Instructions for generating workstation licenses are located in 5. Generating Workstation Licenses.
Step 2: Install Wind River products on development workstations.
Your developers can wait for you to give them a Product Activation file before installing, or they can install and register for a temporary license.
Step 3: Activate workstation licenses.
If your developers installed their license-managed products using a temporary license (also known as temporary activation), you or they must permanently activate those products.
Step 4: Uninstall Wind River products from a workstation.
If a developer no longer needs to use a particular Wind River product, you can uninstall it from that development computer using the Wind River Maintenance Tool.
Step 5: Rehost product seats on a different development computer or license server.
After you uninstall a product from a workstation, you can reassign its license to another development computer (for a node-locked license) or back to the pool of seats to be allocated by a license server (for floating and unique user licenses). For details about rehosting and regenerating new licenses, see Rehost, p.19.
4
Generating Server
License Files
4.1 Before You Begin 13
4.2 What Is a License Server? 13 4.3 Generating Server License Files 14
4.4 License Maintenance and Management Tasks 18
4.1
Before You Begin
Before starting, locate the License Administrator Essentials sheet that came in your Wind River product box. It contains a code you will need in order to create and manage licenses on the Wind River licensing Web site.
4.2
What Is a License Server?
A license server is an application made up of two processes: a FLEXlm-based license manager daemon and a vendor-specific daemon. The license server runs on a
subnet as the development workstations), and it grants them permission to run specific Wind River products.
This granting of permission is based on the contents of the server’s license file, which describes how many seats of each product can be used simultaneously.
4.2.1
Do You Need to Install a License Server?
Whether or not you must install a license server depends on the type of license(s) your organization purchased for its Wind River products.
■ If your organization purchased floating or unique user licenses, you must set up a license server to allocate those licenses to your developers.
■ If your organization has purchased only node-locked licenses, you do not need to set up a license server. However, you must generate node-locked license files for each development host computer. Skip the remainder of this section and go on to 5. Generating Workstation Licenses.
4.3
Generating Server License Files
Complete the following steps to generate a license file for the computer that will act as your license server.
1. Log in to the Wind River licensing Web site and create your account. 2. Activate your license.
3. Add your license server as a new host.
4. Activate your products and generate a license file for your license server. These tasks are described in greater detail in the following sections.
4 Generating Server License Files 4.3 Generating Server License Files
2. Go to http://www.windriver.com/licensing.
3. Check the list of products that can be activated from this site to be sure your product appears here. If it appears in the list, click Login.
4. Log in to the site:
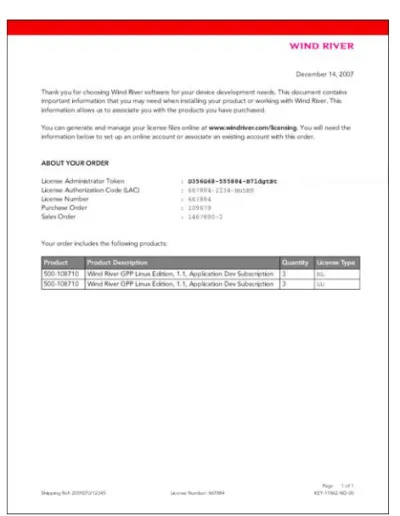
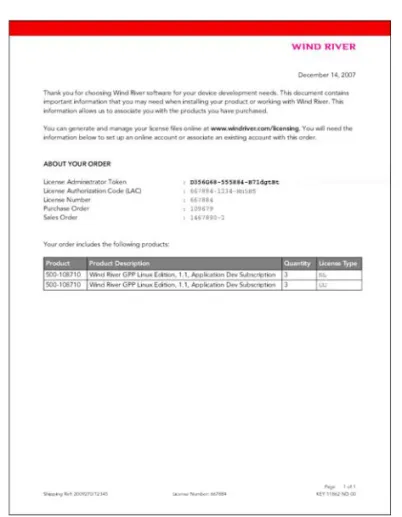
Figure 4-1 Sample License Administrator Essentials Sheet
NOTE: Some older products cannot be activated from the licensing Web site; to activate those products, see the installation information that was included with the products. If you do not have access to installation instructions for an older product, contact Wind River Customer Support or e-mail to
■ If you already have a Wind River User ID and Password (for example because you previously logged in to this site or the Wind River support site), type them and click Login.
or
■ If you are not yet a registered user on any Wind River site, click
Register for a User ID and Password. Type your user profile information, including your license number from the License Administrator Essentials sheet. Type a password, confirm it, then click Submit.
Step 2: Activate your license.
1. Click Activate your products to open the Add Licenses screen. Type in your License Number and License Administrator Token from the License
Administrator Essentials sheet.
If you expect to eventually manage several licenses, also type in a label (for example, VxWorks GPP 3.4 or Alameda Campus) to make it easier to identify this particular license in the future.
2. Click Submit. On the Add Licenses Confirmation screen, check to be sure all the information is correct.
Your license has now been added to your account. If you order additional Wind River products in the future, click Manage Licenses and then click Add New License to add the new products to your account.
Step 3: Add your license server as a new host.
Once your license has been activated, use the Manage Hosts screen to add information about the computer that will act as your license server. If you have any license server hosts already defined, they appear on this screen.
1. To add a host, click Add New Host.
2. On the Create Host screen, enter the host computer’s name, host ID, and other requested information.
4 Generating Server License Files 4.3 Generating Server License Files
Step 4: Activate your products and generate a license file for your license server.
1. After you have added a license server host to your account, click Manage Licenses to activate the products you have purchased.
2. From the drop-down list next to the license on the Manage Licenses screen, select Activate Products.
From this screen you can activate all or some of your available seats for a particular product. For information on the other actions available on the Manage Licenses screen, see 4.4 License Maintenance and Management Tasks, p.18.
3. To activate a product, select the check box next to the product code and click Next.
4. In the Quantity field, type the number of seats to allocate.
5. From the Host Label drop-down list, select the computer to which these seats should be assigned. If you defined only one host, that appears by default. ■ If you defined more than one host and you want to distribute the available
seats between them, assign some seats to the first computer, then click Add Row and assign others to another computer.
■ If you want to add another license server host computer to your account now, click Create New Host.
6. When you have finished assigning seats, click Next.
7. On the Verify/Generate screen, confirm that you have allocated the correct number of seats to the correct computer(s), then click Next.
8. On the Download/E-mail Licenses screen, enter an e-mail address for the person who should receive the summary of allocations.
NOTE: If you are activating a node-locked license, you can choose 0 or 1 from the drop-down list.
NOTE: Server licenses are cumulatively generated, which means that as you assign new products to this host, the license file will include the previous products along with the new ones.
To generate a license file that lists only the new product you are assigning in this session, select Do not generate cumulative licenses.
9. Click Download if you want to download the server license file now. If you would prefer to have it e-mailed to you or to someone else, fill in the form and click Send.
If you chose to send licenses by e-mail, the E-mail Licenses Confirmation screen displays to whom they were sent.
Once you have the server license file (WRSLicense.lic), see 8. Installing and Configuring a License Server for instructions on how to use it.
4.4
License Maintenance and Management Tasks
The following additional actions are available from the drop-down list next to each license on the Manage Licenses screen.
■ Installation Keys
This screen shows the installation keys associated with the products covered by this license. You can use these installation keys to install license-managed products on the appropriate workstations.
■ View Products
Use this screen to see information such as how many seats of a particular product were purchased under a license, the support status of that product, and the expiration date of the license.
■ View Temporary Activations by Users
This screen shows which developers (if any) have installed a license-managed product and requested temporary activation.
4 Generating Server License Files 4.4 License Maintenance and Management Tasks
■ License Info
Use this screen to view contact information for the person responsible for this license. This information is only available if it was entered when the license was activated.
Single License Server
Merging License Files for Wind River Products
Wind River recommends that whenever possible, you put each Wind River license management file on a separate license server. This is the simplest approach because you eliminate the need to merge license files, or to control access to products by specifying user inclusions and exclusions. In this case, the only action you must perform is to install the product on a development computer or a file server, then point to the license server from the development computer’s license file.
However, if you must use one license server to distribute licenses for more than one Wind River product, you can merge the license information into one file. For instructions on how to do this, see 9.3 Merging License Server Files, p.59.
Multiple License Servers
If you have more than one license server defined, the following actions are available on the Manage Licenses screen.
■ License Files by Host
Click the appropriate host name to view the active seats assigned to that host for a particular license and product.
You can also download the server license file associated with that host.
■ Rehost
Use this screen to remove seats of a product from the pool allocated by a particular license server and assign them to a different license server.
a. From the Select server for rehost drop-down list, select the license server
NOTE: This option is available only if you have more than one license server defined.
b. From the Rehost screen, select the reason for rehosting from the
drop-down list, then type the number of seats you want to reallocate in the Rehost Qty field for each product and type of license. Click Next. c. Click Return the seats to pool if you do not want to reassign them now, or
type the number of seats and select the host to which you want to assign the product seats.
To allocate seats between more than one server, select a server in the drop-down list and assign the correct number of seats, then click Add Row to select another existing server or Create New Host to define a new server and assign an appropriate number of seats.
d. On the Rehost Verification screen, make sure that product seats are now assigned to the correct license server. Read the text on the screen, select I agree with the Software License Agreement, and then click Next. e. The Confirmation screen displays the completed reallocation.
NOTE: The rehost option is available only if you have more than one license server defined.
5
Generating Workstation
Licenses
5.1 Workflow for Generating Workstation Licenses 22 5.2 Generating a Node-Locked License File 22
5.3 Generating a Floating or Unique User License File 25 5.4 Editing License Files 27
5.1
Workflow for Generating Workstation Licenses
Complete the following steps to generate a license file for a development computer:
1. Log in to the Wind River licensing Web site. If you do not yet have an account on the site, create your account.
2. Add the license number for this order to your account to activate this license. 3. Find out if any of your developers installed a Wind River product and
requested a temporary license (also known as temporaryactivation). If so, generate a permanent license for them.
4. Add information about, and generate licenses for, the development computers that will run node-locked licenses.
5. Using the license server license file, create Product Activation files for users who have not yet installed the product.
6. Using the product installer, generate a license file and response.xml file(s) for installations you will perform for your users.
These tasks are described in greater detail in the following sections.
5.2
Generating a Node-Locked License File
To generate a node-locked license, follow these steps:
Step 1: Log in to the Wind River licensing Web site.
1. Locate your License Administrator Essentials sheet, as in Figure 5-1. You will need information from it to complete this task.
5 Generating Workstation Licenses 5.2 Generating a Node-Locked License File
2. Go to http://www.windriver.com/licensing.
3. Check the list of products that can be activated from this site to be sure your product appears here. If it appears in the list, click Login.
4. Log in to the site:
Figure 5-1 Sample License Administrator Essentials Sheet
NOTE: Some older products cannot be activated from the licensing Web site; to activate those products, see the installation information that was included with the products. If you do not have access to installation instructions for an older product, contact Wind River Customer Support or e-mail to
■ If you already have a Wind River User ID and Password (for example because you previously logged in to this site or the Wind River support site), type them and click Login.
or
■ If you are not yet a registered user on any Wind River site, click Register for a User ID and Password. Type your user profile information,
including your license number from the License Administrator Essentials or the Developer Essentials sheet. Type a password, confirm it, then click Submit.
Step 2: Activate your license.
1. Click Activate your products to open the Add Licenses screen. Type in your License Number and License Administrator Token from the License
Administrator Essentials sheet.
If you expect to eventually manage several product licenses, also type in a label (for example, VxWorks GPP 3.4 or Alameda Campus) to make it easier to identify this particular license in the future.
2. Click Submit. On the Add Licenses Confirmation screen, check to be sure all the information you typed in is correct.
Your license has now been added to your account. If you order additional Wind River products in the future, click Manage Licenses and then click Add New License to add the new products to your account.
Step 3: Add your development computer as a new host.
Once your license has been activated, use the Manage Hosts screen to add information about the development computer. If you have any hosts already defined, they appear on this screen.
1. To add a host, click Add New Host.
2. On the Create Host screen, enter the host computer’s name, host ID, and other requested information.
5 Generating Workstation Licenses 5.3 Generating a Floating or Unique User License File
Step 4: Activate your products and generate a license file for the development computer.
1. After you have added the development computer to your account, click Manage Licenses to activate the products you have purchased.
2. From the drop-down list next to the license on the Manage Licenses screen, select Activate Products.
3. Select the product you want to allocate to this development computer (look for NL in the License Type column). Click Next.
4. From the Host Label drop-down list, select this development computer, then click Next.
5. Confirm that you selected the correct host, then click Next.
6. Click Download to download the license file immediately, or enter an e-mail address if you want the license file to be sent to the person responsible for this computer. If you entered an e-mail address, click Send.
7. If you chose to send licenses by e-mail, the E-mail Licenses Confirmation screen displays to whom they were sent.
Once you have the node-locked license file, see the chapter on installation for instructions on how to use it.
5.3
Generating a Floating or Unique User License File
Before generating a floating or unique user license, you should have completed these tasks:
1. Create an account on the Wind River licensing Web site and generate a license file for your license server computer, as described in 4. Generating Server License Files.
2. Install and configure the license server, as described in 8. Installing and
NOTE: You can both download the license file and receive it in e-mail. If you download the file, you must be sure to preserve the .lic ending on the license file or the file will not work properly.
Generating a floating or unique user license consists of two tasks: allocating the appropriate product seat(s) to a specific license server, and creating a license file for the development computer by extracting information from the server’s license file.
Step 1: Log in to the Wind River licensing Web site.
Go to http://www.windriver.com/licensing and log in as described in Step 1 under 5.2 Generating a Node-Locked License File, p.22.
Step 2: Assign floating or unique user seats to a license server
1. Click the Manage Licenses tab, and from the drop-down list next to the appropriate license, select Activate Products.
2. Select the product for which you want to generate a license (look for FL or UU in the License Type column), then click Next.
3. Type the number of seats you want to allocate, select the license server to which you want to allocate them, and click Next.
4. Verify the number and type of seats that are assigned to the listed license server, then click Next.
5. Click Download to download the new server license file immediately, or enter an e-mail address if you want the license file to be sent to the person
responsible for this computer. If you entered an e-mail address, click Send. 6. Replace the existing license server file with this new file, which contains the
newly allocated seat(s) along with any previously assigned seats.
Step 3: Create a Product Activation file from a server license file.
There are two types of Product Activation file: install.txt and WRSLicense.lic. Both are created by extracting information from the server license file, and both permanently activate products so that developers can begin using them. 1. In your server license file, near the bottom, you will see lines similar to the
following:
# Begin: client license
5 Generating Workstation Licenses 5.4 Editing License Files
# Uncomment next 2 line before use. # SERVER servername hostID portnumber
# USE_SERVER #--#% Keys
#--#CDR-firstProductInformation
#--#CDR-secondProductInformation
#--#CDR-thirdProductInformation
# End: install.txt
# End: client license
---2. Copy the lines that appear in bold above, and paste them into a text file named install.txt or WRSLicense.lic:
■ Create an install.txt file if the license-managed products have not yet been installed.
or
■ Create a WRSLicense.lic file and copy it into the installDir/license directory of an already-installed product.
3. Uncomment these two lines:
# SERVER servername hostID portnumber
# USE_SERVER
4. Save the file, then use it or distribute it to your developers.
For more information about installing products on development computers, see the installation chapter in this guide.
5.4
Editing License Files
Unless directed to do so by Wind River support, do not change any text in a license file. Doing so can invalidate the license file and cause it to stop working.
6
Shared Installations
6.1 Before You Begin 29
6.2 Network and File System Considerations 30 6.3 Installing a Product for Shared Use 31 6.4 Non-Typical Installations 32
6.1
Before You Begin
Before you can install your Wind River products, make sure you have the following items available:
■ Your product box, which includes:
– installation media (discs or image files). – the Developer Essentials sheet
– the Getting Started book
■ Several gigabytes (GB) of disk space on your development computer for Standard (recommended) installations.
The amount of disk space required varies for each product. For a given installation disk, the installer calculates the amount of space required for all features you selected; this is less than the actual space required if your
installation contains multiple disks. Verify that you have adequate free space before you begin installation.
■ Write permissions to your installation directory.
■ For typical installations, a Product Activation file to permanently activate your products during installation (see 5. Generating Workstation Licenses).
■ For non-typical installations, installation keys (printed on your Developer Essentials sheet).
6.2
Network and File System Considerations
Performance can vary greatly when running applications from a
file-server-mounted drive. At a minimum, you should have a 100Mbit network, and a high performance file server.
6.2.1
Installing for Multiple Host OS Platforms
For certain Wind River products, you can install more than one OS-specific version of the product at the same time. For example, you can install a Windows version and a Linux version of the same product on your file server at the same time; however, there are some limitations:
Not Recommended
For performance reasons, Wind River does not recommend the following for shared installations that serve both Windows and UNIX clients:
■ Installing on a UNIX/Linux server and exporting the installation to Windows clients with SAMBA (SMB).
6 Shared Installations 6.3 Installing a Product for Shared Use
6.3
Installing a Product for Shared Use
This section describes the process for installing a Wind River product on a file server for remote (client-side) execution. In this scenario, you will install the product on a file server, and members of your workgroup will run the software from their own workstations.
6.3.1
Standard Installation
Step 1: Generate a Product Activation file.
A shared file-server installation requires that your users have floating or unique user licenses. You cannot use a node-locked license with a shared installation. When you generate your Product Activation file, it will contain information about which license server will allocate licenses to the users of this installation.
Step 2: Install the product.
To install a Wind River product on your file server, complete the following steps: 1. Launch the installer by putting the disc labelled Install First into your drive,
or by navigating to the product image, and running setup_linux.
2. Read each installer screen and provide the requested information, then click
NOTE: Shared installations where the software is being run on the server, but viewed remotely, are not currently supported.
NOTE: If you are installing the product from a shared network directory, ensure that the directory name and path do not include spaces. If there is a space character anywhere in the absolute path, some elements of the installation will not be available.
NOTE: If you are installing a product suite that includes Wind River Workbench, the Workbench image must be installed first. The rest of the products in the suite can be installed in any order.
If you are installing a product suite that includes more than one product (such as a Wind River Platform), be sure to choose the same installation directory for all products.
3. When prompted to select an Activation Type (or Installation Type), you must select permanent activation (or permanent installation). Enter the path to the Product Activation file you generated in Step 1.
4. When prompted to select product features to install, choose any combination of supported host types.
Step 3: Notify your workgroup of the location of the product installation.
Installation is complete, and the products are ready for use.
Depending on which product you have installed, there may be remaining tasks that you or someone in your organization must perform. For example:
■ configuring optional workgroup tools ■ compiling runtime code
■ installing patches or service packs ■ installing additional reference BSPs
6.3.2
Installing a Service Pack
Each Wind River product service pack is delivered with its own installer program, similar to the one you used to install your products in Step 2:Install the product., p.31. The installer program automatically uses the installation keys that are included with the service pack.
Service packs are installed as additions to a previous installation; they do not overwrite existing product installations.
6.4
Non-Typical Installations
6 Shared Installations 6.4 Non-Typical Installations
6.4.1
Installing Workbench into an Existing Eclipse Environment
Wind River Workbench provides a complete Eclipse framework. You do not need to install Eclipse separately. However, if you have your own customized Eclipse installation, and you prefer to integrate Workbench into it, you must:
1. Install Wind River Workbench (as described in this document).
2. Follow the instructions in Wind River Workbench User’s Guide: Using Workbench in an Existing Eclipse Environment to integrate Wind River Workbench into your existing Eclipse installation.
6.4.2
Incremental Installation
An incremental product installation can be performed in situations such as the following:
■ You installed only certain features of a Wind River product (by selecting Custom rather than Standard installation) and now wish to add the excluded features.
■ You are installing complementary Wind River products (for example, adding On-Chip Debugging to your existing installation of Wind River Workbench). When you do an incremental installation, you can again choose Standard or Custom mode. In a standard installation, the installer program installs only those products or features that are not yet present in your installation directory. If you select Custom installation, the installer program shows you a full list of the available products and features, indicating which ones are already installed. You can choose whether to re-install what is already present. (By default, existing features are not re-installed.)
6.4.3
Parallel Installation
If you have a previous version of Workbench installed, you can install a later version alongside it as long as they are in different directories.
7
Post-Installation Tasks
7.1 Installing Patches 35
7.2 Downloading and Installing Board Support Packages 36 7.3 Building the VxWorks Run-Time Source 39
7.4 Building the Linux Target Run-Time Source 41 7.5 Uninstalling Wind River Products 42
7.1
Installing Patches
To install patches for your Wind River products, use the Wind River Product Maintenance Tool, provided with products from Wind River Workbench 3.0 forward and available from your installation directory. The Maintenance Tool handles all updates to Wind River software after initial installation, as well as product uninstallation.
To launch the Maintenance Tool, do the following:
■ From the GUI
Select Applications (the main menu on the panel) >Wind River > Uninstall and Maintenance > Maintenance Tool.
■ From the command line
Execute the following commands from the command shell:
% cd installDir/maintenance/mtool
% ./mtool_linux
7.2
Downloading and Installing Board Support Packages
Wind River provides board support packages (BSPs) for both the VxWorks and Wind River Linux operating systems. Although the specific details of a BSP vary considerably between VxWorks and Linux, BSPs serve the same purpose on each operating system. That is, BSPs provide the necessary code to run your customized VxWorks or Wind River Linux operating system instance on specific target hardware. BSPs provided by Wind River can be used for development on available hardware or can be used as a base for BSP development for your custom hardware.
For more information on BSP development, see the VxWorks BSP Developer’s Guide or the Wind River Linux Platforms Users Guide.
7.2.1
When Should You Download a BSP?
Many VxWorks and Wind River Linux distributions provide board support packages directly on the product installation media. However, new BSPs and updates are continuously added to the BSP Web page. Therefore, to have access to the latest board support packages and updates, you must visit the BSP Web page.
NOTE: Patches cannot be installed with a silent or unattended installation method.
NOTE: Wind River recommends that, when developing for custom hardware, you try to customize an existing BSP instead of trying to write your BSP from scratch.
7 Post-Installation Tasks 7.2 Downloading and Installing Board Support Packages
Compatibility
The Wind River installation program does not verify version compatibility between your Wind River products and BSPs. For compatibility information, see the documentation that accompanies the BSP.
7.2.2
Navigating the BSP Web Site
The Wind River public Web site provides you with access to a listing of all available Wind River BSPs. The BSP main page is:
http://www.windriver.com/products/bsp_web/
You can also navigate to this page from the Wind River Web site home page by selecting Products > Board Support Packages.
Locating a Specific BSP
From the BSP main page, you can choose to locate a specific BSP by: Architecture
This is the generic processor family to which the desired CPU belongs. For example, ARM or PowerPC. If you know the architecture family for your development processor, use this category.
Hardware Vendor
This is a list of hardware vendors for the development boards that are supported by the Wind River BSPs. If you know the manufacturer of the development board for the BSP you wish to use, use this category.
Market
This is the general market targeted by the development board or processor. For example, processors that are targeted for use in medical equipment are
NOTE: This Web page is publicly accessible, but you must have a valid Online Support login in order to download a BSP .zip file.
NOTE: This category is organized by hardware development board vendors, not by processor manufacturer. In many cases, the CPU manufacturer is not the board vendor.
Platform
This is a list of available Wind River products that include BSP support. You can use this category to see a list of all BSPs available for your specific Wind River product and version.
7.2.3
Downloading and Installing a BSP
This section provides detailed instructions for downloading and installing BSPs for products from Wind River Workbench 3.0 forward.
The BSP Download Page
Once you have located your desired BSP, you must download and install the associated .zip file. To get to the download page, find the correct entry in the BSP list and click More (this button appears at the far right end of the specific BSP entry line). This link brings you to the BSP technical details page.
If a version of the BSP is available for download, a link to a downloadable .zip file appears at the top of the page under the BSP Sales Contact field. Certain BSPs are only available as part of a product distribution. If this is the case, the Product Availability field indicates that the BSP is available on CD-ROM (or DVD-ROM). If you do not have the product CD (or DVD) for the BSP, contact Wind River Customer Support for assistance.
Installing a BSP with the Maintenance Tool
Downloaded BSPs are placed in your installDir/updates directory. To install a new BSP, launch the Maintenance Tool:
■ From the GUI
Select Applications (the main menu on the panel) >Wind River > Uninstall and Maintenance > Maintenance Tool.
7 Post-Installation Tasks 7.3 Building the VxWorks Run-Time Source
7.3
Building the VxWorks Run-Time Source
The information in this section applies to one or more of the following product bundles:
■ Wind River General Purpose Platform, VxWorks Edition ■ Wind River Workbench for VxWorks
■ Wind River VxWorks Platforms
Any of the above products can be optionally purchased as a source code product. However, Wind River VxWorks Platforms products (Platform AD, Platform CD, Platform ID, and Platform NE) always include source code for technologies such as the Wind River Network Stack. The General Purpose Platform and the Wind River Workbench for VxWorks products are pre-compiled and do not require a source code build (even if you have purchased the source code option). The Platform AD, Platform CD, Platform ID, and Platform NE source code must be compiled prior to using the Platform product.
7.3.1
The Kernel and Platform Build Processes
Depending on what product and options you have purchased as well as your development requirements, you may wish to perform a VxWorks kernel build or a Platform technology build, or both. (Note that for the General Purpose Platform and the Wind River Workbench for VxWorks products, neither build is required). Additional information on each build process (and when it must be performed) is provided in the remaining sections. Complete build instructions and additional information on each build type is available from one of the following manuals
NOTE: Wind River VxWorks Platforms includes:
Wind River Platform for Automotive Devices, VxWorks Edition (Platform AD) Wind River Platform for Consumer Devices, VxWorks Edition (Platform CD) Wind River Platform for Industrial Devices, VxWorks Edition (Platform ID) Wind River Platform for Network Equipment, VxWorks Edition (Platform NE)
NOTE: Platform AD, Platform CD, Platform ID, and Platform NE include a pre-built kernel; but all other Platform technologies, including the network stack, must be built from source prior to first use.
■ Wind River General Purpose Platform, VxWorks Edition Getting Started: Compiling Source
■ Wind River Workbench for VxWorks Getting Started: Compiling Source
■ Wind River VxWorks Platforms Getting Started: Compiling Platform Component
Source
Building VxWorks Kernel Source Code
In general, you are not required to compile the VxWorks operating system (kernel) source code in order to begin development with any VxWorks-based product, even if you purchase a source code product. The General Purpose Platform is shipped fully pre-compiled and users are not required to compile any source code before using this product. Wind River VxWorks Platforms users must compile their product before use, but that requirement is limited to the network stack and other technologies that sit above the underlying operating system. The kernel itself is pre-compiled and does not need to be built prior to use. (For more information on building Wind River VxWorks Platforms products, see Building Wind River VxWorks Platforms Source Code, p.40.)
Although it is not required, there are many reasons for which you might wish to build or, at a minimum, reference the VxWorks source code. One of the most common reasons is to ease the application debugging process (the pre-built VxWorks kernel images are not built with debug symbols).
Building Wind River VxWorks Platforms Source Code
Wind River VxWorks Platforms products (Platform AD, Platform CD, Platform ID, and Platform NE) are always shipped as source code and must be compiled prior to using the product.
NOTE: In all Wind River VxWorks Platforms products, the VxWorks kernel and system libraries are shipped in a pre-built form as well as source form. You can use
7 Post-Installation Tasks 7.4 Building the Linux Target Run-Time Source
Wind River VxWorks Platforms Build Process Overview
Building the Wind River VxWorks Platforms source is a two step process. 1. First, you can customize the features in your Platform using the Platform
Makefile. This makefile allows you to specify what features you want to have available in your Platform during development. You can also choose to skip this customization and compile your Platform without modification using the default makefile options.
For complete information on customizing your Platform using the Platform Makefile, see Wind River VxWorks Platforms Getting Started: Customizing the Default Configuration.
2. Next, you must execute the source code compile using Wind River Workbench or the vxprj command-line utility. (For more information on the vxprj
command-line utility, see the VxWorks Command-Line Tools User’s Guide.) This step also requires you to choose the compiler and target architecture you wish to compile for.
7.3.2
Where to Find Additional Information
Complete build instructions and additional information on each build type is available from one of the following manuals (depending on which product you have purchased):
■ Wind River General Purpose Platform, VxWorks Edition Getting Started
■ Wind River Workbench for VxWorks Getting Started
■ Wind River VxWorks Platforms Getting Started
7.4
Building the Linux Target Run-Time Source
7.4.1
When Is It Necessary to Build Linux Source Code?
All Wind River Linux Platforms require a source code build prior to using the product for development. You must build the source using one of the two build
Additional information on each build type is provided in the following section. Complete instructions for building your source code with each build type are provided in the Wind River Linux Platforms Users Guide.
7.4.2
Choosing a Build Method
As stated previously, you must build your Platforms source before using the product, and there are two methods available for building your Platform source code. The first method is the RPM build method. This method is the fastest way to build a complete run-time system. The RPM build method uses a pre-built, target hardware and file system-specific kernel as well other pre-built elements to assemble a complete run-time system. Because this method uses largely pre-built source code to assemble the target run-time, the build completes in just minutes. The second build option is a full source code build. This method allows you to build the entire run-time system, including the kernel, from source. However, when using this method, it can take several hours for a complete system to build the first time it is run. If necessary, you can shorten the build time while still maintaining control over what source code is built, by using the source build method for your first build and then using the RPM build method for subsequent builds. You can choose the source code build method to build only certain aspects of the system (such as a kernel-only build) and then assemble the final run-time system using the RPM method.
7.4.3
Where to Find Additional Information
Complete information on the available build types and step-by-step tutorials that walk you through the Wind River Linux Platforms target run-time build process are provided in the Wind River Linux Platforms User’s Guide.
7 Post-Installation Tasks 7.5 Uninstalling Wind River Products
and you want to continue working with it, you may first wish to archive some files before uninstalling.
Archiving Downloaded Plug-Ins
If you installed any third-party plug-ins in the installation directory of your Wind River product and you want to preserve them, you must move them outside the installation directory. For more information about working with plug-ins, see Wind River Workbench User’s Guide: Integrating Plug-Ins.
Preserving Workbench Project Files
To preserve the state of Workbench projects and be able to recreate them after reinstalling the product, copy the following files to a location outside the Workbench installation directory:
For user-defined projects, all makefiles must also be version-controlled.
Project File Description
.project Eclipse platform project file containing general information about the project.
.wrproject Workbench project file containing mostly general build properties.
.wrfolder Workbench project file containing folder-level build properties (located in subfolders of your projects).
.wrmakefile Workbench managed build makefile template used to generate makefiles.
*.makefile Workbench managed build extension makefile fragments (for example, for VxWorks image projects or some Platform projects). *.wpj VxWorks Image project file containing specific data not
7.5.1
Uninstalling Through the Maintenance Tool
To remove Wind River products, it is recommended that you use the Maintenance Tool provided with your product installation. The Maintenance Tool can uninstall many products at the same time.
To launch the uninstallation tool, do the following:
■ From the GUI
Select Applications (the main menu on the panel) >Wind River > Uninstall and Maintenance > Maintenance Tool.
■ From the command line
Execute the following commands from the command shell:
% cd installDir/maintenance/mtool
% ./mtool_linux
7.5.2
Uninstalling a Service Pack
Service packs are uninstalled the same way a standard release is uninstalled. Follow the instructions in 7.5.1 Uninstalling Through the Maintenance Tool, p.44, to uninstall the product(s) you no longer want to use.
NOTE: The Maintenance Tool removes all Wind River products from Wind River Workbench 3.0 forward; it does not uninstall products from previous releases.
8
Installing and Configuring
a License Server
8.1 Before You Begin 45
8.2 Installing License Administrator Tools 46 8.3 Configuring a License Server 47
8.4 Starting a License Server 50 8.5 Stopping a License Server 52 8.6 Deactivating a License Server 54 8.7 Uninstalling a License Server 54
8.8 Troubleshooting License Server Problems 55
8.1
Before You Begin
Before you can install and configure a license server, you must have the following available:
■ a server license file (generated according to the instructions in 4. Generating Server License Files).