PHD Virtual believes the information in this publication is accurate as of its publication date. The information is subject to change without notice.
THE INFORMATION IN THIS PUBLICATION IS PROVIDED “AS IS.” PHD VIRTUAL TECHNOLOGIES MAKES NO
REPRESENTATIONS OR WARRANTIES OF ANY KIND WITH RESPECT TO THE INFORMATION IN THIS PUBLICATION, AND SPECIFICALLY DISCLAIMS IMPLIED WARRANTIES OF MERCHANTABILITY OR FITNESS FOR A PARTICULAR PURPOSE. Use, copying, and distribution of any PHD Virtual software described in this publication requires an applicable software license. Linux is a registered trademark of Linus Torvalds.
Windows is a registered trademark of Microsoft Corporation.
Citrix, Xen, XenServer, XenDesktop, XenMotion, and XenCenter are either trademarks or registered trademarks of Citrix Systems, Inc.
To license and register this product, go to:http://www.phdvirtual.com.
For customers and partners with an active support agreement, you can use the support web board orhttp://phdvirtual.comor [email protected] information about software patches, technical documentation, and support programs. Note: A valid support agreement is necessary to receive new release and software updates.
About This Guide 8
What's New 9
Benefits of PHD Virtual Backup 10
Getting Help 11
Chapter 2 - PHD Virtual Backup Overview 12
How PHD Virtual Backup Works 13
Backups 14
Restores 15
Replication 16
PHD Virtual Backup Components 17
The PHD Virtual Backup Appliance 18
The PHD VBA Console 20
Best Practices 21
Failover and Failback: Recovering From Disaster 22
Verifying Backups and Restores with TrueRestore™ 23
Frequently Asked Questions 24
Chapter 3 - Backing Up Virtual Machines 26
Creating Backup Jobs 27
Running a Backup Now 28
Scheduling Backups 30
The Backup Wizard 32
Accessing the Backup Wizard 32
Using the Backup Wizard 33
Using Tags to Backup VMs 38
Using the Restore Wizard 47
Recovering Files 52
Restoring Files and Folders 53
Restoring Files from a Linux or Unix VM on Windows 55
Mounting iSCSI Targets on Other Devices 56
Deleting iSCSI targets 57
Chapter 5 - VM Replication 58
Using VM Replication 59
Prerequisites 60
Step 1: Deploy/Configure a PHD VBA for Replication 60
Step 2: Create VM Replication Jobs 62
Step 3: Run Replication Jobs and Manage Replicas 63
Testing Replica VMs 65
Failover 67
The Create Replication Job Wizard 69
Accessing the Create Replication Job Wizard 69
Using the Create Replication Job Wizard 70
Seeding a DR Site 76
Chapter 6 - The PHD Virtual Backup Console 78
Accessing the PHD Virtual Backup Console 79
Limiting the PHD Console to a Single PHD VBA 80
Dashboard 82
Backup Appliances List 83
System Alerts 83
Backup Catalog 85
Backup Retention 102
Replication 105
Connectors 109
Support 111
License Manager 113
License Details 114
License Management - Hosts 115
License Management - Appliances 116
License Manager Tasks 117
Appendix A - Troubleshooting 120
Downloading Support Files 121
Recovering Backups from an Unavailable PHD VBA 122
Resetting PHD VBA Network Settings 123
BDC Share and Local Security Policies 124
Backup Alerts 125
Increasing Backup Storage (Attached Disk) 127
TCP/IP Ports 128
XenServer System Logging 129
Appendix B - Errors and Warnings 130
Appendix C - Using the View/Edit VM Settings Table 132 Appendix D - Using Multiple Network Adapters 134
Chapter 1 - Welcome
PHD Virtual™ Backup for Citrix XenServer® provides reliable backup, recovery, and replication for all of the virtual machines (VMs) in your XenServer environment. With PHD Virtual Backup, you can manage backup and recovery right from within XenCenter using simple, integrated menus. Using the PHD Virtual Backup Console and wizards, you can create and manage custom backup and restore jobs to meet all of your data protection requirements - without interrupting workflow and without directly accessing Xen Domain Zero (Dom0).
PHD Virtual Backup is built on the next generation of PHD’s award winning VBA™ (Virtual Backup Appliance) architecture. Purpose-built for virtualization, the PHD VBA architecture enables backup and recovery to be deployed as a virtualized workload directly on the XenServer platform. This approach enables high-performance data protection that seamlessly scales for large and distributed deployments. With PHD Virtual Backup, there is no need to deploy and manage separate physical servers, additional software, scripts, or agents. After you've deployed and configured the PHD Virtual Backup Appliance and plug-in, you're ready to begin protecting your virtual environment, right away.
Topics in this chapter include:
About This Guide 8
What's New 9
Benefits of PHD Virtual Backup 10
About This Guide
This guide is designed to introduce you to PHD Virtual Backup for Citrix XenServer and to:
l Illustrate the steps necessary to perform the available product functions, including virtual machine backups, restores, and replication.
l Describe the PHD Virtual Backup Appliance configuration options. l Explain what to do when troubleshooting certain scenarios.
Note: This guide contains information tailored to using PHD Virtual Backup for Citrix XenServer - if you are using PHD Virtual Backup on another hypervisor, refer to the specific User Guide for that hypervisor.
In addition to this guide, an Installation Guide is available that can assist you with the installation of the product, including the PHD Console and Plug-in, the deployment of the PHD Virtual Backup Appliance, and the installation of the PHD Exporter. The Installation Guide is available on thePHD Virtual Web siteas well as in the installation package.
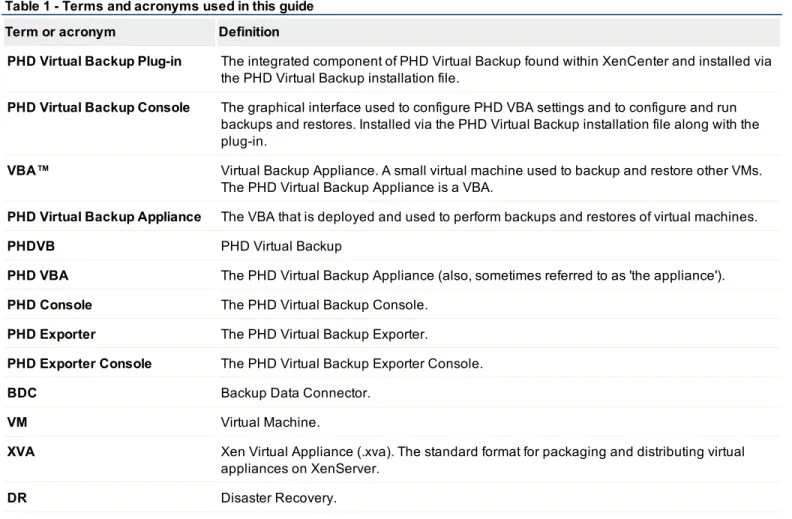
Term or acronym Definition
PHD Virtual Backup Plug-in The integrated component of PHD Virtual Backup found within XenCenter and installed via the PHD Virtual Backup installation file.
PHD Virtual Backup Console The graphical interface used to configure PHD VBA settings and to configure and run backups and restores. Installed via the PHD Virtual Backup installation file along with the plug-in.
VBA™ Virtual Backup Appliance. A small virtual machine used to backup and restore other VMs. The PHD Virtual Backup Appliance is a VBA.
PHD Virtual Backup Appliance The VBA that is deployed and used to perform backups and restores of virtual machines.
PHDVB PHD Virtual Backup
PHD VBA The PHD Virtual Backup Appliance (also, sometimes referred to as 'the appliance'). PHD Console The PHD Virtual Backup Console.
PHD Exporter The PHD Virtual Backup Exporter.
PHD Exporter Console The PHD Virtual Backup Exporter Console.
BDC Backup Data Connector.
VM Virtual Machine.
XVA Xen Virtual Appliance (.xva). The standard format for packaging and distributing virtual appliances on XenServer.
DR Disaster Recovery.
What's New
PHD Virtual Backup v5.4 includes new features and enhancements to the product, including:
l Disable jobs - you can now disable scheduled jobs using the Jobs interface. You no longer need to delete or change the schedule for a job you would like to temporarily prevent from running - you can now use the disable feature to prevent the job from running until it is enabled again.
l Log updates - Overall logging was improved and now includes additional, updated status and error messaging. As a result, the Debug Logging option is now disabled by default.
l License Manager - With version 5.4, you can now manage licenses from a single, central location, making it much easier to apply and update licenses for all of your PHD Virtual Backup Appliances. In addition, you can now easily manage which hosts are backed up or used as replication targets or view all of your license information, including the number of licensed hosts and expiration dates, all from a single location.
l Additional bug fixes and updates.
Benefits of PHD Virtual Backup
The First Citrix Ready Solution for Virtual Backup and Recovery
PHD Virtual Backup is built upon the next generation of PHD Virtual's VBA architecture and version 5.4 extends the Citrix XenServer virtualization backup and recovery solution with new capabilities. PHD Virtual Backup provides:
l XenCenter management integration. With the plug-in for XenCenter, PHD Virtual Backup provides "single pane of glass" management of your virtual machine backup and restore right from the XenCenter management console.
l Reduced storage requirements and optimized network backup with TrueDedupe™. Source-side deduplication and compression occur before the data leaves the host, reducing the network impact and providing an ideal solution for backup over distributed networks and WAN environments.
l Replicate virtual machines from a production site to a Disaster Recovery (DR) site to provide fail over capabilities giving you immediate access to your virtual machines, applications and data in the case of a significant DR event.
l Using the PHD Exporter, export VM’s from your existing backups for long term or offsite storage. VM’s are exported in standard compressed OVF format for portability. Also, additional support for tape backup solutions via the Backup Data Connector. Quick and easy integration with tape backup solutions, providing the ability to sweep VM backups to tape. l TrueRestore™ allows you to restore VM backups with confidence. Data integrity is checked during both the backup and
restore processes, ensuring the restored data matches the original.
l Flexible backup storage options. You can send your backup data to locally attached storage or external storage locations such as NFS or CIFS shares.
l Job scheduling and container backups. Create backup jobs based on containers (hosts, pools, folders, tags) so that any VM added to that container later will automatically be backed up based on the job settings. Also, VMs within each container can be excluded from the job, if needed.
l File Level Restore for any operating system. Restore individual files and folders without the need to restore the entire VM. l Additional support for tape backup solutions via the Backup Data Connector. Quick and easy integration with tape backup
solutions, providing the ability to sweep VM backups to tape.
l Scalable and fault-tolerant deployment. Distributed architecture minimizes a single point of failure. Multiple VBAs can be configured to support backup across large and distributed environments.
l Backup retention and archiving. Define and configure flexible retention policies for storing VM backups. Trim options can automatically remove old backups based on customizable policies. Archiving provides the ability to mark specific backups for archive to exclude them from being deleted by the retention policy.
Getting Help
In addition to the Release Notes, Installation Guide, and Users Guide, PHD Virtual Backup includes context-sensitive, online help which can be accessed by clicking the help button within any of the wizards or the PHD Console or by selectingPHD Virtual Backup Helpfrom within the XenCenter Help menu.
The PHD Virtual Web site also contains additional information about PHD Virtual Backup and its benefits. Video Tutorials
Along with product guides and a searchable HTML library, video tutorials are available on the PHD Virtual Web site (www.phdvirtual.com) that demonstrate how to install and use PHD Virtual Backup.
Knowledge Base
The PHD Virtual Customer Support Center includes a Knowledge Base of information about PHD Virtual Backup, including announcements, best practices, FAQs, and an expanded list of errors and warnings not found in the product guides. http://customersupport.phdvirtual.com
Chapter 2 - PHD Virtual Backup Overview
The topics in this chapter discuss how PHD Virtual Backup works, frequently asked questions about the product, and best practices for using the product and its features.
How PHD Virtual Backup Works 13
Backups 14
Restores 15
Replication 16
PHD Virtual Backup Components 17
The PHD Virtual Backup Appliance 18
The PHD VBA Console 20
Best Practices 21
Failover and Failback: Recovering From Disaster 22 Verifying Backups and Restores with TrueRestore™ 23
How PHD Virtual Backup Works
PHD Virtual Backup uses jobs to perform backups, restores, and backup storage maintenance (manual and automatic deletes). When a job is created, the PHD Virtual Backup Appliance (VBA) performs the requested action right away or based on a defined schedule.
When deployed to a XenServer resource pool, the PHD Virtual Backup Appliance performs the backup and restore processing for all of the VMs within that pool (as long as they are using shared storage).
The next few sections present a conceptual overview of how PHD Virtual Backup works and the components used. l Backups on page 14
l Restores on page 15 l Replication on page 16
Backups
When a backup is run, the PHD VBA first reads the target VM metadata and creates a snapshot.
Next, the virtual disks created with the snapshot are attached to the PHD VBA as new virtual disks and the snapshot is
removed.
The data is then deduplicated, verified, and
compressed and sent to the defined backup storage location.
Finally, the virtual disks are detached from the PHD VBA and removed.
Restores
When a virtual machine restore job is run, the appliance searches the storage location for the matching VM metadata, networking information, and data blocks. All of the data is then uncompressed, verified, and written to the restore location.
PHD Virtual Backup can be used to restore entire VMs or you can restore individual files with an iSCSI connection. See Recovering Files on page 52for details. Individual backups can also be restored from exported backup files either manually or using the Backup Data Connector.
Restore Notes
l When a restore job is created, the VM backup selected is restored using the PHD Virtual Backup Appliance used to perform the backup (the PHD VBA that has access to the storage location on which the backup resides).
l Restoring VMs to the same location where the original VM is located will result in VMs with duplicate names in XenCenter. l vApp information is not included with restored VMs.
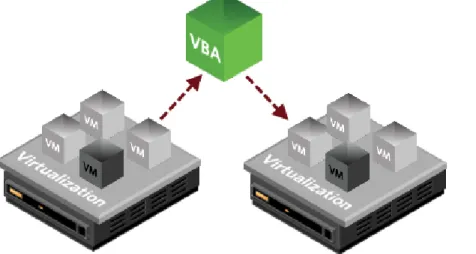
Replication
PHD Virtual Backup VM Replication takes advantage of existing VM backups created by your PHD VBAs. When a virtual machine is replicated, the PHD VBA connects to the backup storage location at your primary site then uses that data to create a replica of each VM at your secondary site. Because VMs are replicated from your existing backups and backup storage, no additional snapshots are required. This reduces the required resources and results in no impact to your production environment.
After a VM is replicated, PHD Virtual Backup creates a snapshot to preserve the VMs initial state. Each time a replication jobs runs, only the changed data is pulled from the backup storage location and used to update the replicated VM, optimizing performance and bandwidth utilization and data transferred. A built in Test Mode enables you to validate replicated VM’s in the standby environment so you can be confident in your ability to successfully fail over in the case of a DR event.
PHD Virtual Backup Components
l PHD Virtual Backup Appliance- The Virtual Backup Appliance (VBA) which performs the backup and restore processing and presents the target for backup storage. The appliance VM can be configured to use locally attached storage or an external data store. For more information, seeThe PHD Virtual Backup Appliance on page 18
l PHD Virtual Backup Console- Installed with the Plug-in, the PHD Virtual Backup Console displays the status of running jobs, maintains a job history, and is used to create and manage backup and restore jobs. The console can be opened from within XenCenter or from the Windows Start Menu. For more information, see The PHD Virtual Backup Console on page 78.
l PHD Virtual Backup Plug-in- Installed with the Console, the plug-in provides access to PHD Virtual Backup right from within XenCenter, through simple, integrated menus.
l PHD Virtual Backup Exporter- Installed separately from the PHD Console and Plug-in, the PHD Exporter is used to export backup files to a staging location for archive or other long term storage purposes. The PHD Exporter Console is used to configure and create export jobs. For more, refer to thePHD Virtual Backup Exporter User Guide.
l Backup Data Store- The storage location where PHD Virtual sends all backup data. The backup data store can be a virtual disk attached to the PHD VBA, a CIFS share or an NFS share. Information for selecting the right backup storage is available in the Installation Guide and also on the PHD Virtual Web site.
The PHD Virtual Backup Appliance
The PHD Virtual Backup Appliance (PHD VBA) performs all of the backup and restore processing including source-side deduplication and compression. After it is deployed, the PHD VBA must be configured to use a backup storage location (an attached virtual disk, CIFS share or NFS share).
Figure 1 - The PHD Virtual Backup Appliance in XenCenter
When creating backup jobs, you select which PHD Virtual Backup Appliance to use to perform the job. The PHD VBA you select also determines where the backup data is stored based on its configured storage location.
Configuring the PHD VBA
All configuration for the PHD VBA is done using the PHD Virtual Backup Console. See The PHD Virtual Backup Console on page 78for details.
PHD VBA status and log information can also be seen by selecting the PHD VBA virtual machine within XenCenter then clicking the Console tab. SeeThe PHD VBA Console on page 20.
How many PHD VBAs do I need?
l You will need to deploy at least one PHD Virtual Backup Appliance per resource pool. Each PHD VBA can perform backups and restores for VMs within the same resource pool. If you have more than one resource pool, you will need to deploy an additional PHD VBA to each pool. Depending on your environment, you may choose to use multiple PHD VBAs within each pool, though only one per pool is required. If you will be replicating VMs to another location you will need to deploy at least one PHD VBA to the second location. Note that although multiple appliances can be deployed within an environment, PHD Virtual Backup is licensed on a per-host basis.
Figure 2 - PHD VBA in a XenServer Resource Pool with shared storage
Note: If a PHD Virtual Backup Appliance is restarted while a backup or restore job is in progress, the job will be canceled. When the PHD VBA starts up again, a system job runs and cleans up any snapshots leftover from the job that was in progress.
The PHD VBA Console
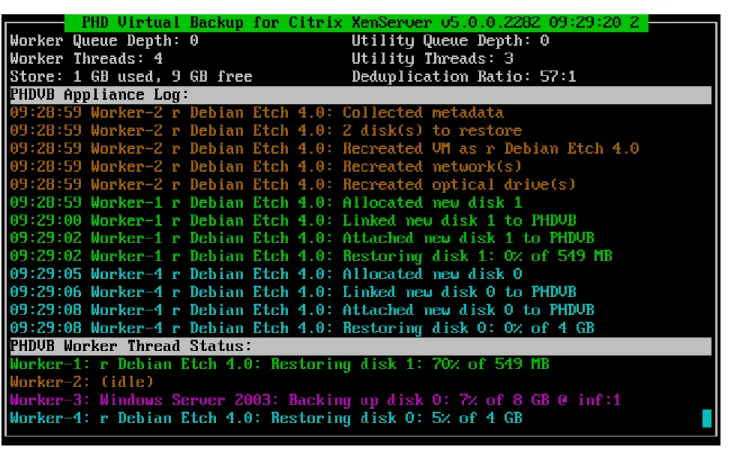
Viewing the PHD VBA virtual machine console within XenCenter (in XenCenter, select the appliance, then click the Console tab) displays the number of licensed worker threads (each worker thread can perform a single backup or restore process for a virtual disk image), the available free space on the backup storage location, the latest log information, and thread status. The number of threads used during each backup and restore job can be adjusted using the Configuration area of PHD Virtual Backup Console.
The following figure shows a sample appliance console as it begins a new backup and simultaneously restores another VM. Figure 3 - The PHD Virtual Backup Appliance console in XenCenter
Best Practices
To help ensure optimal performance when running PHD Virtual Backup in your environment, review the best practices included in this section.
CIFS/SMB Shares
When using a CIFS share as backup storage, the CIFS service account must have full permissions (read/write/delete) for the share used as the backup target. Also, antivirus software should not be configured to analyze or scan the PHD VBA CIFS storage repository.
NFS Shares
When using an NFS share as backup storage, the PHD VBA requires direct write access to the NFS export. During backup, the PHD VBA will directly mount and copy files to the NFS share. It is important to configure the export to allow this behavior. Antivirus software
Running antivirus software on a backup target can result in file locking or deletions and may cause additional issues with writing and deleting backups. PHD Virtual recommends excluding backup targets from antivirus software scans, including the network shares and directories used for backup targets.
In addition, antivirus programs may prevent the PHD Exporter from exporting files to your staging location. If you are running antivirus software on your staging computer, make sure an exclusion is added to your antivirus software to allow the PHD Exporter to save any exported files.
Disk Defragmenter
Defragmenting virtual disks can impede the overall performance of PHD Virtual Backup, resulting in lower deduplication rates, which in turn produces larger backup files written to storage and longer backup durations. To ensure consistent backup performance, PHD recommends running disk defragmentation programs only when necessary.
Running defragmentation on any disks used as backup storage is not recommended. PHD Exporter
Though the PHD Exporter can be installed to a physical or virtual machine running a Windows Server operating system (see the System Requirements for additional details), for performance reasons, a physical machine is recommended.
Failover and Failback: Recovering From Disaster
With PHD Virtual Backup configured to backup and replicate your virtual machines, you are well protected in the event of a DR scenario. If your primary site becomes unavailable, you have multiple options available for recovering your business critical data.
Figure 4 - An unavailable primary site with VMs powered on at the DR location.
PHD Virtual Backup's VM Replication feature allows you to failover replicated VMs. What this means is, when your primary location is unavailable, you can power on the replica VMs at your DR site to continue your day to day operations. When your primary site is recovered, or when you're ready to populate a new production site, you can use PHD Virtual Backup to fail back to your new location, by either seeding the servers at the new site, or restoring backups of the failed over VMs into your production environment. For more information on seeding, seeSeeding a DR Site on page 76.
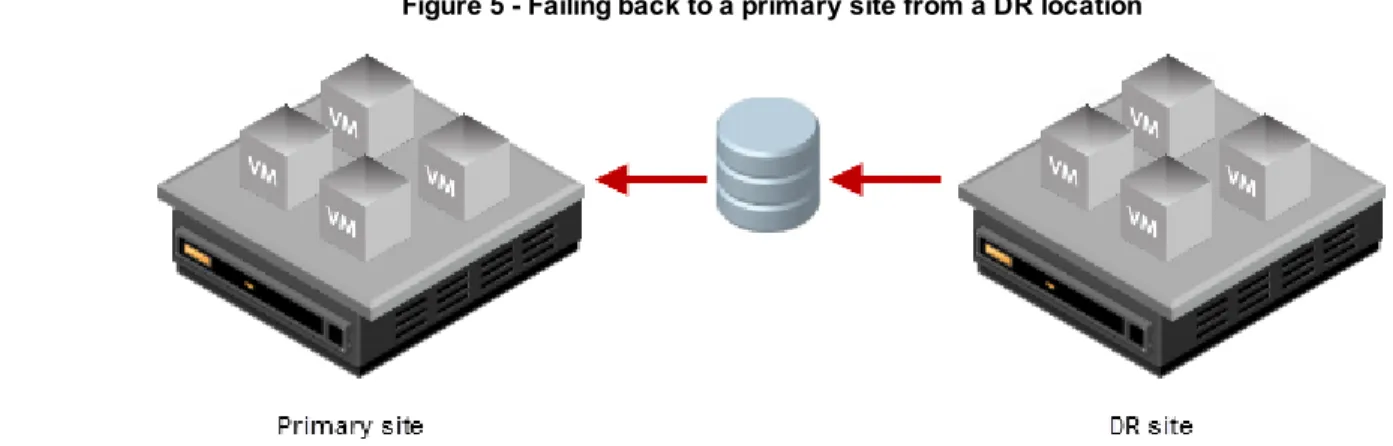
Figure 5 - Failing back to a primary site from a DR location
When the primary location has been completely recovered (failover and failback has occurred), you can begin replicating to your DR site, once again.
Verifying Backups and Restores with TrueRestore™
With data verification and self-healing, PHD Virtual Backup's TrueRestore technology ensures the data you backup is the data you can restore. Available verification options can be enabled during the backup and restore processes. For backups, you can additionally set the level of verification to use to None, New blocks only, or All blocks.
In addition to verify options, TrueRestore includes backup data self-healing. When a bad block is identified, it is flagged, and PHD Virtual Backup Appliance will then attempt to repair the bad block, further ensuring the integrity of your data.
To verify backups
1. At theOptionsstep of the Backup Wizard, use theVerifymenu to select the type of verify to use.
n None- Data is written but not checked. If a bad copy occurs or the target storage has a defective sector, valid restoration will not be possible.
n New blocks only- Verify only new data. Because deduplication allows for the reuse of data blocks, using this option lets you verify only the new blocks of data written to the data store. This ensures that all blocks written to the data store have been verified once after being written. Note that this option is most useful ifNoneis never used. If bothNone andNew blocks onlyare used, then some blocks for the VM being backed up, even withNew blocks onlyselected, may never be verified. Selecting this option will impact performance.
n All blocks- Verify every data block needed for a restore after a backup. This includes blocks that are common to multiple backups and will result in the same blocks being verified multiple times. This option will impact backup performance.
To verify restores
1. During the Restore Wizard, at theSet Job Settingsstep, select the check boxVerify virtual machine after restore.
This option instructs PHD Virtual Backup to verify the restored VM. What that means is, during the restore process, each block that is written is immediately read back and verified against the backup file.
Frequently Asked Questions
This section contains frequently asked questions about PHD Virtual Backup. How many appliances do I need?
The number of PHD Virtual Backup Appliances you will need is determined by how your virtual machine environment is configured. PHD VBAs must be able to access the storage location where virtual machine disks are located in order to perform the backup. If you have some VMs on local storage and others on shared, you will need to deploy at least one appliance that can access the local storage on the individual host. For more information, refer to the Installation Guide.
How many backups can I store per appliance?
The number of backups you can store per appliance depends on the size of the target storage you are using. Due to deduplication and compression, typically, to store one month of backups per VM, you need to allocate only enough backup storage equal to the total size of your VM data. For example, if you have 500 GB of VMs, allocate 500 GB of space to store one month of backups for each VM. Visit the PHD Virtual web site for additional information, including a whitepaper on planning for deduplicated backup storage.
How is the PHD Virtual Backup Appliance deployed?
The appliance is deployed via an XVA - XenServer's virtual appliance format. Refer to the Installation Guide for details. Why does my deduplication ratio display as inf:1?
When a deduplicated backup is performed, only new blocks of data are written to the storage location for each backup. Since this ratio is calculated while the backup is in progress, before any new data is written, the deduplication ratio is essentially infinite for the current virtual disk backup and is therefore displayed as a ratio of inf (infinite) to 1. When new data is encountered and written to disk, the deduplication ratio is updated.
How do I configure my backup retention policy?
The retention policy (how long to keep backups for each virtual machine) is configured using the PHD Virtual Backup Console, Configuration page. For details, seeBackup Retention on page 102.
What happens if a PHD VBA restarts during a backup?
The running backup job will be canceled and when the appliance restarts, any leftover snapshots or data will be cleaned up and removed. If the job was a scheduled backup job, and the appliance restarts within one hour of the job's start time, the job will start again, automatically, when the PHD VBA finishes restarting.
Can I edit a job while it is running?
Yes – scheduled jobs can be edited while in progress but any changes will not take place until the next time the job runs. Can I restore Microsoft Exchange mailboxes or database objects?
Can I back up the same VM multiple times per day?
Because PHD Virtual Backup uses backup jobs, you can create any number of customized jobs to protect your virtual machines. For example, you could create a job that backs up all of your VMs each night, then create another job that runs in the afternoon for specific VMs that have shorter RPO requirements.
Can I replicate VMs from one host to another?
Yes, using the PHD Console, you can create Replication Jobs to replicate VMs from a primary site to a DR site or another location.
How do I export my backups to tape?
Using the Backup Data Connector, you can enable an SMB/CIFS share on the appliance to access all of your backup data in uncompressed format. For details, seeConnectors on page 109. Additionally, you can use the PHD Virtual Backup Exporter to export backups from your backup storage locations to a Windows Server. From there you can then sweep backups to tape for archiving purposes using a third-party solution. For more, refer to thePHD Virtual Backup Exporter User Guide.
Can I specify the order in which my VMs are backed up?
Using Backup Jobs, you can define a schedule for specific VMs that should run first each night. For example, create a job that backs up critical VMs beginning at 8 PM. You could then create a second backup job that includes the next tier of VMs to begin at 10 PM, and so on. In this way, you can ensure that your most critical machines have priority and are protected each night. How do I apply my PHD Virtual Backup license file?
Any time before or after the trial period has expired, you can upload your license file using the License Manager area of the PHD Console (seeLicense Manager on page 113, for details). After uploading your license, you will then be able to apply that license to all of your deployed PHD Virtual Backup Appliances and also, select the hosts on which you will be performing backups or replication.
How is PHD Virtual Backup licensed?
PHD Virtual Backup is licensed per-host, which means, the license you purchase will allow you to perform backups and replication on a specific number of hosts in your environment. For example, if you purchase a 4-host license, you could backup all of the VMs on two hosts and then replicate those VMs to two additional hosts (for a total of four). If you're not using
replication, with a 4-host license, you could instead run backups on four different hosts. Be sure to obtain a license that supports the correct number of hosts to protect your environment. For details on using the PHD Console to configure licensing, see License Manager on page 113.
Chapter 3 - Backing Up Virtual Machines
Protecting your virtual environment with PHD Virtual Backup begins with creating jobs to backup your virtual machines. The topics in this section describe how to create and manage backup jobs, including step by step instructions for using the Backup wizard.
Creating Backup Jobs 27
Running a Backup Now 28
Scheduling Backups 30
The Backup Wizard 32
Accessing the Backup Wizard 32
Using the Backup Wizard 33
Using Tags to Backup VMs 38
Skipping VMs 39
Excluding VMs and Disks 41
Backup Retention and Archiving 42
Creating Backup Jobs
PHD Virtual Backup protects your virtual machines using Backup Jobs that you create and customize. Jobs can be run immediately or they can be created with a schedule to backup VMs every night, for example.
You can create backup jobs to protect individual virtual machines or you can create jobs by Pool, Folders, or Tags. When you create a job using a Pool, Folder, or Tag, VMs added to the pool or folder or assigned the tag will be included in the job automatically. Likewise, if you remove a VM from a pool or folder or remove the tag from a VM, it will not be included in the backup job. For instance, if you create a scheduled daily job that backs up all of the VMs in your production pool, any new VMs added to that pool in the future will also be included in the back up the next time the job runs.
Backup jobs are created using the Backup wizard. The wizard is accessed by selectingPHD Virtual Backup > Backupfrom the integrated PHD Virtual Backup menus in XenCenter, or when you click Backupwithin the PHD Virtual Backup Console. Before creating any jobs, a PHD Virtual Backup Appliance must be deployed and configured with backup storage - refer to the Installation Guide for details.
To create a Backup Job
1. Start the Backup wizard by right-clicking a VM within XenCenter and selectingPHD Virtual Backup > Backup. 2. Follow the steps in the wizard to select VMs for backup and define a backup schedule. For detailed information about
each step in the wizard, seeUsing the Backup Wizard on page 33. To edit a job
1. Start the PHD Virtual Backup Console, then clickJobs. The Current tab displays all jobs in progress as well as any scheduled jobs.
2. Select the job you would like to edit , then click Edit.
3. The Backup Wizard opens with the settings you originally defined for the job. Use the wizard to make any edits and submit the job again. For details on each step of the wizard, seeUsing the Backup Wizard on page 33.
Running a Backup Now
There are multiple ways to run a backup with PHD Virtual Backup - the simplest is to right-click a VM name within XenCenter then selectBackupfrom the PHD Virtual Backup integrated menu. This will open the Backup wizard which guides you through the process of creating your Backup Job.
To run a single backup
1. Within XenCenter, right-click the name of the VM you want to backup. 2. From the context menu, selectBackupfrom the PHD Virtual Backup menu.
The Backup wizard opens and guides you through the process of creating the Backup Job that will back up your selected VM. For detailed information about each step of the wizard, seeUsing the Backup Wizard on page 33
When the wizard completes, the PHD Virtual Backup Console opens and displays the progress of your backup job.
To run a scheduled backup now
1. Open the PHD Virtual Backup Console and clickJobs.
2. Click the scheduled job you want to run and then click Start.
3. The job status changes fromInactivetoRunningand the backup begins.
When complete, the job remains in the Current tab and the status returns to Inactive, but the History tab will contain a record of the job you just ran.
Scheduling Backups
Backups can be scheduled to run Once, Daily, or Weekly, using the PHD Virtual Backup Wizard. In addition, a recurrence value can be entered to create a customized schedule to meet your backup requirements.
To create a scheduled backup job
1. From within XenCenter, start the PHD Virtual Backup Wizard using the Pool, Server, or VM menu item:PHD Virtual Backup > Backup.
2. Use the wizard to select VMs to include in the scheduled backup job and the PHD VBA to run the job. 3. At theSchedulestep, use the options to set your schedule.
For example, to create a weekly backup schedule, selectWeekly, then set the date to start the backups, the time the backups should be allowed to run, and the day of the week.
n Start Date- The date the scheduled job will begin. n Start Time- The time the job should start.
n Do not start after- The time after which the job should not start. In a situation where many backup jobs or very large jobs are running and this time passes before the job can begin, it will not start until the next scheduled start time. Jobs already in progress after this time will not stop - they will complete as normal.
Backup Wizard on page 33.
The selected VMs will be backed up based on the schedule you defined.
Use the Console, Jobs page to manage the existing scheduled backup jobs. From there you can run the job immediately to test your settings or edit the job details. See"PHDVB Console - Jobs"for more information.
To disable a scheduled job
l If you need to disable a scheduled job to temporarily prevent it from running, in theJobsarea, select the job and click Disable. The job will not run again until you select it and clickEnable.
The Backup Wizard
The Backup Wizard guides you through the process of creating backup jobs to protect the virtual machines in your environment. The next sections describe how to access and use the wizard.
Accessing the Backup Wizard
There are multiple ways to start the wizard, using either the PHD Console or the integrated menus within XenCenter. From the Console,Jobsarea, you can click Backup. Within XenCenter, you can right-click a VM name then selectPHD Virtual Backup > Backupfrom the integrated menu, as shown in the following image.
When opened, the wizard presents the steps required for backing up your virtual machines. SeeUsing the Backup Wizard on page 33for details.
Using the Backup Wizard
1. When the wizard opens, you are presented with theSelectstep. Here you can use the View by:menu to change how the virtual machines available for backup are displayed.
Server View- Display all VMs within the XenServer Pool, by XenServer host. Folder- Display only VMs assigned to folders.
Tag- Display only VMs that contain tags.
If you select the top container in any view (for example, Xen56DocPool in the image above) all VMs in that pool or folder or with that tag applied will be included in the backup job. Also, any VMs added to a selected pool or folder or with the tag applied in the future will also be included in the backup job. Likewise, any VMs removed from the selected pool, folder, or tag will no longer be included in the job.
n Include Templates- Show or hide Templates in the list of displayed objects.
n Exclude/Include- When backing up groups of VMs, an entire folder, for example, you can choose to exclude specific VMs or individual disks from the backup job by selecting the VM or disk and clickingExclude. Excluded VMs can be included again select the VM and clickingInclude.
2. Select the VMs you want to backup and clickNext.
The Backup wizard searches for all available PHD VBAs. The PHD VBA you select will perform the backup processing then store the backup data on its configured storage.
Note: If you will be backing up a VM located on local storage, you must select an appliance that is located on the same host as the VM or else the backup will fail. Virtual disks for any VMs that are unreachable by an appliance (on different local or shared storage, for example) will be displayed after the appliance is selected. You can then choose to click Previous and exclude those VMs or disks or select another appliance with access to those disks.
4. When you've selected the PHD VBA, clickNext.
5. TheSchedulestep lets you run a backupNow, schedule a backupOncefor later, create aDailybackup or aWeekly backup. Select the type of backup to create and define any required options and clickNext. For additional details on scheduling backup jobs, seeScheduling Backups on page 30.
n Start Date- The date the scheduled job will begin. n Start Time- The time the job should start.
n Do not start after- The time after which the job should not start. In a situation where many or very large backup jobs are running, and this time passes before the job can begin, it will not start until the next scheduled start time. Jobs already in progress after this time will not stop - they will complete as normal.
n Recurs everynDays/Weeks- How often the job will run. A daily job, by default, will run once per day. If you'd like a job to run every other day, for example, enter a value of 2. Weekly jobs will run once per week, by default. To create a job that runs only once every two weeks, select a Weekly job then set this value to 2.
6. Select the type of backup to create, then clickNext.
n Verify backup- This option determines how the backup should be verified. By default, this is set toNonewhich means data is written, but not verified.All blocksinstructs PHD Virtual Backup to verify every block of data (for a scheduled job, this would happen every time the backup job runs).New blocks onlyverifies only the information that has changed since the last backup. For additional information on the verify options, seeVerifying Backups and Restores with TrueRestore™ on page 23.
n Backup powered off virtual machines- Select this check box to backup VMs included in the backup job even if they are powered off.
n Archive backups- Select this option to flag backups created with this job as archived backups. This means the backups will never be deleted by the automatic retention policy. Archived backups also cannot be manually deleted. To remove an archive flag, or to archive existing backups, see the Backup Catalog in the console.
n Quiesce the VM before backing up (Windows only)- When backing up a Windows VM, if XenServer tools are installed, you can choose to quiesce the VM before backing it up, to take advantage of Microsoft's Volume Shadow Copy Services.
n Ignore virtual machine skips- Select this option to ignore any PHDVB:skip tags added to any of the VMs included in the backup job. For additional information on skipping VMs, seeSkipping VMs on page 39.
8. When you've finished adding a job name and selecting job options, clickNext.
9. Review theSummaryinformation, then clickSubmit. The backup job is then submitted for processing. ClickFinishto close the wizard.
Using Tags to Backup VMs
Using the Backup Wizard, you can select VMs to backup individually, or you can select entire Pools, Folders, or Tags. When View by: Objects by Tagis selected, tagged VMs are displayed, grouped by the tag applied. The following image displays a list of VMs with the custom tagPHDbackupapplied.
Figure 1 - VMs listed by tag in the Backup Wizard
Tags are applied using XenCenter by editing a virtual machine's properties. Figure 2 - Edit Tags dialog within XenCenter displaying a custom tag.
When a backup job is created for a specific tag, any VMs that have that tag applied will be included in the backup job, Also, any VMs that have the tag applied in the future will be also included in the job, automatically. There is no need to edit the job each time a new VM is added with the tag applied - you can simply add the tag using XenCenter when the VM is deployed and it will be backed up the next time the scheduled backup job runs.
This same concept, dynamically backing up containers, applies to XenServer Pools and Folders. Creating a scheduled backup job for a specific pool or folder will backup all of the VMs that belong to that folder or pool. Adding or removing VMs from a pool or folder will cause them to be backed up or excluded during the backup, respectively.
Skipping VMs
If you create a backup job that includes multiple VMs but would like to exclude some of those VMs from the scheduled backups, rather than editing the job, you can use a Tag within XenCenter, PHDVB:skip.
When you would like to begin backing up the VM again, you can simply remove the tag the same way it was applied. To skip a VM with a tag in XenCenter
1. Within XenCenter, right-click the VM you would like to skip and selectProperties. The properties window for that VM opens.
2. In the Tags area, clickEdit tags...The Edit Tags dialog opens.
4. ClickOK.
The next time you run a backup that includes the VM, it will be skipped, unlessIgnore virtual machine skipsis selected during the backup wizard.
Note: In addition to the VM, the skip tag can be added to individual virtual disks. When applied at the virtual disk level, though, the disks are always skipped regardless ifIgnore virtual machine skipsis selected during the backup wizard.
Skipping Swap File Disks
If you place your swap file data for each virtual machine on a separate virtual disk, you can use the PHDVB:skip tag to skip this disk each time the VM is backed up. Skipping the virtual disks that contain swap file data is a good idea because you do not need to save this data. Also, backup compression and deduplication ratios for your VMs will improve because swap file disks contain effectively random data that does not compress or deduplicate well.
Excluding VMs and Disks
Using the Backup Wizard, you can exclude VMs or individual virtual disks from a backup job. For instance, if you wanted to backup all VMs within a Folder with the exception of one, you could select the Folder within the Backup Wizard, select the VM you wanted to skip, and clickExclude. Then, when the backup job runs, all VMs within the folder will be backed up with the exception of the VM you chose to exclude.
When excluded, the virtual disk name is displayed with a strikethrough.
Later, if you decide you want to include the disks in the backup job, you can select the job within the Console's Job page and click Edit. See"PHDVB Console - Jobs" (on page 1)for details.
Backup Retention and Archiving
By default, PHD Virtual Backup will keep all backups for each VM. You can adjust the number of backups retained in the backup catalog using the PHD Virtual Backup Console'sRetentiontab in theConfigurationarea. After defining a retention policy, if you'd like to retain some backups indefinitely, you can use the Backup Catalog to set Archive flags for individual or groups of backup files.
Backup Retention
Every hour, a trim job runs and removes older backups based on the defined policy. By default, no backup files are removed (Retention is set to Keep All). For details about the available settings (Keep All, Typical, and Custom), seeBackup Retention on page 102
Individual backups can also be deleted using the Backup Catalog. Select the backups to delete and click Deletein the Jobs area toolbar.
To delete all backups for a specific VM, within the Backup Catalog, select the VM name and click Delete. Archiving Backups
If you'd like to retain certain backup files indefinitely, for example if you needed to keep a master copy available on demand, you can use the Backup Catalog to set an Archive flag by selecting the backup, then clicking Archive.
Backups flagged for archive display an archive icon in the backup catalog, as seen in the image above. To remove the archive flag, select the backup and click Archiveagain.
You can also set the archive flag during the Backup Wizard. At theOptionsstep, selectArchive Backups. When the backup job runs, all backups created will be flagged for archive.
Sending Backup Files to Tape
With PHD Virtual Backup, you have multiple options for getting your backup files to tape, using the PHD Virtual Backup Exporter or the Backup Data Connector.
PHD Virtual Backup Exporter
The PHD Exporter lets you export files directly from your backup storage locations to a staging server location (a Windows server) to then be swept to tape or for other long term storage purposes. For more information on using the PHD Exporter, refer to thePHD Virtual Backup Exporter User Guide.
Backup Data Connector
With the Backup Data Connector, you can allow access to all of your backup files through the PHD VBA via an SMB/CIFS share. Then you can use third-party tools or your own scripting to copy and move these uncompressed files to tape or to another disk location.
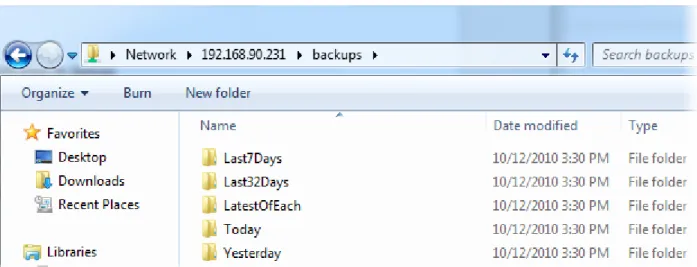
The BDC is enabled using theConnectorstab in theConfigurationarea of the PHD Console. When enabled, you can access the share by browsing to thebackupsdirectory using the PHD VBA's IP address, as seen in the following image.
Figure 3 - A sample BDC share
Chapter 4 - Restoring Virtual Machines and Files
Using a few simple wizards, PHD Virtual Backup allows you to quickly and easily recover your backed up data. The topics in this section describe how to create and manage VM restore jobs, including step by step instructions for using the Restore wizard and how to use the File Recovery feature to recover individual folders and files right from your backed up virtual disks.
Restoring Backups 45
Restoring multiple VM backups (Mass Restore) 45
The Restore Wizard 46
Accessing the Restore Wizard 46
Using the Restore Wizard 47
Recovering Files 52
Restoring Files and Folders 53
Restoring Files from a Linux or Unix VM on Windows 55
Mounting iSCSI Targets on Other Devices 56
Restoring Backups
Virtual machine backups can be restored in the same way they were backed up, using the PHD Virtual Backup menu options within XenCenter. By right-clicking an existing VM name, you can restore previous versions of that VM, or you can search through all existing backups to find the VM to restore.
To restore a virtual machine
1. From within XenCenter, selectPHD Virtual Backup > Restorefrom any of the integrated menus.
Tip: If you right-click a VM Name then selectPHD Virtual Backup > Restore, if a backup exists for that VM, it is pre-selected within the Restore wizard catalog.
The Restore wizard guides you through the process of restoring your selected VM. For detailed information about each step of the wizard, seeUsing the Restore Wizard on page 47
When the wizard completes, the PHD Virtual Backup Console opens and displays the progress of your job.
Restoring multiple VM backups (Mass Restore)
As of version 5.3, multiple backups can be restored at one time by creating a Restore Job and selecting all of the VMs you want to restore. Restore jobs for both single and multiple backups can be scheduled to run right away, at a later date or even run as needed by creating an On Demand job. For additional information, seeThe Restore Wizard on page 46.
The Restore Wizard
The Restore Wizard lets you restore one or many virtual machine back ups right away or at a specified date and time. The restored VMs include the metadata and also all of the virtual disks associated with the VM - for additional details about what attributes are included with each restored virtual machine, seeRestores on page 15. The next sections describe how to access and use the wizard.
Accessing the Restore Wizard
The wizard can be started by right-clicking an object within XenCenter or by using the File menu and selectingRestorefrom the integratedPHD Virtual Backupmenu, as shown in the following image.
The wizard can also be accessed using the PHD Console, either from theBackup Catalogor from theJobsarea.
When opened, the wizard presents the steps for restoring your virtual machine backups. SeeUsing the Restore Wizard on page 47for details.
Using the Restore Wizard
1. When the Restore Wizard opens, theSelect Appliancestep lets you choose the PHD VBA that will be used to perform the restore.After you select the PHD VBA, you will then be able to restore any of the backups available in that PHD VBA's backup storage. Use theSelect Backup Appliancemenu to select a PHD VBA, then clickNext.
2. TheSelect Machinesstep presents you with all of the backups available for restore from the PHD VBA's backup storage location. SelectLatestto restore the most recent backup available or selectBy Backup Dateto select a specific backup for each VM.
3. After selecting the VM or VMs to restores, clickNext.
4. TheSet Job Settingsstep lets you name the job and select the default storage and network settings that will be applied to all VMs in the job.
Job Name- The name for the job. This will be displayed in theJobsarea of the PHD Console.
Append to VM name- To automatically append text to the name of the VMs to be restored, select this check box then enter the text to append to the name of the restored VM. For example, with the default selection, a VM backup named
Win7-Devwould be restored asWin7-Dev_restored.
Verify- If you want to add additional verification during the restore process, selectVerify. For more information on verifying backups and restores, seeVerifying Backups and Restores with TrueRestore™ on page 23.
Default VM Storage- Where the VM will be restored, including the host and the actual storage location. Free space on each storage location is displayed. If you need to change settings for an individual VM, you can do so at the View/Edit VM Settingsstep.
Use network settings from backup (if available)- Use this option to restore the VM using the network settings that were configured when the VM was backed up. If these network settings are not available at the restore site, the Default Network will be used.
Auto-generate new MAC address- Leave this option selected to create a new address for the restored VM. If you remove this selection, you must ensure that the original VMs either no longer exist or they are not powered on or routable address as you may encounter networking issues.
Default Network- The network to assign to the restored VM. All available networks are displayed. If you need to change settings for an individual VM, you can do so at theView/Edit VM Settingsstep.
SelectNowto run the job when the wizard completes or selectOnceto run the job at a later date. Then clickNext. 6. TheView/Edit VM Settingsstep displays all the VMs in the restore job as well as the default job settings.
You can change any individual settings by clicking within the corresponding cell in the table. For example, if you need to restore an individual disk for a VM somewhere other than the selected server's default storage, click the value in theData Storecolumn for that disk and then select the new location. For additional details on using all of the features of this table, seeUsing the View/Edit VM Settings Table on page 132.
If an issue exists with a VM to be restored, the VM name will be highlighted and an icon will be displayed next to the VM name. Hover over the error icon for additional information, as seen in the following image.
7. When you are satisfied, clickSubmit.
Recovering Files
With PHD Virtual Backup, you can restore an entire VM or you can restore individual files from a VM backup. By creating iSCSI targets from your backup files, you can mount your backed up virtual disks and browse them using Windows Explorer.
You can use the Backup Catalog to locate the backup that contains the files you want to restore then open the File Recovery wizard,
or you can start the File Recovery wizard right from the File Recovery page and browse the available backup files there.
When the wizard completes, an iSCSI target is created and available in the File Recovery area. The following sections describe how to use the PHD Virtual Backup File Recovery feature in detail.
l Restoring Files and Folders on page 53.
l Restoring Files from a Linux or Unix VM on Windows on page 55. l Mounting iSCSI Targets on Other Devices on page 56.
l Deleting iSCSI targets on page 57.
File Recovery Notes
l When running Windows, you can use the Microsoft iSCSI Software Initiator to mount the target locally or from another device. When mounted, you can browse the virtual disk using Windows Explorer to find the individual files you want. l When running Windows, to restore files from a Linux backup, you will need to install and use a third-party Linux file system
browser, for example, Ext2explore, to view the contents of the Linux disk.
l When running Linux, to mount iSCSI targets you must install an iSCSI Software Initiator for your Linux operating system, for example, on Ubuntu, you can install the Linux Open-iSCSI Initiator.
Note: To mount iSCSI targets on a Windows machine you will need the Microsoft iSCSI Software Initiator, which is installed, by default with Windows Vista, Windows 7, and Windows 2008 Server. For earlier versions of Windows, the Initiator can be downloaded from the Microsoft web site. To mount iSCSI targets on Linux or
Restoring Files and Folders
Restoring files and folders from your backups is as simple as creating and mounting an iSCSI target. Follow the steps below to create, mount, and browse files on an iSCSI target created from an existing backup.
To restore individual files
1. Open the PHD Virtual Backup Console and clickBackup Catalog.
2. Select the checkbox for the backup that contains the file or files you would like to recover.
3. Click FLR. The File Recovery wizard opens.
4. Follow the steps in the wizard to create an iSCSI target for the selected backup. You can use the wizard to create custom target credentials and to mount the target locally after the wizard completes (to mount iSCSI targets, an iSCSI Software Initiator for your operating system must be installed).
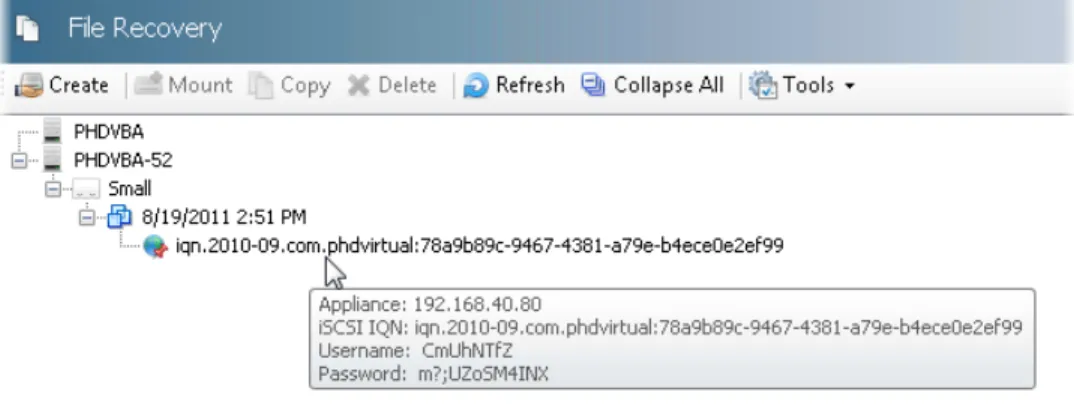
5. When the wizard completes, the target is available within the File Recovery area. The following image displays an iSCSI target created from a backup of a Windows VM.
When mounted, a target created from a Windows VM backup should appear in Windows Explorer as a new hard drive.
Note: If the target disk does not appear in Windows Explorer, openComputer Management > Disk
Managementand find the newly mounted disk. Make sure it is set toOnline. Additionally, you may need to import the disk if it displays as "foreign." This may happen if it is a dynamic disk created with a version of Windows different than the version running on the computer you are using to mount the target. Use the right-click menu options to import or configure the disks as necessary. Changing the attributes of a mounted disk will not affect your backup data.
n If you did not select to mount the target during the wizard, you can still mount it locally by clicking Mount. Note: If the iSCSI Service is not running, you will encounter an error when attempting to mount the
backup. Make sure the service is running before attempting to mount any targets.
n To mount the target on another device, use the iSCSI Software Initiator and the target credentials. SeeMounting iSCSI Targets on Other Devices on page 56for details.
7. Using Windows Explorer, you can now browse the new drive to find the files to restore. Related topics
l If you need to mount an iSCSI target created from a Linux or Unix VM on Windows, seeRestoring Files from a Linux or Unix VM on Windows on page 55.
l To mount an iSCSI target on another device, seeMounting iSCSI Targets on Other Devices on page 56. l To delete an iSCSI target, seeDeleting iSCSI targets on page 57.
Restoring Files from a Linux or Unix VM on Windows
If you need to restore files from a Linux or Unix VM, but you only have access to a Windows machine to do the restore, you can use a third-party tool to view the mounted iSCSI target and browse the disk.
Note: In order to view the contents of the disk, the third-party tool must support the filesystem used by the Linux or Unix operating system. View your operating system documentation for filesystem details.
To restore files from a Linux or Unix VM backup on a Windows machine
In order to restore files from an iSCSI target created from a Linux or Unix backup you will need to use a third-party tool, for example Ext2explore or explore2fs, to view the mounted disks from a Windows computer.
1. Follow the steps above to create the iSCSI target and mount the disk, making sure it is available and online within the Disk Management interface.
2. Use a file system explorer tool to view the contents of the mounted disk. The following image shows one example of a third-party tool, Ext2explore, used to browse a mounted Linux disk on Windows.
Related topics
l To mount an iSCSI target on a Windows machine, seeRestoring Files and Folders on page 53.
Mounting iSCSI Targets on Other Devices
After creating an iSCSI target, you can either mount the target locally from the machine where the PHD Console is installed, or you can copy the target's credentials and mount the target on another device.
To mount an iSCSI target on another device
Mount the iSCSI target using its credentials found in the File Recovery area. You can mount the target on any Windows machine that has the Microsoft iSCSI Software Initiator installed. To mount iSCSI targets on a Linux or Unix machine you must install an iSCSI Software Initiator for your operating system, for example, on an Ubuntu machine, you can install the Linux Open-iSCSI Initiator.
1. Open the Windows iSCSI Software Initiator. 2. If the service is not running, clickYesto start it.
3. Follow the specific steps for your operating system, below. Windows 7, Windows Vista, and Windows Server 2008 R2:
a. Use theTargetstab and in theTargetdialog, enter the IP address of the PHD VBA where the iSCSI target was created.
b. Select the IQN from the list ofDiscovered targets(clickRefreshif needed) and clickConnect. c. In the dialog that opens, clickAdvancedand selectEnable CHAP log on.
d. Enter the username and password of the iSCSI target in theNameandTarget secrettext boxes and clickOK. e. ClickOKagain.
Windows 2003, Windows XP, Windows Server 2008:
a. Use theDiscoverytab and in the Target Portals area, clickAdd.
b. Enter the IP address of the PHD VBA where the iSCSI target was created.
c. Click theTargetstab and select the IQN of the iSCSI target from the list, and clickLog On.... d. In the dialog that opens, clickAdvanced...and selectCHAP logon information.
e. Enter the username and password of the iSCSI target in theUser nameandTarget secrettext boxes and click OK.
f. ClickOKagain.
4. The target is mounted and available from within Windows Explorer as a new drive. Related topics
l If you need to mount an iSCSI target created from a Linux or Unix VM, seeRestoring Files from a Linux or Unix VM on Windows on page 55.
Deleting iSCSI targets
If you need to delete an iSCSI target, you must first disconnect or log off the target using the iSCSI Initiator. To delete iSCSI targets
Note: To delete iSCSI targets, they must first be disconnected/logged off and not in use on any device (there must be no open files or directories).
1. To disconnect/log off a target:
a. Windows 7 and Windows Vista: To disconnect a target, open the Microsoft iSCSI Software Initiator, select the target and click disconnect.
b. Windows 2003, Windows XP, and Windows 2008: To log off a target, open the Microsoft iSCSI Software Initiator, click the Targets tab and select the target you want to delete. Click Details, then select the target identifier and click Log Off.
Chapter 5 - VM Replication
With PHD Virtual Backup, you have the ability to further protect your virtual environment by replicating virtual machines from one environment to another. This allows you to populate a disaster recovery (DR) site with mission critical VMs that can be up and running quickly in case of a catastrophic event.
PHD Virtual Backup VM Replication takes advantage of existing VM backups created by PHD VBAs. You use the backups that already exist to create replica virtual machines at your secondary site. PHD VBAs at the secondary site connect to backup storage locations in a read-only mode then use that data to replicate the VMs.
After you've created replica VMs, you have the option to test each replica to validate your standby environment or to failover to your replicated VMs.
The topics in this chapter describe how to use PHD Virtual Backup's VM Replication feature to protect your environment.
Using VM Replication 59
Prerequisites 60
Step 1: Deploy/Configure a PHD VBA for Replication 60
Step 2: Create VM Replication Jobs 62
Step 3: Run Replication Jobs and Manage Replicas 63
Testing Replica VMs 65
Failover 67
The Create Replication Job Wizard 69
Accessing the Create Replication Job Wizard 69
Using the Create Replication Job Wizard 70
Using VM Replication
There are multiple scenarios in which VM Replication can be used. At a minimum, a single PHD VBA can be used in one virtual environment to replicate VMs from one host to another. This is done by creating backups for your VMs, then creating replication jobs that will create replicas of those VMs on another host in the same virtual environment.
Figure 1 - Using a single PHD VBA to replicate VMs within the same virtual environment.
When using a DR site, you could deploy another PHD VBA to that site to run your replication jobs. In this scenario, the PHD VBA at the DR site would be configured to connect to the primary site's backup storage directly, then use that data to create the replica VMs on the hosts at the DR site. Then as backups are created at the primary site each night, replicas can be updated with the changed data from each backup.
Prerequisites
Before replicating VMs, you must have at least one PHD Virtual Backup VBA deployed and running regular backups. These backups can be stored on any supported backup data storage (attached virtual disk, a CIFS share, or an NFS share). Note that if an attached virtual disk is used, it must be shared in order to be used for replication. For details, seeConnectors on page 109 In addition, a stable network connection must exist between any primary and secondary locations in order to transfer replicated data.
After establishing your regular backups, you will create replication jobs to run after the backups have finished to replicate any changes.
Step 1: Deploy/Configure a PHD VBA for Replication
If you will be using a DR site, the first step to configuring replication requires that you deploy a new PHD VBA to your secondary location. This is the location where you will be replicating VMs to (the "DR site" in the image above). The PHD VBA deployed here will read the data from your primary site's backup location then use that data to create replica VMs. Follow the instructions in the PHD Virtual Backup Installation Guide to deploy a new PHD VBA.
After deciding which PHD VBA will be used to perform the replication, it will need to be configured. Open the PHD Console and connect to the location where your replication PHD VBA is deployed. In theConfigurationarea, configure the hypervisor credentials (if it is a new PHD VBA) on theGeneraltab (refer to the Installation Guide for additional detailed deployment and configuration instructions).
site, for example) or the current PHD VBA's backup storage. Add all of the backup storage locations from which you want to replicate VMs.
After entering the required information and clickingOK, the storage location is displayed in the list, as seen in the following image.
Step 2: Create VM Replication Jobs
After adding the storage locations you will use for creating replica VMs, you will next use the Create Replication Job wizard to create your replication jobs. The wizard can be opened from theJobsarea of the PHD Console, or from theReplicationarea.
From theReplicationarea, in theVirtual Machines Available for Replicationtab, you can see all of the VMs available for replication. This list of VMs represents all of the VM backups available on the storage locations you added in the previous step.
At this point, you can select the VMs you want to replicate then click Replicateto open theCreate Replication Jobwizard. Follow the steps in the wizard to create the replication job. For details, seeUsing the Create Replication Job Wizard on page 70.
Tip: Replication takes advantage of existing backups to create and update replica VMs. Therefore, some
consideration should be given to when your replication jobs are scheduled to run. If possible, replication jobs should be set to run after your nightly backups complete, to ensure your replicas are up to date with the latest
Step 3: Run Replication Jobs and Manage Replicas
When a Replication Job runs, either scheduled or if manually started, VMs are replicated to the location you specified. If you view theReplicated Virtual Machinestab in theReplicationarea of the PHD Console, you will see all of the VMs that have been created.
Note: Only one replica VM can be created per hypervisor environment. For example, if you create a replica forVM1
calledVM1_replicaon a host, andVM1is also included in a second replication job replicating to that same host, when the job runs, the original replica will be found and no new replica will be created. A warning stating the replica already exists will be logged and included in the email report when the job completes.