EVault Software
Agent 6.5 for Microsoft Windows
User’s Guide
March 2009
Contents
1.
INTRODUCTION AND INSTALLATION
... 7
1.1 What’s New... 8
1.1.1 Agent 64-bit... 10
1.2 Agent for Windows Installation... 11
1.2.1 System Requirements... 11
1.2.1.1 Privilege Requirements...12
1.2.1.2 Configuration File locks...12
1.2.1.3 Open Files, File Lock Management, and Anti Virus Programs...13
1.2.1.4 Default Installation Directories...13
1.2.2 Installation Procedures... 14
1.2.2.1 Plug-Ins...14
1.2.2.2 Requirements...15
1.2.2.3 Running the Self-extracting Install Kit...15
1.2.2.4 System Privileges for EFS...17
1.2.3 Setup Maintenance... 18
1.2.3.1 Installation Languages...18
1.2.3.2 Modify...19
1.2.3.3 Repair...20
1.2.3.4 Uninstalling...21
1.2.3.5 Upgrading from earlier versions...22
1.2.4 MAPI Upgrades... 25
1.2.5 Silent Install... 26
1.2.5.1 Running the Silent Installation...29
1.3 How the Windows Agent Works... 30
1.3.1 Agent Software... 31
1.3.1.1 MS Exchange Plug-In...31
1.3.1.2 Oracle Plug-In...31
1.3.1.3 MS SQL Server Plug-In...32
1.3.1.4 Cluster Support Plug-In...32
1.3.1.5 MS SharePoint 2003/2007 Plug-In...32
1.3.2 CentralControl Software... 33
1.3.3 Director Software... 33
1.3.4 On Line Helps... 33
2.4 Configure the Vault – Agent Configuration... 49
2.4.1 Configure a New Vault Connection... 50
2.4.2 Agent Configuration Tabs... 52
2.4.3 Re-Registration... 54
2.4.4 Cluster Support... 55
2.4.4.1 Virtual Server Agents...56
2.4.4.2 Cluster Support Plug-In...57
2.5 Create a Job... 59
2.5.1 Adding Files and Directories to a new Backup Job... 61
2.5.1.1 Wildcards in File Names and Directories...63
2.5.1.2 Wildcards in Directory Paths...64
2.5.1.3 Wildcard Rules for Directories...65
2.5.2 Adding/Removing a File or Directory with an existing Backup Job... 66
2.5.3 System State and System Files... 67
2.5.4 Other Sources... 68
2.5.5 Performance... 69
2.6 Schedule the Job... 70
3.
PERFORMING BACKUPS
... 72
3.1 Running an ad hoc Backup... 73
3.2 Check the Backup results... 75
3.2.1 Process Information - Backup... 75
3.2.2 Safeset Properties... 76
3.2.3 Log Files... 76
3.2.4 Email Notification... 77
4.
PERFORMING RESTORES
... 79
4.1 Restoring a Safeset... 79
4.1.1 File Restore Handling... 81
4.1.1.1 Original or Alternate Location...81
4.1.1.2 Subdirectories...81
4.1.1.3 File Overwrite Options...81
4.1.1.4 Overwrite if locked...81
4.1.1.5 Restore all streams or only data streams...82
4.1.1.6 Use all available bandwidth...82
4.1.2 Restoring from CD or DVD... 82
4.1.3 Process Information - Restore... 83
4.1.4 Log Files for Restore Jobs... 83
4.2 Cross-Computer Restores... 84
4.3 Bare-metal Restore... 85
5.
APPENDIX
... 86
5.1 Examples... 86
5.1.1 Example 1: Creating a Backup Job... 86
5.1.2 Example 2: Running an ad hoc Backup... 88
5.1.3 Example 3: Scheduling a Backup Job... 89
5.1.7 Example 7: Bare-metal Disaster Recovery... 92
5.2 Windows System Recovery... 94
5.2.1 Hardware Requirements... 94
5.2.2 Software Requirements... 94
5.2.3 Windows Restoration Steps... 95
5.2.4 Windows Recovery Problems... 98
5.2.5 Recovery Verification for Windows... 98
5.2.6 Active Directory Restores... 99
5.2.6.1 Troubleshooting:...99
5.3 Cluster Awareness – Cluster Plug-In... 100
5.3.1 Main Features of the Cluster Plug-In... 100
5.3.2 Installation Setup Recommendations... 101
5.4 Command Line Interface (CLI)... 102
5.4.1 VV.exe CLI Command Mode... 102
5.4.1.1 General Command Options...103
5.4.1.2 Backup Command Options...104
5.4.1.3 Restore Command Options...106
5.4.1.4 Sync Command Options...107
5.4.1.5 Inventory Command Options...107
5.4.1.6 List Command Options...107
5.4.1.7 Verify Command Options...107
5.4.1.8 Forcereseed Option...108
5.4.2 CLI Command Syntax... 109
5.4.2.1 Using File names in Command Strings...109
5.4.3 CLI File Formats... 110
5.4.3.1 Directory Layout and Configuration Files...110
5.4.3.2 Configuration Files...110
5.4.3.3 Settings that are Global to all Jobs...111
5.4.3.4 Settings that are usually Job specific...111
5.4.3.5 Miscellaneous Settings...112
5.4.4 Scheduling Backups... 113
5.4.4.1 How to Schedule Backups under Windows...113
5.4.4.2 How to use the AT Service under Windows...114
5.4.4.3 Entries Scheduled Simultaneously...114
5.4.4.4 VVAgent CLI Command Mode...115
Table of Figures
Figure 1. - 64-bit Agent Status...10
Figure 2. - MAPI Upgrade screen...25
Figure 3. - Overview of Product Set...34
Figure 4. - License Behavior for Agents...36
Figure 5. - Create an Agent Profile...43
Figure 6. - Agent Properties...43
Figure 7. - Check Agent Status...44
Figure 8. - Save the Workspace...46
Figure 9. - Set Workspace Password...47
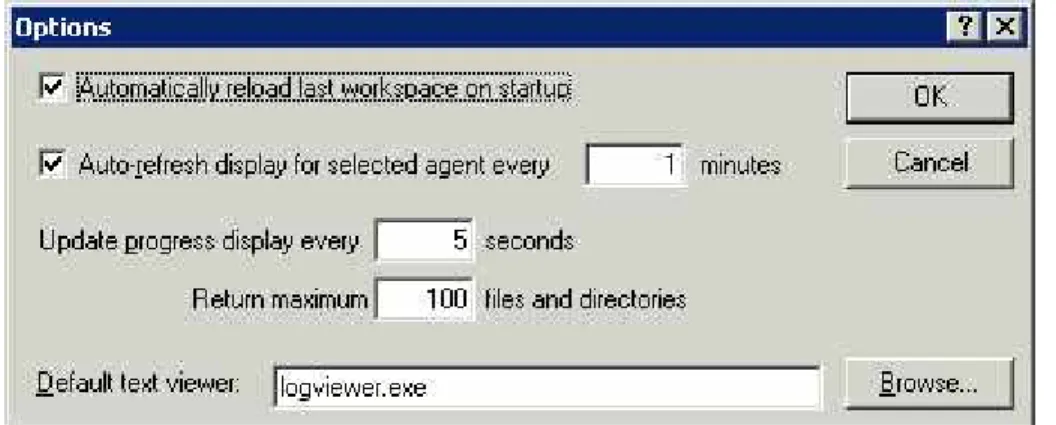
Figure 10. - Workspace Options...48
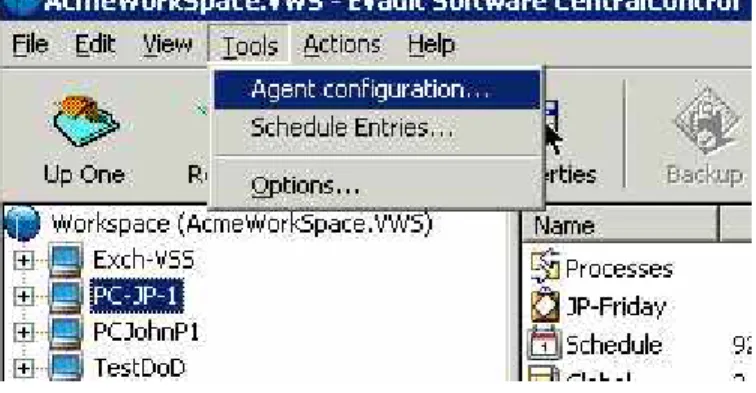
Figure 11. - Start Agent Configuration...49
Figure 12. - Vault Configuration Wizard...50
Figure 13. - Can’t delete a Vault connection with jobs...51
Figure 14. - Agent Configuration tabs...52
Figure 15. - Cluster Support Plug-In...57
Figure 16. - Cluster Virtual Servers – Cluster Support Plug-In License...58
Figure 17. - Virtual Server – Agent Icon...58
Figure 18. - Create a Job...59
Figure 19. - Backup Source and Options...61
Figure 20. - Include/Exclude Directories and Files...62
Figure 21. - Confirm Include...63
Figure 22. - Wildcard example...64
Figure 23. - Source Tab in Job Properties...66
Figure 24. - System State and System Files...67
Figure 25. - Schedule the Job...70
Figure 26. - Ad hoc Backups...73
Figure 27. - Backup Progress...74
Figure 28. - Backup Completed...74
Figure 29. - Checking Backup results...75
Figure 30. - Safeset Properties...76
Figure 31. - Email Notifications...77
Figure 32. - Starting a Restore...79
Figure 33. - Restore in Progress...83
Figure 34. - Log Files for Restore Jobs...83
Revision: This manual has been updated for Version 6.5. Software Version: 6.50 (March, 2009)
© 1997-2009 i365 Inc. All rights reserved.
i365, A Seagate Company, makes no representations or warranties with respect to the contents hereof and specifically disclaims any implied warranties of merchantability or fitness for any particular purpose. Furthermore, i365 reserves the right to revise this publication and to make changes from time to time in the content hereof without obligation of i365 to notify any person of such revision of changes. All companies, names and data used in examples herein are fictitious unless otherwise noted.
No part of this document may be reproduced, transmitted, transcribed, stored in a retrieval System or
translated into any language including computer language, in any form or by any means electronic, mechanic, magnetic, optical, chemical or otherwise without prior written permission of:
i365, A Seagate Company. c/o Corporation Trust Center 1209 Orange Street
Wilmington, New Castle Delaware 19801 www.i365.com
EVault, EVault Software, EVault SaaS, and EVault DeltaPro, are registered trademarks of i365, A Seagate Company. All other products or company names mentioned in this document are trademarks or registered trademarks of their respective owners.
Acknowledgements: Two encryption methods, DES and TripleDES, include cryptographic software written by Eric Young. The Windows versions of these algorithms also include software written by Tim Hudson. Bruce Schneier designed Blowfish encryption.
“Part of the software embedded in this product is gSOAP software. Portions created by gSOAP are Copyright I 2001-2006 Robert A. van Engelen, Genivia inc. All Rights Reserved. THE SOFTWARE IN THIS PRODUCT WAS IN PART PROVIDED BY GENIVIA INC AND ANY EXPRESS OR IMPLIED WARRANTIES,
INCLUDING, BUT NOT LIMITED TO, THE IMPLIED WARRANTIES OF MERCHANTABILITY AND FITNESS FOR A PARTICULAR PURPOSE ARE DISCLAIMED. IN NO EVENT SHALL THE AUTHOR BE LIABLE FOR ANY DIRECT, INDIRECT, INCIDENTAL, SPECIAL, EXEMPLARY, OR CONSEQUENTIAL DAMAGES (INCLUDING, BUT NOT LIMITED TO, PROCUREMENT OF SUBSTITUTE GOODS OR SERVICES; LOSS OF USE, DATA, OR PROFITS; OR BUSINESS INTERRUPTION) HOWEVER CAUSED AND ON ANY THEORY OF LIABILITY, WHETHER IN CONTRACT, STRICT LIABILITY, OR TORT (INCLUDING
NEGLIGENCE OR OTHERWISE) ARISING IN ANY WAY OUT OF THE USE OF THIS SOFTWARE, EVEN IF ADVISED OF THE POSSIBILITY OF SUCH DAMAGE.”
The EVault Software Agent, EVault Software CentralControl, and EVault Software Director applications (version 4 and above) now have the added encryption option of 128bit AES (Advanced Encryption Standard). Advanced Encryption Standard algorithm (named Rijndael, pronounced “Rain Doll”) was developed by cryptographers Dr. Joan Daemen and Dr. Vincent Rijmen. This algorithm was chosen by the National Institute of Standards and Technology (NIST) of the U.S. Department of Commerce to be the new Federal Information Processing Standard (FIPS). AES is not available when connecting to a Vault lower than version 4.1.
See:http://csrc.nist.gov/encryption/aes/round2/r2report.pdf for details.
1. Introduction
and
Installation
This User’s Guide is intended for the System Administrator responsible for ensuring that their Users’ computers are properly configured to be backed up, and that Backups and Restores can be run successfully. The computer Users who use the Servers are not usually aware that their Systems are being backed up.
Different Servers may require different files and directories backed up, on different schedules, depending on what data needs to be secured. Some may require backing up more frequently, depending on how the data changes (its volatility).
This Guide will show the Administrator how to install the Agent, select data to be backed up, configure the Agents to do that, and how to schedule the backup times. Restores are also covered in detail.
The “Windows CentralControl Operations Guide” manual covers all the details about Windows CentralControl and Agents, from the point of view of “how to operate” the program.
Note that BUAgents running under Web CentralControl are described separately in the Web CentralControl documentation. The Agent installation uses the same program for installation for Windows CentralControl or Web CentralControl.
1.1 What’s
New
New Features in this Release:
1. This version supports Windows Server 2008. (System State and Event Log backup/restores for Agents on Windows Server 2008 are not supported.) Bare Metal Restore is a new Backup option for ESR (EVault System Restore). 2. This release only supports backups and restores with versions 5.53 and 6.0x of
the Director. It supports version 6.5 of Windows CentralControl (32-bit) and version 6.5 of Web CentralControl. The 32-bit and 64-bit Agent installation kits offer the same functionality as the earlier kits, but now they are MSI based. 3. The Windows installation kit allows the user to choose an account other than
LocalSystem, under which to run the Server Agent’s VVAgent services. Two separate options are provided. The first option lets the user specify an existing account (with password) and the second lets the kit automatically generate the user account and password.
4. The Agent provides support for vaults configured for LVR (Logical Vault Recovery: one-to-one, and many-to-one).
5. The Agent can re-create a missing delta file. The Agent includes additional information with the backup that allows it to re-build the file, partially or wholly. This delta recovery only occurs with Director 6.0+.
6. Bandwidth Throttling: The user now has the opportunity to either let the system use as much bandwidth as it can get for backups and restores, or “throttle back” and restrict the usage by a percentage (i.e., in kb/sec), and/or time of day, and days of the week. When two or more jobs are run simultaneously, they will share an equal portion of the available bandwidth. Backup and Restore jobs are
weighted equally in terms of allocated bandwidth. Bandwidth sharing works regardless of how the job is created (i.e.: ad hoc, scheduled, or command line). 7. Performance improvements in backups and restores with multi threading features
on multi CPU systems.
8. Advanced Filtering to improve backup performance and usability.
9. Longer Job name support. The Agent provides support for very long path names for both file system and Plug-In data sources. The maximum path length
only support browsing of path lengths up to the buffer size limit of (approximately 8,000 characters). When this limit is reached it will show a dialog box with
“Selection spec is too long”, preventing the user from browsing any further. Web CentralControl does not have this limitation.
11. Browse and back up network resources via UNC paths (for Windows Agents only). The UNC share will be the root for the browse, instead of a device letter. 12. Oracle Plug-In for Windows has functionality similar to that of the existing Oracle
Plug-In for Solaris (non-RMAN).
13. Cross catalog searching. Users can search through all available catalogs when restoring files, without switching Restore Wizard screens.
14. Restore from another computer. The User can restore from another computer when the job name is identical on both computers.
15. The Agent supports symbolic and hard links on Vista and Server 2008. The Agent can back up and restore the symbolic link itself, but not the target. If the symbolic link is a directory, the Agent will not traverse the target path. Handling hard links allows the Agent to process a single instance of all selected hard linked files. That is, the backup size will be smaller, and the backup process will be faster.
16. SharePoint 2003/2007 Plug-In. This version of the MS SharePoint Server Plug-In performs backups and restores of SharePoint Portal 2003, WSS 3.0 and Server 2007 on Windows 2003/2008 Servers. The SharePoint Plug-In enables brick level backups and restores of SharePoint items such as webs, lists, libraries, folders and documents.
17. When connected to a version 5.5+ Director, the Agent supports Director based licensing of these products/Plug-Ins: MS SQL Plug-In; MS Exchange DR Plug-In; MS Exchange MAPI In; Oracle In (Windows and Solaris); Cluster Plug-In; and OTM.
Note: If you are configuring a 5.5x Vault (see Section 2.4 in this manual) the OTM License field, and the Validate Key field are shown as available to be changed, and used (that is, not grayed out). You cannot modify these with a 5.5x Vault, and the Validate Key is not applicable, but you can use them on an earlier Vault.
18. Force Reseed. There is a new command line only option to force a re-seed, in case of a failure with delta recreation in rebuilding delta files. Delta recreation allows the user to rebuild a DTA file by using job synchronization. See section 5.4.1.8 of this guide.
See the “Windows CentralControl Operations Guide”, the “Web CentralControl User Guide”, or the “Web CentralControl Administrator Guide” (or their Helps) for more details on these features.
1.1.1 Agent 64-bit
This manual covers both 32-bit and 64-bit Agents.
A 64-bit Agent can only be installed on a supported 64-bit Windows Server platform. See the Agent-Win 64 Release Note for a list of those supported platforms. If you try to install it on a non-supported platform, you will get an error message:
“This installation package is not supported by this processor type. Contact your product vendor.”
The 64-bit Agent currently supports the following Plug-Ins: • MS SQL Server Plug-In
• MS Exchange Plug-In • MS SharePoint Plug-In • Cluster Plug-In
The 64-bit Agent is controlled by the same CentralControl as the 32-bit Agent. If you do an Agent Status after configuring a 64-bit Agent, you will see the OS version as one of the supported platforms. For example:
1.2
Agent for Windows Installation
This chapter describes the steps required to install the Agent on a supported Windows machine. See the Release Notes for all supported versions.
Note: To communicate with, configure and manage the VVAgent, the Windows CentralControl program must be installed on a supported Windows System.
Note: The Agent can use alternate vaults, in a Vault Replication scenario. To do this the Agent has a list of alternate vaults that is created and overwritten whenever the Agent connects to a Vault. This list (file) has an .ALT extension, and is kept in the installation folder.
1.2.1 System Requirements
(See the “Shipping Products Chart” for the most current version requirements. For 64-bit requirements, see the Release Notes.)
Hardware
CPU and RAM – Should meet the basic requirement of your Operating System, as prescribed by Microsoft.
HDD – at least 100 MB of available disk space. Software
OS – 32-bit editions of the following:
2000 Server & Advanced Server (SP4) / XP Professional (SP2) / 2003 Server (Standard, Enterprise, and Small Business) (SP1) and 2003 Server Standard & Enterprise R2 x86
Vista Home Basic, Home Premium, Business, Ultimate, and Enterprise x86
Server 2008 (Standard, Enterprise, and Datacenter) x86 OS – 64-bit editions of the following:
XP Professional (SP2)
Vista Home Basic, Home Premium, Business, Ultimate, Enterprise
2003 Server Standard & Enterprise (SP2), R2 (SP2) Server 2008 (Standard, Enterprise, and Datacenter)
Network – A TCP/IP stack (for communicating with the Vault Director and CentralControl software).
Optional Open File Software for the Windows Agent: • Open Transaction Manager * - OTM 1.12.211 for
Windows (included in the installation kit).
OR …
• Open File Manager ** - OFM 10 (not included – available separately).
*OTM is a product of Columbia Data Products. See the CentralControl Help files or the CentralControlUser’s Guide for configuration details.
**OFM is a product of EVault Software. See the CentralControl Help files or the CentralControlUser’s Guide for configuration details.
Note: The CentralControl GUI optimally requires the video setting of 16-bit graphics. This setting is found in your Windows > Settings > Control Panel > Display Properties > Settings.
1.2.1.1 Privilege Requirements Installation
To install the Agent, Administrator or equivalent access is required for the target machine.
Note: If you want to manage an Agent from both Windows CentralControl and Web CentralControl, they must both be installed using the same service account user identities. That is, “BUAgent” and “VVAgent” service accounts must be the same. If not, the BUAgent will not be able to provide any status, or administration functions. The account under which services are running is shown in VVAgent and BUAgent logs.
Functional
Three modes of operation of the Agent for Windows 2000 Server / 2003 Server / XP Professional / Vista / Server 2008 are provided:
Ad-Hoc: Using the CentralControl application, the User can configure Backup and Restore Jobs on an Agent. The specified User must have the “Backup Files and Directories” privilege. The initial configuration requires these privileges.
Scheduled: Backup jobs can be configured to run in scheduled mode. Using the CentralControl application, the User can schedule Backup and Restore Jobs on an Agent. If the VVAGENT.EXE program is run as a System service logged in under the System Account User, no special privileges are required to run scheduled jobs.
CLI: Command Line Interface mode allows the User logged on to the System console to execute Backups and Restores directly from the command line interface, or in a batch file. Users must log on with an account that includes “Backup Files and Directories” privilege. This privilege is enabled by default for the Backup Operators and Administrators groups.
1.2.1.2 Configuration File locks
Of course, the Agent itself will still be able to perform its functions. Only users without the proper permissions will be “locked out”.
1.2.1.3 Open Files, File Lock Management, and Anti Virus Programs
The system supports two optional file-lock management software utilities called Open Transaction Manager (OTM) from Columbia Data Products and Open File Manager (OFM) from EVault Software.
Note: Both OTM and OFM must NEVER be installed on the same System. Installing both OTM and OFM is not recommended or supported. Other open file software products are available.
Typically, OTM is used on small to medium sized servers, while OFM is used on large servers.
OTM and OFM are intended to protect open files, such as user data files, and
databases. Installation and Agent directories should not be included in Agent backups. Also, if using VBA, the Director WORK and RAID locations should be excluded from scanning.
If you use an Anti Virus program, you should disable real time scanning on reads (sometimes called “outgoing” on some AV products). Do not back up the AV directories themselves.
Do not use any file-lock management utilities on Agent installation and application directories, or AV directories.
Directories that contain the AV programs, and the Agent installation and application programs can be re-installed, if the Agent system crashes. The operating system can also be re-installed, but you should also be backing up the System State.
1.2.1.4 Default Installation Directories
By default the installation will put the files for fresh installs in directories called:
C:\Program Files\EVault Software\Agent
C:\Program Files\EVault Software\Agent Assistant
(Where “C:” may be another drive.) You may still change the path, if required.
All the Agent applications are then located in a single directory, but have their own sub directory to run in. Requirements (like locking down for admin users only) won’t affect the other applications. The Agent would only lock down the Agent sub directory for Administrators.
The install kit will not remove the top level directory unless it is empty at the end of an uninstall.
1.2.2 Installation Procedures
Note: The 32-bit Agent and 64-bit Agent installations are similar. See the Release Notes for versions and supported platforms.
The Agent for Windows Installation kit is available in a self-extracting executable format with the file name “Agent-Windows-6-xx-xxxx.exe”, or “Agent-Windows-x64-6-xx-xxxx.exe”. Your Service Provider may have renamed this file. This single self-extracting executable file contains all these components necessary to install the Agent under Windows:
• Windows Agents (32 and 64 bit) • OTM (32 and 64 bit)
• SQL Server Plug-In (32 and 64 bit) • Oracle Plug-In (32-bit)
• MS Exchange Plug-In (32 and 64 bit) • Cluster Support Plug-In (32 and 64 bit) • SharePoint Plug-In (32 and 64 bit)
1.2.2.1 Plug-Ins
MS Exchange, MS SQL Server, Oracle, Cluster Support and SharePoint Plug-Ins, and OTM can be installed along with the Agent. That is, there is no separate install program for individual Plug-Ins.
You can always install a Plug-In afterwards by running the installation again, with the Modify option.
See the CentralControl Operations Guide, and the separate Plug-In Guides for more information on licensing and installation.
Note that Plug-Ins require a separate license if you are connecting to a Vault that is lower than version 5.53. If you are connecting to a Vault that is version 5.53 or more, the license is supplied automatically from the Vault.
To apply a license that is not supplied automatically, you first install the Plug-In. Then enter and validate the license from CentralControl, under Agent Configuration, Plug-In tab. See the CentralControl User Guide.
1.2.2.2 Requirements
You must have the following items before installing and using the 32-bit Agent: The self-extracting Agent for Windows Installation kit.
A target System running 2000 Server / 2003 Server / XP Professional / Vista / Server 2008. (See the Release Notes for 64-bit Agents.)
1.2.2.3 Running the Self-extracting Install Kit
Depending on your service provider, you may have the option of installing from disk, or the Web or a CD. Each of the self-extracting install kits may be executed directly over the Web or may be copied to a temporary directory first and then executed. They may also be executed directly from a CD.
Option A: If installing directly from the Web, follow the instructions given on the Web page to start the installation process.
Option B: From the Web, you can download the self-extracting executable to a temporary directory. Navigate to the temporary directory.
Option C: If using a CD, place the media containing the CentralControl installation kit into the CD-ROM drive. Navigate to the disk or CD drive that contains the self-extracting executable.
To install the Agent for Windows using the installation Wizard: 1. Log on to the System.
2. Double click on the self-extracting executable file (“Agent-Windows-6-xx.exe”). You are first prompted to select a language for the installation. Choose English, French, German or Spanish.
3. InstallShield sets up the installation process (Extracting and Preparing). From the Setup Welcome dialog, click Next. A text viewer window appears. 4. From the viewer screen, Users can read or print Support Notes and product
Release Notes. Click Next to proceed.
5. The software “End User License Agreement” window is shown. You must Accept this to continue the installation.
6. Select Install Type. You can choose a Typical Install, or a Custom Install. Typical will finish without you having to choose more components. It will take you to the end (Step 13) and begin the actual installation. If you choose Custom, you will be asked the following steps, before you begin the installation.
7. “Agent Management Method Selection” is next. This allows you to choose how you want to give the proper credentials for the Agent Service to run on the PC.
Note: “Use ‘Local System’ Account”, and “Create Account automatically” supply the correct user rights (in the administrator group). If you select “Use custom account”, you must ensure that the account (in the administrator group) has “act as part of the operating system”, and “logon as a service” user rights. (See the note in section 1.2.1.1 – Privilege Requirement – about BUAgent and VVAgent together.) 8. Choose a destination folder for the installation, or accept the default. Click
9. The “Custom Setup” dialog appears. You may choose these program features, depending on what your system will use to back up its data. They will require a proper license before you can use them. Note that OTM is optional, but if it is chosen here, you will get an “OTM settings” screen later in this installation, and you will have to restart the computer.
Note: You can return to this installation at another time (with Modify) to install these program features, if you do not select them now. You must install at least the Agent. It cannot be turned off. The other features are optional. Click Next.
10. If you had chosen, before, to install OTM, you will now get an “OTM Settings” screen. These parameters are described in the “CentralControl Operations Guide”, and can be changed, in the CentralControl GUI, under the Agent Configuration screen, Open File tab. OTM can also be set with Web CentralControl.
Note: If you had asked for OTM before, you will be reminded here that this is a 30-day trial and you will need to get a permanent license if you wish to
continue using OTM. Click Next.
11. Agent Management Method Selection. Choose one of:
I will manage my Agent using Web CentralControl hosted at <Web URL> I will manage my Agent using Web CentralControl. I will specify the location. I will manage my Agent using Windows CentralControl only.
That is, you may be asked to use a known Web URL address, or to supply one if you want to use Web CentralControl, or to only use Windows CentralControl. Depending on how your install kit is set-up, and what Agent you have installed already, you may see a) all three of these prompts, or b) the first and third, or c) the second and third ones.
12. If you have selected to manage your Agent with Windows CentralControl only, you will not see the next screen on Registering the Agent with Web
CentralControl. But if you have selected one of the first two choices you will see that screen next. “Would you like to begin the installation?” Click Yes. 13. “Register Agent with Web CentralControl” screen. If you are using the Web
CentralControl, you must Register the Agent with it so that it can be managed by the Web CentralControl. You may or may not have an address in the address field, depending on what you selected in the “Agent Management Method Selection”. Enter the username and password that will allow this Agent to register with the Web CentralControl. This is a name and password created for this Agent by an Administrator on the Web CentralControl. Click Next. The
17. Note: If you had chosen to include the Agent Assistant in a Custom Setup (in Web CentralControl only), you will be prompted next for the URL of the Web CentralControl program and the URL for the Help for the Web CentralControl. When you installed the Web CentralControl application on your server, you chose the locations for them. They must correspond to the addresses here. The Web CentralControl and the Help applications can then be accessed from the Agent Assistant on the Agent machine.
(See section 1.5.1.1 for an example of the URL addresses.) 18. The installation is finished.
In addition to holding the executables, the directory setup will also store all the required configuration and delta files.
The space requirements for these files will vary depending on the following factors:
- whether or not Backups are targeted to a local directory,
- the retention settings that are applied to the Backups.
1.2.2.4 System Privileges for EFS
If you have Encrypted File System on your Windows system, the Agent will need more than Administrator Rights to be able to back up those files. You might receive error messages (in the log) about “access is denied” and “ACL’s for all subsequent files might not be backed up.”
After the Agent has been installed, you need to change local security settings, or the default domain policy.
- For the logon for the Agent, you need to set it to “Act as part of the operating system”.
- Set it to “Logon as a service”.
- Then, in services, select the Agent Job, choose the logon tab, choose the “This account” button, and set it to the administrator logon.
This will ensure that the logon for the Agent has the correct rights to be able to do the EFS backups.
1.2.3 Setup Maintenance
Users can modify, repair, upgrade or uninstall the Agent currently on their System. To run the Setup Maintenance Wizard, double click on the Agent-Windows-6-xx-xxxx.exe file (located on your computer hard drive, CD or the web) or select Add/Remove
Programs from the Control Panel. The Setup Maintenance Wizard presents you with the following choices:
Modify: add or remove additional components (OTM and Plug-Ins).
Repair: fix your current version of the Agent. This option appears if the application detects that you have the same version of the Agent on your System.
Upgrade: move up to a newer version of the Agent. This option appears if the installation is a newer version than the previously installed one.
Uninstall: remove the currently installed Agent. This can be a partial (program files), or total uninstall.
Note: If you run the Agent-Windows installation and it detects that you have a newer version of the Agent on your System, the Setup Maintenance Wizard will
terminate. That is, you cannot install an older version of the Agent over a newer one.
1.2.3.1 Installation Languages
Language choices are: English, French, German and Spanish. English is the default. During a Modify/Upgrade of the Agent, you cannot change the setup language. As a workaround, you can uninstall the Agent’s Program files (not a total uninstall) and run a fresh install of the Agent kit, selecting the desired language when prompted.
1.2.3.2 Modify
To Modify Agent components under Windows:
1. Choose Start > Settings > Control Panel > Add/Remove Programs, and select <Service Provider>Agent<version>. Or, instead of using Add/Remove
Programs, you can re-run the installation program.
At this point, you cannot change the setup language. (As a workaround, you can uninstall the Agent’s Program files. This is not a total uninstall. Next, run a fresh install of the Agent kit, selecting the desired language when prompted.) 2. Click OK to continue.
3. From the Welcome screen, click Next.
4. Choose the Modify option (from Modify, Repair, or Remove).
5. “Agent Management Method Selection” is next. This allows you to choose how you want to give the proper credentials for the Agent Service to run on the PC. Note: “Use ‘Local System’ Account”, and “Create Account automatically” supply the correct user rights (in the administrator group). If you select “Use custom account”, you must ensure that the account (in the administrator group) has “act as part of the operating system”, and “logon as a service” user rights.
For a Modify or Repair, you can typically leave these credentials unchanged. 6. Select the components (Agent, OTM, and/or Plug-Ins) you want to install and
deselect the components you want to remove.
Note: If you deselect everything, you will be doing an uninstall. 7. If you have selected components, the installation continues like a new
installation. See the previous sections.
8. Agent Management Method Selection. Choose one of:
I will manage my Agent using Web CentralControl hosted at <Web URL> I will manage my Agent using Web CentralControl. I will specify the location. I will manage my Agent using Windows CentralControl only.
That is, you may be asked to use a known Web URL address, or to supply one if you want to use Web CentralControl, or to only use Windows CentralControl. Depending on how your install kit is set-up, and what Agent you have installed already, you may see a) all three of these prompts, or b) the first and third, or c) the second and third ones.
9. Ready to modify the program. Click Install.
10. If you had selected to install OTM, you will be asked to restart. Select either Yes, I want to restart my computer now or No, I will restart my computer later. Click Finish.
1.2.3.3 Repair
When the Agent installation is launched, it searches your computer for previously installed versions of the Agent. If the same version of the Agent is located, you will be offered the options of Modifying the software, Repairing or Uninstalling it.
To Repair the Agent under Windows:
1. Choose Start > Settings > Control Panel > Add/Remove Programs, and select <Service Provider>Agent<version>. Or, instead of using Add/Remove
Programs, you can re-run the installation program.
At this point, you cannot change the setup language. (As a workaround, you can uninstall the Agent’s Program files. This is not a total uninstall. Next, run a fresh install of the Agent kit, selecting the desired language when prompted.) 2. Click OK to continue.
3. From the Welcome screen, click Next.
4. Choose the Repair option (from Modify, Repair, or Remove). 5. Agent Management Method Selection. Choose one of:
I will manage my Agent using Web CentralControl hosted at <Web URL> I will manage my Agent using Web CentralControl. I will specify the location. I will manage my Agent using Windows CentralControl only.
That is, you may be asked to use a known Web URL address, or to supply one if you want to use Web CentralControl, or to only use Windows CentralControl. Depending on how your install kit is set-up, and what Agent you have installed already, you may see a) all three of these prompts, or b) the first and third, or c) the second and third ones.
6. Ready to Repair the program. Click Install.
7. When the Repair is complete, the Maintenance panel appears indicating the Agent has been properly installed. Click Finish.
1.2.3.4 Uninstalling
To uninstall the Agent under Windows:
1. Choose Start > Settings > Control Panel > Add/Remove Programs, and select <Service Provider>Agent<version>. Or, instead of using Add/Remove
Programs, you can re-run the installation program.
At this point, you cannot change the setup language. (As a workaround, you can uninstall the Agent’s Program files. This is not a total uninstall. Next, run a fresh install of the Agent kit, selecting the desired language when prompted.) 2. Click OK to continue.
3. From the Welcome screen, click Next.
4. Choose the Remove (Uninstall) option (from Modify, Repair, or Remove). Click Next.
5. Select Total Uninstall or Program Files Only. A total uninstall removes all traces of the application from your System. Program Files Only leaves Job configuration files, log files, delta files and Backup Safesets on your computer for future use.
6. Click Remove to uninstall. (Note: You cannot Cancel after this stage, as the uninstallation is now irreversible.)
1.2.3.5 Upgrading from earlier versions
Agent 6.50 supports upgrades from:
- The version 6.50 Agent only supports upgrades from version 5.6 or 6.30 Agents. Agent versions earlier than version 5.6 must be upgraded to 5.6 before attempting an upgrade to 6.50. Agent versions later than 5.6 but earlier than version 6.3 must be upgraded to 6.3 before attempting an upgrade to 6.50.
Upgrading an Agent to Version 6.50 involves these tasks:
- Meeting System and Software Requirements
- Preparing the Computer
- Upgrading Program Files and Configuration Files
- Meeting System and Software Requirements
To upgrade to Agent 6.50, your System must meet the minimum requirements mentioned in the User Guide.
Note: Available free space of the volume that the Agent is installed on should be bigger than the size of all Delta files + the size of the largest Delta file + a reasonable cushion (at least 100 MB).
- Preparing the Computer
To prepare your existing machine for upgrading Agent, complete the following Jobs: 1. Back up the previous Agent Files
We strongly recommend that you make at least one Backup of your previous Agent files, including all files and subdirectories under the Agent installation directory. Do not attempt an upgrade without a Backup.
2. Clean up Server Profiles in Global.vvc
From the Management Console, open up the Agent Configuration that you want to upgrade. Go to Vaults section, check if there is any Server configuration that no longer being used and delete it. Also, highlight every Server configuration and click Edit, and double check the information of this Server Profile is valid. Then click OK to save your changes.
4. Synchronize all Backup Jobs
After cleaning up the Jobs, check the Backup logs of each Job to see if any errors show “Validation failed: “. If so, you need to verify the validation
information with your Vault Operator to make sure it is valid. If the latest Backup log shows no errors, do a Synchronize with the Vault and check the Synch log. 5. Verify eligible Director version
For every Vault that you are backing up to, make sure it is running the latest version. Otherwise, the Vault software needs to be upgraded before upgrading the Agent.
- Upgrading Program Files and Configuration Files
The files installed by Agent 6.50 are listed in the Release Notes.
We recommend starting the installation when all the Directors in Global Settings are not busy on other Jobs.
When the Installation Kit is launched, it detects the previously installed versions of the Agent and starts to upgrade it.
IMPORTANT: When the upgrade process starts, you should wait until it is finished. Do not run multiple upgrade processes at a time.
Always check the log file, after an upgrade process. The log file will be used when troubleshooting in the case of failure. If an upgrade failed, the Global.vvc, Job vvc and Delta files are rolled back to the old version. But they will not work with new executables. You may try to run the upgrade program again. If it still fails, contact your service
provider for support. To completely rollback to the old version, you need to manually copy back the previous Backups.
We recommend that to do at least one Backup for each Job after upgrading successfully to allow the Agent to upload new configuration files to the Director.
Note: If you were already registered with Web CentralControl, you will be shown the existing address and port number (for example: “MyServer:8086”) and you will be prompted to “Keep my current registration” or “Change registration” if you want to move the Agent to another Web CentralControl.
If you select to change, it will take you to the “Register Agent with Web CentralControl” screen, before resuming the InstallShield Wizard. If you keep your current registration, you are prompted to resume the InstallShield Wizard.
Important Information regarding upgrading and re-seeding:
Upgrade: The version 6.50 Agent only supports upgrades from version 5.6 or 6.30 Agents. Agent versions earlier than version 5.6 must be upgraded to 5.6 before
attempting an upgrade to 6.50. Agent versions later than 5.6 but earlier than version 6.3 must be upgraded to 6.3 before attempting an upgrade to 6.50.
Note: There are two conditions you should be aware of that could cause your backups to be reseeded.
• One would occur if you are upgrading older Agents from 4.x to 5.6 to 6.0 to 6.01 to 6.10 or 6.3 or 6.50. During the upgrade from 6.0 to 6.01 to 6.10 or 6.30 or 6.50, the older 4 k blocks change to the newer 32 k blocks, causing a re-seed on the next backup.
• The other reseeding case may occur because Exchange Mailbox names are now the same as displayed in Exchange System Manager Console. If the older names were different, the newer names will cause a reseed.
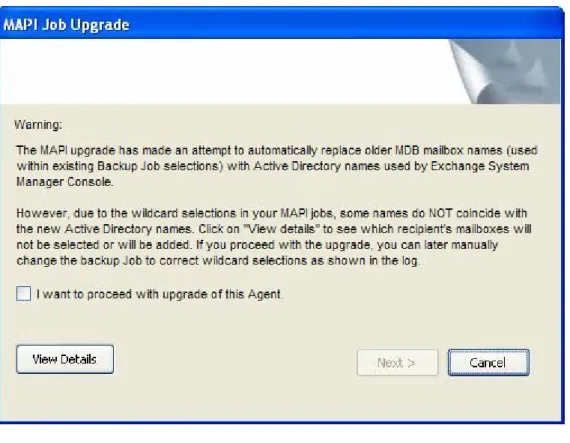
1.2.4 MAPI Upgrades
If you have an MS Exchange MAPI Plug-In installed on a previous 5.6/6.0/6.1 Agent you may be prompted to replace or remove older MDB mailbox names.
This will only occur if the installation finds any names that were displayed as
“LegacyExchangeDN” names (MDB) and these would not match the newer Exchange System Manager Console (Active Directory) names.
At this stage of the upgrade, it will create a log file with a list of mailboxes that do not match. You can see this with the “View Details” button. You must click the “I want to proceed with upgrade of this Agent” box to enable the “Next” button, to be able to proceed with the upgrade.
Figure 2. - MAPI Upgrade screen
For example, in your older Agent’s Job you may have had some mailboxes (MDB names) that started with a number, and you used a wildcard combination such as “1*” to select them for backup.
The new Agent, using Active Directory names shows the names as starting with a letter. So the old Job parameters will not find the mailboxes. The old names will show in the “View Details”. You should edit the job and change the 1* selection to something like A* (for this example).
You can always review the upgrade details (including the mailbox names missed) later, in the Upgrade Log file.
1.2.5 Silent Install
The InstallShield program allows users to create an installation answer file, to be used to install another Agent “silently” – that is, without any user interaction. An administrator can create an answer file on one machine, and then play that back on another machine, to perform an identical installation.
So, an administrator with many installs can run the installation once, and copy the files to other remote machines, and run them silently there.
Configuration File:
A configuration file is required for silent installation. This xml format configuration file contains the properties that need to be set for the installation. This file is not supplied with the installation. The user must create it.
A file similar to the following example can be used for your system. Example xml configuration file (“silentinstall.xml”):
<SilentInstallSettings>
<AccountType>AutoCreate</AccountType>
<ServiceAccountName>dd</ServiceAccountName>
<ServiceAccountPassword>dd</ServiceAccountPassword> <InstallDir>c:\program files\Evault Software</InstallDir> <FeatureAgentTray>on</FeatureAgentTray>
<FeatureOTM>on</FeatureOTM> <FeatureCluster>Off</FeatureCluster> <FeatureSQL>Off</FeatureSQL>
<FeatureExchange>Off</FeatureExchange> <FeatureOracle>Off</FeatureOracle>
<FeatureSharePoint>off<FeatureSharePoint> <FeatureAgentTray>off</FeatureAgentTray> <KeepExistingReg>true</KeepExistingReg>
<RegisterWithWebCC>true</RegisterWithWebCC> <WebCCURL>192.168.2.167</WebCCURL> <WebCCPort>8086</WebCCPort>
<WebCCLoginName>login</WebCCLoginName>
<WebCCPassword>password</WebCCPassword> <OTMForceReboot>true</OTMForceReboot>
Silent Install Settings:
AccountType: (required). There are three types : AutoCreate, LocalSystem, and
Custom. For the first two types, ServiceAccountName and ServiceAccountpassword are not required. If the wrong account type is provided, or the account credentials are wrong, the installation will fail silently. The “SetUp.log” will contain the error information.
Note: If you use “Custom” account, then both <ServiceAccountName> and < ServiceAccountPassword > should have valid values
The account name should be in the form “domainname\username”, or if a built-in domain is used, the username should be in the form “.\username”. For example:
- An account with a domain name: <AccountType>Custom</AccountType>
<ServiceAccountName>MyDomain\Administrator</ServiceAccountName> <ServiceAccountPassword>password</ServiceAccountPassword>
- A built-in domain account: <AccountType>Custom</AccountType>
<ServiceAccountName>.\Administrator</ServiceAccountName> <ServiceAccountPassword>password</ServiceAccountPassword>
InstallDir: (required). If you are upgrading from a previous kit, the previous installation directory will be used for the silent installation directory.
FeatureOTM: This is for turning on/off the OTM Plug-In installation. If not specified, it defaults to Off.
Note: If you use Silent Install with OTM, at the end of the installation the system will be rebooted automatically so that OTM can be operational.
FeatureCluster: This is for turning on/off the Cluster Plug-In installation. If not specified, it defaults to Off.
FeatureSQL: This is for turning on/off the SQL Plug-In installation. If not specified, it defaults to Off.
FeatureExchange: This is for turning on/off the Exchange Plug-In installation. If not specified, it defaults to Off.
FeatureOracle: This is for turning on/off the Oracle Plug-In installation. If not specified, it defaults to Off.
FeatureSharePoint: This is for turning on/off the SharePoint Plug-In installation. If not specified, it defaults to Off.
FeatureAgentTray: During a silent install, this switch (on or off) will install, or not install the Agent Tray program. Default is off.
RegisterWithWeb CC: This is for turning on/off the Registration with Web CentralControl. If not specified, it defaults to False (Off).
WebCCURL: (required). This is only required if “RegisterWithWeb CentralControl” is set to True (On).
WebCCPort: (required). This is only required if “RegisterWithWeb CentralControl” is set to True (On).
WebCCLoginName: (required). This is only required if “RegisterWithWeb CentralControl” is set to True (On).
WebCCPassword: (required). This is only required if “RegisterWithWeb CentralControl” is set to True (On).
OTMForceReboot: This tag, if set to true, will make the system reboot after the installation, otherwise the rebooting will not occur.
BackupConsoleUrl: This is only required if “FeatureAgentTray” is set to True (On). BackupConsoleHelpUrl: This is only required if “FeatureAgentTray” is set to True (On).
(Note: See section 1.5.1.1 for an example of these two URL addresses.)
InstallLanguage: (optional). If it is not set, the default is “English”. Choices are: English, French, German or Spanish.
1.2.5.1 Running the Silent Installation
To run the Silent Installation from the command line, go to the directory containing the Agent installation kit and the silentinstall.xml file and then run the following command: Agent-Windows-6-xx-xxxx.exe /s /v” /qn
SILENTINSTALLCONFIG=\”c:\silentinstall.xml\””/l”1033”
The end of this example is where you can choose an installation language. If you do not choose one, the default English is used.
You can select one of these languages for the installation: 1033=English
1031=German 1034=Spanish 1036=French
Note: In this example, the version of 6-xx-xxxx.exe would be the real version number of the supplied installation kit, rather than the x characters shown. Also, the kit may have been renamed.
For Uninstall:
1.3
How the Windows Agent Works
The CentralControl program (Windows or Web) and the Windows Agent comprise a data protection software suite that securely backs up file data from computers across a network to a remote Data Protection Vault. The applications provide an automated, unattended method for protecting your valuable computer data without the need for tape devices or other Backup media.
Each Backup is termed a “full” backup in that it is possible to Restore all the data, if necessary, without using any incremental or differential backups.
Each computer that needs to be backed up must have the Agent software installed and running, and be connected to a network, to be able to access a Vault. The Agent runs on the computer as a background service, and starts automatically when the System is booted.
The setup of Agents, Jobs, scheduling, and monitoring is done from the CentralControl GUI application. The actual Backup is done from the Computer System with the Agent, to the System with the Vault. No (Backup) User data goes through the CentralControl. The Vault has to be previously set up with an account, to receive your Agent’s
commands and data.
Once an Agent has been properly configured and scheduled, backups will occur
automatically. The CentralControl does not have to be running all the time. It is used for configurations, and to check for successful completion and to view the error logs. Success or failure messages can also be sent by automated emails.
1.3.1 Agent Software
The Agent software runs on the individual computers to be backed up. Backups on the Agent computers are configured and scheduled by the CentralControl computer. The Agent then sends its Backup data (optionally encrypted, for security) directly to the Director (Vault).
The Agent consists of the following components:
• The “VV.exe” component performs the Backup and Restore functions to the Vault.
• The Agent component (“VVAgent.exe” for Windows CentralControl and “BUAgent.exe” for Web CentralControl) handles scheduling, configuration and communication with the CentralControl. It runs as a Windows Service on a supported Windows Operating System.
Note: Check the Appendix of this manual for more information on these, and other files that run the applications.
The Windows platform can optionally have: Exchange In; Oracle In; MS SQL Plug-In; Cluster Plug-In, and SharePoint Plug-In.
Note: See the appropriate Release Note for the current supported versions of the Agents, Plug-Ins, and Operating Systems.
The following products are optional on some Systems, and require an extra license. During installation of the Agent, the Plug-Ins are installed (i.e.: made available) and ready to be activated. You do not need a separate installation for a Plug-In. But, you may also install them later, using the Repair/Upgrade option.
1.3.1.1 MS Exchange Plug-In
The MS Exchange Plug-In is an add-on to the Windows Agent. It allows for full (DR-VSS) disaster recovery capabilities on Microsoft Exchange databases as well as for backing up and restoring individual mailboxes and folders (with MAPI).
1.3.1.2 Oracle Plug-In
The Oracle Plug-In is an add-on to the Windows or Solaris Agent. It allows a user to perform a database Backup on an Oracle database. The Plug-In is installed on top of the Agent on the database host to perform the Backups.
The Oracle Plug-In for Windows is installed via the Server Agent install kit. It will appear as a new option in the “Select Plug-Ins to install” page. The Server Agent kit will not contain the “Oracle Instant Client” required by the Oracle Plug-In for Windows. The Oracle Instance Client will be made available through a separate kit. The Server Agent kit, however, will detect when the Oracle Instant Client has not been installed, and direct the user to the appropriate installation kit.
The Oracle Instant Client kit, created with InstallShield, is dedicated to installing Oracle’s Instant Client. The kit will only install the Oracle Instant Client into the installation
directory of the Server Agent. If the Agent has not already been installed, the install will terminate gracefully.
1.3.1.3 MS SQL Server Plug-In
The MS SQL Server Plug-In is an add-on to the Windows Agent. It allows a user to perform a database Backup on an MS SQL Server database. The Plug-In is installed on top of the Agent on the database host to perform the Backups. The Plug-In, with ODBC, now supports SQL Server 2005 and SQL Server 2008. The Plug-In still supports SQL 2000.
Upgrades of earlier Plug-In versions are supported, and do not require any reconfiguration and/or reseeding of existing data.
1.3.1.4 Cluster Support Plug-In
The Virtual Server Cluster Support Plug-In is an add-on to the Windows Agent. It allows a user to be able to back up a server that has failed over to another machine (node) in the cluster. The configuration is automatically picked up by the correct server after a failover. Single Copy Cluster (SCC), LCR, CCR, and SCR are supported.
1.3.1.5 MS SharePoint 2003/2007 Plug-In
This version of the MS SharePoint Server Plug-In performs backups and restores of SharePoint Portal 2003 and Server 2007 on Windows 2003/2008 Servers. The
SharePoint Plug-In enables brick level backups and restores of SharePoint items such as webs, lists, libraries, folders and documents. This high level of granularity enables backups and restores of the entire site, down to different individual document versions. You can also restore a document as a document or a document version to the file system.
The SharePoint Plug-In, on a restore, allows browsing and selection to the file level. You can also search for a file to restore.
The MS SharePoint Server Plug-In with the Agent installs directly on the server hardware.
1.3.2 CentralControl Software
The CentralControl provides a centralized point of control for managing all computers running the Agent software on a large computer network. Within an organization, the configuration and scheduling of Jobs is done through the computer(s) running the CentralControl software.
The CentralControl software connects to an organization’s computers running the Agent software, activating that computer’s Backup Job.
Windows CentralControl software operates as an application on supported Windows Systems.
Web CentralControl runs on a web server, but the user uses a browser to connect across the network to perform the same functions as on the Windows CentralControl. Note: You should not use both types of CentralControl (at the same time) to manage the same Agents.
1.3.3 Director Software
The Director software controls and manages the pooling and storage of data at a remote secure Vault location. This data is communicated to the Director from the Agent
computers over a WAN, LAN, the Internet, or imported from an alternate media. The Director does not interact with the CentralControl program. The CentralControl communicates with, and manages the remote Agents. The Agent sends its backup data directly to the Vault.
1.3.4 On Line Helps
The Windows CentralControl application (GUI) has an online help, which contains information similar to the user manual. The help is accessed from the main drop-down menu, or by using the F1 function key. There is also context sensitive “WhatsThis?” help on each GUI screen.
Web CentralControl is described in the Web CentralControl Administration User Guide, and the Web CentralControl on-line help.
1.3.5 Overview of Product Set
This diagram shows the relation between the various related products.
Windows CentralControl or
Web CentralControl
Director Vault
Online Online Offline
Backup Export Import
Tape or Quickship
Evault Reporting System
Management of Agents and Jobs
Reports via Web Browser
Agent Agent
Backup Restore
Director Console (GUI)
Offline Restore
Primary Pool Data
Secondary Pool data
Network Attached Storage
Agent
VBA
Synch Web
Figure 3. - Overview of Product Set
(Note: Not all of these products shown here are discussed in this manual. They are included in this diagram for completeness.)
1.3.6 Overview of Licensing
Vaults (version 5.53 or later) implement licensing via a quota system on the Vault. Agent licenses are used (consumed) by Agents during registration. When an Agent connects to a Vault, the license is automatically supplied from the Vault.
Note: If an Agent registers to a Vault and license quotas are exceeded on the Vault, backups for that new Agent will fail to complete. This will not affect previously licensed Agents. Additional licenses can be acquired and applied to the quota. Contact your vendor for further details.
Licenses are required for these various software products: • Windows Agents
• Desktop Agents • Agent Linux • Agent AIX-IBM • Agent System i – IBM • Agent Sun Solaris • Agent Novell NetWare • Agent Vault Backup
• Agent ESX Server VMware Plug-In • MS Exchange Plug-In
• MS SQL Server Plug-In • MS SharePoint Plug-In • MS Cluster Support Plug-In • Oracle Plug-In for Solaris • Oracle Plug-In for Windows • ArcWare
• OFM/OTM
• Bare Metal Restore (BMR) License Behavior:
Agents may be either pre-version 5.6, or 5.6 and later: Depending on the conditions encountered you may be:
Allowed/Disallowed on Job creation, Allowed/Disallowed on Backups, Allowed/Disallowed on Restores.
There may also be Warning Messages. Warning and Disallowed messages are displayed in the CentralControl and Agent Logs.
The conditions for Warnings and Disallowing include: Vault storage limit exceeded,
Vault limit for Agent type exceeded, Vault limit for Plug-In type exceeded,
Agent (pre-5.6) (1) (2) (3) (4) (5)
Registration Allow Allow Allow Client Key N/A
Job Creation Disallow Allow Disallow Client Key N/A
Backup Allow Allow N/A Client Key N/A
Restore Disallow Disallow N/A Client Key N/A
Agent (5.6 and above)
Registration Allow Allow Allow Allow Allow
Job Creation Disallow Allow Warn Warn Warn
Backup Disallow* Allow Disallow* Disallow* Disallow*
Restore Disallow Disallow Disallow* Disallow* Disallow*
System I (pre- 5.6)
Registration Allow Allow Client Key N/A N/A
Job Creation Disallow Allow Disallow N/A N/A
Backup Allow Allow N/A N/A N/A
Restore Disallow Disallow N/A N/A N/A
Figure 4. - License Behavior for Agents (1) If Vault Base License
is not valid:
(2) If Vault Storage limit is exceeded:
(3) If Vault limit for Agent type is exceeded:
(4) If Vault limit for Plug-In type is exceeded:
(5) If Customer Quota for Plug-In type is exceeded:
Scenarios:
If an end user can successfully register an Agent to a Vault, then that Agent will be able to perform Backups and Restores. Successful registration means that the Vault accepts the Agent’s credentials and can supply the licenses that the Agent needs.
After this, it is up to the Vault Administration to ensure that Vault disk space and quotas are available for all properly licensed users.
Quotas restrict Customers to some configurable amount of disk space and number of licenses (by the Vault). So, even though there may be more licenses and disk space available on the entire Vault, individual Customers can be restricted to a limited amount. If an end user is rejected because of license or space restrictions, it is up to the user (“Customer”) to acquire more licenses.
A Vault Administrator may disable a User’s account, for example, for Accounting problems. This will stop the user from accessing the Vault even though they have previously Registered and performed Backups and Restores.
Note:
- Job Registration is always allowed.
- Backups will fail if the licenses are not present, or are insufficient (exceeded).
- If an Agent already has a claim on the necessary licenses (it has previously done a Backup of that type), the operation (Backup or Restore) will be allowed.
1.4 Agent/CentralControl
Configuration
Overview
The Agent program runs as a service on the computer that will be backed up. The way to control/direct it is with the CentralControl GUI program. One CentralControl program controls many Agents on many Servers on a network.
1. Each computer to be backed up needs an Agent.
2. You need to connect (from the CentralControl) to an Agent (when you create a new Agent).
3. You must supply: a Name, IP or DNS address, and user/password credentials. 4. Then, you must Register the computer on the Vault.
You must Register a computer on a Vault to be able to “log on” to the Vault and establish a connection. The Vault must know that this Agent is valid and is authorized to perform its functions.
You will need to “re-register” a computer if you are restoring from another computer, or you are performing a bare-metal Restore (described in chapter 4 of this Guide.).
Jobs are registered during the creation of the Job, and are used during a Backup. They contain information such as:
1. Which Profile is used? (i.e.: which Vault?) 2. What data is to be backed up?
3. What type of logs do you want? 4. What type of encryption (if any)? 5. When is it scheduled to run?
Note: The first Backup is a “seed” (a complete, full Backup), the next and subsequent ones are deltas (i.e. changes only), but they are equivalent to, and still considered a “full” Backup. That is, you are able to restore all or any files from it.
Depending on how your System is configured:
- There may be more than one Vault you can connect to.
- One CentralControl usually controls all the Agents on your network.
1.4.1 Agent Assistant Overview
If you have installed the Agent Assistant option with the Agent, you will have an icon in the System Tray that will show status messages with your backups and restores. If the BUAgent service is on, the Agent Assistant will start automatically when the PC starts. You will see the Agent Assistant icon in the System Tray, beside the time/clock.
If you hover the mouse pointer over the icon, it will show you the current status.
The icon has three display states:
Ready. This is the normal state. The Agent is operational and ready to perform scheduled backups.
Processing. The Agent is currently running a backup.
Not Ready. The Agent may be down, or the network connection may not be accessible.
Right click on the Agent Assistant icon to show the menu choices. You can Exit from the Agent Assistant program. Scheduled backups will continue to run without the Agent Assistant running.
If there is a backup or restore running on your Agent, the “Stop running processes” line becomes active. This allows you to gracefully stop all Agent Jobs.
When you run a backup, you will see a message in the balloon over the icon.
If you hover the mouse over the Agent Assistant icon, after the “Backup Started”
message disappears, you will see a message telling you how many backups are running (concurrently). Typically, there will only be one running at a time.
You may also see Job Status messages (in the balloons and when hovering) such as: • There is a failed Backup Job.
• There is a Backup Job with errors. • A Backup Job has not run in a week. • Backup completed with errors.
Note: If your Agent is controlled by Web CentralControl, you will have all the menu choices active. But if the Agent is controlled by Windows CentralControl, only the Exit will be active.
If you Exit the Agent Assistant, scheduled backups will still occur, but you will not see the status messages here. If you only want to restart the Agent Assistant, go to “Program Files” on your installation disk, “<Agent Assistant directory>” and run the program called “Maestro.exe”.
1.4.1.1 Help, Show Status and Launch Web CentralControl menu choices
If your Agent was configured at installation time to be controlled by Web CentralControl, you will see “Launch Web CentralControl”, “Show Status” and “Help” active (not grayed out) in the Agent Assistant menu choices.
“Show Status” will bring up a screen with the latest message. This is the same message that showed in the balloon, and when you hover the mouse over the Agent Assistant icon in the System Tray. You can also Launch Web CentralControl from here.
“Help” will take you a page in the online Help for Web CentralControl. Usually this is the Welcome page.
If these pages cannot be displayed, your browser will display a “cannot display the webpage” message.
If you want to change where the Launch and Help menu choices point to, you can edit the configuration file. It is in the directory where the Agent Assistant was installed (usually “Program Files > Agent Assistant”).
Modify the “Maestro.cfg” file (an XML file) with an editor such as Notepad. The Help URL address is bracketed between <BackupConsoleHelpUrl> … and </BackupConsoleHelpUrl>.
The Login URL address is bracketed between <BackupConsoleUrl> … and </BackupConsoleUrl>.
For example:
<BackupConsoleHelpUrl>http://MyServer/BackupConsole/Documentation/en-US/main/Welcome_To_Web_CentralControl.htm</BackupConsoleHelpUrl>
<BackupConsoleUrl>http://MyServer/login/login.aspx</BackupConsoleUrl>
You can modify these to suit your environment. See your System Administrator.
If you make changes to this cfg file, you must stop and start the “Maestro.exe” program (the Agent Assistant) to be able to see the changes.