By Ian Jarrett and Sean Clarke
It’s day one and you have a job to
do. Start
configuring
Junos today.
In this Day One booklet you’re just
a few hours away from setup of
the base system settings of your
router, switch, or security device.
DAY ONE:
Juniper Networks Day One booklets provide just the information you need on day one. They are written by subject matter experts and engineers who specialize in getting networks up and running. Look for other titles covering high-performance networking solutions at www.juniper.net/dayone. This book is available in both PDF and printed formats.
This second booklet in the Junos Fundamentals Series helps you to configure the basic settings of your device and to learn more about configuration mode. These settings are the first steps to configuring a Junos device, whether you are setting up a router, switch, or security platform.
Building upon the foundation set by the first booklet, Day One: Configuring Junos Basics continues
the practical tutorial for first-time users of Junos and Juniper products. It is also written as a reference or refresher for more experienced Junos administrators.
“The Day One series is extremely useful in my day-to-day activities with Juniper devices. It answers my questions about how the Junos configuration process works and how to set up devices in my network, providing lots of practical tips and examples from Juniper experts. This is exactly what I was looking for.”
Gadde Pradeep, JNCIA-M, JNCIS-M, JNCIA-EX, JNCIA-ER, JNCIS-ER
Day One: Configuring Junos Basics shows you how to:
• Create a handy checklist of settings to use in configuring the system basics • Configure base system settings
• Create login accounts and permissions
• Set up SNMP to work with your existing systems
• Monitor your device remotely and configure system logs • Installs Web-based management
• Make changes faster with configuration shortcuts
• Streamline device setup with configuration groups and templates • Compare your resulting configuration to the booklet example
Day One: Configuring JUNOS Basics
By Ian Jarrett and Sean Clarke
Chapter 1: Creating a Checklist . . . .5
Chapter 2: Configuring the System Basics . . . .11
Chapter 3: Setting Up Users . . . .25
Chapter 4: Configuring SNMP . . . .33
Chapter 5: Using Monitoring and Logging . . . .43
Chapter 6: Working with Configuration Templates and Other Shortcuts . . . .57
And a PDF supplement to the print edition (available at www.juniper.net/dayone) Appendices: Day One Worksheet, Configurations, and More . . . .73
© 2009 by Juniper Networks, Inc. All rights reserved. Juniper Networks, the Juniper Networks logo, JUNOS, NetScreen, and ScreenOS are registered trademarks of Juniper Networks, Inc. in the United States and other countries. JUNOSe is a trademark of Juniper Networks, Inc. All other trademarks, service marks, registered trademarks, or registered service marks are the property of their respective owners.
Juniper Networks assumes no responsibility for any inaccuracies in this document. Juniper Networks reserves the right to change, modify, transfer, or otherwise revise this publication without notice. Products made or sold by Juniper Networks or components thereof might be covered by one or more of the following patents that are owned by or licensed to Juniper Networks: U.S. Patent Nos. 5,473,599, 5,905,725, 5,909,440, 6,192,051, 6,333,650, 6,359,479, 6,406,312, 6,429,706, 6,459,579, 6,493,347, 6,538,518, 6,538,899, 6,552,918, 6,567,902, 6,578,186, and 6,590,785.
Day One Series Editor: Cathy Gadecki Writers: Ian Jarrett, Sean Clarke Editing: Nancy Koerbel
Literary Management: Ames & Eames, Inc. Printed in the USA by Vervante Corporation. Version History: v1 August 2009
2 3 4 5 6 7 8 9 10
About the Authors
Ian Jarrett is a Senior Product Line Manager at Juniper Networks, responsible for JUNOS Software. He has over eleven years of experience with JUNOS and is happy to share some of that experience with a wider audience.
Sean Clarke is a Senior Systems Engineer at Juniper Networks, with over nine years of hands-on experience with JUNOS.
Authors’ Acknowledgments
The authors want to thank the many people who assisted us in creating this book. Our literary manager Patrick Ames guided us and Nancy Koerbel edited our writing. The Day One Series Editor Cathy Gadecki saved this project several times and tirelessly devoted many days to working with us. Michael Scruggs and Marilyn Kerr fine-tuned our attempts at instructional clarity. David Nguyen, Jerish Parapurath, Jennifer Pulsifer, and Brad Woodberg answered our questions and provided technical review of sections. Ian Jarrett would personally like to thank everybody on the Juniper Networks team who has helped to make this publication possible; and Sean Clarke would like to give thanks to the production team who turned technical jargon into English, and also to Marian for her patience and support.
A free PDF version of this booklet is available at: www.juniper.net/dayone.
Welcome to Day One
Day One booklets help you to quickly get started in a new topic with just the information that you need on day one. The Day One series covers the essentials with straightforward explanations, step-by-step instructions, and practical examples that are easy to follow, while also providing lots of references on where to learn more.
Why Day One Booklets?
It’s a simple premise – you want to use your Juniper equipment as quickly and effectively as possible. You don’t have the time to read through a lot of different documents. You may not even know where to start. All you want to know is what to do on the first day, day one. Day One booklets let you learn from Juniper experts, so you not only find out how to run your device, but also where the shortcuts are, how to stay out of trouble, and what are best practices.
What This Booklet Offers You
Day One: Configuring JUNOS Basics helps you to configure the basic settings of your device and to learn more about configuration mode. These settings are the first steps to configuring a JUNOS device, whether you are setting up a router, a switch, or a security platform. When you’re done with this booklet, you’ll be able to:
P Create a handy checklist of settings to use in configuring the system basics
P Configure basic system settings
P Create login accounts and permissions
P Set up SNMP to work with your existing systems
P Monitor your device remotely and configure system logs
P Install Web-based management
P Make changes faster with configuration shortcuts
P Streamline device setup with configuration groups and templates
Trying Things Out in Your Own Device
Having access to a JUNOS device while reading is useful for working along with the steps and commands of the examples. The Appendix available in the electronic version of this booklet provides a reference configuration. If you follow along in your own device by entering all of the configuration commands designated by an arrow ► in the left margin (and no other commands), your resulting configuration should match the expected configuration in the Appendix. For example:
► root@juniper1# set class super-user
To access JUNOS Software, you must first have access to the device itself, either through the console port or the management port. Because each network is different, the process of logging in to de-ployed equipment is beyond the scope of this booklet. So before attempting to log in to the JUNOS command-line interface, you need to know how to access your device on the network, or have physical access to it.
MORE? If you need information on deploying your device, see the Quick Start
guide for your product at www.juniper.net/techpubs/.
What to Enter into Your Device
With a focus on doing, Day One booklets include lots of examples. The examples show screen output in a fixed-width font with the
commands that you enter in boldface. If the command includes user
named input (such as the name of a file, group, or policy), the exam-ples show it as boldface italic. The booklet uses these conventions in
both the examples and their discussion to identify types of input in the booklet. However, when you type commands into the command-line interface (CLI), all input is plain-text entry.
What You Need to Know Before Reading
Before reading this booklet, you should be familiar with basic net-working concepts and the topics covered in the first booklet of the JUNOS Software Fundamentals series. Day One: Exploring the JUNOS CLI introduced the basic commands used to configure and operate the JUNOS device, summarized in the table in the Appendix (available in the electronic version).
Creating a Checklist
Hostname . . . 6
Loopback Interface . . . .6
Management Interface . . . .7
Backup Router . . . .7
Domain Name System (DNS) . . . .7
Time Servers . . . .8
User Names and Passwords . . . 8
Remote Authentication Servers . . . 9
Network Interfaces . . . 9
Network Management System . . . 10
JUNOS Software is a network operating system that runs many of the Juniper Network platforms. Whether it is your first day setting up a new router, a switch, or a security platform, this booklet walks you through the steps to configure the JUNOS basics. These steps are straightforward and follow common practices well-known to experi-enced network administrators.
As with any network device, regardless of the manufacturer, there are a number of fundamental settings to configure before you can declare it “ready for use.” For example, the device needs to know its assigned IP addresses, which users are allowed to enter, as well as its manage-ment basics.
This first chapter steps you through the list of information you may need to configure the device basics. Record this information in the margins or in a worksheet provided in the Appendix, so you have a record of vital information and because sometimes a pen and paper is easier to use when you’re moving among the racks. If you gather all the details described in the sections of this chapter, you can breeze through the basic device setup discussed in Chapters 2 through 5.
Hostname
Most devices in your network infrastructure – whether they are routers, switches, servers, or firewalls – are known by a specific name rather than by the device’s IP address. A name is simply easier to remember than a long string of numbers. The device name is also known as the hostname.
Often, administrators choose a hostname that reflects the device’s use in the network, for example: uk-london-R1. The hostname should be
unique to the device. It is usually added to the DNS servers so that administrators can connect to the device using the easy-to-remember hostname.
Loopback Interface
Most of the addresses you configure on your device are physical interfaces, however, the loopback interface is a virtual interface – an interface not associated with any hardware or network. While physical interfaces might be removed or their addresses changed, the loopback address never changes. The loopback address has many different uses in the operation and management of the network.
Management Interface
A management interface lets authorized users and management systems connect to the device over the network. If your device is an EX Series Ethernet Switch or an M Series or MX Series router, it has a dedicated management port on the front panel. For other types of platforms you can configure a management interface on one of the network interfaces; this interface can be dedicated to management or shared with other traffic.
Before users can access the management interface, you must configure it. Information required to set up the management interface includes its IP address and prefix. In many types of JUNOS devices (or recom-mended configurations) it is not possible to route traffic between the management interface and the other ports. Therefore, you should select an IP address in a separate (logical) network, with a separate prefix (netmask).
Backup Router
If JUNOS is running on a network device that performs Layer 3 forwarding (such as a router) you may want to specify a backup router. A backup router can be used during the initial boot process of JUNOS, before any routing protocols have converged. It allows the device to establish a Layer 3 connection quickly, thus keeping unavail-ability to a minimum. In selecting a backup router, it is common practice to choose the default gateway of your management network that is directly connected to your device.
Domain Name System (DNS)
It is easier for most people to remember names rather than numbers especially if those numbers are IPv4 addresses. Because of this, domain name system (DNS) servers are used to map device hostnames to IP addresses and vice versa.
DNS allows you to use names to designate key external systems such as file and log servers that your device may need to contact. The DNS server maintains a centralized repository for device hostnames on the network, ensuring each device hostname is unique. This centralized repository makes it easier to query and to administer translations between the network IP addresses and hostnames. You can configure your device to query one or more DNS servers via their IP addresses.
Time Servers
The IETF defined the Network Time Protocol (NTP) to synchronize the clocks of computer systems connected to each other over a network. Most large networks have an NTP server that ensures that time on all devices is synchronized, regardless of the device location. If you use NTP server(s) on your network, ensure you know the address(es).
User Names and Passwords
The root account of JUNOS Software provides full administrative access to your device with complete control over its configuration and operation. The root account is often referred to as the superuser. In new devices, the root account has no password. You must add a password to the root account before you can commit any configuration. The stronger you make the password, the harder it is for others to discover it and use it to break into the account.
JUNOS helps to enforce the use of strong passwords. For example, valid passwords must:
n Be a minimum length of 6 characters
n Contain at least one change of case or character class
n Be at least six characters long and use at least three of the five defined character classes (uppercase letters, lowercase letters, numbers, punctuation marks, and other special characters). Control characters are not recommended for passwords.
BEST PRACTICE Increase the length of the password and the minimum number of case, digit, and punctuation changes to set up safer passwords. An example of a good password would be: t3aMX*u7rS.
In addition to the root user, it is highly recommended that you create at least one other local user. This user can log in when you need to per-form administration or maintenance tasks on the device.
In assigning usernames, do not include spaces, control characters, colons, or commas. A username can be a maximum length of up to 64 characters. User passwords also require a change of case, digits, or punctuation.
You should keep all your passwords secret at all times. If you write down a password here, make sure that this document is kept safe and secure.
Remote Authentication Servers
You probably already use a remote authentication server (or servers) in your network. It’s a recommended best practice, because the server(s) allow you to centrally create a consistent set of user accounts for all devices in your network.
Using a central server has multiple advantages over the alternative of creating local users on each and every device – a time-consuming and error-prone task. A central authentication system also simplifies the use of one-time password systems such as SecureID, which offer protection against password sniffing and password replay attacks, in which someone uses a captured password to pose as a system adminis-trator.
There are two basic methods of remote authentication in use by most enterprises today: RADIUS (Remote Authentication Dial In User Service) and TACACS+ (extended Terminal Access Control Access Control System). JUNOS can be configured to query multiple remote authentication servers of both types.
MORE? If you want more information about RADIUS or TACACS+ technolo-gies, see the System Basics Configuration Guide of the JUNOS techni-cal documentation. All Juniper technitechni-cal documentation is available at www.juniper.net/techpubs.
Network Interfaces
If your device is performing Layer 3 forwarding (e.g. IP routing), it needs at least one IP address assigned to an interface. If you have more than one network interface, you need at least one IP address for each. This booklet helps you to configure a Gigabit Ethernet interface so that you can get your device “up and running” on your network.
MORE? Day One: Configuring JUNOS Interfaces and Routing discusses how to configure other types of interfaces. Check availability and down-load your copy at www.juniper.net/dayone.
Network Management System
Do you use a central network management system (NMS)? Most NMS’s use a version of Simple Network Management Protocol (SNMP) that can monitor the status of JUNOS devices that send unsolicited messages called traps. You can configure the IP address of your NMS so that JUNOS knows where to send its traps.
SNMP uses a very basic form of authentication called community strings to control access between a manager and remote agents, and vice versa. Community strings are administrative names used to group collections of devices (and the agents running on them) into common management domains. If a manager and an agent share the same community, they can talk to one another.
Many people associate SNMP community strings with passwords and keys because the jobs they do are similar. As a result, SNMP communi-ties are traditionally referred to as strings. The community string is the first level of management authentication implemented by the SNMP agent in JUNOS.
You may also want to configure remote logging on your device. JUNOS uses a syslog mechanism similar to many Unix devices to forward log messages to a specified log host address. This allows each of your devices to forward their messages to one central host, making it easier to monitor the network as a whole. Syslog is a very flexible and rich way of logging messages and is used by many device vendors to supplement the information provided by SNMP traps.
That’s the End of the Gathering
That’s it. That’s the information you need to begin your day one configuring. Print out the Configuration Information Worksheet from the Appendix (included in the electronic version of this booklet) and record the information you’ve gathered. Or just write the details for your devices in the margins of a printed copy of this booklet. Now, you have a reference to complete the commands and steps described in the remaining chapters of this booklet.
Configuring the System Basics
Configuring Base System Settings . . . .12
Reaching a Domain Name System Server . . . .18
Setting Up the Date and Time . . . 19
Introducing Interfaces . . . .21
In the previous chapter you gathered the essential configuration information to use with this booklet. In this chapter, you begin the actual setup of your device with the basic settings, including the base system, user accounts, remote access, and interfaces.
Follow along in your own device by entering all the configuration commands designated by an arrow ► in the left margin. You can then compare your resulting configuration with the expected configuration included in the Appendix.
A pratical change is to customize your command entries using the specific information gathered in Chapter 1. When you compare your resulting configuration with the expected configuration in the Appen-dix, the only differences will be in the customizable fields, and your device will be ready with the basic settings to run in your network.
Configuring Base System Settings
This section guides you through the first steps in configuring your device, including base system settings of root (administrator) pass-word, hostname, management interface, loopback interface, and backup router. Follow along and refer to the information that you gathered in Chapter 1 to customize the setup of your device for your network.
NOTE This booklet follows the convention of not always showing the command prompt in displaying configuration mode command examples.
TIP If you are new to JUNOS, or it has been awhile since you last config-ured a new device, explore the [edit system] hierarchy as a reminder
of basic settings that you can configure:
[edit system]
root@juniper1# set system ?
Possible completions:
+ authentication-order Order in which authentication methods are invoked > backup-router IPv4 router to use while booting
domain-name Domain name for this router host-name Hostname for this router
> location Location of the system, in various forms > login Names, login classes, and passwords for users
> name-server DNS name servers
> ntp Network Time Protocol services > radius-options RADIUS options
> radius-server RADIUS server configuration
> root-authentication Authentication information for the root login > syslog System logging facility
time-zone Time zone name <snip>
Root Authentication Password
The root account or user is a predefined user name in JUNOS. The root user is by default the administrator or super user, who has absolute permission to both configure and install software on a device.
JUNOS requires configuration of the root password before it accepts a commit. On a new device the root password must always be a part of the configuration submitted with your initial commit. Use the follow-ing command to set up a plain text password for the root user.
set system root-authentication plain-text-password
New password: ######
Retype new password: ######
As you enter the password in plain text, JUNOS encrypts it immedi-ately. You don’t have to tell JUNOS to encrypt the password as in some other systems. Plain text passwords are therefore hidden and marked as ## SECRET-DATA in JUNOS configuration listings (see Appendix example).
BEST PRACTICE Strengthen security by only allowing root access from the console port:
set system services ssh root-login deny
Hostname
The hostname of the device provides its identification for many purposes. JUNOS uses the configured hostname as part of the com-mand prompt, to prepend log files and other accounting information, as well as in other places where knowing the device identity is useful. In this booklet we use the name juniper1, but you can choose
some-thing more descriptive:
Loopback Interface
The loopback interface supports many different network and opera-tional functions and is an “always up” interface. For example, the loopback interface assures that the device is reachable, even if some of the physical interfaces are down, removed, or an IP address has changed. In most cases, you always define a loopback interface. JUNOS follows the IP convention of using lo0 as the loopback
inter-face’s identifier name. Refer to Chapter 1 as a reminder of what you have chosen as the IP address of your loopback interface:
set interfaces lo0 unit 0 family inet address 192.26.0.110/32
NOTE See this chapter’s Introducing Interfaces section for more information about the set interfaces command format.
ALERT! JUNOS requires that the loopback interface always be configured with a /32 network mask (avoiding any unnecessary allocation of address space).
You can configure as many addresses as you need on the lo0 interface,
so it’s good practice to make one address preferred:
set interfaces lo0 unit 0 family inet address 192.26.0.110/32 preferred
Only unit 0 (unit is a reference to a logical channel on JUNOS
inter-faces) is permitted as the master loopback interface. If you want to add more IP addresses to this, you simply configure them in the normal way under unit 0, without the preferred option:
set interfaces lo0 unit 0 family inet address 192.168.1.1/32 set interfaces lo0 unit 0 family inet address 192.168.2.1/32
BEST PRACTICE On the lo0.0 interface, it is useful to have the IP address 127.0.0.1
configured, as certain processes such as NTP and MPLS ping use this default host address:
set interfaces lo0 unit 0 family inet address 127.0.0.1/32
The 127.0.0.1/32 address is a Martian IP address (an address invalid for routing), so it is never advertised by the Juniper device.
NOTE Depending on your network configuration, you may also need an ISO address for the IS-IS routing protocol:
Management Interface
The management interface supports access to your device for autho-rized users as well as management systems. Users can then connect to the management interface over the network using standard utilities such as SSH and telnet (set up in Chapter 3).
Many types of JUNOS platforms include a dedicated management port on the front panel. For others, you can configure one of the Ethernet ports to act as the management interface.
Platforms that use a network Ethernet interface for management include the SRX100, SRX210, SRX240, and SRX650 Services Gateways and the J Series Services Routers. A network interface can be configured as being dedicated to out-of-band management or as being shared by both management and network traffic.
MORE? Even though your device has a dedicated management port, you may prefer to configure a network interface to carry management traffic. For example, your organization may use this approach when cost does not justify a separate management infrastructure. Find out how to configure the EX Series Ethernet Switches with in-band
management by downloading the white paper Deploying EX-series Switches in Branch Offices at www.juniper.net/us/en/products-services/switching/ex-series/.
Dedicated Management Port
The dedicated management port supports out-of-band management access with complete physical separation from network traffic within your device. This approach limits access to your device, and thereby the potential for problems. Further, because it only carries manage-ment traffic, the managemanage-ment port is fully available to you for analyzing and reacting to problems if your device happens to be under attack.
How to set up the dedicated management port:
Configuration of the dedicated management port simply requires assignment of the IP address that you want to use as the management interface. The interface name that you use in the JUNOS command depends upon the type of device that you are setting up.
The following example shows the command format to set up the dedicated management port for an EX Series switch. The EX Series Ethernet Switches use the interface name me0 as the name of the
man-agement port:
set interfaces me0 unit 0 family inet address 172.26.27.44/24
On other JUNOS devices the dedicated management port is named fxp0.
Table 2.1 outlines the assigned names of the dedicated management port in various Juniper platforms. If you are using one of these other plat-forms, substitute the interface name me0 with fxp0 in the above
com-mand statement.
Table 2.1 Names of Dedicated Management Ports
Platform Dedicated Management Port
EX Series Ethernet Switches me0 (see note at the top of next page)
M, MX, and T Series Routers fxp0
SRX5xxx and SRX3xxx Services Gateways fxp0
MORE? Turn to the J Series documemtation for more about its management interface as www.juniper.net/techpubs.
NOTE The EX Series also includes a commonly used virtual management interface known as vme that is used for managing devices grouped
together in a virtual chassis. For more information check the availability of Day One: Configuring EX Series Ethernet Switches at www.juniper. net/dayone.
Management Over a Network Interface
If your type of device uses a network interface for carrying management traffic, you similarly need to configure it with the IP address that you want to use as the management interface. The following example sets up the management interface on a network interface which is dedicated to out-of-band management. The Appendix outlines how to set up man-agement on a shared network interface.
The following section discusses how to configure the management interface on a branch SRX Series device or J Series in flow-based mode.
How to set up management on a dedicated network interface with zones:
1. Configure the interface with the IP address that you are using for management:
set interfaces ge-0/0/0 unit 0 family inet address 172.26.27.44/24
2. Before the interface can carry traffic, you must assign the configured management interface to a zone. The zone provides virtual separation of traffic and acts as a policy enforcement point. The functional zone
management is a special predefined zone for out-of-band management in
these platforms. Add the logical interface to this zone with the following command:
set security zones functional-zone management interfaces ge-0/0/0.0
3. Where you have set up a functional zone, it is necessary to specify which protocols the interface responds to, for example:
set security zones functional-zone management host-inbound-traffic system-services ssh
MORE? Learn more about functional and security zones in the Security Con-figuration Guide available at www.juniper.net/techpubs.
Backup Router
You can configure JUNOS to use a backup router during the initial boot process in Layer 3 devices. The JUNOS process responsible for establishing routes (among other functions) is known as the routing protocol daemon (RPD). When JUNOS is booting, RPD is not initially running, and therefore the device has no routes. Configuring a backup router allows the device to establish a Layer 3 connection during boot time, thereby minimizing the amount of time the device is unavailable.
set system backup-router 172.26.31.1 destination 172.16.0.0/12
In this example, if you choose the default gateway of your manage-ment system, the managemanage-ment network (all of the IP range 172.16/12) is reachable via next-hop 172.26.31.1 early on in the boot process, even before other routing protocols have converged.
NOTE JUNOS only uses the backup router during the boot sequence. If you want to configure a backup router for use after startup, you can set up a default route as discussed in Day One: Configuring JUNOS
Interfaces and Routing found at www.juniper.net/dayone.
Reaching a Domain Name System (DNS) Server
JUNOS can resolve hostnames to IP addresses if it knows the location of your DNS server(s). The approach is similar to the way Web browsers resolve the names of a Web site to its network address. Additionally, JUNOS lets you configure one or more domain names which it uses to resolve hostnames that are not fully qualified (i.e., the domain name is missing). This is convenient as you can simply use a hostname in configuring and operating JUNOS without the need to reference the full domain name.
SHORTCUT After adding a DNS server(s) and domain name(s) to your JUNOS configuration, you can use DNS resolvable hostnames in your configu-ration and commands instead of IP addresses.
How to configure the DNS server:
1. Begin by including the IP address(es) of your DNS server(s) within a
name-server statement(s):
set system name-server 172.26.27.2 set system name-server 172.26.27.3
2. It’s good practice to configure the domain name in which the device itself is located. JUNOS then uses this configured domain name as the default domain name to append to hostnames that are not fully qualified:
set system domain-name enterprise.com
3. If your device can reach several different domains, you can configure these as a list of domains to be searched. JUNOS then uses this list to set an order in which it appends domain names when searching for the IP address of a host.
set system domain-search [enterprise.com department.enterprise.com]
This command example configures JUNOS to search the enterprise. com and then the department.enterprise.com domains when attempting to resolve unqualified hosts.
VERIFY If you have configured your DNS server with the hostname and an IP address for your JUNOS device, you can issue the following commands to confirm that DNS is working and reachable.
In the first command use the IP address of your device to confirm resolution to the configured hostname.
root@juniper1> show host 172.26.27.44
44.27.26.172.in-addr.arpa domain name pointer juniper1.enterprise.com.
In the second command, use the configured hostname to confirm resolution to the IP address.
root@juniper1> show host juniper1
juniper1.enterprise.com has address 172.26.27.44
NOTE It doesn’t matter which IP address you assign as the address of your JUNOS device in the DNS server, as long it is an address that reaches your device. Here we have used the management interface, but you may choose the loopback interface, a network interface, or even configure multiples of the addresses on the DNS server.
Setting Up the Date and Time
The initial configuration of a device should include time settings for accurate recording of events. To set the time in your JUNOS device, you can either configure it manually, or your device can take a system time from an NTP (Network Time Protocol) server.
How to set time locally:
If you do not have access to an NTP you may configure JUNOS to keep its own local time using an onboard clock. You can manually configure the date and time from the JUNOS operational mode:
root@juniper1> set date 200901011200.00
The date is in the form (YYYYMMDDhhmm.ss).
How to use a remote time server:
In large networks it’s useful to have an NTP server to set the exact same time across all the network devices. The common reference lets you correlate all timestamps of logs and trace files for troubleshooting purposes.
Use the following steps to configure your device to use one or more NTP servers.
1. The easiest way to have NTP set the time is to have JUNOS retrieve the time when it first boots up. Use the following command with the IP address of your NTP server:
set system ntp boot-server 172.26.27.4
2. To keep the device synchronized with periodic updates, configure a reference NTP server (you can configure more than one). It’s good practice to do this, as the JUNOS device can be up for a long time, and therefore the clock can drift:
set system ntp server 172.26.27.4
3. Next, you may want set the local time zone to match the device’s location (note that Universal Coordinated Time (UTC) is the default). This allows JUNOS to present the time in the correct local format, accounting for things such as offset from UTC, which may change several times throughout the year:
set system time-zone Europe/Amsterdam
TIP Many administrators prefer to keep all their devices configured to use the UTC time zone. This approach has the benefit of allowing you to easily compare the time stamps of logs and other events across a network of devices in many different time zones.
4. If you’ve just booted JUNOS and need to synchronize time with a remote time source, you can do so in operational mode:
root@juniper1> set date ntp 172.26.27.4
7 Apr 10:32:27 ntpdate[4544]: step time server 172.26.27.4 offset -0.000565 sec
How to verify your time settings:
After you set up the time, you can check the configuration in the following ways.
VERIFY Check the system time at any time (pardon the pun):
root@juniper1> show system uptime
Current time: 2009-04-06 15:36:10 CEST
System booted: 2009-03-27 12:56:33 CET (1w3d 01:39 ago) Protocols started: 2009-03-27 12:58:04 CET (1w3d 01:38 ago)
Last configured: 2009-04-06 15:27:02 CEST (00:09:08 ago) by username 3:36PM up 10 days, 1:40, 1 user, load averages: 0.00, 0.00, 0.00
This listing not only provides the current time, but also when the device was last booted, the protocols started, and when the device was last configured.
You can also check the NTP server status and associations of the clocking sources used by your device with the two following com-mands:
root@juniper1> show ntp associations
remote refid st t when poll reach delay offset jitter ============================================================================== *172.26.27.4 203.26.24.6 3 u 16 64 377 0.256 -0.164 0.022 root@juniper1> show ntp status
status=0644 leap_none, sync_ntp, 4 events, event_peer/strat_chg, version=”ntpd 4.2.0-a Wed Mar 25 07:21:19 UTC 2009 (1)”,
processor=”i386”, system=”JUNOS9.4R2.9”, leap=00, stratum=4,
precision=-19, rootdelay=502.545, rootdispersion=74.632, peer=59484, refid=172.26.27.4,
reftime=cd847de9.ccb54775 Mon, Apr 6 2009 15:11:05.799, poll=6, clock=cd847dfc.4a08cfa9 Mon, Apr 6 2009 15:11:24.289, state=4, offset=-0.164, frequency=52.814, jitter=0.030, stability=0.005
Introducing Interfaces
The interfaces available in JUNOS devices include physical interfaces for moving traffic in and out of the device, as well as special interfaces such as the management and loopback interfaces (see the prededing
Management Interface and Loopback Interface sections).
As part of the basic setup of a device, this section discusses the format of the interface naming, introduces logical interfaces, and shows how to configure a Gigabit Ethernet interface.
MORE? Day One: Configuring JUNOS Interfaces and Routing discusses how to configure other types of interfaces. Check availability and download your copy at www.juniper.net/dayone.
Physical Interface Naming
Your platform may include Ethernet interfaces for carrying traffic and one or more of many wide area network interfaces available on different types of JUNOS devices. Regardless of the type of interface,
JUNOS follows a standard format in its interface naming. The inter-face name is made up of two parts: the interinter-face type and the interinter-face numbering.
JUNOS denotes the different types of interfaces with a text identifier.
For example, the identifier for a Gigabit Ethernet interface is the text string ge.
The Juniper engineers assign interface numbers corresponding to each interface location (in each hardware platform). Generally, they use the following conventions in designating numbers to the device interfaces, sequentially assigning numbers beginning with 0.
n slot: the first number corresponds to the slot location. On small platforms, fixed interfaces are usually assigned as being in slot 0. In high end platforms, physical slots exist to hold a Flexible PIC Concentrator (FPC), which is a large board that can in turn hold many interface cards.
n PIC: the second number corresponds to the Physical Interface Card (PIC) position within the slot.
n port: the third number corresponds to the port number on the PIC. Putting it all together, an example of an interface name is ge-0/0/1. In
this example, the type of interface is Gigabit Ethernet, the slot number is 0, the PIC number is 0, and the port number is 1.
TIP The port number is also written on the PIC itself, which is useful when you’re juggling multiple FPCs and PICs.
Try It Yourself:
Viewing the Hardware Configuration
Try entering the following operational mode command on your device to determine its physical configuration:
root@juniper1> show chassis hardware
Logical Units
In setting up your network you may want to partition a physical interface into multiple logical interfaces – for instance, subdividing an Ethernet interface into multiple virtual LANs (VLANs). JUNOS refers
to these logical interfaces as units. Typically JUNOS requires that you
set up one (or more) logical units on each physical interface.
In naming the logical interface, JUNOS simply appends the logical unit to the physical port. If we added a logical unit (also sometimes referred to as a channel) of 0 to our example above, the complete interface name would become: ge-0/0/1.0.
NOTE Other vendors refer to logical interfaces on their platforms as sub-interfaces.
Gigabit Ethernet
The best way to learn how to configure interfaces in JUNOS is to present an example. Let’s say that you want to configure the Gigabit Ethernet interface ge-0/0/1. Use the set interfaces command,
specifying the IPv4 address 192.168.100.1/30:
set interfaces ge-0/0/1 unit 0 family inet address 192.168.100.1/30
Looking at the levels of the command more closely:
nge-0/0/1 is the name of the Gigabit Ethernet physical interface.
nunit 0 is a logical unit configured within the physical interface. Each physical interface must have at least one configured logical interface, with the first one numbered 0 (not 1) before it can carry traffic.
nfamily inet identifies the protocol used by the logical interface. You almost always want to configure at least one family on each logical interface. In this booklet, all of our configurations use inetwhich
is how JUNOS refers to IPv4.
naddress 192.168.100.1/30 is the address of the logical interface. Each logical interface can support multiple addresses. So configuring additional addresses does not override existing addresses.
VERIFY Show that the Gigabit Ethernet interface has been set up:
root@juniper1# show interfaces
ge-0/0/1 { unit 0 { family inet { address 192.168.100.1/30; } } }
Reviewing Your Work
With the essential basics now set up in your device, you may want to review your work. First, commit your configuration. Then, you can compare your listing to the configuration defined by the commands designated by an arrow ►. The full configuration is available in the Appendix of the PDF version of this Day One booklet.
Use the show configuration command in operational mode to see
what’s in your active configuration after completing the commit. If you’ve been following along in your own device, your configuration should include the following statements for the ge-0/0/1 interface: root@juniper1> show configuration interfaces ge-0/0/1 unit 0 {
family inet {
address 192.168.100.1/30; }
}
How to display the active configuration as a series of set commands:
You can also easily convert the displayed listing into the original set
commands by piping the output into the | display set modifier. This
makes it easier for you to see which commands created the configura-tion:
root@juniper1> show configuration interfaces ge-0/0/1 | display set
set interfaces ge-0/0/1 unit 0 family inet address 192.168.100.1/30
NOTE JUNOS displays the show configuration | display set listing from
the top of the configuration mode, i.e. the set commands are in the
form that you would use at the [edit] hierarchy level of the
configura-tion.
TIP When looking at output with operational mode show commands, you
can display more information by using the detail or extensive
Setting Up User Accounts
Creating Login Banners . . . .26 Configuring Login Accounts . . . .27 Setting Up Remote Authentication . . . .29 Enabling Remote Access . . . .31 Committing Your Changes . . . .32
JUNOS offers a rich and flexible set of features for configuring and managing user accounts, authentication, and permissions. This chapter gives you what you need on day one, as well as a few references for when you are ready to take advantage of the more advanced capabilities of JUNOS Software.
Creating Login Banners
You can create login banners for those who post messages and an-nouncements to those who access the device. You might want to config-ure an initial login message now, before you create any user accounts.
Login Message
A login message displays a banner to all users when they access the device, before they log in. The message can be split over multiple lines by using \n (newline, equivalent to a carriage return and line feed) as a
delimiter:
set system login message “ Welcome \n to \n JUNOS Training\n “
After you set up the message above, any user accessing your device sees it displayed on their screen. For example, if the remote client is using the Secure Shell (SSH): $ ssh juniper1 Welcome to JUNOS Training root@juniper1’s password:
TIP Use the login message to warn others that unauthorized access to your device is prohibited (ask your legal department for the preferred state-ment in your organization):
set system login message “WARNING: Unauthorized access is an offense”
Login Announcement
Sometimes you want to make announcements only to authorized users
after they have logged in. For example, you may want to announce an upcoming maintenance event. Use the set system login announcement
command when you want to restrict your announcement to only authorized users:
set system login announcement “Maintenance scheduled 11PM to 2AM tonight”
Configuring Login Accounts
JUNOS requires that all users have a predefined account before they can log in to the device. Further, you can configure the login accounts to restrict who has access to what on your device. The accounts can be set up with a local user and password, as well as with local users and user templates that depend upon remote servers to provide authentica-tion either using the RADIUS or TACACS+ protocols (discussed later).
Local User and Password
Set up local users with a name and password with the following steps, and then add their user class in the next section.
1. To begin setup, navigate to the [edit system login] section of the
configuration:
[edit]
root@juniper1# edit system login
[edit system login] root@juniper1#
2. Add a new user using their assigned account login name. This example creates a new user with username jadmin:
[edit system login]
root@juniper1# edit user jadmin
3. You can also configure a full descriptive name for the account. If the full name includes spaces, enclose the entire name in quotes:
[edit system login user jadmin]
root@juniper1# setfull-name "Juniper Network Administrator"
4.Set the user identifier (UID) for the account. As with Unix systems, the UID enforces user permissions and file access. If you don’t set the UID yourself, JUNOS assigns one for you. The format of the UID is a number in the range of 100 to 64000. To set a UID:
[edit system login user jadmin] root@juniper1# set uid 1250
5. Create a password for the user. As discussed in Chapter 2, you use the set command to create a password as plain text, and JUNOS
internally encrypts it:
[edit system login user jadmin]
root@juniper1# set authentication plain-text-password
New password: ####
By default, JUNOS locally authenticates all users who try to log into the software using the accounts provided in the configuration.
MORE? The user (and root) passwords can also be locally configured as encrypted passwords. Find out how to set these up in the Configuring User Accounts section of the Systems Basics Guide available at www. juniper.net/techpubs.
Login Classes
In addition to the user name and password, all user accounts require configuration of a login class. The login class defines the permissions for executable commands. As users enter commands in the command line, JUNOS checks the login class permission level for each command before accepting it. JUNOS comes with four pre-defined user login classes:
n super-user: all permissions
n operator:clear, network, reset, trace, and view permissions
n read-only: view permissions
n unauthorized:no permissions
For the new user created in the example above, set the login class as
super-user. You should always have at least one super-user set up
locally in the device:
[edit system login user jadmin] root@juniper1# set class super-user
How to set up custom login classes:
If you need more detailed permissions than are provided by the four default classes, you can create your own custom login classes. You can specify exactly which commands you want to include or exclude for each custom login class. In this way, you can create user classes tailored to the specific needs of each particular user group.
1. For example, you may want to create a custom login class just for network operations staff that you call netops:
2. For each login class you can specify which permissions you want to allow or deny, but this example keeps things simple by giving the netops
class access to everything:
set system login class netops permissions all
MORE? To find out more about user classes, including how you can set up your own user classes, see the chapter Configuring User Access in the System Basics Configuration Guide at www.juniper.net/techpubs.
Setting Up Remote Authentication
It’s common practice to use remote authentication servers to centrally store information about users (see Chapter 1). You can configure JUNOS to use one or more remote authentication servers, including RADIUS and TACACS+ servers.
To set up remote authentication in your JUNOS device, you need to configure the access to the server, the authentication order, and the local user accounts. Several options are available for mapping users authen-ticated by remote servers to the locally defined user accounts of the device.
The following examples include the method of using the remote
tem-plate account. The username remote is a special case in JUNOS. It acts
as a template for users who are authenticated by a remote RADIUS or TACACS+ server, but do not have a locally-configured user account on the device. In this method, JUNOS applies the permissions of the remote
template to those authenticated users without a locally defined account. All users mapped to the remote template are of the same login class.
NOTE Another method for mapping remotely authenticated users is to set up a common shared account for all users of the same user class. Use this method when you need more than one type of template for remote users. See Creating a Local Template Account in the Administration Guide of JUNOS documentation at www.juniper.net/techpubs.
How to start the configuration for authentication by a RADIUS server:
Use the following steps to start the set up of user authentication by a RADIUS server. Complete the set up with steps 3 and 4 below.
1. Enter the RADIUS configuration statement:
set system radius-server 172.26.27.5
2. You can also include a shared secret in the command statement and, if necessary, the port number:
set system radius-server 172.26.27.5 port 1845 set system radius-server 172.26.27.5 secret Jun1p3r
How to start the configuration for authentication by a TACACS+ server:
Use the following steps to start the set up of user authentication by a TACACS+ server. Complete the set up with steps 3 and 4 below.
1. Enter the TACACS+ configuration statement:
set system tacplus-server 172.26.27.6
2. You can also include a shared secret, and if necessary the port number, in the command statement:
set system tacplus-server 172.26.27.6 port 49
set system tacplus-server 172.26.27.6 secret Jun1p3r
How to specify the login methods:
3. Specify the order in which JUNOS should attempt authentication:
set system authentication-order [ radius tacplus password ]
The above example assumes your network includes both RADIUS and TACACS+ Servers. Nonetheless, youmust include this command as part of the steps toconfigure the RADIUS and/or TACACS+ configu-rations. In this example, whenever a user attempts to log in, JUNOS begins by querying the RADIUS server for authentication. If it fails, it next attempts authentication with the TACACS+ server, and finally the locally configured user accounts.
ALERT! If the password option is not set (and the authentication server(s) are available), JUNOS does not make an attempt to authenticate with local passwords.
How to complete the configuration for authentication by a remote server:
4. Each user needs a locally defined username (such as adminjlk in this
example), or you can establish the default remote user. If a given
authenticated user name is not found locally on the device, then it defaults to the settings of the remote template:
set system login user adminjlk class super-user set system login user remote class super-user
How to verify the configuration of remote authentication server(s):
1. If all is correct on the server, you should see the following messages in the syslog message file. Note that in order to use this verification you need to first configure system logging, as described in Chapter 5:
root@juniper1> show log messages
Apr 22 13:38:58 juniper1 sshd[17859]: Accepted password for adminjlk from 172.30.48.10 port 61729 ssh2
If the user has no login on the RADIUS server, the message logs include the error message:
Apr 22 13:40:57 juniper1 sshd[17873]: Failed password for username from 172.30.48.10 port 64844 ssh2
2. You can also show the SSH session connections:
root@juniper1> show system connections
Active Internet connections (including servers)
Proto Recv-Q Send-Q Local Address Foreign Address (state) tcp4 0 48 172.30.53.101.22 172.30.48.10.61729 ESTABLISHED
Enabling Remote Access
SSH, telnet, and FTP are widely-used standards for remotely logging into network devices and exchanging files between systems. Before autho-rized users can access your device, or your device can exchange data with other systems, you must configure one or more of these enabling services. They are all disabled by default in JUNOS.
SSH is telnet’s successor and is the recommended method for remote access. SSH encrypts all traffic, including passwords, to effectively eliminate eavesdropping, connection hijacking, and other attacks. The SSH utility includes SCP (secure copy), a file transfer program that uses SSH and is the recommended method for secure file exchange.
Use the following commands to set up the services that are needed in your device:
set system services ftp set system services telnet set system services ssh
BEST PRACTICE Since both telnet and FTP are legacy applications that use clear text passwords (therefore creating a potential security vulnerability), it’s recommended that you use SSH (and SCP). If you don’t intend to use FTP or telnet, it’s not required to configure them on your device. However, don’t forget to consider that some users may use FTP to store configuration templates, retrieve software, or other administrative tasks.
Committing Your Changes
Before leaving this chapter, don’t forget to commit your work so that it becomes a part of the active configuration.
Configuring SNMP
Configuring SNMP Communities . . . .34 Configuring SNMP Traps . . . 37 Applying the Configuration Group . . . .38 Configuring SNMP System Details . . . .39 Configuring View Based Access Control . . . .40 Committing Your Changes . . . .42
At this point, configuration of the base system and users is completed, so the next two chapters move on to basic configuration of the man-agement functions in your device. Chapter 4 discusses how to config-ure Simple Network Management Protocol (SNMP), and Chapter 5 introduces additional management tools. The Day One goal is to integrate your new JUNOS device into your existing network manage-ment infrastructure as quickly and easily as possible.
Because many network management systems are currently based on SNMP, support for that protocol is a key feature of any network device’s instrumentation.
JUNOS includes an onboard SNMP agent to provide remote manage-ment applications with access to a variety of detailed information. The SNMP agent in JUNOS supports SNMPv1, SNMPv2c, and SNMPv3 protocols, thereby enabling interoperability with a majority of the management applications on the market today. A set of both industry-standard and enterprise-specific management information bases (MIBs) are available.
ALERT! By default, JUNOS ships with the SNMP agent disabled. Follow the steps of this chapter to set up SNMP in your device.
Configuring SNMP Communities
Configuring the SNMP agent in JUNOS is a straightforward task that shares many familiar settings common to other managed devices in your network.
For example, you need to configure JUNOS with an SNMP community string and a destination for traps. Community strings are administra-tive names that group collections of devices (and the agents that are running on them) together into common management domains (see Chapter 1). Basically, if a manager and an agent share the same community, they can talk to one another.
An SNMP community defines the level of authorization granted to its members, such as which MIB objects are available, which operations (read-only or read-write) are valid for those objects, and which SNMP clients are authorized, based on their source IP addresses.
Try It Yourself:
Getting Online Help
Before you begin, look at the online help available in operational mode as it relates to SNMP. Find out what configuration options JUNOS supports in your software version:
jadmin@juniper1> help reference snmp community
Get more detailed usage guidelines for a topic or configuration statement:
jadmin@juniper1> help topic snmp community
Finally, get a list of all the JUNOS Software commands where SNMP statements occur:
jadmin@juniper1> help apropos snmp
Configuration Groups
Make things easier for yourself by placing your common SNMP configuration settings inside a JUNOS configuration group (see Chapter 6). Not only does a configuration group help to keep all your customized configuration statements in one place, it also helps you to copy templates between devices later on.
To create a new configuration group that you name common, enter the
following in configuration mode:
edit groups common
You can now add your SNMP configuration statements to the common
group and later apply them where you want in the configuration.
NOTE The examples in Chapters 4, 5, and 6 use jadmin as the user account.
How to create a read-only SNMP community:
1. Refer to what you recorded in Chapter 1 as the community string of the SNMP community used in your network. This example uses the de facto standard name public to create a community that gives limited
read-only access:
[edit groups common]
2. Now focus your configuration statements onto this new branch of the configuration hierarchy:
edit snmp community public
3. Define the authorization level for the community:
[edit groups common snmp community public]
set authorization read-only
In the above command you are confining the public community to
read-only access. Now any SNMP client (for example, an SNMP management system) that belongs to the public community can read
MIB variables but cannot set (change) them.
4. Define a list of clients in the public community who are authorized
to communicate with the SNMP agent in JUNOS. List the clients by IP address and prefix. Typically the list includes the SNMP network management system in your network, or the address of your management network. The following statement defines the network 192.168.1.0 (and any host within it) as being authorized:
set clients 192.168.1.0/24
5. Define the clients that are not authorized within the public
community by specifying their IP address, followed by therestrict
statement:
set clients 0.0.0.0/0 restrict
How to create a read-write SNMP community:
You can also define a community whose members have read-write access to the JUNOS device.
1. If you are following along from the previous example, go back up one level in the configuration hierarchy in order to create a new community. You also want to place this new community inside the JUNOS configuration group called common. Check that you are in this
branch of the configuration by the edit banner:
jadmin@juniper1# up
[edit groups common snmp] jadmin@juniper1#
2. This example uses the de facto standard community string private
to identify the community granted read-write access to the SNMP agent running on the device:
edit community private
3. Use the following commands to set the authorization level, set the clients, and to specify the IP address for those with authorized access:
set authorization read-write set clients 192.168.1.15/24 set clients 0.0.0.0/0 restrict
NOTE A later section discusses how to control access to specific branches of the SNMP MIB tree by defining MIB views and assigning them to SNMP communities.
Configuring SNMP Traps
Traps are unsolicited messages sent from an SNMP agent to remote network management systems or trap receivers. Many enterprises use SNMP traps as part of a fault-monitoring solution, in addition to system logging (see Chapter 5). In JUNOS, SNMP traps are not forwarded by default, so you must configure a trap-group if you wish to use SNMP traps.
How to configure a trap-group:
1. Create a single, consistent source address that JUNOS applies to all outgoing traps in your device. A source address is useful, because although most JUNOS devices have a number of outbound interfaces, using one source address helps a remote NMS to correlate the source of the traps to an individual device:
jadmin@juniper1# edit groups common snmp
[edit groups common snmp]
jadmin@juniper1# set trap-options source-address lo0
The above commands place the statement inside the common config-
uration group that you have defined. It uses the IP address of the loopback interface lo0 (see Chapter 2) as the source address for all
the SNMP traps that originate from the device.
2. Create a trap-group where you can list the types of traps to be forwarded and the targets (i.e., addresses) of the receiving remote management systems:
The above command creates a trap-group called managers which
allows SNMP version 2 formatted notifications (i.e., traps) to be sent to the host at address 192.168.1.15. This statement forwards all categories of traps.
3. Use the categories statement to define the specific subset of trap
categories to be forwarded.
set trap-group managers version v2 targets 192.168.1.15 categories authentication
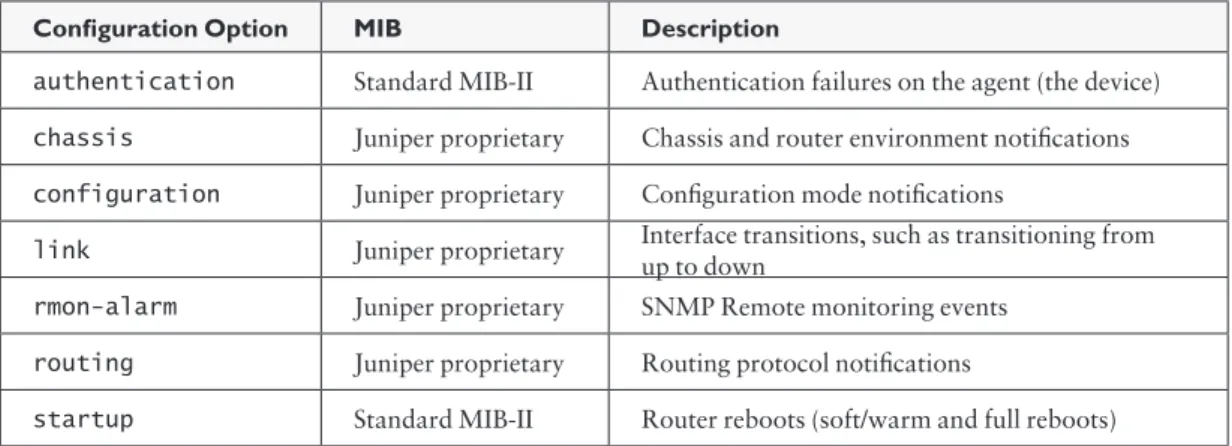
Table 4.1 lists a variety of trap categories used in JUNOS.
Table 4.1 JUNOS SNMP Trap Categories
Configuration Option MIB Description
authentication Standard MIB-II Authentication failures on the agent (the device)
chassis Juniper proprietary Chassis and router environment notifications
configuration Juniper proprietary Configuration mode notifications
link Juniper proprietary Interface transitions, such as transitioning from up to down
rmon-alarm Juniper proprietary SNMP Remote monitoring events
routing Juniper proprietary Routing protocol notifications
startup Standard MIB-II Router reboots (soft/warm and full reboots)
Applying the Configuration Group
So far in this chapter you have been placing all of your SNMP configu-ration statements inside a JUNOS configuconfigu-ration group named common.
And you’ve used a configuration group with the intention of making things easier later on. At some point in the future you might want to reuse the common statements elsewhere in the configuration, or copy
them to other devices.
Now, in order for the statements within the common configuration
group to be recognized by the JUNOS Software, you have to apply them:
jadmin@juniper1# top
[edit]
jadmin@juniper1# set apply-groups common
This example applies the JUNOS configuration group called common at
the top of the configuration, so the group applies to all parts of the configuration.
ALERT! Where you apply configuration groups within the configuration is important, as only that specific hierarchy level (and below) inherits the group statements. Further, the ordering of configuration groups is important, as JUNOS inherits statements in the order that they are applied.
VERIFY Have you committed the trap settings? If so, you can perform a quick test to confirm that you have configured SNMP traps correctly. This example generates an authentication failure trap (i.e., the SNMP agent received a request with an unknown community), although other traps types can also be spoofed:
jadmin@juniper1> request snmp spoof-trap authenticationFailure
Spoof-trap request result: trap sent successfully
Configuring SNMP System Details
You can use SNMP to store basic administrative details, such as a contact name and the location of the device. Your management system can then retrieve these remotely, when you’re troubleshooting a problem or performing an audit. In SNMP terminology, these are the
sysContact, sysDescription, and sysLocation objects found within the system group of MIB-2 (as per RFC 1213). You can set initial values directly via a simple JUNOS configuration process.
How to set the system contact details:
1. Set the system contact details by including the contact statement in
the [edit snmp] hierarchy of the configuration, or under an
appropriate configuration group as explained above: