Landmann
Red Hat Certificate System 8.0
Install Guide
Installing Red Hat Certificate System 8.0
Edition 8.0.13
Installing Red Hat Certificate System 8.0
Edition 8.0.13
Landmann
Copyright © 2009 Red Hat, Inc..
This document is licensed by Red Hat under the Creative Commons Attribution-ShareAlike 3.0 Unported License. If you distribute this document, or a modified version of it, you must provide attribution to Red Hat, Inc. and provide a link to the original. If the document is modified, all Red Hat trademarks must be removed.
Red Hat, as the licensor of this document, waives the right to enforce, and agrees not to assert, Section 4d of CC-BY-SA to the fullest extent permitted by applicable law.
Red Hat, Red Hat Enterprise Linux, the Shadowman logo, JBoss, MetaMatrix, Fedora, the Infinity Logo, and RHCE are trademarks of Red Hat, Inc., registered in the United States and other countries. Linux ® is the registered trademark of Linus Torvalds in the United States and other countries. Java ® is a registered trademark of Oracle and/or its affiliates.
XFS ® is a trademark of Silicon Graphics International Corp. or its subsidiaries in the United States and/or other countries.
MySQL ® is a registered trademark of MySQL AB in the United States, the European Union and other countries.
Node.js ® is an official trademark of Joyent. Red Hat Software Collections is not formally related to or endorsed by the official Joyent Node.js open source or commercial project.
The OpenStack ® Word Mark and OpenStack Logo are either registered trademarks/service marks or trademarks/service marks of the OpenStack Foundation, in the United States and other countries and are used with the OpenStack Foundation's permission. We are not affiliated with, endorsed or
sponsored by the OpenStack Foundation, or the OpenStack community. All other trademarks are the property of their respective owners.
Abstract
This guide explains how to install and configure Red Hat Certificate System subsystems, as well as covering some basic administrative tasks and advanced installation techniques. This guide also lists the supported platforms and dependencies for Red Hat Certificate System; for other information, see the Release Notes.
. . . .
. . . .
. . . .
. . . .
Table of Contents
About This Guide
1. Examples and Formatting
1.1. Formatting for Examples and Commands 1.2. Tool Locations
1.3. Guide Formatting 2. Additional Reading 3. Giving Feedback 4. Document History
Chapter 1. Overview of Certificate System Subsystems
1.1. Subsystems for Managing Certificates 1.1.1. Certificate Manager
1.1.2. Registration Authority 1.1.3. Data Recovery Manager
1.1.4. Online Certificate Status Manager 1.2. Subsystems for Managing Tokens
1.2.1. Token Processing System 1.2.2. Token Key Service
1.2.3. Enterprise Security Client 1.3. Planning the Installation
Chapter 2. Prerequisites Before Installing Certificate System
2.1. Supported Platforms, Hardware, and Programs 2.1.1. Supported Platforms
2.1.2. Supported Web Browsers 2.1.3. Supported Smart Cards 2.1.4. Supported HSM
2.1.5. Supported Charactersets
2.2. Required Programs, Dependencies, and Configuration 2.2.1. Java Development Kit (JDK)
2.2.2. Apache
2.2.3. Red Hat Directory Server 2.2.4. Additional Packages
2.2.5. Firewall Configuration and iptables 2.2.6. SELinux Settings
2.3. Packages Installed on Red Hat Enterprise Linux 2.4. Required Information for Subsystem Configuration
2.5. Setting up Tokens for Storing Certificate System Subsystem Keys and Certificates 2.5.1. Types of Hardware Tokens
2.5.1.1. Internal Tokens 2.5.1.2. External Tokens
2.5.1.3. Hardware Cryptographic Accelerators
2.5.2. Using Hardware Security Modules with Subsystems 2.5.2.1. Adding or Managing the HSM Entry for a Subsystem 2.5.2.2. Using Chrysalis LunaSA HSM
2.5.2.3. Installing External Tokens and Unsupported HSM 2.5.2.4. Setting up SELinux on nCiper netHSM 2000 2.5.3. Viewing Tokens
2.5.4. Detecting Tokens
Chapter 3. Installation and Configuration
3.1. Overview of Installation 5 5 5 5 5 6 7 7 9 9 10 10 10 11 11 12 12 12 12 14 14 14 14 15 15 15 16 16 16 17 17 18 18 18 19 21 21 21 21 21 22 22 22 24 25 25 25 26 26
. . . . . . . . . . . . . . . . . . . . . . . . 3.2. Installing the Certificate System Packages
3.2.1. Installing through yum 3.2.2. Installing from an ISO Image 3.3. Configuring a CA
3.4. Configuring an RA
3.5. Configuring a DRM, OCSP, or TKS 3.6. Configuring a TPS
Chapter 4 . Additional Installation Options
4.1. Requesting Subsystem Certificates from an External CA 4.2. Installing a CA with ECC Enabled
4.2.1. Loading a Third-Party ECC Module 4.2.2. Loading the Certicom ECC Module
4.3. Changing the Hashing Algorithm Used for Subsystem Keys 4.4. Enabling IPv6 for a Subsystem
4.5. Configuring Separate RA Instances
Chapter 5. Creating Additional Subsystem Instances
5.1. About pkicreate
5.2. Running pkicreate for a Single SSL Port 5.3. Running pkicreate with Port Separation
Chapter 6. Cloning Subsystems
6.1. About Cloning 6.1.1. Cloning for CAs 6.1.2. Cloning for DRMs
6.1.3. Cloning for Other Subsystems 6.1.4. Cloning and Key Stores 6.1.5. LDAP Considerations
6.2. Exporting Keys from a Software Database 6.3. Cloning a CA
6.4. Cloning OCSP Subsystems
6.5. Cloning DRM and TKS Subsystems 6.6. Converting Masters and Clones
6.6.1. Converting CA Clones and Masters 6.6.2. Converting OCSP Clones
6.7. Updating CA Clones
Chapter 7. Silent Configuration
7.1. About pkisilent
7.2. Silently Configuring Subsystem 7.3. Cloning a Subsystem Silently
7.4. Performing Silent Configuration Using an External CA
Chapter 8. Updating and Removing Subsystem Packages
8.1. Updating Certificate System Packages 8.2. Uninstalling Certificate System Subsystems
8.2.1. Removing a Subsystem Instance
8.2.2. Removing Certificate System Subsystem Packages
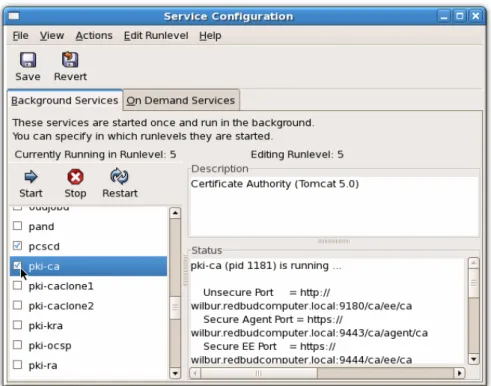
Chapter 9. Using Certificate System
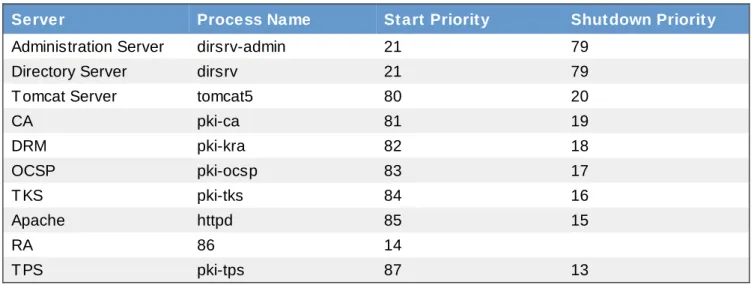
9.1. Starting the Certificate System Console 9.2. Starting, Stopping, and Restarting an Instance 9.3. Starting the Subsystem Automatically
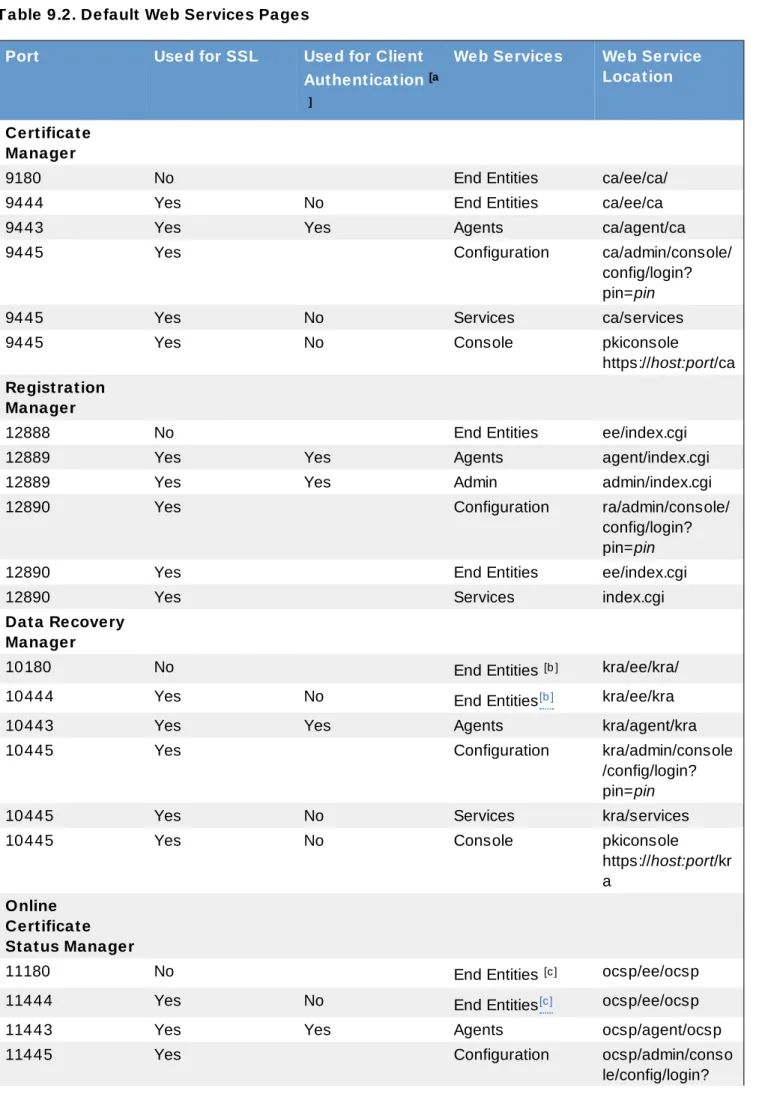
9.4. Finding the Subsystem Web Services Pages
27 28 29 29 37 42 47 55 55 57 57 58 62 63 64 68 68 71 71 73 73 74 75 75 75 76 76 76 79 82 85 85 86 87 88 88 93 96 97 100 100 101 101 101 103 103 103 103 105
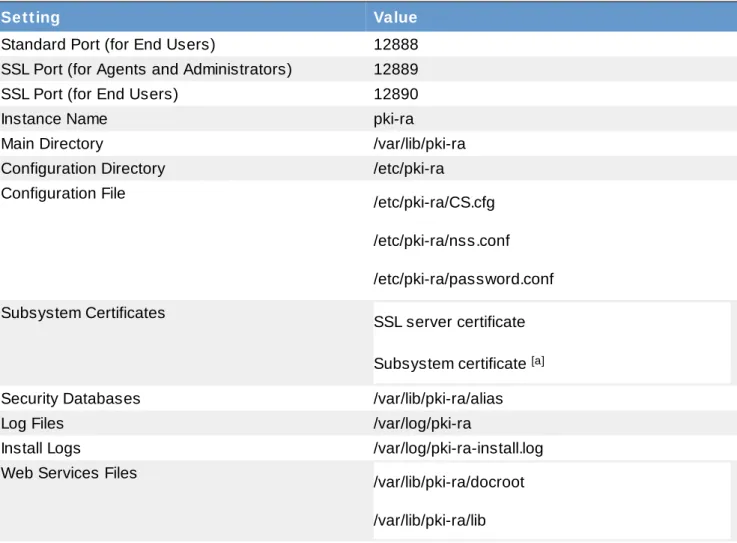
. . . . 9.5.2. Default RA Instance Information
9.5.3. Default DRM Instance Information 9.5.4. Default OCSP Instance Information 9.5.5. Default TKS Instance Information 9.5.6. Default TPS Instance Information
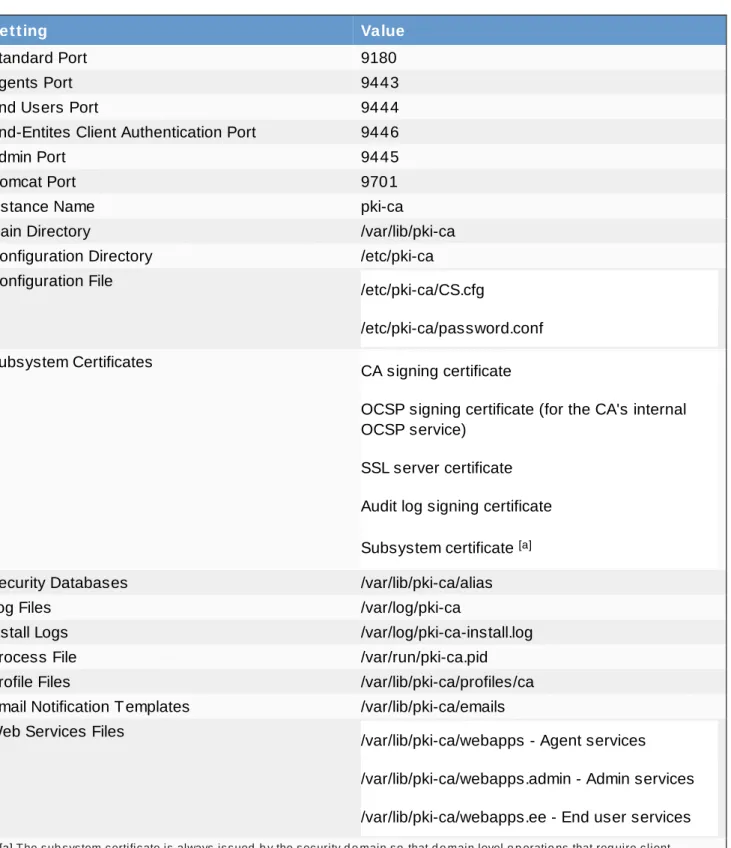
9.5.7. Shared Certificate System Subsystem File Locations
Index A C E H I K P S T 110 111 112 113 114 115 117 117 117 117 117 117 118 118 118 118
About This Guide
This guide explains how to install and configure Red Hat Certificate System subsystems, as well as covering some basic administrative tasks and advanced installation techniques. This guide also lists the supported platforms and dependencies for Red Hat Certificate System; for other information, see the Release Notes.
The Certificate System Deployment Guide explains different usage scenarios, and it is a good idea to understand the major concepts in that guide before installing the Certificate System subsystems. The Certificate System Administrator's Guide covers all of the administrative tasks of Red Hat Certificate System, such as configuring logging, setting up certificate and CRL publishing, requesting and issuing certificates, and building CRLs.
Certificate System agents should refer to the Certificate System Agent's Guide for information on performing agent tasks, such as handling certificate requests and revoking certificates. For information on using Certificate System to manage smart cards and security tokens, see Managing Smart Cards with the Enterprise Security Client.
1. Examples and Formatting
1.1. Formatting for Examples and Commands
All of the examples for Red Hat Certificate System commands, file locations, and other usage are given for Red Hat Enterprise Linux 5 (32-bit) systems. Be certain to use the appropriate commands and files for your platform.
Example 1. Example Command To start the Red Hat Certificate System:
service pki-ca start
1.2. Tool Locations
All of the tools for Red Hat Certificate System are located in the /usr/bin directory. These tools can be run from any location without specifying the tool location.
1.3. Guide Formatting
Certain words are represented in different fonts, styles, and weights. Different character formatting is used to indicate the function or purpose of the phrase being highlighted.
Formatting Style Purpose
Monospace font Monospace is used for commands, package names, files and directory paths, and any text displayed in a prompt.
Monospace with a background
This type of formatting is used for anything entered or returned in a command prompt.
Italicized text Any text which is italicized is a variable, such as
to emphasize a new term or other phrase.
Bolded text Most phrases which are in bold are application names, such as Cygwin, or are fields or options in a user interface, such as a User Nam e Here: field or Save button.
Other formatting styles draw attention to important text.
NOTE
A note provides additional information that can help illustrate the behavior of the system or provide more detail for a specific issue.
IMPORTANT
Important information is necessary, but possibly unexpected, such as a configuration change that will not persist after a reboot.
WARNING
A warning indicates potential data loss, as may happen when tuning hardware for maximum performance.
2. Additional Reading
The documentation for Certificate System includes the following guides:
Certificate System Deployment Guide describes basic PKI concepts and gives an overview of the planning process for setting up Certificate System.
This manual is intended for Certificate System administrators.
Certificate System Installation Guide covers the installation process for all Certificate System subsystems.
This manual is intended for Certificate System administrators.
Certificate System Administrator's Guide explains all administrative functions for the Certificate System. Administrators maintain the subsystems themselves, so this manual details backend configuration for certificate profiles, publishing, and issuing certificates and CRLs. It also covers managing subsystem settings like port numbers, users, and subsystem certificates.
This manual is intended for Certificate System administrators.
Certificate System Agent's Guide describes how agents — users responsible for processing
certificate requests and managing other aspects of certificate management — can use the Certificate System subsystems web services pages to process certificate requests, key recovery, OCSP
requests and CRLs, and other functions.
This manual is intended for Certificate System agents.
Managing Smart Cards with the Enterprise Security Client explains how to install, configure, and use the Enterprise Security Client, the user client application for managing smart cards, user certificates,
security officers), and regular end users.
Using End User Services is a quick overview of the end-user services in Certificate System, a simple way for users to learn how to access Certificate System services.
This manual is intended for regular end users.
Certificate System Command-Line Tools Guide covers the command-line scripts supplied with Red Hat Certificate System.
This manual is intended for Certificate System administrators.
Certificate System Migration Guide covers version-specific procedures for migrating from older versions of Certificate System to Red Hat Certificate System 8.0.
This manual is intended for Certificate System administrators.
Release Notes contains important information on new features, fixed bugs, known issues and workarounds, and other important deployment information for Red Hat Certificate System 8.0. All of the latest information about Red Hat Certificate System and both current and archived documentation is available at http://www.redhat.com/docs/manuals/cert-system/.
3. Giving Feedback
If there is any error in this Installation Guide or there is any way to improve the documentation, please let us know. Bugs can be filed against the documentation for Red Hat Certificate System through Bugzilla, http://bugzilla.redhat.com/bugzilla. Make the bug report as specific as possible, so we can be more effective in correcting any issues:
Select the Red Hat Certificate System product.
Set the component to Doc - quick install guide. Set the version number to 8.0.
For errors, give the page number (for the PDF) or URL (for the HTML), and give a succinct description of the problem, such as incorrect procedure or typo.
For enhancements, put in what information needs to be added and why.
Give a clear title for the bug. For example, "Incorrect com m and exam ple for setup script options" is better than "Bad exam ple".
We appreciate receiving any feedback — requests for new sections, corrections, improvements,
enhancements, even new ways of delivering the documentation or new styles of docs. You are welcome to contact Red Hat Content Services directly at [email protected].
4. Document History
Revision 8.0.12 September 16, 2010 Ella Deon Lackey Adding extra step for setting SELinux context on files used for cloning, per Bugzilla #627054.
Adding required additional parameters for the second step in using pkisilent with an external CA and the key_algorithm, per Bugzilla #631003.
Revision 8.0.11 June 1, 2010 Ella Deon Lackey
Adding back Mac support, on a new platform (10.5.8), per Errata RHBA-2010:0448.
Revision 8.0.10 March 25, 2010 Ella Deon Lackey
Adding information on new end-entities client authentication port for the CA, related to the MitM resolution in Errata RHBA-2010:0169.
Revision 8.0.9 February 18, 2010 Ella Deon Lackey Changing LunaSA setup, per Bugzilla 537529.
Correcting the cs_port definition, per Bugzilla 533303.
Revision 8.0.8 December 21, 2009 Ella Deon Lackey Updating platform support to include 64-bit Windows platforms, per Errata RHBA-2009:1687. Revision 8.0.7 November 25, 2009 Ella Deon Lackey
Updating the pkisilent documentation and expanding the CA configuration section to add ability to specify the CA siging algorithm at installation, per Errata RHBA-2009:1602.
Revision 8.0.6 November 12, 2009 Ella Deon Lackey Updating the Certicom ECC configuration per comment #3 in Bugzilla 507428.
Correcting the 'rpm -qi' example in checking prerequisites, per QE feedback. Adding note about (no) 64-bit support for ESC.
Revision 8.0.5 November 3, 2009 Ella Deon Lackey
Adding information on setting the NSS_USE_DECODED_CKA_EC_POINT environment variable for the console and clarifying the security database argument in the modutil step for configuring the Certicom ECC module.
Revision 8.0.4 August 28, 2009 Ella Deon Lackey
Removing the draft watermarks.
Tech reviews for chapter 2 (prerequisites) and chapter 9 (basic usage), per Bugzilla #510578 and #510587.
Revision 8.0.3 August 11, 2009 Ella Deon Lackey
Tech reviews for chapter 8, per Bugzilla #510586.
Adding extra bullet point on using unique certificate nicknames for HSMs, related to Bugzilla #510987.
Revision 8.0.2 August 3, 2009 Ella Deon Lackey
Tech reviews for chapter 4, per Bugzilla #510580.
Revision 8.0.1 July 26, 2009 Ella Deon Lackey
Tech reviews for chapters 1, 3, 5, 6, and 7, per Bugzilla #510577, #510579, #510581, #510582, #510585.
Adding a section for configuring netHSM to work with SELinux, per Bugzilla #513312, with cross references in the instance configuration sections.
Revision 8.0.0 July 22, 2009 Ella Deon Lackey
Chapter 1. Overview of Certificate System Subsystems
Red Hat Certificate System is a highly configurable set of components which create and manage certificates and keys at every point of the certificate lifecycle. Certificate System is based on open standards so that it effectively creates a scalable, customizable, and robust public-key infrastructure (PKI).
Certificate System has subsystems which discretely handle different PKI management functions. These subsystems interact in flexibly established ways to manage certificates and to manage tokens.
1.1. Subsystems for Managing Certificates
Up to four Certificate System subsystems work together to manage certificates:
Certificate Manager, a certificate authority (CA) which issues, renews, and revokes certificates and publishes certificate revocation lists (CRLs)
Data Recovery Manager (DRM), which archives and recovers keys
Online Certificate Status Manager (OCSP), which processes requests for certificates' revocation status
Registration Authority (RA), which validates and approves certificate requests locally and then forwards approval to the CA to issue the certificates
The core of the Certificate System is the Certificate Manager. This is the only required subsystem and handles the actual certificate management tasks. The other subsystems can be added for additional functionality (the DRM) or to move the load for some common operations off of the CA, such as using an OCSP for status requests and an RA to process certificate requests.
The CA, RA, DRM, and OCSP are the subsystems used to manage certificates, keys, and CRLs, through every step of the cycle of a certificate:
1. Generating a certificate request (CA or RA) 2. Submitting the request to a CA (CA or RA) 3. Generating key pairs (CA)
4. Storing the key pairs (DRM) 5. Issuing the certificate (CA)
6. Recovering the keys if the certificate is lost (DRM) 7. Revoking the certificate (CA)
8. Checking whether the certificate is revoked or active when an entity tries to use the certificate for authentication (OCSP)
All of the subsystems (CA, RA, DRM, and OCSP, as well as the token subsystems) are organized together in security domains. Security domains define communication between subsystems, and this makes the Certificate System very efficient. For example, if a user needs to archive keys, the request can be processed by the first available DRM in the domain, automatically. The available DRMs in the domain are automatically updated every time a new DRM is configured.
1.1.1. Certificate Manager
The Certificate Manager subsystem is a certificate authority. It issues, renews, revokes, and publishes a wide variety of certificates: for servers, for users, for routers, for other subsystems, and for file or object signing. The Certificate Manager also compiles and publishes CRLs.
Certificate Managers can be structured in series (hierarchy), so that one Certificate Manager sets policies and issues signing certificates to a subordinate CA. The highest Certificate Manager in the chain is a root CA.
A special kind of certificate is used by CAs to sign certificates they issue, sort of like a stamp or seal. This is called a CA signing certificate. A subordinate CA is issued a CA signing certificate by a CA higher in the hierarchy, and the parameters of the CA signing certificate are set by the superior CA. A CA which issues its own signing certificate has a self-signed certificate. There are benefits to having a self-signed CA certificate for your root CA, as well as some benefits to having the certificate signed by a third-party CA.
Additionally, a Certificate Manager is always the subsystem which works as the registry for the security domain. The very first Certificate Manager configured must create a security domain, but every
Certificate Manager configured after has the option of joining an existing security domain rather than creating a new one. The configuration of your PKI deployment determines whether you need multiple security domains; for more information, see the Red Hat Certificate System Deployment Guide.
1.1.2. Registration Authority
The Registration Authority subsystem handles certain certificate issuing tasks locally, such as
generating and submitting certificate requests. This effectively makes the RA a load-balancer for the CA; a local RA can receive and verify the legitimacy of a certificate request (authenticate it) and then forward valid requests to the CA to issue the certificate. Certificates can also be retrieved through the RA and the status of the request can be checked through the RA, both of which lower demand on the CA. The RA is normally set up outside of the firewall, and the CA is set up behind the firewall so that requests can be submitted to Certificate System externally, while the CA is protected.
The RA accepts requests for a smaller number of certificate types than the CA, including user, server, and router certificates.
The Data Recovery Manager (DRM) is a key recovery authority, which means it works with the Certificate Manager when a certificate is issued and stores private encryption keys. Those private keys can be restored (in a PKCS #12 file) if a certificate is lost.
NOTE
The DRM only archives encryption keys, not signing keys, because that compromises the non-repudiation properties of signing keys. Non-non-repudiation means that a user cannot deny having performed some action, such as sending an encrypted email, because they are the only possessor of that key.
1.1.4. Online Certificate Status Manager
The Online Certificate Status Manager is an OCSP service, external to the Certificate Manager. Although the Certificate Manager is configured initially with an internal OCSP service, an external OCSP responder allows the OCSP subsystem to be outside the firewall and accessible externally, while keeping the Certificate Manager behind the firewall. Like the RA, the OCSP acts as a load-balancer for requests to the Certificate Manager.
The Online Certificate Status Manager verifies the status of a certificate by checking a certificate
revocation list, published by the Certificate Manager, to see if the specified certificate has been revoked. More than one Certificate Manager can publish CRLs to a single OCSP.
1.2. Subsystems for Managing Tokens
Two subsystems are required to manage tokens:Token Processing System (TPS), which accepts operations from a token and forwards them to the CA (for processing certificate requests, renewal, issuing, and revocation) and to the DRM (to archive or restore keys)
Token Key Service (TKS), which generates master keys and symmetric keys for the TPS to use when communicating with other subsystems
Q: A: Q: A: Q: A:
1.2.1. Token Processing System
The Token Processing System (TPS) is the conduit between the user-centered Enterprise Security Client, which interacts with the tokens, and the Certificate System backend subsystems, such as the Certificate Manager. The TPS is required in order to manage smart cards.
The TPS communicates with the CA and DRM for processing token operations. The TPS also communicates with the TKS to derive token-specific secret keys.
1.2.2. Token Key Service
The Token Key Service (TKS) uses a master key to derive specific, separate keys for every smart card. The TPS uses these secret keys to communicate with each smart card securely, since all
communication between the TPS and the smart card is encrypted.
The only Certificate System subsystem which the TKS interacts with is the TPS.
1.2.3. Enterprise Security Client
The Enterprise Security Client is not a subsystem since it does not perform any operations with certificates, keys, or tokens. The Enterprise Security Client, as the name implies, is a user interface which allows people to manage certificates on smart cards very easily. The Enterprise Security Client sends all token operations, such as certificate requests, to the TPS, which then sends them to the CA.
1.3. Planning the Installation
Before beginning to install and configure the Certificate System subsystems, determine what the organization of the PKI is.
What types of subsystems do you need to install?
This depends on the kind of functionality you need and the load you expect to have. There are several different kinds of subsystems for managing certificates (Section 1.1, “Subsystems for Managing Certificates”) and for managing tokens (Section 1.2, “Subsystems for Managing Tokens”).
How many subsystems do you need to install?
This depends very much on the expected load and also on geographical or departmental divisions. Subsystems can be cloned, meaning they essentially are clustered, operating as a single unit, which is good for load balancing and high availability. Additionally, security domains create trusted relationships between subsystems, allowing them to work together to find available subsystems to respond to immediate needs. Multiple security domains can be used in a single PKI, with multiple instances of any kind of subsystem.
Will the subsystem certificates and keys be stored on the internal software token in Certificate System or on an external hardware token?
Certificate System supports two hardware security modules (HSM): nCipher netHSM 2000 and Safenet LunaSA. Using a hardware token can require additional setup and configuration before installing the subsystems, but it also adds another layer of security.
A: Q: A: Q: A: Q: A:
This depends on the network design. The RA and OCSP subsystems are specifically designed to operate outside a firewall for user convenience, while the CA, DRM, and TPS should all be secured behind a firewall.
To what security domain should a subsystem instance be added?
Because the subsystems within a security domain have trusted relationships with each other, it is important what domain a subsystem joins. Security domains can have different certificate issuing policies, different kinds of subsystems within them, or a different Directory Server database. Map out where (both on the physical machine and in relation to each other) each subsystem belongs, and assign it to the security domain accordingly.
Should a subsystem be cloned?
Cloned subsystems work together, essentially as a single instance. This can be good for high demand systems, failover, or load balancing, but it can become difficult to maintain. For example, cloned CAs have serial number ranges for the certificates they issue, and a clone could hit the end of its range.
Should the Certificate Manager be a self-signed root CA or a subordinate CA?
A Certificate Manager can be configured as either a root CA or a subordinate CA. The difference between a root CA and a subordinate CA is who signs the CA signing certificate. A root CA signs its own certificate. A subordinate CA has another CA (either internal or external) sign its certificate. A self-signing root CA issues and signs its own CA signing certificate. This allows the CA to set its own configuration rules, like validity periods and the number of allowed subordinate CAs.
A subordinate CA has its certificates issued by a public CA or another Certificate System root CA. This CA is subordinate to the other CA's rules about its certificate settings and how the certificate can be used, such as the kinds of certificates that it can issue, the extensions that it is allowed to include in certificates, and the levels of subordinate CAs the subordinate CA can create.
One option is to have the Certificate manager subordinate to a public CA. This can be very restrictive, since it introduces the restrictions that public CAs place on the kinds of certificates the subordinate CA can issue and the nature of the certificate chain. On the other hand, one benefit of chaining to a public CA is that the third party is responsible for submitting the root CA certificate to a web browser or other client software, which is a major advantage for certificates that are
accessed by different companies with browsers that cannot be controlled by the administrator. The other option is make the CA subordinate to a Certificate System CA. Setting up a Certificate System CA as the root CA means that the Certificate System administrator has control over all subordinate CAs by setting policies that control the contents of the CA signing certificates issued. It is easiest to make the first CA installed a self-signed root, so that it is not necessary to apply to a third party and wait for the certificate to be issued. Make sure that you determine how many root CAs to have and where both root and subordinate CAs will be located.
Chapter 2. Prerequisites Before Installing Certificate System
Before installing the Red Hat Certificate System subsystems, check out the requirements and dependencies for the specific platform, as well as looking at the installed packages.
2.1. Supported Platforms, Hardware, and Programs
2.1.1. Supported Platforms
The Certificate System subsystems (CA, RA, DRM, OCSP, TKS, and TPS) are supported on the following platforms:
Red Hat Enterprise Linux 5.3 (x86, 32-bit) Red Hat Enterprise Linux 5.3 (x86_64, 64-bit)
The Enterprise Security Client, which manages smart cards for end users, is supported on the following platforms:
Red Hat Enterprise Linux 5.3 (x86, 32-bit) Red Hat Enterprise Linux 5.3 (x86_64, 64-bit) Microsoft Windows Vista 32-bit
Microsoft Windows Vista 64-bit Microsoft Windows XP 32-bit Microsoft Windows XP 64-bit Apple Mac OS X 10.5.x (Leopard)
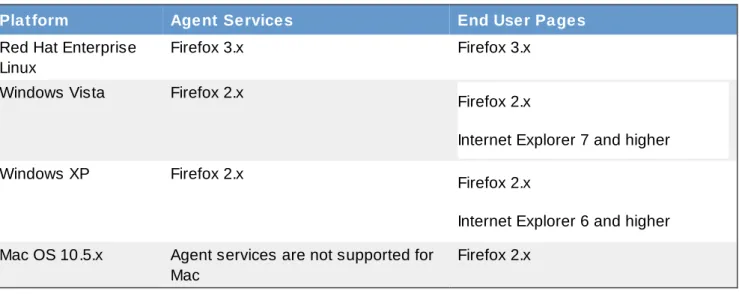
2.1.2. Supported Web Browsers
The services pages for the subsystems require a web browser that supports SSL. It is strongly recommended that users such as agents or administrators use Mozilla Firefox to access the agent services pages. Regular users should use Mozilla Firefox or Microsoft Internet Explorer.
NOTE
The only browser that is fully-supported for the HTML-based instance configuration wizard is Mozilla Firefox.
Table 2.1. Supported Web Browsers by Platform
Platform Agent Services End User Pages
Red Hat Enterprise Linux
Firefox 3.x Firefox 3.x
Windows Vista Firefox 2.x Firefox 2.x
Internet Explorer 7 and higher
Windows XP Firefox 2.x Firefox 2.x
Internet Explorer 6 and higher Mac OS 10.5.x Agent services are not supported for
Mac
Firefox 2.x
2.1.3. Supported Smart Cards
The Enterprise Security Client supports Global Platform 2.01-compliant smart cards and JavaCard 2.1 or higher.
The Certificate System subsystems have been tested using the following tokens:
Gemalto TOP IM FIPS CY2 64K token, both as a smart card and GemPCKey USB form factor key Gemalto Cyberflex e-gate 32K token
Safenet 330J Java smart card
Smart card testing was conducted using the SCM SCR331 CCID reader.
The only card manager applet supported with Certificate System is the CoolKey applet which ships with Red Hat Enterprise Linux 5.3.
2.1.4. Supported HSM
Red Hat Certificate System supports two hardware security modules (HSM), nCipher netHSM 2000 and Chrysalis-IT LunaSA.
HSM Firmware Appliance Software Client Software
Safenet Chrysalis-ITS LunaSA
4.5.2 3.2.4 3.2.4
nCipher netHSM 2000 2.33.60 11.10
2.1.5. Supported Charactersets
Red Hat Certificate System fully supports UTF-8 characters in the CA end users forms for specific fields. This means that end users can submit certificate requests with UTF-8 characters in those fields and can search for and retrieve certificates and CRLs in the CA and retrieve keys in the DRM when using those field values as the search parameters.
Four fields fully-support UTF-8 characters:
Common name (used in the subject name of the certificate) Organizational unit (used in the subject name of the certificate)
Requester name
Additional notes (comments appended by the agent to the certificate)
NOTE
This support does not include supporting internationalized domain names, like in email addresses.
2.2. Required Programs, Dependencies, and Configuration
To install any Red Hat Certificate System subsystems on Red Hat Enterprise Linux, three programs are required: OpenJDK, Apache or Tomcat (depending on the subsystem), and Red Hat Directory Server. All other require packages should be present as part of the base Red Hat Enterprise Linux operating system packages.
2.2.1. Java Development Kit (JDK)
Certificate System requires OpenJDK 1.6.0. On Red Hat Enterprise Linux systems, this must be installed separately. The OpenJDK can be installed by using yum or by downloading the packages directly from http://openjdk.java.net/install/. For example:
yum install java-1.6.0-openjdk
After installing the JDK, run /usr/sbin/alternatives as root to insure that the proper JDK is available:
/usr/sbin/alternatives --config java
There are 3 programs which provide 'java'. Selection Command 1 /usr/lib/jvm/jre-1.4.2-gcj/bin/java + 2 /usr/lib/jvm/jre-1.6.0-openjdk/bin/java * 3 /usr/lib/jvm/jre-1.6.0-sun.x86_64/bin/java
2.2.2. Apache
Apache 2.x must be installed in order to install the TPS subsystem. Check that the appropriate version of Apache is installed. yum info httpd Installed Packages Name : httpd Arch : x86_64 Version: 2.2.3 Release: 22.el5_3.2 Size : 2.9 M Repo : installed ...
yum install httpd
2.2.3. Red Hat Directory Server
All subsystems require access to Red Hat Directory Server 8.1 on the local machine or a remote machine. This Directory Server instance is used by the subsystems to store their system certificates and user data.
The Directory Server used by the Certificate System subsystems can be installed on Red Hat Enterprise Linux 5.3 32-bit, Red Hat Enterprise Linux 5.3 64-bit, or Solaris 9 Sparc 64-bit, regardless of the system on which Red Hat Certificate System is installed.
Check that the Red Hat Directory Server is already installed. For example: yum info redhat-ds
Installed Packages Name : redhat-ds Arch : x86_64 Version : 8.1.0 Release : 0.14el5dsrv Size : 136M Repo : installed ...
Install and configure Red Hat Directory Server 8.1, if a directory service is not already available. For example:
yum install redhat-ds setup-ds-admin.pl
Go through the configuration wizard; the default settings are fine for the Certificate System needs. Installing Red Hat Directory Server is described in more detail in the Red Hat Directory Server Installation Guide.
2.2.4. Additional Packages
The following package groups and packages must be installed on all Red Hat Enterprise Linux systems: gnome-desktop (package group)
compat-arch-support (package group) web-server (package group)
kernel-smp (package) e2fsprogs (package) firefox (package)
To verify that the packages are installed, just run rpm -qi For example: rpm -qi gnome-desktop
gnome-desktop-2.16.0-1.el5
On 64-bit Red Hat Enterprise Linux platforms, be certain that the 64-bit (x86_64) com pat-libstdc++ libraries are installed, and not only the 32-bit (i386) libraries. To confirm this, run the following as root:
libraries are installed, and not only the 32-bit (i386) libraries. To confirm this, run the following as root: rpm -qi compat-libstdc++ --queryformat
'%{NAME}-%{VERSION}-%{RELEASE}.%{ARCH}.rpm\n' | grep x86_64 Numerous libraries should be displayed.
2.2.5. Firewall Configuration and iptables
Any firewalls must be configured to allow access to the Certificate System ports and to any other applications, like Red Hat Directory Server, which are required for the operation of the subsystems. Use caution when configuring the firewall, so that the system remains secure. The port numbers for the default instances are listed in Section 9.5, “Default File and Directory Locations for Certificate System”. As part of configuring the firewalls, if iptables is enabled, then it must have configured policies to allow communication over the appropriate Certificate System ports. Configuring iptables is described in the Red Hat Enterprise Linux Deployment Guide, such as "Using iptables." Installing the subsystems will fail unless iptables is turned on and properly configured.
2.2.6. SELinux Settings
SELinux policies for Certificate System subsystems are installed as a dependency for Certificate System 8.0, in the pki-selinux package. The SELinux policies are automatically configured whenever a new instance is created by the pkicreate command.
Red Hat recommends running Certificate System with SELinux in enforcing mode, to make the most of the security policies.
If SELinux is set to enforcing, then any external modules or hardware which interact with the
subsystems must be configured with the proper SELinux settings to proceed with subsystem installation: Third-party modules, such as for ECC or HSM, must have an SELinux policy configured for them, or SELinux needs to be changed from enforcing mode to perm issive mode to allow the module to function. Otherwise, any subsystem operations which require the ECC module will fail.
Changing SELinux policies is covered in the Red Hat Enterprise Linux Deployment Guide, such as chapter 46, "Customizing SELinux Policy."
SELinux policies must be set for any nCipher netHSM 2000 modules, as described in Section 2.5.2.4, “Setting up SELinux on nCiper netHSM 2000”.
2.3. Packages Installed on Red Hat Enterprise Linux
Multiple packages are installed with the Certificate System, in addition to the core Certificate System components.
RPMs for Certificate System Subsystems and Components
osutil pki-kra pki-tks
pki-setup pki-tps
pki-ca pki-migrate
pki-common pki-native-tools symkey
pki-console pki-ocsp
avalon-framework jakarta-commons-el regexp
avalon-logkit jakarta-commons-fileupload tomcat5
axis jakarta-commons-httpclient tomcat5-common
bcel jakarta-commons-launcher tomcat5-jasper
classpathx-jaf jakarta-commons-logging tomcat5-server
classpathx-mail jakarta-commons-modeler velocity
eclipse-ecj jakarta-commons-pool werken.xpath
geronimo-specs jdom wsdl4j
xalan-j2
geronimo-specs-compat jakarta-commons-beanutils xerces-j2
jakarta-commons-collections ldapjdk xml-commons
jakarta-commons-daemon log4j xml-commons-apis
jakarta-commons-dbcp mx4j xml-commons-resolver
jakarta-commons-digester
RPMs for Apache Web Services
mod_perl perl-XML-NamespaceSupport
pcre-devel perl-XML-Parser
perl-XML-SAX perl-Parse-RecDescent
tcl perl-XML-Simple
tcl-devel
RPMs for LDAP Support
cyrus-sasl mozldap-devel mozldap-tools
RPMs for SQL Lite Support for the RA
perl-DBD-SQLite perl-DBI sqlite-devel
RPMs for NSS and NSPR
jss nspr nss svrcore
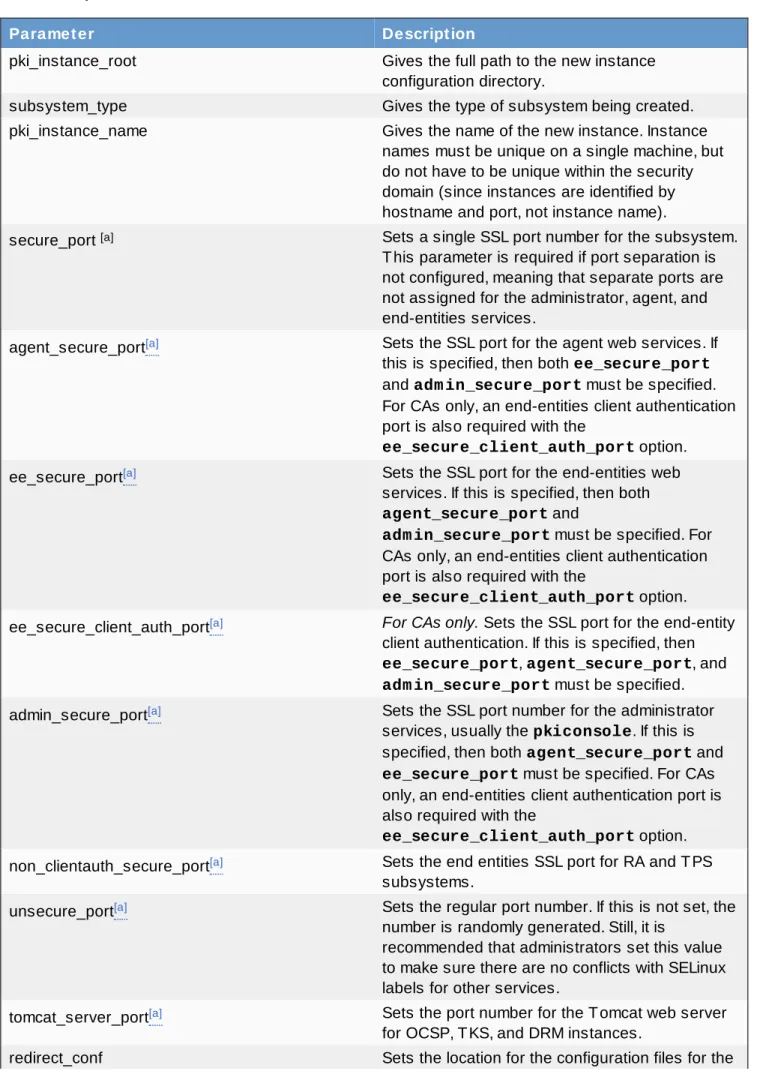
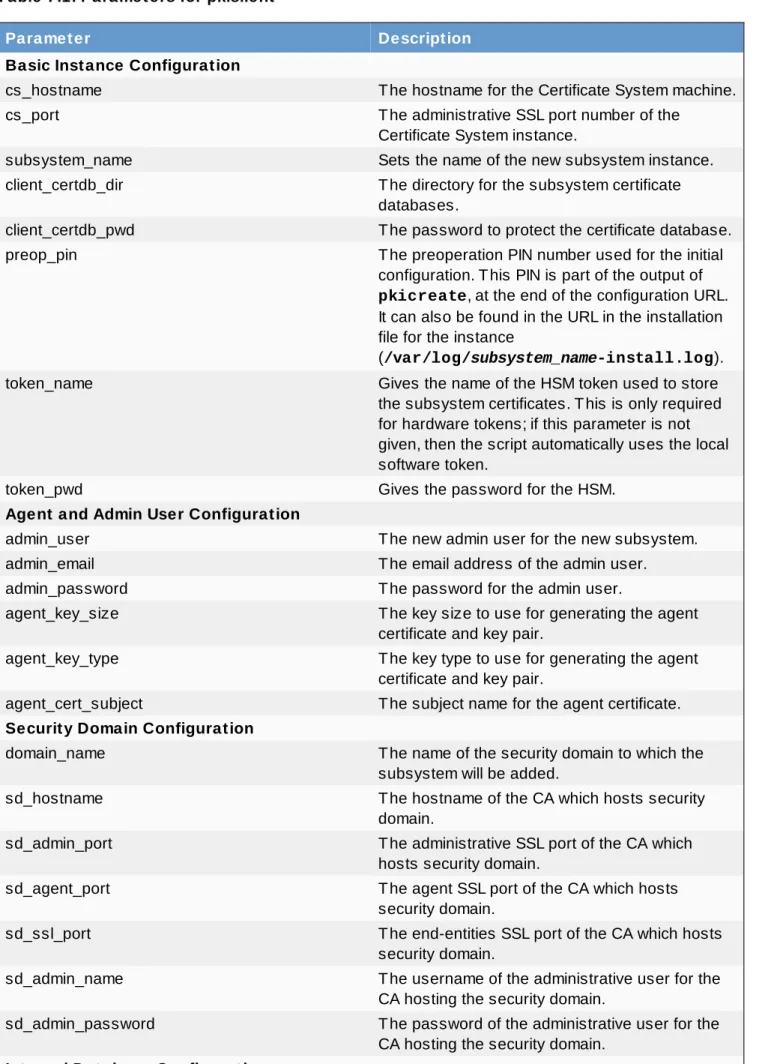
2.4. Required Information for Subsystem Configuration
When the Certificate System subsystems are configured, some outside information must be available, as listed in Table 2.2, “Required Information for Configuring Subsystems”.
Table 2.2. Required Information for Configuring Subsystems
Information Description
Login PIN There is a randomly-generated PIN in the
preop.pin parameter in the CS.cfg file in the instance conf/ directory. This is used to log into the configuration wizard.
Security domain information CAs can create a new security domain, which requires a unique name and a username and password for the CA agent who administers the domain. All other subsystems must join an existing security name. Have the username and password of the CA agent who administers the domain.
CA information If the subsystem is not a CA, then it is necessary to select a CA from a drop-down menu or add an external CA. If a Certificate System CA is
selected, then supply the CA agent username and password.
Subsystem information (for TPS configuration) When installing a TPS, you must have already configured the other subsystem and have their bind information available:
The CA
The TKS (required)
The DRM (optional, for server-side key generation)
When configuring the TPS, the TKS and DRM to connect with the TPS are selected from a drop-down list of all subsystems within the security domain.
Directory Server hostname and port number The Certificate System uses the user database of the Directory Server to store its information, and the hostname and port number of the LDAP directory is required for the Certificate System to access the database.
Directory Manager DN and password The Certificate System must be able to bind to the user database, so a user ID and password must be supplied to bind to the Directory Server. This user is normally the Directory Manager. The default Directory Manager DN is cn=Directory Manager.
Certificate and key recovery files (for cloning) If the subsystem being configured is a clone of another subsystem, then the backup files for the master subsystem must be locally accessible.
2.5. Setting up Tokens for Storing Certificate System Subsystem
Keys and Certificates
A subsystem instance generates and stores its key information in a key store, called a token. A
subsystem instance can be configured for the keys to be generated and stored using the internal NSS token or on a separate cryptographic device, a hardware token.
2.5.1. Types of Hardware Tokens
A token is a hardware or software device that performs cryptographic functions and stores public-key certificates, cryptographic keys, and other data. The Certificate System defines two types of tokens, internal and external, for storing key pairs and certificates that belong to the Certificate System subsystems.
2.5.1.1. Internal Tokens
An internal (software) token is a pair of files, usually called the certificate database and key database, that the Certificate System uses to generate and store its key pairs and certificates. The Certificate System automatically generates these files in the filesystem of its host machine when first using the internal token. These files were created during the Certificate System subsystem configuration if the internal token was selected for key-pair generation.
In the Certificate System, the certificate database is named cert8.db; the key database is named key3.db. These files are located in the instanceID/alias directory.
2.5.1.2. External Tokens
An external token refers to an external hardware device, such as a smart card or hardware security module (HSM), that the Certificate System uses to generate and store its key pairs and certificates. The Certificate System supports any hardware tokens that are compliant with PKCS #11.
PKCS #11 is a standard set of APIs and shared libraries which isolate an application from the details of the cryptographic device. This enables the application to provide a unified interface for PKCS #11-compliant cryptographic devices.
The PKCS #11 module implemented in the Certificate System supports cryptographic devices supplied by many different manufacturers. This module allows the Certificate System to plug in shared libraries supplied by manufacturers of external encryption devices and use them for generating and storing keys and certificates for the Certificate System managers.
Consider using external tokens for generating and storing the key pairs and certificates used by Certificate System. These devices are another security measure to safeguard private keys because hardware tokens are sometimes considered more secure than software tokens.
Before using external tokens, plan how the external token is going to be used with the subsystem: All system keys for a subsystem must be generated on the same token.
The subsystem keys must be installed in an empty HSM slot. If the HSM slot has previously been used to store other keys, then use the HSM vendor's utilities to delete the contents of the slot. The Certificate System has to be able to create certificates and keys on the slot with default nicknames. If not properly cleaned up, the names of these objects may collide with previous instances.
A single HSM can be used to store certificates and keys for mulitple subsystem instances, which may be installed on multiple hosts. When an HSM is used, any certificate nickname for a subsystem must be unique for every subsystem instance managed on the HSM.
The Certificate System can use hardware cryptographic accelerators with external tokens. Many of the accelerators provide the following security features:
Fast SSL connections. Speed is important to accommodate a high number of simultaneous enrollment or service requests.
Hardware protection of private keys. These devices behave like smart cards by not allowing private keys to be copied or removed from the hardware token. This is important as a precaution against key theft from an active attack of an online Certificate Manager.
2.5.2. Using Hardware Security Modules with Subsystems
The Certificate System supports the nCipher netHSM hardware security module (HSM) by default. Certificate System-supported HSMs are automatically added to the secm od.db database with m odutil during the pre-configuration stage of the installation, if the PKCS #11 library modules are in the default installation paths.
During configuration, the Key Store panel displays the supported modules, along with the NSS internal software PKCS #11 module. All supported modules that are detected show a status of Found and is individually marked as either Logged in or Not logged in. If a token is found but not logged in, it is possible to log in using the Login under Operations. If the administrator can log into a token
successfully, the password is stored in a configuration file. At the next start or restart of the Certificate System instance, the passwords in the password store are used to attempt a login for each
corresponding token.
Administrators are allowed to select any of the tokens that are logged in as the default token, which is used to generate system keys.
2.5.2.1. Adding or Managing the HSM Entry for a Subsystem
When an HSM is selected as the default token, the following parameters are set in instance's CS.cfg file to configure the HSM:
#RHCS supported modules
preop.configModules.module0.commonName=NSS Internal PKCS #11 Module preop.configModules.module0.imagePath=../img/mozilla.png
preop.configModules.module0.userFriendlyName=NSS Internal PKCS #11 Module preop.configModules.module1.commonName=nfast
preop.configModules.module1.imagePath=../img/ncipher.png
preop.configModules.module1.userFriendlyName=nCipher's nFast Token Hardware Module preop.configModules.module2.commonName=lunasa
preop.configModules.module2.imagePath=../img/safenet.png
preop.configModules.module2.userFriendlyName=SafeNet's LunaSA Token Hardware Module
#selected token
preop.module.token=Internal Key Storage Token
In addition, the following parameter is set in the password.conf for the HSM password: hardware-nethsm=caPassword
2.5.2.2. Using Chrysalis LunaSA HSM
To make sure that a LunaSA HSM works with Certificate System, edit the configuration files for the HSM before configuring the subsystems:
modutil -dbdir /var/lib/subsystem_name/alias -list Listing of PKCS #11 Modules
1. NSS Internal PKCS #11 Module
slots: 2 slots attached status: loaded
slot: NSS Internal Cryptographic Services token: NSS Generic Crypto Services
slot: NSS User Private Key and Certificate Services token: NSS Certificate DB
2. lunasa
library name: /usr/lunasa/lib/libCryptoki2_64.so slots: 1 slot attached
status: loaded slot: LunaNet Slot token: lunasa3-ca
If the LunaSA module isn't listed, then install the module manually: a. Stop the subsystem.
service subsystem_name stop b. Load the module.
modutil dbdir /var/lib/subsystem_name/alias nocertdb add lunasa -libfile /usr/lunasa/lib/libCryptoki2_64.so
c. Verify that the module has been loaded.
modutil -dbdir /var/lib/subsystem_name/alias -list d. Start the subsystem.
service subsystem_name start
2. Open the /etc/Chrystoki.conf configuration file. 3. Add this configuration parameter.
Misc { NetscapeCustomize=1023; }
4. If they are there, remove these two configuration lines for the applet version. AppIdMajor=2;
AppIdMinor=4;
Then, after going through the subsystem configuration, but before restarting the server when completing the configuration wizard, edit the subsystem configuration to recognize the token:
service subsystem_name stop
2. Edit the instance's serverCertNick.conf file in the /var/lib/subsystem_name/conf directory. Add the HSM token name to the serverCert parameter.
The original value only points to the server: Server-Cert instanceID
The new value includes a reference to the LunaSA HSM: lunasa3-ca:Server-Cert instanceID
3. Start the server.
service subsystem_name start
2.5.2.3. Installing External Tokens and Unsupported HSM
To use HSMs which are not officially supported by the Certificate System, add the module to the subsystem database manually. If the desired HSM does not appear in the Security Modules panel during the subsystem configuration, check that the HSM is installed and activated correctly. Then run m odutil manually to add the module to the secm od.db database.
1. Install the cryptographic device, using the manufacturer's instructions. Be sure to name the token something that will help identify it easily later.
2. Install the PKCS #11 module using the m odutil command-line utility.
a. Open the alias directory for the subsystem which is being configured with the PKCS #11 module. For example:
cd /var/lib/pki-ca/alias
b. The required security module database file, secm od.db, should be created by default when the subsystem is created. If it does not exist, use the m odutil utility to create secm od.db.
modutil -dbdir . -nocertdb -create
c. Use the m odutil utility to set the library information.
modutil -dbdir . -nocertdb / -add module_name -libfile library_file library_file specifies the path to the library file containing the PKCS #11 interface module and module_name gives the name of the PKCS #11 module which was set when the drivers were installed.
For the LunaSA HSM:
modutil -dbdir . -nocertdb -add lunasa -libfile /usr/lunasa/lib/libCryptoki2.so
modutil -dbdir . -nocertdb -add nethsm -libfile /opt/nfast/toolkits/pkcs11/libcknfast.so
2.5.2.4 . Setting up SELinux on nCiper netHSM 2000
SELinux policies are created and configured automatically for all Certificate System instances, so Certificate System can run with SELinux in enforcing or permissive modes.
If SELinux is in enforcing mode, than any hardware tokens to be used with the Certificate System instances must also be configured to run with SELinux in enforcing mode, or the HSM will not be available during subsystem installation.
IMPORTANT
SELinux must be configured for the HSM before installing any Certificate System instances. 1. Install the SELinux packages for Certificate System.
yum install pki-selinux
2. Reset the context of files in /dev/nfast to match the newly-installed policy. /sbin/restorecon -R /dev/nfast
3. Restart the netHSM software.
2.5.3. Viewing Tokens
To view a list of the tokens currently installed for a Certificate System instance, use the m odutil utility. 1. Open the instance alias directory. For example:
cd /var/lib/pki-ca/alias
2. Show the information about the installed PKCS #11 modules installed as well as information on the corresponding tokens using the m odutil tool.
modutil -dbdir . -nocertdb -list
2.5.4. Detecting Tokens
To see if a token can be detected by Certificate System, use the T okenInfo utility. This is a Certificate System tool which is available after the Certificate System packages are installed.
TokenInfo
This utility will return all tokens which can be detected by the Certificate System, not only tokens which are installed in the Certificate System.
Chapter 3. Installation and Configuration
The Certificate System is comprised of subsystems which can be independently installed on different servers, multiple instances installed on a single server, and other flexible configurations for availability, scalability, and failover support. The procedures for downloading, installing, and configuring instances of Certificate System subsystems are described in this chapter.
The Certificate System servers include six subsystems: Certificate Authority (CA)
Registration Authority (RA)
Data Recovery Manager (DRM), sometimes referred to as a Key Recovery Authority (KRA) Online Certificate Status Protocol (OCSP) Responder
Token Key Service (TKS)
Token Processing System (TPS)
The Certificate System client is the Enterprise Security Client. For information about the Enterprise Security Client, see the Certificate System Enterprise Security Client Guide.
3.1. Overview of Installation
The individual subsystems for Red Hat Certificate System are installed and then configured individually. The initial installation is done using package management tools such as RPM; the subsystem setup is done through an HTML-based configuration wizard.
1. Install a Red Hat Directory Server. This can be on a different machine from the Certificate System, which is the recommended scenario for most deployments.
2. Download the Certificate System packages from the Red Hat Network channel. Each subsystem has its own packages, as well as dependencies and related packages. These are listed in Section 2.3, “Packages Installed on Red Hat Enterprise Linux”.
3. Install the packages, as described in Section 3.2, “Installing the Certificate System Packages”. By default, the installation process immediately launches pkicreate to create the default instances as soon as the subsystem packages are installed. The default instances are
configured with the default settings listed in Section 9.5, “Default File and Directory Locations for Certificate System”. It is also possible to prevent the pkicreate command from running so that you can configure an instance with custom settings, which is described in Chapter 5, Creating Additional Subsystem Instances.
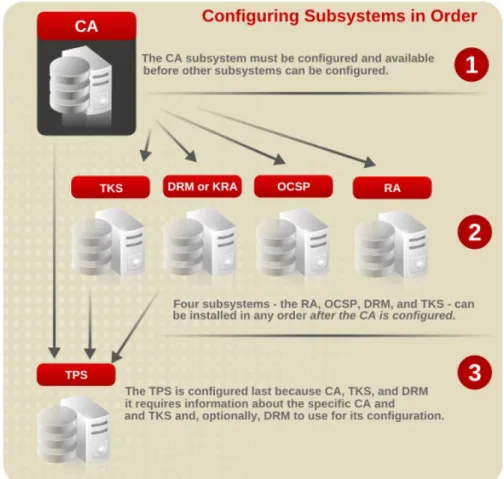
4. Configure the Certificate System CA subsystem. At least one CA subsystem must be installed and fully configured before any other type of subsystem can be configured.
See Section 3.3, “Configuring a CA” for instructions on setting up the Certificate Manager. 5. Configure the RA, OCSP, DRM, and TKS subsystems. Once the CA is installed, the other
subsystems, except for the TPS, can be installed and configured in any order.
See Section 3.5, “Configuring a DRM, OCSP, or TKS” and Section 3.4, “Configuring an RA” for the process on installing and configuring the OCSP, DRM, TKS, and RA subsystems.
6. Configure the TPS subsystem. The TPS requires having an existing TKS and DRM available when it is configured, so this is the last subsystem to set up.
See Section 3.6, “Configuring a TPS” for the process on installing and configuring the TPS. The order in which subsystems are configured is very important because of the basic relationships
Figure 3.1. Order of Subsystem Configuration
3.2. Installing the Certificate System Packages
There are two ways to obtain and install the subsystem packages. For all supported platforms, the Certificate System packages can be downloaded as ISO images through the appropriate Red Hat Network channel. These packages are then installed through a package utility, such as rpm.
Alternatively, if the appropriate network access is available, the subsystems and dependencies can be downloaded and installed on Red Hat Enterprise Linux systems using the yum command.
Several packages are installed with the Certificate System packages for related applications and dependencies, not only for the subsystems. These packages are listed in Section 2.3, “Packages Installed on Red Hat Enterprise Linux”.
Section 3.2.1, “Installing through yum” Section 3.2.2, “Installing from an ISO Image”
NOTE
When the first subsystem is installed on a machine, the installation process automatically creates a new user (pkiuser) and group (pkiuser). All default Certificate System instances run as this user and group.
3.2.1. Installing through yum
NOTE
pkicreate is launched by the installer to create the default instances, using default settings. There is an environment variable, DONT _RUN_PKICREAT E, which stops the pkicreate script from running automatically after the subsystems are installed.
Setting DONT _RUN_PKICREAT E allows the default instances to be installed in user-defined installation directories, instead of the default locations in /var/lib. It can be preferable to install through the ISO image with this environment variable set to block the pkicreate script for deployments where the default instances must be installed in custom locations.
NOTE
To use an IPv6 hostname for configuration, set the hostname in the PKI_HOST NAME environment variable before installing the packages. This is described in Section 4.4, “Enabling IPv6 for a Subsystem”.
To install the initial subsystems on Red Hat Enterprise Linux 5 (32-bit), run a command like the following for each subsystem:
yum install pki-subsystem
NOTE
yum is used only for the first subsystem instance; any additional subsystem instances are added using pkicreate.
subsystem can be any of the Certificate System subsystems: ca for the Certificate Manager.
ra for the Registration Authority. kra for the Data Recovery Manager.
ocsp for the Online Certificate Status Protocol Responder. tks for the Token Key System.
tps for the Token Processing System. console for the Java console.
Once the packages are installed, then the installer automatically launches the pkicreate script to create the default subsystem instance automatically. A URL to access the new instance is printed to the screen which gives the subsystem instances hostname, port, and a login PIN to access the configuration wizard.
PKI instance creation Utility ... PKI instance creation completed ...
Starting instance_name: [ OK ]
instance_name (pid 17990) is running ...
'instance_name' must still be CONFIGURED! (see /var/log/instance_name-install.log)
Before proceeding with the configuration, make sure the firewall settings of this machine permit proper access to this subsystem.
Please start the configuration by accessing:
https://hostname.domainname:admin-port/subsystem_type/admin/console/config/login? pin=pin
After configuration, the server can be operated by the command: /sbin/service instance_name start | stop | restart
To install the pkiconsole to administer the subsystems, run the following: yum install pki-console
3.2.2. Installing from an ISO Image
Red Hat Certificate System 8.0 can also be downloaded from Red Hat Network as an ISO image. This ISO image contains an RPMS/ directory which can be used as a local yum repository.
1. Open the Red Hat Certificate System 8.0 Red Hat Network channel and download the ISO image.
2. Place that RPMS/ directory on a web server and then configure yum to use that location as a repository.
3. Install Certificate System as described in Section 3.2.1, “Installing through yum”, including setting any environment variables, HSMs, or IPv6 settings.
3.3. Configuring a CA
The CA is always the first subsystem to be configured; every other subsystem depends on the CA for its configuration. The CA, along with setting up the CA hierarchy for the PKI, issues certificates which every subsystem uses to function and sets up a security domain which establishes trusted relationships between subsystems.
NOTE
If a CA has an ECC signing certificate, it can issue both RSA and ECC client certificates. To enable ECC for the CA, load an ECC module first (described in Section 4.2, “Installing a CA with ECC Enabled”) and then configure the CA.
Subsystem configuration is done by accessing a unique web-based configuration page for the instance. The only supported web browser for subsystem configuration is Mozilla Firefox.
1. Install the subsystem packages. For example: yum install pki-ca
Once the packages are installed, then the installer automatically launches the pkicreate script to create the default subsystem instance automatically. A URL to access the new instance is printed to the screen which gives the subsystem instances hostname, port, and a login PIN to access the configuration wizard.
http://server.example.com:9180/ca/admin/console/config/login?pin= 2. Open the configuration wizard using the URL returned from the package installation.
Alternatively, log into the setup wizard through admin link on the services page and supply the preop.pin value from the /var/lib/pki-ca/conf/CS.cfg file when prompted.
https://server.example.com:9444/ca/services 3. Create a new security domain.
The default CA instance must create a new security domain. Subsequent CAs can create a new domain or join an existing security domain, but it is recommended that each CA have its own security domain.
5. Set up the PKI hierarchy. Commonly, the first CA is a root, or self-signed, CA, meaning that it signs its own CA signing certificate rather than submitting its certificates to a third-party CA for issuance. Subsequent CAs can be subordinate CAs to that root. There are many other options, depending on the PKI environment.
For a CA, there are two possible configuration options:
Root CA. A root CA signs its own CA signing certificate and, therefore, can set its own certificate issuance rules.
Subordinate CA. A subordinate CA receives its CA signing certificate from a root CA. The root CA must be referenced here; it can be another Certificate System CA, but, for the default (i.e., first) CA instance, this will probably be an external root CA. The certificate requests generated in this process must be submitted to the external CA and be approved before configuration can be completed.
See the planning question Should the Certificate Manager be a self-signed root CA or a subordinate CA?.
6. Fill in the information for the LDAP server which will be used for the instance's internal database. This requires connection information for the Directory Server instance, such as the hostname, port number, bind DN (username), and password. This step also creates a database in the Directory Server and a corresponding base directory entry (base DN) to use for the subsystem's entries.
The hostname can be the fully-qualified domain name or an IPv4 or IPv6 address, if IPv6 was configured before the packages were installed.
NOTE
One thing that can derail subsystem configuration or function is having services that are unable to connect with each other. If servers that need to communicate with each other are on different servers or networks, when the firewalls and iptables must be configured to give the required access.
If the Red Hat Directory Server instances is on a different server or network than the Certificate System subsystem, then make sure that the Certificate System host's firewall allows access to whatever LDAP port was set in the previous configuration panel.
Installation will not complete if iptables is not configured properly. To configure iptables, see the Red Hat Enterprise Linux Deployment Guide, such as "Using iptables." It is also
possible to simply turn iptables off.
7. Select the token which will store the Certificate System certificates and keys; a list of detected hardware tokens and databases is given.
IMPORTANT
Any hardware tokens used with the instance must be configured before configuring the subsystem instance. If the HSM is not properly configured, it may not be listed in the key stores panel or the instance may not function properly. HSM configuration is described in Section 2.5.2, “Using Hardware Security Modules with Subsystems”.
To determine whether a token is detected by the Certificate System, use the T okenInfo tool, as described in Section 2.5.4, “Detecting Tokens”.
The Certificate System automatically discovers Safenet's LunaSA and nCipher's netHSM
hardware security modules. The discovery process assumes that the client software installations for these modules are local to the Certificate System subsystem and are in the following locations:
LunaSA: /usr/lunasa/lib/libCryptoki2.so
nCipher: /opt/nfast/toolkits/pkcs11/libcknfast.so
8. Set the key size and the hashing algorithm to use. By default, the settings for the signing key are applied to the keys for every certificate for the CA. To set different key types, sizes, or hashing algorithms for each certificate, click the [Advanced] link to expand the form so each key pair is listed.
NOTE
An ECC CA signing certificate can be used to sign both ECC and RSA certificates. If you do not want to use the ECC client certificate that is generated at installation, simply replace the client certificate after configuration, and keep the ECC CA signing certificate.
An ECC module must be loaded for ECC certificates to be generated. Adding ECC support is covered in Section 4.2, “Installing a CA with ECC Enabled”. Any ECC-enabled PKCS#11 module must be loaded before beginning to configure the CA.
The hashing algorithms that are available depend on whether RSA or ECC is selected as the key type. For RSA, the available algorithms are as follows:
SHA256withRSA (the default) SHA1withRSA SHA256withRSA SHA512withRSA MD5withRSA MD2withRSA For ECC:
SHA256withEC (the default) SHA1withEC
9. Optionally, change the subject names for the certificates.
NOTE
Certificate nicknames must be unique, and changing the default nicknames is one way to ensure that.
Having unique certificate nicknames is vital for using an HSM, since any nickname conflicts (even for subsystems on different servers) will cause configuration to fail.
10. The next panels generate and show certificate requests, certificates, and key pairs.
If an external CA is used to issue the certificates, configuration cannot go forward until they are received from the external CA. When they are issued, paste the certificates into this panel to add them to the CA database, and then proceed with the installation. Click Apply to view the
certificates as they are imported.
11. If the subsystem will ever be cloned, or as a protection if keys or certificates are ever lost, back up the keys and certificates when prompted. It is also possible to extract these keys later, as long as they are not stored on an HSM.
NOTE
It is not possible to export keys and certificates stored on an HSM to a .p12 file. It is also not necessary to extract keys from the HSM to clone a subsystem. The keys are already stored on the HSM and accessible to any cloned instances.
12. Provide the information for the new subsystem administrator.
13. Click Next through the remaining panels to import the agent certificate into the browser and complete the configuration.
14. When the configuration is complete, restart the subsystem. service pki-ca restart
IMPORTANT
The new instance is not active until it is restarted, and weird behaviors can occur if you try to use the instance without restarting it first.
3.4. Configuring an RA
Subsystem configuration is done by accessing a unique web-based configuration page for the instance. The only supported web browser for subsystem configuration is Mozilla Firefox.
IMPORTANT
Before any RA can be set up, a Certificate System CA must be installed, configured, and running. This subsystem depends on the CA to issue their certificates and to create a security domain. If the security domain CA is not available, then the configuration process fails.
1. Install the subsystem packages. For example: yum install pki-ra
Once the packages are installed, then the installer automatically launches the pkicreate script to create the default subsystem instance automatically. A URL to access the new instance is printed to the screen which gives the subsystem instances hostname, port, and a login PIN to access the configuration wizard.
https://server.example.com:12889//ra/admin/console/config/login? pin=kI7E1MByNIUcPJ6RKHmH
2. Open the configuration wizard using the URL returned by the package installation. https://server.example.com:12889//ra/admin/console/config/login? pin=kI7E1MByNIUcPJ6RKHmH
Alternatively, log into the setup wizard through admin link on the services page and supply the preop.pin value from the /var/lib/pki-ra/conf/CS.cfg file when prompted.
https://server.example.com:12889/services
3. Join an existing security domain by entering the CA information. This URL can be identified by running service pki-ca status on the CA's host; the security domain URL is returned with the other configuration settings. For example:
https://server.example.com:9445
When the CA is successfully contacted, then supply the admin username and password for the CA so that it can be properly accessed.
The hostname for the security domain CA can be the fully-qualified domain name or an IPv4 or IPv6 address, if IPv6 was configured before the packages were installed.
4. Enter a name for the new instance.
5. Select the CA which will issue, renew, and revoke certificates for certificates processed through the RA. All of the CAs configured in the security domain are listed in a dropdown menu.