SAP BusinessObjects Business Intelligence platform
Document Version: 4.1 Support Package 4 - 2014-06-13
Table of Contents
1 What's new in the Information Design Tool User Guide. . . 14
2 Getting started with the information design tool. . . 18
2.1 About the information design tool. . . 18
2.2 About resources in the information design tool. . . 19
2.3 Starting the information design tool. . . .21
2.4 About the information design tool interface. . . 22
2.4.1 Resetting the user interface display. . . .24
2.5 Setting preferences in the information design tool. . . 24
2.5.1 Setting preferences for the Business Layer Editor. . . .25
2.5.2 Setting preferences for check integrity . . . 26
2.5.3 Setting connection display preferences for the Data Foundation Editor. . . .27
2.5.4 Setting display preferences for the data foundation view. . . 27
2.5.5 Setting table and join detection options. . . 28
2.5.6 Setting default join states for contexts. . . .29
2.5.7 Setting performance-related options for the data foundation view. . . 30
2.5.8 Setting languages used by the information design tool. . . 31
2.5.9 Setting a link for online tutorials. . . 31
2.5.10 Setting middleware for secured relational connections. . . 32
2.5.11 Setting preferences for showing values. . . 32
2.6 How to get help using the information design tool. . . 33
2.7 Wizards in the information design tool. . . 34
3 Creating Universes. . . 35
3.1 How to create a universe with the information design tool . . . .35
3.2 Using SAP NetWeaver BW data sources. . . 38
3.2.1 How InfoProvider objects are mapped in a universe. . . 39
3.2.2 Refreshing universes based on SAP Netweaver BW. . . 42
3.3 Using SAP HANA data sources. . . 42
3.3.1 Creating relational resources on SAP HANA information models. . . 45
3.4 Using SAP ERP data sources. . . 46
3.5 Using Microsoft Analysis Services (MSAS) data sources. . . 47
3.6 Using Essbase data sources. . . 48
3.7 Using SAS data sources. . . 50
3.8 Multilingual universes. . . 50
3.8.1 Translating universe metadata. . . 52
3.9 About the New Universe wizard. . . .53
3.9.1 Select or create a project in the New Universe wizard. . . 53
3.9.3 Select or create a relational connection in the New Universe wizard. . . 54
3.9.4 Select or create an OLAP connection in the New Universe wizard. . . .54
3.9.5 Select or create a data foundation in the New Universe wizard. . . 55
4 Converting .unv universes. . . 56
4.1 About .unv and .unx universes. . . 56
4.2 About converting .unv universes . . . 56
4.3 Features supported when converting .unv universes. . . .58
4.4 Tips for resolving check integrity errors after converting .unv universes. . . 62
4.5 Converting a .unv universe in a repository. . . 64
4.6 Converting a locally-stored .unv universe. . . .65
5 Retrieving published universes. . . 67
5.1 Retrieving a published universe from the local file system. . . 67
5.2 Retrieving a published universe from a repository. . . .67
6 Migrating universes to SAP HANA. . . .69
6.1 About Universe Landscape Migration. . . 69
6.1.1 Universe Landscape Migration requirements and limitations. . . 70
6.2 Migrating a universe to SAP HANA: Pre-Migration. . . 71
6.3 Migrating a universe to SAP HANA: Migration. . . .72
6.4 Migrating a universe to SAP HANA: Post-Migration. . . 73
7 Working with projects. . . 74
7.1 About local projects and resources. . . 74
7.1.1 Creating a local project. . . .75
7.1.2 About resource names. . . 75
7.1.3 Finding universe resources in the local file system. . . 76
7.1.4 Opening a local project. . . .76
7.1.5 Deleting a local project. . . 76
7.1.6 Searching for and filtering resources in the Local Projects View. . . 77
7.2 Recovering universe resources in local projects after workspace corruption. . . 77
7.3 About shared projects. . . 78
7.3.1 Creating a shared project from a local project. . . 79
7.3.2 Working in a shared project. . . 79
7.3.3 Renaming a shared project. . . .80
7.3.4 Deleting a shared project. . . 80
7.4 About project synchronization. . . 81
7.4.1 Opening the Project Synchronization View. . . .83
7.4.2 Synchronizing a project. . . 84
7.4.3 Locking a resource. . . 85
7.4.4 Unlocking a resource. . . 85
7.5 Saving resources as reports. . . 87
8 Working with repository resources. . . 88
8.1 About managing repository resources. . . .88
8.2 About session management. . . 89
8.2.1 Opening a session. . . 90
8.2.2 Closing a session. . . 91
8.3 Running a query on a universe published in a repository. . . 91
9 Working with connections. . . 92
9.1 About connections. . . 92
9.1.1 About local connections. . . 93
9.1.2 About secured connections. . . 93
9.1.3 About connection shortcuts. . . 94
9.2 About the Connection Editor. . . .95
9.3 Creating a relational connection. . . 95
9.3.1 Name a connection. . . 96
9.3.2 Select a middleware driver. . . 97
9.3.3 Set the connection parameters. . . 97
9.4 Creating an OLAP connection. . . 115
9.4.1 Select an OLAP middleware driver. . . 116
9.4.2 Set login parameters for OLAP data sources. . . 117
9.4.3 Select an OLAP cube . . . 121
9.5 Creating a connection shortcut. . . 122
9.6 Editing local and secured connections. . . 122
9.7 Editing connection shortcuts. . . .123
9.8 Showing values in a relational connection. . . 123
9.9 Showing values in an OLAP connection. . . 124
10 Working with data foundations. . . 125
10.1 About data foundations. . . 125
10.1.1 About data foundation types. . . 125
10.1.2 About single-source data foundations. . . 125
10.1.3 About multisource-enabled data foundations. . . 126
10.2 About the Data Foundation Editor. . . 128
10.3 How to build a data foundation. . . 130
10.4 About connections in the data foundation. . . .132
10.4.1 Adding connections to a data foundation. . . 134
10.4.2 Changing a connection in a data foundation. . . 135
10.4.3 Selecting delimitation overrides to keep. . . 136
10.4.4 Searching for tables in the Connection pane. . . 136
10.4.6 Filtering tables in an SAP HANA connection by information model. . . 138
10.5 About tables in the data foundation. . . 139
10.5.1 Inserting tables into the data foundation. . . 141
10.5.2 Editing table properties. . . .142
10.5.3 Setting case of table names. . . 143
10.5.4 Hiding and unhiding table columns. . . 144
10.5.5 Changing column data types. . . 144
10.5.6 Changing qualifiers and owners. . . 145
10.5.7 Changing table and column delimitation. . . 145
10.6 About table keys. . . 146
10.6.1 Setting and detecting table keys. . . 147
10.7 About table row counts. . . 147
10.8 About joins. . . 148
10.8.1 Inserting and editing a join. . . 150
10.8.2 Detecting joins. . . 151
10.8.3 Inserting a column filter. . . 152
10.9 About cardinality. . . 153
10.9.1 Detecting and setting cardinalities. . . 154
10.10 Inserting a calculated column. . . 154
10.11 Inserting a time column. . . 155
10.12 About derived tables. . . 156
10.12.1 Inserting a derived table based on a data foundation table. . . 156
10.12.2 Merging tables. . . 156
10.12.3 Inserting and editing a derived table . . . 157
10.13 About alias tables. . . .158
10.13.1 Inserting alias tables. . . .159
10.13.2 Detecting alias tables. . . 159
10.13.3 Highlighting aliases. . . 160
10.13.4 Highlighting the original table of an alias. . . .160
10.14 About contexts. . . .161
10.14.1 Detecting contexts. . . 161
10.14.2 Inserting and editing contexts. . . 162
10.15 Resolving loops. . . 163
10.16 About input columns in the data foundation. . . 164
10.16.1 Editing input columns. . . 164
10.17 About parameters and lists of values in the data foundation. . . 165
10.18 About data foundation properties. . . 166
10.18.1 Editing SQL options in the data foundation. . . 167
10.18.2 Setting SQL generation parameters in the data foundation. . . .167
10.18.3 Showing a data foundation summary. . . 168
10.18.5 Showing SAP HANA variable information. . . 168
10.19 Showing table values. . . 169
10.19.1 Showing values in a data source. . . 169
10.20 Showing column values. . . 170
10.21 Profiling column values. . . 171
10.22 Showing local dependencies in the data foundation. . . 171
10.23 About refreshing a data foundation. . . 172
10.23.1 Synchronizing tables. . . 173
10.24 Inserting a custom data foundation view. . . .173
10.25 Searching for tables and columns in the data foundation. . . 174
10.26 Inserting a comment into the data foundation view. . . 175
10.27 Centering the view on a selection. . . 175
10.28 Changing the display of objects in the data foundation. . . .176
10.28.1 Auto-arranging tables in the data foundation view. . . 176
10.28.2 Changing table display. . . 176
10.28.3 Grouping tables using families. . . 177
11 Working with the federation layer. . . 178
11.1 About the federation layer. . . .178
11.2 Building the federation data flow. . . 178
11.3 About federated tables. . . 179
11.3.1 Adding a federated table manually. . . 181
11.3.2 Adding a federated table from a data source. . . 181
11.3.3 Editing a federated table. . . 182
11.4 About input tables and joins. . . 182
11.4.1 Adding input tables to a mapping. . . .183
11.4.2 Joining input tables. . . 184
11.4.3 Configuring meanings of input table joins using core tables. . . 184
11.5 About mappings in the federation layer. . . 186
11.5.1 Mapping columns from the input table to columns of the federated table. . . 186
11.5.2 Editing a mapping formula. . . 187
11.5.3 About the SQL Expression Editor. . . 187
11.5.4 Adding a mapping. . . 188
11.5.5 Activating and deactivating mappings. . . 189
11.6 About distinct rows on input tables. . . 189
11.6.1 Activating and deactivating distinct rows. . . 189
11.7 About pre-filters and post-filters. . . 189
11.7.1 Adding and editing pre-filters. . . 190
11.7.2 Editing post-filters. . . 190
11.8 Showing values in a federated table. . . 191
11.9 Checking integrity of the federation layer. . . 191
11.11 Refreshing the structure of the federation layer. . . 192
12 Working with business layers. . . 194
12.1 About business layers. . . 194
12.2 About business layer objects. . . .194
12.3 How to build a relational business layer. . . 197
12.3.1 Specifying the type of data source for a business layer. . . 198
12.3.2 Naming a business layer. . . 199
12.3.3 Selecting a data foundation for a business layer. . . 199
12.4 How to build an OLAP business layer. . . .200
12.4.1 Selecting an OLAP connection and cube for a business layer. . . 201
12.4.2 Selecting an Essbase Accounts dimension. . . .202
12.4.3 Selecting objects from an OLAP cube for a business layer. . . 202
12.5 About the Business Layer Editor. . . 203
12.5.1 Changing display options of the business layer tree view. . . 204
12.6 About business layer properties. . . 204
12.6.1 OLAP data source properties. . . 206
12.6.2 About query stripping. . . 207
12.6.3 Editing the business layer name, description, and comments. . . 208
12.6.4 Editing query limits and options in the business layer. . . 208
12.6.5 Changing the data source of a business layer. . . 209
12.6.6 Setting SQL generation parameters in the business layer. . . 209
12.6.7 Displaying a business layer summary. . . .210
12.7 About index awareness. . . .210
12.8 About analytic functions. . . 211
12.8.1 Analytic functions: syntax and examples. . . 212
12.8.2 Analytic functions: rules, restrictions, and best practices. . . 214
12.8.3 Using analytical functions in a business layer object definition. . . 215
12.8.4 Using analytical functions in a derived table definition. . . 216
12.9 About aggregate awareness. . . 217
12.9.1 Setting up aggregate awareness. . . 217
12.9.2 Setting aggregate navigation. . . .218
12.10 Working with business layer objects. . . .219
12.10.1 Inserting a folder. . . 219
12.10.2 Inserting and editing dimensions. . . .220
12.10.3 Inserting dimensions directly from the data foundation. . . 222
12.10.4 Defining keys for dimensions and dimension attributes. . . 223
12.10.5 Turning an attribute or measure into a dimension. . . 224
12.10.6 Inserting and editing measures. . . 224
12.10.7 Turning a dimension or attribute into a measure. . . .226
12.10.8 Inserting and editing attributes. . . 228
12.10.10 Inserting and editing filters. . . 230
12.10.11 Inserting and editing analysis dimensions. . . 231
12.10.12 Inserting and editing hierarchies. . . 232
12.10.13 Inserting and editing hierarchy levels. . . .234
12.10.14 Inserting and editing named sets. . . .235
12.10.15 Inserting and editing calculated members. . . 236
12.10.16 Defining the SQL expression for an object. . . 238
12.10.17 Defining the MDX expression for an object. . . 238
12.10.18 Associating extra tables. . . 239
12.10.19 Changing the state of an object: Active, Hidden, or Deprecated. . . 240
12.10.20 Setting object access levels. . . 240
12.10.21 Setting where objects can be used. . . .241
12.10.22 Setting options for the default list of values. . . .241
12.10.23 Creating and editing display formats for business layer objects. . . 242
12.10.24 About source information for business layer objects . . . 249
12.10.25 Inserting and editing custom properties. . . .249
12.10.26 Showing associated objects. . . 250
12.10.27 Showing business layer object values. . . 250
12.10.28 Searching for business layer objects. . . 251
12.11 About business layer views. . . 251
12.11.1 Creating and editing a business layer view. . . 252
12.11.2 Filtering by business layer view. . . 252
12.12 About parameters . . . .253
12.12.1 Inserting and editing a parameter. . . 254
12.12.2 Creating an index-aware prompt. . . 254
12.13 About lists of values . . . 255
12.13.1 Inserting or editing a list of values . . . .256
12.13.2 List of values column properties. . . 258
12.13.3 Associating a list of values with a business object. . . 258
12.13.4 Associating a list of values with a prompt defined in the business layer. . . 259
12.14 About navigation paths for objects. . . 260
12.14.1 Inserting a navigation path object into a business layer. . . 260
12.15 About queries in a business layer. . . .261
12.15.1 Inserting and editing a query in the business layer. . . 261
12.16 Reordering objects in the Business Layer Editor. . . 262
12.17 About refreshing business layers. . . 263
12.17.1 Refreshing an OLAP business layer . . . .264
12.17.2 Inserting candidate objects. . . .264
12.18 About computing statistics for optimized query execution . . . 265
12.18.1 Computing statistics for a multisource-enabled universe. . . 266
13.1 How to build a query. . . 267
13.2 About the Member Selector. . . 268
13.2.1 About selecting hierarchy members. . . 269
13.2.2 Opening the Member Selector in the Query Panel . . . 270
13.2.3 Selecting hierarchy members. . . 270
13.2.4 Selecting members by hierarchy relationship . . . 271
13.2.5 Selecting hierarchy members by level. . . 272
13.2.6 Selecting named sets. . . 272
13.2.7 Selecting calculated members. . . 272
13.2.8 Searching for hierarchy members. . . 273
13.2.9 Excluding hierarchy members. . . .273
13.2.10 Defining a prompt to select members. . . 274
13.2.11 Showing selected members in the Member Selector. . . 275
13.2.12 Sorting hierarchy members. . . 275
13.2.13 Setting display options. . . 275
13.2.14 Showing estimated child count. . . 276
13.3 Filtering data in the Query Panel. . . 276
13.3.1 How to build a business filter. . . .276
13.3.2 Filtering data using prompts. . . 278
13.4 Setting query properties. . . 280
13.5 Viewing and editing the query script. . . 282
13.6 Profiling column values in the query panel. . . 282
14 Checking integrity. . . .283
14.1 Running check integrity. . . 283
14.2 Reviewing check integrity problems. . . 284
15 Showing dependencies between resources. . . 285
15.1 About resource dependencies. . . 285
15.2 Showing local dependencies. . . 287
15.3 Showing repository dependencies. . . .288
16 Publishing resources. . . .289
16.1 About publishing resources. . . 289
16.2 Publishing a universe. . . 290
16.2.1 Selecting a repository folder. . . 291
16.2.2 Selecting a local folder. . . 291
16.3 Publishing a local connection to the repository. . . 291
16.4 Publishing a local universe to the repository. . . 292
17 Managing security. . . .293
17.1 About universe security. . . 293
17.3 CMC rights for information design tool users. . . 295
17.4 About the Security Editor. . . 297
17.5 How to secure a universe using security profiles. . . 298
17.6 Opening the Security Editor. . . 300
17.7 Inserting and editing a Data Security Profile. . . .300
17.7.1 Data Security Profile settings. . . 301
17.7.2 Data Security Profile Connections settings. . . 302
17.7.3 Data Security Profile Controls settings. . . 302
17.7.4 Data Security Profile SQL settings. . . .303
17.7.5 Data Security Profile Rows settings. . . .304
17.7.6 Data Security Profile Tables setting. . . .305
17.8 Changing Security Profile priority. . . 305
17.9 Inserting and editing a Business Security Profile. . . .306
17.9.1 Business Security Profile settings. . . 307
17.9.2 Business Security Profile Connections settings. . . 308
17.9.3 Business Security Profile Create Query settings. . . 308
17.9.4 Business Security Profile Display Data settings. . . .310
17.9.5 Business Security Profile Filters settings. . . .311
17.10 Security profile aggregation. . . .311
17.10.1 Aggregation of Connections settings. . . 313
17.10.2 Aggregation of Controls settings. . . 313
17.10.3 Aggregation of SQL settings. . . 314
17.10.4 Aggregation of Rows settings. . . 315
17.10.5 Aggregation of Tables settings. . . 315
17.10.6 Aggregation of Create Query settings. . . .316
17.10.7 Aggregation of Display Data settings. . . 317
17.10.8 Aggregation of Filters settings. . . 318
17.11 Changing security profile aggregation options. . . 319
17.12 Assigning Security Profiles to users. . . 319
17.13 Displaying profiles assigned to a user and previewing net profiles. . . 320
18 SQL and MDX reference. . . .321
18.1 About the SQL/MDX Expression Editor. . . 321
18.2 SAP BusinessObjects SQL function reference for multisource-enabled universes . . . 323
18.2.1 Aggregation functions. . . 323
18.2.2 ASCII Code (ascii). . . 327
18.2.3 Absolute (abs). . . 328
18.2.4 Angle Tangent 2 (atan2). . . 328
18.2.5 Arc Tangent (atan). . . 329
18.2.6 Arc Cosine (acos). . . 330
18.2.8 Case. . . 331
18.2.9 Cast. . . 333
18.2.10 Catalog. . . .334
18.2.11 Ceil (ceiling). . . 334
18.2.12 Character (char). . . 335
18.2.13 Charindex (pos) (locate). . . 335
18.2.14 Concat. . . .336
18.2.15 Contains Only Digits. . . 337
18.2.16 Convert. . . .338
18.2.17 Cosine (cos). . . 339
18.2.18 Cotangent (cot). . . 339
18.2.19 Current Date (curDate). . . 340
18.2.20 Current Time (curTime). . . 340
18.2.21 Database. . . .340 18.2.22 Day Name. . . 341 18.2.23 Day Of Month. . . 342 18.2.24 Day Of Week. . . 342 18.2.25 Day Of Year. . . 343 18.2.26 Decrement Days. . . 343 18.2.27 Degrees. . . .344 18.2.28 Exp. . . 344 18.2.29 Floor. . . 345 18.2.30 Hexa To Int. . . 345 18.2.31 Hour. . . 346 18.2.32 If Else. . . .347 18.2.33 If Null (nvl). . . 347 18.2.34 Increment Days. . . 348 18.2.35 Int To Hexa. . . 348 18.2.36 Is Like. . . .349 18.2.37 LPad. . . 350 18.2.38 Left. . . 351
18.2.39 Left Remove (ltrim). . . 352
18.2.40 Length. . . .352 18.2.41 Log. . . 353 18.2.42 Log10. . . 354 18.2.43 Lowercase (lcase). . . 354 18.2.44 Minute. . . .355 18.2.45 Mod. . . 355 18.2.46 Month Name. . . 356 18.2.47 Now. . . 357
18.2.48 Number of the Month (month). . . .357
18.2.49 Number of the Week (week). . . 358
18.2.50 Permute. . . .358 18.2.51 Pi. . . 360 18.2.52 Power. . . 360 18.2.53 Quarter. . . 361 18.2.54 Radians. . . 361 18.2.55 Random (rand). . . 362 18.2.56 Replace. . . .362
18.2.57 Replace String Exp. . . 363
18.2.58 Replicate (repeat). . . 364 18.2.59 Rightpart (right). . . 365 18.2.60 Round. . . 365 18.2.61 Rpad. . . 366 18.2.62 Rpos. . . 367 18.2.63 Rtrim. . . 368 18.2.64 Schema. . . 368 18.2.65 Second. . . 369 18.2.66 Sign. . . 369 18.2.67 Sine (sin). . . 370 18.2.68 Space. . . 370 18.2.69 Sqrt. . . 371 18.2.70 Stuff (insert). . . 371 18.2.71 Substring. . . 372 18.2.72 Tangent (tan). . . 373 18.2.73 Timestamp Add. . . 374 18.2.74 Timestamp Diff. . . 375 18.2.75 To Boolean. . . 376 18.2.76 To Date. . . 377 18.2.77 To Decimal. . . 378 18.2.78 To Double. . . 378 18.2.79 To Integer. . . 379 18.2.80 To Null. . . .379 18.2.81 To String. . . .380 18.2.82 To Time. . . 381 18.2.83 To Timestamp. . . 382 18.2.84 Trim. . . 383 18.2.85 Trunc. . . 383 18.2.86 Uppercase (ucase). . . 384
18.2.87 User. . . 385 18.2.88 Year. . . 385 18.3 About @Functions. . . 386 18.3.1 About @Aggregate_Aware. . . 386 18.3.2 About @DerivedTable. . . 387 18.3.3 About @Execute . . . .387 18.3.4 About @Prompt. . . .389 18.3.5 About @Select. . . 393 18.3.6 About @Variable. . . 393 18.3.7 About @Where. . . 395
18.4 About SQL Generation Parameters. . . 396
18.4.1 SQL generation parameters reference. . . .396
1
What's new in the Information Design Tool
User Guide
Links to information about the new features and documentation changes for the information design tool for each version of SAP BusinessObjects BI platform.
SAP BusinessObjects BI platform 4.1 Support Package 4 - June 2014
What's new Link to more information
Corrected a documentation error in reference to SQL-92 ANSI.
SQL expressions in multisource-enabled data founda tions [page 128]
SAP BusinessObjects BI platform 4.1 Support Package 3 - March 2014
What's new Link to more information
Enhanced query stripping method for relational uni verses.
About query stripping [page 207]
DELIMITER parameter for the @Variable function. About @Variable [page 393] Clarified table types allowed in table replacements in
Data Security Profiles.
Data Security Profile Tables setting [page 305]
SAP BusinessObjects BI platform 4.1 Support Package 2 - November 2013
What's new Link to more information
An application preference that lets you change the de fault state for joins in existing contexts when joins are added to the data foundation. You can also choose to use the new default behavior when adding contexts.
Setting default join states for contexts [page 29]
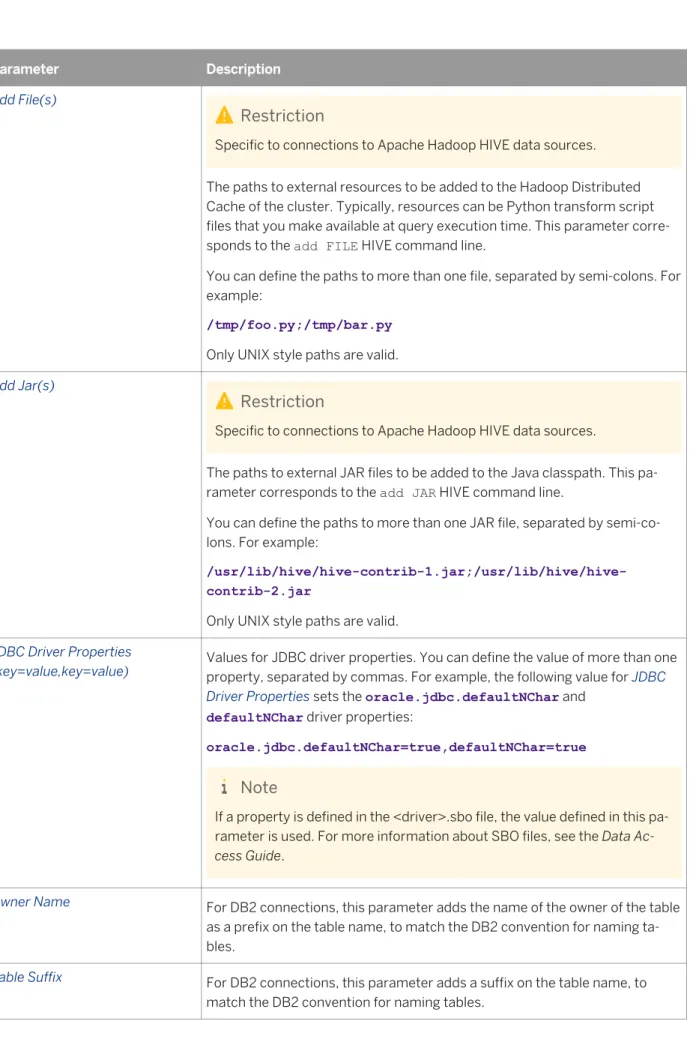
For connections to Oracle data sources using JDBC middleware, a configuration parameter Query Timeout that lets you modify the number of seconds before a query times out.
Configuration parameters for relational connections [page 109]
Added information on how to use analytic functions in the information design tool, including examples.
SAP BusinessObjects BI platform 4.1 Support Package 1 - August 2013
What's new Link to more information
Added information on how to create an index-aware prompt.
Creating an index-aware prompt [page 254]
Removed information about two options for lists of val ues: Allow users to edit list of values and Automatic refresh before use. These options do not apply to uni verses created with the information design tool. Updated information about SAP HANA variables, show ing values, and business layer creation on SAP HANA relational connections. Certain features apply only to single-source data foundations.
Using SAP HANA data sources [page 42]
SAP BusinessObjects BI platform 4.1 - May 2013
What's new Link to more information
A federation layer in multisource-enabled data founda tions. The federation layer lets you create federated ta bles that can include data from any of the data source connections defined in the data foundation.
About the federation layer [page 178]
Enhancements to relational universes on SAP HANA, including support for SAP HANA variables, and a wiz ard to automatically create a data foundation and busi ness layer based on selected SAP HANA information models.
Using SAP HANA data sources [page 42]
The Universe Landscape Migration plug-in, which lets you to migrate existing relational universes to SAP HANA.
About Universe Landscape Migration [page 69]
Help for new information design tool users, including a welcome page, a cheatsheet to help create an OLAP universe, and a New Universe wizard.
How to get help using the information design tool [page 33]
About the New Universe wizard [page 53] Columns can be hidden in standard tables in the data
foundation (supports features in new data sources).
About tables in the data foundation [page 139]
You can override the default delimitation for column names in the data foundation.
About tables in the data foundation [page 139]
You can enter empty values for input columns in the data foundation with character data type.
What's new Link to more information You can filter by table type or information model (SAP
HANA connections) when inserting tables into the data foundation.
Inserting tables into the data foundation [page 141]
You can filter by column name when editing joins. Inserting and editing a join [page 150] Wildcard searches in the data foundation connection
panel are now supported.
Searching for tables in the Connection pane [page 136]
You can filter by information model in the data founda tion connection pane.
Filtering tables in an SAP HANA connection by informa tion model [page 138]
Dimension attributes in the business layer can be index aware.
Defining keys for dimensions and dimension attributes [page 223]
Added information on index awareness. About index awareness [page 210] You can define attributes for measures in OLAP busi
ness layers.
Inserting and editing attributes [page 228]
Query stripping is available for relational and OLAP uni verses.
About query stripping [page 207]
You can share custom display formats for business layer objects between business layers.
Creating and editing display formats for business layer objects [page 242]
You can create a custom ordering of objects such as parameters and lists of values.
Reordering objects in the Business Layer Editor [page 262]
Command to turn measures or dimensions into attrib utes in the business layer.
Turning a dimension or measure into an attribute [page 229]
Command to turn dimensions or attributes into meas ures in the business layer.
Turning a dimension or attribute into a measure [page 226]
You can drag and drop table columns to create dimen sion and attribute keys in the business layer.
Defining keys for dimensions and dimension attributes [page 223]
Connections for OData data sources. Parameters for OData connections [page 105] Connections for XML and Web Services data sources. Parameters for XML and Web Services connections
[page 107] Direct access connections for SAP HANA for SAP Crys
tal Reports for Enterprise.
Using SAP HANA data sources [page 42]
Additional SAP HANA connection parameters for rela tional and direct access.
Login parameters for relational connections [page 98] Login parameters for OLAP connections [page 117]
What's new Link to more information Additional relational connection parameters for SAP
NetWeaver BW.
Login parameters for SAP NetWeaver BW and ERP con nections [page 100]
Security profile setting for OLAP replacement connec tions.
Business Security Profile Connections settings [page 308]
Enhanced join support and naming of business layer objects for relational universes on SAP ERP.
2
Getting started with the information
design tool
2.1
About the information design tool
The information design tool is an SAP BusinessObjects metadata design environment that enables a designer to extract, define, and manipulate metadata from relational and OLAP sources to create and deploy SAP
BusinessObjects universes.
A universe is an organized collection of metadata objects that enable business users to analyze and report on corporate data in a non-technical language. These objects include dimensions, measures, hierarchies, attributes, pre-defined calculations, functions, and queries. The metadata object layer, called the business layer, is built on a relational database schema or an OLAP cube, so the objects map directly to the database structures via SQL or MDX expressions. A universe includes connections identifying the data sources so queries can be run on the data. The role of the universe is to provide the business user with semantically understandable business objects. The user is free to analyze data and create reports using relevant business language regardless of the underlying data sources and structures.
Universes created using the information design tool can be used by the following SAP data analysis and reporting applications starting with version BI 4:
● SAP BusinessObjects Web Intelligence ● SAP Crystal Reports for Enterprise ● SAP BusinessObjects Explorer
● SAP BusinessObjects Dashboard Design ● SAP Lumira
● SAP Predictive Analysis ● SAP Design Studio
Note
Check the documentation for an application for any restrictions on accessing universes.
To enable the designer to create universes, the information design tool provides the resources necessary to do the following:
● Create connections to data sources. ● Extract a complete OLAP cube schema.
● Extract tables and joins to build a relational schema called a data foundation.
● Create metadata objects from the cube or the data foundation. These objects are contained and organized in a business layer. The SQL and MDX expressions within objects can be validated and queries run against the target databases to test the business layer.
● Share resources to allow multiple designers to work on the same resources concurrently.
● Publish a universe, which compiles the business layer, the data foundation, and the connections into a single universe file (.unx):
○ Publish a universe to a repository to be implemented in deployments of SAP BusinessObjects data analysis and reporting applications.
○ Publish a universe locally, to be implemented by client applications in standalone mode (for example Web Intelligence Rich Client).
● Create security profiles to define user access to universe data and metadata.
Who uses the information design tool?
The universe designer may be a database administrator, an applications manager or developer, a project manager, or a report creator who has acquired enough technical skills to create universes for other users. A security administrator also uses the information design tool to define universe security profiles.
There can be more than one universe designer in a company. The number of universe designers depends on the company's data requirements. For example, one universe designer could be appointed for each application, project, department or functional area.
Related Information
About resources in the information design tool [page 19] Starting the information design tool [page 21]
How to create a universe with the information design tool [page 35]
2.2 About resources in the information design tool
The information design tool provides the following design resources to extract metadata and build universes.
Resource Description
Project A project is a named local workspace that contains the resources used to build one or more universes.
A project can be shared so that multiple designers can work on the same resources. A project can contain any number of independent resources, for example data foun dations, business layers, and connections. All resources contained within a project can be used interchangeably, for example a connection can be used by several data foundations within the same project.
Projects and their resources are displayed in the Local Projects View. To open a re source in the editor, double-click the resource in the Local Projects View.
Connection
OLAP
A connection is a named set of parameters that define how a universe can access a relational or OLAP data source. A universe is always associated with at least one connection. A connection is an independent resource and can be used by several
Resource Description
Relational universes. You can build a multisource-enabled universe that references one or more relational connections. Connections can be local (stored in a local file) or secured (an object in a shared re pository that is referenced by a connection shortcut).
Local connections are stored in the local project as .cnx files.
Connection shortcut A connection shortcut is an object in the local project that references a secured connection in a repository. You use a connection shortcut to refer to secure con nections when creating data foundations and business layers based on secure con nections.
Connection shortcuts are stored in the local project as .cns files.
Data foundation A data foundation is a schema that defines the relevant tables and joins from one or more relational databases. You enhance the data foundation by adding federated tables, derived tables, alias tables, calculated columns, additional joins, contexts, prompts, lists of values, and other SQL definitions. The data foundation becomes the basis of one or more business layers.
Data foundations are stored in the local project as .dfx files.
Business layer A business layer is a collection of metadata objects that provides an abstraction of relational database entities or OLAP cubes, understandable by a business user. Ob jects map via SQL expressions to an underlying data foundation, or via MDX expres sions to an underlying OLAP cube. These objects include dimensions, hierarchies, measures, attributes, and predefined conditions.
You can add dimensions, hierarchies, measures, attributes, and other objects as the universe design requires. You can validate the SQL or the MDX at any time. You can create queries, lists of values, parameters (also called prompts), and navigation path objects.
The business layer is the universe under construction, and when the business layer is complete, it is compiled with the connections or connection shortcuts and data foundation, published, and deployed as a universe.
Business layers are stored in the local project as .blx files.
Query A query is a set of objects that define a request to the database for data. A query can be defined and saved in the business layer as a metadata object to be used to test objects in the business layer.
Parameter List of values
A parameter is a variable in the universe that requires a value at query time. Param eters are often defined to prompt the user to supply a value, and in this case are referred to as prompts.
A list of values is a collection of data values that can be associated with an object in the universe, allowing the user to choose values for a prompt.
Parameters and lists of values can be defined in the data foundation. They are in herited by all business layers based on that data foundation.
Resource Description
Parameters and lists of values can also be defined in the business layer.
Universe A universe is a compiled file that includes all resources used in the definition of the metadata objects built in the design of the business layer. The universe is used by SAP BusinessObjects data analysis and reporting applica tions, where the business layer objects are visible for analysis and reporting. Universes are stored either locally or in a repository as .unx files.
Security Profiles
Data
Business
A security profile is a group of security settings that controls the data and metadata that are displayed to users and modifies the parameters defined in the data founda tion and/or business layer. Security profiles are defined on published universes and stored in the repository.
Related Information
How to create a universe with the information design tool [page 35] About local projects and resources [page 74]
About connections [page 92] About data foundations [page 125] About business layers [page 194]
About queries in a business layer [page 261] About parameters [page 253]
About lists of values [page 255] About universe security [page 293]
2.3 Starting the information design tool
The information design tool is installed with the SAP BusinessObjects Business Intelligence platform Client Tools. For more information on installing the BI platform Client Tools, see the SAP BusinessObjects Business Intelligence Suite 4.0 Master Guide, or the SAP Crystal Server 2011 Getting Started Guide.
Once the client tools are installed on your machine, for example in a Windows installation of the BI platform, you can start the information design tool with the command: Start All programs SAP Business Intelligence SAP BusinessObjects BI platform 4 Client Tools Information Design Tool .
No authentication is required to use the information design tool in offline mode (not connected to a repository). You can begin creating and editing local resources.
Note
When you double-click a resource file in the local file system (for example a .blx, .dfx, or .cnx file), the
information design tool opens without opening the specific resource editor. You must open the editor from the Local Projects View.
Related Information
About the information design tool interface [page 22] About resources in the information design tool [page 19]
How to create a universe with the information design tool [page 35] About securing resources in the information design tool [page 294]
2.4 About the information design tool interface
Welcome page
The first time you start the information design tool, you see the Welcome page. From the Welcome page you can access all the resource creation wizards, open existing resources, and link to help and training materials. You can close the Welcome page to display the information design tool interface. To re-open the Welcome page, select Help Welcome .
Views and editors
The information design tool interface is composed of views and editors that let you navigate and work on different resources. For more information about each view, see the Related Topics.
View Description How to open the view
Local Projects
View Use this view to create and navigate local projects, and to open and validate resources. Select Window Local Projects . Repository Re
sources View Use this view to navigate repository resources and create secured connections. Select Window Repository Resources .
Data Foundation Editor
Use this editor to define and maintain the data foundation structure and its connections, and to access the data federation layer.
Double-click a data foundation in the Local Projects View.
View Description How to open the view Business Layer
Editor
Use this editor to define and maintain the busi ness layer and its data source.
Double-click a business layer in the Local Projects View.
Connection Edi tor
Use this editor to edit connection and connec
tion shortcut parameters. Double-click a connection or connection shortcut in the Local Projects View. To open the editor for a secured connec tion, double-click the connection in the Re pository Resources View.
Project Synchro nization View
Use this view to manage shared project resour ces in the repository and synchronize local re sources with the repository.
Select Window Project Synchronization .
Check Integrity Problems
Use this view to review the results of last integ
rity check. Select Window Check Integrity
Problems . Query Panel Use this view to run queries on business layers
and published universes. To run a query on a business layer, in the Business Layer Editor Query pane, edit an existing query, or create a query.
To run a query on a published universe, in the Repository Resources View, right-click a universe and select Run Query.
You can also run a query on a published universe in the Security Editor.
Security Editor Use this editor to define security profiles and
assign profiles to users. Select Window Security Editor .
Related Information
Resetting the user interface display [page 24] About local projects and resources [page 74] About managing repository resources [page 88] About the Data Foundation Editor [page 128] About the Business Layer Editor [page 203] About the Connection Editor [page 95] About project synchronization [page 81] Running check integrity [page 283] Using the Query Panel [page 267] About the Security Editor [page 297]
2.4.1
Resetting the user interface display
The information design tool user interface can be customized by dragging and dropping editor tabs and views, minimizing views, and hiding and splitting panels within the views.
To reset the user interface to the default configuration, select Window Reset to Default Display .
2.5 Setting preferences in the information design tool
To set preferences, from the information design tool main menu, select Window Preferences . The following table gives a brief description of the types of preferences you can set. For more information, see the related topics.
Preference type Description
General These settings and customizations require a good understanding of the Eclipse development environment. To learn more about Eclipse, search for the Eclipse Foundation Web site. Help Lets you select how you would like the help topics to display when you click the help icon.
>Content: You can use these settings to include custom help files. These settings require an understanding of the Eclipse help system. To learn more about Eclipse, search for the Eclipse Foundation Web site.
Business Layer Editor
Lets you change how object names are generated in relational business lay ers.
Information
Design Tool Check Integrity Lets you set the integrity rules to run automatically when saving resources. You can also set the severity level of the rules. Data
Foundation Editor
Lets you set display options for connections in the data foundation editor. > Appearance: Set display options for columns, tables, and joins in the Data Foundation Editor.
> Detections: Set whether or not to automatically detect tables, joins, and cardinalities when inserting tables into the data foundation. Set the default join state for contexts when adding joins and contexts to the data founda tion.
> Performance: Set options that impact how graphics are displayed in the Data Foundation Editor.
Languages Lets you change the language of the user interface and the Preferred View ing Locale.
Preference type Description Secured
Connections Lets you set whether to use the server or the local middleware driver for secured relational connections.
Note
This preference applies only if the Download connection locally right is granted in the Central Management Console for the connection.
Show Values Lets you set how to display table and column values for the Show Values commands.
Related Information
Setting preferences for the Business Layer Editor [page 25] Setting preferences for check integrity [page 26]
Setting connection display preferences for the Data Foundation Editor [page 27] Setting display preferences for the data foundation view [page 27]
Setting table and join detection options [page 28] Setting default join states for contexts [page 29]
Setting performance-related options for the data foundation view [page 30] Setting languages used by the information design tool [page 31]
Setting a link for online tutorials [page 31]
Setting middleware for secured relational connections [page 32] Setting preferences for showing values [page 32]
2.5.1
Setting preferences for the Business Layer Editor
The Business Layer Editor preference page lets you change how object names are generated in relational business layers.
1. From the information design tool main menu, select Window Preferences .
2. In the Preferences dialog box, expand the Information Design Tool node and select Business Layer Editor. 3. Select how object names are generated in the business layer:
The option applies to the automatic generation of object names when creating relational business layers and inserting data foundation tables into the business layer .
The option does not apply for business layers based on SAP ERP, SAP NetWeaver BW, and SAP HANA, which use a dedicated strategy for naming object during automatic generation.
Option Description
Translate table and column
names to user-friendly names If selected, generates object names by changing non-letter characters to blanks and
capitalizing the first letter of each word. For example, the column name region_id
generates the dimension name Region Id.
Use table and column names
as they are If selected, generates object names using the table and column names in the data
foundation. For example, the column name region_id generates the dimension name
region_id.
4. To restore the default values for preferences on the current page, click Restore Defaults. 5. To save the changes and continue editing preferences, click Apply.
6. To save the changes and close the Preferences dialog box, click OK. The new preferences take effect immediately.
2.5.2 Setting preferences for check integrity
In the check integrity preference page, you can select rules to be run automatically whenever you save a resource. You can also change the severity of the messages returned by each rule.
1. From the information design tool main menu, select Window Preferences .
2. In the Preferences dialog box, expand the Information Design Tool node and select Check Integrity. 3. To select rules to be run automatically when you save a resource:
a) Select the Enable background check integrity on save option. b) Select the rules to include in the background check.
The Cost column indicates the relative processing time required to execute the rule.
4. To change the severity of the messages returned by a rule, click in the Severity column for the rule. Select a severity from the list.
5. To restore the default values for check integrity preferences, click Restore Defaults. 6. To save the changes and continue editing preferences, click Apply.
7. To save the changes and close the Preferences dialog box, click OK. The background check takes effect immediately.
Related Information
Running check integrity [page 283]2.5.3 Setting connection display preferences for the Data
Foundation Editor
The Data Foundation Editor preference page lets you to change how connections are displayed in the Data Foundation Editor. For information on other preferences for the Data Foundation Editor, see the Related Topics. 1. From the information design tool main menu, select Window Preferences .
2. In the Preferences dialog box, expand the Information Design Tool node and select Data Foundation Editor. 3. Set or clear options for how connections are displayed in the data foundation:
Option Description
Enable automatic expansion If selected, and the connection provides default qualifiers and/or owners, the catalog in
the Connections pane automatically expands the default qualifier/owner.
Show Qualifiers/Owners If selected, qualifiers and owners, if available, are displayed by default in the Connections
pane.
Show only information models (SAP HANA connections)
If selected, in the _SYS_BIC owner of SAP HANA connections, only information models (such as Analytic Views and Calculation Views) are displayed by default in the
Connections pane.
4. To restore the default values for preferences on the current page, click Restore Defaults. 5. To save the changes and continue editing preferences, click Apply.
6. To save the changes and close the Preferences dialog box, click OK. The new preferences take effect immediately.
Related Information
Setting display preferences for the data foundation view [page 27] Setting table and join detection options [page 28]
Setting performance-related options for the data foundation view [page 30] About connections in the data foundation [page 132]
2.5.4 Setting display preferences for the data foundation
view
1. From the information design tool main menu, select Window Preferences .
2. In the Preferences dialog box, expand the Information Design Tool node and then expand the Data Foundation Editor node.
3. Select Appearance.
The options change the display of elements in the data foundation view.
Option Description
Show data types If selected, an icon showing the data type of the column is displayed in front of the
column name. For example, AB indicates a string data type, and 12 indicates numeric.
Centered If selected, column names are centered in the table display. Otherwise, column names
are left-justified.
Shadow border If selected, tables display with a shadow border. Show row counts If selected, a row count displays for each table. Postfix alias names with
original table name If selected, the original table name for an alias table is displayed in parentheses after the alias table name. Prefix table names with owner
and qualifier If selected, the owner and qualifier names are displayed in front of the table name. Join Lines Select the type of join line from the list.
Show full table names in join
expressions This option is not currently used. Auto scroll and zoom to
selection If selected, when you select an element in the view, the view automatically scrolls and zooms to better center the element in the viewing area.
5. To restore the default values for preferences on the current page, click Restore Defaults. 6. To save the changes and continue editing preferences, click Apply.
7. To save the changes and close the Preferences dialog box, click OK. The new preferences take effect immediately.
2.5.5 Setting table and join detection options
Set whether or not to automatically detect table keys, row counts, joins, and cardinalities when inserting tables into the data foundation.
1. From the information design tool main menu, select Window Preferences .
2. In the Preferences dialog box, expand the Information Design Tool node and then expand the Data Foundation Editor node.
3. Select Detections.
4. Set or clear detection options:
Option Description
Detect keys If selected, when inserting a table into the data foundation, automatically detects primary and
Option Description
Keep keys defined in data foundation if none detected in database
If selected, when you use the Detect Keys command, if no keys are detected for a table in the data source, the keys that were set manually in the data foundation table are kept.
Detect row counts If selected, when inserting a table into the data foundation, the number of rows in the table is
counted and stored in the data foundation.
Detect joins If selected, when inserting tables into the data foundation, joins are detected automatically
(using the selected method) and inserted into the data foundation.
Detect cardinalities If selected, when inserting tables into the data foundation, the cardinality of joins is detected
and set automatically.
Note
Detect joins must also be selected.
For a description of the method used to detect cardinality, see the related topic about cardinality.
5. To restore the default values for preferences on the current page, click Restore Defaults. 6. To save the changes and continue editing preferences, click Apply.
7. To save the changes and close the Preferences dialog box, click OK. The new preferences take effect immediately.
Related Information
About table keys [page 146] About table row counts [page 147] Detecting joins [page 151]About cardinality [page 153]
Setting default join states for contexts [page 29]
2.5.6 Setting default join states for contexts
Application preferences let you set the default join state for contexts when adding joins and contexts to the data foundation.
1. From the information design tool main menu, select Window Preferences .
2. In the Preferences dialog box, expand the Information Design Tool node and then expand the Data Foundation Editor node.
4. Select the state that new joins will have when they are added to existing contexts: Option Description
Neutral This is the default value. Joins added to the data foundation are neutral in any existing contexts. Neutral joins are not explicitly included or excluded but may be used in a query path.
Excluded Joins added to the data foundation will be excluded in any existing contexts.
Included Joins added to the data foundation will be included in any existing contexts.
5. Optionally, select the check box to apply this rule when creating contexts.
By default, when creating a context, all joins in the data foundation are neutral. If, for example, you set the default state for joins to Excluded in step 4, and if you select Also apply this rule when creating contexts, then when creating a context, all joins in the data foundation will be excluded from the context.
Related Information
About contexts [page 161]2.5.7 Setting performance-related options for the data
foundation view
The following options enhance the display in the data foundation view. In some cases the enhancements can cause sluggishness when dragging elements within the view. Options can be unselected in cases where this results in a better display-performance benefit.
1. From the information design tool main menu, select Window Preferences .
2. In the Preferences dialog box, expand the Information Design Tool node and then expand the Data Foundation Editor node.
3. Select Performance.
4. Set or clear performance options:
Option Description
Use transparency effects If selected, when dragging a table in the data foundation view, a semi-transparent
shadow of the table follows to show the trail.
Use line smoothing If selected, displays smoothed lines for joins. Use image enhancement when
zooming If selected, avoids using big pixels when zooming. Use text line smoothing If selected, lines in the text are smoothed. Use fading transitions This option is not currently used.
5. To restore the default values for preferences on the current page, click Restore Defaults. 6. To save the changes and continue editing preferences, click Apply.
7. To save the changes and close the Preferences dialog box, click OK. The new preferences take effect immediately.
2.5.8 Setting languages used by the information design tool
1. From the information design tool main menu, select Window Preferences .
2. In the Preferences dialog box, expand the Information Design Tool node and select Languages. 3. To change the language of the user interface, select the language from the Product Languages list. 4. To change the Preferred Viewing Locale, select the language from the list.
For information about the Preferred Viewing Locale and how it impacts the language display, see the related topic about multilingual universes.
5. To save the changes and continue editing preferences, click Apply. 6. To save the changes and close the Preferences dialog box, click OK.
7. Exit and restart the information design tool for the language change to take effect.
Related Information
Multilingual universes [page 50]2.5.9 Setting a link for online tutorials
You can access online tutorials about the information design tool from the Help menu. The Online Tutorials preferences page allows you to update the URL address to the tutorials.
1. From the information design tool main menu, select Window Preferences .
2. In the Preferences dialog box, expand the Information Design Tool node and select Online Tutorials. 3. Enter the new URL address in Online Tutorial Address.
4. To save the change and continue editing preferences, click Apply. 5. To save the change and close the Preferences dialog box, click OK. The new address takes effect immediately.
Related Information
2.5.10 Setting middleware for secured relational connections
The secure connections middleware preference applies only if the Download connection locally right is granted in the Central Management Console for the connection.
When running queries on secured relational connections in the information design tool, you can choose to run queries on the server using the server middleware driver, or locally using the local middleware driver.
1. From the information design tool main menu, select Window Preferences .
2. In the Preferences dialog box, expand the Information Design Tool node and select Secured Connections. 3. Select the middleware to use:
Option Description
Server middleware To use the middleware driver on the repository server.
Local middleware To use the middleware driver on the local machine.
4. To restore the default value, click Restore Defaults.
5. To save the changes and continue editing preferences, click Apply. 6. To save the changes and close the Preferences dialog box, click OK.
Related Information
About secured connections [page 93]
2.5.11 Setting preferences for showing values
For the show values commands in the data foundation and business layer editors, you can select how to display values.
1. From the information design tool main menu, select Window Preferences .
2. In the Preferences dialog box, expand the Information Design Tool node and select Show Values. 3. Select how you want the values to display.
4. To save the change and continue editing preferences, click Apply. 5. To save the change and close the Preferences dialog box, click OK. The new display option takes effect immediately.
Related Information
2.6 How to get help using the information design tool
The Help menu in the information design tool lets you link to different types of user assistance for the application.
Help menu command Description
Welcome From the Welcome page you can access all the resource creation wizards, open existing resources, and link to help and training materials.
Cheat Sheets A cheat sheet shows how to complete a complex task, for example, creating a relational universe.
The Cheat Sheets command displays a list of available cheat sheets. Double-click a cheat sheet to start. It opens in the information design tool Help View. For some steps, you can click Click to perform and the application will start the appropriate wizard to help you complete that step.
To get more help on a step, click the help icon .
Online Tutorials The Online Tutorials command links to the list of official product tutorials for the information design tool on the SAP Community Network.
If the URL address of the online tutorials changes, you can enter the new ad dress in the information design tool preferences.
Help Contents The Help Contents command opens the Information Design Tool User Guide in a help window. To display help topics, you can navigate the Table of Contents, search the text, or look up topics in the index.
Note
See the SAP Help Portal for the most updated version of the guide at http:// help.sap.com/.
Search The Search command opens the Help View on the search function. To search the contents of the Information Design Tool User Guide, enter text in the Search expression field.
Related Information
2.7 Wizards in the information design tool
You can use wizards to help you create local resources in the information design tool. The wizards are available from the New menu in the main tool bar. To see a list of all wizards, select New Other . To start a wizard, select it in the list and click Next.
To get help on a particular page of any wizard, click the help icon in the wizard dialog box.
Related Information
About resources in the information design tool [page 19]
3
Creating Universes
3.1
How to create a universe with the information design tool
Before you begin:
● Make sure the middleware drivers are configured for the data sources to which you want to connect. For more information about middleware configuration, see the Data Access Guide.
For information about supported data sources, see the SAP Business Objects BI Platform 4.1 Supported Platforms (PAM) at http://service.sap.com/pam .
● Make sure you have the appropriate rights defined in the Central Management Console (CMC). See the related topic about CMC rights for information design tool users.
● Decide if the data foundation type should be single-source or multisource-enabled. The type and number of connections available, as well as the SQL syntax that is used to define SQL structures depends on the data foundation type. For more information, see the related topic about data foundation types.
Connections for multisource-enabled data foundations must be secured, relational connections, and are managed by the data federation service. Information about tuning the data federation service can be found in the Data Federation Administration Tool Guide.
● Refer to the additional information available if you are creating a universe on one of the following data sources:
○ Using SAP NetWeaver BW data sources [page 38] ○ Using SAP HANA data sources [page 42]
○ Using SAP ERP data sources [page 46]
○ Using Microsoft Analysis Services (MSAS) data sources [page 47] ○ Using Essbase data sources [page 48]
○ Using SAS data sources [page 50] ○ Multilingual universes [page 50]
Note
For OLAP universes, you do not need to create a data foundation. The business layer is built directly from the objects you select in the source cube.
You can use the New Universe wizard to create the resources you need to publish a local universe: either a single-source relational or OLAP universe. If you want to base your universe on secured connections, the connection shortcuts must exist in a local project. The wizard lets you create only local connections. For more information, see the related topic. To start the wizard, select File New Universe .
The following procedure describes how to make any kind of universe from scratch. Links to more information on each step in the procedure can be found in the Related Topics.
1. Create a local project. In the Local Projects View select File New Project . The resources you use to build the universe are created and stored in the project 2. Define the connections. Connections can be local or secured:
○ Use a local connection if you want to publish the universe on the local file system. Later, you can publish the business layer to a repository.
○ Create a secured connection if you want to create a multisource-enabled universe, or if you want to publish the universe in a repository without first publishing locally. For secured connections, you must create connection shortcuts in the local project to reference the secured connections in the repository.
Option Command
To create a local relational connection In the Local Projects View, right-click the project folder and select New Relational Connection .
To create a local OLAP connection In the Local Projects View, right-click the project folder and select New OLAP Connection .
To create a secured relational connection In the Repository Resources View, start a repository session. Right-click the Connections folder or sub-folder and select Insert Relational Connection.
To create a connection shortcut, select the connection in the Connections folder of the repository and select Create Relational Connection Shortcut.
To create a secured OLAP connection In the Repository Resources View, start a repository session. Right-click the Connections folder or sub-folder and select Insert OLAP Connection.
To create a connection shortcut, select the connection in the Connections folder of the repository and select Create OLAP Connection Shortcut.
3. Create the data foundation (relational data sources only). In the Local Projects View, right-click the project folder and select New Data Foundation .
○ For a single-source universe, select a single connection identifying the database source.
○ To build a data foundation with multiple relational connections, create a multisource-enabled data foundation.
The data foundation opens in the editor. To build the structure of the data foundation, see the related topic. 4. Create the business layer. In the Local Projects View, right-click the project folder and select New
Business Layer .
○ For relational business layers, select the data foundation to be the basis for the business layer. You can choose to automatically generate objects in the business layer for all data foundation structures, or select columns to be mapped as objects.
Note
To build a universe on multiple data sources (relational data sources only), the business layer must be based on a multisource-enabled data foundation.
○ For OLAP business layers, select the connection to the OLAP cube. Objects are created automatically for all structures in the cube.
The business layer opens in the editor. To build the business layer, see the related topic. 5. In the business layer, you can create and run queries to validate and test the universe.
6. Publish the business layer:
○ Business layers based on local connections must be published to a folder on the local file system. Later, you can publish the resulting local universe to a repository. See the related topic about publishing a local universe to the repository.
○ Business layers based on one or more secured connections must be published to the repository on the same Central Management System where the secured connections are stored.
Option Command
To publish the universe locally In the Local Projects View, right-click the business layer and select Publish To a Local Folder .
To publish the universe to a repository In the Local Projects View, right-click the business layer and select Publish To a Repository .
7. Define universe security. To open the Security Editor, on the information design tool main menu, select Window Security Editor . Open a session on the repository where the universe is published.
Use the Security Editor to define security profiles on the published universe. You also use the Security Editor to assign profiles to users and groups.
Related Information
About the information design tool interface [page 22] About resources in the information design tool [page 19] CMC rights for information design tool users [page 295] About data foundation types [page 125]
Creating a local project [page 75]
Creating a relational connection [page 95] Creating an OLAP connection [page 115] Creating a connection shortcut [page 122] How to build a data foundation [page 130] How to build a relational business layer [page 197] How to build an OLAP business layer [page 200] About queries in a business layer [page 261] Publishing a univer