v 7 . 5 . 3
T R I T O N - D a t a S e c u r i t y H e l p
W e b s e n s e
®
D a t a S e c u r i t y
©1996–2010, Websense, Inc. All rights reserved.
10240 Sorrento Valley Rd., San Diego, CA 92121, USA Published 2010
Printed in the United States and Ireland
The products and/or methods of use described in this document are covered by U.S. Patent Numbers 5,983,270; 6,606,659; 6,947,985; 7,185,015; 7,194,464 and RE40,187 and other patents pending.
This document may not, in whole or in part, be copied, photocopied, reproduced, translated, or reduced to any electronic medium or machine-readable form without prior consent in writing from Websense, Inc.
Every effort has been made to ensure the accuracy of this manual. However, Websense, Inc., makes no warranties with respect to this documentation and disclaims any implied warranties of merchantability and fitness for a particular purpose. Websense, Inc., shall not be liable for any error or for incidental or consequential damages in connection with the furnishing, performance, or use of this manual or the examples herein. The information in this documentation is subject to change without notice.
TRITON - Data Security Help i
Contents
Part I: Getting Started
Topic 1 Overview . . . 1
What can I protect?. . . 2
PreciseID fingerprinting . . . 3
Policy database and engine. . . 4
Managing Websense Data Security . . . 4
Web Security Gateway Anywhere mode . . . 5
Topic 2 Navigating the System . . . 7
Logging on . . . 7
The TRITON module tray . . . 10
Collapsible navigation and content panes . . . 10
Main tab . . . 12 Settings tab . . . 13 Today page . . . 14 Toolbar . . . 14 Icons . . . 16 Breadcrumbs. . . 21 Check boxes . . . 21 Pagination. . . 22
Reviewing and deploying changes . . . 22
Topic 3 Initial Setup. . . 25
Entering your subscription key. . . 26
Defining general system settings . . . 26
Configuring user directory server settings . . . 27
Setting up alerts. . . 28
Setting up notifications. . . 29
Configuring linking . . . 31
Configuring system modules . . . 32
Configuring the protector . . . 33
Running the first-time policy wizard . . . 36
ii Websense Data Security Contents
Part II: Securing Your Company’s Data
Topic 4 Creating Custom Policies. . . 41
What’s in a policy?. . . 41
Viewing policies. . . 43
Policy levels . . . 46
Changing the policy templates you selected . . . 47
Selecting items to include or exclude in a policy. . . 47
Creating a custom policy . . . 50
Using express mode . . . 51
Using advanced mode . . . 54
Managing rules . . . 63
Adding exceptions . . . 63
Rearranging exceptions . . . 64
Adding a new exception . . . 64
Topic 5 Classifying Content . . . 69
Content classifier menu bar . . . 71
Details pane . . . 72
PreciseID Patterns . . . 74
Adding a PreciseID Pattern classifier . . . 76
Key Phrases . . . 77
Adding a key phrase classifier . . . 78
Dictionaries. . . 78
Adding a dictionary classifier . . . 79
File properties. . . 80
Adding a file-type classifier . . . 80
Adding a file-name classifier . . . 81
Adding a file-size classifier. . . 81
PreciseID Natural Language Processing (NLP). . . 82
Editing a PreciseID NLP classifier . . . 83
PreciseID Fingerprinting - files & directories . . . 84
PreciseID Fingerprinting Wizard - General . . . 85
PreciseID Fingerprinting Wizard Shared Folder/Site Root. . . 85
PreciseID Fingerprinting Wizard - Scanned Files/Documents . . . 86
PreciseID Fingerprinting Wizard - Scheduler. . . 87
PreciseID Fingerprinting Wizard - File Filtering . . . 88
PreciseID Fingerprinting Wizard - Finish. . . 88
PreciseID Fingerprinting - database records . . . 89
Connecting to data sources . . . 89
Preparing for fingerprinting . . . 90
TRITON - Data Security Help iii
Contents Creating a PreciseID database-record fingerprint classifier . . . 95
PreciseID Fingerprinting Wizard - General . . . 96
PreciseID Fingerprinting Wizard - Data Source . . . 96
PreciseID Fingerprinting Wizard - Field Selection. . . 98
PreciseID Fingerprinting Wizard - Scheduler. . . 99
PreciseID Fingerprinting Wizard - Fingerprinting Type. . . 100
PreciseID Fingerprinting Wizard - Finish. . . 100
Creating a rule from a content classifier. . . 101
Topic 6 Defining Resources . . . 103
Sources and destinations. . . 105
User directory entries . . . 105
Custom users . . . 106 Custom computers. . . 107 Networks . . . 107 Domains . . . 107 Business Units. . . 108 URL categories . . . 109 Printers . . . 110 Endpoint Devices . . . 111 Endpoint Applications . . . 111
Endpoint Application Groups . . . 112
Remediation . . . 114
Action Plans . . . 114
Remediation scripts. . . 118
Notifications . . . 121
Topic 7 Performing Discovery . . . 125
Creating a data discovery policy . . . 126
Scheduling the scan . . . 128
Performing file system discovery. . . 128
Performing SharePoint discovery. . . 129
Performing database discovery. . . 130
Performing Exchange discovery. . . 131
Performing endpoint discovery . . . 132
Viewing discovery status . . . 132
Viewing discovery results . . . 133
Updating discovery. . . 133
Configuring discovery incidents. . . 133
Copying, moving, or encrypting discovered files . . . 134
Preparing and running the remediation scripts . . . 134
iv Websense Data Security Contents
Scheduling network discovery tasks . . . 140
File System tasks. . . 140
SharePoint tasks . . . 145
Database tasks . . . 149
Exchange tasks . . . 152
Scheduling endpoint discovery tasks . . . 157
Topic 9 Viewing Incidents and Reports . . . 161
The report catalog. . . 163
Editing a report . . . 165
Scheduling tasks . . . 177
Viewing the incident list. . . 179
Previewing incidents . . . 183
Managing incident workflow . . . 185
Remediating incidents. . . 189
Escalating incidents. . . 190
Managing incident reports. . . 192
Tuning policies . . . 196
Viewing the dashboard. . . 197
Viewing top violated policies. . . 199
Viewing incidents by severity and action. . . 199
Viewing top sources and destinations . . . 199
Viewing incident trends . . . 199
Viewing assessment reports . . . 200
Viewing sensitive data reports . . . 200
Topic 10 Viewing Status and Logs . . . 203
Viewing the Today page. . . 204
Monitoring system health. . . 206
Viewing endpoint status . . . 208
Viewing deployment status . . . 209
Viewing logs. . . 210
Traffic log . . . 210
System log. . . 211
Audit log . . . 212
Part III: Administering the System
Topic 11 Configuring System Settings . . . 215Setting preferences for incidents and reports . . . 216
Setting general preferences . . . 216
Setting preferences for data usage incidents . . . 217
TRITON - Data Security Help v
Contents Backing up the system . . . 218
Scheduling backups. . . 220
Monitoring backups . . . 220
Backup folder contents . . . 220
Restoring the system . . . 221
Exporting incidents to a file . . . 222
Configuring endpoints . . . 223
Configuring user directory settings . . . 225
Adding a new user directory server. . . 225
Rearranging user directory servers . . . 227
Importing users . . . 227
Importing user entries from a CSV file. . . 228
Configuring remediation . . . 231
Configuring alerts. . . 232
Setting general alert preferences . . . 233
Setting up email properties . . . 233
Editing outgoing mail server properties . . . 234
Configuring archive storage . . . 234
Entering subscription settings. . . 235
Subscription alerts. . . 236
Linking data and Web security. . . 236
Enabling joint administration . . . 238
Importing URL categories. . . 238
Editing Linking Service properties . . . 239
Topic 12 Configuring Authorization . . . 241
Defining administrators . . . 241
Adding a new administrator . . . 242
Working with access roles . . . 243
Adding a new access role . . . 244
Configuring personal settings. . . 246
Topic 13 Archiving Incidents . . . 249
Archiving a partition. . . 251
Restoring a partition . . . 251
Deleting a partition. . . 252
Archive threshold . . . 252
Topic 14 Updating Predefined Policies and Classifiers . . . 253
Viewing your update history . . . 253
Installing template updates. . . 254
Restoring templates to a previous version . . . 255
vi Websense Data Security Contents
Topic 15 Managing System Modules . . . 257
Adding modules . . . 259
Configuring modules . . . 260
Configuring the management server . . . 261
Configuring a supplemental Data Security Server . . . 261
Configuring the SMTP agent . . . 262
Configuring the PreciseID fingerprint repository . . . 264
Configuring the endpoint server . . . 266
Configuring the crawler . . . 267
Configuring the forensics repository. . . 267
Configuring the policy engine. . . 268
Configuring the protector . . . 269
Configuring ICAP . . . 275
Configuring the Content Gateway module . . . 276
Configuring the ISA agent . . . 278
Configuring the printer agent . . . 279
Configuring the Exchange agent. . . 280
Configuring protector services . . . 281
Configuring SMTP . . . 281
Configuring HTTP . . . 286
Configuring FTP . . . 288
Configuring chat . . . 289
Configuring plain text . . . 291
Balancing the load . . . 292
Defining load balancing distribution. . . 293
Topic 16 Configuring Endpoint Deployment. . . 295
Adding an endpoint profile. . . 296
General tab . . . 297
Servers tab. . . 298
Properties tab. . . 299
Encryption tab . . . 300
Rearranging endpoint profiles . . . 302
Deploying endpoint profiles. . . 302
Backing up encryption keys . . . 303
Restoring encryption keys . . . 303
Configuring endpoint settings . . . 304
Monitoring endpoint removable media . . . 305
Selecting endpoint destination channels to monitor. . . 305
Bypassing endpoint clients. . . 307
Using the endpoint client software. . . 308
TRITON - Data Security Help vii
Contents Viewing contained files. . . 310
Viewing logs . . . 310
Updating the endpoint client . . . 311
Topic 17 Troubleshooting . . . 313
Problems and Solutions . . . 313
Discovery . . . 314 Endpoint . . . 315 Fingerprinting . . . 316 Incidents . . . 318 Miscellaneous . . . 319 Performance . . . 320 Printer agent . . . 321 Protector . . . 322 Linking . . . 323 Online Help . . . 326 Technical Support. . . 326
Part IV: Appendices
Appendix A Predefined Policies . . . 331Data Usage policies . . . 331
Personally Identifiable Information (PII) . . . 332
Private Health Information (PHI) . . . 332
Credit Cards . . . 332
Financial Data . . . 332
Acceptable Use . . . 333
Company Confidential and Intellectual Property . . . 334
United States Federal and Industry Regulations . . . 334
United States - State Laws . . . 339
EMEA Policies . . . 345
APAC Regulations . . . 349
Data Discovery policies . . . 351
PCI. . . 351
Private Information . . . 351
Company Confidential and Intellectual Property . . . 352
Acceptable Use . . . 353
Regulations . . . 353
Appendix B Predefined Classifiers. . . 355
File-type classifiers. . . 355
NLP scripts . . . 358
Dictionaries. . . 371
viii Websense Data Security Contents
Appendix C Supported File Formats . . . 381
Appendix D Endpoint Applications . . . 397
Built-in support. . . 397
Importing other applications. . . 400
Appendix E File Size Limits . . . 403
Appendix F How Do I.... . . 407
Archive my incident data? . . . 407
Configure a policy? . . . 408
Create a custom block message? . . . 409
Define an exception? . . . 410
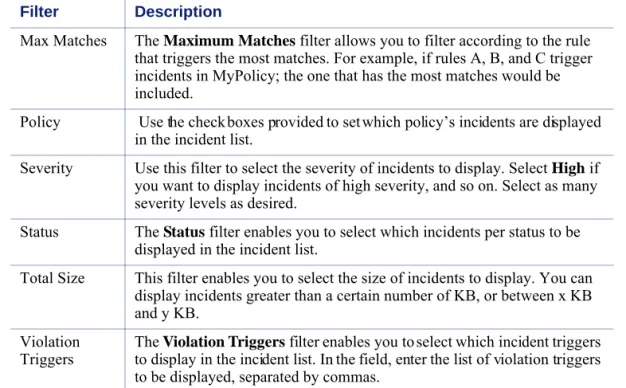
Filter incidents? . . . 410
Fingerprint data?. . . 411
Ignore sections of my document when fingerprinting? . . . 412
Fingerprint specific field combinations in a database table? . . . 413
Import/export the Oracle database? . . . 414
Mitigate false positives in pattern or dictionary phrases? . . . 414
Move from monitor to protect? . . . 414
Perform discovery?. . . 415
Permanently delete incidents? . . . 416
Appendix G Glossary . . . 417
P a r t I
G e t t i n g S t a r t e d
1
TRITON - Data Security Help 1
Overview
Websense® Data Security protects organizations from information leaks and data loss both at the perimeter and inside the organization.
Websense Data Security can operate alone in the network, or be paired with Websense Web and email security solutions (on-premises or in the cloud), to provide a well-rounded Essential Information Protection solution for your organization.
Websense Data Security protects organizations from data loss by:
Discovering the location of sensitive data inside the network Monitoring data as it travels inside or outside the organization
Protecting data while it is being manipulated in office applications, with
policy-based controls that align with business processes The 2 main components of Websense Data Security are:
The Data Security Management Server The Data Security Protector
The Data Security Management Server is a Windows 2003-based machine where you install the Websense Data Security software. This machine provides the core
information loss technology, capturing fingerprints, applying policies, and storing incident forensics. You can install multiple Data Security servers, sharing the analysis load, but one must be the primary, management server.
The protector is a Linux-based machine that intercepts and analyzes traffic on a variety of channels, such as email, HTTP, FTP, and chat. It is an essential component of Websense Data Security providing monitoring and blocking capabilities to prevent data loss and leaks of sensitive information. Using PreciseID technology, the protector can accurately monitor sensitive information in transit on any port.
In addition, Websense Data Security can utilize a variety of agents to intercept data on Exchange servers, print servers, and more. Endpoints that are deployed on users’ computers (PCs, laptop, etc.) enable administrators to analyze content within a user’s working environment and block or monitor policy breaches as defined by the endpoint profiles.
Overview
2 Websense Data Security
What can I protect?
Websense Data Security lets you control or monitor the flow of data throughout your organization. You can define:
Who can move and receive data What data can and cannot be moved Where the data can be sent
How the data can be sent
What action to take in case of a policy breach
Websense Data Security secures:
Network printers - You can monitor or prevent sensitive data from being printed
on any printer in your network.
Endpoint applications - You can monitor or prevent sensitive data from being
copied and pasted from one application to another on endpoint clients. This is desirable, because endpoint clients are often disconnected from the corporate network and can pose a security risk.
Endpoint removable media - You can monitor or prevent sensitive information
from being written to a removable device such as a USB flash drive, CD/DVD, or external hard disk.
Endpoint LANs - Users commonly take their laptops home and then copy data
through a LAN connection to a network drive/share on another computer.
You can specify a list of IPs, hostnames or IP networks of computers that are
allowed as a source or destination for LAN copy.
You can intercept data from an endpoint client.
You can set a different behavior according to the endpoint type (laptop/other)
and location (connected/not connected).
Note that Endpoint LAN control is applicable to Microsoft sharing only.
Email systems - You can monitor or prevent sensitive information from being
emailed in or outside of your domain.
Web channels
FTP - You can monitor or prevent sensitive information from being uploaded
to file transfer protocol (FTP) sites. Related topics:
Sources and destinations, page 105 Classifying Content, page 69 Defining Resources, page 103 Remediation, page 114
TRITON - Data Security Help 3 Overview
Chat - You can monitor sensitive information going out via instant messenger
applications such as Yahoo! Messenger.
Plain text -You can monitor or prevent sensitive information from being sent
via plain text (unformatted textual content).
HTTP/HTTPS - You can monitor or prevent sensitive information from
being posted to a Web site, blog, or forum via HTTP. You can also prevent users from downloading sensitive data from the Web.
Endpoint HTTP/HTTPS - You can monitor or protect endpoint devices such
as laptops from posting or downloading sensitive data over the Web. By such comprehensive monitoring of these channels, you can prevent data from leaving your organization by the most common means.
PreciseID fingerprinting
One of the ways that you can classify data in your organization is by “fingerprinting” it using the Websense patented PreciseID™ technology. (Other ways include
identifying key phrases, regular expression patterns, dictionaries, or file types. See
Classifying Content, page 69.)
The power of PreciseID techniques is its ability to detect sensitive information despite manipulation, reformatting, or other modification. Fingerprints enable the protection of whole or partial documents, antecedents, and derivative versions of the protected information, as well as snippets of the protected information whether cut and pasted or retyped.
PreciseID technology can fingerprint 2 types of data: structured and unstructured.
Structured fingerprinting defines what tables and what data inside the table should
be fingerprinted. (To set this up, select Main > Policy Management > Content Classifiers > PreciseID Fingerprinting - Database Records.)
Unstructured fingerprinting defines files and folders that should be fingerprinted.
(To set this up, select PreciseID Fingerprinting - Files & Directories.)
PreciseID classifiers not only define what to fingerprint, but when and how often to run the fingerprinting scan. That way, if files or data change after fingerprinting, Data Security stays up to date.
Related topics:
PreciseID Fingerprinting - files & directories, page 84 PreciseID Fingerprinting - database records, page 89 PreciseID Natural Language Processing (NLP), page 82 Classifying Content, page 69
Overview
4 Websense Data Security
At scan time, PreciseID technology examines the content of documents or raw data and extracts a set of mathematical descriptors or “information fingerprints.” These fingerprints are compact and describe the underlying content. By assigning unique identities to each information asset, PreciseID technology can track information in motion with great precision. Original content cannot be recreated or reverse engineered from the PreciseID information fingerprint.
PreciseID supports real-time hash validation for data identification and integrity. You can fingerprint data in all common languages. Websense has fine-tuned fingerprinting for English, Spanish, German, Russian, Hebrew, and Japanese.
Policy database and engine
There is a policy database and a policy engine on all Websense Data Security servers and the protector. The policy database is a repository for all of the policies you create. For optimal performance, it is stored locally on each server, as is the fingerprint database. The policy database is “pushed” during the deploy operation, while fingerprints are distributed automatically as they are generated.
The policy engine is responsible for parsing your data and using analytics to compare it to the rules in your policies. If you are combining Websense Web and Data Security solutions, the policy engine resides on the Websense Content Gateway as well. This allows the 2 systems to interoperate seamlessly to secure your enterprise. A policy engine also resides on endpoints, but with only unstructured fingerprints.
Managing Websense Data Security
The interface that you use to manage Websense Data Security is called the TRITON™ Unified Security Center. TRITON has modules for both Web security and data
security. TRITONis a Web-based user interface that enables you to perform basic Related topics:
Balancing the load, page 292
Configuring the policy engine, page 268
Related topics:
TRITON - Data Security Help 5 Overview
setup, system maintenance, policy creation, reporting, and incident management for both modules in the same location.
To access TRITON - Data Security, click the Websense TRITON Data Security
shortcut placed on the desktop during installation or select Websense TRITON Data Security from your Start menu.
TRITON - Data Security consolidates all aspects of Websense Data Security setup and configuration, incident management, system status reports, and role-based
administration.
For more information on using the TRITON - Data Security interface, see Navigating the System, page 7.
Web Security Gateway Anywhere mode
Websense Data Security works seamlessly with Websense Web Security and Websense Web Security Gateway. You can purchase full subscriptions for these products to make use of their complete capabilities.
If you have Websense Web Security Gateway Anywhere, data loss is prevented on Web channels only and you are not required to purchase a separate Data Security subscription or a protector appliance.
The Web channels covered by Web Security Gateway Anywhere include HTTP, HTTPS, FTP, and FTP-over-HTTP. This allows you to prevent posts to Web sites, blogs, and forums as well as FTP sites.
Note
TRITON Unified Security Center supports Internet Explorer 7 and 8 and Firefox 3.0.x - 3.5.x. If you have another browser version, unexpected behavior may result.
Note
If you have Websense Web Security Gateway Anywhere, you won’t see all the options that are presented in this Help system. If you require access to other options and channels that you see here, talk to your Websense account
representative about purchasing a full Websense Data Security subscription.
Overview
2
TRITON - Data Security Help 7
Navigating the System
In this section, you will learn how to navigate the TRITON - Data Security interface. It covers:
Logging on
Collapsible navigation and content panes Today page Toolbar Icons Breadcrumbs Check boxes Pagination
Reviewing and deploying changes
Logging on
There are 3 ways to access TRITON - Data Security:
Click the Websense TRITON - Data Security shortcut placed on the desktop
during installation.
Select Start > Programs > Websense > Websense TRITON - Data Security
from your Windows Start menu.
Open a browser window, and enter the following URL into the address field: https://<IP_or_hostname>:8443/dlp/pages/mainFrame.jsf
where <IP_or_hostname> is the IP address or host name of the Data Security Management Server.
Initially, your user name and password are both WebsenseAdministrator
(case-sensitive). Enter these credentials and click Log On. Note
The host name must not contain underscore
characters.
Navigating the System
8 Websense Data Security
In the Change Password screen, type the old password, WebsenseAdministrator then
enter a new password and retype it for confirmation. Click Save & Log On. If you log
onto TRITON - Web Security and configure Linking before logging onto TRITON - Data Security for the first time, your password is automatically set to the Web Security
WebsenseAdministrator password.
Troubleshooting log on
If you are unable to connect to TRITON - Data Security on the default port, refer to the dlp-all.log file on the Data Security Management Server (located by default in the
C:\Program Files\Websense\data security\tomcat\logs\dlp directory) to verify the port. If you are using the correct port, and are still unable to connect to TRITON - Data Security from a remote machine, make sure that your firewall allows communication on that port.
Security certificate alerts
An SSL connection is used for secure, browser-based communication with TRITON - Data Security. This connection uses a security certificate issued by Websense, Inc. Because the supported browsers do not recognize Websense, Inc., as a known
Certificate Authority, a certificate error is displayed the first time you launch TRITON - Data Security from a new browser. To avoid seeing this error, you can install or permanently accept the certificate within the browser.
1. Click the link on the log on page for instructions on installing the certificate.
2. When asked “Would you like to install the certificate on this server?”, click Yes.
(Select Don’t show this alert on the logon screen again to permanently remove
the note from the logon screen.)
3. If a yellow bar appears at the top of the resulting browser window, click it and download the required ActiveX control.
4. Click Install to install the Websense certificate.
Once the security certificate has been accepted, the TRITON - Data Security logon page is displayed in the browser window.
If you want to restore the alert warning for any reason, navigate to Settings > Authorization > My Settings and select Show all reminders.
Note
A maximum of 20 users can be signed in simultaneously, each in a separate browser instance.
Note
Opening more than one session of TRITON - Data Security in the same browser results in unexpected behavior.
TRITON - Data Security Help 9 Navigating the System
Windows 7 considerations
If you are using the Windows 7 operating system, you may need run the browser as administrator for it to allow ActiveX controls.
1. Right-click the browser application and select Run as administrator.
2. Log on to TRITON - Data Security and accept the security certificate as described above.
Adobe Flash Player
Adobe Flash Player v8 or beyond is required for the Data Security Today and System Health dashboards. All the other functions of the manager interface can operate without Flash. If you do not already have Flash Player, you are prompted to install it when you log on. Click the link that is supplied and download Flash Player from the Adobe download center.
Time outs
A TRITON - Data Security session ends 30 minutes after the last action taken in the user interface (clicking from page to page, entering information, caching changes, or saving changes).
If no activity has taken place in TRITON - Data Security during this time, you are logged out, even if you are working in other modules of the TRITON security center. If you have multiple tabs in the same browser displaying TRITON - Data Security and
you are working in one of the tabs, the others do not expire.
If you have multiple windows displaying TRITON - Data Security and you are
working in one of the windows, the time out behavior depends on the browser type:
In Firefox and Internet Explorer v8, the other windows do not expire In Internet Explorer v7, the other windows expire
Note
If you have multiple TRITON - Data Security instances open, whether in browser tabs or windows, changes made in one are reflected in the others once you refresh the screen.
Navigating the System
10 Websense Data Security
The TRITON module tray
The TRITON module tray indicates which module is active.
When you log onto TRITON - Data Security, the Data Security module is active and the Data Security button in the module tray is yellow. When you’re in TRITON - Web Security, the Web Security button is yellow, and the Data Security button is grey. If you have a subscription to Websense Web Security, Websense Web Security Gateway, or Websense Web Security Gateway Anywhere, you can enable the buttons in the module tray so that administrators can easily switch between TRITON - Web Security and TRITON - Data Security. (You must have administrator accounts with the same user names and passwords in both managers for this to work.) See Linking data and Web security, page 236 for instructions on configuring this option.
Until you configure linking, clicking the Web Security button opens a Web page describing the benefits of Websense Web security solutions.The Email Security button displays a similar Web page.
Collapsible navigation and content panes
The left pane of the TRITON Unified Security Center is known as the navigation
pane. The navigation pane is organized with tabs and buttons, some of which offer a
Note
Once you have opened both management consoles in the TRITON security center, use the operating system task bar to switch between the two.
Related topics:
Main tab, page 12 Settings tab, page 13
TRITON - Data Security Help 11 Navigating the System
menu of options. The right pane is known as the content pane. The content in this
pane varies according to the selection in the navigation pane.
The navigation pane is collapsible to enable larger working space and a wider display area for all TRITON pages. In TRITON - Data Security, this is especially useful for the Data Usage and Data Discovery reports.
To collapse the navigation pane, click the arrows in the upper-right corner of the pane. To expand it, click the arrows again. You can do this on any page in the TRITON security center. Content Pane Navigation Pane Collapse Arrow
Navigating the System
12 Websense Data Security
There are 2 tabs on the navigation pane: Main and Settings. In TRITON - Data Security:
The Main tab is where you create and fine-tune policies, perform discovery,
manage incidents, and view system status and logs.
The Settings tab is where you administer the system. Here, you can perform
system maintenance; configure endpoint deployment; and configure settings, modules, and roles.
Main tab
*Not included with Websense Web Security Gateway Anywhere.
Incidents & Reports
Data Usage: View and manage data usage incidents relevant to the active
administrator. You can assign incidents to other administrators and view consolidated reports on incidents and information leaks. This gives you a complete picture of what’s going on inside your network. You can also schedule reporting tasks.
Data Discovery*: View information about incidents that were discovered through
data discovery. Using this screen, you can assign, view, and monitor data discovery incidents.
Policy Management
Data Usage Policies: Create or manage a network policy or endpoint policy. You
can create policies from scratch or by using a predefined regulatorytemplate.
Data Discovery Policies*: Create or manage a data discovery policy. You can
create policies from scratch or using a predefined regulatory template.
Note
If you have Websense Web Security Gateway Anywhere, your tabs look slightly different. That’s because not all of the options apply to you, such as discovery and endpoint.
Related topics:
Viewing Incidents and Reports, page 161 Creating a custom policy, page 50 Performing Discovery, page 125
Scheduling Data Discovery Tasks, page 137 Classifying Content, page 69
Defining Resources, page 103 Viewing Status and Logs, page 203
TRITON - Data Security Help 13 Navigating the System
Data Discovery Tasks*: Schedule data discovery tasks.
Content Classifiers: Describe the data to be governed. You can classify data by
file properties, key phrases, dictionaries, natural-language patterns (NLP), a database record fingerprint, a directory (including SharePoint) fingerprint, and/or a file fingerprint.
Resources: Define the source and destination of the data you want to protect, the
endpoint device or application that may be in use, and the remediation or action to take when a violation is discovered (such as block or notify).
Status & Logs
Today: The Today page appears first when you log on to TRITON - Data
Security. It provides an at-a-glance dashboard of the enterprise data loss prevention status.
For more information about the Today page, see Today page, page 14. System Health: This enables you to monitor Websense Data Security
performance. See Monitoring system health, page 206.
Endpoint Status*: On this page you can view a list of data endpoints that are
registered with the Data Security Management Server, including information regarding an endpoint’s data discovery, profile and policy, and the host’s system summary. See Viewing endpoint status, page 208.
Traffic Log: This enables you to see details of the traffic being monitored by
Websense Data Security. See Traffic log, page 210.
System Log: Here you can view a list of the events sent from system components,
such as the Data Security servers, protectors, and policy engines. See System log,
page 211.
Audit Log: This page displays a list of actions that administrators have performed
in the system. See Audit log, page 212.
Settings tab
*Not included with Websense Web Security Gateway Anywhere. Related topics:
Configuring System Settings, page 215 Configuring Authorization, page 241 Archiving Incidents, page 249 Managing System Modules, page 257 Configuring Endpoint Deployment, page 295 Main tab, page 12
Navigating the System
14 Websense Data Security
Configuration
System: Configure basic system settings for incidents and forensics, user
directories, mail gateways, Websense product integration, and more.
Authorization: Set up and manage TRITON - Data Security system
administrators, assign access roles, and change your own password.
Archive: Archive partitions for incident storage.
Deployment
System Modules: Manage system components such as Data Security servers,
fingerprint repositories, policy engines, and agents.
Endpoint*: Configure endpoint profiles.
Today page
When you log onto TRITON - Data Security, the Today page displays. This page includes a comprehensive view of data usage incidents that occurred in the last 24 hours, and the total number of data discovery incidents.
From the Today page, you can see any system alerts and act on them quickly and easily. You can also view incidents by host names and policy categories so you know where your greatest risks lie.
For details about the Today page and its contents, see Viewing the Today page, page
204.
Toolbar
The top banner displays the user name and access role of the person who is logged into the system. The user’s access role affects the screens and incidents that he or she can view.
TRITON - Data Security Help 15 Navigating the System
The Refresh button updates the data on the screen.
The Help button (the question mark icon) is your access to information whether you
are learning how to use the system or troubleshooting it. You have several options in the Help’s drop-down menu:
Explain this page: Context-sensitive help about the active TRITON - Data
Security screen. To access the entire Help system from the context help page, click the Browse button in the upper-left corner of the help page.
Help Contents: The complete online Help system for Websense Data Security.
Support Portal: Quick access to the Websense Customer Support portal and
Knowledge Base.
About TRITON - Data Security: Version information about the software you’ve
licensed.
In Websense Data Security, your policy and configuration changes are saved as soon as you make them and click OK, but they are localized to the Data Security
Management Server.
To deploy changes across your network, you must click the Deploy button on the
TRITON banner. (See Reviewing and deploying changes, page 22.)
The Deploy button deploys your policy changes across all network components—the
protector, agents, gateways, endpoint hosts, etc. This includes changes to policies, rules, exceptions, resources, content classifiers, and tasks.
Tip
In addition to these Help features, many screens offer an information icon:
This is another tool for user assistance. The icon displays vital information about its related field.
Navigating the System
16 Websense Data Security
If you have changes waiting to be deployed, the Deploy button is highlighted yellow
to indicate the deployment is required.
Click the left button (the magnifying glass icon) to view the status of the last deployment. Click the right button to deploy the settings you configured.
If no changes are awaiting deployment, the Deploy button is white, but you can still
view deployment status.
If you are not allowed to deploy or see the last status, these buttons are greyed out. In TRITON - Web Security, the Save All button performs a similar function.
Icons
The following icons are used throughout the TRITON - Data Security interface:
Note
Deploy is not the same as Enabled. When you create
Websense Data Security rules, exceptions, and policies, you mark them as Enabled or Disabled. You can deploy them in either state. You might deploy a policy with all its rules enabled, and later want to disable a rule because of false positives. Or you might disable the entire policy temporarily.
Icon Description
System Modules
Data Security Management Server Data Security Server
TRITON - Data Security Help 17 Navigating the System
Content Gateway SMTP agent ISA agent Printer agent Exchange agent WES agent
PreciseID fingerprint repository
Endpoint server Crawler Forensics repository Policy engine ICAP server Deployment Status Modified Disabled Icon Description
Navigating the System
18 Websense Data Security
Forced Bypass
Severity
High Medium Low
Incident Status Flags
New In Process Closed Endpoint Operations Print Cut/copy Paste File access Download Screen capture Icon Description
TRITON - Data Security Help 19 Navigating the System
Channels HTTP Endpoint Exchange FTP IM Printer SMTP ICAP Web Details report Escalate Hide preview Show preview
Add scheduled task - accesses the Task Scheduler screen
Print preview - Current, selected, or all filtered incidents
Navigating the System
20 Websense Data Security
Incidents & Reports
Details report
Summary report
Print and Export
Export as PDF
Export as CSV
Print Preview
System-wide
When a user modification or update to the system fails, the Error icon is displayed at the top of the screen with an explanation of the failure.
When a user modification or update to the system succeeds, the Success icon is displayed at the top of the screen with a description of what has been done. The Information icon provides added details upon click.
The Note icon is displayed when extra information is supplied that is pertinent to the configuration.
TRITON - Data Security Help 21 Navigating the System
Breadcrumbs
Breadcrumbs appear at the top of each screen, providing you with the complete path of screens that you have visited up to the current page. The paths are clickable links that direct you to the relative screen.
The Help system also includes breadcrumbs.
Check boxes
Most check boxes used in the TRITON - Data Security interface function in a hierarchical manner. In tables, the title check box enables you to select or deselect all the check boxes below it. In forms, clicking a check box allows you to access the
Navigating the System
22 Websense Data Security
check boxes below it and then activate them as necessary. Disabling the highest-level check box disables lower-level check boxes as well.
Pagination
In tables where there is more than one page of data (more than 50 items), the pagination control enables you to move from one page to another.
The Next and Previous buttons move to the next or previous pages, while the First
button moves to the first page and the Last button accesses the final page.
Reviewing and deploying changes
In Websense Data Security, your policy and configuration changes are saved as soon as you make them, but they are not deployed across your network until you click the
Deploy button on the TRITON banner.
If you have changes waiting to be deployed, the Deploy button turns yellow and
flashes occasionally to indicate the deployment is required. If no changes are awaiting deployment, the Deploy button is white. If the user has no permission to deploy or to
see the last deployment status, the button is greyed out.
Before you click Deploy, be sure to review your configuration changes.
When you click Deploy, a confirmation message appears:
You are about to deploy the current settings. Click OK to continue.
TRITON - Data Security Help 23 Navigating the System
You will see a table indicating the dynamic status of the components being deployed.
Deploying changes can take time, and if a component is down or disconnected from the network, deployment can fail. If Websense Data Security encounters problems, you’ll see a message indicating deployment failure in the table.
While your changes are being deployed across your network, you can see the status column updates for each module from Processing to either Success or Failed.
See Troubleshooting for tips on how to solve failed deployments.
Note
When deploying settings to the protector, active instant messenger (IM) sessions are no longer monitored. Every IM session that is opened after the deploy is monitored; however, existing connections are not be monitored after the deploy.
If you have deployed a protector is in inline mode, when you deploy changes to network settings, users lose an Internet connection for approximately 5 seconds.
Navigating the System
3
TRITON - Data Security Help 25
Initial Setup
To get Websense Data Security up and running, follow these basic steps:
1. Enter your Websense Data Security subscription key.
2. Define the general system settings, such as user directories and alerts.
3. Set up notifications.
4. Configure the system modules.
5. Run the first-time policy wizard.
6. Deploy your settings.
If you have Websense Web Security Gateway Anywhere, follow these steps:
1. Define the general system settings, such as user directories and alerts.
2. Configure linking with Websense Web Security.
3. Run the first-time policy wizard.
4. Deploy your settings.
Basic instructions are provided in this chapter. For more detailed instructions, follow the links under Related topics.
Related topics:
Entering your subscription key, page 26 Defining general system settings, page 26 Setting up notifications, page 29
Configuring linking, page 31
Configuring system modules, page 32 Running the first-time policy wizard, page 36 Reviewing and deploying changes, page 22
Initial Setup
26 Websense Data Security
Entering your subscription key
Before beginning to work with the Websense Data Security you must enter your subscription key:
1. Log on to TRITON - Data Security. If you have never entered subscription information before, the subscription page appears automatically. If you need to navigate to the subscription page:
a. Select Settings > Configuration > System.
b. From the System pane, choose Subscription.
2. Select the product to which you subscribe:
Data Security Suite
Websense Web Security Gateway Anywhere
3. If you select Data Security Suite, browse to your subscription file, then click
Submit. Your current subscription information is displayed, and the TRITON -
Data Security application restarts.
4. If your license is about to expire, you’ll see a notice in this screen, along with an Update button. Click the Update button to update your subscription. Once
updated, you’ll need to log off and then log on again to see accurate information on the subscription screen.
Defining general system settings
Related topics:
Entering subscription settings, page 235
Note
If you have Websense Web Security Gateway Anywhere, enter your subscription information in TRITON - Web Security or Content Gateway Manager. It is communicated to the Data Security Management Server automatically.
Related topics:
Configuring user directory server settings, page 27 Setting up alerts, page 28
TRITON - Data Security Help 27 Initial Setup
On the Settings tab, there are settings to configure before you can get started. Namely,
you need to:
Configure user directory server settings. This lets you base your administrator
logon authentication on user directory credentials, resolve user details during analysis, and enhance the details displayed with the incident.
Set up alerts. This lets you configure the cases when administrators receive alerts
from the system, such as when a subscription is about to expire or disk space is reaching its limit.
Configuring user directory server settings
1. Select Settings > Configuration > System.
2. Click the User Directories option in the System pane.
3. Click New in the toolbar.
4. In the Add User Directory Server screen, complete the following fields: Related topics:
Configuring user directory settings, page 225
Field Description
Name Enter a name for the user directory server.
Type Select the type of directory from the pull-down menu:
Active Directory, Domino, ADAM, or CSV file. Follow referral Select Follow referral if you want Websense Data
Security to follow server referrals should they exist. Otherwise, select Ignore referrals. A server referral is
when one server refers to another for programs or data.
Connection Settings
IP address or host name Enter the IP address or host name of the user directory server.
Port Enter the port number of the user directory server.
User name Enter a user name that has access to the directory server.
Password Enter the password for this user name.
Use SSL Connection Select this box if you want to connect to the directory server using Secure Sockets Layer (SSL) encryption. Test Connection Click this button to test your connection to the
user-directory server.
Initial Setup
28 Websense Data Security
5. Click OK to save your changes.
Setting up alerts
1. Select Settings > Configuration > System.
2. Select the Alerts option in the System pane.
3. On the General tab select the conditions on which you want to trigger alerts.
Import user records from
this server Select this option if you want to import user and group information from the specified directory server to your resource page. If you do not select this box, you cannot add these resources to your policies.
Get additional user
attributes Select this box if you want to retrieve additional user attributes from the directory server. Attributes to retrieve Enter the user attributes that you want TRITON - Data
Security to collect for all users (comma separated). Sample email address Enter a valid email address with which you can perform a
test.
Test Attributes Click Test Attributes to retrieve user information on the
email address you supplied. Click View Results to check
the user information imported. Use this server to
authenticate logged-in administrator
Select this option if you want to authenticate
administrators on this server when they log on to TRITON - Data Security.
Note
If you select CSV as the file type in the Add User Directory Server, you won’t see the IP address, port, and SSL fields. You need to supply the full path for the CSV files, along with a user name and password. The Test Connection functionality is the same.
There are no Directory usage fields associated with CSV files.
Field Description
Related topics:
Configuring alerts, page 232
TRITON - Data Security Help 29 Initial Setup
4. On the Email Properties tab, complete the fields as follows:
5. To define or edit the Outgoing mail server, click Edit (the pencil icon). Complete
the fields as follows:
6. Complete the remaining fields as follows:
7. Click OK to save your changes.
Setting up notifications
Notification are configured on the Resources page. Notifications are email messages
that are sent when policy breaches are discovered.
Field Description
Sender name When an alert is sent to administrators, from whom should it be coming?
Sender email address Enter the email address of the person from whom the alert is coming.
Field Description
IP address or host name Enter the IP address or host name of the outgoing SMTP mail server to use for scheduled alert notifications.
Port Enter the port number of the mail server to use.
Field Description
Subject Enter a subject for alerts. Click the right-arrow to select a variable to include in the subject, such as %Severity%. Recipients Click Edit to select the recipients to whom alerts should be
sent.
Note
The same outgoing mail server is used for alerts, notifications, and scheduled tasks. The settings you use here apply to the other cases, and if you change the settings for one, it affects the others.
Note
If you have Websense Web Security Gateway Anywhere, this step does not apply to you.
Initial Setup
30 Websense Data Security
Websense Data Security offers a built-in notification template, Default notification,
that you can edit as required. This notification is used as a default by the built-in action plans: to ensure that a notification is sent when an action plan is triggered, either edit the Default notification or create a new notification and edit your action plan to use it. See Notifications, page 121 and Action Plans, page 114 for more details. 1. Select Main > Policy Management > Resources.
2. From the Remediation section, select the Notifications option.
3. Click New on the toolbar.
4. Enter a name and description for this notification template, such as “Breach notification”.
5. On the General tab, complete the fields as follows:
6. You already configured the outgoing mail server when setting up alerts. The same server is used for notifications and scheduled tasks. There is no need to change this here.
7. Complete the remaining fields as follows:
Field Description
Sender name Enter the name of the person from whom notifications should be sent. This is the name that will appear in the email From field.
Sender email address Enter the email address of the person from whom notifications should be sent.
Field Description
Subject Type the subject of the notification. This appears in the email Subject: line. Click the right arrow to choose
variables to include in the subject, such as “This is to notify you that your message was %Action Taken% because it breached corporate policy.”
Recipients Define the recipient(s) for the notification.
Click Edit to select to select users or groups from a user
directory.
Select Additional email addresses then click the right
arrow to select a dynamic recipient that varies according to the incident. For example, you can choose to send the notification to the policy owners, administrators, source, or source’s manager. Select the variable that applies, such as %Policy Owners%.
TRITON - Data Security Help 31 Initial Setup
8. On the Notification Body tab, select a notification type and display format from
the drop-down lists.
9. Click OK to save your changes.
Configuring linking
In order to include URL categories in policies or perform IP address to user name resolution for incidents, you must configure linking and enable the Websense Linking Service. You can configure this in the TRITON - Data Security or TRITON - Web Security user interface. If you have configured linking in the Websense Web Security product, you do not need to do it here as well.
To configure linking in TRITON - Data Security:
1. Select Settings > Configuration > System.
2. From the System pane, choose Linking.
3. Enter the IP address and port as follows:
Field Description
Type For fastest set up, select Standard and leave all the check
boxes selected.
See Notifications, page 121 if you want to customize
notifications.
Display as Select a display format from the drop-down list: HTML or plain text.
Related topics:
Linking data and Web security, page 236
Note
This step applies only to customers with Websense Web security solutions (Websense Web Filter, Web Security, Web Security Gateway, or Web Security Gateway Anywhere).
Field Description
IP address or host name Enter the IP address or host name of the TRITON - Web Security machine (also known as the Web Security Manager machine).
Port Enter the port number of the TRITON - Web Security
Initial Setup
32 Websense Data Security
4. Click Link. This creates a connection between TRITON - Data Security and
TRITON - Web Security.
When you click Link, TRITON - Data Security looks for the Websense Linking
Service and enables it. It displays the IP address and port number for the Linking Service that it found in the Linking Service section of the screen.
If it cannot find the Linking Service, this information is not displayed. Refer to
Linking Service information is not shown on the Linking page, page 323 for
troubleshooting tips.
5. Click Test Connection to test the linking connection. A confirmation message is
returned.
6. Click OK.
For information on enabling the module tray buttons, importing URL categories, or editing or disabling Linking Service properties, see Linking data and Web security,
page 236.
Configuring system modules
When you install Websense Data Security, the modules you install are automatically registered with the Data Security Management Server.
Select Settings > Deployment > System Modules to view a list of all the modules
you installed.
The Data Security Management Server has the following modules by default:
SMTP agent
PreciseID fingerprint repository Endpoint server
Crawler (fingerprinting and data discovery agent) Forensics repository
Policy engine
The protector appliance has the following modules: Related topics:
Managing System Modules, page 257 Configuring the protector, page 33
Note
If you have Websense Web Security Gateway Anywhere, this step does not apply to you.
TRITON - Data Security Help 33 Initial Setup
ICAP agent Policy engine
PreciseID fingerprint repository
It is also a module itself.
If added any other modules to your system—such as supplemental Data Security servers, agents, crawlers, or the Websense Content Gateway—these components appear in the tree view as well.
To get Websense Data Security up and running, all you have to do is configure the protector. You need only configure the other modules for non-default behavior. In some cases, the protector is not even required—as in some endpoint deployments and in Websense Web Security Gateway Anywhere deployments.
Configuring the protector
1. Select Settings > Deployment > System Modules.
2. If it is not already, expand the tree in the content pane.
3. Click the protector module in the tree and provide the information in all the tabs offered:
General tab, page 33 Networking tab, page 34 Local Networks tab, page 35 Services, page 35
General tab
Note
See the Websense Data Security Deployment Guide for
instructions on installing Websense Data Security modules.
Note
Refer to Configuring modules, page 260 for information
on the default settings of system modules.
Field Description
Name The name you gave the protector when you added it. Edit as
desired.
Description The description you gave the protector when you added it. Edit as desired.
Initial Setup
34 Websense Data Security
Networking tab
Enabled Select Enabled to activate this protector in your system.
Though you have added the protector, it is not used until you select Enabled.
Host name Read-only field of current host name.
IP address Read-only field of current IP address.
Managed by Enter the name of the Data Security Management Server that should manage this protector.
Field Description
Field Description
Default gateway Enter the name of your default network gateway.
This is the gateway that your computer uses when it needs to route data to a network that is not directly accessible (for example, it’s in a different VLAN).
Interface Select the type of network interface being used for this protector. DNS servers Enter the IP address of your network Domain Name System
(DNS) server, then click Add. If you have more than one DNS
server, add them all.
DNS suffixes Enter the DNS suffix used by your organization, then click Add.
If you have more than one DNS suffix, add them all.
Connection mode Select a connection mode from the drop-down list to indicate how you have deployed this protector. Was it deployed in inline (bridge) or SPAN/mirror port mode?
TRITON - Data Security Help 35 Initial Setup
Local Networks tab
Services
Select the services you want the protector to monitor or add a new service. The
Services tab indicates whether incoming, outgoing, or internal data is to be monitored
(unless you selected Include all networks above, in which case all traffic is
monitored regardless). In most cases, the default settings are sufficient to get you started.
Network interfaces There are 4 types of network interfaces: Management, Bridge, Monitoring, and Network. Click an interface to view or change details about it. A dialog appears. Depending on the interface, you might be asked to enter the following:
Interface name - The name of the network interface. Status - Set the status of the interface to Up or Down. Mode - Select Network or Monitoring
Interface IP address - Enter the interface’s IP address. Subnet mask - Enter a subnet mask for the interface. Link speed - Set the Link Speed to either: 10Mb/s, 100 Mb/s,
1000Mb/s, Automatic.
Duplex mode - Set Duplex Mode to either Half, Full or
Automatic.
Bridge name - The name of the network interface.
Enable bypass mode - Select this option to activate bridge
failover.
Force bypass - Select this option to force bridge into bypass
mode.
Enable VLAN support Select this check box if you want to enable Virtual LAN support on this network.
Field Description
Field Description
Include all networks Select this radio button to cover all local networks with the protector.
Note that when you select this option, the protector accepts all traffic it sees for processing, regardless of the Direction setting on the Services tab.
Include specific
networks Select this radio button to specify which local networks to cover, then specify the following: Network address - Specify the network IP address to
include.
Subnet mask - Specify the network subnet mask to include.
Initial Setup
36 Websense Data Security
To change the default settings, click a service name or highlight a name and click
Edit. Refer to Configuring the protector, page 269 for information on configuring
protector services.
Running the first-time policy wizard
Once you have installed Websense Data Security software and defined an administrator, the next step is to create a policy.
Websense Data Security comes with a rich set of predefined policies that cover the data requirements for a variety of regulatory agencies (such as GLBA, HIPPA, and Sarbanes-Oxley) all over the globe. For each policy, there is a template that was composed in accordance to specific regulations or acts. The template is an XML document that defines policy content.
Websense Data Security provides a policy wizard that allows you to select predefined policies to monitor and control the communication of customer data and company confidential information according to specific laws and regulations.
To create your first policy:
1. Select Main > Policy Management > Data Usage Policies.
or
Main > Policy Management > Data Discovery Policies.
Choose the first option to create a policy that protects data in your network or endpoint systems.
Choose the second option to create a policy that will discover the location of sensitive data in your enterprise.
2. Read the Welcome screen and click Next when you’re ready to proceed.
3. In the Regions screen, indicate the region or regions for which you will be
creating policies. This helps the policy wizard focus on policies generally relevant to your geographical location. Expand the tree by clicking the plus signs. Click
Next when you’re done.
4. In the Industries screen, select the industry or industries relevant to the policies
you will create. This helps the policy wizard focus on policies generally relevant to your industry.
If the policies are to be run at a public company, select the Public Company
check box to ensure all policies relevant to public companies are available.
5. Click Next. The Policies Templates screen appears showing policies that may be
relevant for your organization. Highlight a policy to read details about it. You can view all relevant policies or only those that are commonly used. (For more information about these regulatory compliance policies, refer to Predefined Policies, page 331.)
6. Select the policies you want to apply in your organization by checking the box next to their policy names. When you are satisfied with the policies you have selected, click Next.
TRITON - Data Security Help 37 Initial Setup
7. The Finish screen appears, summarizing your selections. Click Finish. The
Websense Data Security policy database is updated and a confirmation message appears.
Many times, these predefined regulatory policies are all our customers need to deploy. However, once you are accustomed to monitoring incidents from these mission-critical policies, you may choose to create custom policies to safeguard other types of data as well—for example, proprietary data on file servers and SharePoint.
You create custom policies using wizards as well. Refer to Chapter 4 for information on creating policies for your network and endpoint machines. Refer to Chapter 5 for instructions on creating data discovery policies.
Deploying your settings
To deploy all the settings and policies you configured in this chapter, click Deploy in
the TRITON - Web Security toolbar.
Note
The Regions and Industries settings you configured in this section are applied to data discovery policies as well as data usage. You do not need to select them again. If you want to change them in the future, go to the policies view, click Policy Templates then click Filter.
Warning
If you customize one of Websense’s built-in policies and save it under a new name, you are responsible for keeping that policy up to date.
Initial Setup
P a r t I I
S e c u r i n g Y o u r C o m p a n y ’ s D a t a
4
TRITON - Data Security Help 41
Creating Custom Policies
Once you’ve had an opportunity to run your regulatory policies for a while and monitor the results, you might want to create custom policies.
Although much of this process is performed through wizards, it’s important that you understand some key concepts before you get started.
What’s in a policy?
Related topics:
What’s in a policy?, page 41 Viewing policies, page 43
Creating a custom policy, page 50
Related topics:
Managing rules, page 63 Adding exceptions, page 63 Classifying Content, page 69 Defining Resources, page 103
Creating Custom Policies
42 Websense Data Security
In Websense Data Security, policies contain rules, exceptions, conditions (defined by content classifiers), and resources. This is true of predefined and custom policies.
These components are the building blocks of a policy. When you create a policy from a policy template, it contains rules, exceptions, classifiers, sources, destinations, and actions already. When you create a policy from scratch, wizards prompt you for such information.
Element Description
Rules Provide the logic for the policy. They are the conditions that govern the behavior of the policy. When should something be blocked? When should managers be notified?
Exceptions Define the conditions that should be exempt from the rules. An exception is part of a rule and checked only when its rule is triggered.
Content
classifiers Describe the data to be governed. You can classify data by file properties, key phrases, dictionaries, natural language processing (NLP), a database record fingerprint, a directory fingerprint, and/or a file fingerprint. Resources Describe the source and destination of the data you want to protect, the
endpoint device or application that may be in use, and the remediation or action to take when a violation is discovered (such as block or notify).