guava easyCyte™ System
User Guide
Copyright © 2014 EMD Millipore Corporation, Inc. All rights reserved.
No part of this publication may be reproduced, transmitted, transcribed, stored in retrieval systems, or translated into any form, or by any means: electronic, mechanical, magnetic, optical, or otherwise, without the prior written permission of EMD Millipore Corporation, 25801 Industrial Blvd., Hayward, CA 94545, United States of America.
Disclaimer EMD Millipore reserves the right to change its products and services at any time to incorporate the latest technological developments. This guide is subject to change without notice.
EMD Millipore has thoroughly tested the operation of guavaSoft™ Software on Microsoft® Windows® XP and Windows® 7 operating systems, but does not warrant that the software functions correctly on any other operating system.
EMD Millipore has not validated the analysis of guava easyCyte™ System data using third-party programs and cannot warrant that the results using these programs will be correct. EMD Millipore does not provide support for any third-party programs.
Limitations The guava easyCyte™ System is for research use only; not for use in diagnostic procedures. The results of the assays are dependent upon the proper use of the reagents and instrument. Please refer to the appropriate package insert for specific instructions and limitations.
Trademarks The M logo is a trademark of Merck KGaA, Darmstadt, Germany.
Millipore, FlowCellect, InCyte, easyCheck, guavaSoft, ViaCount, Nexin, and guava are registered trademarks or trademarks of EMD Millipore Corporation.
Microsoft, Windows, Internet Explorer, and Excel are registered trademarks of Microsoft Corporation.
Dell is a trademark of the Dell Computer Corporation.
All other trademarks are property of their respective companies.
Patents The guava easyCyte™ System is the subject of issued and pending US patents and foreign
equivalents, including the following US patents:
5,798,222 – Apparatus for monitoring substances in organisms 6,403,378 – Cell Viability assay reagents
6,710,871 and 6,816,257 – Method and apparatus for detecting microparticles in fluid samples 7,320,775 – Exchangeable flow cell assembly with a suspended capillary
7,410,809 – Particle or cell analyzer and method
Preface . . . vii
About This Guide . . . viii
Safety . . . viii
Limitations . . . x
Chapter 1: Introduction
guava easyCyte™ System . . . .1-1 System Components . . . .1-2 Hardware Connections . . . .1-2 easyCyte™ System Troubleshooting . . . .1-4 easyCyte™ Instrument . . . .1-6 guavaSoft™ Software Overview . . . .1-8 Main Menu . . . .1-8 Unlocking guava InCyte™ . . . .1-10 FlowCellect® Templates . . . .1-11 guava InCyte™ Overview . . . .1-12 About guava InCyte™ . . . .1-12 Tool Bar . . . .1-13 InCyte™ Acquisition Screen . . . .1-14 InCyte™ Analysis Screen . . . .1-18 Exiting the Assay . . . .1-19 Files . . . .1-20 Instrument Settings . . . .1-22
Chapter 2: Getting Started
System Startup and Shutdown . . . .2-1 Startup . . . .2-1 Shutdown . . . .2-2 Quitting guavaSoft™ Software . . . .2-2 Running the easyCheck™ Procedure . . . .2-3 easyCheck™ Results . . . .2-4 Viewing and Exporting easyCheck™ Results . . . .2-5 Viewing Trend Data . . . .2-7 easyCheck™ Procedure Troubleshooting . . . .2-8
Chapter 3: Cleaning and Maintenance
Running Quick Clean . . . .3-1 Running Guava® Clean . . . .3-2 Backflushing the Fluid System . . . .3-4 Filling the Cleaning Solution Vial . . . .3-4
Emptying the Waste Vial . . . .3-5 Cleaning the Flow Cell . . . .3-6 About the Flow Cell . . . .3-6 Using the Syringe Tool to Clean the Flow Cell Assembly . . . .3-6 Replacing the Flow Cell . . . .3-10 Replacing the Fuses . . . .3-12 Returning the System for Service . . . .3-13
Chapter 4: guava InCyte™ Assay
Introduction . . . .4-1 InCyte™ Application Window . . . .4-2 Plots . . . .4-2 Pie Legend . . . .4-5 guava InCyte™ Sample Acquisition . . . .4-6 guava InCyte™ Analysis . . . .4-13 The Analysis Panes . . . .4-14 Analyzing Files Acquired Using InCyte™ . . . .4-15 Analyzing Files Acquire Using Other guava® Software Modules . . . .4-17 Regions, Gates, and Statistics . . . .4-19 Regions . . . .4-19 Gates . . . .4-22 Stat Markers . . . .4-26 Exporting Results . . . .4-33 Compensation . . . .4-34 Performing Manual Compensation . . . .4-34 Performing Semi-automated Compensation . . . .4-36 HeatMap . . . .4-38 Creating a HeatMap . . . .4-39 Thresholds . . . .4-43 Metrics . . . .4-43 IC-50/EC-50 . . . .4-44 Creating an EC-50 or IC-50 Curve . . . .4-45 Special Features . . . .4-46 Creating a Group . . . .4-46 Data Pooling . . . .4-48 Overlaying Histograms . . . .4-49 Printing Results . . . .4-50 guava InCyte™ Troubleshooting . . . .4-51
Appendix A: Administrator Features . . . A-1
Setting up Access Control . . . .A-1
Administration Configuration . . . .A-8
Specifications . . . 1
guava easyCyte™ System . . . 1
easyCyte Lasers and Fluorescent Filters . . . 3
Fluorochromes . . . 4
Compliance . . . 5
Symbols . . . 5
Notice to Purchaser: Limited Use License . . . 6
Warranty . . . 7
Preface
The guava easyCyte™ System is an automated, desktop cell analysis system that can perform a wide range of multi-color cellular and assays. The system is equipped with three lasers—violet, blue, and red—allowing you to analyze up to 10 fluorescence parameters, as well as forward and side scatter. It accommodates individual microcentrifuge sample tubes.
guavaSoft™ software, used to set up and maintain the system, offers a number of assay-specific acquisition and analysis modules, depending on your applications. Use the guava InCyte™ software module to acquire and analyze data. InCyte™ is an open software package, which you can also use to analyze FCS 3.0 data files acquired from any guava® software module. For a list of assay-specific software modules, see “Program Search List” on page 1- 9.
guava InCyte™ application templates are available for all FlowCellect® assays. The templates provide the plots, parameters, analysis tools (Methods), and statistics for each application. For more information on these templates, refer to the specific reagent kit user guide.
About This Guide
The guava easyCyte™ System User Guide provides detailed information on operating
and maintaining the guava easyCyte™ System, and using the guava InCyte™ software module for data acquisition and analysis. This guide is intended for the guava easyCyte™ 5, 6-2L, 8, and 12 instruments. Any reference to NIR, Red2, and NIR2 parameters, may not apply to your specific instrument. Refer to “easyCyte Lasers and Fluorescent Filters” in Specification for a complete list of the parameters available with each system. For information on using the other guava® software modules, refer to the guavaSoft™
Modules User Guide.
This guide assumes you have a working knowledge of Microsoft® Windows® operating system. If you have any questions regarding the Dell™ computer or the operating system, refer to the appropriate manufacturer’s documentation.
For information on preparing samples, refer to the appropriate reagent kit user guide that was shipped with your reagents.
Conventions Used in This Guide
■
NOTE:
Points out additional information that may be helpful.◆
WARNING:
Alerts you to situations that could result in bodily harm, instrument damage, failure in a procedure, or incorrect results.Bold: Indicates buttons to click or options within the software to select.
Italics: Used for names of user guides and package inserts, as well as messages that
appear on the screen.
Help
1 Read through the section of the guide specific to the operation you are performing.
Refer to the table of contents and index to locate information. A glossary is included to assist you with any unfamiliar terms.
2 See the Troubleshooting section in each chapter for a list of problems and suggested
solutions.
3 Refer to the technical support contact information listed below:
• For ordering information or technical support, call toll-free:
USA and Canada, Phone: +1 (800) 645-5476 Fax: +1 (951) 676-9209 • For additional contact information, visit www.millipore.com/flowcytometry
Safety
The guava easyCyte™ System is equipped with safety features for your protection. Use the system only as directed in this user guide. Do not perform instrument maintenance or service except as specifically stated. Please read the following safety information before using the system.
General Safety
◆
WARNING:
If this instrument is not used in the manner indicated by the instructions in this guide, the safety features of the instrument may be impaired. Follow these guidelines:• The use of tubes other than those specified may result in damage to the instrument.
• Do not run any other programs, including Internet Explorer®, on the laptop while using guavaSoft™ Software to acquire data. guavaSoft™ Software requires the full resources of your laptop during data acquisition. Running other programs during a run may interfere with acquisition or interrupt the run.
Biological Safety
◆
WARNING:
All biological specimens and materials that come into contact with them can transmit potentially fatal disease. To prevent exposure to biohazardous agents, follow these guidelines:• Handle all biological specimens and materials as if capable of transmitting
infection. Dispose of waste using proper precautions and in accordance with local regulations. Never pipette by mouth. Wear suitable protective clothing, eyewear, and gloves.
• Add 10 mL of bleach to the waste vial after emptying it. Dispose of waste in accordance with federal, state, and local regulations.
Electrical Safety
The instrument must be connected per the instructions in the user guide. The power conditioner is required to meet electrical compliance.
◆
WARNING:
Turn off the main power switch at the back of the instrument and disconnect the power cord before replacing fuses.Laser Safety
The following lasers are used in the easyCyte™ System:
■
NOTE:
These are the maximum powers for each laser. For the actual power for a specified instrument model, see “easyCyte Lasers and Fluorescent Filters” under Specifications.Laser Wavelength (nm) Maximum Power (mW)
Violet 405 ±5 110
Blue 488 ±5 160
No radiation is accessible to the user during normal operation and maintenance. Light shields within the instrument enclose the path of laser radiation. Additionally, the instrument enclosure provides secondary protection from any laser radiation.
◆
WARNING:
To avoid exposure to laser radiation or electric shock, follow theseguidelines:
• Do not open the instrument or attempt to perform any internal maintenance. There
are no user-serviceable parts.
• Turn off the power to the guava easyCyte™ System before attempting to remove the flow cell.
◆
WARNING:
The use of controls or adjustments or performance of procedures other than those specified herein may result in hazardous radiation exposureLabels
Following are examples of the labels affixed to the guava easyCyte™ instrument:
Limitations
• The guava easyCyte™ System is for research use only; not for use in diagnostic procedures.
• The results of the assays are dependent upon the proper use of the reagents and instrument. Refer to the appropriate reagent kit user guide for specific instructions and
USA and Japan Europe 110 VAC 220 VAC FUSE 2A Time-Lag 1.6A Time-Lag
CAUTION - CLASS 3B LASER RADIATION WHEN OPEN. AVOID EXPOSURE TO BEAM Passed By: Date: D.C. 7/08/05 B S/N: 8470120101 Manufactured: 04JUN2014
NOTE:
The following caution label is visible when the flow cell access panel is removed. The panel is to be removed when the system is powered off. Even when powered on, the accessible laser radiation falls within Class I limits.CHAPTER 1
Introduction
guava easyCyte™ System
The guava easyCyte™ System streamlines cell phenotyping, drug discovery, and cell culture monitoring and screening by providing turnkey assays for a wide range of cell-based applications. The system includes the easyCyte™ instrument, a laptop computer with pre-installed software for data acquisition and analysis, and optimized reagents and protocols.
guavaSoft™ software includes dedicated application modules for cell- and bead-based assays, minimizing training requirements. In addition, the software includes the guava easyCheck™ module, which verifies that the system is performing optimally, and Guava Clean, a cleaning module that allows you to clean the instrument’s fluid system prior to shutdown.
guavaSoft™ software automatically saves data files, which can be recalled later for offline analysis. In addition, results are exported to a spreadsheet file.
System Components
The easyCyte™ System is shipped with the following components.
Hardware Connections
Although the easyCyte™ System is a portable unit, it contains precisely aligned optical components that are sensitive to jarring movements. Place the instrument on a stable surface in a dedicated location in the laboratory. Allow at least 4 inches between the back of the instrument and the wall for proper ventilation. Maintain easy access to the power cord in case the instrument needs to be disconnected in an emergency. The initial installation will be performed by an EMD Millipore field service representative.
◆
WARNING:
To avoid damage to the instrument, be sure to remove the shippingrestraint before plugging in the instrument.
■
NOTE:
If the instrument needs to be moved to a new location in the lab area or building, always use two people to lift and a sturdy transport such as a cart. If a longer distance move requiring packup is required, contact EMD Millipore. A Relocation and Installation service is available for a fee. See Appendix C: "Ordering Information" for details.1 Connect the cytometer to the laptop with the USB cable (see Figure on page 1-3). 2 Connect the power cable between the power conditioner and a grounded
(three-prong) AC power outlet.
guava easyCyte™ System
power cable guavaSoft™ software CD sample tube holders power conditioner extension cable laptop computer
laptop power supply and power cord
3 Connect the extension cable between one of the four power outlets on the back of the
power conditioner and the power input on the cytometer.
■
NOTE:
The power conditioner is required to meet electrical compliance.4 Connect the laptop power supply to the laptop. Plug the power supply into the power
cord, then plug the power cord into the power conditioner.
◆
WARNING:
The power conditioner is not a continuous power supply. Ensure that the instrument is powered on during acquisition.Connecting the guava easyCyte™ System
5 You can connect the laptop to a local network or the internet. Contact your network
administrator for assistance. You can also connect a printer. If you connect a printer, you must install the appropriate print drivers.
6 The easyCyte™ System comes with two sets of sample tube holders: a set of holders
for 1.5-mL microcentrifuge tubes and a set of holders for titer tubes. Select the set you want to use and install them by screwing each holder onto the loader assembly as illustrated below.
The easyCyte™ System supports the following tubes: • 1.2-mL microtiter tube with conical tip
• 1.5-mL microcentrifuge tube with conical tip and screw cap (if snap-cap tubes are used, cut off the cap)
◆
WARNING:
The use of tubes other than those specified may result in damage to the instrument.7 Refer to “System Startup and Shutdown” on page 2-1 for the correct procedure to
start the laptop computer, easyCyte™ instrument, and guavaSoft™ software.
8 Prime the fluid system. Follow the instructions in “Running Guava® Clean” on page 3-2
using deionized water in place of cleaning solution. Keep the tube of water loaded on the system whether you are ready to run samples or are going to shut down the system.
easyCyte™ System Troubleshooting
Problem Possible Causes Solutions
Laptop prompts for user ID
or password. Laptop is set up for authorization. Do not enter password. Click OK or Cancel to continue. Contact your IT department for assistance with any modifications. The original laptop setup does not require a password.
During start-up, laptop freezes on particular screen.
System may be searching for directory during
startup.
Press Enter to continue. Reboot system, if necessary.
Message:
The instrument could not be detected.
Communication problem. Press Enter to continue. Reboot system, if necessary. If message appears after rebooting, contact EMD Millipore Technical Support. Message:
The instrument appears to be either off or not
connected. You can run in Analysis mode only.
1. guava easyCyte™ System is not turned on or is not getting power. 2. Cable connection
between easyCyte™ System and laptop is loose.
3. easyCyte™ System and laptop were not
powered on in correct sequence or have lost communication.
1. Ensure easyCyte™ System power cord is properly plugged in and system is turned on. 2. Ensure USB cable is securely
connected to laptop. Use USB 2.0 ports if possible. Reboot computer, if necessary. 3. Turn off easyCyte™ System,
exit guavaSoft™ software, restart laptop, turn on
easyCyte™ System, wait for indicator light before starting the software.
guavaSoft™ software launches, but only
Analysis mode is available when an assay is
launched.
Registration code not entered or not entered correctly.
Enter registration code and ensure all characters are correct.
◆
WARNING:
Do not run Excel® software, Internet Explorer® browser, or any other program on the laptop while using guavaSoft™ software to acquire data from the guava easyCyte™ System. guavaSoft™ software requires the full resources of your laptop during data acquisition. Running other programs (even if you are not actively using them) during a run may interfere with acquisition or interrupt the run.Instrument will not power
on. Loose power cable. Ensure instrument is plugged. Check all power connections. Laptop keeps shutting
down. 1. Power supply to laptop is faulty. 2. Screen saver is
interfering.
3. Laptop overheating.
1. Ensure laptop is plugged in correctly. Use surge protector and ensure it is plugged in and turned on.
2. Adjust power scheme screen saver options. Click Start> Settings>Control Panel. Double-click Display, select Screen Saver tab, click Settings under Energy saving features of monitor. Make sure “Setting for Always On power scheme” are all set to Never.
Laptop should not be allowed to “sleep.” guavaSoft™ software will stop acquiring data until the laptop is woken up.
3. Ensure cooling vents are clean and unobstructed.
For InCyte™ only Message:
Sorry - this unlock is invalid.
Incorrect or no unlock key. Ensure the correct unlock key is entered. If necessary, contact EMD Millipore Technical Support to obtain unlock key.
easyCyte™ Instrument
The easyCyte™ System was designed for easy operation and minimal maintenance. The power switch, sample loader, and waste and cleaning solution vials are the only instrument components that you will routinely handle, and most of your interaction is through the software via the laptop. The power switch is located on the back-right side of the instrument.
Sample Loader
The sample loader holds up to two sample tubes. The loader arm can be lowered and swiveled, allowing you to quickly switch from one sample to the next during acquisition. To load samples, pinch the release lever with your thumb and forefinger and gently lower the arm assembly (figure 1). Once lowered, rotate the assembly to change the sample tube (figure 2), then push up on the assembly until you hear a click.
sample loader
power switch (located on back of instrument) access to flow cell
guava easyCyte™ System and components
cleaning solution vial waste vial
indicator lights
1. Pinch release lever and gently lower sample holder. 2. Rotate loader assembly to change tubes.
Cleaning Solution and Waste Vials
The cleaning solution vial (located on the right ) can be filled with Guava® Instrument Cleaning Fluid (ICF), for easy system cleaning. For information on filling the vial, refer to “Filling the Cleaning Solution Vial” on page 3-4.
The waste vial (located on the left ) captures the sample fluid after it exits the fluid system. Empty the waste vial at the end of each day or more often, if necessary. Add 5 mL of bleach to the vial after you empty it (see page 3-5 for information).
Fluid System
Sample uptake occurs through a capillary and is
regulated by a variable-speed fluid pump. The pump does not require sheath fluid or other supplementary fluids for operation.
Because the system’s sampling precision depends on the integrity of the fluid pathway, it is important to maintain a clean system. Do not allow samples to remain in the capillary for extended periods of time. Perform frequent cleaning cycles to prevent the build-up of cellular debris that may restrict sample flow. Always keep a tube on water loaded when the instrument is not in use. If a clog does occur, you can clear it by using the backflush feature, which reverses the flow of fluid and flushes it out of the flow cell at a high speed. Refer to “Backflushing the Fluid System” on page 3-4 for detailed instructions on using the backflush feature.
Some assays allow you to select the sample flow rate for acquisition. For most assays, the Medium flow rate is the default. This works well when the sample concentration is approximately 500 particles/µL. If the sample concentration is higher, dilute the sample or use a lower flow rate. For assays where the peak CV is critical, such as Cell Cycle, use the Low or Very Low flow rate. Always use the same flow rate for acquisition that you use for adjusting the settings.
Laser
The guava easyCyte™ has three lasers—blue, violet, and red. During acquisition using InCyte™ or easyCheck™, all three lasers turn on. During acquisition using ExpressPro, the blue and red lasers turn on. During acquisition using any of the other guava® software modules, only the blue laser turns on. The lasers turn off when acquisition is complete.
■
NOTE:
For information on the easyCyte™ lasers and the fluorochromes compatiblewith each, refer to "easyCyte Lasers and Fluorescent Filters" in Specifications.
Software CD
A CD contains guavaSoft™ software. The guava easyCyte™ System User Guide is installed with the software.
guavaSoft™ Software Overview
Use guavaSoft™ software for the acquisition and analysis of data.
Main Menu
The guavaSoft™ software main menu allows you to select an assay from either a list of favorites or the program search list. Essential Tools allows you to run easyCheck™, clean the instrument, or select Setup, where you can customize your list of favorites. Use links @ Millipore to quickly access EMD Millipore websites for information.
Favorites
Favorites allows you to quickly select an assay. You can have up to seven assays at a time in your Favorites list. To add a favorite assay, select the assay from the Program Search list and click Add to Favorites. The new assay will
be added to the bottom of the list. And if the list already consists of seven assays, the first assay in the list will be removed.
To remove a favorite assay, click Setup under Essential Tools. Remove the check from
the check box for the assay you wish to remove. Click DONE.
Program Search List
The Program Search List allows you to select an assay to run or open a FlowCellect® template in InCyte™. You can create a Favorites list to quickly select an assay later. The main menu allows you to select from the following assays:
• guava ViaCount® Assay for performing cell counting and viability assays
• guava® ExpressPro Assay for performing assays with up to six colors, or where time, area, and/or width parameters are necessary
• guava InCyte™ for performing assays with up to ten colors and two scatter
parameters, or where time, area, and/or width parameters are necessary, or if you want to analyze any guava FCS 3.0 data files
• guava Nexin®, guava® Caspase, guava® TUNEL, and guava® MitoPotentialAssays
for performing apoptosis assays
• guava® Cell Cycle Assay for performing DNA cell cycle assays
• guava® CellPaint Assay for tracking target cells in mixed populations, or for monoclonal antibody (mAb) screening in mixed cultures
• guava® CellToxicityAssay for cell-mediated cytotoxicity determinations
• guava® CellGrowthAssay for cell proliferation studies and to assess the number of live versus dead cell
Additionally, FlowCellect® template are available for acquisition and/or analysis using InCyte™. See “FlowCellect® Templates” on page 1-11.
Essential Tools
guava easyCheck™ allows you to check the system’s counting, fluorescence, and
scatter performance prior to running samples. The guava easyCheck™ Bead is a standard particle used with this tool.
Cleaning allows you to run Guava Clean, an automated system cleaning cycle that
cleans the fluid system.
Setup allows administrators to:
• configure certain software features for specific users (see “Appendix A: Administrator Features” for more information)
• remove assays from your Favorites list
• enter assay registrations codes (see “Unlocking guava InCyte™” on page 1-10)
■
NOTE:
The Setup button is available only when an administrator is logged onto thesystem.
links @ Millipore
This section allows you to access commonly used EMD Millipore websites. You must have internet access.
Check for Template Updates
Select Check for Template updates to search online or, if you are not connected to the
internet, any available USB drives, for the latest FlowCellect® templates. The system will notify you if you currently have the latest templates installed.
1 If updated templates are available, the following dialog appears. Click Yes to install
the latest template package.
Click Export to download the templates to a USB drive.
2 Click Close when you receive confirmation that the latest templates were installed.
If you chose to export the templates to a USB drive, select the drive from the drop-down menu and select Export.
Exit
Closes guavaSoft™ software
Unlocking guava InCyte™
guava InCyte™ requires an unlock key. If you get a message containing your computer code and prompting for an unlock key, e-mail EMD Millipore Technical Support and they will provide you with an unlock key for InCyte™.
FlowCellect
®Templates
Software templates are available for all FlowCellect® assays. The templates can be used for acquisition and/or analysis. Open a template before acquiring your samples in
InCyte™. The instrument settings, plots, gates, and markers for the assay are contained in the template. If you already acquired data using either InCyte™ or another guavaSoft™ module, open the data file in the template and perform analysis using the Analysis Method provided.
Templates for the following assays are available:
• FlowCellect®Cytochrome c for mitochondrial cytochrome c loss
• FlowCellect®Human CD4/CD8 T Cell for quantification on CD4 and CD8 T cells
• FlowCellect®Human T Cell Caspase for caspase activation in CD4 and CD8 T cells
• FlowCellect®MitoCaspase for caspase and mitochondrial membrane depolarization
detection
• FlowCellect®MitoDamage for apoptosis, mitochondrial membrane depolarization,
and cellular death detection
• FlowCellect®MitoPotential Red for mitochondrial membrane depolarization and
cellular death detection
• FlowCellect®Th1/Th17 for Th1 and Th17 intracellular cytokine detection
Using a FlowCellect
®Template
For more information on using the templates, refer to the user guide for the individual assay kit.
1 To open a template, select it from the Program Search list and click Launch.
The assay template opens in InCyte™.
2 Select the Analyse or Acquire button at the top of the control panel. Perform
acquisition or analysis according to the instructions outlined in the kit user guide. • If you are acquiring samples, the instrument settings should be close to what you
need. Check the settings and fine tune, if necessary.
• If you are analyzing InCyte-acquired data, but you acquired the data without the use of a template, you will need to drag the template Analysis Method to the Analysed Group. Check the gates and markers and fine tune, if necessary.
• If you are analyzing a data file acquired using a program other than InCyte™, open the data file. The assay template will contain the appropriate Analysis Method. You will need to create an Analysed Group and drag the data file and the Analysis
Method to the Analysed Group. Check the gates and markers and fine tune, if necessary.
guava InCyte™ Overview
About guava InCyte™
guava InCyte™ was developed to be an open assay module providing all the tools for instrument setup, sample acquisition, and data analysis.
The guava InCyte™ module allows you to acquire and analyze up to ten fluorescence parameters in combination with forward scatter (FSC) and side scatter (SSC), as well as area, width, and time. It provides automated compensation and an instant update feature, making it easier to perform complex analysis.
Key Features
A single Method (or analysis strategy) can be applied to multiple data sets in parallel, or multiple Methods can be applied to a single data set to obtain statistics to be displayed in the heat map. The process of creating equation-based gating schemes has been
simplified through use of drag-and-drop regions; “draggable” features are used throughout InCyte™.
The HeatMap allows you to visually compare results using a plate map that displays varying shades of blue to represent relative statistical values. Results from up to six parameters or six data sets can be displayed simultaneously.
Additionally, all channels can be used with reagents that fluoresce in appropriate
channels. Refer to "easyCyte Lasers and Fluorescent Filters" in the Specifications section for filter information.
Components of InCyte™ Files
Data files acquired using InCyte™ contain raw FCS data, the analysis components also known as Methods (regions, gates, markers, statistics, etc), instrument settings, and compensation settings. The raw data combined with the Analysis Method make up the InCyte™ Analysed Group.
At the start of acquisition, you have the option to select a Method, instrument settings, and compensation settings. These components can be retrieve from a saved InCyte™ FCS file. You can also retrieve the Method and/or instrument settings from individual saved Method and instrument settings files. If you do not retrieve a Method, a default Method will be applied.
Tool Bar
The tool bar appearing on the far left side of the window provides additional features for acquisition and analysis. The features are also accessible from the Tools menu. Other than the Pie Legend, which is described on page 4-5, the tools are described in detail at
the point in the workflow where they are used.
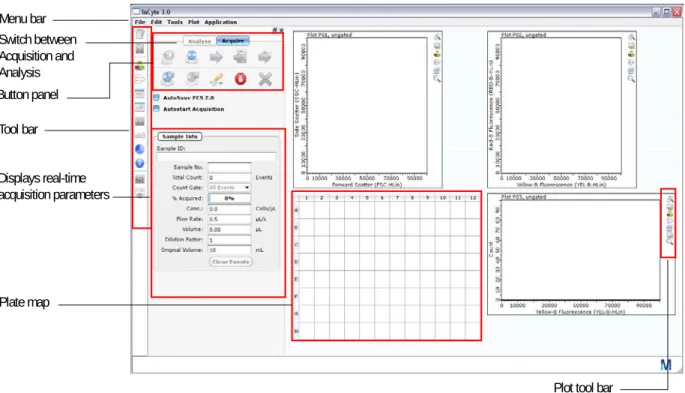
InCyte™ Acquisition Screen
◆
WARNING:
Do not run Excel® software, Internet Explorer® browser, or any other program on the laptop while using guavaSoft™ software to acquire data from the guava easyCyte™ System. guavaSoft™ software requires the full resources of your laptop during data acquisition. Running other programs (even if you are not actively using them) during a run may interfere with acquisition or interrupt the run.The Acquisition screen appears when you enter the assay. Use the Acquisition screen to acquire data from samples you run on the easyCyte™ System. You can also perform data analysis from the Acquisition screen immediately following acquisition.
Event Log
Show/Hide Acquisition Controls Region List
Gate List
Show Current Run Stats Show Group Stats Show Instrument Settings Show Compensation Controls Show Pie Legend
Show Sample Info Show Gain Controls Show Miscellaneous Controls
Tool bar Menu bar Switch between Acquire and Analyse control panels
Plate map Button panel
Plot tool bar Control panel - displays
real-time acquisition parameters
Acquisition Buttons
Place the cursor over the icon to display text describing the button.
The following table describes the acquisition buttons. Acquisition Button Description
Start New Session File Allows you to select the worklist file, the Method, instrument settings, and compensation, prompts you to load the for acquisition or the adjust settings, if applicable.
Adjust Settings Allows you to adjust instrument settings using the appropriate sample.
Acquire Next Sample Begins data acquisition for the next sample. You can make changes to the sample information (except for Events to Acquire) after acquisition and before clicking Save and Close Current Sample. After clicking Save and Close Current Sample, the Sample # advances and any changes made to the sample information will apply to the next sample.
■
NOTE:
When Autostart Acquisition is checked, data acquisition starts automatically each time a new tube is loaded. Therefore, you do not need to click Acquire Next Sample or Save and Close Current Sample.Save and Close Current
Sample Saves the sample data. You can now acquire the next sample. Next Step Proceeds to the next step in the data acquisition process. The data
already acquired is saved.
Retrieve Settings Allows you to recall instrument and analysis settings from a settings file and download the settings to the easyCyte™ instrument. If this button is disabled, your system administrator may have chosen to not allow the retrieval of Methods and instrument settings from individual Method and instrument settings files. These settings can be retrieved only from an FCS file.
Stop and Close Session File Capillary Cleaning Tools Save Settings Retrieve Settings
Save and Close Current Sample Acquire Next
Sample Adjust Settings
Start New Session Next Step
Autostart Acquisition
An automated sample acquisition feature saves you from having to click Acquire Sample
and Save and Close Current Sample. Check the Autostart Acquisition box to
automatically start data acquisition each time you load a tube. Be aware that if you use the Autostart Acquisition feature, you must enter a Sample ID prior to loading the sample.
■
NOTE:
If you are using Autostart Acquisition, it is automatically disabled when youclick Settings, then Adjust Settings or Retrieve Settings, Quick Clean, or Backflush. If you click one of these buttons, you must recheck the Autostart
Acquisition box to turn on this feature again.
Save Settings Allows you to save the current instrument settings to a separate file.
Capillary Cleaning Tools
Backflush reverses the flow of fluid out of the flow cell. Perform a
backflush if the acquisition rate declines and you suspect a clog. During acquisition, click Save and Close Current Sample before Backflush. Follow a backflush with a Quick Clean.
Quick Clean cleans the fluid pathway. During acquisition, click
Save and Close Current Sample before Quick Clean. Stop and Close Session
File Stops the assay after finishing the acquisition for the current sample. After stopping you cannot resume. Abort Stops the session. The data for the current sample is not saved.
You cannot resume an assay after you abort. You must start the assay from the beginning.
Acquire Control Panel
Sample Info
AutoSave FCS 2.0 Files saves files in FCS 2.0 format, in
addition to the FCS 3.0 files that are saved.
Autostart Acquisition automatically starts acquisition when
you load each tube. You do not need to click the Acquire Next Sample button.
Sample Info
• Sample ID: Displays the Sample ID for the individual
sample. Defaults to the plate well number.
• Sample No: Displays the sample #. This number defaults
to 1 and advances at the completion of sample acquisition. • Total count: Displays the number of events to acquire.
The default is 5000. Total count changes to Gated count if you apply a count gate.
• Count Gate allows you to select a gate used as a counting
gate. All events above the threshold are saved to the file whether they are in the gate or not.
• % Acquired: A progress bar provides an estimate of the
target event count during acquisition.
• Conc.: Displays the cells/µL that have exceeded the
threshold.
• Flow Rate: Displays the flow rate selected during the
adjust settings step (µL/s).
• Volume: Displays the sample volume that is acquired.
• Dilution Factor: Displays the dilution factor. The default is
1.
• Original Volume: Displays the original sample volume.
The default is 10.
• Clear Events: Click to clear the display and restart
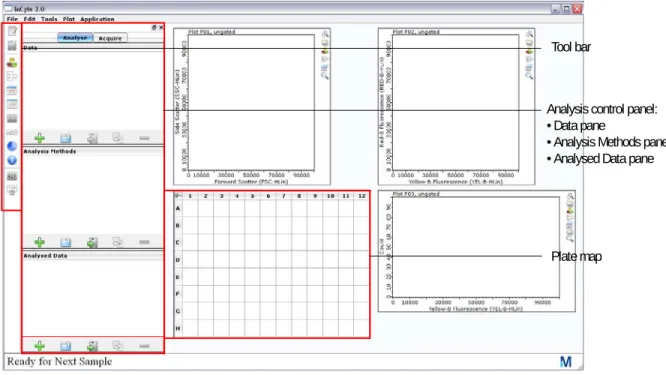
InCyte™ Analysis Screen
The Analysis screen allows you to analyze data from samples that were previously acquired. When you open a data set, the data for the first sample appears. The samples within the file are listed in the Data pane. Click the + in front of the FCS file to display the list of samples. Click any sample to view the data for that sample. You can also click the up/down arrows on the keyboard to select samples.
You can access the Analyse screen by clicking Analyse at the top of the control panel. If you display the Analyse screen at the completion of acquisition, the samples you just ran are listed in the Data pane. Any gates and marker you set during acquisition will appear.
Plots
The plots area of the window displays three plots by default. Use the Plots menu to change the number of plots displayed. Use the tool bar on the right to change the plot type and set regions and gates. For more information on plots, see “Plots” on page 4-2.
Plate Map
The plate map provides a visual representation of the samples contained in the dataset. During analysis, click a well in the plate
map to view the data for that sample in the plots. Place your cursor over a well to display the results for that sample. If you are using the HeatMap feature, the plate map provides a visual representation of the relative values for each well, or well-to-well variations in varying shades of blue. For more information on HeatMapping, see “HeatMap” on page 4-38.
Analysis control panel: • Data pane
• Analysis Methods pane • Analysed Data pane
Plate map Tool bar Undock Plot type New Region Plot gate New Stat Marker Edit Overlay List Zoom
Analyse Control Panel
Exiting the Assay
Before quitting the software, be sure to save your current analysis using the Save Analysed Group icon in the Analysed Data pane.
1 To quit InCyte™ and return to the guavaSoft main menu, select Quit from the File
menu.
2 Select Yes in the confirmation dialog.
Analysis Buttons
Place the cursor over the icon to display text describing the button. The buttons have the same function for each pane but apply specifically to that pane.
Data
Displays the open data files, as well as any user-created subsets of these files or groups and allows you to select a data set or group for analysis.
Analysis Methods
Displays the Analysis Methods for the current experiment. Each Analysis Method contains a gate list, a region list, and a metric (statistical parameter). InCyte™-acquired files contain Methods. For data files acquired using a program other than InCyte™, you must create a new Method or open an existing Method before you can perform analysis.
Analyzed Data
Displays the FCS file and the associated Method. Created by pairing a non-InCyte™–acquired data file with a new or existing Method during analysis, or created automatically during acquisition using InCyte™.
Delete Duplicate
Save Open
Files
guava InCyte™ automatically saves a flow cytometry standard (FCS) 3.0 data file, which contains the data for all samples within a data set.
Additionally, you can optionally choose to save (or export) the following files: • a separate Method file
• a separate instrument settings file
• FCS 2.0 or 3.0 files for individual samples for analysis using third-party analysis programs
• list-mode data files
For information on exporting FCS 2.0, 3,0, and list-mode files, see “Exporting Results” on page 4-33.
■
NOTE:
To keep your computer performing optimally, periodically clear old files from your hard drive by archiving the files to a back-up storage location.Flow Cytometry Standard (FCS) 3.0 Data Files
InCyte™ saves a single FCS file containing all the samples within a data set. The extension .fcs is automatically appended to the file name.
FCS files are data files saved in a format compatible with standard flow cytometry analysis applications as defined by the Society for Analytical Cytology [Cytometry. 1990:11(3);323–332]. One FCS 3.0 file is saved for all samples acquired within a data set.
■
NOTE:
Always save guavaSoft™ software’s data files directly to the laptop’s harddrive during acquisition. Saving acquisition data to an outside network may result in data loss. You may copy the file(s) to another location when acquisition is complete.
Method Files
A Method contain all the analysis components (gates, regions, markers, plots, parameters, and statistical setup). When you acquire data using InCyte™, Methods are part of the FCS file. Methods can also be saved to a separate file (.gsy). Data files acquired using a
program other than InCyte™ will not have Methods associated with them.
Instrument Settings Files
Instrument settings are automatically saved with the FCS file. You can also save instrument settings to a separate file. The extension .GST is automatically appended to the file name you enter. For more information on instrument settings, see “Saving Instrument Settings” on page 1-23.
Appending and Overwriting Existing Files
If you select the name of an existing dataset name at the start of acquisition, you will be prompted to either append or overwrite it. If you append, the sample number defaults to the next available number in the existing data file.
If you append data to an existing file, the instrument settings and analysis gates and markers are automatically updated to reflect the settings for the last sample in the file.
■
NOTE:
Your system administrator may have configured guavaSoft™ software todisable appending and/or overwriting files. If appending only is disabled, you may create a new file or overwrite an existing file. If overwriting only is disabled, you may create a new file or append to a copy of an existing file. If both appending and overwriting are disabled, you must create a new file.
Event Log
Each time you run an assay, guavaSoft™ software saves a log containing a list of all events that occurred during the assay. This information is contained within the FCS data file. To view this list,click the Event Log icon in the tool bar, or select Tools > Show Event Log. A list of all events appears with the date and time the event occurred.
You can filter the list to view errors, warnings, statuses, and/or actions. Click the appropriate check box(es) to display the types of events you wish to view.
Every step the instrument performs, independent of the operator (for example, priming, setting thresholds, performing calculations) is logged. Every step the operator performs (for example, key presses, selections, changes to gates and markers, logging comments) is also logged. During data analysis, although changes to settings are logged, the specific details of the change may not be.
If errors or warnings occur during a run, a message appears in red in the status bar indicating that errors/warnings have been logged and how many times they have occurred.
Warnings include:
• Less than 10 particles/µL. Sample is too dilute. Accuracy may be compromised.
• More than 500 particles/µL. Sample is too concentrated. Please dilute or accuracy may
be compromised.
• The run timed out before enough events were acquired.
• Adjust Settings timed out. Please re-enter Adjust Settings if necessary to complete the
instrument set-up.
• Maximum velocity exceeded for “x” events (applies only to area/width parameters)
Errors include:
• The pump has reached the end of its stroke. You should run this sample again.
• Error occurred while trying to generate FCS 2.0 file for sample x.
To export the log to a text file, click Export. Select the storage location and enter a file
name. Then, click Save.
Instrument Settings
InCyte™ saves the instrument settings for each sample acquired. To access the settings window select the Analysed Group from the Analysed Data pane, then click the Show Instrument Settings tool in the tool bar, or select Tools > Show Instrument Settings. In
addition to the threshold, gains, and compensation, all of the acquisition information, such as date, time, number of events, total volume, concentration, and flow rate, along with sample-specific information, like sample ID and number, dilution factor, and original volume are saved.
To copy the window to the clipboard, right-click in the window and select Copy to Clipboard.
To export the settings to a CSV file for use in a spreadsheet program, click Export to CSV. Select the folder where you want to store the file, enter a file name, and click Save.
To print the settings, click Print Stats.
Saving Instrument Settings
Although the instrument settings are automatically saved with the FCS file, guavaSoft™ software allows you to save the current instrument settings and analysis gates and markers to a separate file. You must perform the adjust setting step before you can save a settings file. You can recall this file later to:
• download the instrument settings to the guava easyCyte™ System for acquisition • apply the gates and markers to data during acquisition
1 Click the Save settings button from the Acquisition screen.
2 Enter a name for the file, select the directory where you wish to save it, and click Save.
Retrieving Instrument Settings
1 Click the Retrieve settings button from the Acquisition screen.
2 Locate and select the file and click Open.
The settings are downloaded to the guava easyCyte™ System.
■
NOTE:
If you retrieve instrument settings after you perform the adjust settings step, you will be prompted to repeat the adjust settings step. You can choose to repeat the adjust settings if you wish.CHAPTER 2
Getting Started
System Startup and Shutdown
Startup
1 Turn on the power conditioner if it is not already on. Once it is powered on, it can
remain on.
2 Turn on the laptop computer.
3 Turn on the guava easyCyte™ System.
The power switch is located on the back of the instrument at the lower-right corner (as shown).
4 When the indicator lights turn on, start
guavaSoft™ software by double-clicking the
guavaSoft 3.1 application icon on the desktop.
You can also click the Start button, point to
Programs, then Millipore, then guavaSoft 3.1, then click guavaSoft.
5 Ensure the cleaning vial is filled with ICF and
the waste vial is empty, except for 5 mL of bleach.
■
NOTE:
If the software detects a communication problem with the easyCyte™ System or that the system is not turned on, the following message appears.guavaSoft™ will start but you will only be able to access an assay’s analysis mode. If you wish to perform acquisition, exit guavaSoft™ software then restart it. If the
power switch
message appears again, shut down the system. Ensure that the USB cable between the computer and the instrument is securely connected before restarting the
computer. When the computer is finished booting up, turn on the guava easyCyte™ System. When the indicator lights are on, start guavaSoft Software.
Shutdown
Clean the easyCyte™ System and leave a tube of water in the sample loader.
1 Run the cleaning procedure at the end of the day. See page 3-2 for complete
instructions.
After the cleaning procedure is complete, return to the Main Menu and exit guavaSoft™. Then turn off the instrument and shut down the laptop, in any order.
2 Leave the tube of deionized (DI) water loaded on the easyCyte™ System.
The system can be left in this state.
◆
WARNING:
Do not leave Guava® ICF, bleach, or any other cleaning agent on the easyCyte™ System overnight or for an extended period of time. Prolonged exposure to strong oxidizing agents will damage the flow cell. Always leave a tube of DI water on the easyCyte™ System when shutting down the instrument. Change the tube of water regularly to ensure it is clean and free of particles.3 Exit guavaSoft™ software. Do not shut down the guava easyCyte™ System while
guavaSoft™ software is running.
Quitting guavaSoft™ Software
1 Click Main Menu from any of the guava® assay screens, the Guava Clean screen, or
the easyCheck screen.
Running the easyCheck™ Procedure
Run the easyCheck™ procedure at the start of each day you use the guava easyCyte™ System to ensure the system is performing properly. easyCheck™ averages the results from three acquisitions of a guava easyCheck™ Bead sample to determine if the results are within the expected range.
■
NOTE:
Before running the easyCheck™ Procedure, perform a Quick Clean using distilled water to prime the fluid system. If it has been more than a day since you used the system, perform two Quick Cleans using water to prime the fluid system.1 Prepare a 1:20 dilution of guava easyCheck™ Beads. Refer to the easyCheck™ Kit package insert for information.
2 Click easyCheck from the main menu.
3 The first time you run the easyCheck™ Procedure, enter the easyCheck™ Bead Lot # and Bead Expiration Date (found on the easyCheck™ Beads Reagent vial label),
and
Expected Particles/mL in the appropriate fields. Thereafter, enter any necessary
changes to these values.
Optionally, you may enter the guava easyCheck™ Kit lot number and expiration date (found on the side of the guava easyCheck™ Kit box).
The Expected Particles/mL is typically around 50,000, however check the information card that comes with the easyCheck™ Kit for the actual particle count for each new lot. The particles/mL corresponds to the concentration of beads in your prepared sample where the guava easyCheck™ Bead Reagent was diluted 1:20 with Guava® Check Diluent.
■
NOTE:
Your system administrator may have configured guavaSoft™ software to require that you enter values in these fields each time you run the easyCheck™ Procedure. If the fields are blank when you access the easyCheck screen, you must enter the current information.Enter bead lot #, expiration date, and particles/mL.
4 Mix the easyCheck™ bead sample using a vortex mixer and load the sample on the
easyCyte™ System. Click Run 1st Replicate.
The system acquires 1000 events and displays the results in the row for Replicate 1. Check the Particle Count in the Sample Information control panel. The FSC, SSC, BLU-V, GRN-V, YEL-V, RED-V, GRN-B, YEL-B, RED-B, NIR-B, RED-R, and NIR-R counts should be within 100 particles of each other when acquisition is complete.
5 Remove the sample, mix it well using a vortex mixer to resuspend the beads, and
load it on the easyCyte™ System. Click Run 2nd Replicate.
The system acquires 1000 events and displays the results in the row for Replicate 2.
6 Remove the sample, mix it again to resuspend the beads, and load it on the
easyCyte™ System. Click Run 3rd Replicate.
The system acquires 1000 events and displays the results in the row for Replicate 3. The % CV, average Particles/mL, and average FSC, optional SSC, and fluorescence intensities for the three replicates are displayed.
■
ACQUISITION NOTES
• The progress bar provides an estimate of the target event count during the acquisition period, which times out after 1 minute.
• If the acquisition rate appears to slow dramatically or there are no particles being acquired, the fluid pathway may be blocked. Click Abort, load a tube of deionized
(DI) water, then click Backflush. When the backflush is complete, load a tube of
fresh DI water and click Quick Clean. Then, reload the sample and click Adjust Settings to start the acquisition process from the beginning.
easyCheck™ Results
The software displays the %CVs and the averages for the particles/mL (bead count), FSC and SSC intensities, and all mean fluorescence intensities (MFIs) for the three replicates. • If any result for Particles/mL falls outside ±10% of the expected value, the result is
outside the acceptable range and appears in red. For example, if the actual particle count is 50,000, the acceptable Particles/mL range (±10%) is 45,000 to 55,000. • If any result for MFI falls outside ±15% of the expected value, the result is outside the
acceptable range.
• If the %CV for Particles/mL is >10%, it appears in red.
• The %CV for FSC and SSC Intensities and MFIs for the three replicates should be <5%.
Refer to the information card that comes with the guava easyCheck™ Kit for the
acceptable intensity ranges for each parameter. This information may change from lot to lot.
To monitor the instrument performance, look at the average and %CV values for FSC and SSC Intensity, and BLU-V, GRN-V, YEL-V, RED-V, GRN-B, YEL-B, RED-B, NIR-B, RED-R, and NIR-R MFIs. Refer to “Viewing and Exporting easyCheck™ Results” on page 2-5 for information on displaying past easyCheck™ results.
If the Particles/mL (count) for a replicate or the average falls outside the acceptance range, or if an intensity value is outside the acceptable range, run Quick Clean (refer to page 3-1). Rerun the easyCheck™ Procedure after cleaning is complete. If values continue to fall outside the acceptance range, refer to “easyCheck™ Procedure Troubleshooting” on page 2-8, for more information.
If the signal intensity for any of these parameters shows significant drift over time beyond the range listed, and this change is not correlated to a change in the bead lot, a new flow cell, or instrument service, contact EMD Millipore.
Viewing and Exporting easyCheck™ Results
To display a history of all easyCheck™ runs and view the results for individual runs, click Show History at the bottom of the easyCheck screen. The History List control panel opens showing a list of all easyCheck™ Procedure runs. To display the results for a particular run, click on the run in the list.
Click to display the results for a particular run.
• Click Log Comment to enter comments related to the run and save these comments
to the event log.
• Click View Event Log to display the event log, which lists all errors, warnings,
statuses, and actions that occurred during the easyCheck™ run. For more information on the event log, refer to “Event Log” on page 1-21.
• Click Show Trend Graph to display a trend graph of the Particles/mL value from the
last 30, 60, or 90 runs. See “Viewing Trend Data” on page 2-7.
• Click Print Screen to print the results. A print dialog box appears allowing you to
select the printer.
• Click Export to Spreadsheet to export the data from all easyCheck™ runs to a
spreadsheet file. The file contains the average and %CV for each parameter, as well as the details for each replicate of all runs.
• Click Export Service Check File to export the Service Check file. The Service Check
file is a zipped file containing the detailed results from the most recent easyCheck™ run. This file is used by service personnel to troubleshoot your system. If your easyCheck™ results continue to fail. Use this export feature to export the file so that you can send it to EMD Millipore.
Viewing Trend Data
To view a trend graph of the Particle/mL data, click Show History at the bottom of the screen, then click Show Trend Data.
A trend graph appears showing the Particles/mL results from the last 30, 60, or 90 runs. A data point appears for each of the three replicate values. The date appears for every seventh or eighth time that the easyCheck™ Procedure was run.
A legend in the lower-right corner of the window lists the information found on the graph. A description of the items in the legend appears in the following table.
Legend Item Description
Replicates Outside Range data point appears as a red triangle (value falls outside the high or low, 10% limit lines)
Replicates Within Range data point appears as a black triangle
Median of Replicates a black line connects the median values from each triplicate Limit High pink line that appears 10% above expected particle count Target green line at the expected particle count entered
Limit Low pink line that appears 10% below expected particle count Display data from last 30, 60, or 90 runs.
easyCheck™ Procedure Troubleshooting
Problem Possible Cause Solutions
No event counts appear for
RED-R and NIR-R. 1. Wrong beads used. 2. Red laser not operating or
problem with the signal.
1. Use easyCheck™ beads. Do not use Guava® Check beads.
2. Contact EMD Millipore Technical Support. One or more Particles/mL
results falls outside the acceptance range (appears in red).
1. System is not clean. 2. Incorrect information
entered in easyCheck™ fields.
3. Bead suspension incorrectly prepared.
1. Run Quick Clean. If results are still outside range, run Clean Only.
2. Ensure correct Bead Lot # and Expected Particles/mL are entered. Refer to page 2-3 for information. 3. Prepare fresh bead sample
and rerun easyCheck™ Procedure. Refer to
easyCheck™ Kit package
insert for preparation instructions.
FSC, SSC, GRN-B, YEL-B, RED-B, NIR-B, RED-R, and/or NIR-R intensity is >10% outside the acceptable range.
1. System is not clean. 2. Problem with detector or
laser.
1. Run Quick Clean. If results are still outside range, run Guava® Clean.
2. If problem persists, contact EMD Millipore Technical Support.
Particle counts for FSC, SSC, GRN-B, YEL-B, RED-B, NIR-B, RED-R, and/or NIR-R intensity is not within 100 events of each other.
1. If FSC count is low, capillary may not be seated correctly.
2. If any of the counts is low, possible problem with detector.
1. Remove metal plate. Unscrew tubing from top of flow cell and firmly push down on top of flow cell assembly.
If problem persists, contact EMD Millipore Technical Support.
2. Rerun easyCheck™ Procedure. If counts are still low, contact EMD Millipore Technical Support.
Few events, as indicated in
Particle Count section of Sample Information control panel.
1. Clogged flow cell.
2. Insufficient sample volume.
3. Beads in suspension have settled.
1. Remove sample, load bleach, click Backflush. Follow with Quick Clean using DI water.
2. Minimum sample volume is 90 µL.
3. Click Abort. Remove sample, mix, reload, and reacquire.
No events, as indicated in
Particle Count section of Sample Information control panel.
1. Sample tube not properly loaded.
2. Insufficient sample volume.
3. No beads in sample. 4. Clogged flow cell.
5. Broken flow cell. 6. Sample pump not
working.
7. Laser is not operational. 8. Loose fitting on minstac
tubing (under metal plate).
1. Ensure tube is loaded and loader assembly is up. 2. Minimum sample volume
is 90 µL.
3. Ensure correct sample is loaded.
4. Remove sample, load bleach, click Backflush. Follow with Quick Clean using DI water.
5. Remove flow cell and inspect for damage. Replace, if necessary. 6. Run Quick Clean and
watch for fluid in waste vial.
7. Contact EMD Millipore Technical Support.
8. Ensure tubing connector is secure.
Message:
The login user does NOT have read/write permission to the file
GuavaCheckLog.csv in the Log folder. Contact the system administrator for assistance.
The user was not assigned
access control to the system. Contact your system administrator for user access to the software.
CHAPTER 3
Cleaning and Maintenance
Depending on the type of cleaning you wish to do, guavaSoft™ software offers different cleaning options—Quick Clean, which you can use as often as you like throughout an assay or anytime, and Guava® Clean, a more thorough cleaning, which you run at the start and end of each day to thoroughly clean the fluid system.
To clean the outside of the instrument, wipe it down with a soft cloth moistened with 70% alcohol. Follow with a cloth moistened with water.
◆
WARNING:
To avoid exposure to laser radiation or electric shock, DO NOT open the easyCyte™ System or attempt to perform any internal maintenance. There are no user serviceable parts.Running Quick Clean
Quick Clean is a short cleaning cycle that allows you to clean the fluid system during and after an assay, or as often as you like throughout the day. If you are running lots of samples or particularly dirty or adherent cells, run Quick Clean frequently. The Quick Clean feature, which is accessible from the easyCheck™ and all guavaSoft™ Assay screens, prompts you for a tube of cleaning solution.
1 Load one of the following solutions on the easyCyte™ System:
• deionized water to quickly flush out the fluid system
• undiluted Guava® ICF to clean the system, followed by water to rinse
• a 10% bleach solution in Guava® ICF (1 part bleach in 9 parts Guava® ICF; for example, 100 µL bleach plus 900 µL Guava® ICF) to clean and sanitize, followed by water to rinse
2 Click Quick Clean from any of the guava® assay screens. From guava InCyte™, click
the Capillary Cleaning Tools button and select Quick Clean.
A message appears prompting you to load a tube of cleaning solution. Ensure the tube is loaded and click OK.
The solution is pumped through the system for approximately 30 seconds.
3 If you used water, you are finished. If you used Guava® ICF, either straight or with
bleach, load a tube of water and click Quick Clean again to rinse.
You may continue running samples, or leave the tube of water on the easyCyte™ System until you are ready to use the system again.
Running Guava
®
Clean
Run Guava® Clean to clean the instrument at the beginning and end of the day, as well as between assays if a thorough cleaning is needed. You can also use Guava® Clean to prime the fluid system or if you suspect there is air in the fluid lines. Fill the cleaning vial and sample tube with water and run Guava® Clean to prime. Guava® Clean takes approximately 15 minutes to complete. While it is running, the lasers are turned off.
Always leave a tube of deionized water on the easyCyte™ System at the end of the
cleaning cycle.
1 Click Cleaning from the main menu.
The Guava Clean screen appears.
2 Click Start Cleaning.
A dialog box appears, prompting you to load a tube of water.
After approximately 4 minutes, a message appears prompting you to load a tube of cleaning solution.
4 Load a tube half-filled with a 10% bleach solution in Guava® ICF (1 part 100% bleach
in 9 parts Guava® ICF) and click OK.
After approximately 3 minutes, a message appears prompting you to load a tube of clean water.
5 Load a tube of fresh water and click OK.
If you notice air moving through the cleaning vial tubing, when the cleaning cycle is complete, check the connectors holding the tubing to ensure they are tight.
After approximately 5 minutes, a message appears prompting you to load the tube of clean water.
6 If you are shutting down the instrument, place a tube of deionized (DI) water on the
easyCyte™ System. Return to the Main Menu and exit guavaSoft™. Then turn off the instrument and shut down the laptop, in any order.