, /
A High Performance
Interactive Programming
Environment for the
Apple Macintosh® Computer
CREATIVE lOLUTIOtts
(MIll
ccfCR11H1
UII
User and Reference Manual
Copyri ght 1 984
Creative Solutions. Inc
All Rights Reserved
Both this physical document and the right to use it is owned
exclusively by Creative Solutions, Inc. Use of this document by
others is licensed by Creative Solutions under the terms of the
MacFORTH Software license Agreement. This document may not be
reproduced in any form· either in part or in whole without the
express written consent of Creative Solutions, Inc.
Acknow1edgments:
Portions of this document are derived and sometimes directly copied from the
documentation provided to the authors by Apple Computer, Inc. This has been
done to ensure technical accuracy, and is used with their permission.
This document was entirely prepared and produced on a Macintosh'" under
MacWrite'". All output was produced on an Imagewriter'" printer.
MacFORTH was designed by Doni Dave, and Steve; implemented by Don and
Dave; and documented by Dave, Doni Chrls, Christina, and Richard.
June I, 1984
Creativity is more than just being different ...
Anybody can play weird -- thafs easy.
Whafs hard is to be as simple as Bach.
Making the simple complicated is commonplace ...
Making the complicated simple
--awesomely simple;
That·s creativity.
-- Charles Mingus. jazz musician (1922-1979)
The MacFORTH project is dedicllted to Alexllnder Rllmsay,
and proudly bears the Ramsay tartan on its cover. In his
90th yellr, he is
IIcontinuing source of inspirlJtion for the
road ahead.
Table of Contents
Dedication
Table Of Contents
I ntroduct ion
Users Guide:
Chapter
1:
InstallationChapter
2:
Going FORTHChapter
3:
Program EditingChapter
4
Getting StartedChapter
5:
Getting ResultsChapter 6: Graphic Resul ts
Reference Guide
Chapter
7:
MenusChapter
8:
WindowsChapter 9: File System
Chapter 10: Printing/Serial Interface
Chapter
11:
Advanced TopicsChapter
12:
Error HandlingChapter 13: Glossary
Index
Appendix: ASCII Chart
Introduction Page i -
5
Chapter 1
Chapter 2
Chapter 3
Chapter 4
Chapter 5
Chapter 6
Chapter 7
Chapter 8
Chapter 9
Chapter 10
Chapter 11
Chapter 12
Chapter 13
June 3J 1984
Introduction
To
MacFORTH"fM
WELCOME
I
We are about to make your work more fun. We'll do it by making
you
more productive with results that are easier to attain. The Apple
MacintoshlH (or more fondly 'Mac') represents a revolution in the way that
users interface to computers. Few computer users who have experienced the
Mac's graphics, windows, menus, or mouse will happlly choose to go back to
the same old alpha screen and keyboard interface.
In order to provide a consistent user interface across all applications, Apple
has included a large amount of software features in read-only memory (ROM)
built into every Macintosh. Mac FORTH has been specifically tal10red to put
these functions at your disposal.
Regardless of your prior programming experience, you will find writing
programs for the Macintosh to be a new and exciting experience.
The
objective of this manual and the MacFORTH product is to equip you with the
necessary tools to develop software which fits comfortably within the
Macintosh environment.
Learning how to effectively use the Macintosh is in many ways similar to
learning FORTH.
Each is based on extensions to a small set of simple
concepts. Each requires you to re-orient the way you approach computer
related applications, and allows you to get better results with less effort.
In order to learn how to use the Macintosh
1we will first teach you how to
write programs in MacFORTH, and then how to use such programs to interface
to the Macintosh.
We have
included a Computer Aided Instruction Course for those just
beginning to learn FORTH. The course is designed to help novice FORTH users
and programmers to understand how to solve problems with MacFORTH. If you
are an old hand at FORTH, you'll want to go quickly through the course to
review some of the basics of MacFORTH.
Creative Solutions has been producing 68000 based FORTH systems since
1979. The MacFORTH product is a derivative of our Multi-FORTH'" product
line, specifically tuned to take maximum advantage of the Macintosh features
and facll ities.
CSI 68000 FORTH Products have been used to solve problems across a wide
spectrum of applications:
Airborne Radar Systems
Telephone Company Circuit Analyzers
General Accounting Systems
Video Games
Nuclear Power Plant Pipe Testers
Spread Sheet Programs
Data Base Managers
Hospital Operating Room Patient Monitoring
and some of the world's largest ROBOTS
The MacFORTH product line is divided into three areas:
For the hobbyist or those just getting started with the Macintosh. The Levell
product has been designed to put the tremendous power of the Macintosh at
your fingertips, without your having to know a lot about programming or
computers.
This and all levels of the MacFORTH product line provide
stand-alone programming capabilities with the Mac, as well as TRACE, DEBUG,
and toolbox access. Support of the serial interface and sound capabilities of
the Mac 1s also included.
Level II
For the Professional who will be using MacFORTH in her/his work. The Level 2
product includes many enhancements such as more advanced graphics
commands, a full 68000 in-l1ne assembler, floating pOint, and more
documentation allowing further access to the toolbox. It is specifically
designed to meet the needs of the professional user.
Level III
For program developers thinking of either converting existing programs to run
on the Mac or developing new programs. Level 3 wi 11 allow you to do all of
your program development on the Mac, and then generate run-time only
versions of your product (contact CSI for details on royalties and other
arrangements). This version includes support from CSI, additional
documentation and 250 "right to execute" licenses.
The Macintosh: An Appliance Computer
The Macintosh is Intended to be the first mass-market personal computer. It is designed to appeal to an audience of non-programmers, including people who have traditionally feared and distrusted computers. To achieve this goal, the Macintosh must be friendly. The system must dispel any notion that computers are difficult to use. Two key ingredients combine in making a system easy to use: fami I iarity and consistency.
Familiarity means the user easily understands and is comfortable with what is expected of her or him at all times. Most Macintosh applications are oriented towards common tasks: writing, graphics and paste-up work, ledger sheet arithmetic, chart and graph preparation, and sorting and filing. The actual environment for performing these tasks already exists in people's offices and homes; we mimic that environment to an extent which makes users comfortable with the system. Extensive use of graphics plays an important part in the creation of a familiar and intuitive environment.
Consistency means a uniform way of approaching tasks across applications. For example, when users learn how to insert text into a document, or how to select a column of figures in one application, they should be able to take that knowledge with them into other applications and build upon it. Uniformity and consistency in the user interface reduces frustration and makes a user more at ease with the task at hand.
Years of software development, testing, and research have gone into the definition of the MaCintosh user interface. On many other computers, since little or no user interface aids are built in, each applications programmer invents a new and original interface for each program. This leads to many dlfferent (and usually conflicting) interfaces.
Apple has attempted to avoid this situation on Macintosh by building tools for a versatile, well-tested user interface and placing them in ROM to be used by all application programs. There's no strict requirement that an applications program must use any or all of the supplied interface tools; but programmers who create their own interface do so at the expense of their own development time, useable data space, and the overall consistency of the application.
MacFORTH is able to directly access most of the bunt-in tool box functions. Since the toolbox has been designed for general applicability, often the amount of set-up required to perform even a simple function (like adding a window or menu item) is extensive. We have factored out the most common functions (menu, window, mouse, and file operations) and provided you with simplified FORTH operators which make them easy to use.
MacFORTH:
A High Performance, Interactive Programming Environment
FORTH 1s a language, but it is also a tailorable operating system and a set of
tools for developing and debugging your programs interactively. Since FORTH
is all of these things at once, it has been accurately described as a
"programming environment".
We feel that FORTH matches the process of human thought more closely than
any other programming method. Defining your own commands as you go along,
and using these commands in defining further commands, you actually create
your own personalized programming environment that is natural to the way
you think about your applications.
FORTH gives you as much or as little control over the computer hardware as
you want, at any level -- from the most powerful application commands down
to the machine code instructions. Figure 1 illustrates the various levels at
which comparable programming languages operate.
MacFORTH is a very powerful 32-bit implementation of FORTH which includes
the traditional features of FORTH as well as many new innovations.
Philosophically, FORTH takes a substantially different approach to developing
computer appllcations from other languages and operating systems. Most
other programming systems were designed to teach students how to solve
simple, self-contained problems on large timesharing or batch mainframe
computers. FORTH was developed specifically by and for the use of scientific
and engineering professionals in the solution of difficult real time data
acquisition and process automation problems. Since its inception over ten
years ago, FORTH has been hammered into its current form on the hard anvi I of
actual applications experience.
What has emerged is a system which
antiCipates competence and technical responsibility by the user and in turn,
delivers unbridled performance.
MacFORTH puts the power of the computer in your hands. If you choose to
execute an endless loop or overwrite your program with data, MacFORTH wtll
not stand in your way. Consider the analogy of a power saw. The saw
substantially reduces the time required to cut a piece of wood to a desired
size. It does not protect you however, from cutting in half the sawhorse on
which the board rests. Avoiding such an obvious error is your responsibi I ity.
Consider the cost of a saw which was able to detect sawhorses and turned
itself off whenever it encountered one -- similar to the tremendous overhead
involved in many "traditional" computer languages.
While using MacFORTH, you wi11 occasiona11y cause an error which will require a restart of the system. This is the natural result of the learning process. As you become more proficient, this will occur less frequently.
FORTH
Assembly FORTH"S Hi gh leve I language language
Low
High
Language Leve 1
Iterative Organization
The organization of this manual is cycllc, not 11 near. Before we elaborate, let's look at the method most often used for designing FORTH applications.
The oldest programming approach was simply to write code until you finished. Later the fashion was to organize a program into "modules", then to code each of the modules. This approach was named "top down design", and the older approach was dubbed "bottom up".
FORTH uses a still newer approach. Modularization is part of the method, but the "modules" (or skeletal versions of the modules) are actually coded and tested at the same time they are designed. You can code a "sketch" of the appl1cations, and test to see if your general solution to the problem is correct. If not, you simply rewrite the simple outline, and continue testing untll you're satisfied. Then you can "flesh out" the outline with more detail.
This process is called "iterative development." On each iteration you solve the problem at a deeper level and gather information necessary to avoid problems at the next lower level. If you reach a point where insufficient information is available, it is easy to interactively explore alternative approaches, selecting the best solution at that level.
We have utilized a siml1ar approach in this manual. The manual is divided into two main sections: the User's Guide and the Reference Guide. The beginning chapters of the User's Guide show you to how to interact with MacFORTH: creating, editing and saving. Later chapters of the User's Guide walk you through successively more comprehensive examples, building on previously developed skills and introducing the MacFORTH interface to each of the major Macintosh features and facllities. The Graphics Results chapter introduces graphiCS, and how to use the extensive set of graphics tools built into the Macintosh.
The User's Guide ends with an example which touches on the major functions highl ighted by a separate chapter in the Reference Guide.
The Reference Guide provides in-depth discussion of the MacFORTH interface to each of the follOWing Macintosh features: Menus, Windows, File System, and Printing/Serial Interface.
The Reference Guide also discusses Advanced TopiCS, Error Handling, and provides a glossary of a11 user applicable words in the system.
We hope our approach makes learning Mac FORTH easy. We know you'll be happy
with the results.
Creative Solutions solicits any comments in reference to the form, content,
or accuracy of this manua1. Your responses will allow this documentation to
evolve to better meet the needs of our customers. Please send your comments
to:
MacFORTH Product Manager
Creative Solutions, Inc.
4701 Randolph Road, Suite 12
Rockville, MD 20852
301-984-0262
Chapter 1: Installation
Overview
This chapter will show you how to install MacFORTHlH on your computer. It
wi 11 also discuss the files found on your MacFORTH system disk.
license Agreement
Before opening the package which contains the MacFORTH System Disc, carefully read the License Agreement on the cover of the package. Briefly, it states ...
Mac FORTH, including this manual and supplied diskette and contents of both, is owned exclusively by Creative Solutions, Inc. A copyright is registered with the United States Copyright Office, for both the manual and the accompanying Object code. After paying the license fee, agreeing to the terms of the I icense agreement, and returning the attached registration card, you are licensed to use MacFORTH on a single computer system.
You may not provide copies of CSI supplied materials to anyone else for any reason. If you transfer your right to use MacFORTH to anyone else, you are then no longer licensed to use it yourself.
WeOre quite serious about this. The MacFORTH product is the result of an enormous amount of work. We have foregone any hardware copy protection scheme for your convenience, we simply encode a serial number on each disk. This allows you to always have a backup in the event of a media or hardware failure and allows us to trace the source of illegal copies. We feel that we have produced an outstanding product for the price, and that our customers will respect our efforts and the law by adhering to these terms. If the cover to the manual that you are reading does not include the distinctive MacFORTH red, white and black logo, you are utilizing a copy which was produced in violation of US copyright laws. Contact your attorney for instructions on how to return this illegally produced material to Creative Solutions.
Be sure you make a backup of your
Mac FORTH system disk
before you use the systeml
Making a Backup
Be sure to write protect your original MacFORTH disk before you make a
backup. This is described in your Macintosh System documentation (on page 89
- "Locked Disks").
Place the MacFORTH disc in your drive and follow the instructions in your
Macintosh System documentation (on page 81 - "Copying an Entire Disk").
When you have made a backup, store the original disk in a safe place and use
your backup disk. This will protect you in the event of a disc related error.
loading MacFORTH
Before you just start experimenting with the system, you should proceed
through this manual, trying each example (feel free to try other examples of
your own on the topic being presented). This may sound a little harsh, but the
Macintosh is l1ke
no other computer. There are many unique features you need
to know about to make the best use of this new computer.
When you are ready to load MacFORTH, place the Mac FORTH system disk in the
drive and reset your computer (either press the programmer's reset button, or
turn the computer off, then back on).
Loading the MacFORTH System
To load the MacFORTH system (which loads MacFORTH and the editor), double
click on either the "MacFORTH 1.1" icon or the "FORTH Blocks" icon. "FORTH
Blocks" is a MacFORTH document and will load the MacFORTH sytem first, then
load the source code contained in the "FORTH Blocks" file itself.
The MacFORTH window will appear and you will see the soon-to-be-familiar
"ok". The arrow cursor will turn into a wristwatch, indicating you should
wait while the system is extended to include the editor (you will notice that
when source code is loaded from disk, the cursor will turn into a wristwatch
temporarlly). Finally, you will be asked to enter your initials (this is for the
editor and is explained in more detail in the "Program Editing" chapter).
Loading Only MacFORTH
If you want to load the MacFORTH system itself, without the editor or any
other "extras", edit block 1 of the "FORTH Blocks" file and delete (or comment
out) any commands which load other code.
Setting MacFORTH as the "Startup" Flle
Finder 1.1 (the current level of the Macintosh operating system) allows you to
select a fUe to be automatically loaded when the computer is reset (or turned
on). To select MacFORTH as the auto-load fHe, from the Finder, select the
"MacFORTH 1.1" icon (it w111 become inverted), and then select the "Set
Startup" item from the "Special" menu. To verify that MacFORTH will be
automatlcally loaded, turn your computer off then on and watch MacFORTH
load.
Loading the MacFORTH Demos
In order to understand the demos better, we highly recommend that you
complete the Users Guide section of this manual (chapters 1 through 6).
The demos provide a few graphic and music examples for your amusement. To
load the demos from the Finder, double cllck on the "Demo Blocks" file. To
load the demos from MacFORTH, execute the phrase
IHelUDE· De.o Blocks·
The demos provided are:
1.) Approach
Spins 1n the MacFORTH logo. Shows the rotation and scaling features
of the MacFORTH graphics package.
2.) Clock
Displays the current time (as read from the internal clock) in the
format of an analog clock. Shows real time update of the window.
You can change the size of the clock by resizing its window.
3.) Dark Beams
Displays a series of lines which can create some facinating results.
Try reslzing the window.
4.)
Bouncer
Displays a bouncing ball in the window.
Resize the window for
different bouncing patterns.
5.) Spirals
Displays some geometric doodllng. Shows the speed and power of the
MacFORTH graphics package. The code for this demo fits easl1y in one
block of source code.
6.) Sound
Plays Bach's two part invention #8.
Installation
Page 1 - 3
June 3, 1984
To select the demo you like, activate its window (by clicking the mouse down
inside its window) or pull down the music menu. You can see (and modify if
you like) the source code for the demos by simply editing the "Demo Blocks"
file (as described in the Program Editing chapter).
We provide the source code to the demos for you to use as examples. Feel free
to modify the code for the purpose of experimentation. We discuss how to do
this in the Editing chapter.
Contents of the MacFORTH System Disk
In case you're wondering what each of the files on the disc are:
1.) "MacFORTH ,.'"
Contains the MacFORTH system itself. When opened from the Finder
(by double-clicking), it loads MacFORTH, and then the "FORTH Blocks"
fi Ie to extend the system. (By "extending" the MacFORTH system, you
are simply loading the standard utilities -- and any you might add to
the load block for the "FORTH Blocks" file.)
2.) "FORTH Blocks"
MacFORTH blocks
fiIe which contains the source code for some useful
utilities. It is loaded to extend the MacFORTH system. Modify block
one of this file if you want to load your application automatically
when MacFORTH is loaded.
3.) "Going FORTH"
MacFORTH blocks file which contains the source code for the Going
FORTH tutorial. Double-click on this file to load the computer-aided
instruct ion course.
4,) "GF Data"
Contains the text used in the Going FORTH tutorial.
5.) "Demo Blocks"
MacFORTH blocks file which contains the source code for the demos.
6.) "MacFORTH Folder"
A Mac folder used to hold files used by MacFORTH. The Finder and
system are contained in this folder to avoid cluttering up the screen.
MacFORTH Customer Support Hotline: (300 984-3530
We have established the "MacFORTH Hotline" to assist you with questions
and/or problems you have concerning the MacFORTH product. Help is available
between the hours of 1 p.m. and 5 p.m. EST, Monday thru Friday (excluding
holidays) at (301) 984-3530.
The following guidelines have been established for the MacFORTH Hot1ine:
1.) Only MacFORTH customers who have signed and returned their
registration cards may use the MacFORTH hotline. If you haven't
signed and returned your card (the one attached to the disk envelope)
yet,
do it now.2,) Know your serial number (its on the original MacFORTH disk you
received). You need to tell the person answering the hotl ine your
name and disk number before you can ask your questions.
3.) Have your questions written down in front of you. We allow a
maximum of 5 minutes per call when others are waiting. This is
ample time to answer even a long list of questions if they are clear
and wri tten down.
4.)
Please don't use the hotline for marketing questions. This is for
technical support only.
If these quidelines seem a bit harsh, please understand. We are happy to
support valid, registered users who have questions about MacFORTH.
You can also direct any questions/comments/suggestions in writing to:
I nsta llat ion
MacFORTH Product Manager
Creative Solutions, Inc.
4701 Randolph Road, Suite 12
Rockville, MD 20878
Page 1 - 5
June 3, 1984
Chapter 2: Going FORTH
Tooic
Overview
Preparat i on
Running the Course
Going FORTH Page 2 - 1
Page
2
2
2
I
Overview
This chapter provides the instructions for running the Going FORTH computer
aided instruction course which is supplied on the MacFORTH system disc.
The tutorial is designed for everyone. The novice FORTH programmer wlll
learn the basics of FORTH, more experienced FORTH programmers wi 11 get a
flavor for running MacFORTH on the Macintosh.
It is important that you run through the course, as many Macintosh specific
terms are introduced there. We will assume you have run the course and use
these terms throughout the manual.
Preparat ion
To run the course, power up your Macintosh with the MacFORTH system disc in
the drive. Open the "Going FORTH" document (by double clicking in it). While
it is loading, you wi II get the message "Loading the Going FORTH Tutorial." Be
sure you read this chapter before you begin the course (and remember to
re-size the window).
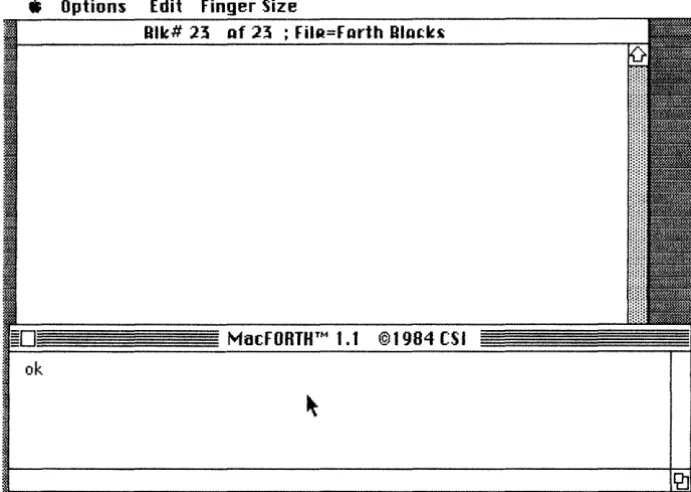
Once the course is loaded, you need to shrink the size of the MacFORTH
window by dragging its size box over to the left. Figure 2.1 shows what your
screen should look like while running Going FORTH.
Running the Course
When you uncover the Going FORTH window, the course will start
automatically, displaying the first frame. On the right hand side of the
window you will notice the scroll bar. To move on to the next frame, cl1ck
the arrow in the lower right side of the window.
To review previous
material, click the arrow in the upper right side of the window.
To move from chapter to chapter, click the mouse down in the shaded area
above or below the scroll box (the scrol1 box is the white box in the shaded
area of the scrol1 bar). You can also move the scroll box to any position
within the course by dragging the scroll box up or down.
If you press any keys while in the Going FORTH window, the Mac will beep at
you, reminding you that you can only enter keystrokes in the MacFORTH
window while you are completing the tutorial.
If you close the Going FORTH window, you can re-enter the course by selecting the "Going FORTH" item from the "Tutorial" menu.
That's it! That's all you need to know; the tutorial will give you any additional instructions you need, now get going FORTH!
" Options Tutorial
ok
Going FORTH
Going FORTH
A
Cornputer-A i ded Instruction Course on ry
lacFORTH
Creative Solution:::, Inc. Copyright 1984
(click: Hie flrrow in Hie lO'wer right
corner to cont inue)
Figure 2.1
[image:24.549.111.459.163.421.2]Chapter 3: Program Edi ti ng
I
Topic Page
Overview 2
Preparat ion 2
Selecting a Fi le for Editing 2 Displaying File Assignments 3 Using a Different File to Edit 3 Selecting a Different to Edit 3
Entering the Editor 4
Exiting the Editor 4
Block Buffers 4
Using the Editor
5
Practice Editing Block
5
Editor Window 6
Edit Menu 8
Insertion Point 9
Selection Range 10
Cleaning a Block 10
Reverting to the Last Version 10 The Editor Stamp 11
Loading Blocks 11
Error Detection While Loading a Block 11
Listing Programs 12
Copying Blocks 13
Single Block Copying 13 Multiple Block Copying 13 Copying Blocks from One File to
Another 13
Blank Filling Blocks 14 Cutt i ng and Past i ng to the Notepad 14
Overview
This chapter introduces you to one of the most used features of MacFORTH, the editor. Using the editor, you can create and save your programs on disc. This allows you to create and modify program source code without retyping it each
time
you load the system. The MacFORTH editor uses an editing technique similar to MacWrite, so if you are familiar with MacWrite, you will be right at home using the MacFORTH editor.The MacFORTH editor is used to edit program source files on the disc. We wi 11 introduce some of the file system commands you will use normally with the editor. For an in-depth discussion of the file system and its commands, refer to the File System chapter.
Preparat ion
To start this session load the MacFORTH system by resetting your Macintosh (power off then on or press programmers reset button on the left side of your machine) . With your MacFORTH disc in the drive, double click on either the "MacFORTH 1.1" or the "FORTH Blocks" file in the window that appears on your screen (if you have set the MacFORTH flle as the startup file, you don't need to double click on the "MacFORTH 1.1" icon). When this file loads, it also loads the editor from the file "Editor Blocks" automatically. (Remember to enter your initials when asked.)
We'll stress again the importance of the editor to your effectiveness with MacFORTH and urge you to spend the time
now
to understand how it works. You should try each example in this chapter before continuing with the manual.Be sure to restart your computer as instructed above so that the examples in this chapter make sense.
Selecting a File for Editing
When you loaded the "FORTH Blocks" file from the Finder (if you don't know what the finder is, refer to your Macintosh manuals), MacFORTH assigned the file to file number 0, opened it and selected it as the current "blocks file". The MacFORTH editor allows you to edit the current "blocks file" only. (File assignment, opening, selection and flle numbers are discussed in more detail in the File System chapter. For now, just execute the examples to practice using the editor.)
pisplaying file Assignments
You can see what files are assigned and opened by executing:
?FILES
You can see that "fORTH Blocks" is assigned to file number 0, that it is open (by the capital "0"), and that it is the current "blocks file" (by the capital "B" -- this is explained in more detall in the file System chapter).
Since the "fORTH Blocks" file is the file you are going to work with in this chapter, you don't need to do anything else to continue. for your reference, we will discuss how to select a different file for editing.
Using a Different file to Edit
If you want to use a different file for editing, execute the USE- command 1n the following format:
USE-
<file
nOle>-USE- assigns the file specified by the name <file name> to the first avallable flle number, opens it, and selects it as the current blocks flle for editing (if it is a blocks file). for example, if you wanted to edit the source code for the MacfORTH demos (contained in the fi Ie "Demo Blocks"), you would execute (don't execute this example now):
USE·
Delo Blocks·
Selecting a Different flle to Edit
Once a file has been assigned and opened (via the USE- command, for example), you simply select it as the file to edit with the SELECT command. SELECT is used in the following format:
<file nUlber>
SELECT
So, for example, if you wanted to edit the program source code contained in the file assigned to file number 1 (assuming it is a blocks flle), you would execute (don't execute this example now):
1 SELECT
SELECT acts on a file which has already been assigned a number. USE- should be used when that file has not yet had a number assigned to it (e.g. the first time you use the file after entering MacfORTH ).
Program Ed1ting- Page
3-
3 June 3, 1984Entering the Editor
There are three ways to enter the editor (don't try any of these techniques just
yeti
simply become familiar with how to enter the editor):1.) Execute the
EDIT command in the following format:
<block-) EDITie: (don't try this example now) 5 EDIT
2.) Activate the editor window by clicking in it with the mouse.
3,) Pull down the "Edit" menu and select the "Enter Edit" item (or execute its equivalent keystroke, command
D.
Exiting the Editor
There are three ways to exit the editor (don't try any of these techniques just
yeti
simply become familiar with how to exit the editor):1) Pull down the "Edit" menu and select "Exit Editor" item (or execute its equivalent keystroke, command E) .
2) Click in another window with the mouse.
3) Close the editor window by clicking in its close box.
Block Buffers
When a block is edited, it is read from disk into memory. The area of memory it is kept in during the editing process is called a "block buffer", Each time a change is made to the block, it is modified in the block buffer only, When you exit the editor, or select another block to edit the block is written to disk,
Once again, the image of the block you are editing is in memory and not updated (written) to the file on disk until you exit the editor or select another block to edit.
Using the Editor
The files you will edit are called "block files" because they are made up of a
sequence of "blocks" (old-time FORTH programmers may prefer the term
"screens"). A block is the fundamental unit of disc storage used by MacFORTH.
It is simply a fixed length record containing 1024 characters for programs.
The "FORTH Blocks" file on the MacFORTH system disc contains the source
code for some MacFORTH utilities, as well as empty space for your use.
You should organize your program source code logically into files by
categories. For example, you can see that we put the MacFORTH utilities in
the "FORTH Blocks" file, the demo programs in the "Demo Blocks" file, and the
Going FORTH tutorial source code in the "Going FORTH" flle. By logically
organizing your source code into fUes you will find program development
simplified greatly.
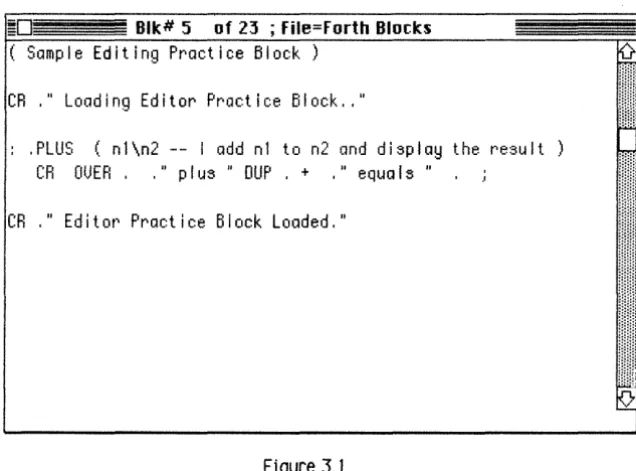
Practice Editing Block
In order to illustrate the use of the editor, we have provided a practice block
for you to work with while completlng this chapter. Begin by displaying the
practice block with the editor. Execute
5 EDIT
You should now see on your screen an edit window which looks like figure 3.1
below:
=0
Blk# 5 of 23 ; File-Forth Blotks( Sample Editing Practice Block)
CR ," Loading Editor Practice Block, ,"
,PLUS (nl\n2 --
Iadd nl to n2 and display the result
CR (lOER,
," p I us " OUP
, + ,"equa Is" , .:
[image:30.543.127.445.363.598.2]CR ," Editor Practice Block Loaded,"
Figure 3.1
Editor Window
The MacFORTH editor uses its own window. The window is large enough to display one block of source code in a format 16 lines by 64 characters each for a total of 1024 characters (as you can see in Figure 3.1). The following list pOints out the features of the editor (don't try these features just yet, simply read through the list to familiarize yourself with each):
- Title Bar
Displays the current block number being edited, the total number of blocks in the file and the file name. Each time you edit a different block this information is updated to show you exactly what you are editing.
- Close Box
Lets you close the editor window by clicking in its close box. The editor window will reappear the next time you enter the editor.
- Drag RegIon
Allows you to drag the edit window to a new position on the screen (remember to keep the entire window visible when editing).
- Scroll Bar
The vertical bar on the right hand side of the window is the scroll bar. It allows you to scroll up and down within the current program file, selecting different blocks for editing.
- Up Arrow
Selects the previous block (numbered one less than the current block) as the block to edit. Stops on the first block in the file.
- Down Arrow
Selects the next block (numbered one more than the current block) as the block to edit. Stops on the last block in the file.
- Scroll Box
Drag the scroll box to select another block to edit. Move it up to edit lower numbered blocks and down to edit higher numbered ones.
- Shaded Area
Click inside the shaded area above or below the scroll box to move 3 blocks at a time in either direction (up or down).
Now try a few of these features. First, click inside the close box. The editor window disappears and the MacFORTH window becomes the active window. To make the editor window reappear, re-enter the editor by executing (from the MacFORTH window):
5 EDIT
With the edit window now the active window, here's how to move up in the fUe to block
4:
click the up arrow in the scroll bar on the right side of the window. Click it once and it will move you up one block in the file ("up in the fHe" meaning to a lower numbered block). You'll see the title of the window change toBlk.# 4 of 23; File= FORTH Blocks
indicating that you are now displaying block number
4.
Return to block 5 for editing by clicking the down arrow in the scroll bar once. You can see that you have returned to block 5 by the title of the editor window:Blk.# 5 of 23; File= FORTH Blocks
You can also move 3 blocks at a time in either direction in the file by clicking within the shaded area above or below the scroll box. Click in the shaded area below the scroll box once. You are now editing block 8 (you were previously on block 5).
Each time you edit a new block, the scroll box is moved up or down. Its position tells you what block you are editing relative to the start and end of the file.
By dragging the scroll box up or down within the shaded area, you can position the editor to edit any block in the file. Try dragging the scroll box to several different positions now. Simply drag it to a new location and release the mouse button to display the block being edited.
Moving the scroll box to the top position in the shaded area wi II position you to edit block 0 of the file. The bottom position in the shaded area positions you to edit the last block in the file. You can locate a particular block by positioning the scroll box in the approximate location from the beginning or end of the file. For example; since there are 23 blocks in the "FORTH Blocks" file, if you wanted to edit block 12 you would position the scroll box approximately half way between the top and bottom of the scroll bar. Try to find block 12 now using the above technique.
Edit Menu
The Edit menu provides you with the following options while editing. Each item in the menu provides a powerful function at your fingertips (don't try these features just yet; simply read through the list to familiarize yourself with them):
Undo (command Z)
Undoes the previous cut, copy, or paste operation (including any changes since the last operation). It actually restores the contents of the block to the version since the last cut, copy or paste operation.
Cut (command X)
Cuts the current selection range (discussed later in this chapter) from the text and places it on the clipboard. (Cut, copy and paste use the clipboard for consistency with the Macintosh environment).
Copy (command C)
Copies the current selection range (discussed later in this chapter) to the clipboard.
Paste (command V)
Inserts the contents of the cl1pboard to the block at the current cursor position and/or replaces the current selection range.
Stamp (command S)
Stamps the current block with the current date, as read from the internal clock, and initials stored in the user variable INITIALS. Use the word OINIT to change the value in INITIALS. DATE displays the current initials and date stamp. If the flrst three characters in INITIALS are non-printable ASCII characters or blanks, the stamp function is disabled.
CJean
Blank fllls the contents of the block currently being edited. Use this
command with caution as
you
cannot undo
it.Revert
Resets the contents of the current block back to the version saved on the disc. Use this command with caution as you cannot undo it.
Enter/Exit Editor (command E)
Allows you to enter or exit the editor.
Insertion Point
If you look in the editor window, you will see a flashing vertical bar. This is called the
Insertion point
Try typing the phrase (type it in only, doll2.t.
press Return):This Is the Insertion point.
and you'll see it inserted at the insertion point. You can also see that everything to the right of the insertion point was shifted over each time a character was typed. Characters in the last position on the right were pushed right out of the window. Now delete what you just inserted by pressing the Backspace key once for each character you just entered (the key wll1 repeat automatically if you hold it down).
You can change the insertion point by pointing with the mouse to the position you want to insert text and cllcking once. In the edit window, the cursor becomes an "I-beam" instead of an arrow to make it easier to select an insertion pOint between characters. Try moving the insertion point to several different places in the window now. Remember, position the i-beam cursor and click once. Each time you reposition it, the insertion point will be marked by the flashing vertical bar.
Try repositioning the insertion point to several places again, but this time, each time you position the cursor, type the phrase "abc" and backspace it away to get a feel for inserting and deleting text.
You can also insert a line at any point by positioning the insertion point and pressing the Return key. For example, position the insertion point between the words "Sample" and "Editing" in the first line and press Return. Everything on the line to the right of the insertion point is shifted down to the beginning of the next line, all lines below it are shifted down one llne. Press the Backspace key once to "glue" the lines back together. When you pressed the Return key, you inserted a carriage return. Pressing Backspace deleted it.
When you insert text in a line, all text to the right of it is shifted to the right. If you insert a Return, the text after the insertion point and all lines below are shifted down one line. You can recover the text that was pushed off the end of a line or the bottom of the screen by deleting some text (if off to the right) or deleting some lines (if off the bottom). To delete a blank Hne, just position the cursor against the left edge of the editor window and press Backspace.
While you ~ recover the text that has been pushed out of the window while you are editing,
only the visible text
is saved on the disc when you exit the editor. After any operation that saves the data in the disk buffers (stamp,clean, undo, etc. -- explained next) you cannot recover any text that you can't see.
The MacFORTH editor uses a simple, yet powerful "cut and paste" style of editing (similar to MacWrite). By now, you can see how to insert and delete text at the insertion points by typing in new text or backspacing it away.
Se I ect i on Range
If you are familiar with MacWrite this description will be a review. Cut, Copy and Paste operate on a range of selected information (ie: a text string). To select items for edit the I-beam cursor should be placed at the beginning of the desired text and dragged to the end of the "selection range".
For example, try entering the following line in the block (put it anywhere you like):
Uelcole to the .orld of nacFORTH editing!!!
Now remove the word "MacFORTH" by selecting it and "cut"ting it out: click at the beginning of "MacFORTH", drag to the end of the word (it is now displayed in inverse characters) and release the mouse button when the entire word is selected (entirely in inverse characters). Select the "Cut" item from the "Edit" menu; the selection range is now deleted and saved on the clipboard. Bring it back by selecting "Paste" from the "Edit" menu.
You can now reposition the insertion pOint and paste the word "MacFORTH" anywhere in the current block. You can even move to a different block and paste it in that block! This should give you an idea of the power of the editor. You can cut or copy a selection from any block and paste it into any other block.
Cleaning a Block
The "Clean" item in the "Edit" menu allows you to completely erase the current block being edited (filling the block buffer with blanks). THIS COMMAND CANNOT BE UNDONE .. so use
it
with caution. You can only revert to the version of the block saved on disk.Reverting to the Last Version
The "Revert" item in the "Edit" menu al10ws you to revert back to the old version of the block (from disc). AI1 changes made to the block since it was last read in from disc wil1 be lost. THIS COMMAND CANNOT BE UNDONE .. so use it with caution.
The Editor Stamp
The MacFORTH stamp allows you to mark a block with your initials and the current date. Using this method informs you and others who last changed the block and what day the change was made. Vou should "stamp" the screen (by selecting the "Stamp" item from the EDIT menu each time you modify a block with the editor.
Loading Blocks
To load a block from disc, execute the LOAD command in the following form:
<block.) LOAD
For example, to load the block you were editing, execute
5 LOAD
When a block is loaded, the source code on the screen is interpreted just as if you had typed it in from the keyboard. This enables you to mix definitions and commands to be executed immediately.
Error Detection While Loading a Block
If MacFORTH encounters an error while loading a block (an undefined word, a typo, missing del1miter, etc.), it wi 11 abort immediately and issue an error message. To find where the error occurred, simply enter the editor. The insertion point (flashing vertical bar) will be located just after the error.
For example,
if
you have the sequenceQUERTY
in a block (and it was not a deflned word) when you loaded the block, the insertion pOint would be one space after the "V". This feature is invaluable for locating the cause of an error during loading because it shows you where MacFORTH encountered the error.
Listing Programs
The following words are provided to enable you to list your programs to the display and/or printer. If you have an Apple Imagewriter connected to your Mac, select the "Printer" item from the "Options" menu to turn it on. All output to the screen will be sent to the printer as well.
LIST
Displays the specified block. The data, screen numbers, and lines of the block ( numbered 0-15) are displayed. For example:
10 LIST
would list the contents of block 10.
INDEX
Displays the first line of a range of blocks. If you follow the convention of using the first line of each block as a comment describing the contents of the blOCk,
INDEX
will allow you to see quickly what a range of blocks contains. For example:5 15
IHDEX
would display the first line of blocks 5-15, with the block numbers displayed on the left.
TRIAD
Displays three sequential blocks on one page, starting with a block that is evenly divisible by three. You specify the number of any block in the "triad" that you want to display. For example:
10 TRIAD
displays blocks 9, 10 and 11. This enables you to update your program listings with only the screens that have changed. The icon used for MacFORTH blocks (program) files contain three rectangles to deSignate triad listings.
SHOW
Displays a range of blocks (as a series of triads). Given the starting and ending blocks to
displaYi
SHOW generates a listing of triads. For example:10 20 SHOU
would generate a listing of three blocks per page containing the specified range of blocks (it would actually list blocks 9-20).
Copy
ing
Blocks
The following routines allow you to copy the contents of one block (or blocks) to another (or others).
Single Block Copying
When copying limited numbers of blocks, use the
COPY
command in the following format:<source block-> <destination block->
COpy
For example, to copy the contents of block 6 to block 5, you would execute:
6
5 COPY
Multiple Block Copying
If more than a couple of blocks need to be copied, a copying utility program is available. Load these routines by loading block 10 of the "FORTH Blocks" file. To copy a series of blocks from one location on the disc to another, use the
COPY.BLOCKS
in the following format:<first> <last> <target>
COPY.BLOCKS
For example, to copy blocks 3 thru 7 to screens 12 thru 16, execute:
3
7 12
COpy , BLOCKS
(just an exa.plej do not try this no.!)
During the copying procedure, you are shown which screens are being accessed with the following message:
sss -) ddd
where sss is the source block number and ddd is the destination block being copied.
Copying Blocks from One File to Another
Load the block transfer routines by loading block 12 of the "FORTH Blocks" file. The word
XFER.BLOCKS
will al10w you to copy blocks between files, promting you to enter the required information. You will be asked for the file numbers of both files as well as the range of blocks to be transferred.Blank-Filling Blocks
To blank-fill a single block, select the "Clean" item from the "Edit" menu
while editing the block. If you want to blank-fill a series of blocks, load the
block copy routines (if you have already loaded them, you don't need to re-load
them). You now have the word CLEAR. BLOCKS. It is used in the following
format:
<first> <last> CLEAR.8LOCKS
For example, to blank-fill blocks 20 thru 25 in the current blocks file, you
would execute (don't try this example):
20 25 CLEAR.8LOCKS
Each time a block 1s cleared, the message
ccc Cleared
is displayed, where ccc is the number of the block being cleared.
cutting and Pasting to the Notepad
You can cut, copy and paste selected text to/from the Notepad. This allows
you to share ASCII data between MacFORTH and any other Macintosh system
that lets you move data to the notepad.
To move ASCII data from MacFORTH to the Notepad, enter the editor and cut
(or copy) the desired text. Select the Notepad item from the apple menu and
paste the selected text into the Notepad.
To move ASCII data from the Notepad to MacFORTH, select the Notepad item
from the apple menu and cut (or copy) the desired text. Enter the editor in
MacFORTH and paste the selected text into a block.
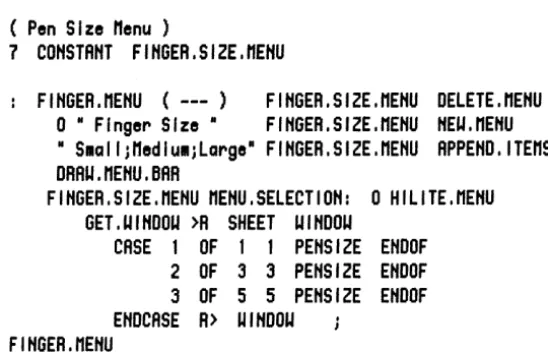
Chapter 4: Getting Started
Topic
Page
Overview 2
Preparat ions 2
Finger Paint Example Program 3
Create a Window 3
Track the Mouse 5
Deflne the Window Program 6
Re-title the Window 7
Print ing the Picture 7 Define the Pen Size Menu 8
Summary 9
Overview
This chapter will give you first-hand experience in programming the
Macintosh. You wi11 enter a sample program, try it out, make some changes,
and try
itagain to see the differences. Don't try to understand each command
now. The intent of this chapter is to give you a feel for programming the
Macintosh,
not
to give a comprehensive description of each command. Later
chapters will fi11 in the missing information. For now, just enter the example
program and enjoy.
By the time you finish this chapter, you will have created a new menu, deflned
a program to be executed for the window, tracked the mouse, created some
graphics pictures (and printed them if you have an Apple Imagewrlter
printer), and defined a menu.
Preparations
By now you should have completed the Going FORTH tutorial, if you haven't, do
so
now
before you continue. You will be instructed to edit some source code
into the "FORTH Blocks" file. If you skipped the Program Editing chapter, read
it
now
before you continue.
It is important that you complete this chapter in one sitting.
The only thing you'11 need is about 20 minutes of time, your Mac, MacFORTH,
and you.
Restart your computer (by turning the power off then on) and load MacFORTH
by opening the "FORTH Blocks" document from the Finder (by double clicking
it). When MacFORTH loads, enter your initials when asked and you'11 get "ok".
You are now ready to start.
Finger Paint Example Program
The example program you will be entering will allow you to create pictures in a new window using the mouse. Press the Return key a few times to see where your cursor is (some more "ok"s will appear).
Prior to typing in the following example, resize the MacFORTH window and drag it down to the lower two-thirds of your screen (your screen should be similar to figure 4.2, except the Finger Paint window won't be present yet). This will expose the editor window. During the course of the following example another window will be defined and will appear in the upper left corner of the screen.
One other reminder before you start typing; spaces separate words in FORTH, so pay careful attention to spacing in this example.
You will use blocks 2 thru 4 of the "FORTH Blocks" file to enter the source code for this example. If there is already source code in any of the blocks, clean the block by selecting the "Clean" item from the "Edit" menu (be sure that you are editing the correct block before you clean it).
Finally, remember to put the comment (in parentheses) in the topmost I ine of the block.
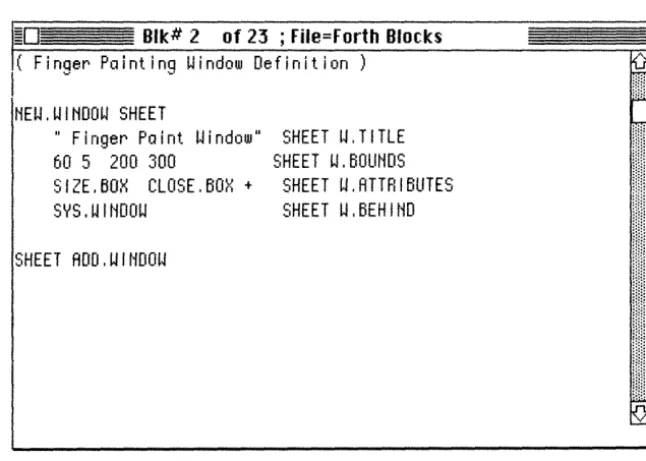
Create a Window
Edit the following source code into block 2:
( Finger Painting Uindow Definition
HEU.UIHDOU SHEET
" Finger Paint Uindow"
60 5 200 300
SIZE.BOH CLOSE.BOH
+SYS.UIHDO\.l
SHEET ADD.UIHDOU
Getting Started Page 4 - 3
SHEET \.I.TITLE
SHEET U.BOUHDS
SHEET
\.I.ATTRI BUTES
SHEET \.I.BEHIHD
Your block should now look like the block in figure 4.1. If there are differences go back into the editor now and correct them before you cont inue:
;;;;0
Blk# 2 of 23 ; File-Forth BlocksI(
FinQer PaintinQ Window Definition)
I
... ·
....
liEW.WINDOW SHEET
" Finger Paint Window"
60 5 200 300
SIZE. BOX CLOSE. BOX
+SYS.WltiDOW
SHEET W.TITLE
SHEET W.BOUNDS
SHEET W.ATTRIBUTES
SHEET W.BEHIND
SHEET ADO.WlliDOW
Figure 4.1
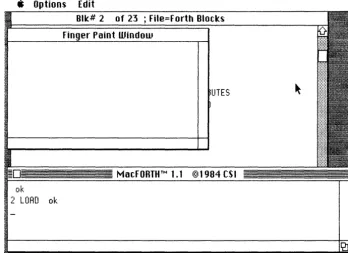
Now load the block by executing:
2
LOAD
At thlS pOlnt a new wlndow wlll appear in the upper left corner of the screen.
Resize your MacFORTH window and drag it towards the lower right corner of your screen so that both windows are visible (you can also see the editor window). Your screen shouid be simi iar to figure 4.2.
[image:43.550.86.409.128.359.2]" Options Edit
UTES
[image:44.545.112.460.64.316.2]ok
2 LOAD ok
Figure 4.2
I f you c 1
i ck in the new window the system will just beep at you. eli ck back
inside the MacFORTH window and continue.Track the Mouse
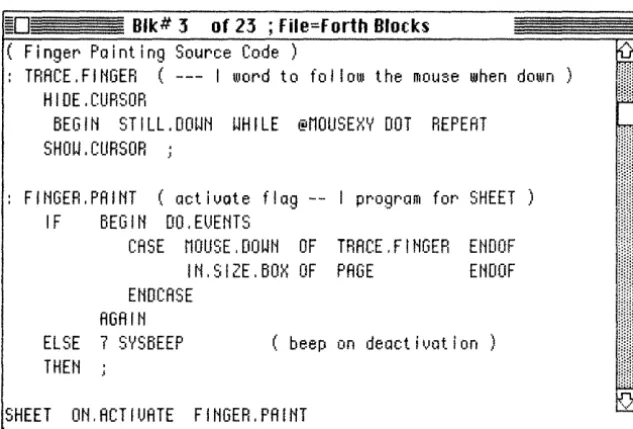
Edit the following source code into the top of block 3:
( Finger Painting Source Code)
TRACE.FIHGER (--- I word to follow the mOU5e when down)
HIDE.CURSOR
BEGIH STILL.DOWH WHILE @MOUSEXY DOT REPEAT
SHOW.CURSOR
Pef I ne the
Wi
ndow program
Edit the followIng source code Into the bottom of block 3 (under the source
code for TRACE.FINGER):
FIHGER.PAIHT
(activate flag --
I
progra. for
SHEET)
IF
BEGIH DO.EUEHTS
CASE MOUSE.DOUH OF TRACE.FIHGER EHDOF
IH.SIZE.BOX OF PAGE
EHOOF
EHDCRSE
AGAIH
ELSE
7 SYSBEEP
(
beep on deactivation)
THEH
SHEET OH.ACTIUATE FIHGER.PRIHT
Your block should now look l1ke the block in figure 4.3.
If there are
dIfferences, go back Into the edItor now and correct them before you continue.
~D 811e# 3 of 23 ; File-Forth Blocles
( Finger Painting Source Code)
TRACE.FINGER (--- I word to fol low the mouse when down)
HIOE.ClIRSOR
BEGIN STILL.OOWN WHILE @MOLISEXY DOT REPEAT
SHOW. CURSOR .:
FINGER.PAINT (activate flag -- I program for SHEET
IF
BEGIN OO.EUENTS
CASE MOllSE.OOWN OF TRACE.FINGER ENOOF
IN.SIZE.BOX OF PAGE
ENOOF
EtmCASE
AGAIN
ELSE 7 SYSBEEP
THEN
( beep on deactivation)
SHEET ON.ACTIUATE FINGER. PAINT
Load
theblock by
executing: [image:45.546.88.405.286.500.2]3 LORD
Figure 4.3
Gett 109 Started
Page 4- 6
June 4,1984I
Activate the finger paint window by pointing to it with the mouse and
clicking down inside it. When you drag the mouse around in that window, the
cursor disappears and a line follows where you
move
the mouse. You can even
drag outside the window and come back In. When you release the mouse
button (le. stop dragging), the cursor re-appears and you don't get a line
following you anymore.
Try moving the cursor and clicking in the MacFORTH window now. The Mac
beeps at you when you de-activate the SHEET window (1ts title is "Finger
Paint Window) as you told it to do in FINGER.PAINT. Now resize the SHEET
window so your drawing space is larger (but leave both windows visible).
When you resize the SHEET window, the picture you drew is erased and you
are given a clear space to work in.
Close the sheet window (by cl1cking in its close box at the top left corner).
To make
itre-appear, execute (from the MacFORTH window):
SHEET SHOU.UIHOOU
You can now activate the SHEET window and do some more drawing.
Re-Title the Window
Go back to the MacFORTH window (by clicking in in Now change the title of
the new window to your name. For example, if your name 1s Marge, execute:
" Marge's Rrt.ork" SHEET SET.UTITLE
or Harry:
U