Bering
MultiPac IV IIX
User's Manual
Manual No. 11-09878-01, Rev B
©
Copyright 1990, 1991
Bering Industries
246 East Hacienda Avenue
Important FCC
Information
Note:
@ 1991 by Bering Industries. All rights reserved. Printed in the United States of Amer-ica. No part of this document may be reproduced in any way without the express written permission of Bering Industries.The information oontained in this document is subject to change without notice. Every reasonable precaution has been taken in the preparation of this manual to insure its ac-curacy. However, Bering Industries assumes no liability resulting from any errors or omissions in this manual, or from the use of the information contained herein, nor does it make a oommitment to update the information contained herein.
MultiPac is a trademark of Bering Industries.
This peripheral device generates and uses radio frequency energy and if it is not in-stalled and used properly, that is, in strict accordance with this manual, it may cause interference to radio and television reception. It has been type tested and found to comply with the limits for a Oass-A computing device in accordance with the specifi-cations in subpart J of part 15 of FCC Rules, which are designed to provide reasonable protection against such interference when operated in a commercial environment. However, there is no guarantee that interference will not occur in a particular installa-tion. Operation of this equipment in a residential area is likely to cause interference and is up to the user, at his own expense, to take whatever measures may be required to correct the interference. You can test to see whether this equipment does cause in-terference with radio or television reception by turning the disk drive off and on. If it is causing interference, try to correct the problem by one or more of the following measures:
• Be sure you're using the shielded interconnect cables provided with this device.
• Reorient the receiving antenna.
• Relocate the drive with respect to the receiver.
• -Move the receiver away from the disk drive, or vice versa.
• Plug the computer into a different outlet so that the oomputer and receiver are on different circuits.
Warranty Statement
MultiPac products sold in the U.S.A. and Canada carry a standard one year warranty against defects in materials and workmanship.· During the warranty period, Bering will, at its option, repair or replace equipment which proves to be defective.MultiPac cartridge media is warranted against defects for one year from the date of purchase. H the media becomes defective, Bering will replace it upon receipt of the de-fective media from the customer.
All repairs will be performed at the factory. Any other arrangement, such as on-site service, will be at your expense. Before any product is returned for repair, a Return Materials Authorization number (RMA#) must first be obtained from a Customer Serv-ice representative.
Customer Service Bering Inc.
246 East Hacienda Ave. Campbell, CA 95008-6687 (408) 379-6900
The selection and use of media, supplies, and consumables is the customer's responsi-bility. Bering reserves the right to exclude from the warranty any damage caused by misuse of the product, unauthorized modification, shipping damage, non-Bering-ap-proved media, interface, software, or cleaning supplies.
NO OTHER WARRANTY IS EXPRESSED OR IMPLIED, INCLUDING, BUT NOT LIMITED TO, THE IMPLIED WARRANTIES OR MERCHANTABILITY AND FIT-NESS FOR A PARTICULAR PURPOSE. BERING SHALL NOT BE LIABLE FOR CONSEQUENTIAL DAMAGES, DIRECTLY OR INDIRECTLY RELATED TO THE USE OR PERFORMANCE OF BERING PRODUCTS.
Contents
ClIapter 1
INTRODUCTION •....•••••....•.••••••••..••.••••••...••..•...•••...•... 1
Conventions in this Manual ... 2
Unpacking ... 3
ClIapter2 INSTALUNG THE DISK DRIVE ... 5
Quick-Start Procedure ... 5
Connecting the Disk Drive ... 6
ClIapter3 OPERATING THE DISK DRIVE &: CARTRIDGE ... 7
Power Up ... 7
Loading a Cartridge ... 8
Unloading a Cartridge ... 9
Write-Protecting a Cartridge ... 12
Inserting &: Removing Floppy Disks ... 13
Write-Protecting a Floppy Disk ... 14
Floppy Disk Precautions ... 14
ClIapter4 MULTIPAC SYSTEM FUNCTIONS ... 15
System Overviews ... 16
7540 / 7901 MENU TREE ... 16
MUL TIPAC 7580 / 7902 MENU lREE ... 17
MULTIPAC 7508/7518 7908/7918 MENU lREE ... 18
MUL TIPAC 7503 &: 7903 MENU lREE ... 19
Main Menu ... 20
UNLOAD CARlRIDGE, UNLOAD UPPER CARlRDIGE, OR UNLOAD LOWER CARlRIDGE ... 20
COpy CARlRIDGE ... 21
LOCAL BACKUP ... 22
LOCAL RESTORE ... 25
CONFIGURATIONS ... 27
UTILITIES ... 27
DISPLAY TIME AND MESSAGES ... 27
Configurations Submenu ... 28
CHANGE HPIB ADDRESS (0) ... 28
CHANGE OPTION (NORMAL) ... 28
CHANGE EMULATION ... 29
CHANGE DRIVE BUTTON (DISABLED) ... 29
CHANGE DEFAULTSEC[TOR] SIZE ... 30
CHANGE FIXED DISK VOLUME PROTECT ... 30
CHANGE CS80 FORMAT (ENABLED) ... 31
SET TIME ... 31
Utilities Submenu ... 32
FIXED DISK UTILITIES SUBMENU ... 33
REMOVABLE / UPPER / LOWER DISK UTILmES SUBMENU ... 33
Show Disk / Cartridge Information ... 34
Unload Cartridge ... 34
Lock / Unlock Cartridge ... 35
Park Disk Head ... 35
Verify Disk / Cartridge ... 35
Format Disk / Cartridge ... 36
Copy Cartridge to Upper / Lower Drive ... 37
FLOPPY DISK UTILITIES SUBMENU ... 37
Show floppy Information ... 37
Verify Floppy ... 38
Format Floppy ... 38
TESTS SUBMENU ... 39
Show Statistics ... 40
Test LCD Display ... 40
Certify Media ... 41
Verify Media" ... 42
ChapterS CONFIGURING YOUR liP SYSTEM ... 45
Formatting a Floppy Disk ... 46
Series 200 - Basic 2.0 ... 47
Series 200 -lJasic 3.0/4.0 ... 50
Series 200/300 - BASIC 5.0 ... 53
Series 200/300- PASCAL 2.0/3.0/3.1 ... 58
Series 200/300 - PASCAL 3.2 ... 62
Series 300 - HP-UX ... 67
Series 200 - SRM ... 71
Series 500 - HP-UX ... 73
Series 800 - HP-UX ... 75
HP1000A ... 78
HP 1000 M/E/F ... ; ... ,... 80
Chapter 6 CARING FOR THE DISK DRIVE & CARTRIDGE ... 81
General Safeguards ... 81
Cartridge Care ... 82
Cleaning the Read/Write Head ... 83
Chapter 7 IF YOU HAVE PROBLEMS ... 87
Before You Do Anything Else ... 87
Error Codes and LCD Messages ... 87
Chapter 1
INTRODUCTION
Congratulations on purchasing what we think is the finest remov-able cartridge system on the market. Bering MultiPac drives are built for years of reliable service.Bering MultiPac drives are a family of removable Bernoulli disk drives with optional 80MB or 180MB fixed disk drives. They are compatible with Hewlett-Packard business, technical and personal computers, such as the HP1000 and HP9000 Series 200/300/500. In this manual we refer to all Bering MultiPac drive models as MultiPac and all HP systems as computer unless otherwise indicated.)
Serving a wide range of storage needs, the MultiPac comes in the fol-lowing configurations:
• Model 7503 a single 44 megabyte (MB) removable Bernoulli with a microfloppy disk drive
• Model 7540 a single 44 megabyte (MB) removable Bernoulli disk drive
• Model 7580 a dual 44MB removable Bernoulli disk drive • Model 7508 a single 44MB removable Bernoulli disk drive with
an 80MB fixed disk drive
• Model 7518 a single 44MB removable Bernoulli disk drive with a 180MB fixed disk drive
• Model 7901 a single 90 megabyte (MB) removable Bernoulli • Model 7902 a dual 90 megabyte (MB) removable Bernoulli • . Model 7903 a single 90 megabyte (MB) removable Bernoulli
with a microfloppy disk drive
• Model 7908 a single 90 megabyte (MB) removable Bernoulli with an 80 MB fixed disk drive
• Model 7918 a single 90 megabyte (MB) removable Bernoulli with a 180 MB fixed disk drive
All MultiPacs use 5.25-inch removable cartridges. Each cartridge can store 44MB or 90MB of data. This can benefit you in several ways.
• Your storage capacity is limited only by the number of car-tridges you use.
• Your data is portable and secure. Just remove the cartridge from the drive and take it with you or store it in a safe place.
• Your data cartridge is protected in a durable case.
• Your MultiPac can be used to back up the data on fixed disks if
INTRODUalON
Conventions in this
Manual
The MultiPac provides fast, reliable storage that's always on hand. The installation procedure is almost identical for all models. No soft-ware or hardsoft-ware modifications are required. All MultiPac models support the latest HP disk command sets.
We'll use the following conventions to make the information in this manual more precise:
• Keys on the keyboard are indicated by capital letters enclosed in square brackets, e.g., [ENTER], regardless of whether the charac-ters on your keys are actually capitalized. On the other hand, buttons on the MultiPac are indicated by underlined capital let-ters alone followed by the word button, e.g., ENTER button. • A monospaced type font, like this, is used to convey text
you should see on your screen, e.g., "you'll see: Welcome! on your monitor." .
• The same monospaced font in contrast (either bold or regular) to the surrounding text, like this, is used to present the exact characters or keys you are to type or press, e.g., "type UTIL and press [ENTER] to continue." However, these keystrokes will not be typographically differentiated if they are conditional or theoretical. That is, if you have the option of making one of several entries or we are speaking of hypothetical situations, e.g.,
"If you type Y and press [ENTER] the disk will be reformatted, but if you type N and press [ENTER] you will exit the program." For clarity, we will place entries you are to type which are longer than one word on a separate line in the monospaced font de-tailed above.
• A bold, sans serif font, like this, indicates text you should see on the LCD. The font will not be bold if it also indicates an action you are to to take.
• Commands, program, utility, and file names are capitalized in body text to distinguish them from the rest of the text. How-ever, when in a command line, they will be represented in lower case letters unless upper case (capital) letters are actually re-quired, e.g.
in body text: " ... create a LIF volume using the LIFlNIT command."
Unpacking
Unpacking
• Italics in any type face, like this, have a limited number of possi-ble meanings:
Words as words, letters as letters, or numerals as numerals, e.g., "the word enter can be confused with the key on your keyboard, therefore we will use type in its place."
Titles of books, booklets, or disks, e.g., The Bible
Symbolic of variable words, characters, or numerals. That is, something must be in the variable's place, but the exact contents vary with different situations and cannot be specified without know-ing a particular situation. Variable is not synonymous with optional. Frequently the letter(s) n (for numerals), or x (for words or charac-ters) are used to hold the place of the variable, e.g., "the program will respond that there are n widgets." Note, however, that a capital N is used for clarity when you are to type the letter n - usually to signify No - even though you don't actually have to capitalize the letter when you type it.
This chapter describes the unpacking procedure. Carefully unpack your MultiPac near the spot where you want to set it up, noting the packing method as you go. Save the packing materials they'll come in handy if you ever want to ship the unit.
Besides this manual, you'll find: • The MultiPac
• A removable data cartridge • A power cable
• A warranty card
Chapter 2
INSTALLING THE
DISK DRIVE
Quick-Start Procedure
This chapter describes the installation procedure for the MultiPac and is divided into two sections. The "Quick-Start Procedure" sec-tion enables experienced users to begin operasec-tion right away. The "Connecting the Disk Drive" section helps new users connect the disk drive before going on to the next chapter for additional operat-ing instructions.
This section describes the quick-start procedure to set up the Multi-Pac. Most of the parameters are already set at the factory. There may be some adjustments necessary before the MultiPac can operate in your particular environment. (Refer to Chapter 5 for detailed in-structions).
The default parameter settings are as follows: Time:
Date:
HP-IB address: Option:: Drive button: Default sector size: CS80 Format:
Pacific time current date
o
1024 disabled 1024 enabled
1. Turn off your computer and connect the MultiPac.
If necessary, refer to the next section in this chapter.
2.
Turn on the MultiPac and wait for the self-test to end.
When the test ends without incident, the time and date should be displayed on the front panel LCD and the clock should be running.
3. Check the time and date. Adjust the dock if required.
4. Check the HP-IB address in the
configurationsfunction. Make sure all
devkes on the HP-IB have a unique address.
s.
Select the disk
OPTION •See Chapter 5 for your specific environment.
6. Select the disk
DRIVE BUTTONmode (enabled or disabled).
7. Load a cartridge.
8. Turn on your computer.
9. Initialize the cartridge or fixed disk and begin using the MultiPac.
INSTALLING THE DISK DRIVE
Connecting the Disk
Drive
.&.
CAUTION:
.&.
CAUTION:
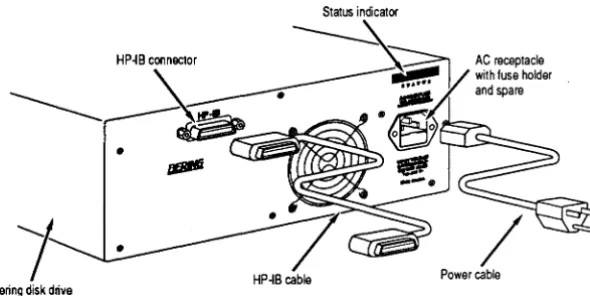
This section describes the disk drive connection procedure. Figure 2-1 illustrates all connections required for correct installation.
Turn off your computer and unplug the power cord from the wall out-let. Disconnect any other cables attached to the back panel of your computer that may be in your way.
1.
Turn off your computer, then connect the HP-IB cable to the HP-IB connector
on the back of the computer and tighten the thumb screws by hand.
Bering disk drive
Figure 2-1: MultiPac rear panel
2. Connect the power cable to the back of the MultiPac.
3. Make sure there is at least one inch of space around the back and two
inches around the sides of the drive.
4. Plug the MultiPac and the computer into three-pronged (grounded) electrical
outlets.
Be sure that the outlets actually are grounded - that the third prong really is connected to a ground. The MultiPac should be on the same circuit as your computer .
[image:12.543.187.482.176.324.2]Chapter 3
OPERATING THE
DISK DRIVE
&
CARTRIDGE
Power Up
[image:13.541.203.475.206.479.2]This chapter describes the operating procedure of the MultiPac and cartridges. It is divided into four sections: "Power Up," "Loading a Cartridge," "Unloading a Cartridge," and "Write-Protecting a Cartridge."
Figure 3-1 illustrates all controls and indicators required for operat-ing the MultiPac.
1.
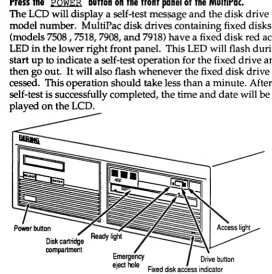
Press the
POWERbutton on the front panel of the MultiPae.
The LCD will display a self-test message and the disk drive model number. MultiPac disk drives containing fixed disks (models 7508 , 7518, 7908, and 7918) have a fixed disk red access LED in the lower right front panel. This LED will flash during start up to indicate a self-test operation for the fixed drive and then go out. It will also flash whenever the fixed disk drive is ac-cessed. This operation should take less than a minute. After the self-test is successfully completed, the time and date will be dis-played on the LCD.Power button Disk cartridge compartment
Figure
3-1:MultiPac front panel
OPERATING THE DISK DRIVE & CARTRIDGE
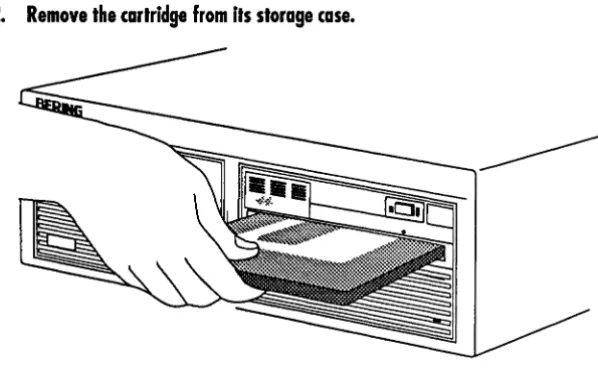
Loading a Cartridge
Loading a data cartridge is very much like loading a cassette in your tape player. [image:14.543.186.485.117.301.2]1. Make sure the MultiPac is turned on before you load a cartridge.
2. Remove the cartridge from its storage case.
Figure 3-2: Loading a cartridge
3. Insert the cartridge into the drive slot with the label side up and the
write-protect switch toward you
and rush
the cartridge straight in, keeping it
par-allel with the top and bottom
0the drive,
until
itseats with a click.
4. Gently push the cartridge load lever (under the drive opening) to the left
until it is flush with the front panel.
If the Drive button is enabled an LED will light as the drive spins up and you will hear a solid click. After a brief test, the LED will extinguish and the other LED will light to tell you the drive is ready.
If the Drive button is disabled (the default factory setting) pro-ceed to the following steps.
S.
With the time function displayed on the LCD, push the
SELECTbutton
on the front panel.
The Load cartridge function{s) will be displayed. For the 7580 and 7902 dual-drive systems, the following options are available.
Load upper cartridge Load lower cartrdige
Unloading a Cartridge
A
CAUTION:
Never move or transport the MultiPac with a cartridge in the drive. This will damage the cartridge and cause a read/write head crash.Unloading a Cartridge
It is important to remove the cartridge before you turn off the Multi-Pac. If you leave the cartridge in the drive, the shutter remains open and the recording media itself is vulnerable to dust. The media or the heads could easily be damaged and cause loss of valuable data. The MultiPac must be turned on before you can unload a cartridge.If the Drive button is enabled, proceed directly to step 3.
1.
With the time function displayed on the LCD, push the
SELECTbutton
on the front panel
The Unload cartridge function(s) will be displayed. For the 7580 and 7902 dual-drive systems two options will be available:
Unload upper cartridge Unload lower cartridge
a. Push the
SELECTbutton to select the drive to be unloaded.
2.
Press the
ENTERbutton to execute the command.
The cartridge will spin down and both LEDs on the drive will turnoff.
3. Make sure both LEDs on the drive are off, then press the
DRIVEbutton
on the front panel of the drive.
4. Remove the cartridge carefully and place It In its protective storage case
Immediately.
Remember to label and date the cartridge for future reference.
OPERATING THE DISK DRIVE & CARTRIDGE
If you can't get the cartridge to eject using any other method, or if
there is no power to the drive, use the following as a last resort. Use this procedure only when absolutely necessary.
1.
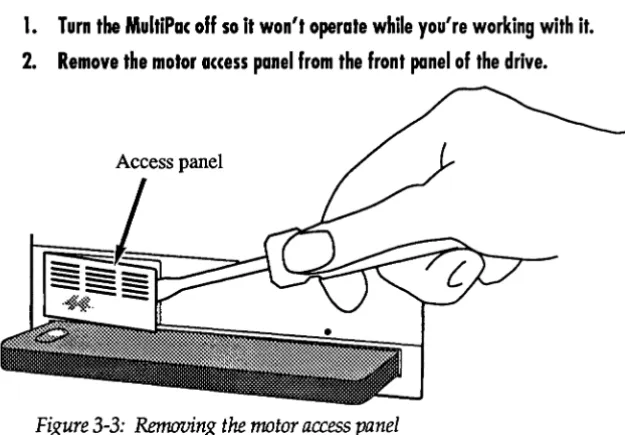
Turn the MultiPac off so it won't operate while you're working with it.
[image:16.543.170.483.95.312.2] [image:16.543.170.485.391.535.2]2. Remove the motor access panel from the front panel of the drive.
Figure
3-3:Removing the rrwtor access panel
3. Insert the eraser end of a pencil into the space behind the motor housing on
the right side of the space.
4. Rotate the motor until the dot on the motor housing aligns with the dot on
the drive's pendl shield.
.
Motor housing
.. CAUTION:
.. CAUTION:
Unloading a Cartridge
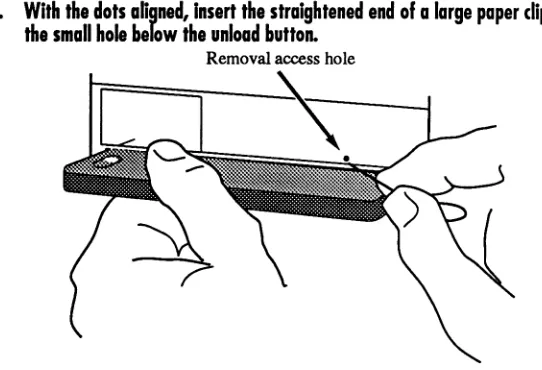
5. With the dots ahgned, insert the straightened end of a large paper clip into
[image:17.540.201.472.57.242.2]the small hole below the unload button.
Removal access holeFigure 3-5: Inserting a paper clip in the access hole
To avoid damaging the drive and cartridge, do not remove the car-tridge without first aligning the dots on the motor.
6. Apply firm inward pressure with the paper clip and simultaneously pull the
cartridge completely out of the drive.
7. Replace the motor access panel
OPERATING THE DISK DRIVE & CARTRIDGE
Write-Protecting a
Cartridge
You may want to write-protect the cartridge after removing it from your MultiPac. Write-protection prevents accidentally erasing or overwriting data on the removable cartridge. The write-protection switch is located at the front of the cartridge.
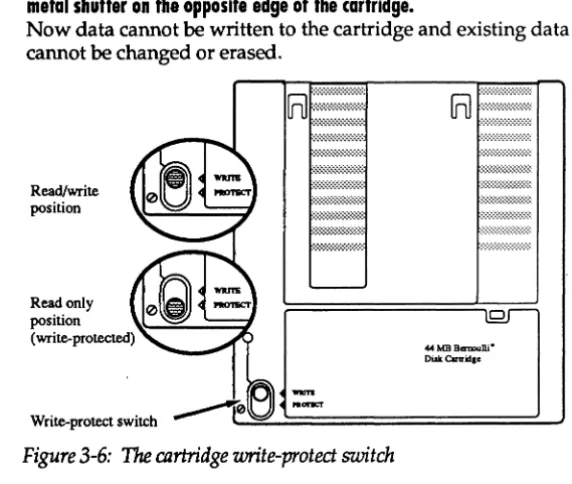
1. To write-protect a cartridge slide the write-protect tab away from the
metal shutter on the opposite edge of the cartridge.
Now data cannot be written to the cartridge and existing data cannot be changed or erased.
Read/write position
[image:18.543.183.469.132.374.2]Read only position (write-protected)
Figure
3-6: Thecartridge write-proted switch
o
44MB
BermuUi-DiskClrtrid.e
Inserting
&
Removing
Floppy Disks
INSERTING
REMOVING
Inserting & Removing Floppy Disks
Insert and remove floppy disks just as you would on a Pc.
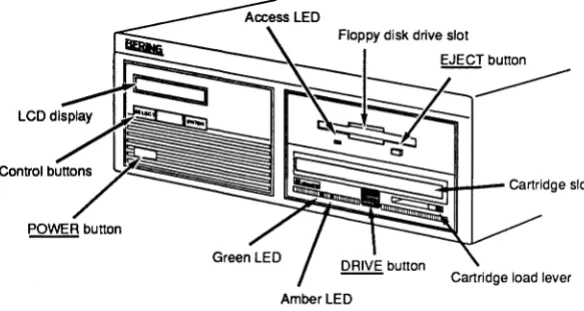
[image:19.541.196.488.96.251.2]Q.!ill!5. button Amber lED
Figure
3-7:MultiPac 7503 front panel
1.
Hold the labeled edge of the disk between thumb and forefinger - the
label up, the metal shutter facing the drive slot, and the angled corner of
the disk on your right.
2.
Align the disk with the drive slot, then carefully insert the edge with the
metal shutter into the drive and push the disk all the way in until it drops
into place.
1. Press the floppy disk drive ejed button on the lower right corner of the
drive.
The floppy disk will pop out part way.
2.
Pull the floppy disk straight out of the drive.
OPERATING THE DISK DRIVE & CARTRIDGE
Write-Protecting a
Floppy Disk
Floppy Disk Precautions
You may want to write-protect the floppy disk after removing it from your drive. Write-protection helps prevent accidental erasure of data on the floppy disk. The write-protection switch is opposite the angled comer.
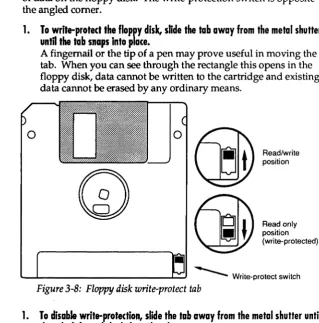
1. To write-protect the floppy disk,. slide the tab away from the metal shutter
until the tab snaps into plate.
A fingernail or the tip of a pen may prove useful in moving the tab. When you can see through the rectangle this opens in the floppy disk, data cannot be written to the cartridge and existing data cannot be erased by any ordinary means.
o
GaY
Read/write position(jJY
=o~"'Y
(write-protected) [image:20.543.159.479.94.417.2]- - - Write-protect switch Figure 3-8: Floppy disk write-protect tab
1. To disable write-protection, slide the tab away from the metal shutter until
the tab clicks and the hole is closed.
Follow these precautions when using floppy disks.
• Don't use single-sided floppy disks with manual shutters. The drive and/ or disk may be damaged. Make sure tha t your HP single-sided disks have the words AUTO SHUTTER on the shutter.
Chapter 4
MULTIPAC
SYSTEM
FUNCTIONS
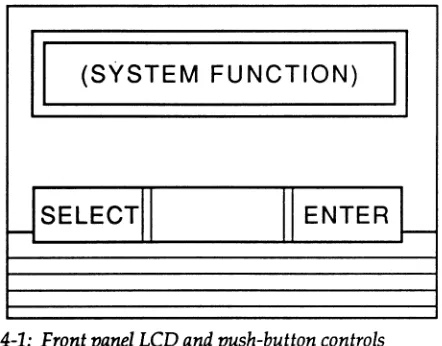
This chapter describes the MultiPac configuration and operating pro-cedures. The MultiPac features a push-button operation for perform-ing configuration and operatperform-ing procedures. This procedure is based on a hierarchical structure of system functions displayed on the disk drive's LCD. The menu trees in this chapter give an over-view of the various procedures within the hierarchy. All procedures can be performed using the two front panel push-button controls: SELECT and
ENTER.
These instructions should be used in conjunction with your specific HP computer's configuration procedure given in Chapter 5.
II
(SYSTEM FUNCTION)
II
[image:21.540.228.449.215.388.2]USELECTII
II ENTER
L
Figure 4-1: Front panel LCD and push-button controls
All system operations are performed by first selecting a function and then entering it for execution. The SELECT button enables you to scroll through all the available system functions and select desired choices. The ENTER button enables you to execute the chosen function.
• To select a system function, press the SELECT button until the desired function appears on the LCD.
• To execute the chosen function or display its options, press the
~ button.
• To cancel the current operation, press the SELECT and
~ buttons simultaneously.
The abort function is allowed only during certain operations. • To scroll or step backward in a menu, press and hold the
MULTIPAC SYSTEM FUNCTIONS
System Overviews
7540/7901 Menu Tree
The menu tree below should help you orient yourself within the command structure for the MultiPac 7540 and 790l.Time/Date
Unload cartridge Configurations
Change HPIB address Change option Change drive button Change default sector size Change
CSBO
format Set timeSet date Return to main Utilities
Bering model ROM version / date Removable disk utilities
Show cartridge information Unload or Lock / unlock cartridge Verify cartridge
Format cartridge Previous menu Tests
MULTIPAC 7580 / 7902 MENU
TREE
System Overviews
The menu tree below should help you orient yourself within the command structure for the MultiPac 7580 and 7902.
Time / Date
Unload upper cartridge Unload lower cartridge Copy cartridge to lower drive Copy cartridge to upper drive Configurations
Change HPIB address Change option Change drive button Change default sector size Change CS80 format Set time
Set date Return to main Utilities
Bering model ROM version / date Upper disk utilities
Show cartridge information Unload or Lock / unlock cartridge Verify cartridge
Format cartridge
Copy cartridge to lower drive Previous menu
Lower disk utilities
(like Upper disk utilities, but copies to upper drive) Tests
Show statistics Test LCD display Certify media Verify media Previous menu Return to main
MULTI PAC SYSTEM FUNCTIONS
MULTIPAC 7508/7518 7908/7918 MENU TREE
The menu tree below should help you orient yourself within the command structure for the MultiPac 7508/7518 and 7908/7918. Time / Date
Unload cartrige Local backup Local restore Configurations
Change HPIB address Change option Change drive button Change default sector size Change emulation
Change fixed disk volume protect Change CS80 format
Set time Set date Return to main Utilities
Bering model ROM version / date Fixed disk utilities
Show disk information Park disk heads Verify disk Format disk Previous menu Removable disk utilities
Show cartridge information Unload or Lock / unlock cartridge Verify cartridge
Format cartridge Previous menu Tests
Show statistics Test LCD display Certify media Verify media Previous menu Return to main
MULTIPAC 7503 & 7903 MENU TREE
System Overviews The menu tree below should help you orient yourself within the command structure for the MultiPac 7503 and 7903.
Time / Date
Load/Unload cartrige Configurations
Change HPIB address Change option Change drive button Change default sector size Change CS80 format Set time
Set date Return to main Utilities
Bering model ROM version / date Removable disk utilities
Show disk information
Load/Unload or Lock / unlock cartridge Verify cartridge
Format cartridge Previous menu Floppy disk utilities
Show floppy information Verify floppy
Format floppy Previous menu Tests
Show statistics Test LCD display Certify media Verify media Previous menu Return to main
MULTI PAC SYSTEM FUNCTIONS
Main Menu
UNLOAD CARTRIDGE, UNLOAD UPPER CARTRDIGE, OR UNLOAD LOWER CARTRIDGE
The default display on the front panel LCD is the time/ date. When the SELECT button is pressed, the first choice of the Main menu will be displayed. You can scroll the Main menu by repeatedly pressing the SELECT button. To execute the selected function or to enter the sub-menu, press the ENTER button. The following options are avail-able from the Main menu:
Unload cartridge
Local backup (7508/7518 and 7908/ 7918 only)
Local restore (7508/7518 and 7908/7918 only)
Configurations Utilities
Display time and messages
These options are available from the Main menu of the MultiPac 7580 and 7902 dual-drive subsystems:
Unload upper cartridge Unload lower cartridge Copy cartridge to lower drive Copy cartridge to upper drive Configurations
Utilities
Display time and messages
Use this function to unload the cartridge when the Drive button is disabled (the default setting).
1.
Use the
SELECTbutton to choose the function you want to initiate from
the Main menu:
Unload cartridge
For the 7580 and 7902:
Unload upper cartridge or
Unload lower cartridge
2. Press the
ENTERbutton.
If the drive button is disabled in the Configurations menu, a re-quest is sent to the host system for permission to remove the car-tridge. If the system grants the request or if there is no response for one second, the cartridge will be ejected. This is required for some operating systems and also prevents accidental ejection during cartridge use.
If the cartridge is in use by the operating system, you'll see:
COPY CARTRIDGE
Main Menu
3. Press the
SELECTbutton to select
Yes, if need be; when Yes isse-lected, press the
ENTERbutton to initiate this action.
See "Unloading a Cartridge" in Chapter [C#,Operating for more details.
This function is available only for the MultiPac 7580 and 7902. Use COpy CARTRIDGE to copy an image of one cartridge to another.
1. Write-protect your source cartridge to preclude the possibility of erasure.
2. Load the source and destination cartridges into the drives.
3. Choose the appropriate COPY command from the Main menu and press the
ENTER
button to start the COpy command.
This warning message will appear:Erase entire media? No
4. Use the
SELECTbutton to choose
Yes and press the ENTERbutton.
If the destination cartridge is unformatted or has a different for-mat than the source (e.g., different sector size) the following mes-sage will appear:Format destination? No
a.
If
you decide not to start the process, choose
No and press theENTER
button to quit.
If you do not see the above format query, you'll automatically pick up the process with the paragraph at the top of step Sa.
5. Use the
SELECTbutton to choose
Yes and press the ENTERbutton
to begin the process.
Formatting cartridge
will appear and formatting will take about 30 minutes. Once the destination cartridge has been formatted, the data from the source will automatically be copied.
As the copy progresses, the record address will be updated on the display:
Copy CARTRIDGE
record
n
a. To stop the COpy process at any time, press and hold the
SELECTand
ENTERbuttons simultaneously until you see this message:
Abort received Wait ••.
b. Release the buttons.
MULTIPAC SYSTEM FUNCTIONS
c. Press the
ENTERbutton to exit.
When the COPY process is completeUnloading CARTRIDGE
will flash on the LCD momentarily and then you'll be asked to
Remove cartridge 1!
6.
Push the
DRIVEbutton and
release the cartridge.7. Remove the cartridge, label it appropriately, and then press the
ENTERbutton.
You will seeCopy done at
10:30
am
8. Press the
ENTERbutton to exit the COpy process.
LOCAL BACKUP
This function is available only on the Bering 7508, 7518, 7908, and 7918 subsystems. Use it to back up the fixed disk in those units. The entire image of the fixed disk is copied onto as many cartridges as are required.22
Note:
For tutorial purposes the following steps assume that you do not have a cartridge in the drive when you initiate the LOCAL BACKUP function.1.
Select Local Backup from the Main menu and press the
ENTERbutt.on
to choose this option.
You will be asked:
Erase entire
media? No
2.
If your fixed disk is formatted with multiple volumes (see the FORMAT
DISK function), you will be asked
Backup volume
all?
a. Press the
SELECTbutton to scroll through the choices:
all
=
entire disko
=
volume 1 1=
volume 2etc.
b. Press the
ENTERbutton to continue when the desired choice is
visible.
3. Press the
SELECTbutton to choose Yes and press the
ENTERbut-ton to condnue.
Main Menu
a. If you change your mind and want to quit the BACKUP process, use the
the
SELECTbutton to choose
No and press the ENTERbutton.
You'll seeUser abort
be Press the
ENTERbutton and you'll be returned to the TIme and
Date display in the Main menu.
4. Load a cartridge which is not write-protected into the drive, wait for it to
spin up, and press the
ENTERbutton to continue.
You'll see: Loading
CARTRIDGE
If you inserted a blank, formatted disk the backup will begin im-mediately. Otherwise, the message you see next will depend on your situation.
5. If the cartridge is not formatted or has a different sedor size than the fixed
disk you wdl see:
.
Format
destination? No
a. Use the
SELECTbutton to choose
Yes and press the ENTERbutton to continue.
You will see: Formatting
CARTRIDGE
When the cartridge has been formatted the LOCAL BACKUP procedure will automatically begin the backup without your in-tervention.
6. If
the
cartridge already contains a readable backup •••
You will see:Overwrite backup
Thu Feb 21, 1991? No
If that is the cartridge on which you want your backup ...
a. Use the
SELECTbutton to choose Yes and press the
ENTERbutton to continue.
You'll see the messages detailed in step 8 if you choose Yes.
MULTI PAC SYSTEM FUNCTIONS
24
If you want to use a different cartridge ...
a. Use the
SELECTbutton to choose
No,if need
be,
then press the
ENTER
button.
You will see UnloadingCARTRIDGE
then you'll be promted to: Remove
cartridge!
b. Remove the cartridge from the drive, and press the
ENTERbutton.
Now you'll be notified toLoad cartridge 1
&
continue? Yesc. Go back to step 4.
7. If, after you back up onto a cartridge or two, you accidently insert a
car-tridge which contains part of the current backup, you
will
be notified:
Part of current cartridge set!
In that case, you'll need to eject the cartridge and replace it with the proper one.
a. Press the
ENTERbutton and you'll see:
UnloadingCARTRIDGE
Then you'll be prompted: Remove
cartridge!
b. Remove the cartridge from the drive and press the
ENTERbutton.
Now you'll be notified toLoad cartridge 1
&
continue? Yesc. Go back to step 4 to resume the backup.
8. As the backup progresses, the record address of the fixed disk
will
be
up-dated on the LCD:
Backup disk ... record
n
When the cartridge is full you'll see: Remove
LOCAL RESTORE
Main Menu
9. Press the drive button and flip the cartridge load lever to remove the
car-tridge and label It carefully, including the date and carcar-tridge number, then
press the
ENTERbutton to continue.
If another cartridge is required, you will be prompted to: Load cartridge
2 & continue? Yes
10. Load the next cartridge, wait for it to spin up, and press the
ENTERbut-ton to choose
Yes and continue the backup.a. To abort the function at any time, press and hold the
SELECTand
ENTERbuttons simultaneously until you see the following message:
Abort receivedWait •••
b. Release the buttons.
The function will abort and you'll see: User abort .
c.
Press the
ENTERbutton to exit and return to the Main menu.
Continue in the loop until the backup is complete. You willbe notified: Backup done at
10:30
pm
11. Press the
ENTERbutton to exit the LOCAL BACKUP fundion and return
to the Main menu.
Use this function to restore the fixed disk in the Bering 7508, 7518, 7908, or 7918 subsystems. The entire image of the disk is restored from the cartridges generated by the LOCAL BACKUP function. You can restore the backup set in any order.
1. Load one of the cartridges from the set containing the desired backup image.
2.
With the Local restore function displayed, press the
ENTERbutton
to choose the RESTORE function.
You will see one of the following messages: Restore to
Wed
Jan 24,19901
NoThis message shows the date of the total fixed disk backup on the cartridge you inserted.
Restore vol n
Wed
Jan 24,19901
NoThis message, on the other hand, shows the date of the fixed disk volume backup on the cartridge you inserted.
MULTIPAC SYSTEM FUNCTIONS
If you choose No and press the ~ button you will return to the Main menu.
3. Press the
SELECTbutton to choose
Yesand press the
ENTERbut-ton to continue.
4.
If
the fixed disk is not formatted or has a different sedor size than the
backup image you
will
see:
Format
destination? No
a. Use the
SELECTbutton to choose
Yes and press the ENTERbutton to format the fixed disk.
You'll be notified:
Formatting DISK
Formatting the fixed disk will take up to an hour.
If you choose not to format the fixed disk by selecting No and pressing the ENTER button, you will instead see:
User abort
a. Press the
ENTERbutton to exit.
S. If both formats match, the restoration process will begin.
As a standard restoration progresses the record address of the fixed disk is updated with the following message:
Restore disk ... record
n
When the data from a cartridge has been restored to the fixed disk, you will see:
Remove cartridge n!
6. Remove the cartridge from the MultiPac and press the
ENTERbutton to
continue.
If another cartridge is required to continue or complete the re-storation you will see:
Load cartridge n to continue? Yes
If the restoration is complete you'll see:
Restore done at 10:30 pm
7. If the backup isn't complete, load the next cartridge with the backup set
into the MultiPac, make sure that
Yes is still selected, and press theCONFIGURATIONS
UTILITIES
DISPLAY TIME AND MESSAGES
Main Menu
If you want to stop the restoration, choose No and press the
~ button. You'll see: User abort
,.. Pr.ss the
ENTERbutton and you'll b. returned to the Main menu.
a.
If the cartridge you Inserted in the MultiPac does not belong to the current
backup set, you'll b. advised:
Not part of cartridge set!
a. Press the
ENTERbutton to unload the cartridge.
b. Go back to step 6.
9. If the data on the cartridge is already restored you
will
see:
Data alreadyrestored!
a. Press the
ENTERbutton to unload the cartridge and go to step 6.
10. Press the
ENTERbutton to complete and exit the LOCAL RESTORE
process.
Functions in this submenu set the HP-IB address, emulation mode, change the drive button function, default sector size, CS80 format, command mode, and set the date and time. (See the "Configura-tions Submenu" section for detailed information.)
This function shows cartridge information; locks and unlocks, veri-fies, and formats the cartridge and the fixed disk; copies cartridge data; and performs test functions. Refer to the "Utilities Submenu" section for detailed information.
MULTI PAC SYSTEM FUNCTIONS
Configurations Submenu
CHANGE HPIB ADDRESS (0)
CHANGE OPTION (NORMAL)
The functions in this submenu set the HP-IB address, change the emulation, change the drive button function, default sector size, CS80 format command, and set the date and time.
1.
Press the
ENTERbutton when the
Configurationsfunction is
dis-played on the Main menu.
The Configurations submenu will offer these functions:
Change HPIB address (n) Change option (normal)
Change drive button (disabled) Change default sec[tor] size
Change emulation (disabled) (7508,7518,7908,7918)
Change fix[ed] disk volume protect (7508,7518, 7908, 7918)
Change CS80 format Set time
Set date
Return to main
2. Press the
SELECTbutton to scroll through the functions.
3. To return to the Main menu, press the
ENTERbutton when you see:
Return to mainThis function sets the HP-IB address of the MultiPac. The values range from 0 to 7. When selecting the HP-IB address, make sure each device on the same HP-IB has an unique address.
1. With the
Change HPIB addressfunction displayed, press the
ENTERbutton to choose this function and you'll see:
HPIB address
=
n2. Press the
SELECTbutton to scroll through all the choices, then press
the
ENTERbutton to choose an address.
The MultiPac will reset to the new value.
This function selects one of four special options:
normal - the drive will report the exact configuration of the car-tridge to the host system. For example, configuration is a remov-able cartridge with 512 bytes/sector.
CHANGE EMULATION
CHANGE DRIVE BUTTON
(DISABLED)
Configurations Submenu
256 bps -logically organizes the cartridge as 256 bytes/sector regardless of its sector size. Use this only if the cartridge is not formatted to 256 bytes/sector for systems that do not support other sector sizes, e.g., the HP1000 RTE}.
1024 bps -logically organizes the cartridge as 1024 bytes/sec-tor regardless of its secbytes/sec-tor size. Use this only if the cartridge is not formatted to 1024 bytes/sector for systems that do not sup-port other sector sizes.
1. With the
Change option function displayed, press the ENTERbut-ton
tochoose this option and the following message will appear:
Set option to
(normallfix di$kl256 bps/1024 bps)
2.
Press the
SELECTbutton to step through the
normal, fix disk, 256 bps, and 1024 bps functions, then press the ENTERbutton to
choose the one which is displayed.
This function enables or disables HP disk emulation for the Bering fixed disk. When enabled, the Bering fixed disk will emulate an HP fixed disk. The default setting is disabled.
1. With the Change emulation function displayed, press the
ENTERbutton to choose this function.
The following message will appear:
disable/enable HPxxxxx emulation
where xxxx is the HP model to be emulated
2. Press the
SELECTbutton to toggle between disable and
enable.3. Press the
ENTERbutton to choose the desired setting.
This function enables or disables (default) the Drive button. The de-fault setting permits cartridge removal only by using the Unload car-tridge function. This allows the MultiPac to communicate with the host system to request permission for cartridge removal.
1. With the
Change drive button function displayed, press the ENTERbutton to choose this function.
The following message will appear:
disable/enable drive button
2. Press the
SELECTbutton to toggle between
disable and enable. 3.Press the
ENTERbutton to choose the desired setting. The
disableMULTI PAC SYSTEM FUNCTIONS
CHANGE DEFAULT SEC[TOR] SIZE This function sets the default physical sector size when the fixed disk is formatted by the host computer.
Note:
The physical sector size for the cartridge is always 512 bytes. The sector size may be specified by the FORMAT option in the FORMAT or INITIALIZE utilities (or commands) from your host computer. Refer to Chapter 5 for details.1. With the Change default sec size function displayed, press the
ENTERbutton to choose this function.
You'll see this message: Set bytes/sector to same/256/512/1 024
2.
Press the
SELECTbutton to scroll through the selections:
same=
no change256
=
256 bytes/ sector 512=
512 bytes/sector 1024=
1024 bytes/sectorA sector size of 256 bytes/sector is required for some systems. HP 9000, and HP-UX users may use 1024 bytes/sector. See Ap-pendix A for capacities.
3. Press the
ENTERbutton to choose the desired value.
CHANGE FIXED DISK VOLUME PROTEO
This function is available only for the Bering 7508, 7518, 7908, and 7918. Use it to toggle write-protection on or off for each individual . volume on the fixed disk.
30
1. With the Change fixed disk volume protect function displayed,
press the
ENTERbutton to choose this function.
You'll see
Write protect volume n? No
(HANGE (580 FORMAT
(ENABLED)
.. Caution:
SET TIME
Configurations Submenu
Use this function to disable the CS80 FORMAT command when you want to speed up the initilization process or to prevent accidental ex-ecution of the FORMAT utility .
When the FORMAT command is disabled, the INITIALIZE utility or command may overwrite the existing directory with a new one caus-ing the loss of all of your files.
1. With the Change CSSO format fundlon displayed, press the
ENTER
button to Initlat. this fundion.
You will see:disable/enable CSSO
format command
2.
Use
the
SELECTbutton to toggle between Enable and Disable and
press the
ENTERbutton to choose the desired setting.
The
Enable
setting is recommended.This function allows you to change the time.
1. When Set time is displayed, press the
ENTERbutton. You'll see:
Set time
3:15:27
PMThe actual time displayed will vary. The hour field will be blinking.
2.
Pr.ss the
SELECTbutton to increment the hour.
Holding the SELECT button will cause the hour to increment
(thro~gh twelve hours) continuously.
To decrement the hour, press and hold the SELECT button, and then press the ENTER button.
3.
When the corr.d hour is displayed, press the
ENTERbutton.
The minute field will start to blink.
4.
SELECTand
ENTERthe corred minute setting just as you did the
hour.
s.
SELECTand
ENTERthe corred setting for seconds.
6.
SELECTand
ENTERthe corred AM/PM setting.
MULTI PAC SYSTEM FUNCTIONS
SET DATE
Utilities Submenu
This function allows you to change the date.
1.
When
Set dateis displayed, press the
ENTERbutton. You'll see:
Set dateSat Feb 24, 1990
The actual date displayed will vary. The day field will be blinking.
2.
Press the
SELECTbutton to increment the day.
Holding the SELECT button will cause the day to increment (through twelve hours) continuously.
To decrement the day, press and hold the SELECT button, and then press the ENTER button.
3. When the correct day is displayed, press the
ENTERbutton.
The month field will start to blink.
4.
SELECTand
ENTERthe correct month setting like you did the day.
S.
SELECTand
ENTERthe correct date setting.
6.
SELECTand
ENTERthe correct year setting.
After you have made this setting, you'll be returned to the Set date option.
This function shows cartridge information; locks and unlocks, veri-fies, and formats the cartridge; copies and erases cartridge data; and performs test functions via the following options:
• MODEL NUMBER - Displays the model number of the MultiPac.
• ROM VERSION - Displays the firmware version number and release date.
• REMOVABLE DISK UTILITIES - Shows cartridge information; locks and unlocks, verifies, and formats the cartridge copy. The Bering 7580 and 7902 will offer functions for the upper and lower disks. Refer to the "Removable Disk Utilities Submenu" section for detailed information.
• FIXED DISK UTILITIES - (For the Bering 7508, 7518, 7908, and 7918 only.) Shows disk information, parks the heads, verifies and formats the fixed disk. (See the "Fixed Disk Utilities Sub-menu" section for detailed information.)
FIXED DISK UTILITIES SUBMENU
REMOVABLE / UPPER / LOWER
DISK UTILITIES SUBMENU
Utilities Submenu
To access and exit these utilities ...
1. Press the
ENTERbutton when the Utilities function is displayed on
the Main menu.
The Utilities submenu then appears and displays the following options:
Bering model number
ROM version, date
Removable disk utilities
Fixed disk utilities
(7508, 7518, 7908, and 7918)Tests
Return to main
2. Press the
SELECTbutton to scroll through the information or functions.
3. When you see Return to main, press the
ENTERbutton to return to
the Main menu.
This group of functions shows fixed disk information; verifies and formats the disk; and parks the read/ write head.
1. Press the
ENTERbutton when the Fixed disk utilities function is
displayed on the Utilities submenu.
The Removable disk utilities submenu then appears displaying the following functions:
Show DISK information
Park disk head
Verify disk
Format disk
Previous menu
2.
Press the
SELECTbutton to saoll through the functions.
3. You can return to the Utilities menu by pressing the
ENTERbutton
when you see Previous menu.
This group of functions shows cartridge information; locks and un-locks, verifies, and formats the cartridge; and erases cartridge data. The same basic functions, where appropriate, are available for all subsystems, though there are some product-specific additions and variations.
1. Press the
ENTERbutton when the Removable/Upper/Lower
disk utilities function is displayed on the Utilities submenu.
MULTIPAC SYSTEM FUNCTIONS
Show Disk / Cartridge Information
Unload Cartridge
Show CARTRIDGE information Load/Unload cartridge
Lock/Unlock cartridge Verify cartridge Format cartridge
Copy to upper/lower cartridge (7580 / 7902) Previous menu
2. Press the SELECT button to scroll through the functions.
3. You can return to the Utilities menu by pressing the ENTER button
when you see Previous menu.
This function displays the following information about the disk / cartridge:
Number of volumes on disk / cartridge (if more than 1) Volume capacity in KB
Volume size in cylinders Volume cylinder size in tracks Volume track size in sectors Volume size in sectors Logical sector size Physical sector size
Date disk / cartridge last formatted * Date disk / cartridge last written
*
Date disk / cartridge last accessed * Last full backup date *+
Volume n backup date *+
Last backup of disk *#
Disk number n of n *#
* only if disk / cartridge is formatted + fixed disk only
# cartridge only
1.
Press the ENTER button to scroll through each field.Lock / Unlock Cartridge
Park Disk Head
Verify Disk / Cartridge
Utilities Submenu This function is available only if the DRNE button is enabled in the Configurations menu. It is used to lock the cartridge in the drive to prevent accidental ejection during cartridge use.
1.
With the Lock cartridge function displayed, press the
ENTERbut-ton to lock the cartridge in the drive.
The function will change to Unlock cartridge?
1.
To unlock the cartridge, press the
ENTERbutton when the
Unlock cartridge function is displayed.The function will change to Lock cartridge?
This function moves the read / write head of the fixed disk into the inner-most tracks for safety.
1. Press the
ENTERbutton to execute this function.
This function scans every sector on the disk / cartridge for defects.
If a bad sector is found, this function will tenninate with the LCD showing the error.
1.
With the
Verify cartridge function displayed, press the ENTERbut-ton to start.
As the verification progresses, the record address is updated. The following message will appear:
Verify CARTRIDGE record n
2. To abort the function at any time, press and hold both the
SELECTand
ENTERbuttons simultaneously until the following message appears:
Abort received. Wait ••.
3. Release the buHons.
The function will take awhile to stop and the following message will appear:
CARTRIDGE verified
4. Press the
ENTERbutton to exit.
When you've exited the function, the following message will appear:
n complete verifies done
5. Press the
ENTERbuHon to return to the Fixed / Removable disk
utili-ties submenu.
MULTI PAC SYSTEM FUNCTIONS
Format Disk / Cartridge
36
This function is used to fonnat the disk / cartridge if the FORMAT utility is not available in your host system or if you want to partition the disk / cartridge into multiple volumes. After the disk / car-tridge is formatted into multiple volumes, you must use the HP-IB address, unit number (0) and the volume number (0 to 7) to access each of the volumes.
1.
Press the
ENTERbutton when the
Format disk / cartridgefunc-tion is displayed on the Fixed / Removable disk utilities submenu.
The Format cartridge submenu then appears displaying the fol-lowing message:
Erase entire media? No
2. Press the
SELECTbutton to choose
Yesand press the
ENTERbut-ton to continue.
The following message will appear: Set bytes/sector
to same
3. Use the
SELECTbutton to scroll through the options
(same,256,
512, 1024) , choose one, and press the
ENTERbutton.
We recommend that you choose 256 bytes per sector. When you've made your choice, you'll see:
Set interleave to 1
4. Use the
SELECTbutton to scroll through the options (1-10), choose
one, and press the
ENTERbutton.
You'll see:Set volumes to
n
S. Use the
SELECTbutton to scroll through the choices for number of
vol-umes 1-8 and press the
ENTERbutton to choose the desired value.
You'll see a display showing the number of volumes (vols) and the sector size (bps - bytes per sector):
1
vols1024
bps continue? NoIf you choose No the FORMAT option will quit and you'll be re-turned to the Removable disk utilities menu.
6. Use the
SELECTbutton to select
Yesand press the
ENTERbutton
to start the format process.
The following message will appear: Formatting
Copy Cartridge to Upper /
Lower Drive
FLOPPY DISK UTILITIES
SUBMENU
Show floppy. Information
Utilities Submenu
Fonnatting will take up to 1 hour. When the process is com-plete, the following message will appear:
DISK I CARTRIDGE
formatted
7. Press the
ENTERbutton to return to the Fixed / Removable disk
utili-ties submenu.
These are the same as the functions in the main menu. See the "Copy Cartridge" section in this chapter for details.
This group of functions shows floppy disk information; verifies and fonnats the disk.
1. Press the
ENTERbutton when the Floppy disk utilities function is
displayed on the
Utilities submenu.The Floppy disk utilities submenu then appears displaying the following functions:
Show FLOPPY information Verify floppy
Format floppy Previous menu
2.
Press the
SELECTbutton to scroll through the functions •.
3.
You can return to the
Utilities menu by pressing the ENTERbutton
when you see Previous menu.
This function displays the following information about the floppy disk:
Floppy capacity in bytes High/Low density Single/Double sided Sector size
Interleave IBMfonnat Write-protected .
1. Press the
ENTERbutton to scroll through each field.
MULTIPAC SYSTEM FUNCTIONS
Verify Floppy
Format Floppy
This function scans every sector on the floppy for defects. If a bad sector is found, this function will terminate with the LCD showing the error.
1.
With the
Verify floppy function displayed, press the ENTERbutton
to start. You'll see
Verifying FLOPPYAs the verification progresses, the track address is updated. The following message will appear:
Verifying Cyl
n
Headn
2. To abort the function at any time, press and hold both the
SELECTand
ENTERbuttons simultaneously until the following message appears:
Abort received. Wait ...
3. Release the buttons.
The function will take awhile to stop and the following message will appear:
FLOPPY verified
4. Press the
ENTERbutton to exit .
. S. Press the
ENTERbutton to return to the Floppy disk utilities submenu.
This function is used to format the floppy disk if the FORMAT utility is not available in your host system.
1. Press the
ENTERbutton when the
Format floppy function isdis-played on the Floppy disk utilities submenu.
The Format cartridge submenu then appears displaying the
fol-lowing message: .
Erase entire media? No
2. Press the
SELECTbutton to choose
Yes and press the ENTERbut-ton to continue.
The following message will appear:
TESTS SUBMENU
Utilities Submenu
3. Use the
SELECTbutton to scroll through the options
(same, 256,512, 1024, PC) ,
choose one, and press the
ENTERbutton.
We recommend that you choose 256 bytes per sector. When you've made your choice, you'll see:Set interleave to 1
4. Use the
SELECTbutton to scroll through the options (1-10), choose
one, and press the
ENTERbutton and you'll see:
256 bpsInterleave 1
5. Press the
ENTERbutton again and you'll see:
OK to format?No
!fyou choose No the FORMAT option will quit and you'll be re-turned to the Floppy disk utilities menu.
6. Use the
SELECTbutton to select
Yesand press the
ENTERbutton
to start the format process.
The following message will appear:
Formatting FLOPPY
and then
Formatting Cyl n Head n
When the process is complete, yoy'll see:
FLOPPY formatted
7. Press the
ENTERbutton to return to the Floppy disk utilities submenu.
This function shows statistics, tests the LCD, and certifies media.
1.
Press the
ENTERbutton when the
Testsfunction is displayed on the
Utilities submenu.
The Tests submenu will appear offering the following options in sequence:
Show statistics Test LCD display Certify media Verify media
2. Press the
SELECTbutton to scroll through the options.
3. To return to the
Utilitiesmenu, press the
ENTERbutton when you see
Previous
menu.
MULTI PAC SYSTEM FUNCTIONS
Show Statistics
Test LCD Display
This function displays a list of statistical information. The options and LCD messages vary, depending on the MultiPac model you have.
1. With the
Show statisticsfunction displayed, press the
ENTERbut-ton and you'll see one of the following messages
For the 7508, 7518, 7908, and 7918:
Fixed disk statistics Cartridge disk statistics
For the 7580 and 7902:
Upper cartridge statistics Lower cartridge statistics
2. Press the
SELECTbutton to scroll through the options and press the
ENTER
button to choose a drive and see the statistics for it.
3. Press the
ENTERbutton once for each message to step through the
fol-lowing counters:
Blocks read
=
n
Blocks written
=
n Read errors= n
Write errors
=
n Seek errors= n
Other errors
=
n
4. Press the
ENTERbutton after viewing
Other errors and you'll see:Clear statistic counters? No .
S. Press the
SELECTbutton to choose
Ves and then press the ENTERbutton to exit.
Since the statistic counters are stored on the disk or cartridge, this in-formation will not be available if the media becomes unreadable or is not formatted. Normally, there are no errors. Any soft errors due to dust particles or electrical noise should be recoverable using error correction code.
This function is used to make sure the LCD is working properly.
1.
With the Test LCD display function displayed, press the
ENTERbutton to start the test.
All of the dots on the LCD will be turned on. The last character block will alternate between dots and an asterisk (*). If there are any missing dots (except the last character with an *), call the Ber-ing Service Department for replacement.