OCU DP OPTION MODULE
Part Number 1200068L1
Part Number 1200068L1#HS
OCU DP PLUG-ON BOARD
Part Number 1200083L1
USER MANUAL
901 Explorer Boulevard Huntsville AL 35806-2807
OCU DP MODULE MODULE
OCU DP OPTION MODULE
TABLE OF CONTENTS
1. Introduction ... 1
1.1 OCU DP Overview ... 1
1.2 Functional Description ... 1
Features ... 1
OCU DP Option Module Specifications ... 2
1.3 Physical Description ... 4
Figure 1. OCU DP Option Module ... 4
2. Installation ... 5
2.1 Unpack & Inspect ... 5
2.2 Installing The Option Module ... 5
Figure 2. Installing Option Module ... 6
2.3 WarrantyAnd Customer Service ... 7
2.4 Wiring ... 8
Table A. Eight-Position Modular Jack Interface. ... 8
2.5 Power-Up Testing and Initialization ... 9
3. Operation ... 10
3.1 Overview ... 10
3.2 Front Panel ... 10
Indicators/Buttons ... 10
3.3 Menu Structure ... 10
Figure 3. TSU 100 Main Menu ... 10
OCU DP Menus Are All Submenus ... 11
2)PORTS Status, Submenu of 1)Status ... 11
7)PORT CONFIG, Submenu of 2)CONFIG ... 12
3)FACTORY RESTORE, Submenu of 3)UTIL ... 14
7)PORT UTILITY, Submenu of 3)UTIL ... 14
2)RUN SELF TEST, Submenu of 4)TEST ... 15
3)PORT Test, Submenu of 4)TEST ... 15
Figure 4. Diagram of Loopbacks ... 16
Appendix I OCU DP Failure Messages ... 18
Failure Messages At Power-Up ... 18
OCU DP MODULE MODULE
1. INTRODUCTION
1.1 OCU DP OVERVIEW
The Office Channel Unit Dataport (OCU DP) is one of the Option Modules available for use with the ADTRAN TSU 100. The OCU DP is an all-rate Office Channel Unit Dataport. It provides signal conversion from any of the rates on the customer loop side to a single DS0 time slot. The OCU DP should be selected for use with the connection of DDS or Switched 56 DSU/CSUs or other equipment which utilizes a DDS interface. The OCU DP provides an interface between the T1 Multiplexer and a DSU/CSU over a 4-wire loop, up to 18,000 feet in length of 26 AWG cable. This interface permits the combination of DDS lines into a single T1 stream.
1.2 FUNCTIONAL DESCRIPTION
The OCU DP is designed to fit in the option slot of the TSU 100 and is subject to its operation and control. The OCU DP is configured from the front panel of the TSU 100 or by an external personal computer (PC) program. The internal menus for its configuration are a part of the OCU DP module and are automatically installed when the OCU DP is plugged into the unit.
FEATURES
• Operates using one DS0
• 2.4, 4.8, 9.6, 19.2, 38.4, 56, 64 kbps dedicated rates
• Supports Switched 56 dial-up digital service
• Compatible with DDS secondary channel services at rates ranging from 75 to 2400 bps, depending on the primary channel rate
• 45dB range at all rates
• Transmit attenuation available for short loops
• PRT/LCL bidirectional loopback toward the TSU Network Interface (NI) and the DSU/CSU
• Zero code suppression
• Quality monitor/auto line disconnect
• Latching Loopback enable/disable
• Selectable hardware/software algorithms for Switched-56 operation
• Interface Connector-RJ48C
The 19.6 kbps feature is patented by INC, patent #4,862,480. The 45 dB range feature is patented by ADTRAN, patent #4,759,035. The quality monitor/ auto line disconnect feature is patented by ADTRAN, patent #5,450,441.
OCU DP OPTION
MODULE SPECIFICATIONS
Loop Interface 4-wire (TX Pair and RX Pair)
Data Rate 2.4, 4.8, 9.6, 19.2, 38.4, 56 kbps including secondary channel rates and 64 kbps (clear channel)
Signal Format Bipolar, return-to-zero, 50% duty cycle
TX Output ±1.5V peak ±10% for rates 2.4, 4.8, Amplitude 19.2, 38.4, 54 and 64 kbps
±0.75V peak ±10% for 9.6 kbps
TX/RX Source
Impedance 135 Ω ±20%
Dynamic Range 0 to 45 dB loops loss for all rates measured at a frequency of half the data rate
OCU DP MODULE MODULE
Capacity One DS0 (user configurable)
Tests Power-on circuit test
CSU loopback initiation - (sealing current reversal)
OCU loopback (loopback-internal toward MUX) PRT/ LCL (bidirectional loopback)
1.3 PHYSICAL
DESCRIPTION
The OCU DP, see Figure 1, is an option module which plugs into the option slot in the rear of the TSU 100.
OCU DP Port X.1
NX 56/64 PORT X.2 V.35
DDS.
Figure 1. OCU DP Option Module
OCU DP MODULE MODULE
2. INSTALLATION
2.1 UNPACK & INSPECT
Carefully inspect the OCU DP module for any shipping damages. If damage is suspected, file a claim immediately with the carrier and then contact ADTRAN customer service. If possible, keep the original shipping container for use in shipping the OCU DP Module back for repair or for verification of damage during shipment.
ADTRAN SHIPMENTS
INCLUDE
• The OCU DP Option Module
• The OCU DP Option Module User's Manual (To be inserted into main TSU 100 User's Manual)
CUSTOMER PROVIDES
• Cable for connection to DSU/CSU
2.2 INSTALLING THE OPTION MODULE
CAUTION
Power to the TSU 100 should be OFF when install-ing the OCU DP Module, PN 1200.068L1.
The OCU DP Option Module PN1200.068L1#HS, is hot replaceable and can be installed in the TSU 100 with the power On.
PLACEMENTOFTHE OM
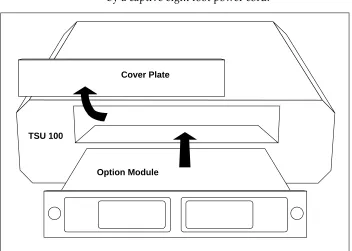
Figure 2 is representative of the action required for proper placement of the Option Module.
• Remove the cover plate from the TSU 100 rear panel.
• Slide the option module into the rear panel until it is positioned firmly against the front of the TSU 100. • Fasten the thumb-screws at both edges of the option
POWER CONNECTION
Each OCU DP module derives power from the base TSU 100 unit. Power to the TSU 100 is supplied by a captive eight foot power cord.
TSU 100
Option Module Cover Plate
OCU DP MODULE MODULE
2.3 WARRANTY AND CUSTOMER SERVICE
ADTRAN will replace or repair this product within five years from the date of shipment if it does not meet its published specifications or fails while in service. For detailed warranty, repair and return information refer to the ADTRAN Equipment Warranty, Repair and Return Policy Procedure in the TSU 100 User's Manual.
Return Material Authorization (RMA) is required prior to returning equipment to ADTRAN.
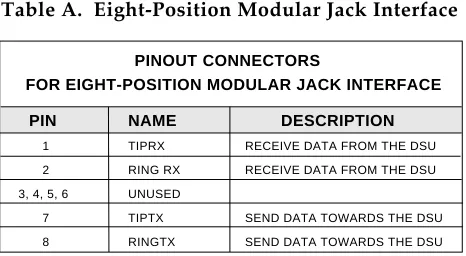
PINOUT CONNECTORS
FOR EIGHT-POSITION MODULAR JACK INTERFACE
PIN NAME DESCRIPTION
1 TIPRX RECEIVE DATA FROM THE DSU
2 RING RX RECEIVE DATA FROM THE DSU
3, 4, 5, 6 UNUSED
7 TIPTX SEND DATA TOWARDS THE DSU
8 RINGTX SEND DATA TOWARDS THE DSU
2.4 WIRING
The OCU DP offers one connector for a DDS interface.
Connector Type (USOC)= RJ48C PN= AMP # 555164-1
OCU DP MODULE MODULE
2.5 POWER-UP TESTING AND INITIALIZATION
The OCU DP option module executes a self test during the power-up sequence, as described in the TSU 100 User's Manual. No initialization input is required. Automatically, upon power-up, any previ-ously configured setting for the OCU DP is restored. When the self testing is complete and the configu-ration is successfully restored, it will be indicated by the illumination of the green "OK" LED in the MOD-ULE group on the front panel. (See the section Front Panel Operation in the TSU 100 User's Manual.) If the OCU DP module fails one or more of the self tests, a message is displayed on the front panel during power-up. (See the section Power Up Testing and Initialization
3. OPERATION
3.1 OVERVIEW
The OCU DP module is controlled as part of the TSU 100 using the same methods as described in the user's manual.
3.2 FRONT PANEL
INDICATORS/BUTTONS
Please refer to the description of the TSU 100 front panel indicators and buttons in the user's manual.
3.3 MENU STRUCTURE
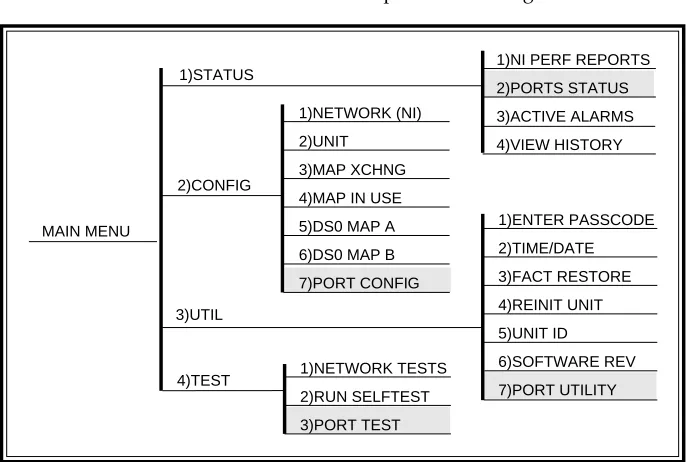
The OCU DP menus appear as a subset of and operate the same as menus for the TSU 100. The menus are accessed by selecting 1.1 OCU DP under the PORT menu items.
Figure 3 shows the TSU 100 Main Menu with the PORT selections shaded.
The TSU 100 User's Manual's appendix TSU 100 Menu Treeis a complete menu diagram.
MAIN MENU
1)STATUS
2)CONFIG
3)UTIL
1)NI PERF REPORTS
2)PORTS STATUS 3)ACTIVE ALARMS 4)VIEW HISTORY 1)ENTER PASSCODE 2)TIME/DATE 3)FACT RESTORE 4)REINIT UNIT 5)UNIT ID 6)SOFTWARE REV 7)PORT UTILITY 1)NETWORK TESTS 2)RUN SELFTEST 4)TEST 1)NETWORK (NI) 2)UNIT 3)MAP XCHNG
4)MAP IN USE
5)DS0 MAP A
6)DS0 MAP B
OCU DP MODULE MODULE
OCU DP MENUS ARE ALL SUBMENUS
The OCU DP menus are accessed from and oper-ated the same as menus for the TSU 100. As can be noticed from the shaded menu items in Figure 3, the OCU DP items are submenu choices of the four main menus.
Each of the OCU DP sub menu items is discussed in the following paragraphs. All are accessed by the same method.
Operation
With the cursor on one of the four main menu choices Press: ENTER or the number key
Results: display of the first two submenu items with the cursor on the first item.
Use: the down scroll key to place the cursor on the desired item
Press: ENTER
Results: display of the first two submenu choices.
2)PORTS STATUS, SUBMENU OF 1)STATUS
This menu item is used to display active status information about the OCU DP. There are three fields that report information. The display of an asterisk (*) indicates an item is active.
Open - An asterisk will be present if the DDS loop is open or wired incorrectly.
IDLE - An asterisk will be present if the OCU is detecting Control Mode Idle (CMI) from the DDS loop.
ADIS - An asterisk will be present if the Quality Monitor Autodisconnect feature is en-abled and the OCU has received enough improper violations to disconnect the DDS loop.
*
7)PORT CONFIG,
SUBMENU OF 2)CONFIG
The 7)PORT CONFIG menu item is used for con-figuration of the OCU DP Passthru Option Module.
Operation
With the cursor on main menu item 2)CONFIG Press: ENTER or the number 2 key
Results: display of the first two Configuration sub-menu items with the cursor on 1)NETWORK (NI)
Use: the down scroll key to place the cursor on 7)PORT CONFIG
Press: ENTER
Results: only the bottom line of the LCD changes display
Use: the scroll keys to identify 1.1 OCU DP
To select
Press: ENTER
Results: the first of eight submenu items
Continue with standard operating procedures.
RATE - Sets the data rate of the OCU DP.
Choices - 2.4, 4.8, 9.6, 19.2, 38.4, 56.0 DDS, 56.0 SW, 64
SEC CHAN - Enables or disables the use of a secondary channel with all data rates excluding 64 kbps.
Choices - OFF or ON
QUAL MON - Quality monitor function/Auto Dis-able Function. Allows the OCU DP to monitor the data it receives from the DDS loop. If it detects
OCU DP MODULE MODULE
Choices - OFF or ON
ZCS - Zero Code Suppression may be used to prevent a channel of zeros when running 56K data rate with secondary channel ON. ZCS is not used for 64 kbps data rate.
Choices - OFF or ON
A/B SIGNL - Selects either a software or hard-ware algorithm to be used for SW56 operation.
The OCU DP decodes signalling from the network and passes this to the loop as either CMI code or data mode. The default method of decod-ing signalldecod-ing from the network is a software technique. If the C bit (bit 8) is 0 in any of the last seven data bytes, signalling is decoded as a 0 (on-hook). If bit 8 is a 1 in all of the last seven data bytes, signalling is decoded as a 1 (off-hook).
If the hardware (HW) option is enabled, sig-nalling is decoded from the A and B bits in frames 6 and 12 of the T1 data.
Choices - SW or HW
LTCHING LBACK - Enables the OCU DP response to the latching OCU and Channel loopback com-mands and performance of the requested test configuration.
Choices - ENABLED or DISABLED
TX LEVEL - Sets the Transmit Signal out of the OCU DP to either Normal or Attenuated. For short line lengths it may be necessary to attenuate the trans-mit signal if the signal is large enough to saturate the DSU/CSU equipment being used.
3)FACT RESTORE, SUBMENU OF 3)UTIL
This menu item is used to restore the factory default setting for all OCU DP option module param-eters.
Operation
Follow standard operating procedure to access the 3)UTIL menu items.
With the cursor on 3)FACT RESTORE Press: the ENTER key
Results: the unit returns to the opening main menu with all factory preset defaults are restored.
7)PORT UTILITY, SUBMENU OF 3)UTIL
The 7)PORT UTILITY menu item is primarily used to access the display of the current software information for each port installed in the unit. This information is required when requesting assistance from ADTRAN customer service or when updates are needed.
Operation
Follow standard operating procedure to access the 3)UTIL menu items.
With the cursor on 7)PORT UTILITY Press: the ENTER key
Results: display of the first available port.
Use: the up and down scroll keys to identify 1.1 OCU DP
To select
Press: ENTER
Results: display of the option card name and the software version installed.
OCU DP MODULE MODULE
2)RUN SELF TEST, SUBMENU OF 4)TEST
This menu item is used to execute both the TSU 100's internal test and the OCU DP's internal test. This is the same test as is executed upon power-up. The results of the self test are displayed on the LCD. For additional information on Self test, consult the chapter Operation in the TSU 100 User's Manual.
Follow standard operating procedure to access the 4)TEST menu items.
With the cursor on 2)RUN SELFTEST Press: the ENTER key
Results: a changing display in the LCD showing the test result.
3)PORT TEST,
SUBMENU OF 4)TEST
This menu item is used to activate tests of the selected data ports. Selecting the OCU DP displays two Loopback tests available for this option module.
Operation
Follow standard operating procedure to access the 4)TEST menu items.
With the cursor on 3)PORT TEST Press: the ENTER key
Results: display of the first available port.
Use: the up and down scroll keys to select 1.1 OCU DP
To select
Press: ENTER
LOOPBACK - This item activates the loopback function on the OCU DP module.
On the OCU DP, the CSU loopback initiates a
sal, the DDS CSU (connected to the OCU DP over a 4-wire loop) should loop data back toward the NI.
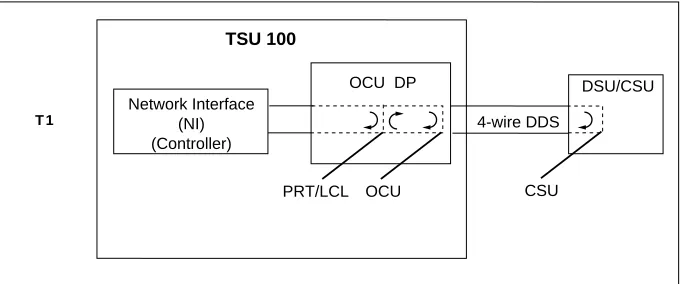
The OCU loopback loops the data mapped to the OCU DP back toward the network interface of the controller. Using the loopback in conjunction with an external BERT driving the Network Interface, will exer-cise the entire data path from the Network Interface (NI) through the OCU DP option module and back out the NI. See Figure 4, Diagram of Loopbacks.
Figure 4. Diagram of Loopbacks
The PRT/LCL bidirectional loopback loops the data mapped to the OCU DP back to the network interface of the controller. It also loops data from the DSU/CSU back to the DSU/CSU. If the DSU/CSU is capable of sending a test pattern, it can be used with this loopback to verify integrity of the 4-wire DDS loop.
To deactivate the Loopback, OFF must be selected under the 1.1 OCU DP submenu.
TSU 100
Network Interface (NI) (Controller)
T 1
OCU DP
4-wire DDS
OCU PRT/LCL
DSU/CSU
APPENDIX I
OCU DP FAILURE MESSAGES
FAILURE MESSAGES AT POWER-UP
The following messages indicate a probable part failure on the OCU DP Module.
EPROM - EPROM ERROR
SRAM - Static RAM ERROR
OCU DP ALARM MESSAGES
The following message indicates an alarm condi-tion on the OCU DP Module.
Index
A
active status information 11
C
Configuration. See PORT CONFIG
Customer Service 7
D
data ports. See Port Test
default setting. See Fact Restore Description 1
Features 1
Functional 1
Physical 4
F
Fact Restore 13
Front Panel 10
I
Indicators/Buttons 10 Initialization 9 Installation 5
Figure, Installing Option Module 6
Placement of the OM 5
Power Connection 5
L
Loopbacks Diagram 16
M
Menu Operation 11
Menu Structure 10
Messages
OCU DP MODULE MODULE
O
OCU DP Menus 11
Operation Overview 10
Overview 1
Features 1
Functional Description 1 Interfaces 2
Specifications 2
P
Physical Description 4
PORT CONFIG 12
A/B SIGNL, soft/hardware algorithm 13
LTCHING LBACK, latching/Channel loopback 13
QUAL MON, quality monitor 12
RATE, data rate 12
SEC CHAN, secondary channel 12
TX LEVEL, Transmit Signal 13
ZCS, Zero Code Suppression 13
Port Test 15
PORT UTILITY 14
PORTS Status 11
Power-Up Testing 9
R
Return Material Authorization (RMA) 7
Run Self Test 15
S
self test 15
software. See Port Utility Specifications 2
status information, active 11
T
TSU 100 Main Menu 10
W
Warranty 7
Product Support Information
Presales Inquiries and Applications Support
Please contact your local distributor, ADTRAN Applications Engineering, or ADTRAN Sales:
Applications Engineering (800) 615-1176
Sales (800) 827-0807
Post-Sale Support
Please contact your local distributor first. If your local distributor cannot help, please contact ADTRAN Technical Support and have the unit serial number available.
Technical Support (800) 726-8663
Repair and Return
If ADTRAN Technical Support determines that a repair is needed, Technical Support will coordinate with the Return Material Authorization (RMA) de-partment to issue an RMA number. For information regarding equipment currently in house or possible fees associated with repair, contact RMA directly at the following number:
RMA Department (205) 971-8722
Identify the RMA number clearly on the package (below address), and return to the following address:
ADTRAN, Inc. RMA Department 901 Explorer Boulevard