CST 150 – Web Design I
CSS Review - In-Class Lab
The purpose of this lab assignment is to review utilizing Cascading Style Sheets (CSS) to enhance the layout and formatting of web pages.
For Parts 1 and 2 below, you will begin with the following html page (fishcreek.html) :
Figure 1 (fishcreek.html with no CSS)
wrapper right_col
Part 1. Two Columns with Left Navigation
In the next steps, you will add CSS rules to format the page as follows:
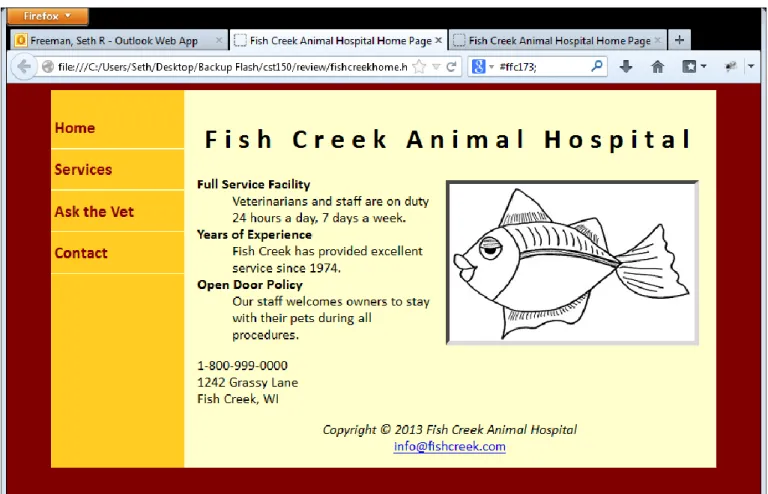
Figure 2 (fishcreek.html) 1. Open fishcreek.html in your web editor.
2. Create a new external stylesheet called fishstyle.css. Make sure to save fishstyle.css in the same folder as your fishcreek.html page.
3. Add the following <link> element to fishcreek.html
<link href="fishstyle.css" rel="stylesheet" type="text/css" />
4. Open fishstyle.css. Add the following css rule to change the background-color and font of the page body body {
background-color: maroon; font-family:Calibri;
}
5. Refresh fishcreek.html to see the changes. Next, we will format the wrapper, left_col and right_col divisions. Read the descriptions of the rules, and then type the css rules below.
The wrapper division will be set to take up 90% of the page body, centered within the page body, and assigned the background color #ffcc22.
#wrapper {
width: 90%; margin: 0px auto;
background-color: #ffcc22; }
The left column is assigned a fixed width and configured to float on the left. Because no background-color is configured, the background color of the container element (wrapper div) displays.
#left_col {
width: 20%; float: left; }
The right column is assigned a margin on the left that is equal or greater than the width of the left column. This margin creates the look of two columns. The right column is assigned the background-color #fffcc and 15px padding.
#right_col { margin-left: 20%; background-color: #ffffcc; padding: 15px; }
6. Refresh fishcreek.html to see the changes. Next, we will format the navigation list ( nav element). Read the descriptions of the rules, and then type the css rules below:
The unordered list within the nav element is formatted to (i) remove the bullet markers (ii) set the padding to 0px (iii) set the font-size to 1.2em and (iv) set the line height to 2em.
nav ul {
list-style-type: none; padding: 0px; font-size: 1.2em; line-height: 2em; }
The list items within the unordered list within the nav element are formatted to with (i) a bottom border that is 1px wide, solid line and coolor #ffffcc (ii) padding of 4px.
nav ul li {
border-bottom: 1px solid #ffffcc; padding: 4px;
}
When the user hovers over the list items within the unordered list within the nav element, the background-color of the list item should be set to #ffffcc.
nav ul li:hover {
background-color: #ffffcc; }
The anchor elements within the list items within the unordered list within the nav element, are formatted to (i) have the font color maroon (ii) remove underlining and (iii) have bold font.
nav ul li a {
color: maroon;
text-decoration: none; font-weight: bold; }
7. Refresh fishcreek.html to see the changes. Next, we will format the image (img element), header and footer. Read the descriptions of the rules, and then type the css rules below:
The image element within the right_col division should be formatted to (i) float to the right (ii) have a 5px inset grey border and (iii) 5px margin around all four sides.
#right_col img { float: right;
border: 5px inset grey; margin: 5px;
}
Center the text within the header and footer header, footer {
text-align: center; }
Set the letter spacing of the h1 element nested within the header element header h1 {
letter-spacing: 8px; }
Part 2. Two Columns Layout with top header and bottom footer In the next steps, you will add CSS rules to format the page as follows:
Figure 3 (fishcreek50.html)
To create the page above, we will first create a new page fishcreek50.html . We will modify fishcreek50.html in the steps below.
1. Save fishcreek.html as fishcreek50.html. Open fishcreek50.html in your Web editor.
2. In fishcreek.html, the header and footer elements are nested within the right_col division. The first change you need to make to fishcreek50.html, is to move the header element and nest the header element inside the wrapper division, before the left_col. Then move the footer element and nest the footer element inside the wrapper division, after the right_col.
3. Create a new external stylesheet called fishstyle50.css. Make sure to save fishstyle50.css in the same folder as your fishcreek50.html page.
4. Update the <link> element in fishcreek50.html
5. Add the following CSS rules to fishstyle50.css body { background-color: #a65c00; font-family: Calibri; } #wrapper { width: 90%; margin: 0px auto;
background-color: #ff8e00; } #left_col { float: left; width: 20%; } #right_col { margin-left: 20%; background-color: rgb(160,200,227); padding:15px; } nav ul {
list-style-type: none; padding: 0px; font-size: 1.2em; line-height: 2em; }
nav ul li {
border-bottom: 1px solid #ffffcc; padding: 4px;
}
nav ul li:hover {
background-color: #ffc173; }
nav ul li a {
text-decoration: none; font-weight: bold; color: black; }
#right_col img { float: right;
border: 2px inset #ffc173; margin: 5px;
}
header, footer {
text-align: center;
background-color: #ffc173; padding: 10px;
}
header h1 {
letter-spacing: 8px; }