C H A P T E R
4
Managing Virtual Servers
Content Switching Module Device Manager (CVDM-CSM) displays details of existing virtual servers and enables users to perform detailed tasks that include creating or deleting virtual servers, associating them with server farms and policies, disallowing (or allowing) specific client IP addresses to connect to the virtual server, and turning the virtual services on or off.
Server farms that are represented as virtual servers can improve scalability and availability of services for your network. You can add new servers and remove failed or existing servers at any time without affecting the virtual server's availability.
Virtual servers represent groups of real servers and are associated with real server farms through policies. Configuring virtual servers requires setting the attributes of the virtual server, specifying the default server farm (default policy), and associating other server farms through a list of policies.
A server farm must be configured before associating it to the virtual server. Policies are processed in the order in which they are entered in the virtual server configuration.
Chapter 4 Managing Virtual Servers Viewing Virtual Servers
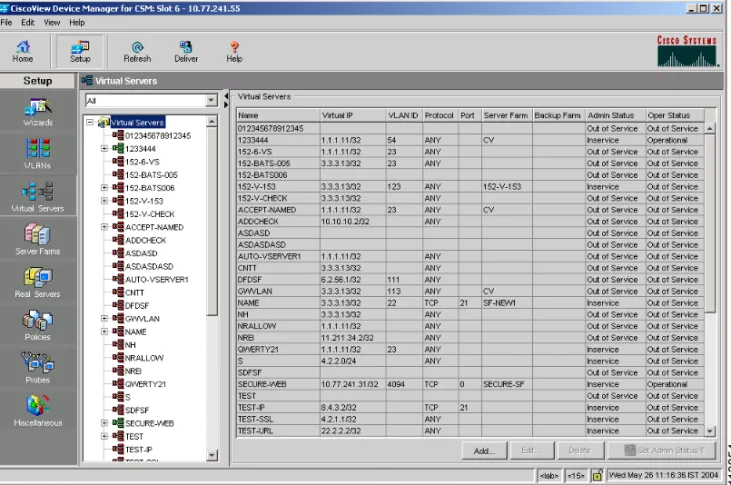
Viewing Virtual Servers
Figure 4-1 Virtual Servers Page
You can view all Virtual Servers that exist on the device. To view the Virtual Servers:
Step 1 Click Home at the top of the page.
Step 2 Click Virtual Servers under the Services Dashboard. Or:
Step 1 Click Setup from the task bar, then click Virtual Servers in the left-most pane.
Chapter 4 Managing Virtual Servers
Viewing Virtual Servers
The following fields appear:
You can group the Virtual Servers based on various common parameters. To group the Virtual Servers, click at the top of the object selector. You can select one of the following options:
• All
• Group by Protocol
• Group by Admin Status
Field Description
Name Name of the virtual server.
Virtual IP Address IP address of the virtual server.
VLAN ID ID of the VLAN.
Protocol Load-balancing protocol.
Port TCP/UDP port number or name.
Server Farm Name of the server farm associated to
the real server.
Backup Farm Name of the backup server farm
associated to the real server.
Admin Status Lets you know the admin status of the Virtual Server.
Operational Status Lets you know the operational status of the Virtual Server.
Chapter 4 Managing Virtual Servers Adding a Virtual Server
• Select a row and click Delete to delete Virtual Servers.
• Click Set Admin Status to set the status of the Virtual Server instantly.
Adding a Virtual Server
You can add a Virtual Server by giving the required configuration details. To add a new Virtual Server:
Step 1 Click Home at the top of the page
Step 2 Click Virtual Servers under the Services Dashboard.
Step 3 Click Add. The Add Virtual Server dialog box appears. Or:
Step 1 Click Setup from the task bar, then click Virtual Servers in the left-most pane.
Step 2 Select Virtual Servers from the object selector.
Step 3 Click Add. The Add Virtual Server dialog box appears with the following tabs:
• General
• Policies
• Default Policy
• Client Restriction
• Sticky Connections
Chapter 4 Managing Virtual Servers
Adding a Virtual Server
General
Click General to configure the basic configuration details. The following details are displayed:
Field Action/Description
Name Enter the name of the Virtual Servers.
Status From the list, select the status of the
Virtual Server.
VLAN ID Specify a VLAN for incoming traffic
from the list.
Virtual IP Address
IP Address Enter the IP Address of the virtual
server.
Protocol From the list, select the type of IP
protocol used. You can choose between Any, TCP or UDP or enter a number between 1 and 255.
Port From the list, select the port number.
This field is enabled only when you choose TCP or UDP.
Service Type From the list, select the service type.
Advertise
Advertise Virtual IP
Advertise only if reals are active
Chapter 4 Managing Virtual Servers Adding a Virtual Server
Policies
Click Policies to add or delete Policies. You have the following options:
• Click Add and select one of the following to associate policies from the Virtual Server.
– Select Policy to select a policy from a list.
– Create Policy to create a policy. For more information see“Adding Policies” section on page 7-4.
• Select a policy and click Delete to remove policies from the Virtual Server.
• Click the Up button to move the policies up in the list.
• Click the Down button to move the policies down in the list.
Note Be sure to order the policies in the correct order. The traffic will be routed based on the order of policies.
Chapter 4 Managing Virtual Servers
Adding a Virtual Server
Default Policy
Click Default Policy to add the default and backup Server Farms. The following details are displayed:
Default Server Farm Click and select one of the following:
• Select Server Farm to select from a list of server farms.
• Create Server Farm to create a server farm. For more information on creating server farms, see “Adding Server Farms” section on page 5-4.
• Clear Server Farm to clear a server farm.
Backup Server Farm
Server Farm Click and select one of the
following:
• Select Server Farm to select from a list of server farms.
• Create Server Farm to create a server farm. For more information on creating server farms, see “Adding Server Farms” section on page 5-4.
• Clear Server Farm to clear a server farm.
Chapter 4 Managing Virtual Servers Adding a Virtual Server
Client Restriction
Click Client Restriction to add details of the restricted clients. You have the following options:
• Click Add to create client restrictions for multiple clients.
• Click Edit to edit the client restrictions for multiple clients.
• Select a row in the table and click Delete to delete the selected client restriction.
When you click Add or Edit, the following details are displayed:
Field Description
IP Address IP Address of the client.
Mask Specify the type of IP mask. It can be
from Class A, Class B, Class C or Class D masks.
If it is not specified, the default for network mask is 255.255.255.255.
Exclude Select the client to exclude traffic from it.
Chapter 4 Managing Virtual Servers
Adding a Virtual Server
Sticky Connections
Click Sticky Connections to add details of the sticky connections. The following details are displayed:
Field Description
Sticky Timer Specifies the period of time (in minutes) that the sticky information is kept.
Mask From the list, select, Class A, Class B,
Class A and Class D masks. If it is not specified, the default for network mask is 255.255.255.255.
Sticky Group Click and select one of the
following:
• Select Sticky Group to select from a list of Sticky Groups.
• Create Sticky Group to create a Sticky Group. For more
information on creating server farms, see“Adding a Sticky Group” section on page 9-5.
• Clear Sticky Group to clear a Sticky Group.
Chapter 4 Managing Virtual Servers Adding a Virtual Server
Other
Click Other to add details of performance, load, and traffic- related parameters. The following details are displayed:
Reverse Sticky Group Click and select one of the following:
• Select Sticky Group to select from a list of Sticky Groups.
• Create Sticky Group to create a Sticky Group. For more
information on creating server farms, see“Adding a Sticky Group” section on page 9-5.
• Clear Sticky Group to clear a Sticky Group.
SSL Sticky
Offset Enter the offset for the SSL ID.
Length Enter the length of the SSL ID.
Field Description
Field Description
Performance/Load Parameters
Idle Timer Enter idle connection timer duration in seconds.
Pending Timeout Enter the time (in seconds) to wait before a connection is considered unreachable.
Parse Length Enter the maximum number of bytes to
parse for URLs and cookies. Maximum Connections Enter the maximum number of
Chapter 4 Managing Virtual Servers
Adding a Virtual Server
URL Hash Select this check box to enable the
begin and end pattern fields. Begin Pattern Specify the beginning pattern of the
URL to parse.
End Pattern Specify the ending pattern of the URL
to parse.
Connection/Traffic Parameters
Enable HTTP Persistence Select this to enable or disable HTTP persistence for connections in the virtual server.
Enable Unidirectional Traffic Select this to enable unidirectional traffic.
Chapter 4 Managing Virtual Servers Editing a Virtual Server
Editing a Virtual Server
You can monitor Virtual Servers connection details and the list of Policies for the selected Virtual Servers.
To monitor Virtual Servers:
Step 1 Click Home at the top of the page
Step 2 Click Virtual Servers under the Services Dashboard.
Step 3 Select a row from the table. Click Edit. The Edit Virtual Server dialog box appears.
Or:
Step 1 Click Setup from the taskbar, then click Virtual Servers in the left-most pane.
Step 2 Select Virtual Servers from the object selector.
Step 3 Select a row from the table. Click Edit. The Edit Virtual Server dialog box appears with the following tabs:
• General
• Policies
• Default Policy
• Client Restriction
• Sticky Connections
Chapter 4 Managing Virtual Servers
Editing a Virtual Server
General
Click General to edit the basic configuration detail The following details are displayed:
Field Description
Name Name of the Virtual Servers.
Status From the list, select the status of the
Virtual Server.
VLAN ID From the list, select VLAN for
incoming traffic from the list. Virtual IP Address Enter the IP Address of the Virtual
Servers.
Protocol From the list, select the type of IP
Protocol used.
You can choose from Any, TCP, or UPD, or you can enter a number between 1 and 255.
Port From the list, select the list of valid
port numbers. This field is enabled only when you choose TCP or UDP. Service Type From the list, select the service type.
Advertise
Advertise Virtual IP Select this to advertise a virtual IP. Advertise only if reals are active Select this to advertise only if real
Chapter 4 Managing Virtual Servers Editing a Virtual Server
Policies
Click Policies to edit Policies. You have the following options:
• Click Add to associate policies from the Virtual Server. For more information see“Adding Policies” section on page 7-4.
• Click Delete to remove policies from the Virtual Server.
• Click the Up button to move the policies up in the list.
• Click the Down button to move the policies down in the list
Note Be sure to order the policies in the correct order. The traffic will be routed based on the order of policies.
Chapter 4 Managing Virtual Servers
Editing a Virtual Server
Default Policy
Click Server Farms to edit a Server Farm. The following details are displayed:
Default Server Farm Click nd select one of the following:
• Select Server Farm to select from a list of server farms.
• Create Server Farm to create a server farm. For more information on creating server farms, see “Adding Server Farms” section on page 5-4.
• Clear Server Farm to clear a server farm.
Backup Server Farm
Server Farm Click and select one of the
following:
• Select Server Farm to select from a list of server farms.
• Create Server Farm to create a server farm. For more information on creating server farms, see “Adding Server Farms” section on page 5-4.
• Clear Server Farm to clear a server farm.
Chapter 4 Managing Virtual Servers Editing a Virtual Server
Client Restriction
Click Client Restriction to edit the details of the restricted clients.You have the following options:
• Click Add to create client restrictions for multiple clients.
• Click Edit to edit the client restrictions for multiple clients.
• Select a row in the table and click Delete to delete the selected client restriction.
When you click Add or Edit, the following details are displayed:
Field Description
IP Address IP Address of the client.
Mask Specify the type of IP mask. It can be
from Class A, Class B, Class C or Class D masks.
If it is not specified, the default for network mask is 255.255.255.255.
Exclude Select the client to exclude traffic from
Chapter 4 Managing Virtual Servers
Editing a Virtual Server
Sticky Connections
Click Sticky Connections to edit details of the sticky connections. The following details are displayed:
Field Description
Sticky Timer Enter the sticky time.
Mask From the list, select Class A, Class B,
Class A and Class D masks. If it is not specified, the default for network mask is 255.255.255.255.
Sticky Group Click and select one of the
following:
• Select Sticky Group to select from a list of Sticky Groups.
• Create Sticky Group to create a Sticky Group. For more
information on creating server farms, see“Adding a Sticky Group” section on page 9-5.
• Clear Sticky Group to clear a Sticky Group.
Reverse Sticky Group Click and select one of the following:
• Select Sticky Group to select from a list of Sticky Groups.
Chapter 4 Managing Virtual Servers Editing a Virtual Server
Offset Enter the offset for the SSL ID.
Length Enter the length of the SSL ID.
Chapter 4 Managing Virtual Servers
Editing a Virtual Server
Other
Click Other to edit details of performance, load, and traffic-related parameters. The following details are displayed:
Field Description
Performance/Load Parameters
Idle Timer Enter idle connection timer duration
(in seconds).
Pending Timeout Enter the time (in seconds) to wait before a connection is considered unreachable.
Parse Length Enter the maximum number of bytes to
parse for URLs and cookies. Maximum Connections Enter the maximum number of
connections to the real server.
URL Hash Select this check box to enable the
begin and end pattern fields. Begin Pattern Specify the beginning pattern of the
URL to parse.
End Pattern Specify the ending pattern of the URL
to parse.
Connection/Traffic Parameters
Enable HTTP Persistence Select this to enable or disable HTTP persistence for connections in the virtual server.
Chapter 4 Managing Virtual Servers Viewing an Individual Virtual Server
Viewing an Individual Virtual Server
You can view the configuration details of each Virtual Server when you click any of them.
Figure 4-2 Virtual Server - Individual Virtual Server Page
To monitor the individual Virtual Servers:
Step 1 Click Home at the top of the page.
Step 2 Click Virtual Servers under the Services Dashboard. Click the virtual server for which you want to view configuration details.
Chapter 4 Managing Virtual Servers
Viewing an Individual Virtual Server
Step 1 Click Setup from the task bar, then click Virtual Servers in the left-most pane.
Step 2 Select Virtual Servers from the object selector.
Step 3 Click the virtual server for which you want to view configuration details. The following fields appear:
Field Description
Admin Status Lets you know if the real server is In Service or Out of Service.
Operational Status Lets you know the operational status of the Virtual Server.
Virtual IP Address IP Address of the Virtual Server.
Protocol Type of IP Protocol used. You can
choose between Any, TCP or UDP or enter a number between 1 and 255.
Mask Type of IP mask. It can be a Class A,
Class B, Class C or Class D mask. If it is not specified, the default for network mask is 255.255.255.255.
Port Port alloted for the traffic. This field is
enabled only when you choose TCP or UDP.
VLAN ID Specifies the VLAN for incoming
traffic.
Service Type Specifies the service type.
Advertise
Chapter 4 Managing Virtual Servers Viewing an Individual Virtual Server
The following tabs appear:
• Policies
• Default Policy
• Backup Server Farm
• Client and Sticky Connections
• Other Parameters
Enable HTTP Persistence Select this to enable or disable HTTP persistence for connections in the virtual server.
Enable Unidirectional Traffic Select this to enable unidirectional traffic.
Chapter 4 Managing Virtual Servers
Viewing an Individual Virtual Server
Policies
Click Policies to view the details of various policies. The following fields appear:
Field Description
Policy Name Policy associated with a virtual server.
Conditions
Cookie Map Name of the cookie map associated
with a policy. Only one Cookie map can be associated with a policy.
URL Map Name of the URL map associated with
a policy. Only one URL map can be associated with a policy.
Header Map Name of the Header map associated
with a policy. Only one Header map can be associated with a policy. Client Group Client group can either be standard
access lists names or an ID between 1 to 99. Only one client-group can be associated with a given SLB policy.
Action
Server Farm Name of the server farm associated to
the real server. You can choose one server farm and/or backup server farm to associate to the Policy.
Backup Server Farm
Sticky Group Number identifying the sticky group to which the virtual server belongs.
Chapter 4 Managing Virtual Servers Viewing an Individual Virtual Server
Default Policy
Click Default Policy to view the details of the default policy. The following fields appear:
Server Farm
Associated Real Servers
Real Real Server associated to the Server
farms through policies.
Minimum Connections Minimum number of connections to the real server.
Maximum Connections Maximum number of connections to the real server.
Weight Weight assigned to the real server. The
weight identifies the capacity of the real server compared to other real servers in the server farm.
Admin Status Lets you know the status of the real server.
Chapter 4 Managing Virtual Servers
Viewing an Individual Virtual Server
Backup Server Farm
Click Backup Server Farm to view the details of the default policy. The following fields appear:
Backup Server Farm Associated Real Servers
Real Real Server associated to the Server
farms through policies.
Minimum Connections Minimum number of connections to the real server.
Maximum Connections Maximum number of connections to the real server.
Weight Weight assigned to the real server. The
weight identifies the capacity of the real server compared to other real servers in the server farm.
Admin Status Lets you know the status of the real server.
Chapter 4 Managing Virtual Servers Viewing an Individual Virtual Server
Client and Sticky Connections
Click Client / Sticky Connections to view details of the restricted clients and the details related to sticky connections.
The following fields appear:
Field Description
Client Restriction
IP Address IP Address of the client.
Mask Specify the type of IP mask. It can be
from Class A, Class B, Class C or Class D masks.
If it is not specified, the default for network mask is 255.255.255.255.
Exclude Select the client to exclude traffic from
it.
Sticky Connections
Sticky Timer Specifies the period of time (in minutes) that the sticky information is kept.
Mask Specifies if it is a Class A, Class B,
Class A and Class D mask. If it is not specified, the default for network mask is 255.255.255.255.
Sticky Group Sticky Group associated with the
Virtual Server.
Reverse Sticky Number identifying the reverse sticky group to which the virtual server belongs.
SSL Sticky
Offset The offset for the SSL ID.
Chapter 4 Managing Virtual Servers
Viewing an Individual Virtual Server
Other Parameters
Click Other Parameters to view details of performance, load and traffic related parameters.
The following fields appear:
Field Description
Performance/Load Parameters
Idle Timer Duration of the idle connection timer
(in seconds).
Pending Timeout Time (in seconds) to wait before a connection is considered unreachable.
Parse Length Maximum number of bytes to parse for
URLs and cookies.
Maximum Connections Maximum number of connections to the real server.
URL Hash
Begin Pattern Specifies the beginning pattern of the URL to parse.
End Pattern Specifies the ending pattern of the
URL to parse.
Connection/Traffic Parameters
Enable HTTP Persistence Enable or disable HTTP persistence for connections in the virtual server. Enable Unidirectional Traffic Enable unidirectional traffic.
Chapter 4 Managing Virtual Servers Viewing a Policy
Viewing a Policy
You can view the details of the conditions and actions of the policy associated with each Virtual Server.
Figure 4-3 Virtual Server - Policy Page
To the view the conditions and actions of each of the policies associated with individual Virtual Servers:
Step 1 Click Home at the top of the page.
Step 2 Click Virtual Servers under the Services Dashboard. Select the required Virtual Server and click the policy associated with it.
Chapter 4 Managing Virtual Servers
Viewing a Policy
Or:
Step 1 Click Setup from the task bar, then click Virtual Servers in the left-most pane.
Step 2 Select Virtual Servers from the object selector. Select the required Virtual Server and click the policy associated with it.
For more information on policies associated with the individual Virtual Servers see“Viewing Policy Nodes” section on page 7-13.
Chapter 4 Managing Virtual Servers Viewing a Default Policy
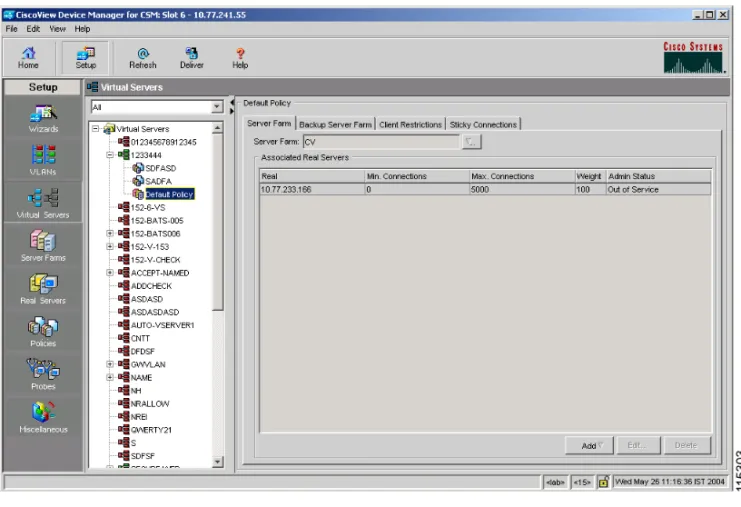
Viewing a Default Policy
You can view the details of the default policy associated with each Virtual Server.
Figure 4-4 Virtual Server - Default Policy Page
To view the details of the default policy associated with the individual Virtual Servers:
Step 1 Click Home at the top of the page.
Step 2 Click Virtual Servers under the Services Dashboard.
Step 3 Select the required Virtual Server and click the default policy associated with it. Or:
Chapter 4 Managing Virtual Servers
Viewing a Default Policy
Step 1 Click Setup from the task bar, then click Virtual Servers in the left-most pane.
Step 2 Select Virtual Servers from the object selector. Select the required Virtual Server and click the default policy associated with it.
The following tabs appear:
• Server Farms
• Backup Server Farms
• Restricted Clients
• Sticky Connections
Server Farms
Click Server Farms to view details of all the Server Farms that are associated to a policy.
The following fields appear:
Field Description
Server Farm You can create or choose one Server
Farm to associate to the Policy. Click and select one of the following:
• Select Server Farm to select a Server Farm from the list.
• Create Server Farm to create a Server Farm. For more
Chapter 4 Managing Virtual Servers Viewing a Default Policy
– Select Create Named Real Server to create a named real server. For more information, see“Adding Named Real Server” section on page 5-17.
– Select Create Unnamed Real Server to create an unnamed real server. For more information, see“Adding Unnamed Real Server” section on page 5-20.
• Select a Real Server and click Edit to edit the configuration values.
• Select a Real Server and click Delete to delete the Real Server.
For more information on Server Farms, see“Viewing Server Farms” section on page 5-2.
Backup Server Farms
Click Backup Server Farms to view details of all the Backup Server Farms that are associated to this policy.
The following fields appear:
From this dialog, you can access functions to do the following:
• Click Add and do one of the following:
Field Description
Backup Server Farm You can create or choose one Backup Server Farm to associate to the Policy. Click and select one of the following:
• Select Server Farm to select a Backup Server Farm from the list.
• Create Server Farm to create a or Backup Server Farm. For more information on creating Server Farms, see“Adding Server Farms” section on page 5-4.
Chapter 4 Managing Virtual Servers
Viewing a Default Policy
– Select Create Named Real Server to create a named real server. For more information, see“Adding Named Real Server” section on page 5-17.
– Select Create Unnamed Real Server to create an unnamed real server. For more information, see“Adding Unnamed Real Server” section on page 5-20.
• Select a Real Server and click Edit to edit the configuration values.
• Select a Real Server and click Delete to delete the Real Server.
For more information on Server Farms, see“Viewing Server Farms” section on page 5-2.
Restricted Clients
Click Restricted Clients to add details of the restricted clients. The following details are displayed:
Field Description
IP Address IP Address of the client.
Mask Specify the type of IP mask. It can be
from Class A, Class B, Class C or Class D masks.
If it is not specified, the default for network mask is 255.255.255.255.
Exclude Select the client to exclude traffic from
Chapter 4 Managing Virtual Servers Viewing a Default Policy
Sticky Connections
Click Sticky Connections to add details of the sticky connections. The following details are displayed:
Field Description
Sticky Timer Specifies the period of time (in minutes) that the sticky information is kept.
Mask From the list, select From the list,
select Class A, Class B, Class A and Class D masks.
If it is not specified, the default for network mask is 255.255.255.255.
Sticky Group Specify the Sticky Group associated
with the Virtual Server.
Reverse Sticky Group Enter the number identifying the reverse sticky group to which the virtual server belongs.
SSL Sticky
Offset Enter the offset for the SSL ID.