Using Help
About the built-in help features
Using Help for vision- and motor-impaired users Opening the Help documentation
About the built-in help features
Adobe® Reader® 7.0 offers many built-in features to assist you while you work, including the Help window you're using right now:
● Help documentation.
● How To pages. (See Using the How To pages.)
● Tool tips, which identify the various buttons, tools, and controls in the work area by name. These labels appear when you place the pointer over the item you want to identify. Tool tips are also available in some dialog boxes.
● Help buttons in some dialog boxes. When you click these Help buttons, the Help window opens with the related topic.
You can also consult online resources. Choosing Help > Online Support leads to links for software downloads, product information, support documents, and more. The Help menu also contains links to various online resources and references.
Note: There is no printed user manual for this product. Overviews, explanations, descriptions, and procedures are included in Help.
Using Help for vision- and motor-impaired users
Vision- and motor-impaired users can use the Accessibility Setup Assistant to change how PDF documents appear on-screen and are handled by a screen reader, screen magnifier, or other assistive technology. The first time you start Adobe Reader, the Accessibility Setup Assistant starts if Adobe Reader detects that assistive technology is running on your system. (See Setting accessibility preferences.)
Single-key accelerators and keyboard shortcuts make document navigation simpler. Some of the more common keyboard shortcuts are described here. For a complete list of
keyboard shortcuts, see About keyboard shortcuts. For additional information on how Adobe products enhance electronic document accessibility, visit the Adobe website at http://access.adobe.com.
To activate single-key accelerators:
1. Choose Edit > Preferences (Windows®) or Adobe Reader > Preferences (Mac OS), and click General on the left.
2. Select Use Single-Key Accelerators To Access Tools. 3. Click OK to apply the change.
To open the How To window: Press Shift+F4.
To close the How To window: Do one of the following:
● (Windows) Press Shift+F4 or Esc. ● (Mac OS) Click the Close button. To open or close Adobe Reader Help:
Do one of the following:
● To open Help, press F1. In Mac OS, you can also press Command+?.
● To close Help, press Ctrl+W or Alt+F4 (Windows), or click the Close button.
Click the Search or Index tab to use that feature. In Windows, press Ctrl+Tab to cycle forward through the tabs, or press Shift+Ctrl+Tab to cycle backward through the tabs. Press F6 to move between the document pane and the navigation pane. In the Index tab, you can type an entry into the Select Index Entry text box. The list scrolls to the first match to the text string you type. Click a link to go to that topic.
Opening the Help documentation
Adobe Reader 7.0 includes complete, built-in documentation in a fully accessible Help system. The Help documentation provides explanations about the tools, commands, concepts, processes, and keyboard shortcuts. You can print individual Help topics as needed. (See Printing Help topics.)
Adobe Reader 7.0 Help opens in a separate window with two panes: a navigation pane on the left and a topic pane on the right. You use the tabs in the navigation pane to find the topics you want to read. For example, you click the Contents tab to show the list of topics available in Help. You click a title in the list to open that topic in the topic pane. For more information on using the Contents, Search, and Index panels, see Using the Help navigation pane to find topics.
Adobe Reader 7.0 Help A. Contents, Search, and Index tabs in the Help navigation pane B. Help topic pane You can drag the vertical bar between the navigation pane and the topic pane to change their widths. You can drag the lower right corner to resize the entire window. The Help window remains visible until you close it.
To open Help:
Choose Help > Adobe Reader Help. To close Help:
Click the Close button.
There are many keyboard shortcuts to help you navigate the Help. (See About keyboard
shortcuts.)
Related Subtopics:
Using the Help navigation pane to find topics Navigating your Help-session history
Using the Help navigation pane to find topics
The Help window opens with the Contents tab selected in the navigation pane.
● Click the Contents tab to view the Help topics organized by subject matter, as in the table of contents of a book. You can click the icons to the left of the topics to collapse or
expand the outline. Click a topic name to that topic in the topic pane.
● Click the Search tab to find a specific word in Help. Type the word in the text box, and click Search. The results list shows the titles of all topics in which the search word appears. Topics are listed in the order that they appear on the Contents tab.
Note: You cannot use Boolean operators (such as AND, OR, NOT, or quotation marks) to limit or refine your search. If you type more than one word, the search results include every topic in which at least one of the words appears.
● Click the Index tab to find a linked, alphabetical list of terms for various functions,
features, and concepts. You can browse the index in two ways. You can click the controls (+ or -) to expand or collapse the entries under a letter of the alphabet, scroll to the term you want, and click a link. Or you can type an entry into the Select Index Entry text box. The list scrolls to the first match to the text string you type. Click a link to go to that topic.
Navigating your Help-session history
The Help system maintains a history of your Help session so that you can go back and forth quickly among the topics you open.
Click the Previous Topic button on the Help toolbar to return to topics you opened earlier in your Help session. Click the Next Topic button to move forward again. When you close Help, you end your Help session and delete your Help history.
Printing Help topics
You can print any individual topic from the Help documentation.
Each topic must be printed individually. You can't print multiple topics at a time or entire sections of Help.
To print a Help topic: 1. Open the Help topic.
Using the How To pages
The How To pages supplement Adobe Reader Help by presenting overviews of some topics. The How To window appears on the right side of the document pane and never blocks the view of your open document.
There are many keyboard shortcuts to help you navigate the How To pages. (See
About keyboard shortcuts.)
To open the How To window: Do one of the following:
● Choose Help > How To > [topic].
● Choose a topic from a How To menu in the toolbar. To close the How To window:
Do one of the following:
● (Windows) Click the Hide button. ● (Mac OS) Click the Close button.
● (Mac OS) Control-click the How To toolbar (under the title bar), and choose Hide. To reposition the How To window:
In Windows, right-click the How To title bar, and choose either Docked Left or Docked Right.
In Mac OS, do any of the following:
● Control-click the How To toolbar (under the title bar), and choose either Docked Left or Docked Right.
● Drag the title bar of the How To window to the opposite side of the Adobe Reader window.
You can change the width of the How To window by dragging the separator bar. The vertical dimension adjusts to match any changes you make to the document pane. To navigate through the How To pages:
Use the Back button and the Forward button in the How To window to navigate among the pages you've viewed in your current session.
ADOBE READER ESSENTIALS
What's the difference between Adobe Acrobat and Adobe Reader? About Adobe PDF documents with additional usage rights
Viewing document properties Updating Adobe Reader
What's the difference between Adobe Acrobat and Adobe
Reader?
Adobe® Acrobat® and Adobe Reader are separate applications that let you open and view documents created in Adobe Portable Document Format (PDF). However, Adobe Acrobat lets you create PDF documents, add bookmarks and comments, change security settings, and edit PDF documents in other ways. Adobe Reader is free software that lets you open and view any PDF document.
There are two versions of Adobe Reader. The basic version contains a smaller set of features to allow for fast downloading, while the full version of Adobe Reader includes a broader version set, including the ability to search PDF files, play back embedded media clips, and support Digital Editions. Both versions of Adobe Reader are available from the Adobe web site (www.adobe.com) at no cost.
Related Subtopics:
Viewing PDF documents on the desktop or in a browser
You can open PDF documents in two different ways. One way is to open the PDF documents directly in the Adobe Reader application on your desktop. Another way is to open a PDF document that is posted on the Internet in your web browser. When you open a PDF document in your web browser, Adobe Reader tools appear within the web
browser. You can change preference settings to determine whether PDF documents on the web are opened in Adobe Reader on your desktop or in a web browser. (See Viewing
Adobe PDF documents in a web browser.)
To determine whether web-based PDF documents are opened within a browser:
1. Choose Edit > Preferences (Windows) or Adobe Reader > Preferences (Mac OS), and then click Internet.
2. Select Display PDF In Browser to open PDF documents on the web within the browser. Deselect this option if you want web-based PDF documents to open in Adobe Reader, not the browser.
About Adobe PDF documents with additional usage rights
Adobe Reader is free software that lets you open and view Adobe PDF documents. In most PDF documents, adding review comments requires Adobe Acrobat. However, you can add review comments in Adobe Reader if the PDF document includes additional usage rights. The Document Status dialog box indicates whether Comment & Markup features are enabled. The author of the PDF document determines whether the document includes additional usage rights.
To view additional usage rights in a PDF document:
Open a PDF document with additional usage rights, and do one of the following: ● View the rights in the yellow Document Message Bar just below the toolbars.
● Choose Document Status from the document pane pop-up menu in the upper right corner. To hide or show the Document Message Bar:
Open a PDF document with additional usage rights, and do one of the following: ● To hide the Document Message Bar, move the pointer over the horizontal bar that
separates the Document Message Bar from the document pane. Drag the bar up to the toolbar when the pointer icon changes to the Double Arrow icon.
● To show the Document Message Bar, move the pointer over the horizontal bar that separates the toolbar from the document pane. Drag the bar down when the pointer icon changes to the Double Arrow icon.
Viewing document properties
When you view a PDF document, you can get information on the file, such as the title, the fonts used, and security settings. Some of this information is generated when the PDF document is created, and some can added by the person who created the document. In Adobe Reader, you can view, but not edit, document properties.
To get information on the current document:
1. Choose File > Document Properties, or choose Document Properties from the document pane menu, which is located just above the vertical scroll bar.
2. Select a tab in the Document Properties dialog box:
● Description. (See Description document property settings.)
● Security. The Security panel describes what activities, if any, are not allowed. (See
Viewing the security settings of PDF documents.)
● Fonts. The Fonts panel lists the fonts and the font types used in the original document, and the fonts, font types, and encoding used to display the original fonts. If substitute fonts are used and you aren't satisfied with their appearance, you may want to install the original fonts on your system or ask the document creator to re-create the document with the original fonts embedded in it.
● Advanced. (See Advanced document property settings.) Related Subtopics:
Description document property settings Advanced document property settings
Description document property settings
The Description panel shows basic information about the document. The title, author, subject, and keywords may have been set by the person who created the document in the source application, such as Microsoft Word or Adobe InDesign®, or by the person who created the PDF document. In Adobe Reader, you cannot add to or edit this document information.
You can search for these description items in Adobe Reader to find particular documents. The Keywords section can be particularly useful for narrowing searches. (See About
searching text.) Note that many search engines use the title to describe the document in
their search results list. If a PDF file does not have a title, the file name appears in the results list instead. A file's title is not necessarily the same as its file name.
The Advanced group box shows which PDF version the document is created in, the page size, number of pages, and whether the document is tagged. This information is generated automatically and cannot be modified.
Advanced document property settings
The Advanced panel shows PDF settings and reading options:
● Base URL displays the base Uniform Resource Locator (URL) set for web links in the document. The base URL is not used if a link contains a complete URL address.
● Search Index displays the name of the autoindex associated with the file. (The autoindex is created in Acrobat.) Opening the file adds the associated index to the list of indexes that can be searched. (See Searching across multiple Adobe PDF documents.)
● The Trapped menu indicates whether trapping is applied to the file. Prepress software uses this information to determine whether to apply trapping at print time.
● Binding affects how the pages are arranged side by side when you view them using the Continuous - Facing page layout. (See Setting the page layout and orientation.) This is for matching the reading direction (left to right or right to left) of text in the document. Right Edge binding is useful for viewing Arabic or Hebrew text or vertical Japanese text.
● Language specifies the default language used in the document. (See Using a screen
Updating Adobe Reader
Adobe Reader files and components can be updated in a variety of ways. Some updates are available if you open an Adobe PDF document that triggers the updating process. For example, if you open a form that uses Asian-language fonts, Adobe Reader asks if you want to download the fonts. Other updates are available only from the Help menu, where you must manually install them. Some updates are available using either method.
You can also use the Updates panel in the Preferences dialog box to determine how to handle updates. Adobe Reader can automatically check for critical updates and
notifications once a month. Depending on your preference settings, Adobe Reader can download updates in the background when other web transactions, such as email, are inactive. In Windows, you can minimize the download dialog box to a status bar icon. When all the components have been downloaded, a Summary Install Now dialog box lets you choose which updates to install.
To set updating preference options:
1. Choose Edit > Preferences (Windows) or Adobe Reader > Preferences (Mac OS), and then select Updates on the left side of the dialog box.
2. Select an option to determine how to handle updates. If you select Do Not Automatically Check For Critical Updates, you should periodically check for updates manually by choosing Help > Check For Updates Now.
3. Click View Notifications to preview any notifications before deciding whether to update. Click OK to close the dialog box.
4. Click Installed Updates to view the names and descriptions of installed updates. If several versions of an update have been installed, only the latest version appears in the Installed Updates dialog box.
5. Deselect Display Notification Dialog At Startup if you don't want to be advised about available updates when you start Adobe Reader.
6. Deselect Display Installation Complete Dialog if you don't want to be advised when updates are successfully installed.
To manually update components:
1. Choose Help > Check For Updates Now.
2. Select updates from the column on the left, and click Add or Reinstall to move them to the column on the right. Only the updates and components appropriate for your platform and product are listed.
What's New in Adobe Reader 7.0
New features overview Additional language support Filling in forms
Reviewing and approving
Document security and digital signatures File attachments
New features overview
As with earlier versions of Adobe Reader, the free Adobe Reader 7.0 software allows you to open and read any PDF document and fill in PDF forms. But Adobe Reader 7.0 also offers significant new features and enhancements that greatly extend the flexibility of Adobe PDF documents. If the creator of an Adobe PDF document has assigned it additional usage rights, more tools and features are available to users of Adobe Reader, allowing you to save form data, sign documents, participate in email and browser-based document reviews, and attach PDF and non-PDF files to a PDF document. If you open a document that has these additional usage rights, a Document Message Bar displays the additional tools required to work with the document.
Language support has been extended, a new autosave feature guards against losing your work in case of a power failure, and new accessibility features make Reader even easier to use for motor- and vision-impaired users. Depending on your preference settings, Adobe Reader can automatically download updates in the background, even while other web transactions are occurring.
Additional language support
The extended language support in Adobe Reader 7.0 allows you to view, search, and print PDF documents that contain Central and Eastern European languages. Forms entry,
comments, and digital signatures are also supported in these languages. If you open a document that requires the installation of additional fonts, you are prompted to install the appropriate language font kit using the Check For Updates Now command.
Filling in forms
If a PDF form contains interactive form fields, you can fill in the form electronically and submit the form by email or over the web. Reader also lets you spellcheck your entries. If the form author added special usage rights to the PDF document, you can also save the form data.
PDF forms may contain bar code form fields that typically appear as a series of vertical bars with a unique set of characters underneath the bars. You can't manually enter data into the bar code form field, but the bars and characters of these interactive barcode fields change to encrypt the data that you've entered into other form fields in the PDF.
Reviewing and approving
If the creator of the PDF document assigned additional usage rights, you can review PDF documents via email or the web. (In Mac OS, browser-based reviews are supported through Safari.) You're provided with a Commenting toolbar and--if you're part of a tracked review--specific instructions for opening the document, adding comments, and returning the document to the review initiator.
You can add your comments as a file attachment, or record an audio comment if there's a microphone connected to the computer. A new Callout tool lets you create text box markups that point to specific areas of a PDF document. And you can group markups so that your comments behave as a single comment. A comments tab gives you easy access to your own and other reviewers' comments.
In the Asian (Traditional Chinese, Simplified Chinese, Japanese, and Korean) version of Adobe Reader 7.0, you may also be invited to participate in a workflow that requires approval from multiple branches of an organization. In this type of workflow, PDF documents are sent to participants in sequential order. (Only users of Acrobat 7.0 Professional can organize a tracked review.)
Document security and digital signatures
With Adobe Reader 7.0, you may receive an Adobe PDF document with attachments that are bundled into a secure electronic envelope (eEnvelope) designed to protect documents during transit. When you open the eEnvelope, you can extract the file attachments and save them to disk. The saved files are identical to the original file attachments and are no longer encrypted when saved.
Acrobat 7.0 users can create Adobe PDF documents using security policies that can expire and revoke documents, as well as maintain accountability by keeping track of who opens protected documents. You can only open these secure PDF documents if you have the necessary passwords or are on the list of approved recipients.
You can sign a PDF document only if the document includes additional usage rights assigned by the creator of the document.
File attachments
Acrobat 7.0 users can attach non-PDF and PDF files or pages from files to their Adobe PDF documents. If you move one of these PDF documents, the attached files or pages automatically move with the document. If the creator of the PDF file has assigned additional usage rights, you can attach files, edit attached files, and save your edits. A description of each attached file appears in the Attachments tab of the navigation pane.
Additional new features
Adobe Reader 7.0 includes many other new and enhanced features to improve how you work.
Updates
Depending on your Updates preferences, Adobe Reader can automatically check for critical updates and notifications. If you disable this feature, you can manually check for updates by choosing Help > Check For Updates Now.
Find toolbar
The Find toolbar provides a basic set of options for searching for text in the active Adobe PDF document. You can locate a word, series of words, or partial word.
Recover your work
The Autosave feature guards against losing your work in case of a power failure by
incrementally saving file changes to a specified location. The original file is not modified. (Autosave is available only for documents that have additional usage rights.)
View 3D content
The 3D plug-in allows you to view and navigate embedded 3D content in PDF files. Now, you can experience high-quality 3D environments with realistic lighting and motion. Acrobat 7.0 Professional is required to embed 3D content.
Set up for accessibility
For vision- and motor-impaired users, a new Accessibility Setup Assistant makes it easy to change how PDF documents appear on-screen and how they're read by a screen reader, screen magnifier, or other assistive technology. In Windows, this wizard starts
automatically the first time Adobe Reader detects assistive technology on your system. In Mac OS, you can start the wizard from a menu.
Read Out Loud
You can use the Read Out Loud feature to read form fields out loud as you tab through them.
Improved Help
The Help system has been improved for vision- and motion-impaired users. Subscribe to digital periodicals and journals
Periodicals can be obtained in the same way as Digital Editions. When you subscribe to a digital periodical and download the first issue, Adobe Reader asks you how often to check for the availability of subsequent issues.
Overprint preview
The Overprint Preview mode lets you see (on-screen) the effects of ink aliasing in the printed output. A prepress service provider may create an ink alias if a document contains two similar spot colors and only one is required, for example. Spot colors aliased to other spot colors or to process colors are reflected directly in the open document.
View PDF documents in the browser (Mac OS)
Adobe Reader works automatically with Safari to make viewing Adobe PDF documents on the web easy. The first time you open Adobe Reader, your system automatically is configured to use Adobe Reader to open PDF files in your browser.
Looking at the Work Area
About the work area Opening documents Navigating in documents
Adjusting the view of documents Customizing the work area Setting preferences
Viewing Adobe PDF documents in a web browser
About the work area
The Adobe Reader window includes a document pane that displays Adobe PDF documents. On the left side is a
navigation pane that helps you browse through the current PDF document. Toolbars at the top of the window and
the status bar at the bottom of the window provide other controls that you can use to work with PDF documents. You can also open a How To window on the right side with an overview of common tasks.
Reader work area A. Toolbars B. Document pane C. Navigation pane (Bookmarks tab displayed) D. Status bar E. How To window
Related Subtopics:
Using the navigation tabs Using context menus Using toolbars Selecting tools
Using the navigation tabs
Tabs display such items as a document's bookmarks, page thumbnails, and articles. Tabs are displayed in the navigation pane on the left side of the work area or in floating panels. To show or hide tabs in the navigation pane:
Do one of the following:
● Move the pointer over the vertical bar that separates the document pane from the
navigation pane. Click the bar when the pointer icon changes to the Double Arrow icon . ● Choose View > Navigation Tabs, and then choose the desired tab from the menu.
● Click the tab name on the left side of the document pane.
Note: The creator of the Adobe PDF document may set the contents of the navigation tabs. In some cases, a tab may not contain any content.
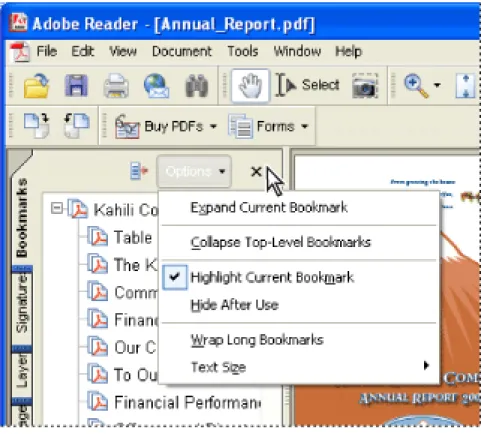
To choose a command from a tab Options menu: 1. Click a tab to open the navigation pane.
2. At the top of the tab, click Options to open the menu, and choose the command you want. The commands vary, depending on which tab is displayed. To close the menu without choosing a command, click anywhere outside the menu or press Esc.
Click the triangle next to Options to open the menu.
You can also choose commands from the document pane menu. Click the triangle just above the scroll up arrow on the right to open the menu, and then choose a command.
Using context menus
Adobe Reader provides context-sensitive menus that display commands for the particular item under the pointer. For example, you can right-click (Windows) or Control-click (Mac OS) the toolbar area to display a context menu that contains toolbar options and the most commonly used toolbars.
To choose a command from a context menu:
1. Position the pointer over an item in the work area, such as a comment, toolbar, bookmark, or document page.
2. Right-click (Windows) or Control-click (Mac OS) to open the context menu, and then choose the command you want.
Using toolbars
The Adobe Reader toolbar area includes a set of toolbars, some of which appear by default and some of which are hidden.
Toolbars open by default A. File toolbar B. Basic toolbar C. Zoom toolbar D. Rotate View toolbar E. Tasks toolbar
Hold the pointer over the tool to see the name of the tool. Hold the pointer over the gripper bar on the left edge of a toolbar to see the name of the toolbar.
To show or hide toolbars: Do any of the following:
● Choose View > Toolbars, and then select the toolbar you want to show or hide. A check mark next to the toolbar name indicates that the toolbar is displayed.
● Choose Tools, select the appropriate topic, and choose Show [toolbar name] Toolbar.
● Right-click (Windows) or Control-click (Mac OS) the toolbar area, and then select the toolbar you want to show or hide.
● To hide all toolbars, choose View > Toolbars > Hide Toolbars. Choose Show Toolbars to display them again.
● Choose View > Toolbars > Reset Toolbars to display the default set of toolbars.
Selecting tools
As a general rule, you should use the Hand tool when browsing through PDF documents. However, you can select a number of other helpful tools from the toolbars. Note: You may notice that certain tools, such as commenting tools, are available in some documents but not in others. When you open a document with additional usage rights, the tools that you need to work with the document are added to the work area. (See About
Adobe PDF documents with additional usage rights.)
To select a tool:
Do one of the following:
● From the Tools menu, choose the toolbar name, and then choose the tool.
● To select a visible tool in a toolbar, click the tool, or press the appropriate keystroke. (See
Keys for selecting tools.)
● To select the Hand tool temporarily, without deselecting the current tool, hold down the spacebar.
● To select the Zoom In tool temporarily, press Ctrl (Windows) or Command (Mac OS) and hold down the spacebar.
● To select a hidden tool, hold down the mouse button on either the related tool or the triangle next to the related tool until the additional tools appear, and then drag to the tool you want.
● To replace a visible tool with a hidden tool, click the related tool or the triangle next to it until the additional tools appear, and click the name of the hidden tool.
● To display hidden tools alongside the other tools, click the related tool or the triangle next to it and choose Expand This Button. To collapse the hidden tools, click the left-pointing arrow to the right of the expanded button.
Using the Properties toolbar
The Properties toolbar is especially useful when you open a document with additional usage rights. The item selected in the document pane determines the contents of the Properties toolbar. For example, if you select a note comment, the Properties bar displays the properties of the note.
When the Properties toolbar is displayed, it appears by default as a floating toolbar. If you prefer, you can dock it next to the other toolbars by dragging it into the toolbar area.
To show or hide the Properties toolbar:
1. Select the object, such as a note comment, that contains the properties you want to edit. 2. Do one of the following:
● Choose View > Toolbars > Properties Bar.
● Right-click (Windows) or Control-click (Mac OS) the toolbar area, and choose Properties Bar from the context menu.
If you want to change properties other than those listed on the Properties toolbar, right-click (Windows) or Control-click (Mac OS) the object, and choose Properties.
Opening documents
You can open an Adobe PDF document from your email application, from your file system, from within a web browser, or by choosing File > Open in Adobe Reader. The initial view of the PDF document depends on how its creator set the document properties. For example, a document might open to a particular page or at a particular magnification. The creator of the PDF document may have enabled additional usage rights that let you participate in a document review, create comments, fill in forms, and sign documents. (See About Adobe PDF documents with additional usage rights.)
When someone sends you a restricted PDF document, you may need to enter a password to open it. If a document is encrypted, you may not be able to open it without permission from the person who created the document. In addition, restricted or certified documents may prevent you from printing a file or copying information to another application. If you're having trouble opening a PDF document, or if you're restricted from using certain features, contact the author of the PDF document. For information on opening documents to which security has been applied, see About security.
If a document is set to open in Full Screen view, the toolbar, command bar, menu bar, and window controls are not visible. You can exit Full Screen view by pressing the Esc key, if your preferences are set this way, or by pressing Ctrl+L (Windows) or Command+L (Mac OS). (See Reading documents in Full Screen view.)
To open a PDF document from within Adobe Reader: 1. Do one of the following:
● Choose File > Open, or click the Open button in the toolbar. In the Open dialog box, select one or more file names, and click Open. PDF documents usually have the extension . pdf.
● Drag the PDF file into the Adobe Reader window.
● (Windows) From the File menu, choose a previously opened document's file name. ● (Mac OS) Choose File > Open Recent File, and then choose the document's file name. 2. If the Document Message Bar appears when a PDF document is opened, the document has
a special status or special features. For example, it may be certified or signed, or it may include additional usage rights. The bottom left corner of the status bar displays icons that represent the special status. You can click any of these to view the document status.
If more than one document is open, you can switch between documents by choosing the document name from the Window menu. In Windows, Adobe Reader places a button for each open window on the Windows taskbar. You can click this button to move
between open documents.
To open a PDF document from outside Adobe Reader: Do one of the following:
● Open the PDF attachment from within an email application. In most email applications, you can double-click the attachment icon to open the document.
● Click the PDF file link in your web browser. The PDF document may open within your web browser. In this case, use the Adobe Reader toolbars to print, search, and work on your PDF documents, because the menu commands may apply to the browser and not to the PDF document. (See Viewing Adobe PDF documents in a web browser.)
● Double-click the PDF file icon in your file system.
Note: In Mac OS, you might not be able to open a PDF document created in Windows by double-clicking the icon. If double-clicking the icon in Mac OS does not open the
document, use File > Open in Adobe Reader, or drag the PDF file icon into the Adobe Reader window.
Related Subtopics:
Saving Adobe PDF documents
You can save a copy of an Adobe PDF document, or if the creator of the document enabled additional usage rights, you can save comments, entries in form fields, or digital signatures that you have added to a document. If a document contains additional usage rights, you are advised what privileges have been assigned when you open the document. (See About Adobe PDF documents with additional usage rights.)
If the file permissions allow it, you can also save the contents of a PDF document in text format. This allows you to easily reuse the text from a PDF document and to use the content with a screen reader, screen magnifier, or other assistive technology.
To save a copy of an Adobe PDF document: 1. Choose File > Save A Copy.
2. In the Save A Copy dialog box, enter the file name and location, and click Save. You can save the file only in PDF format.
To save comments, form field entries, and digital signatures: Do one of the following:
● Choose File > Save to save changes to the current file. ● Choose File > Save As to save changes to a new file.
Note: If you are viewing a document with additional usage rights in a browser, you can only use the Save A Copy command.
To save an Adobe PDF document as a text file: 1. Choose File > Save As Text.
2. In the Save As Text dialog box, enter the file name and location, and click Save. Your file is saved with the .txt extension.
Note: This command appears only in the full version of Adobe Reader.
When you are working on a document to which additional usage rights have been assigned, Adobe Reader automatically saves your work every 5 minutes. You change how often Adobe Reader saves your work in the General Preferences.
Navigating in documents
You can navigate in Adobe PDF documents by paging through them or by using
navigational tools such as bookmarks, thumbnail pages, and links. You can also retrace your steps through documents to return to where you started.
Related Subtopics:
Paging through documents Retracing your viewing path Navigating with bookmarks Viewing layers
Navigating with page thumbnails Navigating with reviewer comments Navigating with links
Navigating documents with file attachments Reading article threads
Paging through documents
The navigation controls in the status bar at the bottom of the window provide a quick way to navigate through documents. In addition, you can use menu commands, the Navigation toolbar, and keyboard shortcuts for paging through a PDF document.
Navigation controls A. First Page button B. Previous Page button C. Current page D. Next Page button E. Last Page button F. Go To Previous View button G. Go To Next View button
To go to another page:
Do one of the following:
● To go to the first or last page, click the First Page button or the Last Page button in the status bar, or choose View > Go To > First Page or Last Page.
● To go to the next or previous page, click the Next Page button or the Previous Page button on the status bar, or choose View > Go To > Next Page or Previous Page. ● To retrace your viewing path, click the Go To Previous View button or the Go To
Next View button .
● If you are in Fit Page view and the page layout is set to single page, press the Up Arrow or Down Arrow key to move up or down a page. (See Setting the page layout and
orientation.)
To learn shortcut keystrokes for paging through documents, see About keyboard
shortcuts.
To use the Navigation toolbar:
1. If the Navigation toolbar isn't open, either choose View > Toolbars > Navigation or right-click (Windows) or Control-right-click (Mac OS) the toolbar area, and then choose Navigation. 2. Click the buttons to move forward or backward through your document.
To jump to a page by its number: Do one of the following:
● Choose View > Go To > Page, type the page number, and click OK.
● Drag the vertical scroll bar until the number of the page you want to jump to appears. ● Select the current page number in the status bar, type the page number to jump to, and
press Enter or Return.
Note: If your document's page numbers are different from the actual page position in the PDF file, the page position may appear in parentheses in the status bar. For example, if the first page of an 18-page chapter begins numbering at 223, the numbering might appear as 223 (1 of 18). You can double-click inside the parentheses, change the page-position number, and press Enter or Return to go to that page. For information on turning on and off logical page numbers, see Page Display preferences.
To automatically scroll through a document: 1. Choose View > Automatically Scroll. 2. Press Esc to stop scrolling.
Retracing your viewing path
After you have navigated through documents, you can retrace your path back to where you started.
To retrace your viewing path: Do one of the following:
● To retrace your path within an Adobe PDF document, choose View > Go To > Previous View or Next View. The Next View command is available only if you have chosen Previous View.
● If you're viewing the PDF document in a browser, use options on the Navigation toolbar to move between views. Right-click (Windows) or Control-click (Mac OS) the toolbar area, and then choose Navigation. Click the Go To Previous View button or the Go To Next View button .
● To retrace your viewing path through other PDF documents, choose View > Go To > Previous Document or Next Document. These commands open the other PDF documents if the documents are closed.
Navigating with bookmarks
Bookmarks provide a table of contents and usually represent the chapters and sections in a document. Bookmarks appear in the navigation pane. The creator of the Adobe PDF
document determines which bookmarks appear.
Bookmarks tab A. Bookmarks tab B. Expanded bookmark C. Click to display bookmark Options menu.
To browse using a bookmark:
1. Click the Bookmarks tab on the left side of the window, or choose View > Navigation Tabs > Bookmarks to display bookmarks.
2. To jump to a topic using its bookmark, click the bookmark. Click the plus sign (+) next to a parent bookmark to expand it. Click the minus sign (-) next to a bookmark to hide its children.
Note: Clicking a bookmark might perform an action instead of taking you to another location. It depends on how the bookmark was defined.
If the list of bookmarks disappears when you click a bookmark, click the Bookmarks tab to display the list again. If you want the Bookmarks tab to always remain open after you click a bookmark, click the Options menu at the top of the Bookmarks tab, and make sure that Hide After Use is not selected.
Viewing layers
Some applications, such as Adobe InDesign, AutoCAD, and Visio, allow layers to be added to documents. When such documents are exported to Adobe PDF, these layers appear in the Layers tab. You cannot create layers in Adobe Reader. However, you can examine layers and show or hide the content associated with each layer by using the Layers tab in the navigation pane.
Layers tab A. Eye icon indicates a displayed layer. B. Hidden layer
You can select or copy content in a layered Adobe PDF document using the Select tool or the Snapshot tool.
A Lock icon in the Layers tab indicates that a layer is for information only. The layer's visibility cannot be changed.
To view layers:
1. Click the Layers tab on the left side of the window, or choose View > Navigation Tabs > Layers.
2. Click the eye icon to hide a layer's content. Click the empty box to show a hidden layer's content. A layer is visible when the eye icon is present, and hidden when the eye icon is absent. This setting temporarily overrides the settings in the Layer Properties dialog box.
3. From the Options menu in the Layers tab, do any of the following:
● Choose List Layers For All pages to show every layer across every page of the document. ● Choose List Layers For Current Page to show layers only on the currently visible page. ● Choose Reset To Initial Visibility to reset layers to their default state.
● Choose Apply Layer Overrides to display all layers. This option affects all optional content in the PDF document, even layers that are not listed in the layers tab. All layers are visible, regardless of the settings in the Layers Properties dialog box. You cannot change layer visibility using the eye icon until you toggle this command off.
Navigating with page thumbnails
Page thumbnails provide miniature previews of document pages. You can use thumbnails
in the Pages tab to change the display of pages and to go to other pages. The red page-view box in the page thumbnail indicates which area of the page appears. You can resize this box to change the zoom percentage. (See Magnifying and reducing the view.)
To browse using page thumbnails:
1. Click the Pages tab on the left side of the window, or choose View > Navigation Tabs > Pages to display the Pages tab.
Navigating with reviewer comments
To view a list of comments in a PDF document, click the Comments tab on the left side of the document window. To browse through the comments, click a comment in the list, or click the Next button or the Previous button to go to the next or previous
comment. (These buttons are unavailable if no comment is selected.) The page on which the selected comment is located appears in the document pane, and the selected comment scrolls into view. To go to the page where another comment is located, simply click the comment in the list.
Navigating with links
Clicking a link in a PDF document is like clicking a link on a website. Links take you to another location in the current document, to other documents, or to websites. The PDF document creator determines what links look like in the PDF document.
Clicking a link can also open file attachments, and play 3D content, movies, and sound clips. To play these media clips, you must have the appropriate hardware and software installed. For information on changing multimedia preferences, see Setting Multimedia
preferences.
Note: If you have not downloaded the full version of Adobe Reader, you cannot play media clips.
To follow a link:
1. Select the Hand tool .
2. Position the pointer over the linked area on the page until the pointer changes to the hand with a pointing finger. (The hand has a "W" if the link points to the web.) Then click the link.
Note: Some links work correctly only if the Automatically Detect URLs From Text option is selected in the General preferences.
Navigating documents with file attachments
The creator of a PDF document can attach PDF and non-PDF files to the document. If you open a PDF document that has files attached, the Attachment icon appears in the status bar at the bottom of the Adobe Reader window. Attached files are listed in the Attachments tab in the navigation pane. You can open these files for viewing, edit the file attachments and save your changes to the file attachment. (See Opening and saving
Reading article threads
Articles are electronic threads created by the PDF creator that lead you through a
document. An article typically begins on one page and continues on a different page later in the document, in the same way as articles skip pages in traditional newspapers and magazines. When you read an article, the page view zooms in or out so that the current part of the article fills the screen.
To read an article:
1. Do one of the following:
● Choose View > Navigation Tabs > Articles to open the Articles tab. Then double-click the article's icon to start reading the article.
Note: You cannot open the Articles tab if you are viewing the PDF document inside a browser.
● Select the Hand tool , and then click anywhere in the article to start reading it at that point.
2. The pointer changes to the follow-article pointer . Do any of the following to navigate through the article:
● To go to the next page in the article, press Enter or Return or click.
● To go backwards through the document, one page at a time, Shift-click in the article, or press Shift+Return.
● To go to the beginning of the article, Ctrl-click (Windows) or Option-click (Mac OS) in the article.
3. When you reach the end of the article, the pointer changes to the end-article pointer . Press Return, or click to return to the view displayed before you started reading the article.
Adjusting the view of documents
Adobe Reader provides tools that help you adjust the view of your Adobe PDF
documents, including simple tools, such as Zoom In and Zoom Out, and more advanced tools. You can also adjust the view by rotating pages and determining whether you'll see one page at a time or a continuous flow of pages.
Related Subtopics:
Adjusting the page position
Magnifying and reducing the view Setting the page layout and orientation Reading documents in Full Screen view Reading documents in read mode
Adjusting the page position
Use the Hand tool to move around the page so that you can view all the areas of it. Moving an Adobe PDF page with the Hand tool is like moving a piece of paper on a desk with your hand.
To adjust the page position: 1. Select the Hand tool. 2. Do either of the following:
● Drag the page up or down.
● If the page is zoomed in to a high magnification, drag the page left or right to view a different area.
Magnifying and reducing the view
The toolbar and status bar offer several methods for magnifying the view of PDF documents. ● The Zoom In and Zoom Out tools let you change the document's magnification.
● The Dynamic Zoom tool lets you zoom in or out by dragging the mouse or mouse wheel up or down.
Magnification options on toolbar A. Zoom In tools B. Fit Width button C. Zoom menu D. Zoom In button To increase or decrease magnification:
Do one of the following:
● Click the Zoom In button or the Zoom Out button in the toolbar, or select a magnification percentage from the toolbar menu.
● From the Zoom menu in the toolbar, choose the Zoom In tool or the Zoom Out tool , and then click the page. To zoom in on a specific area, use the Zoom In tool to draw a rectangle. When you're finished zooming, you may want to select the Hand tool.
● Click the magnification percentage area in the toolbar, type a new percentage, and press Enter or Return. ● From the Zoom menu in the toolbar, select the Dynamic Zoom tool , and then drag up to zoom in to
the area where you begin dragging, or drag down to zoom out from that location. If your mouse has a mouse wheel, you can roll it forward to zoom in or backward to zoom out.
When the Zoom In tool is selected, you can hold down Ctrl (Windows) or Option (Mac OS) while clicking or dragging to zoom out. When the Zoom Out tool is selected, hold down Ctrl or Command to zoom in. With either zoom tool, hold down Shift to use the Dynamic Zoom tool.
To change the magnification level using a page thumbnail:
1. Click the Pages tab on the left side of the window to view the page thumbnails. Each thumbnail represents a page.
2. Locate the thumbnail for the current page, and then position the pointer over the lower right corner of the page-view box until the pointer changes.
3. Drag the corner of the box to reduce or expand the view of the page.
A page-view box in a page thumbnail indicates the area of the page currently showing in the document pane. To resize a page to fit the window:
Do one of the following:
● To resize the page to fit entirely in the window, choose View > Fit Page, or click the Fit Page button on the toolbar.
● To resize the page to fit the width of the window, choose View > Fit Width, or click the Fit Width button on the toolbar. Part of the page may be out of view.
● To resize the page so that its text and images fit the width of the window, choose View > Fit Visible. Part of the page may be out of view.
To see keyboard shortcuts for resizing the document, open the View menu and notice the shortcuts for each command.
To return a page to its actual size:
Choose View > Actual Size, or click the Actual Size button on the toolbar. The actual size for a PDF page is typically 100%, but the document may have been set to another magnification level when it was created.
Setting the page layout and orientation
Changing the page layout is especially useful when you want to zoom out to get an overview of the document layout. You can use the following page layouts when viewing Adobe PDF documents:
● Single Page displays one page in the document pane at a time. ● Continuous arranges the pages in a continuous vertical column.
● Facing arranges the pages side by side, displaying only one or two pages at a time.
● Continuous - Facing arranges the pages side by side in a continuous vertical column. If a document has more than two pages, the first page appears on the right to ensure proper display of two-page spreads.
Single Page, Continuous, Continuous - Facing, and Facing layouts compared
For information on determining how pages are arranged when you use Continuous - Facing layout, see Viewing
document properties.
To set page layout:
1. Do one of the following:
● Choose View > Page Layout, and then choose Single Page, Continuous, Facing, or Continuous - Facing. ● Click the Single Page button , the Continuous button , the Continuous - Facing button , or the Facing
button in the status bar.
2. If necessary, choose View > Fit Page to display the document in the current page layout.
In Single Page layout, choosing Edit > Select All selects all text on the current page. In other layouts, Select All selects all text in the PDF document.
To rotate the page view:
Choose View > Rotate View > Clockwise or Counterclockwise. You can change the view of a page in 90-degree increments. This changes the view of the page, not its actual orientation, and the change in view cannot be saved.
Reading documents in Full Screen view
In Full Screen view, Adobe PDF pages fill the entire screen; the menu bar, command bar, toolbar, status bar, and window controls are hidden. A document creator can set a PDF document to open in Full Screen view, or you can set the view for yourself. Full Screen view is often used for presentations, sometimes with automatic page advancement and transitions.
The pointer remains active in Full Screen view so that you can click links and open notes. You can use keyboard shortcuts for navigational and magnification commands and the Full Screen preferences let you display a navigation bar in Full Screen view. (See Full
Screen preferences.)
To read a document in Full Screen view:
Click the Full Screen View icon on the status bar at the bottom left of the Adobe Reader window. Press Enter or Return or the Down Arrow or Right Arrow key to page through the document. Press Shift+Return or the Up Arrow or Left Arrow key to page backward through the document.
Note: If you have two monitors installed, the Full Screen view of a page may appear on only one of the monitors. To page through the document, click the screen displaying the page in Full Screen view.
To exit Full Screen view:
Press Esc, if Escape Key Exits is selected in the Full Screen preferences, or press Ctrl+L (Windows) or Command+L (Mac OS). If the full screen navigation bar appears, you can also click the Exit Full Screen button .
Reading documents in read mode
The read mode is designed to give you a clean work area for when you're simply reading PDF documents. Click the Hide Toolbars button to retain the menu bar and the
navigation pane and move a limited selection of tools to the status bar at the bottom of the work area. After you click the Hide Toolbars button, a tools menu and zooming features appear to the right of the Hide Toolbars button. Click the tools menu to select a tool. For information on using the Hand tool, see Adjusting the page position; for the zoom tools,
see Magnifying and reducing the view; for the Select tool, see Copying text, tables, and
images.
Customizing the work area
You can change the appearance of the work area to better suit your working style. For example, you can change the appearance and location of toolbars and the navigation pane and lock their position on the desktop. The work area that you create becomes the default work area on your system until you change it.
To show or hide the menu bar:
To hide the menu bar, choose View > Menu Bar. To show it again, press F9. To change the display of a navigation tab:
Do one of the following:
● To change the width of the navigation pane, drag its right border.
● To move a tab to its own floating panel, drag the tab from the navigation pane to the document pane.
● To move a tab to an existing floating panel or to the navigation pane, drag the tab to the floating panel or the navigation pane.
● To collapse a floating panel to show only the tabs, click the tab name at the top of the window. Click the tab name again to return the panel to its full size.
To show or hide tool labels: Do one of the following:
● Choose View > Toolbars > Show Button Labels > [option].
● Choose Edit > Preferences (Windows) or Adobe Reader > Preferences (Mac OS), and select General. For Show Tool And Property Button Labels, select Default Labels, All Labels, or No Labels. Click OK.
Note: Tool labels are turned off selectively, regardless of preference settings, when space in the toolbar area becomes limited.
To move a toolbar:
Do one of the following:
● To move a toolbar in the toolbar area, drag the toolbar by the separator bar, which is located at the left edge of a toolbar.You can move the toolbar within the toolbar area, or you can drag the toolbar into the document pane to create a floating toolbar. You can drag the bar back to its original location.
● To move a floating toolbar to any other location, drag the toolbar by its title bar.
Moving a section of tools from the toolbar area To lock or unlock the position of toolbars:
Choose View > Toolbars > Lock Toolbars.
The separator bars disappear when toolbars are locked.
Note: Lock Toolbars only locks the position of toolbars in the toolbar area. Floating toolbars are not locked in position.
To dock toolbars:
Choose View > Toolbars > Dock All Toolbars to expand and dock all floating toolbars in their default location in the toolbar area. If necessary, the toolbar area expands to three lines, and toolbar labels are hidden selectively to save space.
To return toolbars to their default configuration: Choose View > Toolbars > Reset Toolbars.
Setting preferences
You can use the Preferences dialog box in Adobe Reader to define a default page layout and customize your application in many other ways. These preferences control the application on your system; they are not associated with a particular Adobe PDF document.
To set preferences:
1. Do one of the following:
● Choose Edit > Preferences (Windows) or Adobe Reader > Preferences (Mac OS). ● Choose Preferences from the document pane menu.
2. In the Preferences dialog box, select one of the preference categories from the list at the left.
3. Select preference options for that feature, and then click OK. Click Cancel to leave the settings unchanged.
Related Subtopics:
Setting preferences for visually impaired users Preference categories
Startup preferences Page Display preferences General preferences Full Screen preferences
Setting preferences for visually impaired users
Vision- and motor-impaired users can use the Accessibility Setup Assistant to change the way that PDF documents appear on-screen and how they're read by assistive technology. (See Setting accessibility preferences.) Single-key accelerators and keyboard shortcuts make document navigation simpler. For common keyboard shortcuts, see About keyboard
Preference categories
You set the preference options by category. 3D
Sets preferences for viewing 3D files. This preference is available in full version of Adobe Reader.
Accessibility
Sets preferences for making Adobe PDF documents easier to access for vision- and motion-challenged users. (See Setting accessibility preferences.)
Forms
Sets preferences for the appearance and functionality of forms. (See Setting Forms
preferences.)
Full Screen
Sets preferences for navigation, transitions, and mouse behavior when documents are viewed in full screen mode. (See Full Screen preferences.)
General
Sets miscellaneous preferences, including display and text and image selection preferences. (See General preferences.)
Identity
Sets preferences for personal information used for authorship and digital signatures. International
Sets the language used in Adobe Reader or lets you choose the language each time you start Adobe Reader. You can control the default paragraph direction and turn on options for right-to-left languages.
Internet
Sets web browser and Internet connection options. You can set preferences to check your default browser settings for compatibility with the application each time the application starts, and you can choose a connection speed that is used by the multimedia plug-in. This is also where you set your Internet connection setting. (For more information on setting up Adobe Reader as a helper application in Windows, see Viewing Adobe PDF documents in
a web browser.)
JavaScript
Sets preferences for enabling JavaScript. To access the JavaScript Reference Guide, go to http://partners.adobe.com/ans/developer/acrosdk/main.html (English only) on the Adobe website.
Multimedia
Sets the preferred media player to play 3D content, movies, and sound clips, as well as other multimedia options. (See Setting Multimedia preferences.)
Page Display
Sets options that define the page display, including smoothing text, line art, and images, as well as determining whether CoolType is used. Smoothing the edges of text and
monochrome images minimizes the contrast between the background and the text or image, which sometimes improves the quality of the display on-screen, especially with larger text sizes. CoolType lets you adjust text display to work optimally with your monitor. (See Page Display preferences.)
Reading
Sets read-out-loud options, such as pitch, volume, and speed, for speech used in voice delivery, as well as reading order and screen reader options. (See Setting Reading
preferences.)
Search
Sets preferences for index-based searches and fast find. (See Setting Search preferences.) Security
Sets the preferred security handler and the preferences for creating and managing digital signatures and their appearance. (See Setting Digital Signature preferences.)
Spelling
Sets preferences for the spell checker and determines whether spelling is checked during typing. (See Setting Spelling preferences.)
Startup
Sets preferences for opening the application and opening documents. (See Startup
preferences.)
Trust Manager
Sets permissions for trusted entities. (See Setting Trust Manager preferences.). Units
Sets the page units. Updates
Startup preferences
The Startup panel of the Preferences dialog box defines how documents open and how the application starts. It includes the following options:
Maximum Documents In Most-Recently Used List
Sets the maximum number of documents listed in the File menu (Windows) or when you choose File > Open Recent File (Mac OS). The default is five for Windows and nine for Mac OS.
Reopen Documents To Last Viewed Page
Determines whether documents open automatically to the last viewed page within a work session.
Use Page Cache
Places the next page in a buffer even before the current page is viewed to reduce the amount of time required to page through a document.
Allow Layer State To Be Set By User Information
Allows the author of a layered PDF document to specify layer visibility based on user information.
Display The Document Status Dialog When These Status Items Appear
Determines which documents automatically show a status dialog box when they are opened.
Display Splash Screen
Determines whether the application splash screen appears each time the application starts. Use Only Certified Plug-ins
Ensures that only Adobe-certified third-party plug-ins are loaded. Show Messages And Automatically Update
Page Display preferences
The Page Display panel of the Preferences dialog box includes the following options for the appearance of pages:
Default Page Layout
Sets the page layout used for scrolling when you first open a document. Automatic uses the document setting.
Display Large Images
Displays large images. If your system is slow to display image-intensive pages, you may want to make sure that this option is not selected.
Display Page To Edge
Eliminates the thin white border that appears around the edge of Adobe PDF pages created by some applications. If you do not select this option, pages print with a white border, as defined by the printer driver.
Display Transparency Grid
Displays a grid behind transparent objects. Use Logical Page Numbers
Enables you to use the Number Pages command to display Adobe PDF page numbering that matches the numbering printed on the pages. A page's number, followed by the page position in parentheses, appears in the status bar and in the Go To Page and Print dialog boxes. For example, if the first page in a document is numbered "i", it might appear as "i (1 of 10)". If this option is not selected, page numbering information in documents is ignored and pages are numbered using arabic numbers starting at 1. Selecting this option should alleviate most cases of unexpected Go Back behavior in your web browser.
Use CoolType
Adjusts text display to work optimally with your monitor. Overprint Preview
Turns overprint preview on or off. The Overprint Preview mode lets you preview (on-screen) the effects of ink aliasing in the printed output. A printer or service provider may create an ink alias if a document contains two similar spot colors and only one is required, for example.
Smooth Text, Line Art, and Images
Select whether to smooth text, line art, or images. The default is to smooth both text and images.
Use Greek Text Below
Displays text below the designated point size as gray lines (or greeked text) to speed display time.
Use System Setting
Uses the system settings for monitor resolution. Custom Resolution
Sets the monitor resolution. Default Zoom
Sets the magnification level for PDF documents when they are first opened. This value overrides document settings. Automatic uses the setting of the PDF document.
Max Fit Visible Zoom