Learn Microsoft
®
Kinect API
Copyright © 2012 by Rob Miles
All rights reserved. No part of the contents of this book may be reproduced or transmitted in any form or by any means without the written permission of the publisher.
ISBN: 978-0-735-66396-1 1 2 3 4 5 6 7 8 9 LSI 7 6 5 4 3 2
Printed and bound in the United States of America.
Microsoft Press books are available through booksellers and distributors worldwide. If you need support related to this book, email Microsoft Press Book Support at [email protected]. Please tell us what you think of this book at http://www.microsoft.com/learning/booksurvey.
Microsoft and the trademarks listed at http://www.microsoft.com/about/legal/en/us/IntellectualProperty/ Trademarks/EN-US.aspx are trademarks of the Microsoft group of companies. All other marks are property of their respective owners.
The example companies, organizations, products, domain names, email addresses, logos, people, places, and events depicted herein are fictitious. No association with any real company, organization, product, domain name, email address, logo, person, place, or event is intended or should be inferred.
This book expresses the author’s views and opinions. The information contained in this book is provided without any express, statutory, or implied warranties. Neither the authors, Microsoft Corporation, nor
its resellers, or distributors will be held liable for any damages caused or alleged to be caused either directly or indirectly by this book.
Acquisitions and Developmental Editor: Russell Jones Production Editor: Kristen Borg
Editorial Production: Tiffany Rupp, S4Carlisle Publishing Services Technical Reviewer: Peter Robinson
Copyeditor: Heath Lynn Silberfeld Indexer: WordCo Indexing Services, Inc. Cover Design: Jake Rae
Cover Composition: Karen Montgomery Illustrator: S4Carlisle Publishing Services
Contents at a Glance
Introduction xiii
PART I GETTInG STARTED
ChAPter 1 An Introduction to Kinect 3
ChAPter 2 Getting Started with Kinect 13
ChAPter 3 Writing Software for Kinect 25
PART II USInG ThE KInECT SEnSoR
ChAPter 4 Your First Kinect Application—Video Snapshots 43
ChAPter 5 Moving Pictures 67
ChAPter 6 Fun with the Depth Sensor 81
ChAPter 7 Fun with the Sound Sensor 103
PART III CREATInG ADvAnCED USER InTERfACES
ChAPter 8 Body tracking with Kinect 123
ChAPter 9 Voice Control with Kinect 145
ChAPter 10 Augmented reality with Kinect 165
PART Iv KInECT In ThE REAl WoRlD
ChAPter 11 real-World Control with Kinect 201
ChAPter 12 taking Kinect Further 229
vii
What do you think of this book? We want to hear from you! Microsoft is interested in hearing your feedback so we can continually improve our books and learning resources for you. to participate in a brief online survey, please visit:
microsoft.com/learning/booksurvey
Contents
Introduction . . . xiii
PART I
GETTInG STARTED
Chapter 1 An Introduction to Kinect
3
The Kinect Sensor . . . .3Getting Inside a Kinect Sensor . . . 4
Recognizing People with Kinect . . . 9
Programming the Kinect . . . .10
Kinect for Xbox and Kinect for Windows . . . .10
Summary. . . .11
Chapter 2 Getting Started with Kinect
13
Kinect for Windows SDK Prerequisites . . . .13Kinect Device . . . .13
Visual Studio . . . .14
DirectX Studio . . . .14
Installing the Kinect for Windows SDK . . . .14
Connecting the Kinect Sensor Bar . . . .17
Powering the Kinect Sensor . . . .17
Installing the Kinect Sensor USB Drivers . . . .18
Testing the Kinect Sensor Bar . . . .18
viii Contents
Troubleshooting Your Kinect Installation . . . .21
Remove Old SDK Installations . . . .21
Ensure That Visual Studio 2010 Is Installed but Not Running During Installation . . . .22
Ensure That There Are No Windows Updates in Progress . . . .22
Ensure That the Kinect Is Powered Correctly . . . .22
Remove Any Old USB Drivers. . . .22
Summary. . . .24
Chapter 3 Writing Software for Kinect
25
Making a Kinect Video Camera . . . .25Creating a New Visual Studio Project for Kinect . . . .25
Getting the Kinect Sensor Working . . . .28
Displaying a Video Frame . . . .33
Adding Error Handling . . . .38
Summary. . . .39
PART II
USInG ThE KInECT SEnSoR
Chapter 4 Your first Kinect Application—video Snapshots
43
Image Storage in Computers . . . .43Getting the Kinect Image Data onto the Screen . . . .44
Controlling the Color of the Pixels . . . .47
Creating a Color Adjustment Program . . . .49
Improving the Speed by Writing Unsafe Code . . . .50
Saving the Image to a File . . . .57
Improving Video Quality . . . .59
Improving Performance by Waiting for Each Kinect Frame . . . .61
Creating a Video Display Thread . . . .62
Updating the Image from a Different Thread . . . .63
Stopping the Background Thread . . . .65
Contents ix
Chapter 5 Moving Pictures
67
Detecting Movement in Video Images . . . .67
Storing a Video Image in Program Memory . . . .68
Detecting Changes in Video Images . . . .69
Sounding the Alarm . . . .72
A Complete Alarm Program . . . 74
Switching to Black and White . . . .77
Summary. . . .80
Chapter 6 fun with the Depth Sensor
81
Visualizing Kinect Depth Information . . . .81The Kinect Depth Sensor . . . .81
Obtaining Depth Information from the Sensor . . . .82
Visualizing Depth Information . . . .84
Using the Depth Information to Detect Intruders. . . .89
Using the Depth and Video Sensors at the Same Time . . . .89
Drawing in the Air . . . .90
Detecting Objects . . . .92
Counting Depth Values . . . .93
Making You into the Controller . . . .96
Using the Kinect Sensor with an XNA Game . . . .97
Summary. . . .101
Chapter 7 fun with the Sound Sensor
103
Capturing Sound Using Kinect . . . .103Sound and Computers . . . .103
Receiving Sound Signals from Kinect . . . .106
Playing Sound Using XNA . . . .108
Sound Signals and Latency . . . .111
Visualizing a Sound Signal in XNA . . . .112
Storing Sound Data in a File and Replaying It . . . .115
Creating a WAV File . . . .116
Playing a Recorded Sound . . . .118
x Contents
PART III
CREATInG ADvAnCED USER InTERfACES
Chapter 8 Body Tracking with Kinect
123
Kinect Body Tracking . . . .123
Kinect Skeleton Information . . . .124
A Head Tracking Program . . . .126
The Joints Collection and C# Dictionaries . . . .128
Using Format Strings to Build a Message . . . .130
Skeleton Information Quality . . . .131
Joint Tracking State . . . .132
Drawing a Skeleton . . . .133
Drawing Lines in WPF . . . .133
Converting Joint Positions to Image Coordinates . . . .134
Clearing the Canvas . . . .136
Drawing a Complete Skeleton . . . .136
Detecting Gestures . . . .139
Calculating the Distance Between Two Points in Space . . . .139
Using a Gesture to Trigger an Action . . . .140
Biometric Recognition with Kinect . . . .141
Creating a “Kiss-Detecting” Program . . . .141
Finding Two Skeletons That Are Being Tracked . . . .141
Summary. . . .143
Chapter 9 voice Control with Kinect
145
Using the Microsoft Speech Platform . . . .145Testing Voice Recognition . . . .146
Creating a Program That Recognizes Color Names . . . .147
Adding the Speech Platform SDK Assemblies to a Project . . . .147
Creating a Speech Recognition Engine . . . .147
Building the Commands . . . .151
Creating a Grammar . . . .151
Getting Audio into the Speech Recognizer . . . .152
Contents xi
Creating a Voice-Controlled Painting Program . . . .154
Speech Commands . . . .155
Drawing a Skeleton Cursor . . . .157
Drawing Using the Artist’s Hand . . . .158
Saving the Drawing Canvas to a File . . . .158
Tidying Up When the Program Ends . . . .160
Improving the Drawing Program . . . .162
Adding Speech Output to Programs . . . .162
Feedback Problems. . . .163
Summary. . . .164
Chapter 10 Augmented Reality with Kinect
165
An Augmented-Reality Game . . . .165Creating Sprites . . . .166
Creating Augmented Reality . . . .175
Isolating the Player Image from the Background . . . .182
Putting the Whole Game Together . . . .192
The Kinect Manager Class . . . .193
Improving the Game . . . .196
Summary. . . .196
PART Iv
KInECT In ThE REAl WoRlD
Chapter 11 Real-World Control with Kinect
201
Controlling MIDI Devices with Kinect . . . .201The MIDI Protocol . . . .201
Creating a Class to Manage a MIDI Connection . . . .203
Constructing a MIDI Connection Class . . . .204
Creating a MIDIControl Instance . . . .205
Creating MIDI Messages . . . .206
Sending MIDI Messages . . . .207
Making a Multi-Note Piano . . . .210
Playing a Proper Scale . . . .214
Creating a Human MIDI Keyboard . . . .214
xii Contents
What do you think of this book? We want to hear from you! Microsoft is interested in hearing your feedback so we can continually improve our books and learning resources for you. to participate in a brief online survey, please visit:
microsoft.com/learning/booksurvey
Using the Kinect with a Serial Port. . . .219
Linking a Kinect Program to a Serial Port . . . .221
Summary. . . .227
Chapter 12 Taking Kinect further
229
Adjusting the Sensor Angle . . . .229Using Kinect to Track Multiple People . . . .230
Identifying Particular People in a Scene . . . .230
Combining Skeleton and Person Depth Information . . . .232
Sound Location with the Kinect Microphone Array . . . .234
Using Kinect with the Microsoft Robotics Development Studio . . . .236
Mobile Autonomous Reference Using Kinect . . . .236
Emulating a Robot Environment . . . .237
Robots and Kinect in the Future . . . .238
Taking Kinect Further . . . .239
Mount the Sensor in Different Orientations . . . .239
Use Multiple Sensors . . . .239
Move the Sensor Around . . . .239
Use Skeleton Tracking to Measure Things . . . .239
Investigate TransformSmoothParameters . . . 239
Use Voice Response to Do Anything . . . .240
Have Fun Playing with Video . . . .240
Make More of MIDI . . . .240
Good Luck and Have Fun! . . . .240
Summary. . . .240 Index 241
xiii
Introduction
T
he Kinect sensor provides a genuinely new way for a computer to make some sense of the world around it. The fusion of a camera, a directional microphone system, and a depth sensor into a single, mass-market device provides an opportunity for software developers to advance the field of computer interaction in all kinds of exciting ways.It is now possible to create programs that use the Kinect sensor to create a computer interface with the ability to recognize users and understand their intentions using a “natural” user interface consisting of gestures and spoken commands. In addition, the device’s capabilities have a huge range of possible applications, from burglar alarms to robot controllers.
Start Here! Learn the Kinect™ API gives you an overview of how the Kinect sensor works and how the Kinect for Windows SDK exposes each of the data sources. The book introduces each of the sensors in the context of solving a well-defined problem. The full source code is provided for each example program. You will also find plenty of ideas for further development of both the sample programs and your own applications.
In addition to an overview of the Kinect for Windows SDK, this book explores the fundamentals of the signals being processed: how video, audio, depth, and 3D skeleton information can be represented in a program. Also included is coverage of specific programming issues that are highly relevant to the creation of programs that deal with large streams of data from sensors, including memory allocation, creating unmanaged code to improve performance, and threading. If you want to learn more about these aspects of program development, you will find good coverage and sample code that works. Although this book doesn’t cover every Kinect for Windows SDK, it provides a solid starting point for experimentation and further development.
Who Should Read This Book
This book is intended to be read by C# developers who have a Kinect sensor, either from an Xbox 360 or a Kinect for Windows device, and want to find out how to use the Kinect for Windows SDK to create programs that can process video, sound, and depth views and perform skeleton tracking. If you have an idea for a product based on the Kinect sensor, you can use this book to get a solid grounding in the technology—and you might even be able to use some of the sample code as the basis of your first steps along the road to a working solution.
xiv Introduction
Assumptions
This book expects that you have a reasonable understanding of .NET development using the C# programming language. You should be familiar with the Visual Studio 2010 development environment and object-oriented programming development.
All the examples are provided in the C# language. It will be helpful (although not required) if you have some experience with Windows Presentation Foundation (WPF) development. In addition, some examples make use of the XNA game development framework. The key development principles important to the development of Kinect software are explained in some detail, so you can use the text to broaden your programming knowledge.
Who Should Not Read This Book
If you have never programmed before, you will not find sufficient background on the C# language to be able to understand the examples. If you want to learn how to use the language, you might consider reading John Mueller’s Start Here!™ Learn Microsoft®
Visual C#® 2010 (Microsoft Press, 2011) and/or John Sharp’s Microsoft® Visual C#®
2010 Step by Step (Microsoft Press, 2011).
The text of this book provides coverage of the managed code Application Programmer Interface (API) supported by the Kinect for Windows SDK. So if you are a C++ developer who wishes to learn how to interact with the Kinect sensor from unmanaged C++ programs, you will find that the code samples supplied will not provide this information.
organization of This Book
This book is divided into four sections, each of which builds on the previous section to give you an overview of the Kinect sensor, the Kinect for Windows SDK, and how to create programs that make use of the data. Part I, “Getting Started,” provides an overview of how the sensor works and how you can get a Kinect sensor connected to and working with your computer. Part II, “Using the Kinect Sensor in Programs,” covers the fundamentals of sensor initialization and then introduces each of the data sources, video, depth, and sound. Part III, “Creating Advanced User Interfaces,” shows how the Kinect SDK performs body tracking and how a program can use this information. It also shows how data from the sensors can be combined to produce augmented-reality applications. Finally, Part IV, “Kinect in the Real World,” shows how you can use the
Introduction xv
Kinect to interact with external devices. This section provides additional programming insight and identifies future directions for exploring this fascinating new sensor.
Conventions and features in This Book
This book presents information using conventions designed to make the information readable and easy to follow:
■
■ Boxed elements with labels such as “Note” provide additional information or
alternative methods for completing a step successfully.
■
■ A plus sign (+) between two key names means that you must press those keys at
the same time. For example, “Press Alt+Tab” means that you hold down the Alt key while you press the Tab key.
■
■ A vertical bar between two or more menu items (e.g. File | Close), means that
you should select the first menu or menu item, then the next, and so on.
System Requirements
You will need the following hardware and software to complete the practice exercises in this book:
■
■ Windows 7, 32- or 64-bit version ■
■ Visual Studio 2010, any edition (multiple downloads may be required if using
Express Edition products)
■
■ The Kinect for Windows SDK ■
■ Computer that has a 1 GHz or faster processor (2 GHz recommended) ■
■ 1 GB (32 bit) or 2 GB (64 bit) RAM ■
■ 3.5 GB of available hard disk space ■
■ 5,400 RPM hard disk drive ■
■ DirectX 9 capable video card running at 1024 x 768 or higher-resolution display ■
■ DVD-ROM drive (if installing Visual Studio 2010 from DVD) ■
xvi Introduction
Depending on your Windows configuration, you might require local administrator rights to install or configure Visual Studio 2010 and SQL Server 2008 products.
Code Samples
Most of the chapters in this book include exercises that let you interactively try out new material learned in the main text. All the sample projects can be downloaded from the following page:
http://www.microsoftpressstore.com/title/9780735663961
Follow the instructions to download the KinectStartHereCompanionContent.zip file.
Installing the Code Samples
Follow these steps to install the code samples on your computer so that you can use them with the exercises in this book:
1. Unzip the KinectStartHereCompanionContent.zip file that you downloaded from the book’s website to a directory on your hard drive. It’s best to create a directory near the root of your drive, such as C:\KinectExamples.
2. If prompted, review the displayed end user license agreement. If you accept the terms, select the accept option, and then click Next.
Note If the license agreement doesn’t appear, you can access it from the same webpage from which you downloaded the KinectStartHere
CompanionContent.zip file.
Using the Code Samples
The folder created by the Setup.exe program contains a subfolder for each chapter. In turn, these subfolders contain a number of subfolders, one for each example. The examples have the folder names provided in this book’s text. Each contains the complete Visual Studio project and all the source code and resources required to build them. (To reduce the size of the download file, the examples do not contain the executable programs themselves; you will have to compile the example programs using Visual Studio run them.)
Introduction xvii
Note Some of the folder paths created by Visual Studio 2010 can be quite “deep”—that is, a folder may contain a subfolder and so on for a number of levels. Installing the sample code in a folder that is already deep in the folder hierarchy on your disk may lead to problems when you try to build the program, because some file systems in use on Windows PC systems have a restriction on the maximum length of a path to a file. If you encoun-ter problems running the example programs, you may be able to solve the problem by moving the examples folder closer to the root of the drive you are using.
Acknowledgments
I’d like to thank the following people: Russell Jones for being such a patient and constructive editor, Peter Robinson for sterling duty on the technical editing front, and Tiffany Timmerman and Kristen Borg for breathing on the text and making it so much nicer to read. Finally, I’d like to thank the Kinect team for making such a fascinating product that is such fun to play with!
Errata and Book Support
We’ve made every effort to ensure the accuracy of this book and its companion content. Any errors that have been reported since this book was published are listed on our Microsoft Press site:
http://www.microsoftpressstore.com/title/ 9780735663961
If you find an error that is not already listed, you can report it to us through the same page.
If you need additional support, please email Microsoft Press Book Support at [email protected].
Please note that product support for Microsoft software is not offered through the addresses above.
xviii Introduction
We Want to hear from You
At Microsoft Press, your satisfaction is our top priority, and your feedback our most valuable asset. Please tell us what you think of this book at:
http://www.microsoft.com/learning/booksurvey
The survey is short, and we read every one of your comments and ideas. Thanks in advance for your input!
Stay in Touch
Let’s keep the conversation going! We’re on Twitter: http://twitter.com/MicrosoftPress
1
Part I
Getting Started
ChAPTER 1 An Introduction to Kinect. . . .3 ChAPTER 2 Getting Started with Kinect . . . .13 ChAPTER 3 Writing Software for Kinect . . . .25
In this section you will learn what happens inside the Kinect sensor and how it collects data that lets it see and hear the environment around it. You’ll also find out how the signals that it collects are sent over to your computer or Xbox 360. Finally, you will install the Kinect SDK and work with the software to build your first programs that use data from the sensor.
3
Chapter 1
An Introduction to Kinect
After completing this chapter, you will:■
■ Understand how the Kinect sensor generates data about the world around it ■
■ Identify the key components of the Kinect sensor and how they work ■
■ Appreciate how the sensors and the Kinect provide useful signals to a connected computer or
console
The Kinect Sensor
until recently computers had a very restricted view of the world around them, and users had very limited ways of communicating with computers. Over the years, computers have acquired cameras and audio inputs, but these have been used mostly for unrecognized input; computers can store and play such content, but it has been very difficult to make computers understand input in these forms.
For example, when people hear a sound, they can make judgments about the distance and direction of the sound source relative to their own position. Until recently, computers had more trouble making such judgments. Audio information from a number of microphones does provide considerable information about the distance and direction of the audio source, but determining this information is difficult for programs to do. Similarly, a video picture provides an image of the environment for the computer to analyze, but a computer has to work very hard to extract information about the objects in pictures or video because an image shows a flat, two-dimensional representation of a three-dimensional world.
Kinect changes all this. The Kinect sensor bar contains two cameras, a special infrared light source, and four microphones. It also contains a stack of signal processing hardware that is able to make sense of all the data that the cameras, infrared light, and microphones can generate. By combining the output from these sensors, a program can track and recognize objects in front of it, determine the direction of sound signals, and isolate them from background noise.
4 PArt 1 Getting Started
Getting Inside a Kinect Sensor
To get an idea of how the Kinect sensor works, you could take one apart and look inside. (Don’t do that. There are many reasons why taking your Kinect apart is a bad idea: it’s hard to do, you will invali-date your warranty, and you might not be able to restore it to working condition. But perhaps the best reason not to take it apart is that I’ve already done it for you!)
Figure 1-1 shows a Kinect sensor when it is “fully dressed.”
fIGURE 1-1 A Kinect sensor.
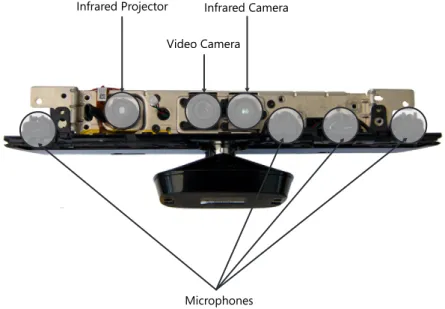
Figure 1-2 shows a Kinect with the cover removed. You can see the two cameras in the middle and the special light source on the left. The four microphones are arranged along the bottom of the sensor bar. Together, these devices provide the “view” the Kinect has of the world in front of it.
Infrared Projector Infrared Camera Video Camera
Microphones
fIGURE 1-2 A Kinect sensor unwrapped.
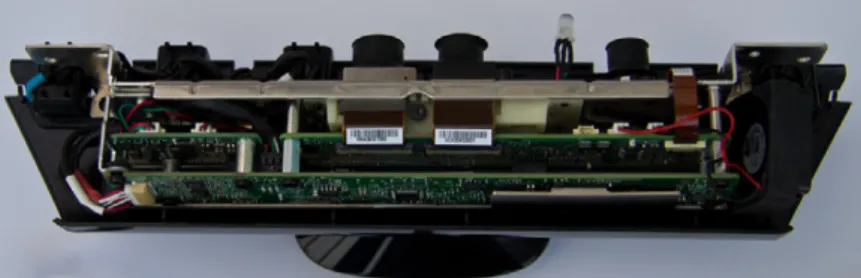
Figure 1-3 shows all the hardware inside the Kinect that makes sense of the information being supplied from all the various devices.
ChAPTER 1 An Introduction to Kinect 5
fIGURE 1-3 The Kinect sensor data processing hardware.
To make everything fit into the slim bar form, the designers had to stack the circuit boards on top of each other. Some of these components produce quite a bit of heat, so a tiny fan that can be seen on the far right of Figure 1-3 sucks air along the circuits to keep them cool. The base contains an electric motor and gear assembly that lets the Kinect adjust its angle of view vertically.
Now that you have seen inside the device, you can consider how each component helps the Kinect do what it does, starting with the “3D” camera.
the Depth Sensor
Kinect has the unique ability to “see” in 3D. Unlike most other computer vision systems, the Kinect system is able to build a “depth map” of the area in front of it. This map is produced entirely within the sensor bar and then transmitted down the USB cable to the host in the same way as a typical camera image would be transferred—except that rather than color information for each pixel in an image, the sensor transmits distance values.
You might think that the depth sensor uses some kind of radar or ultrasonic sound transmitter to measure how far things are from the sensor bar, but actually it doesn’t. This would be difficult to do over a short distance. Instead, the sensor uses a clever technique consisting of an infrared projector and a camera that can see the tiny dots that the projector produces.
Figure 1-4 shows the arrangement of the infrared projector and sensor.
6 PArt 1 Getting Started
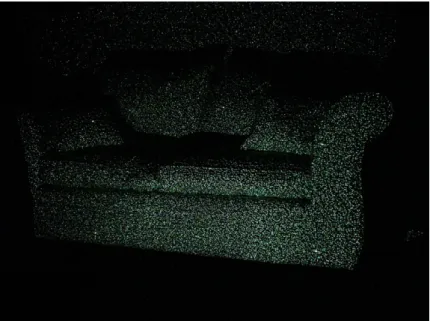
The projector is the left-hand item in the Figure 1-4. It looks somewhat like a camera, but in fact it is a tiny infrared projector. The infrared camera is on the right side of Figure 1-4. In between the projector and the camera is an LED that displays the Kinect device status, and a camera that captures a standard 2D view of the scene. To explain how the Kinect sensor works, I’ll start by showing an ordinary scene in my house. Figure 1-5 shows my sofa as a person (okay, a camera) might see it in a room.
fIGURE 1-5 My sofa.
In contrast, Figure 1-6 shows how the Kinect infrared sensor sees the same view.
ChAPTER 1 An Introduction to Kinect 7
The Kinect infrared sensor sees the sofa as a large number of tiny dots. The Kinect sensor constantly projects these dots over the area in its view. If you want to view the dots yourself, it’s actually very easy; all you need is a video camera or camcorder that has a night vision mode. A camera in night vision mode is sensitive to the infrared light spectrum that the Kinect distance sensor uses.
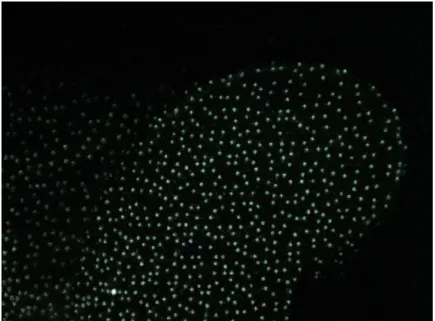
Figure 1-6, for example, was taken in complete darkness, with the sofa lit only by the Kinect. The infrared sensor in the Kinect is fitted with a filter that keeps out ordinary light, which is how it can see just the infrared dots, even in a brightly lit room. The dots are arranged in a pseudo-random pattern that is hardwired into the sensor. You can see some of the pattern in Figure 1-7.
fIGURE 1-7 The dot pattern on the sofa arm.
A pseudo-random sequence is one that appears to be random, but it is actually mechanically generated and easy to repeat. What’s important to remember here is that the Kinect sensor “knows” what the pattern looks like and how it is drawn. It can then compare the image from the camera with the pattern it knows it is displaying, and can use the difference between the two to calculate the distance of each point from the sensor.
To understand how the Kinect does this, you can perform a simple experiment involving a darkened room, a piece of paper, a flashlight, and a helpful friend. You need to adjust the flashlight beam so it’s tightly focused and makes a small spot. Now, get your friend to stand about 5 feet (1.5 meters) away from you, slightly to your right. Ask your friend to hold the paper to the front of you, holding the torch in your left hand, shine the torch dot onto the piece of paper. Now ask your friend to move forward toward you. As the person comes closer, you will see that the dot on the paper moves a little to the left because it now hits the paper before it has traveled quite as far to the right.
8 PArt 1 Getting Started
Figure 1-8 shows how this works. If you know the place you are aiming the dot, you can work out how far away your friend is by the position of the dot on the paper. The impressive thing about the Kinect sensor is that it performs that calculation for thousands of dots, many times a second. The infrared camera in the Kinect allows it to “see” where the dot appears in the image. Because the software knows the pattern that the infrared transmitter is drawing, the hardware inside the Kinect does all the calculations that are required to produce the “depth image” of the scene that is sent to the computer or Xbox.
Your Friend
You
fIGURE 1-8 Showing how the Kinect distance sensor works.
This technique is interesting because it is completely different from the way that humans see distance. Each human eye gets a slightly different view of a scene, which means that the closer an object is to a human, the greater the difference between the images seen by each eye. The brain identifies the objects in the scene, determines how much difference there is between the image from each eye, and then assigns a distance value to each object.
In contrast, the Kinect sensor shines a tightly focused spot of light on points in the scene and then works out how far away that point is from the sensor by analyzing the spot’s reflection. The Kinect itself doesn’t identify any objects in a scene; that task is performed by software in an Xbox or computer, as you’ll see later.
the Kinect Microphones
The Kinect sensor also contains four microphones arranged along the bottom of the bar. You can see them in Figure 1-2: two on the left and right ends, and two more on the right side of the unit. The Kinect uses these microphones to help determine from where in a room a particular voice is coming. This works because sound takes time to travel through air. Sound travels much more slowly than light, which is why you often hear a thunderclap long after seeing the corresponding bolt of lightning.
When you speak to the Kinect sensor, your voice will arrive at each microphone at different times, because each microphone is a slightly different distance away from the sound source. Software can then extract your voice waveform from the sound signal produced by each microphone and—using
ChAPTER 1 An Introduction to Kinect 9
the timing information—calculate where the sound source is in the room. If several people are in a room with the Kinect, it can even work out which person is talking by calculating the direction from which their voice is coming, and can then “direct” the microphone array to listen to that area of the room. It can then remove “unwanted” sounds from that signal to make it easier to understand the speech content.
From a control point of view, when a program knows where the speech is coming from (perhaps by using the distance sensor), it can direct the microphone array in that direction, essentially creating a software version of the directional microphones that are physically pointed at actors to record their voices when filming motion pictures.
Recognizing People with Kinect
One very popular use for the Kinect sensor is recognizing and tracking people standing in front of it. The Kinect sensor itself does not recognize people; it simply sends the depth image to the host device, such as an Xbox or computer. Software running on the host device contains logic to decode the information and recognize elements in the image with characteristic human shapes. The software has been “trained” with a wide variety of body shapes. It uses the alignment of the various body parts, along with the way that they move, to identify and track them.
Figure 1-9 shows the output produced by the body-tracking software as a “stick figure” with lines joining the various elements.
10 PArt 1 Getting Started
The Kinect software can also recognize the height and proportions of a particular person. For example, this feature lets Xbox Live users “train” their Xbox so it recognizes them when they walk into a room.
Programming the Kinect
The software described in the previous sections, and which you’ll see more of in this book, is called the Kinect for Windows Software Development Kit (SDK). Installing the SDK lets you write programs that use the power of the Kinect at different levels. You can obtain direct access to the low-level video and depth signals and create applications that use that low-level data, or you can make use of the powerful library features built into the SDK that make it easy for a program to identify and track users.
You can download the Kinect for Windows SDK for free. The SDK provides a set of libraries that you can add to your own programs and games so they can use the sensor. The SDK also contains all the drivers that you need to link a Kinect to your computer.
You can use the Kinect SDK from a managed code programming language (such as C# or Visual Basic.NET) or from unmanaged C++. The SDK provides a set of objects that expose properties and methods you can use in your programs. The following chapters explore how you can write programs that use these objects to create some novel and fun programs that support completely new ways of interacting with a computer.
The next chapter describes how to install the SDK on your computer and get it connected and talking to the Kinect.
Kinect for Xbox and Kinect for Windows
You can write programs that use either the Kinect for Xbox sensor or the Kinect for Windows sensor. The Kinect for Xbox sensor has been set up to allow it to be most effective when tracking the figures of game players. This means that it can track objects that are up to 12 feet (4.0 meters) away from the sensor but cannot track any objects that are closer than 24 inches (80 cm). The Kinect for Windows sensor has been set up to allow it to track a single user of a computer, and it has much better short-range performance as it is able to track objects as close to the sensor as 12 inches (40 cm).
The Kinect for Windows SDK was, as the name implies, primarily created for use with the Kinect for Windows sensor, but it will also work with an Xbox 360 Kinect sensor. Microsoft engineers will provide support into the future for Xbox Kinect from this SDK, but for best results, particularly if you want to track objects very close to the sensor bar, you should invest in a Kinect for Windows sensor device. The Kinect for Windows device can even track individual finger movements and gestures of the computer user.
ChAPTER 1 An Introduction to Kinect 11
The bottom line is that if you have an Xbox 360 with a Kinect device attached to it, you can use that sensor to have some fun learning how to create programs that can see, measure distance, and hear users. However, if you want to get serious about providing a product of your own that is based on the Kinect sensor, you should target the Kinect for Windows device. If you want complete details of how this all works, read the detailed End User License here:
http://www.microsoft.com/en-us/kinectforwindows/develop/sdk-eula.aspx
Summary
This chapter gave you a look inside the Kinect sensor so you could see (without having to take your own Kinect apart) how complex it is. You saw that the Kinect contains two cameras (one infrared camera and one video camera) and a special infrared transmitter that produces a grid of dots that measure the distance of objects from the Kinect and to compose a “depth map” of the image. You also learned that the Kinect sensor contains four microphones that can be used to remove background noise from an audio signal and to listen to sound from particular parts of a room.
You also saw that the Kinect sensor sends this data to a host device (Xbox or computer), which then processes the data in various ways, including recognizing the position, movement, and even the identity of people in front of the Kinect.
You also found out that two Kinect sensor bars are available, both of which can be used with the Kinect for Windows Software Development Kit (SDK). The Kinect for Xbox device has a good long-range performance for tracking game players, and the Kinect for Windows device has been optimized for shorter-range tracking so that a single computer user can use it to interact with a system that is nearby.
13
Chapter 2
Getting Started with
Kinect
After completing this chapter, you will:
■
■ Identify any prerequisites to work with Kinect on your computer ■
■ Have installed the Kinect for Windows SDK on your computer ■
■ Have connected the Kinect sensor bar and tested it on your machine
Kinect for Windows SDK Prerequisites
the kinect for windows sdkfits alongside an installation of Visual Studio 2010 on your Windows computer. It works on Windows 7. In this section we will look at the things you need to have to get the best out of your Kinect sensor.
Kinect Device
It should come as no surprise that you will need a Kinect device and its power supply along with a USB port so you can plug it into your computer. You can use either of two Kinect sensor bars with the Kinect for Windows SDK. You can use a Kinect sensor from an Xbox console, or you can use a Kinect for Windows sensor that has been optimized for computer use. The examples in this book will work with either sensor bar.
It is best if the Kinect is given exclusive use of a USB connection—that is, if you have a USB hub with your webcam, printer, and external hard disk plugged into it, you should not add the Kinect to the hub as well. The Kinect sensor can produce a lot of data, and it works best if it has exclusive use of its own USB connection.
14 PArt 1 Getting Started
Note You should plug the Kinect sensor into your computer after you have installed the Kinect for Windows SDK. When the SDK is installed, it also adds the USB drivers needed for Kinect; these are not provided as part of a standard Windows 7 installation.
Visual Studio
Before you install the Kinect for Windows SDK, you must make sure that you have Visual Studio 2010 installed on your machine. The SDK can be used with either C++, C#, or Visual Basic .NET. This text will focus on the use of C# to create managed applications that use the sensor, but the fundamentals of the way the libraries present data to your programs are the same. You can use any version of Visual Studio 2010, including those that are available for free from the Visual Studio Express website:
http://www.microsoft.com/express
DirectX Studio
Some of the C++ examples that are supplied with the Kinect SDK make use of the DirectX graphics SDK. If you want to compile and run these programs, you will need to have the DirectX SDK installed. You can download the SDK from here:
http://msdn.microsoft.com/en-us/directx
There is no need to install this SDK if you only plan to use the Kinect SDK from C# and Visual Basic .NET.
Installing the Kinect for Windows SDK
The Kinect for Windows SDK is a free download. The SDK also contains the USB drivers for the various elements inside the Kinect sensor itself. You can find the Kinect for Windows SDK at the Kinect for Windows website:
http://kinectforwindows.org
This site also contains links to detailed descriptions of the Kinect and other useful resources.
Note Although the SDK is provided free of charge, this does not mean that it is free for commercial purposes. Using the Kinect SDK for personal experimentation is not a commercial purpose. It is also not a commercial purpose to use the Kinect SDK in the process of teaching or academic research, even if you are regularly employed as a teacher or professor or if you intend to apply for research grants through such research. However, if you intend to sell a product based on the Kinect device, you should read the License Agreement.
ChAPTER 2 Getting Started with Kinect 15
Installing the Kinect SDK
You should make sure that any older Kinect drivers that are not part of the Kinect system are removed from your system before you install the Kinect SDK. You should also make sure that Visual Studio 2010 is installed on your Windows computer (but not actually open) when you perform the install. If you have any problems you should check out the “Troubleshooting Your Kinect Installation” section at the end of this chapter. To install the Kinect SDK on your PC follow this sequence:
1. You can perform the installation of the Kinect SDK directly from the download webpage: http://www.microsoft.com/en-us/kinectforwindows/develop
2. To do this you should click on the Download link to select the appropriate version for your system.
3. Your browser will ask you if you want to run or save the install file. You should select the Run option, as shown above. Click Run to start the installer, which will display the Welcome Screen as shown below.
16 PArt 1 Getting Started
4. When the Install program starts, you will first see the Welcome Screen as shown previously. Select the tick box to accept the terms of the licensing conditions, and then click Install to begin installation.
5. Because this is a software installation on your computer, you may see a User Account Control dialog box confirming that you are going to allow the installer to make changes to the computer. Click Yes to continue.
6. The installation will now begin. During the installation it might be necessary to install some Visual C++ runtime components, as shown above. Just confirm the installation of each element in turn. Eventually you will see the completion dialog box, as shown below.
ChAPTER 2 Getting Started with Kinect 17
7. Once the installation has completed, you can create programs that use the Kinect for Windows SDK. You can also run programs that have been built using the Kinect SDK. If you want to send your programs to Windows computer owners who will not be developing Kinect applications, the recipients must install the runtime version of Kinect for Windows. This contains the Kinect libraries and USB drivers, but it cannot be used to create new Kinect for Windows applications. The runtime version can be downloaded from the following website:
http://download.microsoft.com/download/E/E/2/EE2D29A1-2D5C-463C-B7F1-40E4170F5E2C/ KinectRuntime-v1.0-Setup.exe
Connecting the Kinect Sensor Bar
After you have installed the Kinect SDK, you can connect the sensor bar to your computer. The Kinect sensor bar works with any Windows computer that has a USB connection.
Note Although you may not be using the Kinect sensor for playing games, you should still be mindful of how the sensor should be positioned and used. If you are using the sensor to detect movement and gestures, allow plenty of space around the device for operators to interact with the sensor. The sensor itself is not able to register depth information of objects that are closer than about 24 inches (800 mm), so make sure that it has a bit of breathing room in front of it.
Powering the Kinect Sensor
The Kinect sensor bar uses more power than is available from a standard USB connection. It needs about 1.5 amps of current, whereas a standard USB port on a computer is only able to supply 0.5 amp. A Kinect sensor bar can get the extra power in either of two ways. The newer, small Xbox 360 consoles have a specially modified USB connection on the back that can provide extra current. Owners of the older, larger Xbox 360s must use the Kinect power supply that is connected between the sensor bar and the console. The Kinect power supply allows use of the Kinect sensor bar with any device that has a standard USB connection.
The plug on the end of the wire coming from the Kinect sensor bar looks a bit like a USB plug, but in fact it is special and has one corner cut off so that it will not fit directly into a USB port in a desktop computer or laptop. If you force the Kinect plug into a standard USB socket, you will break the socket and do expensive damage to your system. Instead, use the Kinect power supply that is connected between the Kinect plug and the USB connection on your computer. The cable from the power supply includes a USB plug that can be fitted safely into a computer.
18 PArt 1 Getting Started
Note If you obtained your Kinect as part of an Xbox 360 and Kinect bundle, you might not have a Kinect power supply. In this case you will need to purchase a Kinect power supply to use the sensor on your computer.
Once you have positioned your sensor bar and connected it to a power source, you are ready to connect it to your computer.
Installing the Kinect Sensor USB Drivers
The very first time that you plug the Kinect sensor bar into your Windows computer, it will
automatically install all the USB drivers that are required. To ensure that you get the latest version of the drivers, your Windows computer will contact Windows Update during the install. It is therefore a good idea to connect the sensor bar for the first time when your computer has a working Internet connection.
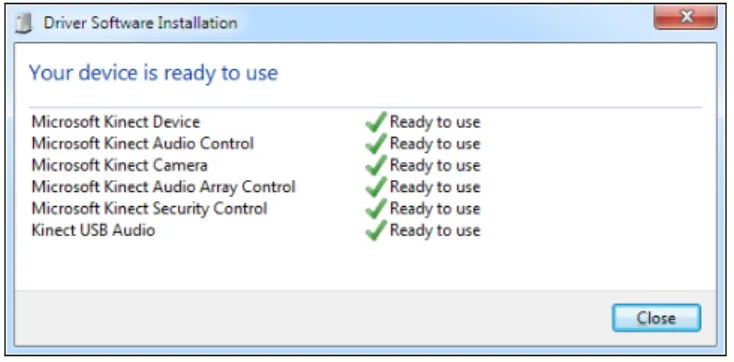
Figure 2-1 shows the results of a successful Kinect installation. If the drivers do not install successfully, this may be because you have older drivers on your machine that need to be removed. Take a look in the “Troubleshooting Your Kinect Installation” section at the end of this chapter for details of how to search for and remove these drivers.
fIGURE 2-1 A successful driver installation.
Testing the Kinect Sensor Bar
The Kinect for Windows SDK is provided with some sample applications that you can use to demon-strate that the Kinect sensor is working correctly. Later in this book, we will take a look inside these applications to find out how they work.
the Kinect SDK Sample Browser
This sample allows you to demonstrate that the video and infrared cameras are working properly. It also gives a very good demonstration of the body-tracking abilities of the Kinect system. The program is supplied as part of the SDK and will be copied onto your computer when you install the
ChAPTER 2 Getting Started with Kinect 19
Kinect for Windows SDK on it. You can find the program on the Windows Start Menu in All Programs | Microsoft Kinect SDK v1.0 | Kinect SDK Sample Browser (Figure 2-2).
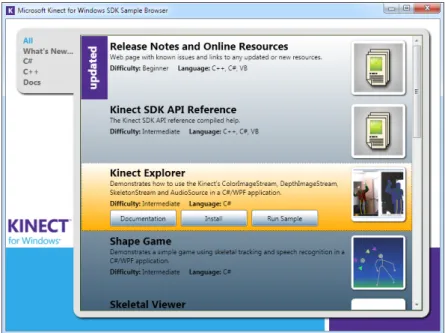
fIGURE 2-2 The Kinect SDK Sample Browser.
When you run the program, it displays a number of options that allow you to view documentation and run a number of sample programs, including the Kinect Explorer program (Figure 2-3).
20 PArt 1 Getting Started
If you click on the Kinect Explorer program, you get the option to read the documentation, install the sample code on your machine, and run the program.
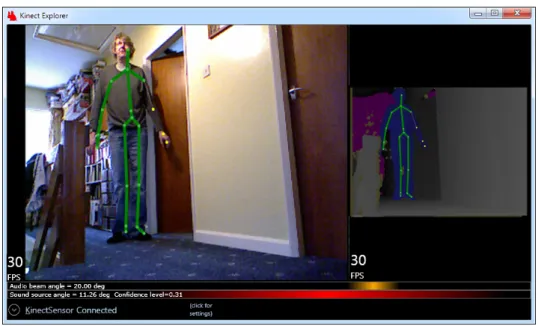
Figure 2-4 shows the main screen displayed by Kinect Explorer. On the left is the image from the video camera, with the bones of any tracked skeletons displayed on top of it. On the right is the image from the “depth” camera. Points in the depth view that are different distances from the sensor are given different colors. The viewer also adds color to those parts of the depth view that have been identified as being part of a person in the scene. The display also shows the rate at which the display is being updated in frames per second (FPS). The sensors generate 30 frames per second. If the computer running Kinect Explorer is not fast enough to process and display each frame, this number will be lower.
fIGURE 2-4 The Kinect Explorer main screen.
By clicking the down arrow at the bottom right of the screen, you can open the Settings menu, which allows you to configure the sensors in the Kinect device.
Figure 2-5 shows the options display. You can change the resolution of the color and depth cameras and also select the type of skeleton tracking that the program uses. You can also use the slider at the right side of the options to adjust the elevation angle of the sensor. This controls the motor in the base of the Kinect sensor and allows for adjustment of the angle of the sensor to get the best view of the scene.
ChAPTER 2 Getting Started with Kinect 21
fIGURE 2-5 Kinect Explorer with option screen.
The Kinect Explorer program also shows how Kinect uses the four microphones in the sensor bar to locate sound. It displays the angle from the sensor to any sound source that it detects as well as the angle of the audio beam that it has directed at the sound. If you make a noise in front of the sensor, you will see that the display changes to display where in front of the sensor the sound came from. In the display in Figure 2-5, the indicator underneath the right-hand “30 FPS” shows the direction in which the microphone is being aimed, with the broader area underneath giving the broad area from where the sound is coming.
Kinect Explorer provides a very good introduction to the capabilities of the sensor. You will discover how each part of the Kinect sensor works and how to use it from your programs in the coming chapters of this book.
Troubleshooting Your Kinect Installation
Most of my installations of the Kinect for Windows SDK and the sensor bar have had no problems. However, you might find the following troubleshooting tips useful.
remove Old SDK Installations
Ensure that you have removed all the previous Kinect Beta SDKs. These can be removed using the Control Panel at Control Panel\Programs\Programs and Features.
22 PArt 1 Getting Started
ensure that Visual Studio 2010 Is Installed but Not running
During Installation
During the Kinect SDK installation the installer will add some environment settings that are picked up by Visual Studio 2010. For this to complete successfully, it is important that Visual Studio is not running on the computer when the Kinect SDK is installed.
ensure that there Are No Windows Updates in Progress
The installation process will modify some system files that might be in use during a Windows Update. Before you start the Kinect SDK installation, you should check in the Control Panel at Control Panel | System and Security | Windows Update to make sure that no updates are in progress. You also should check to see if any updates are waiting to perform a reboot.
ensure that the Kinect Is Powered Correctly
If Kinect fails to install all the USB drivers when it is plugged into the Windows computer for the first time, it may be because the sensor bar is not receiving any power. Make sure that the Kinect power supply is plugged in and that the green light on the power connector is lit.
If the Kinect is showing a steady red light, this may mean that the power supply is not correctly connected. When the Kinect is working correctly, the indicator light on the front of the sensor bar should flash green.
remove Any Old USB Drivers
Make sure that any older Kinect drivers that are not part of the Kinect system are removed from your system before you install the Kinect SDK. If you have any problems with the Kinect device not being properly recognized because you have used other drivers, you can do the following:
1. Ensure that the Kinect sensor is not connected to your computer.
2. Open up a new command prompt running as an Administrator user. The best way to do this is to click the Start button, type CMD into the search box that appears, and then hold down CTRL+SHIFT and press Enter. If you get this right you will be rewarded with a User Account Control dialog box asking for permission to allow the Command Processor to make changes to this computer. Click OK.
3. Next, you need to set an environment variable to tell the Device Manager that you want to see all the hardware devices registered for this computer, not just the ones that are active at the moment. In the Command box, give the following command:
ChAPTER 2 Getting Started with Kinect 23
Note If you type this command incorrectly, you won’t see an error of any kind, but the process won’t work correctly as the Device Manager will not show you non-present devices.
4. Now you can give the command to start the Device Manager: devmgmt.msc
5. Next, open the View menu and select Show Hidden Devices. This is actually quite fun, as now you will see every device that has ever been connected to your computer.
Note Your computer installation will look slightly different from this one.
6. If you use your machine like I use mine, you will see 50 or so different disk drives: one for every memory key that has been plugged in over the years. Look through the device tree for items with the word Kinect in the name, or the name of the package you are removing. Look in the “Human Interface Devices,” “Sound, Video and Game Controllers,” and “Universal Serial Bus Controllers” parts. To remove a driver, right-click on it in the list and then select Uninstall from the properties menu for that driver, as shown above. If the dialog that appears has a checkbox marked “Remove Driver Software Files,” then you should select this so that the driver files are no longer on the machine.
24 PArt 1 Getting Started
Note You must be careful to remove drivers only for the Kinect sensor bar. If you are not sure which drivers are being loaded, you could plug the Kinect sensor in before you remove the driver and note what happens in the Device Manager when you do this. Drivers that become active at this point should be removed.
7. Once you have removed all the drivers, exit Device Manager and close the command prompt. Now you can plug in the sensor bar and the latest versions of the drivers should be loaded.
Summary
In this chapter you have seen how to get a Kinect sensor bar working with a Windows 7 computer and had a quick glimpse of its capabilities. In the next chapter you will write some code of your own to use the signals that the sensor bar produces.
241
depth information and, 186–189 display masks, using, 183–184
Falling Bugs on a Video Image sample, 176 Falling Bugs sample, 175
frame rates for, 172
game image, setting up, 190–191 human MIDI keyboard, creating, 214–218 Kinect-Controlled Piano sample, 218 MapDepthToColorImagePoint method
(KinectSensor class), 187–188
player image, isolating from background, 182–191 player pixels, finding, 184–186
player position, using to control applications, 218 screen/depth coordinates, matching, 176–177 sprites. See sprites
averaging of images, 59–61
B
background threads, stopping, 65–66 BeamAngleMode values (Microsoft Speech
Platform), 153 BGR32 (data format), 47 biometric recognition, 141 bitmap element (WPF)
creating, 36
rendering from canvas element, 158–159 saving to a file, 159–160
BitmapSource object memory usage of, 45 when to use, 46
Black and White Motion Detector sample, 78 BlockCopy method, 69
Body Drawing sample, 154
Body Drawing with Speech Output sample, 164 body tracking. See skeleton tracking
Bug Drawing sample, 169
Index
Symbols
.NET Input/Output library Stream class, 107
.NET Micro Framework, 220–221
A
actions, triggering with gestures, 140–143 Action type, 64
AdditionalInfo property (RecognizerInfo class), 149 Adjustable Sound Alarm sample, 119
Allow Unsafe Code checkbox (Microsoft Visual Studio), 52
alpha value of pixel data, 183 application(s), 25–40
camera images, displaying, 35–38 error handling, 38–39
sensor bar, connecting to, 28–33 sensor initialization in, 31 sound, adding to, 72–73
speech recognition, required libraries for, 147 video frame, displaying, 33–38
Visual Studio Project, creating, 25–28 WPF image display elements, creating, 33–34 Audacity, 72
audioCaptureActive flag, 116, 117 audio data vs. video or depth data, 106
AudioSource property (KinectAudioSource type), 106– 107
augmented reality, 165–198 Bug Drawing sample, 169 Bug Moving sample, 174 Bug Positioning sample, 171 Bugs and a Mallet sample, 180, 182 BugSplat with Player Masking sample, 192 Depth and Player Display sample, 186
Bug Moving sample
242 Index
Bug Moving sample, 174 Bug Positioning sample, 171 Bugs and a Mallet sample, 180, 182 BugSplat with Player Masking sample, 192 byte arrays, manipulating, 68–69
C
C# classes, user-defined, 203–219 constructor methods, 204–205 C++ vs., 52 dictionaries, 128–130 fixed (keyword), 54 garbage collection in, 53Microsoft Visual C# 2010 Step by Step (Sharp), xiv, 26
Start Here! Learn Microsoft Visual C# 2010 (Mueller), xiv
C++, xiv, 10, 52 camera images
displaying in applications, 35–39
improving quality of through averaging, 59 Canvas element(s) (WPF)
clearing, 136 defined, 133
rendering into bitmap, 158–159 SetLeft method, 170
SetTop method, 170 using multiple at once, 157 change thresholds
noise filtering with, 70–71 size thresholds, setting, 71
Choices class (Microsoft Speech Platform), 151 chroma-key effect, 183
classes, user-defined
communicating with Kinect Sensor through, 193–196
constructor, creating a, 204 creating an instance of, 205–219 creating instances of, 193–194 creating, to manage devices, 203–204 Single Note Piano sample, 210
ClippedEdges property (FrameEdges type), 131 code samples, downloading/installing, xvi–xviii color data. See also pixel format
Kinect Camera with Extra Blue sample code, 48 pixel format, when stored in array, 47–49 solarization, avoiding, 48–49
storing, 44–45
Colored Skeletons sample, 232
ColorFrameReady event (KinectSensor class), 35, 44 ColorImageFrameReadyEventArgs type, 44 ColorImageFrame class, 36 CopyPixelDataTo method, 36 PixelDataLength property, 36 ColorImageFrameReadyEventArgs class, 35, 44 ColorImageFrame type, 44–45 CopyPixelDataTo method, 45 OpenNextFrame method, 61 PixelDataLength property, 45 ColorImageStream type, 61
Color Motion Detector sample, 74–77 Color Tweaker Program sample, 50
COM ports vs. Universal Serial Bus (USB), 219 constructor methods (C#), 204–205
CopyPixelDataTo method (ColorImageFrame class), 36, 45
D
Depth-Activated Camera sample, 90 Depth and Player Display sample, 186
DepthFrameReady event (KinectSensor class), 82–83 depth information
Skeleton and Depth Data sample, 233 skeleton information, combining to identify
players, 232–234 depth map, 5
building, by sensors, 7–8 viewing in Kinect Explorer, 20 depth sensor (Kinect), 81–102
anatomy of, 5–6
configuring with Kinect Explorer, 20 data values from, confirming, 84 Depth-Activated Camera sample, 90 depth map and, 5–8
depth values, counting, 93–96 detecting movement with, 89 detecting objects with, 92–100
Kinect-Controlled BlockBuster sample, 100 limiting sensor range for, 90–92
limits on distance readings, 82 Object Detection sample, 96 obtaining information from, 82–84 player bit data from, 83
player data bits, removing, 83–84 players, finding, 96–97
short data type and, 83
high Performance Image Tweaker sample
Index 243
video sensors, using at the same time, 89–90 video sensor vs., 81
visualizing information from, 84–88 XNA games and, 97–100
depth values
converting to XNA gamepad value, 99 counting, 93–96
Depth and Player Display sample, 186 display masks and, 186–189
grouping to detect objects, 93–96, 100 MapDepthToColorImagePoint method
(KinectSensor class), 187–188 player data, use of in augmented reality
programs, 184–186
detecting objects (depth sensor), 92–100 depth values, counting, 93–96 humans, detecting, 96–97 Object Detection sample, 96 devices. See also MIDI devices
creating classes to manage, 203–204 receiving messages from, through serial
ports, 226–227
sending messages to, using serial ports, 222 serial ports and, 219–221
digital vs. analog signals and image noise, 70 DirectX Studio SDK, 14
Dispatcher.Invoke method, 76–78 displayActive flag (threading), 65 Display Manager, 64–65 display masks, 182–191
depth information, using to make, 186–189 drawing, 190
game image, setting up, 190–191 player pixels, finding, 184–186 using, 183–184
distance readings, limits on, 82 drivers (Kinect sensor bar)
included in Kinect for Windows SDK, 14 installing, 18
removing, 22–24 Windows Update and, 18
DynamicSoundEffectInstance class (XNA Game Framework), 108–109
E
ElevationAngle property (KinectSensor class), 229 Enable method (SkeletonStream class), 127
error handling, 38–39
device errors, detecting, 38 setup errors, 39
event handlers
implementing, 212–215
mouse events, triggering actions with, 209–210
f
Falling Bugs on a Video Image sample, 176 Falling Bugs sample, 175
FEZ Mini processor (robot controller), 220 filename manipulation, 78–80
fileNameTextBox object (Path class), 78 fixed (C# keyword), 54
fixed memory locations, 51–52 Format method (string class), 130
Head Tracker sample, 130 FrameEdges type, 131 frame rates, 172
G
Game class, 110
game image, setting up, 190–197 Garbage Collector process, 53
video snapshots and, 45 gestures
calculating distance between two points, 139– 140
detecting, 139–141 Tin Head sample, 139–141 triggering actions with, 140–141 Global Positioning System (GPS) receiver, 219 GrammarBuilder class (Microsoft Speech
Platform), 152
grammar (speech recognition) creating, 151–152
GrammarBuilder class (MSP), 152
h
Head Tracker sample, 126–133, 130
Head Tracker with Backbone Drawing sample, 136 Head Tracker with Skeleton Drawing sample, 138 Head Tracker with Status Display sample, 133 High Performance Image Tweaker sample, 66
image manipulation
244 Index
I
image manipulation
augmented reality programs and, 175–182 display masks, 183–184
Falling Bugs on a Video Image sample, 176 overlaying computer graphics on video
image, 175–176
player pixels, finding, 184–186
transparency, file formats that support, 166 image noise
averaging multiple frames to remove, 59–61 change thresholds as filter for, 70–71 source of, 70
image(s)
adding to project, 167–169
displaying in applications, from camera, 35 improving quality of through averaging, 59 images, manipulating
black and white images, converting to, 77 Color Tweaker Program sample, 49
High Performance Image Tweaker sample, 66 solarization, avoiding, 48–49
Image Tweaker and Ghost Camera sample, 60 InstalledRecognizers method
(SpeechRecognitionEngine class), 148 InteropServices namespace, 203
J
JointCollection dictionary, 129
Joint Photographic Experts Group (JPEG), 166 joints (skeleton)
converting positions to coordinates, 134–136, 176–177
JointsCollection dictionary, 128 positions of, in space, 125 tracking state of, 132–133
JointType type (JointCollection dictionary), 129
K
keyboards and velocity value of MIDI messages, 207–227
Kinect Angle Adjust sample, 229 KinectAudioSource class, 235
Kinect Camera with Extra Blue sample code, 48 Kinect-Controlled BlockBuster sample, 100
Kinect-Controlled Piano sample, 218
KinectController class (XNA framework), 97–100 drawing Kinect depth image in, 100 getting control value from, 99–101 Kinect Explorer, 18–21
display, format of, 20–21
microphones, configuring with, 21 sensor bar, configuring with, 20 Kinect for Windows device, 10
Kinect for Windows Software Development Kit (SDK), 10, 13–24
behavior when no Kinect sensor attached, 38 device, requirements for, 13–14
DirectX Studio SDK and, 14 download, location of, 14, 17 End User License for, 11 installing, 14–17
Kinect SDK Sample Browser, 18–21
removing older versions of, before installing, 15, 21–24
sensor setup for Xbox vs. Windows, 10–11 supported languages for, 14
support for multiple sensors in, 239 Visual Studio and, during install, 22–24 Visual Studio, requirement for, 14 Windows Update and, during install, 22 Kinect for Xbox device, 10
Kinect Kiss Detector sample, 141–143 KinectManager class (user-defined), 193–196
events generated by, 194 instance of, creating, 193–194 polling the sensor, 195 starting/stopping, 195–196 status, displaying, 194–195 Kinect namespace
SkeletonStream class, 127
TransformSmoothParameters method, 239–240 Kinect Photo Booth sample, 59
Kinect SDK Sample Browser audio examples in, 146 video examples in, 18–19 Kinect sensor bar. See sensor bar KinectSensor class, 28–30
AudioSource property (KinectAudioSource type), 106–107
ColorFrameReady event, 35 DepthFrameReady event, 82–83 ElevationAngle property, 229