Development Environment Description
Linux Development
Environment
Description Based on
VirtualBox Structure
VirtualBox is open source virtual machine software. It mainly has three advantages: (1) Free (2) compact (3) powerful. At the same time it is simple to configure, easy to use. This manual describes the installation of the VirtualBox virtual machine and the setting of installing Linux system and a set of shared files in VirtualBox.
1 VirtualBox installation
Prepare environmental, download VirtualBox virtual machine installation package to start installation.
(1) Double click and Open installation
interface. Referto figure 1-1:
Figure 1-1
Development Environment Description
Figure 1-2
(3) Choose whether to create a desktop shortcut and click on “Next”:
Figure 1-3
Figure 1-4
(5) Installation process may pop up prompt dialog box asking if install it. At this situation it is all choose to install. The following are some icons:
Development Environment Description Figure 1-6
Figure 1-7
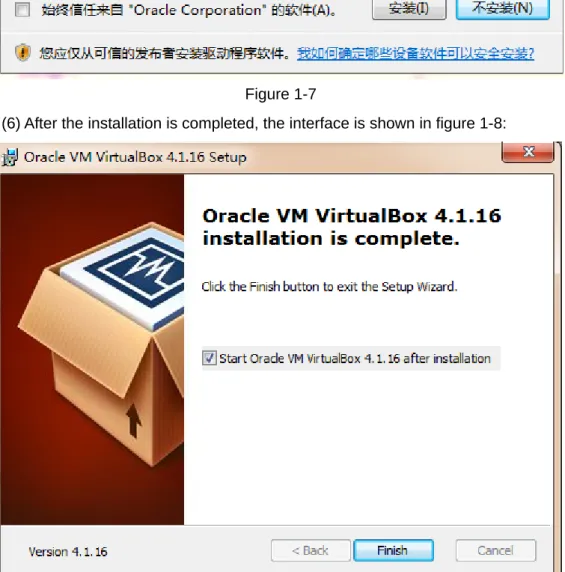
(6) After the installation is completed, the interface is shown in figure 1-8:
Figure 1-8 Click "Finish" to complete the VirtualBox installation.
2
Creating a virtual machine
Open the VirtualBox software, there will be " new " , " set " , " start" , " clear four buttons in the menu.
pop-up dialog box.
Figure 2-1
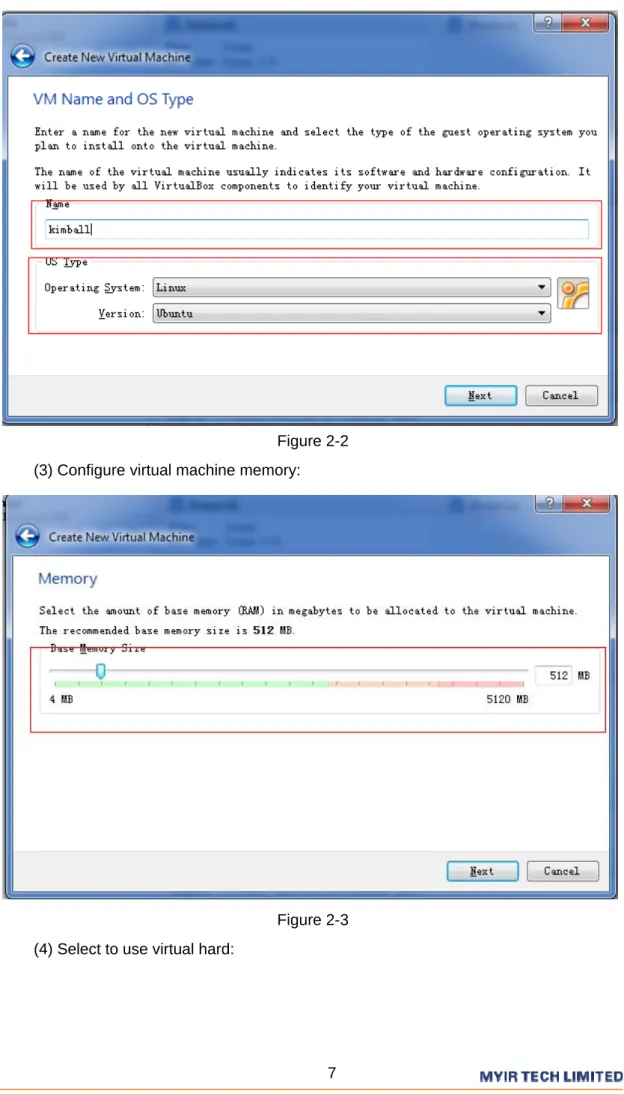
Development Environment Description
Figure 2-2 (3) Configure virtual machine memory:
Figure 2-3 (4) Select to use virtual hard:
Figure 2-4
(5) Select file type and then select disk storage type. It is recommended to use dynamic allocation.
Development Environment Description
Figure 2-6
Figure 2-7
(7) Create a virtual machine successfully. Refer to figure 2-8:
Figure 2-8
After the completion of virtual machine, click "settings", and then appears setup virtual machine interface. Refer to figure 2-9:
Development Environment Description
Figure 2-9
In addition to sharing file, other functions can be changed based on personal preferences habit, which is not specifically described. This sharing file will be described in detail below.
3
Install Linux System
(1) Ready Linux system image, click "Start" button to start created virtual machine, find "device" in start interface, select “CD-ROM distribution ", “choose a virtual CD-ROM” to add ready system image. Download ubuntu 10.04:
32-bit systems:
http://releases.ubuntu.com/lucid/ubuntu-10.04.4-desktop-i386.iso
64-bit systems:
http://releases.ubuntu.com/lucid/ubuntu-10.04.4-desktop-amd64.iso
Figure 3-1
Development Environment Description
Figure 3-3
(2) Add a mirror after restart virtual machine, the operation is as follows:
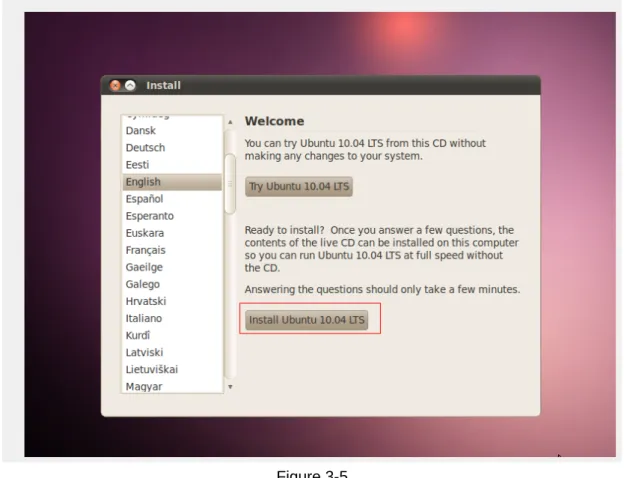
Figure 3-4 (3) Start to install Linux system, select " Install ..." :
Figure 3-5 (4) Select the time zone and keyboard layout.
(5) Select the virtual hard disk partition, in general, it is to select the default system that is "Erase and use entire disk".
Development Environment Description
Figure 3-6
(6) Input computer name, password, and then confirm the installation. Refer to figure 3-7:
Figure 3-8
System begins to install automatically, then as long as installation is complete, and then select to restart it.
4
Shared file settings
4.1 VirtualBox system (recommended)
(1) Start virtual machine, and then choose to install enhancements. After the installation is complete, start next step configuration.
Development Environment Description Figure 4-1
(2) Choose "Settings - > shared folder, and then click" add shared folder. Refer to figure 4-2:
Figure 4-3
(3) Select the sharing file path, set it as "automatic" Mount ", the fixed allocation":
Figure 4-4
Development Environment Description
Figure 4-5
(5) After these steps, it has been completed Windows folder sharing setting. But it also needs user permissions to modify Linux system, the following concrete steps:
Firstly, switch to directory/media. As follows: #cd /media
#ls -l
drwxrwx--- 1 root vboxsf 4096 2012-08-15 11:44 sf_sharefile
dr-xr-xr-x 4 kimballkimball 2048 2012-05-22 21:08 VBOXADDITIONS_4.1.16_78094 See "sf_sharefile" folder in /Media director. The file folder sharefile is set in Windows, but it can’t directly be accessed, so you need to add a native user to user group vboxsf. The command is as follows:
#sudogpasswd -a kimballvboxsf
Note: kimball is native user name, the actual operation should be carried out by facts.
Log to access the shared folders sf_sharefile, the test results are as follows:
Samba is a Linux system comes with a component, achieving the communication between the host windows and virtual machine Linux. The following detailed describes setup steps.
Network Setting
(1) Set virtual machine to double card. The card 1 is set to "NAT" mode, the card 2 is set to "Host-only" mode, as shown in figure 4-7:
Development Environment Description
Figure 4-8
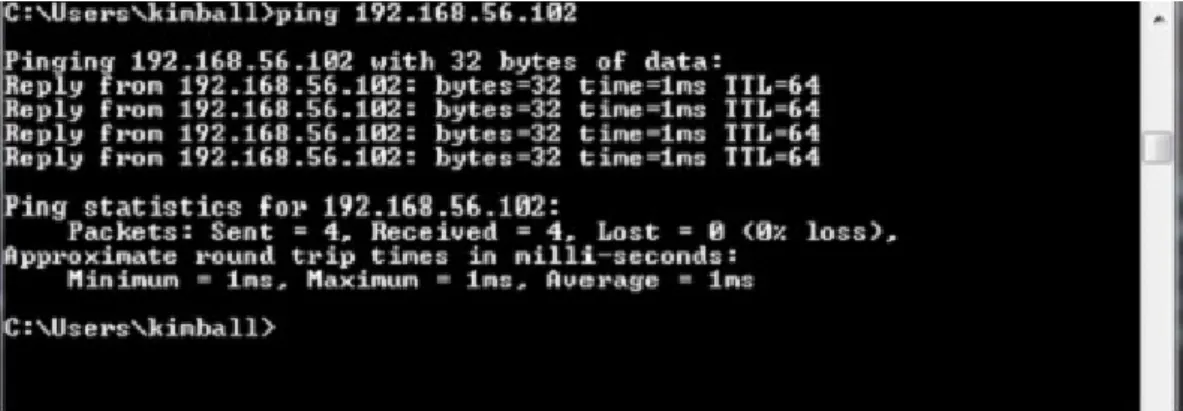
(2) Check whether the network is set up successfully.
Input "ifconfig" in virtual machine terminal to view virtual machine IP firstly, and then input "ping www.baidu.com" to test, the result is shown in figure 4-7:
Figure 4-7
Figure 4-8
Set samba
(1) Install amba
#sudo apt-get install samba #sudo apt-get installsmbfs
(2) Install shared module of system settings #sudo apt-get installkdenetwork-filesharing (3) Create a shared directory
#mkdirshare (Create a folder in the current user which is kimball) (4) Modify the permissions of shared directory
#chmod 777share
The directory is set to everyone can read and write (5) For security reasons, backup smb.conf firstly
#sudocp /etc/samba/smb.conf /etc/samba/smb.conf_backup (6) Start to configure smb.conf
Use the editor to open the configuration file #sudo vim /etc/samba/smb.conf
Make the following changes in the [global] section: workgroup = WORKGROUP
netbios name = kimball
server string = Linux Samba Server TestServer security = share
[share]
path = /home/kimball/share writeable = yes
browseable = yes guest ok = yes
Development Environment Description
in Windows work group and netbios name is displayed in Windows. server string is Samba Server description which can be defined by your own. security which is authentication and login, here using the share and there are a variety of authentication methods. This is one of them, another is common user verification. If you use share would not have set user and password to log in; [share] is displayed in Windows shared directory. path can be set to \directory you want to share, here is set to "/home/Kimball/share”. Whether writeable can be written, it can be set to write here.
Browseable is whether visible, guestok anonymous user is logged as guest.
(7) samba configuration is completed, save and exit. Then start samba, and check whether samba service conform the requirements.
#sudoservice smbd start #testparm
The following information is said to have been configured correctly. kimball@kimball-laptop:~$ sudo service smbd start
smbd start/running, process 1573 kimball@kimball-laptop:~$ testparm
Load smbconfig files from /etc/samba/smb.conf
rlimit_max: rlimit_max (1024) below minimum Windows limit (16384) Processing section "[share]"
…..
Processing section "[printers]" Processing section "[print$]" Loaded services file OK.
Server role: ROLE_STANDALONE
Press enter to Referto a dump of your service definitions (8) Restart samba and view the IP address.
#sudoservicesmbd restart #ifconfig
The IP address is displaied as shown in figure 4-7.
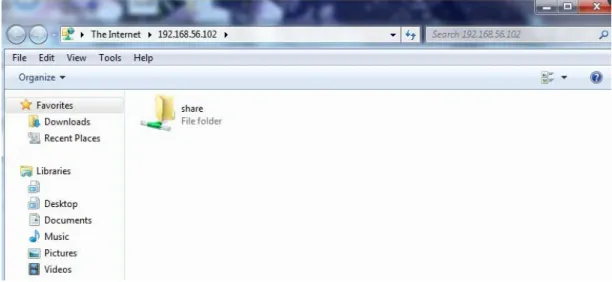
Note: selectting eth1 is that eth2 is "Host-only" mode in the previous step. (9) Input string "\\192.168.56.102" to open page. Refer to figure 4-9:
Figure 4-9 At this point, SAMBA sharing settings are completed.