Administration Guide
Sentinel Log Manager 1.2.2
Legal Notice
NetIQ Sentinel is protected by United States Patent No(s): 05829001.
THIS DOCUMENT AND THE SOFTWARE DESCRIBED IN THIS DOCUMENT ARE FURNISHED UNDER AND ARE SUBJECT TO THE TERMS OF A LICENSE AGREEMENT OR A NON-DISCLOSURE AGREEMENT. EXCEPT AS EXPRESSLY SET FORTH IN SUCH LICENSE AGREEMENT OR NON-DISCLOSURE AGREEMENT, NETIQ CORPORATION PROVIDES THIS DOCUMENT AND THE SOFTWARE DESCRIBED IN THIS DOCUMENT "AS IS" WITHOUT WARRANTY OF ANY KIND, EITHER EXPRESS OR IMPLIED, INCLUDING, BUT NOT LIMITED TO, THE IMPLIED WARRANTIES OF MERCHANTABILITY OR FITNESS FOR A PARTICULAR PURPOSE. SOME STATES DO NOT ALLOW DISCLAIMERS OF EXPRESS OR IMPLIED WARRANTIES IN CERTAIN TRANSACTIONS; THEREFORE, THIS STATEMENT MAY NOT APPLY TO YOU.
For purposes of clarity, any module, adapter or other similar material ("Module") is licensed under the terms and conditions of the End User License Agreement for the applicable version of the NetIQ product or software to which it relates or
interoperates with, and by accessing, copying or using a Module you agree to be bound by such terms. If you do not agree to the terms of the End User License Agreement you are not authorized to use, access or copy a Module and you must destroy all copies of the Module and contact NetIQ for further instructions.
This document and the software described in this document may not be lent, sold, or given away without the prior written permission of NetIQ Corporation, except as otherwise permitted by law. Except as expressly set forth in such license agreement or non-disclosure agreement, no part of this document or the software described in this document may be reproduced, stored in a retrieval system, or transmitted in any form or by any means, electronic, mechanical, or otherwise, without the prior written consent of NetIQ Corporation. Some companies, names, and data in this document are used for illustration purposes and may not represent real companies, individuals, or data.
This document could include technical inaccuracies or typographical errors. Changes are periodically made to the information herein. These changes may be incorporated in new editions of this document. NetIQ Corporation may make improvements in or changes to the software described in this document at any time.
U.S. Government Restricted Rights: If the software and documentation are being acquired by or on behalf of the U.S. Government or by a U.S. Government prime contractor or subcontractor (at any tier), in accordance with 48 C.F.R. 227.7202-4 (for Department of Defense (DOD) acquisitions) and 48 C.F.R. 2.101 and 12.212 (for non-DOD acquisitions), the government's rights in the software and documentation, including its rights to use, modify, reproduce, release, perform, display or disclose the software or documentation, will be subject in all respects to the commercial license rights and restrictions provided in the license agreement.
© 2014 NetIQ Corporation. All Rights Reserved.
About This Guide 3
About This Guide
This guide assumes that you have already installed Sentinel Log Manager on your machine. This guide provides an overview of Novell Sentinel Log Manager and also guides in administering the product and users.
Chapter 1, “Overview,” on page 13
Chapter 2, “Security Considerations,” on page 15
Chapter 3, “Configuring Data Storage,” on page 29
Chapter 4, “Configuring Data Collection,” on page 55
Chapter 5, “Searching Events,” on page 77
Chapter 6, “Reporting,” on page 93
Chapter 7, “Searching and Reporting Events in a Distributed Environment,” on page 109
Chapter 8, “Configuring Tags,” on page 127
Chapter 9, “Configuring Rules and Actions,” on page 137
Chapter 10, “Configuring Users and Roles,” on page 151
Chapter 11, “LDAP Authentication,” on page 161
Chapter 12, “Implementing High Availability and Disaster Recovery,” on page 169
Chapter 13, “License Information,” on page 171
Chapter 14, “Command Line Utilities,” on page 177
Appendix A, “Search Query Syntax,” on page 181
Appendix B, “Managing Data,” on page 191
Appendix C, “Backing Up and Restoring Data,” on page 193
Appendix D, “Syslog Collector Package Policy,” on page 197
Appendix E, “Event Fields,” on page 199
Appendix F, “Troubleshooting,” on page 209
Appendix G, “Internal Audit Events,” on page 211
Audience
This guide is intended for Novell Sentinel Log Manager administrators and end users.
Feedback
We want to hear your comments and suggestions about this manual and the other documentation included with this product. Please use the User Comments feature at the bottom of each page of the online documentation, or go to Novell Documentation Feedback Web site (http://www.novell.com/ documentation/feedback.html) and enter your comments there.
Additional Documentation
For more information about building your own plug-ins (for example, JasperReports), go to the
Sentinel SDK Web page (http://developer.novell.com/wiki/index.php/Develop_to_Sentinel). The build environment for Sentinel Log Manager report plug-ins is identical to what is documented for Novell Sentinel.
For more information about the Sentinel documentation refer to the Sentinel Documentation Web site (http://www.novell.com/documentation/sentinel61/index.html).
For more information about installation and system requirements, see Sentinel Log Manager 1.2.2 Installation Guide.
Contacting Novell
Novell Web site (http://www.novell.com)
Novell Technical Support (http://support.novell.com/ phone.html?sourceidint=suplnav4_phonesup)
Novell Self Support (http://support.novell.com/
support_options.html?sourceidint=suplnav_supportprog)
Patch Download Site (http://download.novell.com/index.jsp)
Novell 24x7 Support (http://www.novell.com/company/contact.html)
Sentinel TIDS (http://support.novell.com/products/sentinel)
Documentation Conventions
In Novell documentation, a greater-than symbol (>) is used to separate actions within a step and items in a cross-reference path.
Contents 5
Contents
About This Guide 3
1 Overview 13
1.1 Before You Begin . . . 13
1.2 Web User Interface . . . 13
2 Security Considerations 15 2.1 Hardening. . . 15
2.1.1 Out of the Box Hardening . . . . 15
2.1.2 Enforcing Password Policy for Users. . . 16
2.1.3 Securing Sentinel Log Manager Data . . . 17
2.1.4 Securing Communication with Networked Storage . . . 17
2.2 Best Practices . . . 17
2.2.1 Changing Passwords . . . 17
2.2.2 Securing Communication with Collector Managers and Event Sources . . . 19
2.2.3 Auditing Sentinel . . . 19
2.2.4 Determining if Raw Data Files Were Tampered With . . . 19
2.2.5 Using CA Signed Certificates . . . 21
2.3 Network Communication Options. . . 23
2.3.1 Communication between Sentinel Log Manager Processes . . . 24
2.3.2 Communication between Sentinel Log Manager and the Event Source Manager Client Application . . . 25
2.3.3 Communication between the Server and the Database . . . 25
2.3.4 Communication with Web Browsers . . . 25
2.3.5 Communication between the Database and Other Clients . . . 25
2.4 Sensitive Data Locations . . . 26
2.5 Overriding the IP Address in the Web Server . . . 27
2.6 Applying Updates for Security Vulnerabilities in Embedded Third-Party Products . . . 28
3 Configuring Data Storage 29 3.1 Types of Data . . . 29
3.1.1 Raw Data . . . 29
3.1.2 Event Data . . . 34
3.2 Configuring Networked Storage Locations. . . 35
3.2.1 Supported Storage Options . . . 35
3.2.2 Types of Networked Storage . . . 36
3.2.3 Configuring Networked Storage. . . 36
3.2.4 Enabling or Disabling Networked Storage . . . 40
3.2.5 Unmounting a Networked Storage Location . . . 40
3.2.6 Changing the Networked Storage Location . . . 41
3.3 Configuring Data Retention Policies . . . 42
3.3.1 Raw Data Retention Policy . . . 42
3.3.2 Event Data Retention Policies . . . 42
3.3.3 Rules for Applying a Retention Policy . . . 45
3.4 Configuring Disk Space Usage . . . 46
3.5 Verifying and Downloading Raw Data Files . . . 46
3.6 Viewing Local and Networked Storage Capacity . . . 47
3.7.1 Determining What Data You Need to Copy to Tape . . . 49
3.7.2 Backing Up Data . . . 49
3.7.3 Configuring Storage Utilization . . . 50
3.7.4 Configuring Data Retention . . . 50
3.7.5 Copying Data to Tape . . . 50
3.7.6 Restoring Data . . . 51
4 Configuring Data Collection 55 4.1 Before You Begin . . . 55
4.2 Configuring Data Collection for Syslog Event Sources . . . 56
4.2.1 Parsing Logic for Syslog Messages. . . 56
4.2.2 Configuring Syslog Servers . . . 56
4.2.3 Setting the Syslog Server Options . . . 57
4.3 Configuring Data Collection for the Novell Audit Server. . . 60
4.3.1 Specifying the Audit Server Settings . . . 60
4.3.2 Setting the Audit Server Options . . . 61
4.4 Configuring Data Collection for Other Event Sources . . . 64
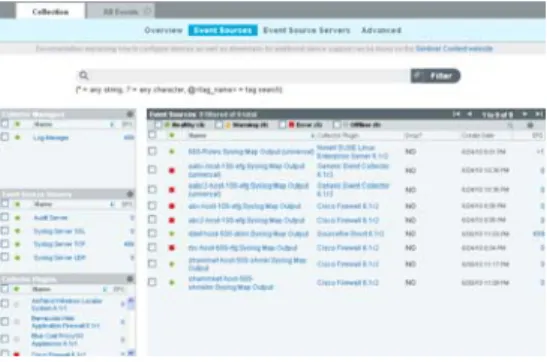
4.5 Managing Event Sources . . . 67
4.5.1 Viewing the Event Sources Page . . . 67
4.5.2 Filtering Event Sources . . . 72
4.5.3 Changing the Data Logging Status of Event Sources . . . 74
4.5.4 Changing the Associated Collector Plug-in for Event Sources . . . 74
4.5.5 Changing the Time Zone Setting for Event Sources . . . 74
4.5.6 Starting and Stopping Event Sources by Using the Script. . . 75
4.6 Viewing Events Per Second Statistics . . . 75
4.6.1 Viewing Graphical Representation of Events Per Second Value . . . 75
4.6.2 Viewing Events Per Second Value of Event Source Servers . . . 76
5 Searching Events 77 5.1 Running an Event Search . . . 77
5.1.1 Running a Basic Search . . . . 78
5.1.2 Running an Advanced Search . . . 78
5.1.3 Search Expression History . . . 79
5.2 Viewing Search Results . . . 80
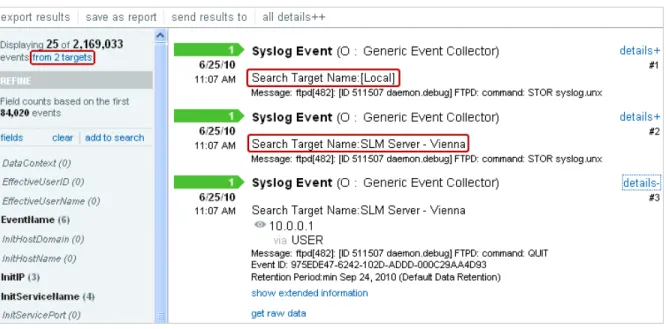
5.2.1 Basic Event View . . . 80
5.2.2 Event View with Details . . . 80
5.3 Refining Search Results. . . 83
5.4 Searching for Events with Empty or Non-Empty Fields . . . 86
5.4.1 Searching for Events with a Non-Empty Field . . . 86
5.4.2 Searching For Empty Fields . . . 86
5.5 Exporting Search Results. . . 86
5.6 Saving a Search Query . . . 87
5.6.1 Saving a Search Query as a Report Template . . . 87
5.6.2 Saving a Search Query as a Rule . . . 90
5.6.3 Saving a Search Query as a Retention Policy . . . 90
5.7 Sending Search Results to an Action. . . 91
5.8 Configuring the Search Limit . . . 92
6 Reporting 93 6.1 Running Reports . . . 93
6.2 Viewing the Reports . . . 96
Contents 7
6.3 Scheduling a Report. . . 98
6.4 Adding Report Definitions . . . 99
6.4.1 Adding or Uploading a Report . . . 99
6.5 Renaming a Report Result . . . 100
6.6 Marking Report Results as Read or Unread . . . 100
6.6.1 Marking a Single Report Result as Read or Unread . . . 101
6.6.2 Marking Multiple Report Results as Read or Unread . . . 101
6.7 Managing Favorite Reports . . . 102
6.7.1 Adding Reports as Favorites . . . 102
6.7.2 Removing Favorite Reports . . . 103
6.8 Exporting Report Definitions and Report Results. . . 103
6.8.1 Exporting a Single Report Definition . . . 103
6.8.2 Exporting Selected Report Definitions . . . 104
6.8.3 Exporting All Report Definitions . . . 104
6.8.4 Exporting a Report Result . . . 105
6.9 Deleting Reports . . . 106
6.9.1 Deleting a Report Definition . . . 106
6.9.2 Deleting Multiple Report Definitions. . . 106
6.9.3 Deleting a Report Result . . . . 107
6.9.4 Deleting Multiple Report Results . . . 107
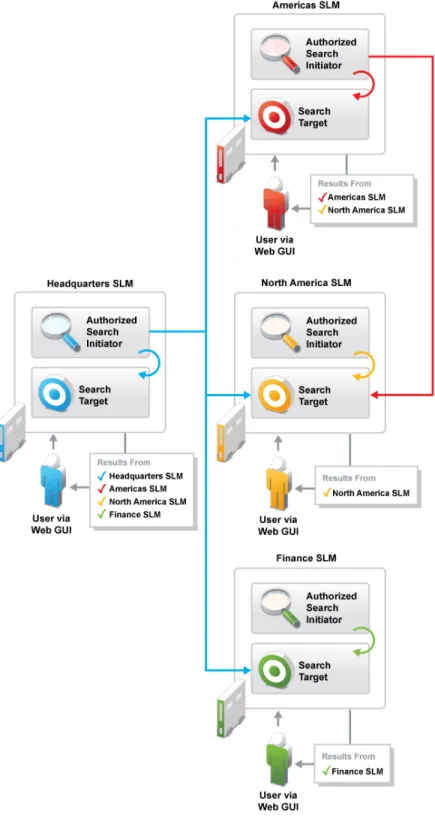
7 Searching and Reporting Events in a Distributed Environment 109 7.1 Overview . . . 109
7.2 Configuring Servers for Distributed Searching and Reporting . . . 111
7.2.1 Enabling Distributed Search . . . 111
7.2.2 Adding a Search Target Server by Using the Administrator Credentials . . . 112
7.2.3 Adding a Search Target Server by Using the Opt-in Password. . . 114
7.3 Searching for Events . . . 117
7.4 Managing the Distributed Search Results . . . 118
7.5 Viewing the Search Activities . . . 120
7.6 Running Reports . . . 120
7.7 Managing the Distributed Setup Configuration . . . 121
7.7.1 Editing the Search Target Server Details . . . 122
7.7.2 Disabling or Deleting a Search Target Server . . . 122
7.7.3 Editing the Search Initiator Server Details . . . 123
7.7.4 Disabling or Deleting a Search Initiator Server . . . 124
7.8 Troubleshooting . . . 124
7.8.1 Permission Denied. . . 124
7.8.2 Connection Down . . . 124
7.8.3 Unable to View Raw Data . . . 125
7.8.4 Problems Adding Search Target . . . 125
7.8.5 Certain Events Are Only Visible from the Local System . . . 125
7.8.6 Cannot Run Reports on the Target Servers . . . 125
7.8.7 Different Users Might Get Different Results. . . 125
7.8.8 Cannot Set the Admin Role as the Search Proxy Role . . . 125
7.8.9 Error Logs . . . 125
8 Configuring Tags 127 8.1 Overview . . . 127
8.2 Creating a Tag . . . 129
8.3 Managing Tags . . . 129
8.3.1 Using the Tag Selector Widget . . . 130
8.3.2 Sorting Tags . . . 130
8.3.3 Adding and Removing Tags from Favorites . . . 130
8.4 Performing Text Refined Searches . . . 131
8.5 Deleting Tags . . . 132
8.5.1 Deleting a Tag . . . 132
8.5.2 Deleting Multiple Tags . . . 132
8.6 Associating Tags with Different Objects. . . 133
8.6.1 Associating Tags with Event Sources . . . 133
8.6.2 Associating Tags with Event Sources Servers . . . 133
8.6.3 Associating Tags with Collector Managers . . . 134
8.6.4 Associating Tags with Collector Plug-ins . . . 135
8.6.5 Associating Tags with Reports Results and Report Definition. . . 135
8.7 Searching Tagged Events . . . 136
9 Configuring Rules and Actions 137 9.1 Configuring Rules . . . 137
9.1.1 Adding a Rule . . . 137
9.1.2 Editing a Rule . . . 138
9.1.3 Ordering Rules. . . 138
9.1.4 Deleting a Rule . . . 139
9.1.5 Activating or Deactivating a Rule . . . 139
9.2 Configuring Actions . . . 140
9.2.1 Executing a Script . . . 141
9.2.2 Logging the Events to a File . . . 141
9.2.3 Sending the Events to Syslog . . . 142
9.2.4 Sending the Events by an E-Mail. . . 143
9.2.5 Sending the SNMP Traps . . . 144
9.2.6 Sending the Events to a Sentinel Link . . . 144
9.2.7 Modifying an Action . . . 147
9.2.8 Deleting an Action . . . 148
9.3 Handling Auto-Created Event Sources without a Time Zone. . . 148
9.4 Forwarding the Events to Another Sentinel System. . . 150
10 Configuring Users and Roles 151 10.1 Overview . . . 151
10.1.1 Default Roles . . . 152
10.1.2 Filtering Data . . . 153
10.1.3 Setting Permissions . . . 153
10.2 Creating Roles and Users . . . 154
10.2.1 Creating Roles . . . 154
10.2.2 Creating Users . . . 155
10.3 Viewing Roles and User Details . . . 156
10.4 Viewing All Users . . . 157
10.5 Modifying Roles and Users . . . 157
10.5.1 Modifying Roles . . . 157
10.5.2 Modifying User Details . . . 158
10.6 Moving Users to Another Role . . . 159
10.7 Deleting Roles and Users . . . 159
10.7.1 Deleting a Role . . . 159
10.7.2 Deleting a User . . . 160
11 LDAP Authentication 161 11.1 Overview . . . 161
Contents 9
11.3 Setting Up LDAP Authentication . . . 162
11.4 Creating an LDAP User Account . . . 166
11.5 Configuring Multiple LDAP Servers for Failover. . . . 166
12 Implementing High Availability and Disaster Recovery 169 12.1 High Availability . . . 169
12.2 Disaster Recovery . . . 170
13 License Information 171 13.1 Understanding the Licenses. . . 171
13.1.1 Trial License . . . 171
13.1.2 Free License . . . 172
13.1.3 Enterprise Licenses . . . 172
13.2 Managing the Licenses . . . 173
13.2.1 Adding a License Key . . . 173
13.2.2 Viewing the License Details . . . 175
13.2.3 Deleting a License Key . . . 175
14 Command Line Utilities 177 14.1 Managing the Sentinel Log Manager Services . . . 177
14.2 Running the Report Development Utility . . . 178
14.3 Getting the .jar Version Information . . . 178
14.4 Reconfiguring Database Connection Properties . . . 179
14.5 Sentinel Scripts . . . 179
A Search Query Syntax 181 A.1 Basic Search Query . . . 181
A.1.1 Case Insensitivity . . . 182
A.1.2 Special Characters . . . 182
A.1.3 Operators . . . 182
A.1.4 The Default Search Field . . . 183
A.1.5 Tokenized Fields . . . 184
A.1.6 Non-Tokenized Fields . . . . 186
A.2 Wildcards in Search Queries . . . 186
A.2.1 Wildcards in Tokenized Fields . . . 187
A.2.2 Quoted Wildcards . . . 187
A.2.3 Leading Wildcards . . . 187
A.3 The notnull Query. . . 188
A.4 Tags in Search Queries . . . 188
A.5 Range Queries . . . 189
A.6 IP Addresses Query . . . 189
A.6.1 CIDR Notation . . . 189
A.6.2 Wildcards in IP Addresses . . . 190
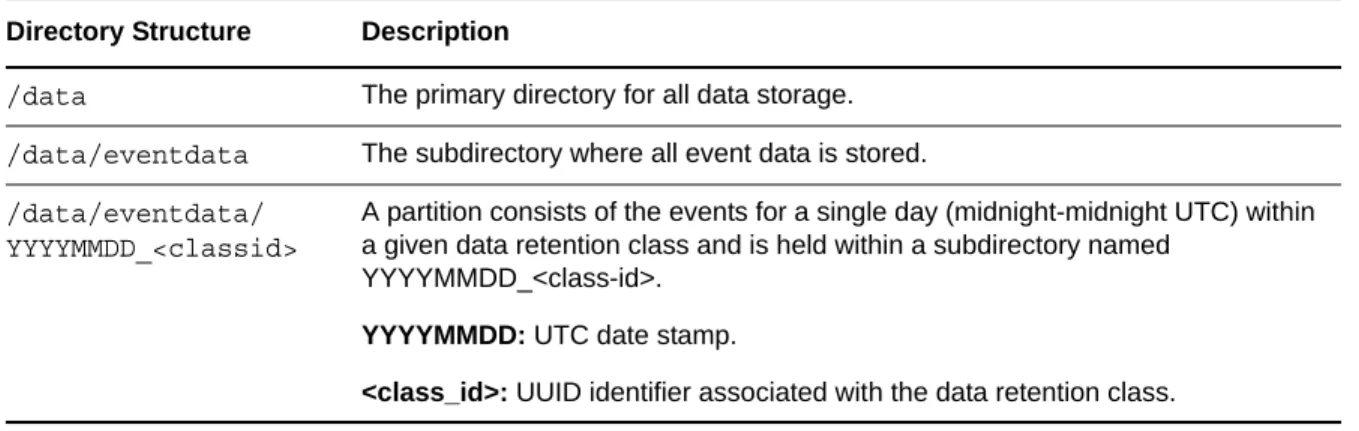
B Managing Data 191 B.1 Moving Event Data Storage to a Large Partition . . . 191
B.2 Directory Structure . . . 192
C Backing Up and Restoring Data 193
C.1 Parameters for the Backup and Restore Utility Script . . . 193
C.2 Running the Backup and Restore Utility Script . . . 195
D Syslog Collector Package Policy 197 E Event Fields 199 F Troubleshooting 209 F.1 Data Retention Policies are not Displayed when there is Large Data in the Networked Storage . . 209
F.2 Unable to Log In to the Web Interface when the System runs out of Local Disk Storage Space. . . 209
G Internal Audit Events 211 G.1 Authentication Events . . . 211
G.1.1 Authentication . . . 211
G.1.2 Failed Authentication . . . 212
G.1.3 Web User Interface Login . . . 212
G.1.4 Web User Interface Login Failed . . . 212
G.1.5 User Logged In . . . 213
G.1.6 User Logged Out . . . 213
G.2 User Management . . . 213
G.2.1 Create User . . . 214
G.2.2 Create User Role . . . 214
G.2.3 Add User To Role . . . 214
G.2.4 Removing User From a Role . . . 215
G.2.5 Updating User . . . 215
G.2.6 Updating User Role . . . 215
G.2.7 Delete User . . . 216
G.2.8 Delete User Role . . . 216
G.2.9 Resetting User Password . . . 216
G.3 Event Router . . . 217
G.3.1 Event Router is Initializing . . . 217
G.3.2 Event Router is Running . . . 217
G.3.3 Event Router is Stopping . . . 218
G.3.4 Event Router is Terminating . . . 218
G.4 Event Source Management - General . . . 218
G.4.1 Collector Manager Initialized . . . 219
G.4.2 Collector Manager Is Down . . . 219
G.4.3 Collector Manager Started . . . 220
G.4.4 Collector Manager Stopped . . . 220
G.4.5 Collector Service Callback . . . 220
G.4.6 Event Source Manager Callback . . . 221
G.4.7 Initializing Collector Manager. . . 221
G.4.8 Update Collector Manager . . . 221
G.4.9 Lost Contact With Collector Manager . . . 222
G.4.10 No Data Alert . . . 222
G.4.11 Persistent Process Died . . . . 222
G.4.12 Persistent Process Restarted . . . 223
G.4.13 Port Start . . . 223
G.4.14 Port Stop . . . 223
G.4.15 Reestablished Contact With Collector Manager . . . 224
Contents 11
G.4.20 Start Event Source Manager . . . 225
G.4.21 Starting Collector Manager . . . 226
G.4.22 Stop Event Source Group . . . 226
G.4.23 Stop Event Source Manager . . . 226
G.4.24 Stopping Collector Manager . . . 227
G.5 Event Source Management - Event Sources . . . 227
G.5.1 Start Event Source. . . 227
G.5.2 Stop Event Source . . . 227
G.5.3 Start Event Sources . . . 228
G.5.4 Stop Event Sources . . . 228
G.5.5 Update Event Source Configuration . . . 228
G.6 Event Source Management - Collectors . . . . 229
G.6.1 Start Collector . . . 229
G.6.2 Stop Collector . . . 229
G.6.3 Update Collector Configuration . . . 229
G.7 Event Source Management - Event Source Servers . . . 230
G.7.1 Start Event Source Server . . . 230
G.7.2 Stop Event Source Server . . . 230
G.7.3 Update Event Source Server Configuration. . . 231
G.8 Event Source Management - Connectors . . . 231
G.8.1 Start Connector . . . 231
G.8.2 Stop Connector . . . 232
G.8.3 Update Connector Configuration . . . 232
G.8.4 Data Received After Timeout. . . 232
G.8.5 Data Timeout . . . 233
G.8.6 File Rotation. . . 233
G.8.7 Process Auto Restart Error . . . 233
G.8.8 Process Start Error . . . 234
G.8.9 Process Stop . . . 234
G.8.10 WMI Connector Status Message . . . 234
G.9 Data Objects . . . 235
G.9.1 Configuration . . . 235
G.10 Search . . . 235
G.10.1 Event Search . . . 235
G.11 Data Retention Policy. . . 235
G.11.1 Create Data Retention Policy . . . 236
G.11.2 Update Data Retention Policy . . . 236
G.11.3 Delete Data Retention Policy . . . 236
G.12 Disk Usage Configuration . . . 237
G.12.1 Change Disk Usage Config . . . 237
G.13 Report Definitions and Report Results . . . 237
G.13.1 Remove Report Definition . . . 237
G.13.2 Remove Report Definitions . . . 238
G.13.3 Remove Report Result . . . 238
G.13.4 Remove Report Results. . . 238
G.14 General . . . 238
G.14.1 Configuration Service . . . 239
G.14.2 Controlled Process is started . . . 239
G.14.3 Controlled Process is stopped . . . 240
G.14.4 Importing Auxiliary . . . 240
G.14.5 Importing Plugin . . . 240
G.14.6 Load Esec Taxonomy To XML . . . 241
G.14.7 Process Auto Restart Error . . . 241
G.14.8 Process Restarts . . . 241
G.14.9 Proxy Client Registration Service (medium) . . . 242
G.14.10 Restarting Process . . . 242
G.14.11 Restarting Processes. . . 242
G.14.12 Starting Process . . . 243
G.14.14 Stopping Process. . . 243
G.14.15 Stopping Processes . . . 244
G.14.16 Store Esec Taxonomy From XML . . . 244
G.14.17 Watchdog Process is started . . . 244
1
Overview 13
1
Overview
Novell Sentinel Log Manager collects data from a wide variety of devices and applications, including intrusion detection systems, firewalls, operating systems, routers, Web servers, databases, switches, mainframes, and antivirus event sources.
Novell Sentinel Log Manager provides high event-rate processing, long-term data retention, policy based data retention, regional data aggregation, and simple searching and reporting functionality for a broad range of applications and devices. It also enables you to search events on other Sentinel Log Manager servers distributed across the globe.
Section 1.1, “Before You Begin,” on page 13
Section 1.2, “Web User Interface,” on page 13
1.1
Before You Begin
Make sure that you have installed Sentinel Log Manager. For more information, see the Sentinel Log Manager 1.2.2 Installation Guide.
To understand the Sentinel Log Manager features, see “Product Overview” in the Sentinel Log Manager 1.2.2 Installation Guide.
To understand the Sentinel Log Manager architecture, see “Product Overview” in the Sentinel Log Manager 1.2.2 Installation Guide.
1.2
Web User Interface
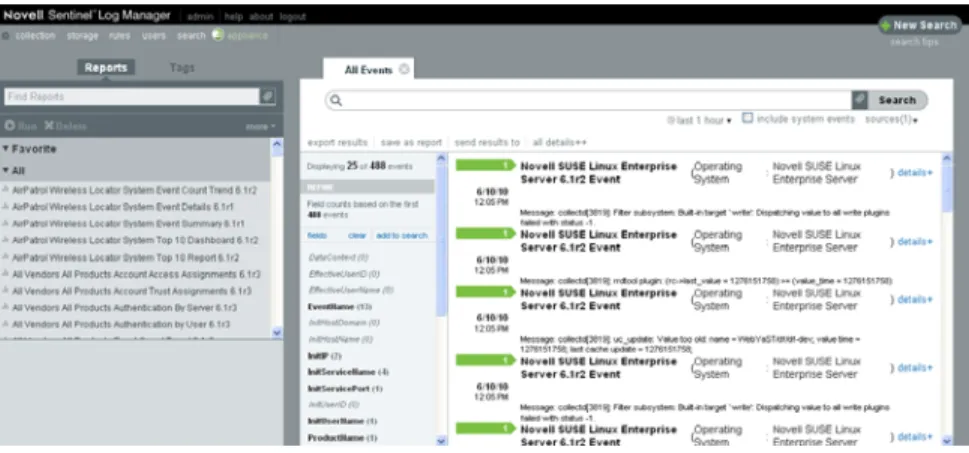
The Novell Sentinel Log Manage comes with a Web-based user interface to configure and use Log Manager. The user interface functionality is provided by a Web server and a Java Web Start based graphical user interface (GUI). All user interfaces communicate with the server by using an encrypted connection.
<name>:The user name of the logged in user is displayed here. For example, if you have logged in as an admin user, then Admin is displayed here.
Help: You can click this button to open the online documentation link for Sentinel Log Manager.
About: Click this button to read the copyright information and details about the installed version of Sentinel Log Manager.
Logout: Click this button to log out of Sentinel Log Manager Server.
Collection: Click this tab to configure event sources and event source servers to collect events and also to launch ESM. For more information, see Chapter 4, “Configuring Data Collection,” on page 55.
Storage: Click this tab to configure location to store data, configure data retention policies and also to monitor the health of the server. For more information, seeChapter 3, “Configuring Data Storage,” on page 29.
Rules: Click this tab to configure rules to filter events based on one or more of the searchable fields. For more information, see Chapter 9, “Configuring Rules and Actions,” on page 137.
Users: Click this tab to configure roles and users and assign them different permissions. For more information, see Chapter 10, “Configuring Users and Roles,” on page 151.
Search: Click this tab to configure search related attributes. For more information, see Chapter 5, “Searching Events,” on page 77.
Appliance: This icon indicates that the installed Sentinel Log Manager is an appliance. For more information on installing Sentinel Log Manager Appliance, see Installing the Appliance in the Sentinel Log Manager 1.2 Installation Guide.
2
Security Considerations 15
2
Security Considerations
This section provides additional information on how to securely install, configure, and maintain Novell Sentinel Log Manager.
Section 2.1, “Hardening,” on page 15
Section 2.2, “Best Practices,” on page 17
Section 2.3, “Network Communication Options,” on page 23
Section 2.4, “Sensitive Data Locations,” on page 26
Section 2.5, “Overriding the IP Address in the Web Server,” on page 27
Section 2.6, “Applying Updates for Security Vulnerabilities in Embedded Third-Party Products,” on page 28
2.1
Hardening
Section 2.1.1, “Out of the Box Hardening,” on page 15
Section 2.1.2, “Enforcing Password Policy for Users,” on page 16
Section 2.1.3, “Securing Sentinel Log Manager Data,” on page 17
Section 2.1.4, “Securing Communication with Networked Storage,” on page 17
2.1.1
Out of the Box Hardening
The following sections describe the out of the box hardening mechanisms used in Sentinel Log Manager:
“Novell Sentinel Log Manager Application” on page 15
“Novell Sentinel Log Manager Appliance” on page 16
Novell Sentinel Log Manager Application
All unnecessary ports are turned off.
Whenever possible, a service port listens only for local connections and does not allow remote connections.
Files are installed with the least privileges so that only a small number of users can read the files.
Default passwords are not permitted to be used.
Reports against the database runs as a user that only has select permissions on the database.
All web interfaces require HTTPS.
Prior to releasing the product, a vulnerability scan was run against the application and all potential security problems were addressed.
All communication over the network use SSL by default and are configured for authentication.
User account passwords are encrypted by default when stored on the file system or in the database.
Novell Sentinel Log Manager Appliance
In addition to the points mentioned in “Novell Sentinel Log Manager Application” on page 15, the Sentinel Log Manager Appliance, also has the following:
The appliance includes a Just enough Operating System (JeOS). Only the required packages are installed.
Default passwords for the appliance operating system or the control center are not permitted for use.
The firewall is enabled by default and all unnecessary ports are closed in the firewall configuration.
Prior to releasing the product, a vulnerability scan was run against the appliance and all potential security problems were addressed.
It is automatically configured to monitor the syslog messages of the local operating system.
2.1.2
Enforcing Password Policy for Users
The Sentinel Log Manager utilizes standards-based mechanisms to make it easier to enforce password policies.
The installer creates and configures a PostgreSQL database with the following users.
dbauser: The database owner (database administrator user). The password is set during the installation process.
appuser: A user that is used by the Sentinel Log Manager server process (the ConnectionManager) to log in to the database. The password is randomly generated during the installation process, and it is intended for internal use only.
admin: The administrator credentials can be used to log in to the Sentinel Log Manager Web interface. The password is set during the installation process.
By default, user passwords are stored within the PostgreSQL database embedded in Sentinel Log Manager. PostgreSQL provides the option to utilize a number of these standards-based
authentication mechanisms, as described in Client Authentication (http://www.postgresql.org/docs/ 8.3/static/client-authentication.html)
Utilizing these mechanisms affects all user accounts in Sentinel Log Manager, including users of the Web application and accounts used only by back-end services, such as dbauser and appuser. A simpler option is to use an LDAP directory to authenticate Web application users. To enable this option by using the Sentinel Log Manager Web UI, see Chapter 11, “LDAP Authentication,” on page 161. This option has no affect on accounts used by back-end services, which continue to authenticate through PostgreSQL unless you change the PostgreSQL configuration settings.
You can achieve robust Sentinel Log Manager password policy enforcement by using these standards based mechanisms and the existing mechanisms in your environment such as your LDAP directory.
Security Considerations 17
2.1.3
Securing Sentinel Log Manager Data
Because of the highly sensitive nature of the data in Sentinel Log Manager, you must keep the machine physically secure and in a secure area of the network. To collect data from event sources outside the secure network, use a remote Collector Manager. For more information on remote Collector Managers, see “Installing Additional Collector Managers” in the Sentinel Log Manager 1.2.2 Installation Guide.
Sentinel Log Manager is compatible with disk encryption technologies.These technologies provide a higher level of data privacy when they are used on the file systems where Sentinel Log Manager stores its data. However, software-based encryption technologies, such as dm-crypt, have a
significant CPU overhead, they can dramatically reduce the performance of Sentinel Log Manager by 50% or more. On the other hand, hardware-based encryption technologies have a much lower impact on the performance of the rest of the system and are available from leading hard drive
manufacturers.
2.1.4
Securing Communication with Networked Storage
You must consider the security implications before deciding the type of networked storage location to use. If you are using CIFS or NFS servers as networked storage locations to store the Sentinel Log Manager event data and raw data, remember that these protocols do not offer data encryption. An alternative is to use direct attached storage (local or SAN), which does not have the same security vulnerabilities. If you choose to use CIFS or NFS, it is important to configure the CIFS or NFS server to maximize the security of your data.
For more information about configuring the networked storage location server settings, see
Section 3.2.3, “Configuring Networked Storage,” on page 36.
2.2
Best Practices
Use the following best practices to secure your Sentinel Log Manager server:
Section 2.2.1, “Changing Passwords,” on page 17
Section 2.2.2, “Securing Communication with Collector Managers and Event Sources,” on page 19
Section 2.2.3, “Auditing Sentinel,” on page 19
Section 2.2.4, “Determining if Raw Data Files Were Tampered With,” on page 19
Section 2.2.5, “Using CA Signed Certificates,” on page 21
2.2.1
Changing Passwords
“Operating System Users” on page 17
“Application and Database Users” on page 18
Operating System Users
“Server Installation” on page 18
Server Installation
The Sentinel Log Manager server installation creates a novell system user and novell group that owns the installed files within the install_directory. The user’s home directory is set to /home/ novell. By default, if a new user is created, the password for the user is not set in order to maximize security. If you want to log in to the system as the novell user, you must set a password for the user after installation.
Collector Manager Installation
System users might vary in their level of security depending on the operating system on which the Collector Manager is installed.
Linux: The installer prompts you to specify the name of the system user who owns the installed files, as well as the location to create its home directory. By default, the system user is esecadm; however, you can change this system username. If the user does not exist, it is created along with its home directory. By default, if a new user is created, the password for the user is not set in order to maximize security. If you want to log in to the system as the user, you must set a password for the user after installation. The default group is esec.
During the client installation, if the user already exists, the installer does not prompt for the user again. This behavior is similar to the behavior while installing or uninstalling software. However, you can have the installer prompt for the user again:
1 Delete the user and group created at the time of first installation.
2 Clear the ESEC_USER environment variables from the /etc/profile file.
Windows: No users are created.
The password policies for system users are defined by the operating system that is being used.
Application and Database Users
Sentinel Log Manager application users are native database users and their passwords are protected by the native database platform, unless LDAP authentication is used. These users have only read access to certain tables in the database so that they can execute queries against the database. Users authenticated by LDAP do not have read access on the database.
The admin user is the administrator user for Sentinel Log Manager user applications. By default, the following database users are created during installation:
dbauser: The dbauser is created as a superuser who can manage the database and is typically the user who can log in to the pgAdmin. The password for the dbauser is accepted at the time of installation. This password is stored in the user home directory/.pgpass file. The system follows the PostgreSQL database password policies.
appuser: The appuser is the non-superuser used by Sentinel Log Manager to connect to the database. By default, the appuser uses a password randomly generated during installation, which is stored encrypted in the /etc/opt/novell/sentinel_log_mgr/config/server.xml
file. To modify the password for appuser, in the database use the following command:
db.sh sql SIEM dbauser "ALTER ROLE appuser WITH password 'new_password’”
Update the server.xml file by using the using the /opt/novell/sentinel_log_mgr/bin/ dbconfig utility.
Security Considerations 19
NOTE: There is also a PostgreSQL database user that owns the entire database, including system database tables. By default, the postgres database user is set to NOLOGIN, so that no one can log in as the PostgreSQL user.
2.2.2
Securing Communication with Collector Managers and Event Sources
You can configure Sentinel Log Manager to securely collect data from various event sources. However, secured data collection is determined by the specific protocols supported by the event source. For example, the Check Point LEA, Syslog, and Audit Connectors can be configured to encrypt their communication with event sources.
For more information on the possible security features that can be enabled, see the Sentinel Plug-ins Web site (http://support.novell.com/products/sentinel/sentinel61.html)
2.2.3
Auditing Sentinel
Sentinel Log Manager generates audit events for many actions performed by users and also for actions performed internally for system activities. These events are tagged with the
SentinelLogManager tag and can be included within a report by selecting include system events and search by using the rv145:SentinelLogManager query. However, you must have the necessary permissions to view system events. For more information, see Section 10.1.2, “Filtering Data,” on page 153.
Sentinel Log Manager includes reports that are pre-configured to include only the events tagged with the SentinelLogManager tag.
A well-audited Sentinel Log Manager not only audits the events occurring within Sentinel Log Manager, but also the infrastructure that Sentinel Log Manager is running on top of. You can set up data collection from the machines and the devices that make up the Sentinel Log Manager
infrastructure and tag them with the SentinelLogManager tag to enable a complete auditing of the systems that can affect the behavior of Sentinel Log Manager.
2.2.4
Determining if Raw Data Files Were Tampered With
The raw data files are stored in one of the following locations:
Local storage location: <SLM data directory>/rawdata/online
Networked storage location: <SLM networked storage directory>/rawdata_archive
If your networked storage is NFS or CIFS, then the NFS/CIFS share is automatically mounted to the /var/opt/novell/sentinel_log_mgr/data/archive_remote directory on the Sentinel Log Manager server. If the networked storage is SAN, then the NFS/CIFS share is mounted to the directory configured by you.
Each raw data file is either a .zip file or a .log file. A .zip file contains the.log files in a compressed format. For more information on raw data files, see Section 3.1.1, “Raw Data,” on page 29.
You can check the integrity of raw data files present in local or networked storage by using the
To determine if the deleted raw data files were tampered with:
Verify the sequence number of JSON records. All JSON records have same ChainID with a monotonically increasing ChainSequence number starting with zero. There are no gaps or missing numbers in the ChainID sequence. If a new ChainID is present, then its ChainSequence
begins with zero.If there are gaps in the sequence of numbers, then the records were either tampered with or were manually deleted.
Verify the RawDataHash against the RawData.To do this, convert the RawData value to a sequence of bytes in UTF-8 format. Calculate a 256 SHA digest against those bytes. Convert the digest to a HEX string, and compare the string with the value in RawDataHash. If they are not identical, either the RawData or the RawDataHash file was tampered with.
If, for example, you want to compute the hash of a file on the file system on Linux, specify a command similar to the following:
sha256sum F6673C60-573A-102D-ADE0-003048306A7C/2010-06/15-1600.zip
For example, if, you want to query the database for the hash of a file, you can specify a command similar to the following:
db.sh sql SIEM dbauser "select FILE_HASH from RAW_DATA_FILES_INFO where FILE_NAME='/F6673C60-573A-102D-ADE0-003048306A7C/2010-06/15-1600.zip';"
However, there is a possibility that a person tampered with the files in such a way that the tampering cannot be detected, because the person also recomputed the sequence number or the RawDataHash. To determine if the raw data files were tampered with, there is another method by using the hash key values of each raw data file stored in the database. The Sentinel Log Manager calculates a hash key value for every raw data file and stores it in the RAW_DATA_FILES_INFO table in the database. The table has the following columns:
FILE_NAME: This column contains the relative file name in the following format: <Event Source UUID>/<Date>/<RawDataFile>
STATE: This column indicates if the raw data file is in the local storage location or the
networked storage location.If the value is ARCHIVED, the raw data file is in the networked storage location.If the value is ONLINE or COMPRESSED, then, the raw data file is in the local storage location.If the value is DELETED, it indicates that the file is deleted from the disk and is not present either in local or in networked storage location.
FILE_HASH: Hash value is computed after the file is compressed and placed in a .zip file. Therefore, only files in the COMPRESSED or ARCHIVED state have a hash value.The FILE_HASH
column contains an SHA256 hash key value computed over the contents of the file.The file is treated as a stream of binary bytes in order to compute the hash.The hash is stored as a HEX string (lowercase).
To determine if a file is tampered with, compute the SHA256 hash, convert it to a HEX string (lowercase), then compare this computed value with the hash value stored in the
RAW_DATA_FILES_INFO table.If the values are different, it indicates that either the file or the database has been tampered with.
To determine if the files were deleted in an unauthorized way, you can scan the records in the
RAW_DATA_FILES_INFO table and look for files whose STATE value is ARCHIVED, ONLINE, or
COMPRESSED.You can ignore those marked DELETED If the STATE value is ARCHIVED, the raw data file should be in the networked storage location.If the STATE value is ONLINE or COMPRESSED, the raw data file should be in the local storage location or the networked storage location.
Security Considerations 21
2.2.5
Using CA Signed Certificates
Novell Sentinel Log Manager uses several digital, public-key certificates as part of establishing secure TLS/SSL communications. During the initial configuration of Sentinel Log Manager, these certificates are self-signed. In some circumstances, it might be necessary to obtain certificates digitally signed by a certificate authority (CA).
You can replace the self-signed certificate with a certificate signed by a well-known CA, such as VeriSign, Thawte, or Entrust. You can also replace the self-signed certificate with a certificate digitally signed by a less common CA, such as a CA within your company or organization.
NOTE: There are many well-known CAs and identifying which CAs are most commonly used varies with the country.
This section provides information on various certificates used in Sentinel Log Manager and also provides instructions on configuring the TLS/SSL certificates to get them digitally signed by CA and then importing the digitally signed certificates into Sentinel Log Manager:
“Types of Certificates” on page 21
“Configuring the TLS/SSL Certificates” on page 22
Types of Certificates
“Web Server Certificate” on page 21
“Java Messaging Service Certificates” on page 21
“Client Proxy Server Certificate” on page 21
Web Server Certificate
The Web server certificate is used for the following purposes:
It is used with Web browsers to connect to the Sentinel Log Manager Web user interface.
It is used to establish trust relationships for the REST API calls between Sentinel Log Manager instances. For example, it is used when configuring Distributed Search.
If the Web server certificate is not signed by a well-known CA and you connect to the Sentinel Log Manager Web user interface, the Connection is Untrusted message is displayed.
Java Messaging Service Certificates
The Java Messaging Service (JMS) certificates include the following:
Broker Certificate
Client Certificate
The JMS certificates are used to establish secure communications between various components of Sentinel Log Manager, including the Sentinel Log Manager server and remote Collector Managers.
Client Proxy Server Certificate
The Client Proxy Server certificate is used to establish secure communication between the Sentinel Log Manager server and client applications, including the Web user interface.
Configuring the TLS/SSL Certificates
Novell Sentinel Log Manager provides the ssl_certs command line tool that helps with the certificate signing process. This tool is available at:
<installation_root>/opt/novell/sentinel_log_mgr/setup/ssl_certs
The tool can be run in an interactive mode or with the command line specifications and options. To see the command line options, change to the directory that contains ssl_certs, then run the -help
command.
Configuring the TLS/SSL certificates involves the following steps:
“Generating a Certificate Signing Request” on page 22
“Getting the Certificate Signing Requests Signed by the CA” on page 23
“Importing the Digitally Signed Certificates into Sentinel Log Manager” on page 23
Generating a Certificate Signing Request
To obtain a digitally signed certificate, you must first generate a Certificate Signing Request, which will be presented to the CA. To generate one or more Certificate Signing Request, perform the following steps on the Sentinel Log Manager server:
1 Log in as the novell user, or switch to the novell user.
2 Change to the setup directory:
cd $APP_HOME/setup
3 Run the ./ssl_certs command. The following options are displayed:
1. Generate certificate signing requests
2. Import Certificate Authority root certificate 3. Import certificates signed by Certificate Authority 4. Exit
4 Enter 1.
The following options are displayed:
1. Web Server
2. Java Messaging Service 3. Client Proxy Service 4. All
5. Done
5 Specify the service for which you want to obtain the signed certificates.
6 Specify a filename where the Certificate Signing Request must be saved. The default filename is based on the internal name of the certificate entry.
7 Select another service if required, or enter 5 to select Done to exit from the service option.
8 Enter 4 to exit from the TLS/SSL certificate configuration. The Certificate Signing Requests are now saved in the specified files.
Security Considerations 23
Getting the Certificate Signing Requests Signed by the CA
1 Submit the Certificate Signing Requests to the CA for signature.
2 Obtain the signed certificate files from the CA.
The details of how this is done depend on the CA. For more information, consult your CA.
Importing the Digitally Signed Certificates into Sentinel Log Manager
Copy the files that contains the digital certificates signed by the CA to the Sentinel Log Manager server. In cases where the files are signed by an enterprise or organizational CA rather than a well-known CA, you must copy the CA's self-signed root certificate to the Sentinel Log Manager server. To import the certificate files to the Sentinel Log Manager server:
1 Log in as the novell user, or switch to the novell user.
2 Change to the setup directory:
cd $APP_HOME/setup
3 Run the .ssl_certs command. The following options are displayed:
1. Generate certificate signing requests
2. Import Certificate Authority root certificate 3. Import certificates signed by Certificate Authority 4. Exit
4 (Conditional) For certificates that are signed by the enterprise or organizational CAs, enter 2, then specify the name of the file that contains the CA root certificates.
5 (Conditional) For certificates that are signed by a well-known CA such as Verisign or Entrust, enter 3.
5a Select the service for which you obtained the signed certificates.
5b Specify the name of the file that contains the CA’s signed digital certificate.
6 Select another service if required, or enter 5 to select Done and exit from the service option.
7 Enter 4 to exit from the TLS/SSL certificate configuration.
8 Restart Sentinel Log Manager.
2.3
Network Communication Options
The various components of Sentinel Log Manager communicate across the network, and there are different types of communication protocols used throughout the system. All of these communication mechanisms affect the security of your system.
Section 2.3.1, “Communication between Sentinel Log Manager Processes,” on page 24
Section 2.3.2, “Communication between Sentinel Log Manager and the Event Source Manager Client Application,” on page 25
Section 2.3.3, “Communication between the Server and the Database,” on page 25
Section 2.3.4, “Communication with Web Browsers,” on page 25
2.3.1
Communication between Sentinel Log Manager Processes
Sentinel Log Manager processes include the Sentinel Log Manager server, Tomcat, and Collector Manager. They communicate with each other by using ActiveMQ.
The communication between these server processes is by default over SSL via the ActiveMQ message bus. The processes use SSL by reading the following information in /etc/opt/novell/
sentinel_log_mgr/config/configuration.xml:
<jms brokerURL="failover://(ssl://
localhost:${activemq.port.userapps}?wireFormat.maxInactivityDuration=30000)?random ize=false" interceptors="compression" keystore="${esecurity.config.home}/etc/opt/ novell/sentinel_log_mgr/config/.activemqclientkeystore.jks"
keystorePassword="password" password-file="${esecurity.config.home}/etc/opt/ novell/sentinel_log_mgr/config/activemqusers.properties" username="system"/>
The jms strategy shown in this XML snippet defines how the Sentinel Log Manager process connects to the server. This snippet defines the client side settings of the connection.
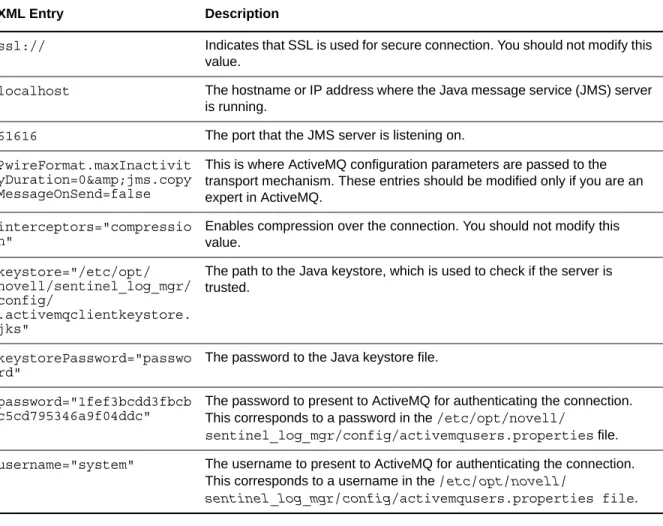
Table 2-1 XML Entries in the configuration.xml File
The server-side settings are defined in the /etc/opt/novell/sentinel_log_mgr/config/ activemq.xml file. For instructions on how to edit the activemq.xml file, see the ActiveMQ Web site (http://activemq.apache.org/). However, Novell does not support the modification of the server-side settings.
XML Entry Description
ssl:// Indicates that SSL is used for secure connection. You should not modify this value.
localhost The hostname or IP address where the Java message service (JMS) server is running.
61616 The port that the JMS server is listening on. ?wireFormat.maxInactivit
yDuration=0&jms.copy MessageOnSend=false
This is where ActiveMQ configuration parameters are passed to the transport mechanism. These entries should be modified only if you are an expert in ActiveMQ.
interceptors="compressio n"
Enables compression over the connection. You should not modify this value. keystore="/etc/opt/ novell/sentinel_log_mgr/ config/ .activemqclientkeystore. jks"
The path to the Java keystore, which is used to check if the server is trusted.
keystorePassword="passwo rd"
The password to the Java keystore file.
password="1fef3bcdd3fbcb c5cd795346a9f04ddc"
The password to present to ActiveMQ for authenticating the connection. This corresponds to a password in the /etc/opt/novell/
sentinel_log_mgr/config/activemqusers.properties file. username="system" The username to present to ActiveMQ for authenticating the connection.
This corresponds to a username in the /etc/opt/novell/
Security Considerations 25
2.3.2
Communication between Sentinel Log Manager and the Event Source
Manager Client Application
The Sentinel Log Manager Event Source Management (ESM) client application by default uses SSL communication via the SSL proxy server.
For an architectural representation, see “Novell Sentinel Log Manager Architecture” in the Sentinel Log Manager 1.2.2 Installation Guide.
ESM knows to use SSL by reading the following information in /etc/opt/novell/ sentinel_log_mgr/config/configuration.xml:
<strategy active="yes" id="proxied_client"
location="com.esecurity.common.communication.strategy.proxystrategy.ProxiedClientS trategyFactory">
<transport type="ssl">
<ssl host="10.0.0.1" port="10013" keystore="./novell/sentinel/ .proxyClientKeystore" />
</transport> </strategy>
2.3.3
Communication between the Server and the Database
The protocol used for communication between the server and the database is defined by a JDBC driver.
Sentinel Log Manager uses the PostgreSQL driver (postgresql-version.jdbc3.jar) to connect to the PostgreSQL database, which is a Java (Type IV) implementation. This driver supports encryption for data communication. To download the driver, refer to the PostgreSQL Download Page (http:// jdbc.postgresql.org/download.html). To configure the encryption, refer to PostgreSQL Encryption Options (http://www.postgresql.org/docs/8.1/static/encryption-options.html).
NOTE: Turning encryption on has a negative impact on the performance of the system. Therefore, this security concern needs to be weighed against your performance needs. The database
communication is not encrypted by default for this reason. Lack of encryption is not a major concern because communication with the database occurs over the localhost network interface.
2.3.4
Communication with Web Browsers
The Web server is by default configured to communicate via HTTPS. For more information, see the
Tomcat documentation (http://tomcat.apache.org/tomcat-4.0-doc/ssl-howto.html).
2.3.5
Communication between the Database and Other Clients
You can configure the PostgreSQL SIEM database to allow connections from any client machine that uses pgAdmin or another third-party application.
The PostgreSQL is compiled with the --with-openssl flag.You can configure it to use encrypted communication, although that is not the default setting. Typically all database communication in Sentinel Log Manager is performed locally and not over the network.
To allow pgAdmin to connect from any client machine, add the following line in the /var/opt/ novell/sentinel_log_mgr/3rdparty/postgresql/data/pg_hba.conf file:
If you want to limit the client connections that are allowed to run and connect to the database through pgAdmin, specify the IP address of the host in the above line.
The following line in the pg_hba.conf file is an indicator to PostgreSQL to accept connections from the local machine so that pgAdmin is allowed to run only on the server.
host all all 127.0.0.1/32 md5
To allow connections from other client machines, you can add additional host entries in the
pg_hba.conf file.
To provide maximum security, by default, PostgreSQL only allows connections from the local machine.
2.4
Sensitive Data Locations
For certain components, passwords must be stored so that they are available to the components when the system needs to connect to a resource such as a database or an event source. In this case, the password is first encrypted to avoid unauthorized access to the clear-text password.
Even if the password is encrypted, you must ensure that the access to the stored password data is protected in order to avoid password exposure. For example, you can set permissions to ensure that files with sensitive data are not readable by other users.
Database credentials are stored in the /etc/opt/novell/sentinel_log_mgr/config/server.xml
file.
<class>esecurity.base.ccs.comp.dataobject.ConnectionManager</class> <property name="username">appuser</property>
<property name="password">7fA+ogBMeK7cRbJ+S6xJ/ InLBUi+sRVGK5qYycDxfIqGDHVX9FApWg==</property>
Following is an example of Database Credentials in the configuration.xml file:
<strategy active="yes" id="jms"
location="com.esecurity.common.communication.strategy.jmsstrategy.activemq.ActiveM QStrategyFactory" name="ActiveMQ">
<jms brokerURL="ssl://
localhost:61616?wireFormat.maxInactivityDuration=0&jms.copyMessageOnSend=false " interceptors="compression" keystore="/etc/opt/novell/sentinel_log_mgr/config/ .activemqclientkeystore.jks" keystorePassword="password"
password="ebccfebf4ec3dac874494b992a91a3c9" username="system"/> </strategy>
The following database tables store passwords (/certificate) in the encrypted format.You must limit access to these tables.
EVT_SRC: column: ect_src_config column data
evt_src_collector: column: evt_src_collector_props
evt_src_grp: column: evt_src_default_config
md_config: column: data
integrator_config: column: integrator_properties
md_view_config: column: view_data
esec_content: column: content_context, content_hash
Security Considerations 27
Sentinel Log Manager stores both configuration data and event data in the following locations:
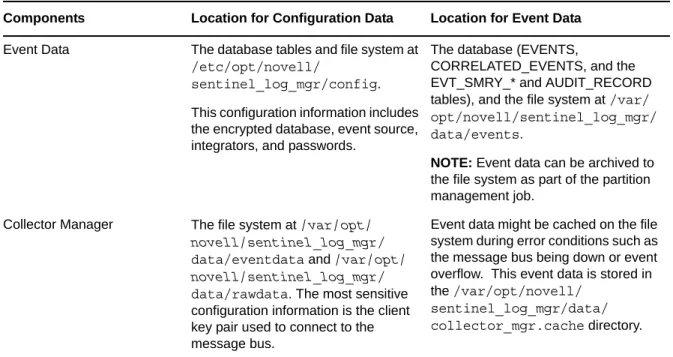
Table 2-2 Locations for Configuration Data and Event Data
2.5
Overriding the IP Address in the Web Server
On Sentinel Log Manager servers where there are multiple IP addresses (network interface), you can configure the Sentinel Log Manager Web server to listen on a specific IP address.
1 Log in to the Sentinel Log Manager server as the novell user.
2 Create the start_tomcat.properties file in the /etc/opt/novell/sentinel_log_mgr/ config directory.
3 Add the following line in the start_tomcat.properties file:
SERVER_IP=<IP_address>
where <IP_address> is the IP address that you want to assign to the Sentinel Log Manager Web server.
4 Restart the Sentinel Log Manager services:
/opt/novell/sentinel_log_mgr/bin/./server.sh restart
Components Location for Configuration Data Location for Event Data
Event Data The database tables and file system at /etc/opt/novell/
sentinel_log_mgr/config. This configuration information includes the encrypted database, event source, integrators, and passwords.
The database (EVENTS,
CORRELATED_EVENTS, and the EVT_SMRY_* and AUDIT_RECORD tables), and the file system at /var/ opt/novell/sentinel_log_mgr/ data/events.
NOTE: Event data can be archived to
the file system as part of the partition management job.
Collector Manager The file system at /var/opt/ novell/sentinel_log_mgr/ data/eventdata and /var/opt/ novell/sentinel_log_mgr/ data/rawdata. The most sensitive configuration information is the client key pair used to connect to the message bus.
Event data might be cached on the file system during error conditions such as the message bus being down or event overflow. This event data is stored in the /var/opt/novell/
sentinel_log_mgr/data/ collector_mgr.cache directory.
2.6
Applying Updates for Security Vulnerabilities in Embedded
Third-Party Products
Sentinel Log Manager includes embedded third-party products such as the Sun JRE, PostgreSQL, and ActiveMQ. Sentinel Log Manager includes patches to address the security vulnerabilities (CVE) for these products when updates for Sentinel Log Manager are released.
However, each of these products has its own release cycle, which means that there might be CVEs that are discovered before a Sentinel Log Manager update is released. You need to separately review the CVEs for each embedded third-party product, and decide whether to apply these updates to your Sentinel Log Manager system outside of the Sentinel Log Manager updates.
If you decide to apply patches to address these CVEs outside of a Sentinel Log Manager update, use the instructions in the following TID available in the Novell Support Knowledge Base (http:// www.novell.com/support/).
3
Configuring Data Storage 29
3
Configuring Data Storage
Sentinel Log Manager stores compressed event data on the server file system and then stores it in a configured location for long-term storage.
The data files are deleted from the local and networked storage locations on a configured schedule. Raw data retention is governed by a single raw data retention policy. Event data retention is
governed by a set of event data retention policies. All of these policies are configured by the Sentinel Log Manager administrator.
Section 3.1, “Types of Data,” on page 29
Section 3.2, “Configuring Networked Storage Locations,” on page 35
Section 3.3, “Configuring Data Retention Policies,” on page 42
Section 3.4, “Configuring Disk Space Usage,” on page 46
Section 3.5, “Verifying and Downloading Raw Data Files,” on page 46
Section 3.6, “Viewing Local and Networked Storage Capacity,” on page 47
Section 3.7, “Using Sequential-Access Storage for Long Term Data Storage,” on page 49
3.1
Types of Data
Sentinel Log Manager receives two separate but similar data streams from the Collector Managers: the event data and the raw data. The data is moved from the local storage, compressed, file-based storage to a user-configured, compressed networked storage location on a regular basis.
Section 3.1.1, “Raw Data,” on page 29
Section 3.1.2, “Event Data,” on page 34
3.1.1
Raw Data
The raw data files are unprocessed events that are received by the Connector and sent directly to the Sentinel Log Manager message bus.This data is written to the Sentinel Log Manager server. When the event is sent to the message bus, the following additional information is also sent without altering the original event:
SHA-256 hash of the event
Chaining indicator (which is reset to 0 whenever the Sentinel Log Manager event source is restarted)
Raw Data ID (in s_RV25)
Event source, Connector, Collector, and Collector Manager node IDs
Event ID (stored in s_RV25)
All raw data is sent to the Sentinel Log Manager without filtering. Because the raw data is not searched or used to generate reports, the data is not indexed.
“Raw Data Storage” on page 30
“Raw Data Representation” on page 31
Raw Data Storage
In Sentinel Log Manager, raw data is always stored. Raw data is stored in partitions that are based on the time and the event source. Raw data partitions are individual files. They are created every hour, and are closed within 10 minutes after the elapsed time.Older, inactive partitions are compressed. The raw data files can be stored in one of the following locations:
Local storage location: <SLM data directory>/rawdata/online
Networked storage location: <SLM archive directory>/rawdata_archive
When a raw data file is closed, it is renamed to identify the closed files. Files in the open state have a
.open extension. When they are closed, they are renamed with a .log extension. At the configured interval, after they are closed, they are compressed and given a .zip extension. The compressed raw data files are moved from the local storage to the networked storage location.
The following table describes the directory structure of the raw data in the local storage under the installation directory:
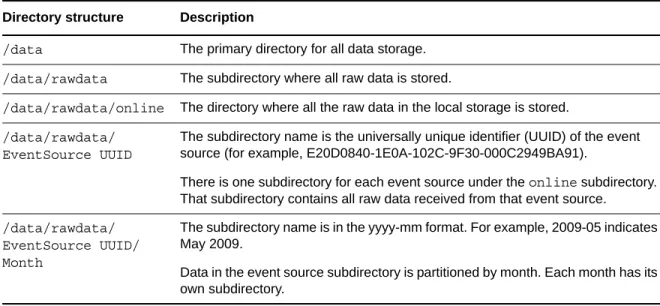
Table 3-1 Raw Data Directory Structure
Directory structure Description
/data The primary directory for all data storage. /data/rawdata The subdirectory where all raw data is stored.
/data/rawdata/online The directory where all the raw data in the local storage is stored. /data/rawdata/
EventSource UUID
The subdirectory name is the universally unique identifier (UUID) of the event source (for example, E20D0840-1E0A-102C-9F30-000C2949BA91).
There is one subdirectory for each event source under the online subdirectory. That subdirectory contains all raw data received from that event source. /data/rawdata/
EventSource UUID/ Month
The subdirectory name is in the yyyy-mm format. For example, 2009-05 indicates May 2009.
Data in the event source subdirectory is partitioned by month. Each month has its own subdirectory.
Configuring Data Storage 31
If the raw data files are stored in the local storage location, the full path name of the file is in the following format:
<SLM data directory>/rawdata/online/<event source UUID>/<Date>/<RawDataFile>
For example:
/var/opt/novell/sentinel_log_mgr/data/rawdata/online/A75CF6A0-4948-102D-A615-000C29A9C3DB/2010-05/24-0600.zip
In this example, /var/opt/novell/sentinel_log_mgr/data is the data directory for Sentinel Log Manager.
If the raw data files are stored in the networked storage location, the full path name would be as follows:
<SLM archive directory>/rawdata_archive/<event source UUID>/<Date>/<RawDataFile>
For example:
/slm_archive_data/rawdata_archive/A75CF6A0-4948-102D-A615-000C29A9C3DB/2010-05/24-0600.zip
In this example, /slm_archive_data is the networked storage directory configured by the user.
Raw Data Representation
Each raw data event is represented as a single line in a raw data file. Each line is a JSON object with the following format:
/data/rawdata/ EventSource UUID/ Month/1 Hour Data Files
Each file in the Month directory contains data received during a specific one-hour period. Most data in the file has a time stamp that is within the one-one-hour period.
The name of the file indicates the day of the month and the one-hour period that is represented.
The filename format is dd-hhmm.extension.
dd is the day of the month.
hh is the hour of the day.
mm is the minute of the hour.
The extension is either .open or .log or .zip (compressed). For example:
A filename of 08-1300.open indicates that the file contains uncompressed data received on the 8th day of the month between 01.00 p.m. and 02.00 p.m. A filename 08-0900.log indicates that the file contains uncompressed data received on the 8th day of the month between 09.00 a.m. and 10.00 a.m. The file is closed, but not yet compressed.
A filename 08-0000.zip indicates that the file contains compressed data received on the 8th day of the month between 12.00 a.m. and 01.00 a.m.
{
"EventDate": "<date>",
"EventRecordID:" "<event record uuid>", "RawData": "<raw data>",
"RawDataHash": "<SHA256 hash of raw data, in hex format>", "EventSourceManagerID", "<uuid of event source manager>", "CollectorID", "<uuid of collector>",
"EventSourceID:", "<uuid of event source>", "ChainID", "<chain ID>",
"ChainSequence", "<Sequence number>" }
The following table describes each of the fields in the raw data event:
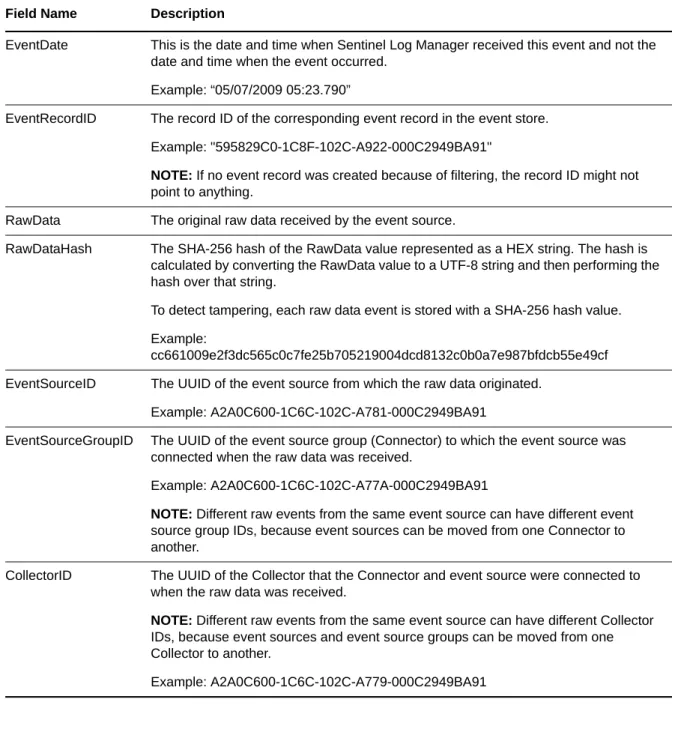
Table 3-2 Raw Data Representation
Field Name Description
EventDate This is the date and time when Sentinel Log Manager received this event and not the date and time when the event occurred.
Example: “05/07/2009 05:23.790”
EventRecordID The record ID of the corresponding event record in the event store. Example: "595829C0-1C8F-102C-A922-000C2949BA91"
NOTE: If no event record was created because of filtering, the record ID might not
point to anything.
RawData The original raw data received by the event source.
RawDataHash The SHA-256 hash of the RawData value represented as a HEX string. The hash is calculated by converting the RawData value to a UTF-8 string and then performing the hash over that string.
To detect tampering, each raw data event is stored with a SHA-256 hash value. Example:
cc661009e2f3dc565c0c7fe25b705219004dcd8132c0b0a7e987bfdcb55e49cf EventSourceID The UUID of the event source from which the raw data originated.
Example: A2A0C600-1C6C-102C-A781-000C2949BA91
EventSourceGroupID The UUID of the event source group (Connector) to which the event source was connected when the raw data was received.
Example: A2A0C600-1C6C-102C-A77A-000C2949BA91
NOTE: Different raw events from the same event source can have different event
source group IDs, because event sources can be moved from one Connector to another.
CollectorID The UUID of the Collector that the Connector and event source were connected to when the raw data was received.
NOTE: Different raw events from the same event source can have different Collector
IDs, because event sources and event source groups can be moved from one Collector to another.