(~
11111I11111111
o
and Maintenance
o
o
~~
000000000000
0000000000000 0000
OOODODODODODOD~DDOD
000000000000000 0000
PROPRIETARY INFORMATION
Copyright (c) 1987, The Ultimate Corp. All Rights Reserved.
This work
~sthe property of and embodies trade secrets and
confidential information proprietary to Ultimate, and may not
be reproduced, copied, used, disclosed, transferred, adopted,
or modified without the express written approval of Ultimate.
FCC WARNING
This equipment generates, uses, and can radiate radio
fre-quency energy and, if not installed and used in accordance
with the instruction manuals, may cause interference to radio
communications. It has been tested and found to comply with
the limits for a Class A computing device pursuant to Subpart
J
of Part 15 of FCC Rules, which are designed to provide
reasonable protection against such interference when operated
in a commercial environment. Operation of this equipment in a
residential area is likely to cause interference, in which
case the user, at his or her own expense, will be required to
take whatever measures necessary to correct the interference.
TABLE OF CONTENTS
FCC WARNING • • • . • • . • • • • • . • • • • • . • • • • • • • • . . • • • . . . • . • . . • . • • P-l
HOW TO USE THIS MANUAL . . . • • • • . • . . • . . • • • • • P-9
1. CONFIGURATION REQUIREMENTS .•.•..••.•••.••••••.•••••• 1-1 1.1 PC Revision Numbering Scheme ••••••••••.••••••••• 1-1
2. GETTING STARTED .••.•..•.•.••...••.•••••••••••••••••• 2-1
3. POWERING ON AND OFF •••••.•••.••••••.•..•.••.•.•.•.•• 3-1
3.1 Powering On . . . 3-1
3.2 Powering Off . . . 3-::2
4. INSTALLING THE OPERATING SYSTEMS ON YOUR PC ..••.•.•• 4.-1 4.1 Installing the Operating Systems on a One
Hard Disk System ••.•.•••••..•...••••••.••.•••... 4-4 4.1.1 If Your Hard Disk Already Contains an
Operating System (One Hard Disk System) ••. 4-4 4.1.2 Creating the Ultimate and DOS Partitions
(One Hard Disk System) . . • . • . . . . • • • • . • . . . 4-9 4.1.3 Preparing the DOS Partition and
Installing DOS (One Hard Disk System) ••.•• 4-17 4.1.4 Preparing the Ultimate Partition on
Your IBM XT or Ultimate 110 PC (One Hard
Dis k S Y stem) • . . . • . . . ...••.•• 4 - 2 0 4.1.5 Preparing the Ultimate Partition on
Your IBM AT (One Hard Disk System) ..••...• 4-21 4.1.6 Installing the Ultimate PC/OS (One Hard
Disk System) . . . 4-25
4.2 Installing the Operating Systems on a Two
Hard Disk System •..••...••••••••••.••.•.••••.• 4-34 4.2.1 If Your Hard Disk Already Contains an
Operating System (Two Hard Disk System) •.• 4-34 4.2.2 Creating the Ultimate and DOS Partitions
(Two Hard Disk System) ...•...•.•.••••..••• 4-42 4.2.3 Preparing the DOS Partition and
Installing DOS (Two Hard Disk System) ••.•• 4-55 4.2.4 Preparing the Ultimate Partition on
Your IBM XT or Ultimate 110 PC (Two Hard
Disk System) . . . 4-59
4.2.5 Preparing the Ultimate Partition on
Your IBM AT (Two Hard Disk System) ..••..•• 4-60 4.2.6 Installing the Ultimate PC/OS (Two Hard
Disk System) . . . 4-65
(-~ ,--,'
c'
7. 8. 9. 10. 11.SYSTEM STARTUP OPTIONS ..
...
·
...
. •• 7-1 7.1 Coldstart ••••.. . .
. •• 7-3 7.2 File-Restore •..
. . .
.
.7-10 7.3 Warmstart . . ....
. ...
. . . . 7-11 7.4 Going From DOS to the Ultimate pc/os.. .
. .
.
.7-14 7.5 :WARMSTOP and Returning to DOS ••••••. •••• 7-15BACKING UP THE SYSTEM ••••••••••.•••••...• ••• 8-1 Tapes or Diskettes •• . . . . 8-1
• •• 8-1 8.1 Organizing Backup
8.1.1 Labeling. 8.1.2 Rotating •. File-Save ..••
· . . . 8-2 . . . . . 8-3
8.2 8.3 8.4 8.5
Account-Save. T-DUMP . . . • . . .
• •••••••••••• 8 - 7
8.6
Update-Saves
8.5.1 ALL-UPDATE-SAVE. 8.5.2 PART-UPDATE-SAVE •.
PC-SAVE . • . • • • . . . • • • • . • • •
RESTORING DATA ... 9.1 File-Restore ••. 9.2 Account-Restore ..
9.3 9.4 9.5
9.2.1 From File-Save or Account-Save Tape or Diskette . • • • . . . • • • . . . • . . 9.2.2 From Update-Save Tape or Diskette ••
T-LOAD . . . .
Selective-Restore . . . • . • . . . • . .
File-Restore From Update-Save Tapes or
· . . . 8-11
. .• 8-13 .•• 8-13 .8-17 .8-20
· .9-1 · .9-1 .. 9-13
.9-13 .9-16 · .9-22 .9-24
Diskettes . . . 9-28
MAINTENANCE •. 10.1 Daily .••
Your Data. -10.1.1 Back Up
10.1.2 Check File Statistics Report .. 10.1.3
10.1.4
Verify-System • . • • . . . • . • . .
10.2
10.3
10.4
Check Print Overflow Table.
Weekly . . . .
10.2.1 File-Save . . • . . . • . 10.2.2 Clean Tape Heads .. Monthly . . . .
10.3.1 Clear ACC File. Semi-Monthly . • . • . . . 10.4.1 File-Restore •.
ADDING EQUIPMENT •••••.•••.•
.
. .
.
.
11.1 Serial Devices •••••••.11.2 Communications Boards ••
. . .
11.3 Other Devices .•..•..••.10-1 .10-1
· . . . 10-1
· .10-1 ..10-2 .10-3 .. 10-5 ..10-5 • ••••. 10-5
· . . . 10-6
..10-6 10-7 • •• 10-7
· . . .
.
· .11-1· . . . .
•• 11-1 .• 11-1. . .
• .11-112. COMMUNICATIONS •.•...•....•...•.•...•... 12-1
12.1 Asynchronous Communications ...•••.•••..•.••••. 12-1
12.2 SmarTerrn ... " ... " ... " ... 12-1 12.3 UltiLink . . . 12-1
13. TROUBLESHOOTING ...•..•...•..•..••...•.•..••... 13-1
13.1 General Procedures •...•.•.•••.•..•.•..•.. 13-1
13.2 Calling Your Ultimate Dealer or Ultimate
Technical Support •.•..••••.••...•..•.••••••. 13-3
13.3 Group Format Errors (GFEs) .•..••.••..••••.•••• 13-4
13 .. 4 Aborts ... " ... " ... " t_ . . . 13-6
13.5 System Hangs ... 13-8 13.5.1 System . . . 13-8 13.5.2 Terminals ... 13-8
13.5.3 Hangs During a File-Save ...•.•.•..• 13-9
13.5.3.1 Disk Errors ..•..•...•.•. 13-9
13.5.3.2 Tape and Diskette Errors ••.... 13-12
13.5.3.3 Lock Errors ...•...•.... 13-13
13.6 Printer Problems ...•...•...•... 13-15
13.7 CRT Problems •...•....•....•...•...•.... 13-16
13.8 Mismatches . . . , . . . 13-17
13.9 Errors While Installing the Ultimate PC/OS ..•. 13-19
13.10 Floppy Drive Errors •...•••.•.•.••.•••.••..••. 13-20
13.11 DOS Diagnostics •...•...•.•.•..•••••••••...• 13-21
13.12 Power Failures ...•...•...•...••.• 13-22
13.12.1 Power Failure Recoveries ..••... 13-22
13.13 Troubleshooting Log Sheet .•...•.•.•...•.. 13-25
14. INSTALLING A NEW VERSION OF THE ULTIMATE
OPERATING SySTEM ...•...• 14-1
14.1 Method 1: File-Restore From SYS-GEN Diskettes.14-2
14.1.1 Installing a New Version of the
Ultimate Operating System on a One
Hard Disk System ....•...•.•...•• 14-3
14.1.1.1 Preparing the Ultimate
Partition on Your IBM XT or
Ultimate 110 PC (One Hard
Disk System) .•.•.•...•... 14-3
14.1.1.2 Preparing the Ultimate
Partition on Your IBM AT (One
Hard Disk System) ...•.•..••. 14-6
14.1.1.3 Installing the Ultimate PC/OS
(One Hard
Disk System) ... 14-11
14.1.1.4 Restoring Application Accounts
(One Hard
Disk System) ....••.. 14-20
14.1.2 Installing a New Version of the
Ultimate Operating System on a Two
Hard Disk System .•...•...•...•... 14-24
14.1.2.1 Preparing the Ultimate
14.1.2.2 Preparing the Ultimate
Partition on Your IBM AT (Two
Hard Disk System) . . . 14-27
14.1.2.3 Installing the Ultimate PC/OS
(Two Hard Disk System) . . . 14-33
14.1.2.4 Restoring Application Accounts
(Two Hard Disk System) ... 14-42
14.2 Method 3: Selective Upgrade .•..•••..•....•..•• 14-46
APPENDIX A: GLOSSARy . . . • . • A-1
APPENDIX B: CRT CONFIGURATIONS . . . B-1
ADDS 2020 Terminal . . . B-1
ADDS Viewpoint/60 Terminal ...•.... ....
B-3ADDS Viewpoint/60+ Terminal ... . . .
B-6ADDS Viewpoint Color Terminal ... .•...
B-9ADDS Viewpoint Plus Terminal . . . ....
B-12ADDS Viewpoint (VDT) Terminal ... ...
B-14Volker-Craig Terminal . . .
B-16Wyse-50 Terminal . . . B-1 7
Wyse-85 Terminal ...•.•..•... B-21
APPENDIX C: PRINTER CONFIGURATIONS . . .
~.C-1APPENDIX D:
DEC Letterprinter 210 ...•...•.. C-1
DEC Letterprinter 100 . . . C-3
DEC Letterprinter 50 . . . • . . . C-5
EPSON FX-286 Printer . . . C-7
HONEYWELL L12ICQ and L32ICQ Printers ... C-10
NEC 3500 Letter Quality Printer ...•.... C-12
NEC 5500 SpinWriter . . . • . . . . C-14
Panasonic MD 1091 . . . C-16
HARDWARE CONFIGURATIONS . . . D-1
1.1 Hardware Specifications . . . D-1
1.2 Hardware Supported By Ultimate . . . D-2
1.2.1 Disk Drives ...••. D-2
1.2.2 Diskette Drives . . . D-2
1.2.3 Monitors, Printers, and
Terminals . . . D- 3
1.2.4 Tape Drives . . . • . . . . D-3
1.3 Formatting Diskettes .•••.••...••...•... D-4
1.4 Ultimate PC 110 System Board
Switch Settings ...••.. D-6
1.5 CRT Cable . . . D-7
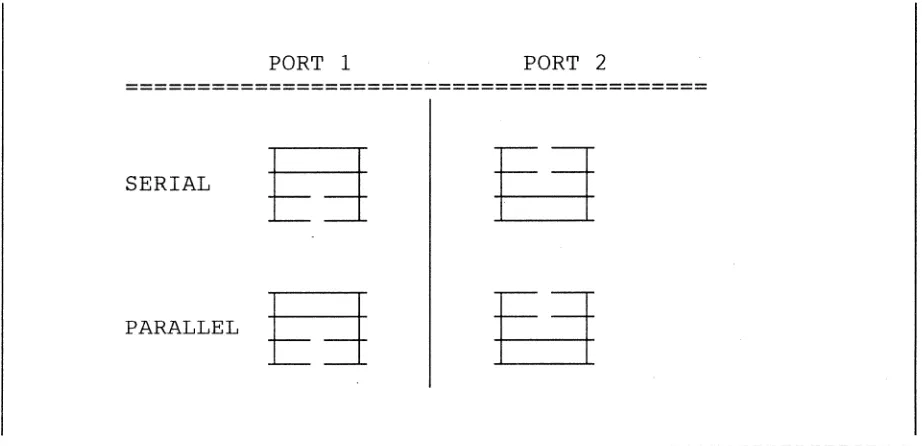
1.6 Tape Controller . . . • . . . D-l1
1.7 Color Controls ...•...•... D-13
APPENDIX E: STORING DISKETTES . . . E-l
INDEX . . . • • • . • . . . • . . . • • . • I-l
Illustrations
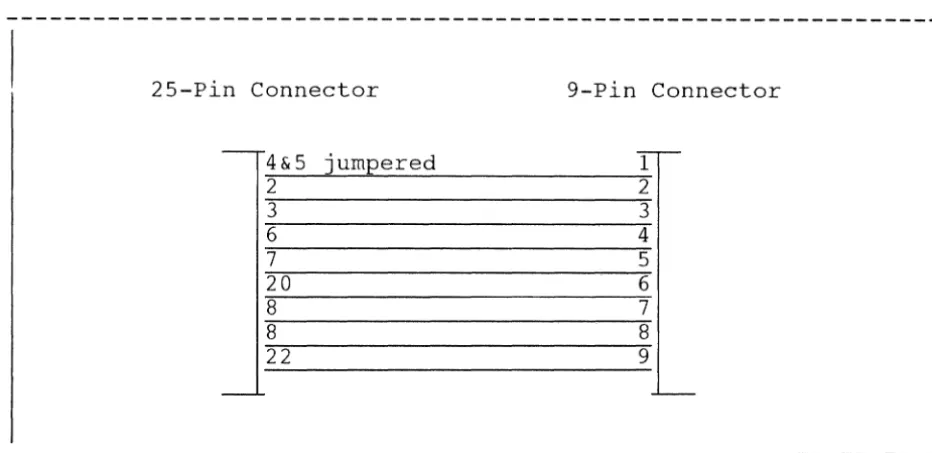
Figure D.l CRT Wiring Specifications ••.•.••••.•..••••• D-7
Figure D.2 Connector Layout •••••....•....•...••.•••••. D-8
Figure D.3 Recommended Conversion Cable Pin Layout ••.• D-8
Figure D.4 Alternate Conversion Cable Pin Layout •••••. D-8
Figure D.S Jumper Locations .•.•.••••••••••••••.•..•••• D-10
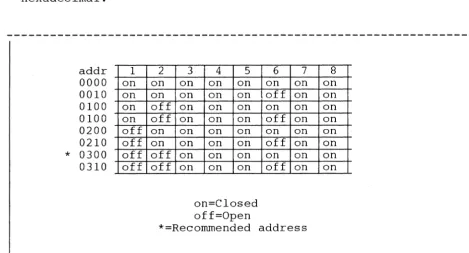
Figure D.6 Settings For Switch Bank 1 .•.•••.•••••••.•. D-ll
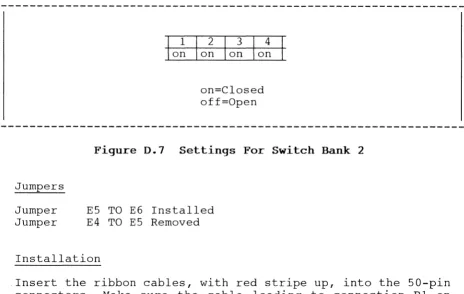
Figure D.7 Settings For Switch Bank 2 ••••..•.•...•.•.. D-12
Tables
Table D.l Hardware Specifications •.•••••••••••..••••• D-l
Summaries
If Your Hard Disk Already Contains an Operating
System (One Hard Disk System) . . . • • . • . . . . • . . . • . . • . • . • . • • 4-8
Creating the Ultimate and DOS Partitions (One Hard
Dis k S Y s tern) • • • • • • • • . • • • . . • . • • . • • • • • • . • . . • • • • • • • • . • • • • • 4 - 16
Preparing the DOS Partition and Installing DOS (One
Hard Disk System) •.•..•.•..••••••.•.•..•••..•••.••••••• 4-19
Preparing the Ultimate Partition on Your IBM XT or
Ultimate 110 PC (One Hard Disk System) •••.••••••••.•••• 4-20
Preparing the Ultimate Partition on Your IBM AT (One
Hard Disk System) .•••••••.•.••••.•.••••.••.••.••••••.•• 4-24
Installing the Ultimate PC/OS (One Hard Disk System) ••• 4-33
If Your Hard Disk Already Contains an Operating
System (Two Hard Disk System) .•••.••.••••...••.•••••••• 4-41
Creating the Ultimate and DOS Partitions (Two Hard
Disk System) . . . 4-54
Preparing the DOS Partition and Installing DOS (Two
Hard Disk System) •.••.•••..••.•••..••..••••••••••.•••.. 4-58
Preparing the Ultimate Partition on Your IBM XT or
Ultimate 110 PC (Two Hard Disk System) .•••.•••••••••••• 4-59
Preparing the Ultimate Partition on Your IBM AT (Two
Hard Disk System) •....•••.••...••...•.••.•.••.••••. 4-64
Installing the Ultimate PC/OS (Two Hard Disk System) ••• 4-73
Coldstart Procedure . . . 7-9
Warms tart Procedure . . . 7 - 9
File-Save Procedure . . . 8-6
Account-Save Procedure . • . . . . • • • . • • . • . . . • . . . • . . . • • . • . 8-10
T-DUMP Procedure . . • . . . • . . . • . . . • . . . • . . . • . . . 8-12
ALL-UPDATE-SAVE Procedure •.•...••.•.•.••.•.•••. 8-16
PART-UPDATE-SAVE Procedure .••.••...•...•..•••••..•... 8-19
PC-SAVE Procedure • • . • • • • • • • • • . . . • . . . • • . • • . • . • • • 8-23
File-Restore Procedure •••••.••••..••••••...•••••..••..• 9-12
Account-Restore from File-Save or Account-Save •••..•••. 9-15
Account-Restore from Update-Save ...•..•...••... 9-21
T-LOAD Procedure ••• , .. , .. , ... (II • • • • • " . . . 41"!111"" .. 9-23
Selective-Restore Procedure •••..•...•••.•....••••.••.•• 9-27
File-Restore from Update-Save Tapes or Diskettes •••••.• 9-39
Maintenance Items . . . til . . . '" • • (III . . . " '" . . . . " • III .. " .10-7
Procedures for Adding Equipment .•..•.•.•.•.•.•...••.•••
l1~3Preparing the Ultimate Partition on Your IBM XT or
Ultimate 110 PC (One Hard Disk System) ....•..•.•••.••.• 14-S
Preparing the Ultimate Partition on Your IBM AT (One
Hard Disk System) . . . fJ • • • • • * ••• , • • • • • • • • • • • • 14-10
Installing the Ultimate PC/OS (One Hard Disk System) ... 14-19
Preparing the Ultimate Partition on Your IBM XT or
Ultimate 110 PC (Two Hard Disk System) ...•••..• 14-26
Preparing the Ultimate Partition on Your IBM AT (Two
Hard Disk System).". "' ... " .. it . . . " • • I) " • • , . , , • • • • ~ It '$ . . . 14-32
HOW TO USE THIS MANUAL
The PC 0Eerations and Maintenance Manual is designed to guide you through normal operating procedures and scheduled maintenance of your PC when used with the Ultimate Operating System.
You should read and become familiar with all of the steps in this manual, and refer to specific sections as they are required.
Section 1
Section 2
Section 3
Section 4
Section 5
Section 6
Section 7
Section 8
lists the CONFIGURATION REQUIREMENTS for using the Ultimate Operating System on your PC.
lists the steps necessary in GETTING STARTED with your PC. This section explains what you will need to do before you can use your system, and i t provides a checklist so you may check your progress and ensure you have completed all the steps necessary in getting started.
explains the procedures for POWERING ON AND OFF your PC.
explains the procedures for INSTALLING THE OPERATING SYSTEMS ON YOUR PC. You must load DOS and the Ultimate Operating System on your hard disk(s) before you can begin using your system. At the end of each major step in this procedure, there is a summary. These summaries are quick-references for the experienced user only. Other users should follow the complete step-by-step instructions.
explains the procedures for LOADING ULTIWORD on your PC. You may use these instructions to load Ultiword (the WP account) on your system at any time.
explains the procedures for CHECKING YOUR EQUIPMENT. You should check and set up your terminals and printers before you begin using your system.
explains the SYSTEM STARTUP OPTIONS available for your system. These options are accessed when you boot your system.
explains the various procedures for BACKING UP THE SYSTEM. These instructions are vital in preventing data losses. For the exper_~nced user, this section also contains summaries v~ each type
Section 9 explains RESTORING DATA. If your data is lost or corrupted, i t can be recovered if you have used one of the backup methods explained in Section 8.
For the experienced user, this section also contains summaries of each type of restore procedure.
Section 10 explains MAINTENANCE. Ultimate recommends that you periodically perform certain maintenance functions to keep your system running smoothly. Procedures are given for daily, weekly, monthly, and semi-monthly maintenance.
Section 11 exp 1 a in s the steps nece s s ary f or ADDING EQUIPMENT. Whenever you add a piece of equipment, you need to make sure that your system recognizes it.
Section 12 provides information on COMMUNICATIONS, which are utilities used to transfer information.
Section 13 explains TROUBLESHOOTING procedures. If you experience a problem with your system, follow the steps in this section to try to determine the problem. Of course, whenever you need help with your system, you may contact your Ultimate dealer. If you have a maintenance pian, you may contact Ultimate Technical Support (see Section 13.2).
Section 14 explains the procedures involved in INSTALLING A NEW VERSION OF THE ULTIMATE OPERATING SYSTEM. Use these instructions to load a new revision (upgrade to a higher release) of the Ultimate Operating System.
Appendix A is a GLOSSARY of terms used throughout the manual.
Appendix B prov ides CRT CONFIGURATIONS, to aid you in setting up your CRTs.
Appendix C provides PRINTER CONFIGURATIONS, to aid you in setting up your printers.
Appendix D provides HARDWARE CONFIGURATIONS, to aid you in setting up your system. It also tells you what specific types of hardware are supported by Ultimate and can be used with your system.
PC Operations and Maintenance Page P
,
I
!
(
...-f
The end of this document contains a Reader Comment Form and a
~~_~~or~Fo~. If you find a problem or error in this
manual, or wlth the PC software, please complete the appropriate form. Then fold and tape the form so that Ultimate's address appears on the outside, and send i t to The Ultimate Corp.
(
You must have the following equipment to run the Ultimate 1 CONFIGURATION REQUIREMENTSOperating System on your PC. For more information on hardware requirements, see Appendix D.
1. The Ultimate 110 PC, IBM AT (or compatible), or IBM XT (or compatible), with at least a 10 megabyte hard disk.
2.
At least 256K memory.3. Either a monochrome text, monochrome graphic, or color graphics communications board and monitor.
4. A minimum of DOS 2.1, complete with PRIME, FDlSK, and diagnostics utilities. The IBM AT requires DOS 3.1 or higher.
5. The Ultimate PC SYS-GEN (ABS and Files) diskette set.
1.1 PC REVISION NUMBERING SCHEME
Beginning with Revision 102PC, Ultimate software revJ.sJ.ons are numbered as follows: All even-numbered revisions of the Ultimate PC/OS will only load on the IBM XT (and compatible hardware) and the Ultimate 110 PC. All odd-numbered revisions will load on the IBM XT (and compatible hardware), the IBM AT
(and compatible hardware), and the Ultimate 110 PC.
When you attempt to load an even-numbered Ultimate PC/OS revision on IBM AT hardware, you get the following message:
~THIS VERSION OF THE ULTIMATE OPERATING SYSTEM WILL NOT OPERATE ON THE IBM-AT"
If you see this message, call your Ultimate dealer to obtain an odd-numbered Ultimate PC/OS revision.
f--"
lj
(~
The following checklist contains all the steps you should 2 GETTING STARTEDfollow to get started with your system. You must complete each item on the checklist before you can begin creating and uSlng files on your Ultimate system.
I I
1. Power up your system. (See Section 3, "Powering On and Off".)2. Install the Ultimate PC Operating System. (See Section 4, "Installing the Operating Systems on Your PC.")
3. If you will be using UltiWord, load the WP account and set up user accounts and user names. (See Section 5, "Loading UltiWord.")
4. Check the location and baud rate of each terminal on your system. (See Section 6, "Checking Your Equipment.")
5. Check the location and baud rate of each printer on your system. See section 6, "Checking Your Equipment.")
When you have completed each item on this checklist, refer to the instructions in the remainder of this manual to maintain and use your system.
NOTES
~
3 POWERING ON AND OFF
3.1 POWERING ON
1. Turn the main power switch on. (Refer to your hardware manual for the location of this switch.)
2. Turn your PC monitor on. (Refer to your hardware manual for the location of this switch.)
NOTE: If you have not yet installed the Ultimate PC/OS, skip Step 3 and go on to the instructions in Section 4, "Installing the Operating Systems on Your PC."
3. If the system was :WARMSTOPped before i t was powered off, you should Warmstart the system. See Section 7.3 for instructions.
If the system was not :WARMSTOPped before it was powered off, you must Colds tart the system. See Section 7.1 for instructions.
PC Operations and Maintenance Page 3
- - - , - - - ' , , - -,,",
3.2 POWERING OFF
Generally, your Ultimate system may be left powered on. You may want to power off, however, during a long weekend or vacation, or if you are having power problems.
A :WARMSTOP brings the system down in a controlled manner. It halts all processing and flushes memory to protect data integrity.
1. Make sure all users are logged off the system. To do so, go to the main monitor (line 0), and at TCL (» type:
LOGTO SYSPROG and press RETURN.
Then press RETURN again to go to TCL. Type:
LISTU and press RETURN.
The main monitor (line 0) should be the only terminal logged on. If other users are logged on, make sure they log off before you continue.
2. Make sure there is no diskette in drive A:. Also, complete the printing of any current spool files. (Refer to the
.§.IT~~ Mana~ment ~nd .§.~E;?rt Guid~ if you need
infor-matlon on how to spool the flles to tape or diskette.) Be sure to complete this step before proceeding to the next step.
3. At TCL (», type:
: WARMS TOP and press RETURN.
wait for your PC to beep before you proceed.
If you wish to completely power down the system, continue with the following steps:
4. Turn your PC monitor off. (Refer to your hardware manual for the location of this switch.)
(
(
4 INSTALLING THE OPERATING SYSTEMS ON YOUR PC
Follow the procedures in this section to install the Disk Operating System (DOS) and the Ultimate Operating System
(PC/OS) onto your PC system.
In order for the hard disk to contain both the Ultimate PC/OS and DOS, you must separate the disk into two partitions. The first partition, DOS, must contain at least 5 cylinders. The rest of the disk is left for the Ultimate PC/OS. The PC/OS partition must contain at least 125 cylinders, or there will not be enough disk space to load the operating system.
If you already have one or more partitions on your hard disk(s), you will have to delete the partition(s) before you can create the new partitions. Then, once you have created the partitions, you will prepare each partition and install DOS and the Ultimate PC/OS on your hard disk(s).
Before you use the steps contained in this section, check off the answers to the following questions. The answers you check determine which set of instructions you must follow. (The instructions are all clearly labeled and easy to find.) By finding the answers to these questions before you begin, you will avoid having to stop and get more information when you are in the middle of this procedure.
1. How many hard disks does your system have?
2 .
I
lOne Hard DiskI I
Two Hard DisksWhat
I I
I I
I I
If you have instructions disk system,
4 .2.
a one hard disk system, start with the in Section 4. 1. I f you have a two hard start with the instructions in Section
type of hardware do you have?
IBM AT or Compatible
IBM XT or Compatible
Ultimate 110 PC
The instructions you must follow are different, depending on whether you have an IBM XT or Ultimate 110 PC, or an IBM AT. You will be told which set of procedures to follow for your hardware.
3. Is your version of the Ultimate Operating System an odd or even revision number?
I I
Odd Revision Number (for example, PCl13)I I
Even Revision Number (for example, PC112)If you have an IBM AT (or compatible), you must use an odd-numbered revision. If you have the wrong type of revision, call your Ultimate dealer.
4. Has an operating system (such as DOS) already been installed on your system? If you don't know, ask your dealer.
I
I
Yes, my hard disk contains an operating system.I I
No, my hard disk does not contain an operatingsystem.
If your system already contains an operating system, you will have to delete its partition. (You will be instructed to do this if necessary.)
5. Do you already have a version of the Ultimate PC/OS on your hard disk(s)?
I
I
Yes, I have Ultimate PC/OS on my hard disk.I I
No, I do not have Ultimate PC/OS on my hard disk.If your answer is yes, and you want to install a new version of the Ultimate PC/OS, do not use these in-structions. Instead, go to Section 14, "Installing A New Version of the Ultimate Operating System."
If your answer is yes, and you want to change the size of the partitions, use the instructions in this section (Section 4).
If your answer l S no, use the instructions In this
section (Section 4).
6. If you have the Ultimate PC/OS on your hard disk( s), l S
Ultimate a permanent partition entry?
I I
Yes, Ultimate PC/OS is a permanent partition entry.I
I
No, Ultimate PC/OS is not a permanent partition,tl--~\
(
Now that you have answered the questions, you are ready to begin loading DOS and the Ultimate Operating System. In general, the instructions in Section 4 are divided into two parts:
Section 4.1 Installing the Operating Systems on a One Hard Disk System
Section 4.2 Installing the Operating Systems on a Two Hard Disk System
Be sure to follow the correct set of instructions.
There are also summaries at the end of each section. If you are already familiar with DOS commands and partitions, you may use the instructions in the summaries as a quick reference aid. However, Ultimate recommends that you follow the step by step instructions if you are not already familiar with these procedures.
To make sure you complete all the necessary steps, use the following checklist.
INSTALLING OPERATING SYSTEMS CHECKLIST
Answer the questions.
If necessary, back up the data in the existing partition(s), and then delete the partition(s).
Create the Ultimate and DOS partitions.
Prepare the DOS partition and install DOS.
Prepare the Ultimate partition.
Install the Ultimate PC/OS.
4.1 INSTALLING THE OPERATING SYSTEMS ON A ONE BARD DISK SYSTEM
Use these instructions only if you have a one hard disk system. If you have a two hard disk system, follow the instructions in section 4.2.
4.1.1 IF YOUR HARD DISK ALREADY CONTAINS AN OPERATING SYSTEM (ONE BARD DISK SYSTEM)
If your computer already contains an operating system, then your system has one or more partitions on its hard disk. You must delete these existing partition(s) before you can go on to the steps for creating the DOS and Ultimate partitions.
If your hard disk does not contain an operating sy~tem, skip these instructions and go on to Section 4.1.2, "Creating the Ultimate and DOS Partitions (One Hard Disk System)."
Use the following instructions to delete any existing partition(s) on your one hard disk system.
1. Completely back ~ your system.
If you have DOS on your hard disk, use the DOS BACKUP command to back up your system. (See your DOS manual for more information.)
If you have the Ultimate operating system on your hard disk, do a full File-Save to back up the Ultimate partition, and then use the DOS BACKUP command to back up your DOS partition. (Refer to Section 8.2 for instructions on performing a File-Save, and refer to your DOS manual for instructions on using the DOS BACKUP command.)
WARNING: All your files and data are deleted when you delete the partition(s). Therefore, you must back ~ your system.
2. If you created a permanent Ultimate partition entry, you must now delete i t by using the DEUPART.EXE Utility.
a. At the C> prompt, type:
DEUPART and press RETURN.
The following screen 1S displayed.
(
C>DEUPART
SELECT DISK DRIVE "C:" OR "D:" «CR> OR D):
NOTE: Your system does not have a drive D:.
b. To delete the partition entry in drive C:, press RETURN.
When the DEUPART.EXE utility is finished, the following screen is displayed.
DEUPART FINISHED
C>
3. Load the DOS diskette in drive A:.
4 .
5.
6.
Turn on both the ma.Ln power and your monitor. (Refer to your hardware manual for the positions of these switches. )
When asked for a new date, press RETURN.
When asked for a new time, press RETURN.
At the A> prompt, type:
FDISK and press RETURN.
NOTE:
The following screen .LS displayed.
The wording on your screens may be different, according to the version of DOS you are using.
FDISK OPTIONS
Current Fixed Disk Drive: 1
Choose one of the following:
1. Create DOS Partition 2. Change Active Partition 3. Delete DOS Partition 4. Display Partition Data
Enter choice: [1]
Press Esc to return to DOS
CAUTION: This step deletes all the data and ~iles on your hard disk. Do not continue with these instructions unless you have completely backed up your system.
Enter 3 and press RETURN to select Delete DOS Partition.
The following screen is displayed.
(/
Delete DOS Partition
Current Fixed Disk Drive: 1
Partition Status
1 A
Type DOS
Start
X
End XX
Total disk space 1S XXX cylinders.
Warning! Data in the DOS partition will be lost. Do you wish to
Size XX
continue . . . ? [ ]
Press Esc to return to FDISK Options
Enter Y and press RETURN to delete the DOS partition.
The following screen 1S displayed.
Delete DOS Partition
Current Fixed Disk Drive: 1
No partitions defined.
Total disk space 1S XXX cylinders.
DOS partition deleted.
Press Esc to return to FDISK Options
Press ESC to return to the FDISK Options menu.
Because the FDISK Options menu is already displayed, you can skip the first three steps in the following instructions, "Creating the Ultimate and D)S Parti-tions (One Hard Disk System)." Go directly to Step 4.
SUMMARY OF II IF YOUR BARD DISK ALREADY CONTAINS
AN OPERATING SYSTEM (ONE HARD DISK
SYSTEM)-1. Completely back ~ your system.
2. If you created a permanent Ultimate partition entry, you must now delete it.
a. At the C> prompt, type DEUPART and press RETURN.
b. Press RETURN to select drive C:.
3. Load the DOS diskette in drive A:.
4. Turn on both the main power and your monitor.
5. Press RETURN when asked for a new date and a new time.
6. At the A> prompt, type FDISK and press RETURN.
7. Enter 3 and press RETURN to select Delete DOS Partition.
8. Enter Y and press RETURN to delete the DOS partition.
9. Press ESC to return to the FDISK Options menu.
,f"
(
(
4.1.2 CREATING THE ULTIMATE AND DOS PARTITIONS (ONE HARD DISK SYSTEM)
To install more than one operating system on your hard disk, you must partition your disk. Each partition holds an operating system. The first partition holds DOS, and the second partition holds the Ultimate Operating System.
Use the following steps to create the DOS and Ultimate partitions.
1. Load the DOS diskette in drive A:.
2. Turn on both the main power and your monitor. (Refer to your hardware manual for the locations of these switches.)
3. When asked for a new date, press RETURN.
When asked for a new time, press RETURN.
4. At the A> prompt, type:
FDISK and press RETURN.
The following screen is displayed.
NOTE: The wording on your screens may be different, according to the version of DOS you are using.
FDISK OPTIONS
Current Fixed Disk Drive: 1
Choose one of the following:
1. Create DOS Partition
2. Change Active Partition
3. Delete DOS Partition 4. Display Partition Data
Enter choice: [1]
Press Esc to return to DOS
NOTE: The 1 lS displayed automatically.
Press RETURN to select Create DOS Partition.
The following prompt is displayed.
Do you wish to use the entire fixed disk for DOS (YIN)?
Enter N and press RETURN.
(
Create DOS PartitionCurrent Fixed Disk Drive: 1
No partitions defined.
Total disk space is
xxx
cylinders. Maximum available space isxxx
cylinders at cylindero.
Enter partition size . . . : [ XXX]
Press Esc to return to FDISK Options
Enter the size (in cylinders) of the DOS partition, and press RETURN. For example, enter 20 and press RETURN.
NOTE: You may make the partition any size you wish, as long as i t contains at least 5 cylinders, and leaves at least 125 cylinders for the Ultimate PC/OS.
The following screen lS displayed.
---Create DOS Partition
Current Fixed Disk Drive: 1
Partition Status
1 N
Type DOS
Start
o
End Size 19 20Total Disk space lS
xxx
cylinders.Enter partition size . . . . • . . . • . . . : Enter starting cylinder number .. :
Press Esc to return to FDISK Options 20 [000]
Enter 0 and press RETURN for the starting cylinder number.
The following screen lS displayed.
Create DOS Partition
Current Fixed Disk Drive: 1
Partition
1
Status
N
Type DOS
Start
o
Total disk space is
xxx
cylinders. End19
Size 20
Enter partition size . . . • . . : 20 Enter starting cylinder number ... : 0
DOS partition created
The following screen 1S displayed.
FDISK OPTIONS
Current Fixed Disk Drive: 1
Choose one of the following:
1. Create DOS Partition 2. Change Active Partition 3. Delete DOS Partition 4. Display Partition Data
Enter choice: [1]
Press Esc to return to DOS
Enter 2 and press RETURN to select Change Active Partition.
The following screen is displayed.
Change Active Partition
Current Fixed Disk Drive: 1
Partition 1 Status N Type DOS Start
o
End 19Total disk space is
xxx
cylinders. Enter the number of the partition you want to make active ••..•.••..•..• : [Press Esc to return to FDISK Options
Size
20
Enter 1 and press RETURN to make partition 1 active.
This step allows DOS to automatically boot from the hard disk when you power up your computer.
The following screen is displayed.
Change Active Partition
Current Fixed Disk Drive: 1
Partition 1 Status A Type DOS Start
o
End 19Total disk space lS
xxx
cylinders. Partition 1 made active.Press Esc to return to FDISK Options
Size
20
o
I('
Press ESC to return to the FDISK Options menu.5. At the FDISK Options menu, press ESC to return to DOS.
The following screen is displayed.
System will now restart
Insert DOS diskette in drive A: Press any key when ready . • •
Check to make sure the DOS diskette is ln drive A:, then press any key to continue.
6. At the "Enter new date" prompt, press RETURN.
At the "Enter new time" prompt, press RETURN.
You are returned to the A> prompt. Go on to Section 4.1.3, "Preparing the DOS Partition and Installing DOS (One Hard Disk System)."
SUMMARY OF CREATING THE ULTIMATE AND DOS PARTITIONS (ONE HARD DISK SYSTEM)
1. Load the DOS diskette in drive A:.
2. Turn on both the main power and your monitor.
3. Press RETURN when asked for a new date and a new time.
4. At the A> prompt, typeFDISK and press RETURN.
5. Press RETURN to select Create DOS Partition.
6. At the "Do you wish to use the entire fixed disk for DOS
(YIN)?" prompt, enter N and press RETURN.
7. Enter the size (in cylinders) of the DOS partition, and press RETURN.
8. Enter 0 and press RETURN for the starting cylinder number.
9. Press ESC to return to the FDISK Options menu.
10. Enter 2 and press RETURN to select Change Active Partition.
11. Enter 1 and press RETURN to make partition 1 active.
12. Press ESC to return to the FDISK Options menu. Then press ESC again to return to DOS.
13. At the "Insert DOS diskette in drive A:" prompt, make sure the DOS diskette is still in drive A:. Then press any key to continue.
('
c
4.1.3 PREPARING THE DOS PARTITION AND INSTALLING DOS (ONE BARD DISK SYSTEM)
To install DOS on your hard disk, you must use the FORMAT command. This command erases and prepares the DOS partition, and then installs DOS on your hard disk.
Use the following steps to prepare the DOS partition and install DOS on your one hard disk system.
1. Make sure the DOS diskette lS In drive A:.
2. At the A> prompt, type:
FORMAT C:/S and press RETURN.
This command formats drive C:. The "S" option transfers the DOS operating system from the diskette to the drive specified, which in this case is drive
c: .
The following screen is displayed.
NOTE: The wording on your screens may be different, according to the version of DOS you are using.
WARNING, ALL DATA ON NON-REMOVABLE DISK DRIVE C: WILL BE LOST!
Proceed with Format (YIN)?
Enter Y process.
and press RETURN to proceed with the formatting
When formatting is complete, a screen similar to the following is displayed.
WARNING, ALL DATA ON NON-REMOVABLE DISK DRIVE C: WILL BE LOST!
Proceed with Format (Y/N)?Y
Formatting ... Format complete System transferred
A>
667648 bytes total disk space 65536 bytes used by system 602112 bytes available on disk
---~---~---
---3. Unload the DOS diskette and load the diskette labeled "UT.EXE and utilities" in drive A:.
4. Then type:
COPY A:*.* C: and press RETURN.
When the system is finished copying the utilities diskette, a screen similar to the following is displayed.
A>COPY A:*.* C: A:UT.EXE
A:BADSECT.EXE A:CLEARUC.EXE A:DEUPART.EXE
4 File(s) copied
A>
5. If you used the DOS BACKUP command to save your data in the DOS partition, use the DOS RESTORE command to load the data now. See your DOS manual for more information.
PC Operations and Maintenance Page 4 18
c
o
(
6. Then type:
c:
and press RETURN.If you hav~ an IBM XT (or compatible) or an Ultimate 110 PC, go on to section 4.1.4. If you have an IBM AT
(or compatible), go on to Section
4.1.5.
SUMMARY OF PREPARING THE DOS PARTITION AND INSTALLING DOS (ONE HARD DISK SYSTEM)
1. Make sure the DOS diskette is in drive A:.
2. At the A> prompt, type FORMAT C:/S and press RETURN.
3. Enter Y and press RETURN to proceed with the formatting process.
4. When formatting is complete, unload the DOS diskette and load the diskette labeled "UT.EXE and utilities" in drive
A: •
5. Type COPY A:*.* C: and press RETURN.
6. If you used the DOS BACKUP command to save your data in the DOS partition, use the DOS RESTORE command to load-the data now.
7. Then type C: and press RETURN.
Installing the Operating Systems on Your PC
4.1.4 PREPARING THE ULTIMATE PARTITION ON YOUR IBM XT OR ULTIMATE 110 PC (ONE BARD DISK SYSTEM)
In this section, you will be preparing the Ultimate partition on your IBM
XT
(or compatible), or Ultimate 110pC
system. If you have an IBM AT (or compatible), do not use these instructions. Instead, go on to the instructfOns in Section 4.1.5, "Preparing the Ultimate Partition on Your IBM AT (One Hard Disk System)."1. At the C> prompt, type:
CLEARUC and press RETURN.
This command starts the disk preparation utilities.
The following screen is displayed.
C>CLEARUC
BEGINNING ULTIMATE CYLINDER
=
XXXENDING ULTIMATE CYLINDER
=
XXXCYLINDER
=
XXXCLEARUC F1NISHED
C>
Go on to the instructions in Section 4.1.6, II Installing
the Ultimate PC/OS (One Hard Disk System)."
SUMMARY OF PREPARING THE ULTIMATE PARTITION ON YOUR IBM XT OR ULTIMATE 110 PC (ONE BARD DISK SYSTEM)
4 • 1.5 PREPARING THE ULTIMATE PARTITION ON YOUR IBM AT (ONE HARD DISK SYSTEM)
If you have an IBM AT (or compatible) computer, you must use Ultimate's BADSECT Utility to prepare the Ultimate partition on your hard disk.
By using the BADSECT Utility, the Ultimate PC/OS can use certain tracks that were flagged as bad by the manufacturer. To use these tracks, the utility builds an alternate track table in the first two cylinders of the Ultimate partition. BADSECT first resets these tracks, and then checks them along with the rest of the Ultimate partition. The BADSECT Utility is only available on IBM ATs (and compatibles) with 20 and 33 megabyte drives as of Revision PC105 and later (kernel 200).
Use the following steps to prepare the Ultimate partition of your IBM AT (or compatible) one hard disk system.
1. At the C> prompt, type:
BADSECT and press RETURN.
A screen similar to the following 1S displayed.
THIS PROGRAM IS AN ADJUNCT TO THE ULTIMATE OPERATING SYSTEM.
THE FUNCTION OF THIS PROGRAM IS TO PRODUCE A "BAD SECTOR TABLE". IT HAS BEEN TESTED ONLY ON IBM-AT'S WITH TYPE 2
AND TYPE 3 (20 & 33 MEGABYTE) DISKS.
THIS IS THE VERSION OF 12-4-85 FOR REV 200 & UP.
THIS PROGRAM DESTROYS THE DATA IN THE ULTIMATE PARTITION!!!
SELECT DISK DRIVE "C:" OR "0:" «CR> OR D):
---~-
---Press RETURN to select drive C:.
NOTE: Your system does not have a drive
0:.
The following prompt 1S displayed.
DO NOT RESET INTERLEAVE AND ERROR TABLES (AGREE
=
<CR>, RESET=
R):If you are preparing the Ultimate partition for the first time, or changing the size of the Ultimate partition, type R and press RETURN to reset the tables.
If you are not preparing the Ultimate partition for the first time or changing the partition size, Ultimate recommends you just press RETURN. By not resetting the tables, the system can retain the bad spots i t has gradually accumulated.
The following prompt lS displayed.
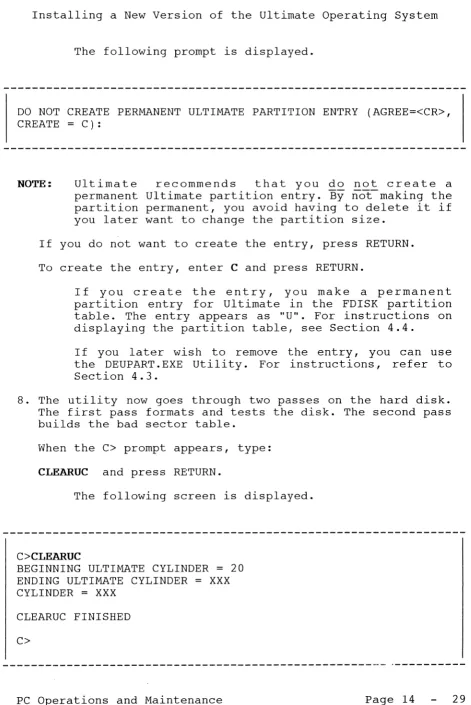
DO NOT CREATE PERMANENT ULTIMATE PARTITION ENTRY (AGREE=<CR>, CREATE = C):
NOTE: Ultimate recommends that you do not create a permanent Ultimate partition entry. I1-yoUidon't make the partition permanent, you avoid having to delete i t if you want to ~hange the partition size later.
If you do not want to create a permanent entry, press RETURN.
To create a permanent entry, type C and press RETURN.
If you create the entry, you make a permanent partition entry for Ultimate in the FDISK partition table. The entry appears as HUH. For instructions on displaying the partition table, see Section 4.4.
If you later wish to remove the entry, you must use the DEUPART.EXE utility. For instructions, refer to Section 4.3.
r~'"
(--.
minutes, depending on your system configuration.)
When the C> prompt appears, type:
CLEARUC and press RETURN.
The following screen is displayed.
C>CLEARUC
BEGINNING ULTIMATE CYLINDER
=
20 ENDING ULTIMATE CYLINDER=
XXXCYLINDER
=
XXXCLEARUC FINISHED
C>
Go on to the instructions in Section 4.1.6, "Installing the Ultimate PC/OS (One Hard Disk System)."
PC Operations and Maintenance Page 4 23
---~.---Installing the Operating Systems on Your PC
SUMMARY OF P~PARING THE ULTIMATE PARTITION ON YOUR IBM AT (ONE HARD OISK SYSTEM)
1. At the C> prompt, type BADSECT and press RETURN.
2. Press RETURN to select drive C:.
3. At the "DO NOT RESET INTERLEAVE AND ERROR TABLES (AGREE
=
<CR>, RESET=
R" prompt, type R and press RETURN (ifpreparing the Ultimate partition for the first time or changing the partition size), or press RETURN to reset.
4. At the "DO NOT CREATE PERMANENT ULTIMATE PARTITION ENTRY (AGREE=<CR>, CREATE
=
C)" prompt, either press RETURN, or type C and press RETURN to create. (Ultimaterecommends that you do not create a permanent partition entry. )
5. At the C> prompt, type CLEARUC and press RETURN.
---~---~---
---c
(~-. 4.1.6 INSTALLING THE ULTIMATE PC/OS (ONE HARD DISK SYSTEM) If the Ultimate Operating System has never been installed on your computer, use the following instructions to load the Ultimate PC/OS.
If you £~~~~~~ !~~ E~~!i!i~~ ~i~~, ~~ ~~! use th~se instructions. Instead, follow the instructions for performlng a File-Restore in Section 9.1.
1. At the C> prompt, type:
UT and press RETURN.
The following screen is displayed.
C>UT
UT LOADED AT X'XXXXX'
This is the Ultimate Operating System Copyright (c) The Ultimate Corp. 1985
Enter Option:
Enter F to select File-Restore.
The following screen is displayed.
This is the Ultimate Operating System Copyright (c) The Ultimate Corp. 1985
Enter Option: F
MEMORY SIZE
=
XXX KBUSING DISK C: 02 COMM LINES
LOAD ABS [AND FILES] FROM (T)APE OR (F)LOPPY Insert COLD section floppy
Press <CR> when ready
NOTE: If your system does not have a tape drive, the "LOAD
ABS [AND FILES] FROM (T) APE OR (F) LOPPY" prompt is not displayed on your screen. If you do have a tape drive, enter F and press RETURN to indicate that you are going to use an ABS and Files diskette. (Do not load the diskette now.) You are then prompted to "Insert COLD section floppy."
Unload the "UT.EXE and Utilities" diskette, and load the diskette labeled "Cold Load Section" in drive A:. Then press RETURN.
The following screen is displayed.
Disc cartridge attached Block size: 500
System serial # is presently
Enter system serial # or <CR> to accept
Enter your system serial number and press RETURN. For example, enter PA1234 and press RETURN.
(
(
"--" ,,"
Disc cartridge attached Block size: 500
System serial # is presently
Enter system serial # or <CR> to accept PA1234
System serial # is presently PA1234
Enter system serial # or <CR> to accept
Press RETURN if the serial number is correct.
You may re-enter your serial number if you made a mistake. Press RETURN after you enter the correct
serial number.
The following screen 1S displayed.
System serial # is presently PA1234
Enter system serial # or <CR> to accept
Mount ABS tape and enter number of files to skip, if any:
2. Unload the "Cold Load Section" diskette, and load the diskette labeled "ABS and Files Disk #1" in drive A:. Then press RETURN.
The following screen is displayed.
Mount ABS tape and enter number of files to skip, if any:
xx-xxx
XXXX-XXX XXXX-XXX XXXX-XXX XXXX-XXX
Spooler started
Mount DATA tape and press RETURN
-~---
---Press RETURN.
CAUTION: Do not change the diskette.
The following screen is displayed.
Mount ABS tape and enter number of files to skip, if any:
xx-xxx
XXXX-XXX XXXX-XXX XXXX-XXX XXXX-XXX
Spooler started
Mount DATA tape and press RETURN
L 01F4 time date DATA PC FILES R10*PCl13 Seq# of this data tape: 0 0 0 0
Is this the right tape (YIN)?
01
Check the diskette label to verify that the diskette in drive A: is the ABS and Files Disk #1. (If you are not sure how to check the diskette label, refer the topic System Sequencing Information under the heading "Update Save Procedures" in the ~stem Mana~ment an~ .§.~port Guide. )
(-c
Then type:
Y and press RETURN.
The File-Restore will now begin. Each filename on the diskette is listed on your screen. The following screen is a sample of what is displayed.
Mount DATA tape and press RETURN
L 01F4 time date DATA PC FILES RI0*PCI13 01 Seq# of this data tape: 0 0 0 0
Is this the right tape (Y/N)?Y SYSTEM 3521,11,1
SYSTEM-ERRORS 3568,1,1 SYSTEM-ERRORS 3569,1,1
SYSTEM-ERRORS 3570,29,1 BLOCK-CONVERT 3599,19,1 Mount reel #2
Label : 11 FEB 1987 DATA BLOCK-CONVERT PC FILES RI0*PCI13 (C)ontinue/(Q)uit?
Unload the first ABS and Files diskette. Then load the diskette labeled "ABS and Files Disk #2." When you are ready, enter C to continue.
You will continue to be prompted at the end of each diskette to mount the next reel (which means to load the next diskette). There are approximately six ABS and Files diskettes.
3. When all the diskettes have been loaded, the following screen is displayed.
Update/transaction tapes (Y/N)?
Enter N and press RETURN.
The following screen is displayed.
Update/transaction tapes (Y/N)? N Saving Monitor
Linking workspace for line 0
date time Logon please:
«< Welcome to the Ultimate Computer System »> «< Copyright date The Ultimate Corp. »> «< time Release XX Rev XXXX date »>
This is the Cold-Start Procedure Enter <CR> to continue
Press RETURN.
The following screen 1S displayed.
date time Logon please:
«< Welcome to the Ultimate Computer System »> «< Copyright date The Ultimate Corp. »> «< time Release XX Rev XX date »>
This is the Cold-Start Procedure Enter <CR> to continue
Linking secondary TCL works paces
X additional task workspaces initialized
time date
Time
=
NOTE: If your system has an external clock, you are not
(
(
.. /Enter the time in military format (HH:MM:SS) and press RETURN.
For example, enter 5 PM as 17:00:00. The following screen is displayed.
This is the Cold-Start Procedure Enter <CR> to continue
Linking secondary TCL works paces
X additional task workspaces initialized
time date
Time
=
17:00:00 17:00:00 date Date=
Enter the date ln the following format: MM/DD/YY. Then press RETURN.
For example, enter February 3, 1987 as 02/03/87. The following screen is displayed.
This is the Cold-Start Procedure Enter <CR> to continue
Linking secondary TCL works paces
X additional task workspaces initialized
time date
Time
=
17:00:00 17:00:00 date Date=
02/03/8717:00:00 03 FEB 1987
The system will display several messages. If there are any error messages, call your Ultimate dealer or
Ultimate Technical Support (see Section 13.2).
The following screen is displayed.
date time Logon please:
4. You may now log on.
(
SUMMARY OF INSTALLING THE ULTIMATE PC/OS (ONE HARD DISK SYSTEM)
1. At the C> prompt, type UT and press RETURN.
2. Enter F to select File-Restore.
3. If you have a tape drive, enter F and press RETURN to
indicate that you will be using an ABS and Files diskette. (Do not load this diskette now.)
4. Load the Cold Load Section diskette In drive A:. Then press RETURN.
5. Enter your system serial number.
6. Unload the Cold Load Section diskette, and load the ABS and Files disk #1 in drive A:. Then press RETURN.
7. At the "Mount DATA tape" prompt, press RETURN.
8. At the "Is this the right tape (Y/N)?" prompt, check the diskette label to verify that the diskette in drive A: is the ABS and Files Disk #1. Then type Y and press RETURN.
9. Continue mounting the ABS and Files diskettes as
prompted. When all the diskettes have been loaded, enter N and press RETURN at the "Update/transaction tapes
(Y/N)?" prompt.
10. Press RETURN at "This is the Cold-Start Procedure."
11. I f your system does not have an external clock, enter the time in military format (HH:MM:SS) and press RETURN. Then enter the date (MM/DD/YY) and press RETURN.
12. You may now log on.
14. Ultimate recommends that you do a PC-SAVE on your system.
4.2 INSTALLING THE OPERATING SYSTEMS ON A TWO HARD DISK SYSTEM
Use these instructions only if you have a two hard disk system.
4.2.1 IF YOUR HARD DISK ALREADY CONTAINS AN OPERATING SYSTEM (TWO HARD DISK SYSTEM)
If your computer already contains an operating system, then your system has one or more partitions on its hard disks. You must delete these existing partitions before you can go on to the steps for creating the DOS and Ultimate partitions.
If your hard disk does not contain an operating system, skip these instructions and go on to Section 4.2.2, "Creating the Ultimate and DOS Partitions (Two Hard Disk System)."
Use the following instructions to delete any existing par-titions on your two hard disk system.
1. Completely back ~ your system.
If you have DOS on your hard disks, use the DOS BACKUP command to back up your system. (See your DOS manual for more information.)
If you have the Ultimate operating system on your hard disks, do a full File-Save to back up the Ultimate partitions, and then use the DOS BACKUP command to back up your DOS partitions. (Refer to Section 8.2 for instruc-tions on performing a File-Save, and refer to your DOS manual for instructions on using the DOS BACKUP command.)
WARNING: All your files and data are deleted when you delete the partitions. Therefore, you must back
~ your system.
2. If you created permanent Ultimate partition entries, you must now delete them by using the DEUPART.EXE Utility.
a. At the C> prompt, type:
DEUPART and press RETURN.
The following screen is displayed.
c
C>DEUPART
SELECT DISK DRIVE "C:" OR "D:" «CR> OR D):
b. You must now delete the permanent partition entry in each drive that i t exists: drive C:, drive D:, or both.
To delete the partition entry for drive C:, press RETURN.
To delete the partition entry for drive D:, type D and press RETURN.
To delete the permanent partition entry in both drives, press RETURN to select drive C:. Then type D and press RETURN to select drive D:.
When the DEUPART.EXE Utility is finished, the following screen is displayed.
( DEUPART FINISHED
c
C>
3. Load the DOS diskette in drive A:.
4.
5.
6.
Turn on both the main power and your monitor. (Refer to your hardware manual for the positions of these switches. )
When asked for a new date, press RETURN.
When asked for a new time, press RETURN.
At the A> prompt, type:
FDISK and press RETURN.
The following screen 1S displayed.
NOTE: The wording on your screens may be different, according to the version of DOS you are using.
FDISK OPTIONS
Current Fixed Disk Drive: 1
Choose one of the following:
1. Create DOS Partition 2. Change Active Partition 3. Delete DOS Partition 4. Display Partition Data
5. Select Next Fixed Disk Drive
Enter choice: [1]
Press Esc to return to DOS
CAUTION: This step deletes all the data and files on your hard disk. Do not continue with these instructions unless you have completely backed up your system.
Enter 3 and press RETURN to select Delete DOS Partition.
The following screen is displayed.
(--(
Delete DOS Partition
Current Fixed Disk Drive: 1
Partition Status
1 A
Type DOS
Start
X
End
XX
Total disk space lS XXX cylinders.
Warning! Data in the DOS partition will be lost. Do you wish to
Size
XX
continue . . . ? [ ]
Press Esc to return to FDISK Options
Enter Y and press RETURN to delete the DOS partition.
The following screen is displayed.
Delete DOS Partition
Current Fixed Disk Drive: 1
No partitions defined.
Total disk space is XXX cylinders.
DOS partition deleted.
Press Esc to return to FDISK Options
Press ESC to return to the FDISK Options menu.
The following screen is displayed.
FDISK OPTIONS
Current Fixed Disk Drive: 1
Choose one of the following:
1. Create DOS Partition 2. Change Active Partition 3. Delete DOS Partition 4. Display Partition Data
5. Select Next Fixed Disk Drive
Enter choice: [1]
Press Esc to return to DOS
---Enter 5 and press RETURN to select Select Next Fixed Drive.
The following screen is displayed.
(~
FDISK OPTIONS
Current Fixed Disk Drive: 2
Choose one of the following:
1. Create DOS Partition
2. Change Active Partition 3. Delete DOS Partition
4. Display Partition Data
5. Select Next Fixed Disk Drive
Enter choice: [1]
Press Esc to return to DOS
Enter 3 and press RETURN to select Delete DOS Partition.
The following screen is displayed.
Delete DOS Partition
Current Fixed Disk Drive: 2
Partition Status
1 A
Type DOS
Start
X
End XX
Total disk space 1S XXX cylinders.
Warning! Data in the DOS partition will be lost. Do you wish to
continue . . . ?
Press Esc to return to FDISK Options Size
XX
Enter Y and press RETURN to delete the DOS part'tion.
The following screen 1S displayed.
---Delete DOS Partition
Current Fixed Disk Drive: 2
No partitions defined.
Total disk space 1S
xxx
cylinders.DOS partition deleted.
Press Esc to return to FDISK Options
7. Press ESC to return to the FDISK Options menu.
8. Then, at the FDISK Options menu, enter 5 and press RETURN to select Select Next Fixed Drive.
Because the FDISK Options menu is already displayed, you can skip the first three steps in the following instructions, "Creating the Ultimate and DOS Partitions (Two Hard Disk System)." Go directly to Step 4.
c
~\
\ i
(-.
c
SUMMARY OF -IF YOUR HARD DISK ALREADY CONTAINS AN OPERATING SYSTEM (TWO HARD DISK
SYSTEM)-1. Completely back ~ your system.
2. If you created a permanent Ultimate partition entries, you must now delete them.
a. At the C> prompt, type DEUPART and press RETURN.
b. At the "SELECT DISK DRIVE C: OR D: «CR> OR D)" prompt, select the drivels) that contain a permanent Ultimate partition entry.
3. Load the DOS diskette in drive A:.
4 • Turn on both the main power and your monitor.
5. Press RETURN when asked for a new date and a new time.
6 • At the A> prompt, type FDISK and press RETURN.
7. Enter 3 and press RETURN to select Delete DOS Partition.
8. Enter Y and press RETURN to delete the DOS partition.
9 . Press ESC to return to the FDISK Options menu.
10. Enter 5 and press RETURN to select Select Next Fixed Drive.
11. Enter 3 and press RETURN to select Delete DOS Partition.
12. Enter Y and press RETURN to delete the DOS partition.
13. Press ESC to return to the FDISK Options menu.
14. Enter 5 and press RETURN to select Select Next Fixed Drive.