Router Option Module
1200350L1
USER MANUAL
Trademark Information:
OpenView is a registered trademark of Hewlett-Packard Company. SunNet Manager is a registered trademark of Sun Microsystems, Inc. Netview is a registered trademark of IBM.
IQ View is a trademark of ADTRAN.
901 Explorer Boulevard P.O. Box 140000 Huntsville, AL 35814-4000
Phone: (256) 963-8000
© 1998 ADTRAN, Inc. All rights reserved.
ABOUT THIS MANUAL
This manual is arranged so you can quickly and easily find the in-formation you need. The following is an overview of the contents of this manual:
• Chapter 1, Introduction, familiarizes you with an over view of the Router Option Module.
• Chapter 2, Installation, describes the installation of the Router Option Module connectors.
• Chapter 3, Operation, explains how to operate your Router Option Module using the terminal interface.
• Chapter 4, Configuration Overview, explains how to access the Router Option Module configuration menu.
• Chapter 5, Statistics, describes how to access statistical infor-mation from the Router Option Module.
• Chapters 6, Diagnostics, explains how to access the Router Option Module diagnostic features.
• Chapter 7, Utility Menu, explains how the Router Option Module’s embedded utilities manage and test the network and facilitate software upgrades.
• Appendix A, Pinouts, provides pinouts for the Router Option Module connectors.
• Appendix B, Specifications, contains product specifications and features.
• Appendix C, Log Messages, contains messages of events that occur.
• Appendix D, SNMP, explains the simple network manage-ment protocol and how it works.
Notes provide additional useful information.
Cautions signify information that could prevent service in-terruption.
FEDERAL COMMUNICATIONS COMMISSION RADIO FREQUENCY INTERFERENCE STATEMENT:
This equipment has been tested and found to comply with the limits for a Class A digital device, pursuant to Part 15 of the FCC Rules. These limits are designed to provide reasonable protection against harmful interference when the equipment is operated in a commercial environment. This equipment generates, uses, and can radiate radio frequency energy and, if not installed and used in accordance with the instruction manual, may cause harmful in-terference to radio frequencies. Operation of this equipment in a residential area is likely to cause harmful interference in which case the user will be required to correct the interference at his own expense.
Shielded cables must be used with this unit to ensure compliance with Class A FCC limits.
Change or modifications to this unit not expressly approved by the party responsible for compliance could void the user's authority to operate the equip-ment.
CANADIAN EMISSIONS REQUIREMENTS
This digital apparatus does not exceed the Class A limits for radio noise emissions from digital apparatus as set out in the interfer-ence-causing equipment standard entitled "Digital Apparatus," ICES-003 of the Department of Communications.
CANADIAN EQUIPMENT LIMITATIONS
Notice: The Canadian Industry and Science Canada label identi-fies certified equipment. This certification means that the equip-ment meets certain telecommunications network protective, operational, and safety requirements. The Department does not guarantee the equipment will operate to the user's satisfaction.
Before installing this equipment, users should ensure that it is per-missible to be connected to the facilities of the local telecommuni-cations company. The equipment must also be installed using an acceptable method of connection. In some cases, the company's inside wiring associated with a single line individual service may be extended by means of a certified connector assembly (tele-phone extension cord). The customer should be aware that com-pliance with the above conditions may not prevent degradation of service in some situations.
Repairs to certified equipment should be made by an authorized Canadian maintenance facility designated by the supplier. Any repairs or alterations made by the user to this equipment, or equipment malfunctions, may give the telecommunications com-pany cause to request the user to disconnect the equipment.
Users should ensure for their own protection that the electrical ground connections of the power utility, telephone lines and in-ternal metallic water pipe system, if present, are connected to-gether. This precaution may be particularly important in rural areas.
Users should not attempt to make such connections them-selves, but should contact the appropriate electric inspection authority, or an electrician, as appropriate.
Table of Contents
Chapter 1. Introduction ... 1-1
Product Overview ... 1-1 Basic Functions of Router Option Module... 1-1 LAN Bridge ... 1-1 IP Router... 1-1 IPX Router ... 1-1 Network Address Translation (NAT) ... 1-2 PPP or Frame Relay ... 1-2 Routing and Bridging with the Router
Option Module... 1-2 Factory Default ... 1-2 Bridging ... 1-2 IP Routing... 1-2 IPX Routing ... 1-3 Concurrent Routing and Bridging ... 1-3 Network Address Translation Mode (NAT) ... 1-3 Warranty and Customer Service ... 1-4
Chapter 2. Installation ... 2-1
Unpack, Inspect, Power Up... 2-1 Receipt Inspection ... 2-1 ADTRAN Shipments Include... 2-1 Installation ... 2-2 Placement of the Option Module ... 2-2 Power Connection ... 2-3 Attaching the Plug-On Board ... 2-3 Control... 2-4 10BaseT... 2-4
Chapter 3. Operation ... 3-1
Table of Contents
General Layout... 3-4 Menu Path... 3-4 Moving Around ... 3-4 Reading Menu Options ... 3-5 Navigating the Keyboard... 3-5 Session Management ... 3-6 Configuration... 3-7 Security Levels ... 3-8
Chapter 4. Configuration Overview ... 4-1
Table of Contents
Table of Contents
Table of Contents
Table of Contents
Filters/Out Exceptions ... 4-43 Configuration/Management ... 4-44 Management/Telnet... 4-44 Telnet/Server Access... 4-44 Telnet/User List ... 4-44 User List/Name ... 4-45 User List/Authen Method... 4-45 User List/Password... 4-45 User List/Idle Time ... 4-45 User List/Level ... 4-45 Management/SNMP ... 4-45 SNMP Access ... 4-46 SNMP/Communities ... 4-46 Communities/Name ... 4-46 Communities/Privilege ... 4-46 Communities/Manager IP ... 4-46 SNMP/Traps ... 4-46 Traps/Manager Name ... 4-46 Traps/Manager IP ... 4-46 Management/Maint Port... 4-47 Maint Port/Password Protect ... 4-47 Maint Port/Password... 4-47 Maint Port/Baud Rate... 4-47 Maint Port/Data Bits ... 4-47 Maint Port/Parity ... 4-47 Maint Port/Stop Bits ... 4-48 Configuration/Terminal Mode ... 4-48
Chapter 5. Statistics ... 5-1
Table of Contents
(Front Panel Interface) ... 5-11 Router Statistics Available on Front Panel ... 5-11 Status ... 5-11
Chapter 6. Diagnostics ...6-1
Test Menu ... 6-1 Test Menu/Echo Request... 6-1 Logs Menu... 6-2 Logs/Syslog Host... 6-3 Logs/PPP Log... 6-3 PPP Log/Active ... 6-3 PPP Log/Wrap... 6-3 PPP Log/Level ... 6-3 PPP Log/View ... 6-3 PPP Log/Clear ... 6-3 Logs/Connection Log... 6-4 Connection Log/Active ... 6-4 Connection Log/Wrap... 6-4 Connection Log/Level ... 6-4 Connection Log/View ... 6-4 Connection Log/Clear ... 6-4 Logs/Network Log ... 6-4 Network Log/Active... 6-4 Network Log/Wrap ... 6-5 Network Log/Level ... 6-5 Network Log/View... 6-5 Network Log/Clear... 6-5
Chapter 7. Utility Menu ...7-1
Table of Contents
CMD Mode... 7-4
Appendix A. Pinouts ... . A-1 Appendix B. Specifications ... B-1
Ethernet Interface (LAN) ... B-1 Display... B-1 Environmental ... B-1 Physical... B-1 Power ... B-1 Agency Approvals ... B-1
Appendix C. Log Messages ... . C-1
PPP Log Messages ... C-1 Call Log Messages ... C-5 Network Log Messages ... C-6
Appendix D. SNMP ... D-1
Understanding SNMP... D-1 SNMP Components:... D-1 Network Manager ... D-1 Agent... D-1 MIB ... D-2 SNMP Embedded Agent ... D-3 Communities... D-3 Traps... D-3
Appendix E. Terminal Mode Commands ... E-1
Menu Commands ... E-1 Key Words ... E-2 Additional Commands ... E-3 Download/Uploading Configuration... E-3
List of Figures
List of Tables
Chapter 1
Introduction
PRODUCT OVERVIEW
The ADTRAN Router Option Module installs in the option slot of the TSU muliplexer family of products and provides integrated rout-ing capability access frame relay or point-to-point networks.
Basic Functions of Router Option Module
The Router Option Module provides the following basic functions:
LAN Bridge
Bridging provides a point-to-point connection between two local area networks (LANs). The bridge learning function scans the source and destination media access control (MAC) addresses of all packets on its LAN and determines which packets should be trans-mitted over the T1 link. Applications include connectivity between single users or small offices to corporate LANs. The Router Option Module uses the Spanning Tree Algorithm (IEEE 802.1d-ISO/ IEC10038), which provides a loop-free topology and redundancy.
IP Router
The Router Option Module can function as an IP router using the Routing Information Protocol (RIP) for advertising and learning routes among other routers. Static routes may also be entered into the routing table.
IPX Router
Chapter 1: Introduction
Network Address Translation (NAT)
Single networks can connect to the Internet with this function. The Router Option Module translates outgoing IP packets over the T1 to the IP router at the Internet Service Provider. Popular Internet ap-plications are supported.
PPP or Frame Relay
The layer 2 protocol used to transfer packets can be PPP or Frame Relay (RFC 1490). PPP allows a point-to-point connection, whereas Frame Relay can provide up to ten permanent virtual circuits.
Routing and Bridging with the Router
Option Module
The Router Option Module is a Router and Transparent Learning Bridge. Its features can be easily configured and used, once several basic concepts are understood.
Factory Default
The Router Option Module comes from the factory configured for MAC Bridging, IP routing, and IPX routing with no filters or con-nection information defined. An IP address of 10.0.0.1 with a net-work mask of 255.255.255.0 is preloaded. The factory default layer 2 configuration is PPP, which provides the least amount of reconfigu-ration due to its negotiation-oriented nature.
Bridging
In Bridge Mode, the Router Option Module can be used to connect two LAN segments. In this mode, all protocols are supported be-cause they are transported across the T1 link at the MAC layer. The Spanning Tree Algorithm can be used to guarantee a loop-free to-pology. MAC- save addresses are “learned” by each Router Option Module to prevent non-WAN packets from being bridged.
IP Routing
The Router Option Module operates as an IP router when the
Chapter 1: Introduction
terface. The IP address and mask assigned to the unit’s LAN inter-face apply to all routing and IP operations for the unit.
In Frame Relay mode, each PVC can be specified as numbered or unnumbered links. If a default gateway is specified on the network of the Ethernet interface, the unit attempts to reach the gateway through that interface. If no default gateway is specified (i.e., 0.0.0.0.), the WAN interface becomes the default gateway (recom-mended for remote applications when there are no other routers on the remote LAN).
IPX Routing
Network routes and services are learned and advertised using No-vell’s RIP and SAP.
Concurrent Routing and Bridging
The Router Option Module can route IP and IPX as well as bridge nonIP/IPX packets simultaneously. The PPP profile will, by default, negotiate PPP network protocols to support the transmission and reception of IP, IPX, and Bridge packets. If the PPP peer does not ac-cept a protocol, the Router Option Module will fall back to any com-bination of routing and bridging.
Network Address Translation Mode (NAT)
NAT is a special mode of operation in which the Router Option Module obtains a dynamically assigned IP address from the peer router (typically an Internet Service Provider). This allows a net-work of computers to appear as a single IP address.
NAT is enabled if the layer 2 protocol is PPP and the PPP profile has the IP parameter NAT set to Yes, or the layer 2 protocol is Frame Re-lay and a DLCI mapping has the IP MAP/NAT parameter set to
Yes.
Chapter 1: Introduction
Warranty and Customer Service
ADTRAN will replace or repair this product within five years from the date of shipment if it does not meet its published specifications or fails while in service. For detailed warranty, repair, and return information refer to the ADTRAN Equipment Warranty and Repair and Return Policy Procedure.
Return Material Authorization (RMA) is required prior to returning equipment to ADTRAN.
Chapter 2
Installation
UNPACK, INSPECT, POWER UP
Receipt Inspection
Carefully inspect the option module for any shipping damage. If damage is suspected, file a claim immediately with the carrier and contact ADTRAN Customer and Product Service (CAPS). If possi-ble, keep the original shipping container for use in shipping the Router Option Module for repair or for verification of damage dur-ing shipment.
ADTRAN Shipments Include
The following items are included in ADTRAN shipments of the Router Option Module:
• Router option module • The user manual
• A modular 8-position to 8-position cable for 10-BaseT port • An 8-position modular to 8-position modular cable and a
modu-lar to female DB-25 adapter for access to the Control Port.
Chapter 2: Installation
INSTALLATION
Placement of the Option Module
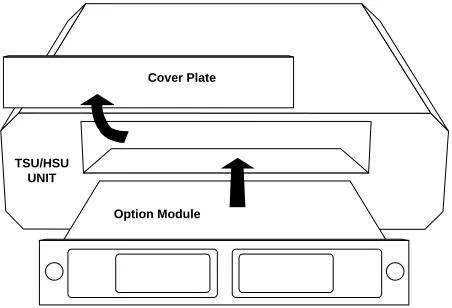
Figure 2-1 shows the proper placement of the option module.
Per-form the following steps to install the option module.
1. Remove the cover plate from the TSU/TDU unit rear panel. 2. Slide the option module into the rear panel of the TSU/TDU unit
until it is positioned firmly against the front of the unit. 3. Fasten the thumbscrews at both edges of the option module.
Figure 2-1. Installing the Option Module
TSU/HSU UNIT
Chapter 1: Introduction
Power Connection
Each option module derives power from the base TSU/TDU unit. Power to the TSU/TDU is supplied by a captive eight-foot power cord.
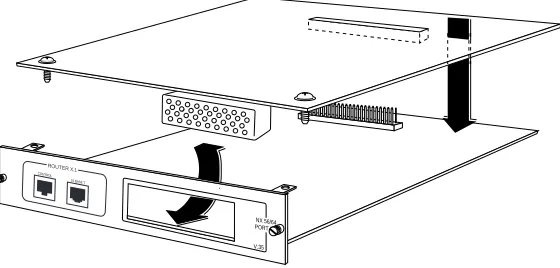
Attaching the Plug-On Board
Figure 2-2 shows the proper attachment of a plug-on board to the
op-tion module. Perform the following steps to install the plug-on board:
1. Hold the plug-on board above the option module.
2. Using a downward and right-to-left motion, slip the V.35 Con-nector plug into opening in the option module back panel. 3. Moving the plug-on board downward, secure the connection of
the header pins at the front of the boards.
4. Install the two 4-40 screws at both edges of the option module.
Figure 2-2. Attaching the Plug-On Board
The connection of the header pins between the option module and the plug-on board must be visually verified. Severe dam-age of the equipment can result from an improper connection.
NX 56/64 PORT X.1 V.35 ROUTER
X.1
CONTR OL
Chapter 2: Installation
Figure 2-3. Router Option Module Rear Panel
Control
The Router Option Module has an 8-pin modular jack labeled CON-TROL. The control port provides connection to a VT 100 EIA-232 compatible interface. An 8-foot cable with adapter connector pro-vides a standard DB-25 EIA-232 interface. See Appendix A: Pinouts for the control port’s pin assignments. A description of the opera-tion of this port is covered in Chapter 3: Operaopera-tion.
10BaseT
The 10BaseT Port allows connection to a Local Area Network (LAN). The 8-pin modular cable included with the Router Module can be used to connect the 10BaseT port to an Ethernet AVB.
PORT X.2 ROUTER X.1
CONTROL
HOT REPLACEABLE
Chapter 3
Operation
FRONT PANEL
Refer to the TSU Product Manual for a description of front panel op-eration.
Terminal Menu Structure
The Router Option Module uses a multilevel menu structure con-taining both menu items and data fields. All menu operations and data display in the terminal menu window. The Router Option Mod-ule is shipped in the Factory Default configuration. Connect any VT 100 or VT 220 type terminal emulator to the Maintenance port. The default rate is 9600 baud 8-N-1. The terminal emulator can flow off the Router Option Module using software flow control. Hardware flow control is not used.
The opening menu (the Main menu, or top-level menu) is the access point to all other operations. Each Main menu item has several func-tions and submenus to identify and access specific parameters.
Figure 3-1 on page 3-2 shows the top-level terminal menu.
In order to edit items in the terminal menus, you must have the appropriate security level. Each menu description in this section indicates the required security level required for write access. The maintenance port is always at security level 0, giving full access to all configuration items.
Main Menu Options
Chapter 3: Operation
Configuration Menu
The Configuration menu provides options to set up the operational configuration for the Router Option Module. See Chapter 4,
Configu-ration Overview, for detailed information on the available options.
1. Menu Path Describes the current position in the terminal menu structure.
2. Right Pane Lists available submenus. Additional submenus available through this pane are indicated by the [+] and [DATA] symbols.
3. System Time Displays the current time.
4. Navigation Help Displays list of characters you can use to navigate the terminal menus. Press Control-Z
5. Rate Status Displays current rate of connection.
6. Loop Status Displays current status of T1.
7. Mode Describes current operating mode.
8. Left Pane Lists available menus.
1 2
3 4
5 6
Chapter 3: Operation
Status Menu
The Status menu provides options to review and monitor the status of the Router Option Module system. See Status Menu on page 5-1 for detailed information on the available options.
Test Menu
The Test menu can be used for performing diagnostic testing of the Router Option Module. See Test Menu on page 6-1 for detailed infor-mation on the tests available.
Logs Menu
The Logs menu can be used for viewing the operational logs for the Router Option Module. See the Logs Menu on page 6-2 for detailed information on the available options.
Utilities Menu
The Utilities menu provides tools for system diagnostics and up-grading the Router Option Module. See Utilities Menu on
Chapter 3: Operation
NAVIGATING THE TERMINAL MENUS
The following sections provide information on how to navigate through the terminal menus.
General Layout
When you first start a terminal mode session, the Top Level Terminal
Menu screen displays, as shown in Figure 3-1 on page 3-2. The screen
is divided into left and right panes. The left pane shows the current list of submenus, while the right pane shows the contents of a select-ed submenu.
Menu Path
The top line of the display shows this session’s current position (path) in the menu tree. Figure 3-1 on page 3-2 shows the top menu level with the cursor on the Configuration submenu, so the path dis-play shows Router/Configuration.
Moving Around
Use the following keys to navigate the menu:
If you want to...
Press...
Move the cursor from the left pane to the right pane.
Tab Key or Right Arrow Key
Move the cursor from the right pane back to the left pane.
Tab Key or Left Arrow Key
Move around within each pane. Up and Down Arrows
Activate a menu. Enter Key
Chapter 3: Operation
Reading Menu Options
The following options display throughout the menus.
Navigating the Keyboard
You can use different keystrokes to navigate through the terminal menu.
Menu Option
Description
Submenus [+] or [DATA] Menus that display [+] or [DATA] indicate that more items are available when selected.
Activation Field <+> Menus that display <+> indicate that an action is to be taken, such as acti-vating a test.
Editable Data Field A highlighted menu item indicates that you can enter data in that field.
Read-Only Field An underlined field is a display field that contains read-only information.
If you want to...
Press...
Activate a pop-up screen with the avail-able keystrokes.
Control-Z
Return to the home screen. H
Jump between two menu items. J
Example:
Press J while on a menu item of interest, and you will jump back to the main screen. Go to another menu item of interest, Press J, and you will jump back to the screen that was dis-played the first time you pressed J. Press J anytime you want to jump between these items.
Chapter 3: Operation
Session Management
Travel back up the menu. Left Arrow Key
Activate an item. Enter
Move into a submenu. Enter
Cancel an edit. Escape
Travel back up the menu. Escape
Dismiss the pop-up help screens. Escape
Move between the left and right panes. Tab
Move to the top of a screen. A
Move to the bottom of a screen. Z
Ascend one menu level. Backspace
If you want to...
Press...
Log out of the session. Control-L
Invalidate the password entry and return to the login screen.
The Password prompt will display.
Control-S
Refresh the screen.
To save time, only the portion of the screen that has changed is refreshed. This option should be necessary only if the display picks up incorrect characters.
Control-R
Chapter 3: Operation
Configuration
If you want to...
Press...
Restore factory default settings.
This setting restores the factory defaults based on the location of the cursor. Entire submenus can be factory defaulted.
F
Copy selected items to the clipboard. (The amount of information you can copy depends on the cursor location when you press C.)
C
Example:
If the cursor is over an editable field, only that item is copied. If the cursor is over the index number of a list, then all of the items in the row of the list are copied. For example, if the cursor is over the
Numb field in the Frame Relay Mapping screen, all of the informa-tion associated with the Map entry is copied.
Paste the item stored in the clipboard, if the infor-mation is compatible. You must confirm all pastes except those to a single editable field.
For certain types of fields, when you paste informa-tion into the field, the value increments by 1.
For certain types of fields, when you paste informa-tion into the field, the value decrements by 1.
P
Insert a new item in a list. I
Example:
To add a new item to the Connection List, press I while the cursor is over the index number.
Delete a list item. D
Example:
Chapter 3: Operation
Security Levels
Each menu item on the configuration screens has an associated se-curity level. The sese-curity level ranges from 0 (highest sese-curity level) to 5 (lowest security level). This level determines whether a Telnet session can access that menu item. The Telnet session is assigned a security level set by the user. Passwords can only be accessed at se-curity level 0. The maintenance port is always at sese-curity level 0.
The security levels are assigned as follows:
Security
Level No.
Description
0 Access all parameters including passwords
1 Access all parameters except passwords
2 Access all parameters except passwords and authentication methods
3 Access all parameters except passwords, authentication methods
4 Access only test and status menus
Chapter 3: Operation
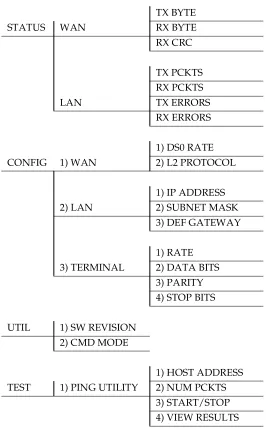
Figure 3-2. Router Option Module Front Panel Menu Structure
TX BYTE
STATUS WAN RX BYTE
RX CRC
TX PCKTS RX PCKTS
LAN TX ERRORS
RX ERRORS
1) DS0 RATE
CONFIG 1) WAN 2) L2 PROTOCOL
1) IP ADDRESS
2) LAN 2) SUBNET MASK
3) DEF GATEWAY
1) RATE
3) TERMINAL 2) DATA BITS
3) PARITY 4) STOP BITS
UTIL 1) SW REVISION
2) CMD MODE
1) HOST ADDRESS
TEST 1) PING UTILITY 2) NUM PCKTS
Chapter 4
Configuration Overview
CONFIGURATION MENU
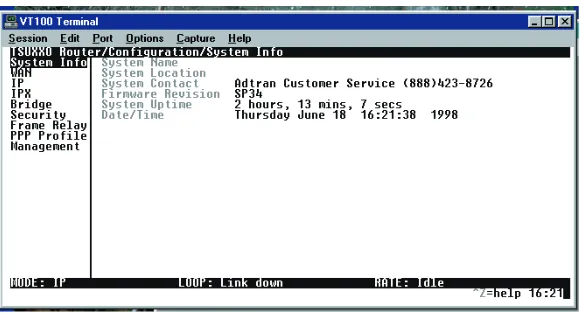
Configuration/System Info
The System Info menu provides basic information about the unit and displays data fields for editing information. Figure 4-1 displays the submenus available under this menu item.
Chapter 4: Configuration Overview
System Name
Write security: 3; Read security: 5
Provides a user-configurable text string for the name of the Router Option Module. This name can help distinguish between different installations. You can enter up to 31 alphanumeric characters in this field, including spaces and special characters (such as an under bar). The system name is also used for PPP authentication and IPX ser-vice name.
System Location
Write security: 3; Read security: 5
Provides a user configurable text string for the location of the Router Option Module. This helps to keep track of the physical location of the unit. You can enter up to 31 alphanumeric characters in this field, including spaces and special characters (such as an under bar).
System Contact
Write security: 3; Read security: 5
Provides a user configurable text string for the contact name. This field can contain a name, phone number, or e-mail address of a per-son responsible for the Router Option Module. You can enter up to 31 alphanumeric characters in this field, including spaces and spe-cial characters (such as an under bar).
Firmware Revision
Read security: 5
Displays the current firmware revision level of the Router Option Module. This is a read-only field.
System Uptime
Read security: 5
Displays the length of time the Router Option Module has been run-ning since power up or reset. This is a read-only field.
Date/Time
Write security: 3; Read security: 5
Displays the current date and time as programmed in the real-time clock. This field can be edited. Enter the time in 24-hour format (such as 23:00:00 to represent 11:00 PM). Enter the date in mm-dd-yyyy format.
Chapter 4: Configuration Overview
Configuration/WAN
The WAN menu is used to set up the ISDN parameters for the Rout-er Option Module. Figure 4-2 shows the WAN menu.
Figure 4-2. Configuration/Frame Relay Screen
WAN/DSO Rate
WAN/L2 Protocol (also available via Front Panel)
Write security: 3, Read security: 5
This parameter specifies the layer 2 data link layer transport used. When selected as PPP (def), the Router Option Module will negoti-ate PPP over the T1 interface. This would be used mainly for cam-pus wiring applications.
Parameters for controlling the PPP negotiation are in the
Configu-ration/PPP Profile menu. Frame Relay should be selected when the Router Option Module is connected to a Frame Relay switch. The
Chapter 4: Configuration Overview
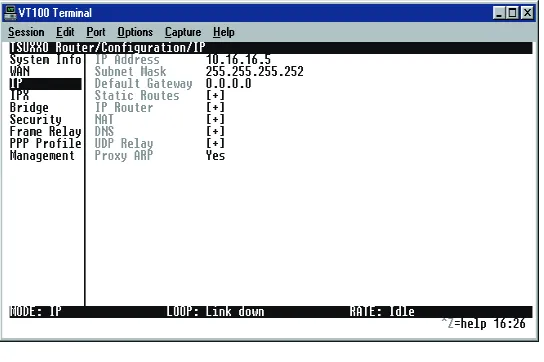
Configuration/IP
The IP menu is used to set up the IP parameters for the Router Op-tion Module. Any general IP-related configuraOp-tion item is under this menu. Figure 4-3 shows the IP menu.
Figure 4-3. Configuration/IP Screen
IP/IP Address (also available via Front Panel)
Write security: 2; Read security: 5
The IP address assigned to the Router Option Module’s Ethernet port is set here. This address must be unique within the network. Factory default is 10.0.0.1.
IP/Subnet Mask (also available via Front Panel)
Write security: 2; Read security: 5
The IP network mask to be applied to the Router Option Module’s Ethernet port is set here. Factory default is 255.255.255.0.
IP/Default Gateway (also available via Front Panel)
Write security: 3; Read security: 5
Chapter 4: Configuration Overview
IP/Static Routes
Static Routes can be inserted under this menu.
Static Routes/Active
Write security: 4; Read security: 5
Adds this static route entry to the IP routing table when set to Yes (def) and removes it (if it was previously added) if set to No.
Static Routes/IP Address
Write security: 4; Read security: 5
This is the IP address of the host or network address of the device being routed to.
Static Routes/Subnet Mask
Write security: 4; Read security: 5
This mask determines the bits in the previous IP address that are used. If this is to be a host route, it must be set to all ones (255.255.255.255).
Static Routes/Gateway
Write security: 4; Read security: 5
This is the IP address of the router to receive the forwarded IP pack-et.
Static Routes/Hops
Write security: 4; Read security: 5
This is the number of router hops required to get to the network or host. Maximum distance is 15 hops.
Static Routes/Private
Write security: 4; Read security: 5
Chapter 4: Configuration Overview
IP/IP Router
The IP router is configured under this menu as follows.
IP Router/Mode
Write security: 3; Read security: 5
When this option is set to On (def), the Router Option Module will advertise and listen to routes from other IP routers.
If Off, the route table is still used but only static routes are used for routing IP packets and only the Ethernet port is used. IP packets can be sent over the WAN, but only when bridged.
IP/RIP
Write security: 3; Read security: 5
The Routing Information Protocol (RIP) is supported by the Router Option Module. The following parameters are required for setting up the mode on the Ethernet port:
RIP/Mode
Write security: 3; Read security: 5 This option turns RIP On (def) or Off.
RIP/Protocol
Write security: 3; Read security: 5 Version can be V1 (def) or V2.
RIP/Method
Write security: 3; Read security: 5
• Split Horizon - Only routes not learned on the Ethernet port are advertised
• Poison Reverse (def) - All routes are advertised, including routes learned from the Ethernet port. These routes are poisoned. • None - All routes are advertised, including routes learned from
the Ethernet port. No attempt is made to poison these routes.
RIP/Direction
Write security: 3; Read security: 5
Chapter 4: Configuration Overview
RIP/V2 Secret
Write security: 0; Read security: 0
This is a text string used for authenticating advertised routes.
IP/NAT
The Network Address Translation general parameters are set up under this menu.
NAT/DHCP Mode
Write security: 3; Read security: 5
When this option is set to On, the Router Option Module acts as a DHCP server and will dynamically assign IP, network mask, de-fault gateway, and DNS addresses to any device which transmits a broadcast DHCP request. The addresses assigned are based on the Router Option Module’s own IP address and will be within the same network. This mode is most commonly used with the NAT functionality. The default is Off.
NAT/DHCP Renewal Time
Write security: 3; Read security: 5
This is the number of hours that the DHCP server should allow the device before it is required to send a new DHCP request. The default is 15 hours. Zero (0) represents an infinite lease.
NAT/Web Server
Write security: 3; Read security: 5
This is the IP address of a web server on the Ethernet network. When an active NAT connection is made to the Internet, any HTTP, FTP, or SMTP server requests from the WAN are translated and sent to this web server.
Normally, communications across NAT must be initiated from the LAN side of the Router Option Module. Web server allows a single machine on the NAT side to be accessed from the Internet side of NAT. This provides outside access to a Web server, mail, or FTP server.
NAT/Default IP
Chapter 4: Configuration Overview
IP/DNS
The Domain Name Server parameters used by the Router Option Module are specified here. The DNS server addresses can be ex-changed between PPP peers. When a connection occurs and IPCP is negotiated, the Router Option Module will get the DNS server ad-dresses from the PPP peer.
If the configured DNS server addresses (Server 1 and Server 2) are all zeros, the addresses from the PPP peer are used. In NAT mode, the PPP peer’s DNS addresses are always used. The DNS addresses set in Server 1 and Server 2 are offered to a PPP peer, if so requested.
DNS/Domain Name
Write security: 3; Read security: 5
This is a text string used to represent the domain name used by the Router Option Module.
DNS/Server 1
Write security: 3; Read security: 5
This is the IP address for the primary DNS device. It is the first serv-er to which domain name requests are sent.
DNS/Server 2
Write security: 3; Read security: 5
This is the IP address for the secondary DNS device. It is used as a back-up in case the primary address does not respond to the re-quest.
IP/UDP Relay
The Router Option Module can be configured as a relay agent for UDP broadcast packets. Normally, a router will not forward UDP broadcast packets. However, many network applications use UDP broadcasts to configure addresses, host names, and other informa-tion. If hosts using these protocols are not on the same network seg-ment as the servers providing the information, the client programs will not receive a response without enabling the UDP relay agent.
UDP Relay/Mode
Chapter 4: Configuration Overview
UDP Relay/UDP Relay List
Up to four relay destination servers can be specified in this list.
UDP Relay List/Relay Address
Write security: 3; Read security: 5
This is the IP address of the server that will receive the relay packet.
UDP Relay List/UDP Port Type
Write security: 3; Read security: 5
Standard (def)
The following standard UDP protocols are relayed when set:
• DHCP, TFTP, DNS,
• NTP (NetworkTime Protocol, port 123). NBNS (NetBIOS Name Server, port 137), NBDG (NetBIOS Datagram, port 138),
• BootP.
Specified
• When set, the UDP port (1 to 65535) can be specified in the UDP Port columns (up to a maximum of three per server).
UDP Relay List/UDP Port 1, UDP Port 2, UDP Port 3
Write security: 3; Read security: 5
UDP Port 1, UDP Port 2, and UDP Port 3 are used for specifying UDP ports to be relayed. These fields only apply when UDP Port
Type is set to Specified.
IP/Proxy ARP
Write security: 4; Read security: 5
This feature allows the network portion of a group of addresses to be shared between several physical network segments. The ARP protocol itself provides a way for devices to create a mapping be-tween physical (i.e., Ethernet) addresses and logical IP addresses.
Chapter 4: Configuration Overview
If this option is set to Yes (def), when an ARP request is received on the Ethernet port, the address is looked up in the IP routing table. If the forwarding port is not on the Ethernet port and the route is not the default route, the Router Option Module will answer the request with its own hardware address.
If set to No, the Router Option Module will only respond to ARP re-quests received for its own IP address.
Configuration/IPX
The IPX menu is used to set up the IPX parameters for the Router Option Module. Any general IPX-related configuration item can be found under this menu. Figure 4-4 shows the IPX menu.
Figure 4-4. Configuration/IPX Screen
IPX/Mode
Write security: 2; Read security: 5
When this option is set to On (def), the Router Option Module will route IPX. Setting it to Off will disable all IPX functionality.
IPX/Network
Write security: 2; Read security: 5
net-Chapter 4: Configuration Overview
cause hard-to-diagnose problems. IPX network numbers should be carefully tracked.
IPX/Frame Type
Write security: 2; Read security: 5
The Router Option Module supports all four defined IPX frame types. The possible frame types are: Ether Type II (def), Ether 802.3
(Raw), Ether 802.2, or Ether SNMP (802.2 SNMP). Only one frame type can be used at one time.
IPX/Seed Status
Write security: 2; Read security: 5
The seed status defines what the Router Option Module is to do with the network information on the selected frame type during startup. There are three possible seeding selections specified:
Seeding Selection
Description
Seed The Router Option Module will listen for an IPX network number being sent by another router (including Novell software routers residing on servers) on the Ethernet segment connected to this port and use this number if it exists. If it doesn’t discover a number in use, the Router Option Module will use the configured IPX network num-ber for the Ethernet segment.
Chapter 4: Configuration Overview
IPX/RIP Timer
Write security: 3; Read security: 5
This value specifies how often the Router Option Module sends out IPX RIP packets on the network segment attached to the Ethernet port. The RIP packets sent contain routing information about the networks for which this Router Option Module is responsible. The default value is 60 seconds.
IPX/SAP Timer
Write security: 3; Read security: 5
This value specifies how often the Router Option Module sends out IPX SAP (Service Access Protocol) packets on the network segment attached to the Ethernet port. The SAP packets sent contain infor-mation about the services (such as servers, printers, etc.) for which this Router Option Module is responsible. The default value is 60 seconds.
Auto-Seed The Router Option Module will listen for an IPX network number being sent by another router (including Novell software routers residing on servers) on the Ether-net segment connected to this port and use this number if it exists. If it doesn’t dis-cover a number in use, the Router Option Module will auto-generate a valid number using its routing tables.
Chapter 4: Configuration Overview
Configuration/Bridge
The Bridge menu is used to set up the bridge parameters for the Router Option Module. The bridging function runs at the Media Ac-cess Control (MAC) level which allows any protocol packets that run over Ethernet to be forwarded. Bridging can run concurrently with the IP and IPX routing. However, when packets are bridged across a WAN connection, the following rules apply:
• When IP routing is active, IP packets (which include ARP pack-ets) are not bridged.
• When IPX routing is active, IPX packets are not bridged.
• The WAN IP Bridge and WAN IPX Bridge menus allow the WAN connection to bridge packets to the Router Option Module but get routed as soon as they arrive at the unit.
Figure 4-5 shows the Bridge menu.
Figure 4-5. Configuration/Bridge Screen
Bridge/Mode
Write security: 2; Read security: 5
Chapter 4: Configuration Overview
Bridge/WAN IP Bridge
When IP routing is active, the Router Option Module will allow an-other WAN device to bridge IP packets to itself by using PPP BCP. Normally, two IP routers would negotiate PPP IPCP to exchange IP packets.
However, if a device can only support PPP BCP, IP packets are en-capsulated by the device as bridge packets. The Router Option Module can treat the WAN IP Bridge as a virtual Ethernet port con-nected only to a WAN device which has negotiated PPP BCP. This menu allows the IP parameters for this virtual Ethernet to be set up.
WAN IP Bridge/Network
Write security: 2; Read security: 5
This is the IP address of the virtual Ethernet port.
WAN IP Bridge/Netmask
Write security: 2; Read security: 5
This is the network mask to be applied to the virtual Ethernet port.
WAN IP Bridge/Triggered
Write security: 2; Read security: 5
When set to Yes, only IP RIP updates are sent when the routing table has changed. When set to No (def), updates are sent periodically.
RIP version, method, and direction are determined by the Ethernet parameters set in the Configuration/IP/IP Router/RIP menu.
WAN IP Bridge/Proxy ARP
If this option is set to Yes (def), the Router Option Module will proxy ARP on the bridge IP port. See the section IP/Proxy ARP on
page page 4-9 for an explanation of the proxy ARP function.
Bridge/WAN IPX Bridge
Rout-Chapter 4: Configuration Overview
net port connected only to a WAN device which has negotiated PPP BCP. This menu allows the IPX parameters for this virtual Ethernet to be set up.
WAN IPX Bridge/Network
Write security: 2; Read security: 5
This is the network address of the virtual Ethernet port. See
IPX/Net-work on page page 4-10 for explanation of the IPX netIPX/Net-work number.
WAN IPX Bridge/Frame Type
Write security: 2; Read security: 5
This is the frame type used for the virtual Ethernet port. See IPX/
Frame Type on page page 4-11 for an explanation of the IPX frame
type.
WAN IPX Bridge/Seed Status
Write security: 2; Read security: 5
This is the seed status used for the virtual Ethernet port. See IPX/
Seed Status on page page 4-11 menu for an explanation of the IPX seed
status.
WAN IPX Bridge/Triggered
Write security: 2; Read security: 5
When set to Yes, only IPX RIP and SAP updates are sent when the routing or service table has changed. When set to No (def), updates are sent at the same rate set for the Ethernet port (see IPX/RIP Timer and IPX/SAP Timer on page page 4-12).
Bridge/Spanning Tree
The Spanning Tree Algorithm and Protocol ensures a loop-free to-pology and provides redundancy. The protocol parameters can be specifically tuned from their defaults, though most applications re-quire no adjustment.
Spanning Tree/Mode
Write security: 2; Read security: 5
Chapter 4: Configuration Overview
Spanning Tree/Priority
Write security: 2; Read security: 5
This assigns a priority to the Router Option Module that permits the relative priority of multiple bridges to be managed. The range is 0 to 65535 with a default of 32768.
Spanning Tree/Maximum Age
Write security: 2; Read security: 5
This is the timeout value used by the Router Option Module to test against the root device. The value is in one-tenth seconds with a range between 60 (6.0 seconds) and 400 (40.0 seconds). The default is 200 (20.0 seconds).
Spanning Tree/Hello Time
Write security: 2; Read security: 5
This is the time between the generation of configuration BPDUs (Bridging Protocol Data Units) by the root bridge. The value is in one-tenth seconds with a range between 10 (1.0 second) and 100 (10.0 seconds). The default is 20 (2.0 seconds).
Spanning Tree/Forward Delay
Write security: 2; Read security: 5
This is the time spent in the listening and learning state while mov-ing from the blockmov-ing state to the forwardmov-ing state. The value is in one-tenth seconds with a range between 40 (4.0 seconds) and 300 (30.0 seconds). The default is 150 (15.0 seconds).
Spanning Tree/LAN Port
The path cost and priority parameters for the Ethernet port are spec-ified under this menu.
LAN Port/Active
Write security: 2; Read security: 5
The Ethernet port can be disabled when set to No. In this mode, no bridge traffic will be forwarded in or out. Setting to Yes (def) allows the port to participate in the spanning tree topology.
LAN Port/Path Cost
Write security: 2; Read security: 5
Chapter 4: Configuration Overview
LAN Port/Priority
Write security: 2; Read security: 5
The priority adjusts the relative priority of the Ethernet port among the multiple bridge ports. The range is 0 to 255 with a default of 128.
Spanning Tree/Bridge Group 1
The Bridge Group 1 is either the first PPP BCP connection or part of multiple DLCI destinations when running Bridge (RFC 1490) over Frame Relay.
Bridge Group 1/Active
Write security: 2; Read security: 5
The Bridge Group 1 port can be disabled when set to No. In this mode, no bridge traffic will be forwarded in or out. Setting to Yes (def) allows the port to participate in the spanning tree topology.
Bridge Group 1/Path Cost
Write security: 2; Read security: 5
This is the cost of using the Bridge Group 1 in the total cost of the path. The range is from 1 to 65535 with a default of 1302 (for 768 kbits/second).
Bridge Group 1/Priority
Write security: 2; Read security: 5
The priority adjusts the relative priority of the Bridge Group 1 among the multiple bridge ports. The range is 0 to 255 with a de-fault of 128.
Spanning Tree/Bridge Group 2
Bridge Group 2 is part of multiple DLCI destinations when running Bridge (RFC 1490) over Frame Relay.
Bridge Group 2/Active
Write security: 2; Read security: 5
This setup is exactly like Bridge Group 1 above.
Bridge Group 2/Path Cost
Write security: 2; Read security: 5
This setup is exactly like Bridge Group 1 above.
Chapter 4: Configuration Overview
Bridge/Address Table
The Router Option Module automatically maintains a table of MAC addresses detected and associates those addresses with the LAN, WAN0, or WAN1 port from which they were received. WAN0 rep-resents Bridge Group 1, and WAN1 reprep-resents Bridge Group 2. This menu permits the user to adjust the parameters or rules for the table as addresses are learned.
Address Table/Aging
Write security: 3; Read security: 5
This is the maximum time an idle MAC address remains in the table before being removed. The value is in minutes and can range from 0 (which means never age) to 65535. The default is 5.
Address Table/Forward Policy
Write security: 3; Read security: 5
Chapter 4: Configuration Overview
Configuration/Security
The Security menu is used to set up the authentication parameters needed to authenticate PPP connection. Also, the filter defines are placed under this menu. Figure 4-6 shows the Security menu.
Figure 4-6. Configuration/Security Screen
Security/Authentication
Write security: 1; Read security: 2
The method used for authenticating the PPP peer is selected here. The possible values are:
None (def) - No attempt is made to authenticate the PPP peer.
Radius - The Router Option Module will act as a radius client and authenticate the PPP peer using the radius server. The radius server parameters must be set up properly for this to work.
PPP Profile - The PPP profile is used to authenticate the PPP peer. See the Frame Relay section on page 4-26 for more information on au-thenticating.
Security/Radius Server
de-Chapter 4: Configuration Overview
Radius Server/Primary Server
Write security: 1; Read security: 2
This is the IP address of the first RADIUS server that the Router Op-tion Module should attempt to communicate with when authenti-cating a PPP peer.
Radius Server/Secondary Server
Write security: 1; Read security: 2
This is the IP address of the back-up RADIUS server that the Router Option Module should attempt to communicate with when the pri-mary server does not respond.
Radius Server/UDP Port
Write security: 1; Read security: 2
This is the UDP port that the Router Option Module should use when communicating with the RADIUS server. The default is 1645, which is the commonly used port.
Radius Server/Secret
Write security: 0; Read security: 1
The RADIUS server and Router Option Module share this text string, which is used by the RADIUS sever to authenticate the Rout-er Option Module that is the RADIUS client. The factory default is to not use a secret.
Radius Server/Retry Count
Write security: 1; Read security: 2
This is the number of times the Router Option Module should send a request packet to the RADIUS server without a response before giving up.
Chapter 4: Configuration Overview
Security/PPP
Write security: 1; Read security: 2
The PPP peer can be authenticated using three standard methods:
1. PAP (Password Authentication Protocol), 2. CHAP (Challenge Handshake Protocol) 3. EAP (Extensible Authentication Protocol).
The strength of the authentication is determined in the following or-der:
1. EAP 2. CHAP
3. PAP (where EAP is the strongest and PAP is the weakest)
PAP is a clear-text protocol, which means it is sent over the PPP link in a readable format.
Do not allow highly sensitive passwords to become compromised using this method.
CHAP and EAP use a one-way hashing algorithm which makes it virtually impossible to determine the password. EAP has other ca-pabilities which allow more flexibility than CHAP.
The following selections are possible:
PAP, CHAP or EAP (def) - The Router Option Module will ask for EAP during the first PPP LCP negotiation and allow the PPP peer to negotiate down to CHAP or PAP.
CHAP or EAP - The Router Option Module will ask for EAP during the first PPP LCP negotiation and allow the PPP peer to negotiate down to CHAP but not PAP.
Chapter 4: Configuration Overview
Security/Filter Defines
The Router Option Module can filter packets based on certain pa-rameters within the packet. The method used by the Router Option Module allows the highest flexibility for defining filters and assign-ing them to a profile. The filters are set up in two steps:
1. Defining the packet types,
2. Adding them to a list under the PPP profile or DLCI map.
See the section DLCI Mapping/Filters on page 4-32 for information on how to set up filter profiles. This menu is used to define the individ-ual filter defines based on packet type.
Filter Defines/MAC Filter Defines
Write security: 2; Read security: 3
The MAC filter is applied to bridge packets only. Bridge packets which are forwarded by the bridge functionality of the Router Op-tion Module are defined here. Up to 32 MAC defines can be specified.
Name Identifies the filter entry
Src Addr 48-bit MAC source address used for compari-son. (hexadecimal format)
Src Mask Bits in the MAC source address which are com-pared. (hexadecimal format)
Dest Addr 48-bit MAC destination address used for com-parison. (hexadecimal format)
Dest Mask Bits in the MAC destination address used for comparison. (hexadecimal format)
MAC Type 16-bit MAC type field used for comparison. (hexadecimal format)
Chapter 4: Configuration Overview
Filter Defines /Pattern Filter Defines
Write security: 2; Read security: 3
The pattern filter is applied to bridge packets only. That is any pack-et which is forwarded by the bridge functionality of the Router Op-tion Module. Up to 32 pattern defines can be specified.
Filter Defines/IP Filter Defines
Write security: 2; Read security: 3
The IP filter defines apply to any IP packet, whether it is routed or bridged. Up to 32 IP defines can be specified.
Name Identifies the filter entry
Offset Offset from beginning of packet of where to start the pattern comparison
Pattern 64 bits used for comparison. (hexadecimal format) Mask Bits in the pattern to be compared.(hexadecimal
for-mat)
Name Identifies the filter entry
IP Src IP address compared to the source address. (dotted decimal format)
Src Mask Bits which are used in the source comparison. (dotted decimal format)
IP Dest IP address compared to the destination address. (dotted decimal format)
Dest Mask Bits which are used in the destination compari-son. (dotted decimal format)
Src Port IP source port number used for comparison. Range: 0 to 65535. (decimal format)
Src Port Cmpr
Type of comparison that is performed:
= -- port equal to
not = -- port not equal to
Chapter 4: Configuration Overview
Filter Defines /IPX Filter Defines
Write security: 2; Read security: 3
The IPX filter defines apply to any IPX packet whether it is routed or bridged. Also, any IPX encapsulation type will be accounted for. Up to 32 IPX defines can be specified.
Dst Port IP destination port number used for comparison Range: 0 to 65535. (decimal format)
Dst Port Cmpr
Type of comparison that is performed:
= -- ports equal to
not = -- port not equal to
> -- port greater than
< -- port less than
None -- the destination port is not compared Proto Protocol used for comparison.
Range: 0 to 255. (decimal format)
Proto Cmpr Type of comparison that is performed:
= -- protocols equal to
not = -- protocols not equal to
> -- protocols greater than
< -- protocols less than
None -- the protocol is not compared TCP Est Yes - only when TCP established
No - only when TCP not established
Ignore - ignore TCP flags
Name Identifies the filter entry (15 characters, max)
Src Net 32-bit source network address
Src Mask Bits in the source network address which are com-pared. (hexadecimal format)
Dest Net 32-bit destination network address
Dest Mask
Chapter 4: Configuration Overview
Src Socket
16-bit value which is the source socket. Range:0-65535.
Src Socket Comp
Type of comparison that is performed:
= -- socket equal to
Not = -- socket not equal to
> -- socket greater than
< --socket less than
None -- no comparison is done on source socket Dest
Socket
16-bit value which is the destination socket. Range is 0-65535.
Dest Socket Comp
Type of comparison that is performed:
= -- socket equal to
Not = -- socket not equal to
> -- socket greater than
< -- socket less than
None -- no comparison is done on destination socket
Type 8-bit value which is the IPX type
Type Comp
Type of comparison that is performed:
= -- type equal to
Not = -- type not equal to
> -- type greater than
< -- type less than
Chapter 4: Configuration Overview
Frame Relay
(also available via Front Panel)
Frame Relay is a connection-oriented service requiring circuits to be configured by your carrier to establish a physical link between two or more locations. Multiple virtual circuits (which appear as virtual point-to-point links) can be run through the same physical connec-tion.
There are two types of virtual circuits supported in Frame Relay:
The Router Option Module supports PVCs only.
The Data Link Connection Identifier (DLCI) number identifies each virtual circuit within a shared physical channel.
Virtual Circuit Types
Description
Permanent Virtual Circuits (PVC)
PVCs are like dedicated point-to-point private lines.
Since the physical connection is always there in the form of a leased line, call setup and tear down is done by a car-rier via a network management sys-tem.
Virtually all Frame Relay communica-tion is done using PVCs.
Switched Virtual Circuit (SVC)
Chapter 4: Configuration Overview
Frame Relay/Maintenance Protocol
Write security: 3, Read security: 5
The Frame Relay maintenance protocol is used on the WAN port. The maintenance protocol is used to send link status and virtual cir-cuit information between Frame Relay switches and other devices (such as routers) that communicate with them. Possible choices are listed below.
Frame Relay/Polling Frequency
Write security: 3, Read security: 5
This parameter is the interval that the Router Option Module polls the Frame Relay switch using the maintenance protocol selected above. The Router Option Module is required to poll the Frame Re-lay switch periodically to determine whether the link is active. The value is in seconds and ranges from 5 to 30 seconds.
Frame Relay/DLCI Mapping
This menu allows each DLCI to be mapped to a particular protocol. Each protocol parameter can be individually configured for each DLCI. By factory default, the DLCI map is empty.
When empty and a maintenance protocol other than static is used, the Router Option Module will poll the switch to determine which DLCIs are active. These active DLCIs will attempt to determine the IP and IPX addresses on the other end of the virtual circuit using In-verse ARP (IARP). If there is a response, the network learned will be
Annex D(def) An ANSI standard that is most commonly used in the US.
Annex A The CCITT European standard.
LMI Used by some carriers in the U.S.
Developed by a vendor consortium and known as the “consortium” management interface spec-ification.
Chapter 4: Configuration Overview
When more than one DLCI mapping is listed, the Router Option Module will try to match the DLCIs learned from the Frame Relay switch with the DLCI values in the map. If there is a match, the pro-tocols specified in the map are used. However, if an active DLCI is not in the list, the Router Option Module falls back to using IARP as in the above paragraph to determine the protocols to use with that particular virtual circuit.
If a static maintenance protocol is used, at least one DLCI mapping must be specified.
If you want to...
Then...
Insert a new profile Press the I key when over the Num col-umn.
Explanation:
A new inserted profile will always be set up with the default parameters.
Copy parameters from an old profile to this newly inserted profile:
Use the copy (C) and paste (P) keys.
Explanation:
Entire configuration trees can be copied with this method.
Delete an unused profile Use the D key when the cursor is over the number in the Num column.
Explanation:
Chapter 4: Configuration Overview
DLCI Mapping/Active
Write security: 3, Read security: 5
When this parameter is set to Yes (def), the mapping is used to de-termine the protocols used. If set to No, the Router Option Module will ignore the virtual circuit with this DLCI.
DLCI Mapping/DLCI
Write security: 3, Read security: 5
This is the DLCI associated with this virtual circuit. This value can range from 16 to 1007.
DLCI Mapping/IP Map
Write security: 3, Read security: 5
This menu represents the IP protocol mapping that is to take place for this DLCI.
IP Map/Active
Write security: 3, Read security: 5
When this is set to Yes (def), the Router Option Module will attempt to transport IP packets for this DLCI. A setting of No means that no IP traffic or route will be exchanged.
IP Map/IARP
Write security: 3, Read security: 5
When set to Yes (def), the Router Option Module will send Inverse ARP packets in order to determine the IP address on the other end of the virtual circuit. If the IARP is responded to, a route is placed in the IP route table.
When set to No, the route address is to be assigned statically using the IP Map/Far-End IP Address parameter.
IP Map/Far-End IP Address
Write security: 3, Read security: 5
This is the IP address of the device on the other end of the virtual cir-cuit. When this DLCI becomes active, the Router Option Module will add a route in the IP routing table.
IP Map/IP Netmask
Write security: 3, Read security: 5
The IP network mask to apply to the Far-End IP Address and Link
Chapter 4: Configuration Overview
IP Map/Link IP Address
Write security: 3, Read security: 5
The virtual circuit may require an IP address to be specified at this DLCI, or numbered, interface. This address is used by the Router Option Module to respond to Inverse ARP requests. If this IP ad-dress is left as 0.0.0.0, the link is treated as unnumbered and the Router Option Module responds to the Inverse ARP with its Ether-net IP address.
IP Map/RIP Protocol
Write security: 3, Read security: 5
The RIP protocol can be specified per DLCI. The selections are:
Off (meaning no RIP packets are listened to or sent)
V1 (def) (which is RIP version 1)
V2 (which is RIP version 2)
IP Map/RIP Method
Write security: 3, Read security: 5
The method of which the RIP protocol is used is specified here:
None All routes in the router table are adver-tised out this virtual circuit with no modi-fication of the metrics.
Split
Horizon (def)
Only routes not learned from this particu-lar virtual circuit are advertised.
Poison Reverse
Chapter 4: Configuration Overview
IP Map/RIP Direction
Write security: 3, Read security: 5
This parameter allows the direction at which RIP advertisements are sent and listened to be specified.
DLCI Mapping/IPX Map
This menu represents the IPX protocol mapping that is to take place for this DLCI.
IPX Map/Active
Write security: 3, Read security: 5
When set to Yes (def), the Router Option Module will attempt to transport IPX packets for this DLCI.
When set to No, no IP traffic or route will be exchanged.
IPX Map/IARP
Write security: 3, Read security: 5
When set to Yes (def), the Router Option Module will send Inverse ARP packets in order to determine the IPX network on the other end of the virtual circuit. If the IARP is responded to, a route is placed in the IPX route table.
When set to No, the IPX network is to be assigned to the link stati-cally using the IPX Map/Link Network parameter.
IPX Map/Link Network
Write security: 3, Read security: 5
This is the IPX network of the link or of the other devices LAN. When this DLCI becomes active, the Router Option Module will add a route to this network in the IPX routing table. This address is also used by the Router Option Module to respond to Inverse ARP re-quests. If this IPX address is left as 0, the link is treated as unnum-bered and the Router Option Module responds to the Inverse ARP
Tx and Rx (def)
RIP advertisements are periodically transmitted and are listened to on this virtual circuit.
Tx Only RIP advertisements are periodically transmitted but are not listened to on this virtual circuit.
Chapter 4: Configuration Overview
DLCI Mapping/Bridge Map
This menu is used to permit bridging of packets over this DLCI. Each DLCI or virtual circuit must be assigned a bridge group. The bridge group treats all virtual circuits as one circuit. Bridge packets destined to be transmitted out a particular bridge group are copied and transmitted individually out each DLCI in the bridge group. However, incoming bridge packets received from one DLCI are not retransmitted out the other DLCIs in the same bridge group. Any device in the bridge group must transmit to each DLCI. This re-quires a fully meshed circuit, meaning each device has a virtual cir-cuit to each other.
Bridge Map/Active
Write security: 3, Read security: 5
When set to Yes (def), the Router Option Module will bridge pack-ets to and from this DLCI. Bridge packpack-ets are any packpack-ets that are not IP or IPX packets except when the router is turned off, in which case that particular router’s protocol packets are bridged.
When set to No, bridging will not occur.
Bridge Map/Bridge Group
Write security: 3, Read security: 5
The bridge group that this DLCI is part of is specified here as Group
1 or Group 2. These groups correspond to the spanning tree proto-cols Bridge Group 1 and Bridge Group 2.
DLCI Mapping/Filters
The Router Option Module can block packets in and out of a PVC port by use of the filters. They are set up in two steps:
1. Define the types of packets that would be of interest in the Con-figuration/Security/Filter Defines menu, and
2. Set up the filter type and combination of defines that will cause a packet block.
Filters/In from PVC
Write security: 2; Read security: 5
The packets which come into the Router Option Module via this PVC can be filtered in three ways:
pack-Chapter 4: Configuration Overview
Block All - All incoming packets from this PVC are blocked except as defined in the Filters/In Exceptions list.
Forward All - All incoming packets from this PVC are not blocked except as defined in the Filters/In Exceptions list.
Filters/In Exceptions
Write security: 2; Read security: 5
This is a list of up to 32 filter entries which can be combined using the operations field. The operations are performed in the order they appear on the list.
Active Turns this entry active when set to ON
Type Selects the filter define list to reference:
MAC - from the Configuration/Security/Filter
Defines/MAC Filter Defines list.
Pattern - from the Configuration/Security/Filter
Defines/Pattern Filter Defines list.
IP - from the Configuration/Security/Filter
Defines/IP Filter Defines list.
IPX - from the Configuration/Security/Filter
Defines/IPX Filter Defines list.
Filter List Name Selects between filters defined in the list.
Next Oper The next operation to use to combine with the next
filter in the list:
End - the last filter to combination.
And - logically AND this filter with the next filter in the list.
Chapter 4: Configuration Overview
Filters/Out to PVC
Write security: 2; Read security: 5
The packets which transmit out this PVC from the Router Option Module can be filtered in three ways:
Disabled (def) - Turns off packet output filtering. No outgoing packets to this PVC are blocked.
Block All - All outgoing packets to this PVC are blocked except as defined in the Filters/Out Exceptions list.
Forward All - All outgoing packets to this PVC are not blocked ex-cept as defined in the Filters/Out Exex-ceptions list.
Filters/Out Exceptions
Write security: 2; Read security: 5
Chapter 4: Configuration Overview
Configuration/PPP Profile
The Router Option Module uses the PPP profile to specify the file used when connected using PPP. Figure 4-7 shows the PPP pro-file menu.
Figure 4-7. Configuration/PPP Profile Screen
PPP Profile/Authentication
The authentication menu contains the required parameters for the authentication of the PPP peer and for being authenticated by the PPP peer.