Table of Contents
OpManager User Guide ... 1
Getting Started ... 3
Starting OpManager ... 3
Enabling SSL WebClient ... 4
Register OpManager ... 7
Configuring Failover Support ... 8
Migrating OpManager Database ... 11
Data Backup and Restoration ... 12
Changing Ports ... 16
Configuring System Settings ... 17
What should be monitored? ... 18
Monitoring Interval ... 19
Personalizing WebClient ... 20
Discovery ... 21
Adding Credentials ... 21
Configuring Rule Engine for Discovery ... 22
Discovering Networks ... 23
Discovering Devices ... 25
Layer 2 Discovery and Mapping ... 26
Managing Devices ... 28
Managing and Unmanaging a Device ... 28
Device Snapshot ... 29
Viewing Asset Details ... 31
Viewing Installed Software ... 32
Configuring Additional Fields for Devices ... 33
Configuring Additional Fields for Interfaces ... 34
Configuring Device Dependencies ... 35
Adding Custom Links to Devices ... 36
Administratively Disabling an Interface ... 37
Classifying and Mapping the Devices ... 38
Using Device Templates ... 38
Using Interface Templates ... 39
Categorizing into Default Maps ... 40
Adding New Infrastructure Views ... 41
Sorting Devices in Maps ... 42
Different Views in Maps ... 43
Importing Devices ... 44 Managing Users ... 45 Adding Domain ... 45 Creating Users ... 46 Changing Passwords ... 48 Removing Users ... 49
Managing Network Resources ... 50
CPU, Disk, Memory Monitoring using SNMP ... 50
CPU, Memory, Disk Monitoring using WMI ... 51
CPU, Disk, Memory Monitoring using CLI ... 52
Adding More Monitors ... 53
Device-specific Monitoring Configuration ... 56
Configuring Thresholds for monitors ... 57
Viewing Process Diagnostics ... 58
Viewing Live Workload on CPU, Memory and Hard disk ... 59
Viewing Live Interface Traffic ... 60
Viewing Live Temperature ... 61
Modifying Live View Parameters ... 62
Monitoring Packet Loss ... 63
Monitoring Response Time ... 64
Monitoring TCP Services ... 65
Monitoring TCP Services on a Device ... 66
Adding New TCP Service Monitors ... 67
Monitoring Windows Services ... 68
Adding New Windows Service Monitors ... 69
Monitoring Processes ... 70
Viewing Active Processes ... 71
Adding New Process Template ... 72
Associating Process Template ... 73
Adding Script Template ... 74
Associating Script Template ... 76
Monitoring Log Files using Agents ... 77
Adding File Monitoring Template ... 78
Adding Folder Monitoring Template ... 80
Monitoring Active Directory ... 82
Monitoring MS Exchange 2000/2003/2007 ... 83
Monitoring MSSQL Parameters ... 84
Monitoring Windows Event logs ... 85
Monitoring URLs ... 87
URL Monitors for Devices ... 89
Adding Syslog Rules ... 90
Configuring Syslog Ports ... 91
Monitoring Syslog Packets ... 92
Viewing Syslog Flow Rate ... 93
Hardware Health Monitoring ... 94
IT Workflow Automation ... 95
About Workflow Automation ... 95
Workflow Checks and Actions ... 96
Adding Workflows ... 111
Executing Workflows ... 115
Viewing Workflow Logs ... 116
Importing/Exporting Workflows ... 117
Customizing Dashboards and Views ... 118
Customizing Tabs ... 118
Creating New Dashboard ... 120
Adding Widgets ... 121
Editing Widgets ... 122
Moving Widgets ... 123
Embedding Widgets ... 124
Deleting Widgets ... 125
Setting as Default Dashbord ... 126
Editing Dashboard Layout ... 127
Adding New CCTV ... 129 Viewing CCTV ... 130 Editing CCTV ... 131 Deleting CCTV ... 132 List View ... 133 Infrastructure Views ... 135 Google Maps ... 136 Business Views ... 137 Network Views ... 139 Alerting ... 140
Managing Network Faults ... 140
Viewing OpManager Alerts ... 141
Configuring Actions on Alert ... 142
Escalating an Alert ... 143
Suppressing Alarms ... 144
Receiving Traps in OpManager ... 145
Processing the Traps into Alerts ... 146
Configuring Notifications ... 148
Mail Server Settings ... 149
Proxy Server Settings ... 150
SMS Server Settings ... 151 Forwarding Syslogs ... 152 Forwarding Traps ... 153 Email Alerting ... 154 SMS Alerting ... 155 Web Alerting ... 156 Running a Program ... 157
Logging a Trouble Ticket ... 158
Running a System Command ... 159
Alerting via Trap ... 160
Alerting via SysLog ... 161
Sound Notification ... 162
Modifying/Deleting a Profile ... 163
Associating a Profile to Devices ... 164
Add-ons & Plug-ins ... 165
VMware Monitoring ... 165
About VMware Monitor ... 165
Discovering VMware Server ... 166
VMware Performance Monitoring ... 169
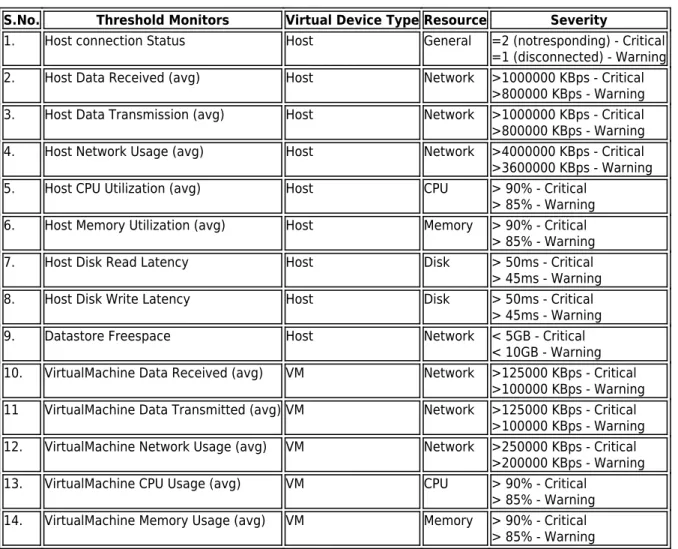
Configuring Thresholds for VMware Host and VMs ... 172
Managing VMware Alerts ... 174
Notifying VMware Alerts ... 176
VMware Performance Reports ... 177
Hyper-V Monitoring ... 182
About Hyper-V Monitor ... 182
Discovering Hyper-V Servers ... 183
Hyper-V Performance Monitoring ... 184
Configuring Thresholds for Hyper-V Host and VMs ... 187
Managing Hyper-V Alerts ... 188
Notifying Hyper-V Alerts ... 189
Configuring VoIP Monitor Template ... 197
Business Views in VoIP Monitor ... 199
Viewing Top 10 Call Paths ... 200
Viewing VoIP Monitor Alerts ... 201
Viewing VoIP Monitor Reports ... 202
FAQs on VoIP Monitor ... 203
WAN Monitoring ... 205
About WAN Monitor ... 205
Adding a new WAN Monitor ... 206
Configuring WAN Monitor Template ... 208
Business Views in WAN Monitor ... 209
Viewing WAN Monitor Alerts ... 210
Viewing WAN Monitor Reports ... 211
FAQs on WAN Monitor ... 212
NCM Plug-in ... 213
About NCM Plug-in ... 213
Installing NCM Plug-in ... 214
Configuring MySQL Server ... 215
Importing Devices into NCM Module ... 216
Configuring NCM Module ... 217
NFA Plug-in ... 218
About NetFlow Plug-in ... 218
Installing NFA Plug-in ... 219
Configuring NFA Module ... 220
IPAM Plug-in ... 221
Applications Monitoring Plug-in ... 222
Integrating with Other ME Applications ... 223
Integrating with NetFlow Analyzer ... 223
Integrating with ServiceDesk Plus ... 224
Integrating with DeviceExpert ... 225
Integrating with Firewall Analyzer ... 226
Integrating with ITPulse ... 227
Other Utilities and Tools ... 228
Rebranding OpManager ... 228
Database Maintenance ... 229
Scheduling Downtime ... 230
Scheduling Reports ... 231
Quick Configuration Wizard ... 233
MIB Browser ... 234
Switch Port Mapper ... 235
Reporting ... 236
Viewing OpManger Reports ... 236
At-a-glance Reports ... 237
Viewing Interface Reports ... 238
Business View based Reports ... 239
Creating New Reports ... 240
Editing Reports ... 241
Copying Reports ... 242
Configuring Favorite Reports ... 243
Time Based Availabily Reports ... 244
REST API ... 245
Appendix ... 246
Installing SNMP on Windows ... 246
Installing SNMP on Linux ... 247
Installing SNMP on Solaris ... 248
Configuring SNMP Agents ... 249
Configuring Agent on Cisco ... 252
Configuring Lotus Agent ... 253
Configuring MSSQL Agent ... 254
Copyright © 2013 Zoho Corporation
Page 1
ManageEngine OpManager - Network Monitoring Software
With the growing need for the network monitoring software in the IT industry, OpManager has been built to satisfy the needs of network administrators by monitoring servers, routers, switches, firewalls, printers, critical services and applications from a single console.
Network Monitoring Software
ManageEngine OpManager is a comprehensive network monitoring software that provides the network administrators with an integrated console for managing routers, firewalls, servers, switches, and printers. OpManager offers extensive fault management and performance management functionality. It provides handy but powerful Customizable Dashboards and CCTV views that display the immediate status of your devices, at-a-glance reports, business views etc. OpManager also provides a lot of out-of-the-box graphs and reports, which give a wealth of information to the network administrators about the health of their networks, servers and applications.
OpManager's network monitoring functionality includes the following:
Network Monitoring: OpManager discovers switches, routers and firewalls in the network during the network discovery
automatically and monitors the critical parameters such as the traffic rate, error and discards rate, buffer hits and misses and so on. You can get the availability report of each port and interface. Using the Switch Port Mapper tool, you can get the list of devices connected to each port of the switch. You can also create your own views and draw the diagram to virtually represent your network and get the availability of the interfaces visually.
Server Monitoring: OpManager allows you to classify devices as servers and desktops. This facilitates separating critical servers from end-user workstations and allows for more meaningful management. You can manage Windows Event Logs and Windows Services.
Cisco IPSLA Monitoring: OpManager allows you to monitor the performance of your VoIP networks with the Cisco IPSLA monitor. The Cisco IPSLA monitor is add-on feature and monitors the various parameter like Latency, Jitter, MoS etc.
WAN Monitoring: OpManager provides complete solutions for monitoring your WAN links. It checks for RTT, Latency and availability between the WAN links. The WAN monitor comes as an add-on feature.
VMware/Hyper-V Monitoring: OpManager out-of-the-box monitors VMware and Hyper-V servers. It monitors VMware servers via native APIs provided by VMware and Hyper-V servers via WMI. All the VMware and Hyper-V hosts and VMs are grouped under Virtualization tab.
Applications and Services Monitoring: OpManager discovers and actively monitors services and applications running in the servers. Out-of-the-box support is provided for services such as Web, HTTPS, FTP, IMAP, LDAP, Telnet, MySQL, MS-Exchange, SMTP, POP3, WebLogic, etc., and applications such as MSSQL, MS Exchange, Oracle and Lotus. Special add-ons are available for
monitoring Exchange 2000/2003/2007 and Active Directory Services.
URL Monitoring: OpManager monitors your Web sites, both global URLs and URLs in the servers, and promptly notifies you when the host becomes unavailable.
Script Monitoring: OpManager monitors the output of the custom scripts you execute on the devices and raise alarm accordingly. OpManager parses the output of the custom scripts and verifies it with the configured threshold condition. If the threshold is violated an alarm is raised and the same is notified via the associated notification profile.
Fault Management: OpManager provides extensive solutions for monitoring Syslogs, Eventlogs and current Processes running on the devices. OpManager detects faults in the network through periodical status polling and generates color-coded alarms for the faults. OpManager can also be configured to notify the administrator about the fault detected in the network.
Performance Management: OpManager measures the performance of the network hardware and software, such as the bandwidth, memory, disk and CPU utilization, and service response time by collecting data at regular intervals. These data are provided in the form of reports and graphs to the administrators. The threshold limits can be configured to pro-actively monitor the critical parameters in the managed devices.
IT Automation Workflows: OpManager helps you automate repeated IT actions with Workflow. Workflow works on if-else based conditions which execute a set of actions when the given condition is satisfied, else executes another set of actions. However, you can also execute actions without any condition.
OpManager User Guide
Copyright © 2013 Zoho Corporation
Page 3
Starting OpManager
After installation, all the OpManager-related files will be available under the directory that you choose to install OpManager. This is referred to as OpManager Home directory.
Starting OpManager on Windows ●
Starting OpManager on Linux ●
Connecting the Web Client ●
On Windows Machines
If you have chosen to install OpManager as Windows service, you will be prompted to start the service after successful installation. The Web Client is invoked automatically on installing as a Service. Enter the log-on details. The default user name and password is 'admin' and 'admin' respectively.
To later start OpManager as a Windows Service, follow the steps below: Click Start, point to Settings, and then click Control Panel. 1.
Under Administrative Tools, select Services. 2.
In the details pane, right-click ManageEngine OpManager and click Start. 3.
To stop the ManageEngine OpManager service, right-click the ManageEngine OpManager service in the Services window and click Stop.
On Windows machines, an icon is displayed on the system tray to manage the application. You can start the client, start the server, and shut down the server using this icon.
On Linux Machines Log in as 'root' user. 1.
Execute the StartOpManagerServer.sh file present in the <OpManager Home>/bin directory. 2.
To stop OpManager running on a linux machine, execute the ShutDownOpManager.sh file present in the <OpManager Home>/bin directory.
Type the User Name and Password in the Shut Down OpManager window and press Enter. Connecting the Web Client
Open a JavaScript-enabled Web browser such as Internet Explorer or Mozilla Firefox. 1.
Type http://<host_name>:<port_number> in the address bar and press Enter. Here, <host_name> is the name of the 2.
machine in which OpManager is running and <port_number> is the port that you have chosen to run OpManager Web Server during installation.
[Note: If you have enabled SSL, connect as https:///<host_name>:<port_number> in the address bar and press Enter.] Type the User Name and Password and click Login. The default user name and password are 'admin' and 'admin' 3.
respectively.
Alternatively, if the OpManager server is running on Windows machines, you can start the Web client using Start > Programs > ManageEngine OpManager > OpManager Web Client.
[OR]
Right-click the tray icon and select Start Client option.
OpManager User Guide
Getting Started
Enabling SSL in OpManager
Steps to enable SSL for OpManager build 8050 and above
In build 8050 we have remove Apache from OpManager. Follow the steps given below to enable SSL: Open a command prompt (Run-> cmd) and change directory to /opmanager/bin.
1.
Execute the following command 2.
ssl_gen.bat -f Enable
You have successfully enabled self signed SSL certificate for OpManager. Now you can access OpManager web client in the same port number with https://.
Steps to disable SSL:
Open a command prompt (Run-> cmd) and change directory to /opmanager/bin. 1.
Execute the following command 2.
ssl_gen.bat Disable
This will disable SSL for OpManager. The web client can be accessed in the same port number with http://.
Steps to enable SSL for OpManager builds older than 8050 (Apache has been removed in build 8050)
Stop OpManager service.1.
Ensure service window is closed. 2.
Open a command prompt and change directory to opmanagerbin. 3.
Execute the script OpManagerService.bat with -r option as shown below: 4.
OpManagerService.bat -r This removes the Service entry.
From the command prompt, with opmanagerbin as the current directory, execute the script ssl_gen.bat. This creates the SSL 5.
Certificate.
Now, execute the OpManagerService.bat script once again, but with the argument as -i as shown below. This recreates the 6.
OpManager Service. OpManagerService.bat -i
Restart OpManager Service and connect as https://<opmanager host name or IP address>:<port number>. For instance, if 7.
the host name is OpM-Server and the port is 80, you will connect as https://OpM-Server:80
The WebClient is now SSL-enabled.
Steps to enable SSL for NetFlow plug-in
If you have also installed the NetFLow plug-in, then follow steps given below. Ensure that SSL has already been enabled in OpManager.
1.
Stop the OpManager Service. 2.
Download and unzip the NetFlow_ssl.zip under opmanager folder. 3.
Run the ssl_gen.bat present under opmanagerNetFlowbin. 4.
Copyright © 2013 Zoho Corporation
Page 5
Start the OpManager service.6.
The NetFlow plug-in is also now SSL-enabled.
Steps to enable third-party SSL in OpManager
Open a command prompt (Run-> cmd) and change directory to /opmanager. 1.
Generate a Keystore file. Execute the following command and provide requested details to create OpManager.truststore 2.
file under conf folder.
>jrebinkeytool.exe -v -genkey -keyalg RSA -keystore confOpManager.truststore -alias opmanager (Press Enter) Enter keystore password:(Enter a password for this keystore. atleast 6 characters long. Press Enter)
What is your first and last name?
[Unknown]: (Enter the Server's name in which OpManager is running. It must be a FQDN [Fully Qualified Domain Name] Ex.: opmserver.manageengine.com. Press Enter.)
What is the name of your organizational unit?
[Unknown]: (Name of your Organization Unit. Ex: SYSADMIN. Press Enter.) What is the name of your organization?
[Unknown]: (Your Organization Name. Ex:Zoho Corp. Press Enter.) What is the name of your City or Locality?
[Unknown]: (Your city name. Ex:Pleasanton. Press Enter.) What is the name of your State or Province?
[Unknown]: (Your state name. Ex:California. Press Enter.) What is the two-letter country code for this unit?
[Unknown]: (Your country's two letter code. Ex:US. Press Enter.)
Is CN=opmserver.manageengine.com, OU=SYSADMIN, O=Zoho Corp, L=Pleasanton, ST=California, C=US correct?
[no]: (Check the details and if it is correct type yes and press enter. If else just press Enter to modify) Generating 1,024 bit RSA key pair and self-signed certificate (MD5WithRSA)
for CN=opmserver.manageengine.com, OU=SYSADMIN, O=Zoho Corp, L=Pleasanton, ST=California, C=US Enter key password for <opmanager>
(RETURN if same as keystore password): (Just press enter. For tomcat both keystore password and key [alias] password must be the same)
[Storing confOpManager.truststore]
Generating CSR File (Certificate Signing Request). Execute the following commands to create opmssl.csr file under conf 3.
folder:
>jrebinkeytool.exe -v -certreq -file confopmssl.csr -keystore confOpManager.truststore -alias opmanager Enter keystore password: (Enter the password for the keystore file)
Certification request stored in file <confopmssl.csr> Submit this to your CA
Get certificates from CA (Certification Authority): 4.
Contact a CA like Verisign, Equifax, with the csr file generated in the previous step to get ssl certificate. Mostly you have to copy and paste the content of the csr file in a text area of their website. After verifying your request, mostly they will sent you the certificate content through mail. Copy and paste the content in a text editor and save it as "ServerCert.cer" under
OpManager_Homeconf folder. Be cautious that while doing copy-paste, no extra space added at the end of lines. Import root and intermediate certificates:
5.
Before importing our certificate, we have to import the CA's root and intermediate certificates into the keystore file we generated at the second step. While mailing you the certificate, CA's will mention the link to their root and intermediate certificates. Save them under conf directory in the name "CARoot.cer" and "CAIntermediate.cer" respectively. Some CAs may
OpManager User Guide
Getting Started
have two or more intermediate certificates. Refer their document clearly before importing.To import root certificate:
>jrebinkeytool.exe -import -trustcacerts -file confCARoot.cer -keystore confOpManager.truststore -alias CARootCert
Enter keystore password: (Enter the keystore password) (Root Certificate's information will be printed)
Trust this certificate? [no]: (type yes and press enter if it is the certificate of your CA) Certificate was added to keystore
To import intermediate certificate:
>jrebinkeytool.exe -import -trustcacerts -file confCAIntermediate.cer -keystore confOpManager.truststore -alias CAInterCert
Enter keystore password: (Enter the keystore password) Certificate was added to keystore
Import Server's Certificate. Execute the following command to add the certificate received from CA to the keystore file: 6.
>jrebinkeytool.exe -import -trustcacerts -file confServerCert.cer -keystore confOpManager.truststore -alias opmanager
Enter keystore password: (Enter the keystore password) Certificate reply was installed in keystore
Configure Tomcat: 7.
Open "ssl_server.xml" file (under OpManager_Hometomcatconfbackup) in a text editor. 1.
Search for term "keystoreFile". It will be an attribute for connector tag. Set the value as 2.
"WEBNMS_ROOT_DIR/conf/OpManager.truststore". Change the value for "keystorePass" attribute 3.
with your keystore file password. Modify conf file:
8.
Open "OpManagerStartUp.properties" file (under OpManager_Homeconf) in a text editor. 1.
Set the value of the parameter "https" as "Enable". 2.
Start OpManager server. Connect client with https. Ex:https://opmserver.manageengine.com:80 9.
Note:
If you are already having a certificate for this server and that certificate was requested by the keystore file generated using Java keytool, you may use it for SSL configuration. Just copy and paste the keystore file under OpManager_Homeconf and rename it to “OpManager.truststore” and follow the steps from 5.
Copyright © 2013 Zoho Corporation
Page 7
Registering OpManager
You can register OpManager by applying the license file that you receive from AdventNet. To apply the license, follow the steps given below:
Click Register at the top right corner of the client page. 1.
Click Browse and choose the license file from the location it is saved. 2.
Click the Register button to apply the license file and close. 3.
OpManager User Guide
Getting Started
Configuring Failover Support for OpManager
Failover or redundancy support for OpManager is necessary to achieve uninterrupted service. It becomes cumbersome if the OpManger DB crashes or loses its network connectivity and not monitoring your network. Though regular backups help you recover from DB crashes, but it takes time for OpManger to resume its service. However, in the mean time your network will be left unmonitored and some other critical devices such as routers, mail servers etc. may go down and affect your business. Implementing a redundancy system helps you to overcome such failures.
Failover support requires you to configure OpManager Secondary or Standby server and keep monitoring the OpManager Primary server. Incase the Primary server fails the Standby server automatically starts monitoring the network. The transition is so quick and smooth that the end user does not feel the impact of the failure of the Primary server or the subsequent taking over by Standby. In parallely the Standby server triggers an email alert (email ID entered configured in the mail server settings) about the Primary's failure. Once the Primary server is restored back to operation the Standby server automatically goes back to standby mode.
Working Mechanism
The Primary server updates its presence with a symbolic count in the BEFailover table at a specified interval known as the
HEART_BEAT_INTERVAL. With every update the count gets incremented. This count is known as LASTCOUNT. Similarly the standby server also updates the its presence by updating the LASTCOUNT in the BEFailover table.
When the Primary server fails, it fails to update the LASTCOUNT. The Standby server keeps monitoring the Primary's LASTCOUNT at a specified periodic interval known as FAIL_OVER_INTERVAL. By default the FAIL_OVER_INTERVAL value is 60 seconds. If required you can modify it in the Failover.xml file (<OpManager_Standby_home>\conf). Supposing, you have specified FAIL_OVER_INTERVAL as 50 seconds, the standby will monitor the Primary's LASTCOUNT for every 50 seconds. Every time, when the Standby server looks up the LASTCOUNT, it compares the previous and present counts. When the Primary server fails to update the LASTCOUNT,
consecutive counts will be the same and the Standby assumes that the Primary server has failed and starts monitoring the network.
Installing the Primary Server
If you are already running OpManager, first upgrade to build 7260 before applying build 8000. If you installing OpManager for the first time directly install build 8000. While installing OpManger (build 8000) on the Primary server, select as Primary server in the installation wizard and complete the installation process. Start the Primary server.
Installing the Standby Server
While installing OpManager on the standby server,
Select as Standby server mode in the installation wizard. 1.
Copyright © 2013 Zoho Corporation
Page 9
Enter the Primary webserver host, port and login details and complete the installation. Do not start the Standby server. 2.Note: The Date and Time settings of the Primary and the Standby should be same.
Configuring Failover:
The procedures for configuring failover support varies according to the following cases (backend DB used): Using MSSQL
●
Using MSSQL as the backend DB
If you are running OpManager with MSSQL as the backend DB, then implement clustering. Clustering refers to an array of
databases in which the data are stored and have a single virtual IP. If any of the DB in the cluster environment fails the other DBs have the data thereby providing high availability of data. The Primary server sends all its data to a virtual IP and the data gets stored in multiple locations. The Standby server that takes control over the network in case the primary fails, then the standby server also sends the data to the same virtual IP.
For configuring MSSQL server clustering visit the below link published by Microsoft. http://www.microsoft.com/technet/prodtechnol/sql/2000/maintain/failclus.mspx#EDAAC
OpManager User Guide
Getting Started
For MSSQL, the Standby OpManager server can be started once the installation is completed, provided you have already configured MSSQL clustering for Primary server.
Once the Primary server fails, the Standby server assumes itself as the Primary server and starts monitoring the network. Once the Primary server is up, the Standby server goes back to its standby mode and monitors the Primary server.
Copyright © 2013 Zoho Corporation
Page 11
Migrating Database
OpManager supports MySQL and MSSQL as the backend database. At a later time, you can choose to migrate from one database to another. Here are the steps:
Migrating from MySQL to MSSQL Prerequisites
The Build Number of OpManager must be 6000 or higher. ●
MSSQL database must be installed as this is not bundled with OpManager. ●
Steps to migrate are,
Stop OpManager again and take a backup of the data using BackupDB.bat 1.
present under /bin/backup directory .
Select Start --> Programs --> ManageEngine OpManager --> DB Manager --> DB Configuration. 2.
A DB Configuration window pops up. Select MSSQL option. 3.
Configure the following information: 4.
DB Host : The name or the IP address of the machine where MSSQL is installed. 1.
Port: The port number in which OpManager must connect with the database. Default is 1433. 2.
User Name and Password: The user name and password with which OpManager needs to connect to the database. 3.
Driver Jars: Specify the path of the Database driver 4.
Click OK. 5.
Restore the data using RestoreDB.bat present in /bin/backup directory 5.
and restart OpManager.
OpManager User Guide
Getting Started
Data Backup and Restoration
Periodically backing up the database is very essential, as it helps you restore OpManager service back during planned maintenance as well as unplanned mishaps. OpManager database contains two types of data:
Performance data: This is the data gathered by OpManager by periodically polling or querying the resources on a monitored device to determine its performance. This includes resources like CPU, Memory, Response time, Traffic etc.
Configuration data: There are quite a few configurations an administrator effects in OpManager for easy management and
monitoring. The configurations include user settings, details of discovered devices, custom monitors, threshold settings, notification profiles, etc. Most configuration data is persisted in the database while a few configurations are written in conf files. So when you backup configuration data, you must take care to back up the ones you need.
Backup & restoration steps for OpManager build 9450 and above ●
Backup & restoration steps for OpManager build 9410 and below ●
Backup & restoration steps for OpManager build 9450 and above
Backup
Following table lists the backup utilities bundled with OpManager and their purpose. Make sure you use the one that fits your backup need:
S.No Utility Path Database Purpose
1 BackupDB_Mysql.bat/sh
Arguments: mode, destination, exclude, threads mode*: Backs up either both performance and configuration data or configuration data alone possible values: all, configdata ('all' backs up both performance and configuration data while
'configdata' backs up configuration data alone) destination: This option is used to store the backup file in different location. By default it will be stored in <OpManager Home/backup> directory.
exclude: Allows you to exclude netflow and ncm plugin data while taking backup
possible values: ncm, netflow
threads: Increasing the number of threads will increase the backup speed. Default thread count is 10, but you can increase up to 15.
Examples:
• BackupDB_Mysql.bat -mode all -exclude ncm • BackupDB_Mysql.bat -mode configdata -threads 12 -destination c:\manageengine
*- Mandatory field
OpManager Home>/bin /backup
MySQL This utility does a backup of the complete database, viz., performance and configuration data.
If you are using MySQL bundled with OpManager and assuming that you will not switch to MSSQL database when restoring the backed-up data.
Copyright © 2013 Zoho Corporation
Page 13
2 BackupDB_Postgres.bat/shArguments: mode, destination, exclude, threads mode*: Backs up either both performance and configuration data or configuration data alone possible values: all, configdata ('all' backs up both performance and configuration data while
'configdata' backs up configuration data alone) destination: This option is used to store the backup file in different location. By default it will be stored in <OpManager Home/backup> directory.
exclude: Allows you to exclude netflow and ncm plugin data while taking backup
possible values: ncm, netflow
threads: Increasing the number of threads will increase the backup speed. Default thread count is 10, but you can extend up to 15.
Examples:
• BackupDB_Postgres.bat -mode all -exclude netflow • BackupDB_Postgres.bat -mode configdata -threads 12 -destination c:\manageengine
*- Mandatory field
-do- PostrgreSQL This utility does a backup of the complete database, viz., performance and configuration data.
If you are using PostgreSQL bundled with OpManager and assuming that you will not switch to MSSQL database when restoring the backed-up data.
3 CrossDBBackup.bat/sh
Arguments: mode, targetdb, destination, exclude, threads
mode*: backs up performance data or configuration data or configuration files or all the aforesaid. possible values: all, configdata, configfiles ('all' backs up both performance and configuration data while 'configdata' backs up configuration data alone. When you backup the DB using Microsoft SQL Enterprise, it does a backup of only the database and ignores the configuration files which are required to run OpManager properly. To backup those configuration files, use the 'configfiles'.) targetdb*: The target database that you are going to restore the backup.
possible values: mysql, mssql, pgsql
destination: This option is used to store the backup file in different location. By default it will be stored in <OpManager Home/backup> directory.
exclude: Allows you to exclude netflow and ncm plugin data while taking backup
possible values: ncm, netflow
threads: Increasing the number of threads will increase the backup speed. Default thread count is 10, but you can extend up to 15.
Examples:
• CrossDBBackup.bat -mode all -exclude ncm -targetdb pgsql
• CrossDBBackup.bat -mode configdata -threads 12 -destination c:\manageengine -targetdb mssql • CrossDBBackup.bat -mode all -exclude netflow -targetdb mssql
*- Mandatory field
-do- MSSQL/ MySQL/
PostgreSQL This utility does a backup of thecomplete database, viz., performance and configuration data.
Use this tool if you are migrating the database across MSSQL, MySQL & PostrgreSQL.
OpManager User Guide
Getting Started
Restoration
To restore the backed up data,
Go to <OpManager Home>/bin/backup directory 1.
Execute RestoreDB.bat/sh with the backup file name as argument. See example below: 2.
C:\<OpManager Home>\bin\backup>RestoreDB.bat BackUp_APR3_2009_17_43_38_8100.zip
While restoring the backup, the tables that are dropped or retained varies according to the backup file restored: Options:
exclude: Used to skip restore data for ncm and netflow plugin. ●
Possible values : ncm, netflow
threads - Increasing the number of threads will increase the restore speed. ●
Value should be less than 15. default 10. Examples :
RestoreDB.bat BackUp_APR3_2009_17_43_38_8100.zip ●
RestoreDB.bat BackUp_APR3_2009_17_43_38_8100.zip -exclude ncm,netflow ●
Note: If you are restoring from PostrgeSQL or MySQL database to MSSQL, download and install SQL native client (refer the installation video) and follow the steps given below:
Ensure that the files bcp.exe and bcp.rll files are present under /opmanager home folder. You will find these files in MSSQL 1.
installation setup.
If the MSSQL server is installed on a 64-bit OS, and OpManager is installed on 32-bit server, the bcp.exe and bcp.rll copied 2.
from the MSSQL server will not work on the OpManager machine. You'll need a 32-bit bcp.exe and bcp.rll.
Backup & restoration steps for OpManager build 9410 and below
Backup
Following table lists the backup utilities bundled with OpManager and their purpose. Make sure you use the one that fits your backup need:
S.No Utility Path Database Purpose
1 BackupDB_Mysql.bat/sh OpManager Home>/bin/backup
MySQL This utility does a backup of the complete database, viz., performance and configuration data.
If you are using MySQL bundled with OpManager and assuming that you will not switch to MSSQL database when restoring the backed-up data.
Ensures a quick backup.
2 BackupDB_Mysql_Config.bat/sh -do- MySQL Use this tool if you want to backup only the configuration data and not the performance data. This requirement arises when you decide that you want to drop all the performance data and start afresh in the same or new machine, but keep all the configurations alone intact.
Ensures a quick backup.
3 BackupDB.bat/sh -do- MSSQL/MySQL This utility does a backup of the complete database, viz., performance and configuration data.
Use this tool if you are using MSSQL as the database. It can also be used for MySQL database besides BackupDB_Mysql.bat/sh, but might take a longer time to backup.
Copyright © 2013 Zoho Corporation
Page 15
4 BackupDB_Config.bat/sh -do- MSSQL/MySQL Use this tool if the OpManager database is MSSQLand if you want to backup only the configuration data and not the performance data.
This requirement arises when you decide that you want to drop all the performance data and start afresh in the same or new machine, but keep all the configurations alone intact.
5 Microsoft SQL Enterprise Manager +
BackupConfFiles.bat
-do- MSSQL You can also use Microsoft SQL Enterprise Manager to backup the database.
When you use this tool, make sure to backup the configuration files too using the
BackupConfFiles.bat utility because the SQL Enterprise Manager does a backup of only the database and ignores the configuration files which are required to run OpManager properly.
6 Using third party backup
utility + BackupConfFiles.bat -do- MSSQL/MySQL When you use any third party backup utility, makesure to backup the configuration files too using the BackupConfFiles.bat utility because the SQL Enterprise Manager does a backup of only the database and ignores the configuration files which are required to run OpManager properly.
Name & Location of the backup files
The backup file created is of the format: <filename>_<date>_<time>_<build number>.zip Example: BackUp_APR3_2009_17_43_38_8100.zip.
The backup files are stored under OpManager Home/backup directory. To store the backup file in another directory other than the default directory (<OpManager Home/backup>), follow the procedure below:
Open a command prompt. 1.
From the command prompt, execute the backup script (that meets your requirement) with the path of the destination 2.
directory as argument as follows:
<backup execution command> -destination <path of the destination directory> Example:
BackupDB_Mysql.bat -destination D:\OpManager_backup
Restoration
To restore the backed up data,
Go to <OpManager Home>/bin/backup directory 1.
Execute RestoreDB.bat/sh with the backup file name as argument. See example below: 2.
C:\<OpManager Home>\bin\backup>RestoreDB.bat BackUp_APR3_2009_17_43_38_8100.zip
While restoring the backup, the tables that are dropped or retained varies according to the backup file restored:
BackupDB.bat/sh: During restoration, all the existing tables are dropped, new tables are created, and the data are restored. ●
BackupDB_Config.bat/sh: During restoration, all the existing tables are dropped, new tables are created, and only the ●
configuration data are restored.
BackupDB_Mysql.bat/sh: During restoration, all the existing tables are dropped, new tables are created, and the data are ●
restored.
BackupDB_Mysql_Config.bat/sh: During restoration, all the existing tables are dropped, new tables are created, and only ●
the configuration data are restored.
BackupConfFiles.bat/sh: During restoration, no tables get dropped. Only the configurations files are restored. ●
OpManager User Guide
Getting Started
Changing Ports in OpManager
You will be prompted to change Web Server port during installation. You can change it after installation.
The script for changing the Web Server port number, ChangeWebServerPort (in Windows this will be a .bat file and in Linux, .sh file) is available under the <OpManager Home>/bin directory.
The steps to change the port number are as follows:
Stop the OpManager server. If you are running OpManager as Windows service, stop the service. 1.
Execute the script as follows: 2.
In Windows,
ChangeWebServerPort <old_port_number> <new_port_number> In Linux,
sh ChangeWebServerPort.sh <old_port_number> <new_port_number>
Here, old_port_number is the port number you specified during installation and new_port_number is the one where you want to run the Web server.
Start the OpManager server. 3.
Changing Other Ports
You can also change the port by editing the value of WEBSERVER_PORT=80 in the file /conf/Port.properties. You can change the following ports too in this file if the default ports are occupied:
WEBCONTAINER_PORT=8009 NMS_BE_PORT=2000 WEBSERVER_PORT=80
TOMCAT_SHUTDOWNPORT=8005 RMI_PORT=1099
Copyright © 2013 Zoho Corporation
Page 17
Configuring System Settings
The following system settings can be enabled/disabled by the users.
Benchmark Statistics: Data collected from the OpManager community is presented to the user for benchmarking their performance. Click on the community tab to know more.
Usage Statistics: We collect statistical data pertaining to quality, stability, and usability of the product from every installation with an intent to enhance the product quality. The collected data will be used as a whole during the analysis and we won't share this data with others. This feature is enabled by default. If you don't want your data to be collected, you can disable it any time. Quick Links: Provides the list of frequently asked questions that will help you to know more about OpManager.
Show Ads: Displays the ads from ManageEngine in the OpManager login UI.
Logging: For quick troubleshooting of monitoring issues, you can now enable detailed logging for SNMP,WMI and CLI monitors and debug prints. This logs the relevant requests to devices and helps troubleshoot.
OpManager User Guide
Getting Started
What Should Be Monitored?
Active network monitoring is a must to gain accurate and real-time visibility of the health of your network. However frequent monitoring can become a huge strain on your network resources as it generates a lot of traffic on the network, especially in large networks.
We recommend monitoring only the critical devices on the network. This is a best practice adopted by the network administrators worldwide.
Following are the components of networks that are considered critical: WAN Infrastructure: Routers, WAN Switches, Firewall, etc.
●
LAN Infrastructure: Switches, Hubs, and Printers. ●
Servers, Services, and Applications: Application Servers, Database servers, Active Directory, Exchange Servers, Web servers, ●
Mail servers, CRM Applications, etc.
Host Resources: CPU, Memory, and Disk Utilization of critical devices. ●
Critical Desktops and Workstations. ●
Copyright © 2013 Zoho Corporation
Page 19
Monitoring Interval for a Device Category
OpManager allows you to set a common monitoring settings for all the devices under a specific category. To do so, follow the steps given below:
Click the Admin tab. 1.
Under Monitoring, click Monitoring Intervals. 2.
To enable monitoring for a category, select the check box under Enable corresponding to the category and type the 3.
monitoring interval in minutes, in the adjacent box.
To disable monitoring a specific category, clear the respective check box. Click Save to save the settings.
4.
For instance, if you want to monitor servers every minute, ensure that the check box corresponding to Servers is selected and type 1 in the adjacent box.
How Frequently Should I Monitor?
The general practice is to monitor critical devices more frequently than non-critical devices.
Given below are the recommended monitoring intervals for small and medium-sized networks (up to 1000 devices): Routers and Critical Servers: 10 minutes
●
Switches, Hubs, and Printers: 10 - 20 minutes ●
Critical Services like Exchange, Active Directory: 10 - 20 minutes ●
Desktops and Workstations: We recommend turning off monitoring for desktops and workstations to reduce the amount of ●
network traffic generated by OpManager.
This is done by removing selection for Desktop category in Admin > Monitoring Intervals. Alternatively, monitor them less frequently, say for every hour or 30 minutes.
OpManager User Guide
Getting Started
Personalize WebClient
Change Password
You can change the WebClient login password. Click on the Personalize link in the WebClient and select the Change Password tab. Provide the current password and the new password. Retype new password to confirm. The next time you login, use the new password.
Select Skin
From the Personalize link, select the Skin Selector tab to select the required skin for the WebClient. Configure Automatic Refresh
From the Personalize link, select the Automatic Refresh tab to set automatic page refresh at the selected interval. You can also set the session timeout interval here.
Copyright © 2013 Zoho Corporation
Page 21
Add Credentials
OpManager accesses the remote devices using the protocols SNMP, CLI, or WMI. The credentials like the password/snmp
community, port etc., may differ for different device types. Pre-configuring a set of credentials in OpManager helps applying them to multiple devices at a time, saving a lot of manual effort.
1.Go to Admin --> Credential Settings. 2.Click New in this screen
3.Configure the following parameters and click Add to add the credentials:
Credential Type: Select the relevant protocol.
SNMP v1/SNMPv2: SNMPv1 and SNMPv2 are community based security models. Enter the Credential name and description. Configure the correct Read and Write community, and the SNMP Port.
SNMP v3: SNMPv3 is a user based security model. It provides secure access to the devices by a combination authenticating and encrypting packets over the network. The security features provided in SNMPv3 are Message integrity, Authentication and Encryption. If you select SNMPv3 as the credential type, then configure the following parameters.
Name: Enter the name of the credential. 1.
Description: Enter a brief description about the credential. 2.
User Name: Enter the name of the user (principal) on behalf of whom the message is being exchanged. 3.
Context Name: An SNMP context name or "context" in short, is a collection of management information accessible by 4.
an SNMP entity. An item of management information may exist in more than one context. An SNMP entity potentially has access to many contexts. In other words, if a management information has been defined under certain context by an SNMPv3 entity, then any management application can access that information by giving that context name. The "context name" is an octet string, which has at least one management information.
SNMP Port: Enter the SNMP port number. 5.
Authentication: Select any of the authentication protocols either MD5 or SHA and enter the password. MD5 and SHA 6.
are processes which are used for generating authentication/privacy keys in SNMPv3 applications.
Encryption: Select any of the encryption protocols either DES or EAS-128 and enter the password. Note: Only after 7.
configuring Authentication it is possible to configure Encryption.
WMI: If you select WMI as the protocol, configure the Domain Name, the user name, and the password. Example:-TestDomainTestUser. Also enter the credential name and description.
Telnet/SSH: Enter the credential name and description. For Telnet/SSH, make sure you configure the correct login prompt, command prompt, and password prompt besides the user name and password to access the device.
VMware: Provide the HTTPS Username and Password of the Host. Enter the HTTPS web service port number and timeout interval for the connection between the Host and OpManager server.
The SNMP credentials created is used during the initial discovery and classifications. OpManager uses these credentials to classify and add the devices into OpManager.
Using Quick Configuration Wizard
You can also use the Quick Configuration Wizard to associate a service to several devices at one go. Here are the steps: From the Admin tab, select Quick Configuration Wizard.
1.
Select the option Associate a credential to several devices and click Next. 2.
All the available Credentials are listed. Select the Credential which you want to associate to your devices. 3.
Select the devices to which you want to assign the credential from the column on the left and move them to the right. 4.
Click Finish. The Credential is associated to the selected devices. 5.
OpManager User Guide
Discovery
Rule Engine
Rule Engine helps you automate the activities such as adding monitors to a device or adding a device to a business view that you carryout after adding the devices to OpManager. This helps you start monitoring the devices straightaway as soon as you add them and avoid repetitive manual effort.
How does Rule Engine Work?
The Rule Engine is condition/criteria based. During discovery, devices that satisfy the condition/criteria are associated with the actions specified in the Rule Engine.
Steps to add a Rule Engine
Go to Admin-> Rule Engine-> Add New. 1.
Enter a Name and Description for the Rule Engine. 2.
Define the Criteria and select the Condition. 3.
Eg. Select Service Name as the Criteria and equals as the Condition, and enter the POP3Svc (POP3Svc is a MSExchange service. This is to verify whether the discovered device is an exchange server or not.)
Click Add. If required you can define multiple criteria, but have to select either AND or OR option. 4.
AND: Executes the action when all the defined criteria are satisfied. OR: Executes the actions when any one of the defined criteria is satisfied. Define the actions
5.
Eg. Select Add Service Monitor as the action and select the requiredservice monitors (Exchange server related monitors are added to thedevices that satisy the POP3Svc condition.)
Click Add. If required you can define multiple actions as well. 6.
Click Save to save the rule. 7.
How to video:
Actions with Rule Engine
Following are the action that be done on a created rule engine Edit ● Copy As ● Enable/Disable ● Delete ●
Click the respective icons to carryout these actions on a Rule Engine. Re-running a Rule
To re-run a rule on demand,
Select the rule that you want to re-run. 1.
Click on the Re-run button. 2.
Select the devices on which you want to execute the rule. 3.
Click OK. 4.
Copyright © 2013 Zoho Corporation
Page 23
Discovering Networks Using OpManager
You can discover devices on a network by either specifying a range or the entire network OpManager uses ICMP/Nmap to discover the devices on a network.
Discover a range
To discover devices from a selected range specify the start and end ip address and select the netmask for the devices to be discovered within that range.
Click the Admin tab. 1.
Under Discovery, select Discover Devices. 2.
Use IP Range: Select this option to specify the range. 3.
Start IP: Specify the IP address of the device in the range from where OpManager should start discovery. 4.
End IP: Specify the IP address till which OpManager should discover. 5.
Netmask: Select the correct netmask. 6.
Discovery Credentials: Select the configured Credentials to be used for discovery. 7.
Advanced SNMP Settings: Click here to configure an increase SNMP timeout or SNMP retries. 8.
Discover a complete network
Use CIDR: Select this option to discover an entire network. 1.
Network IP: Specify the Network IP to be discovered. 2.
Credentials: Select the credentials and SNMP settings as mentioned above. 3.
Click Discovery for the discovery to start. 4.
OpManager supports discovering Hyper-V hosts and VMs using CIDR. Discover by Importing from a file
You can import a set of IP addresses for discovery from a csv file.
Create a csv file (as shown below) with the details of name/ipaddress of the device, displayname and device type. 1.
Browse and select the CSV file from which you want the devices discovered and imported. 2.
Select the Device Name/IP, Display Name and Device Type columns in the CSV file and click OK. 3.
Provide the correct netmask. 4.
Import the Devices into OpManager
OpManager User Guide
Discovery
Click Import Devices to add all the devices for monitoring.1.
Click Finish once the devices are added. 2.
Copyright © 2013 Zoho Corporation
Page 25
Discover Individual Devices
You might have added more devices to your network and may therefore need to forcefully discover these devices. You can discover such devices on demand by following the steps below:
Click the Admin tab. 1.
Under Discovery, select Add Device . 2.
Type either the IP Address or the Device Name of the device to be discovered. 3.
Enter the correct Netmask/Network IP. Example: IPv4-255.255.255.0, IPv6-fe80::b343:567e:c254:0 4.
Select the discovery credentials. 5.
Click Add Device to start discover 6.
The device is discovered and classified properly.
Alternatively, you can also add devices to a specific category directly. Go to the required map view, say Servers Map or Routers map. 1.
Click the Add Server/Router/... etc option on top of the map to discover and classify the device into that particular category. 2.
Note: If you are unable to add the device or if does not show up in the map in which you are looking for, try pinging the device from the OpManager machine and check for response. Search the device using the Device Search box on the top right corner in the WebClient.
OpManager User Guide
Discovery
Layer 2 Mapping
OpManager renders the logical network topology diagram once you discover the networks and network devices. For a better visualization of the physical network connectivity in real networks and the consequences of a failure of a device, network topology map comes handy. To enable automatic layer 2 mapping, post discovery, you will need to specify the seed file so that layer 2 mapping is automatically done. OpManager purely relies on SNMP to represent the connectivity of nodes and links in the network. This document explains the following:
What is a seed device ●
Configuring seed device in OpManager ●
Saving the map as a Business View ●
Exporting a map to Visio ●
What is a seed device?
A seed device is the core switch in your network. The switch must have SNMP-enabled so that OpManager is able to query the device and draw the links automatically, showing the connectivity of all the devices on your network. As changes happen to the networks frequently, OpManager allows you to configure an interval (in days) to re-draw the map. For instance, if a change happens once in a week, you can configure OpManager to re-draw the map every seven days.
Configuring the seed device
From the OpManager dashboard, select Maps --> Network Maps link (mouse-over the Maps tab to see the links to all the 1.
maps).
In the Networks Map, select Actions --> Settings menu to your right. 2.
You will find a combo-box to select the seed device. Select the core switch from the list. 3.
Select the topology layout from the layout combo-box. 4.
Specify the interval (in days) at which the map must be re-drawn in the Sampling Interval field and click Submit. 5.
The map is generated. You can change the layout by selecting the type as Radial Tree, Balloon Tree, Node Link or Custom option for the Layout combo-box on top of the network map. You can also export the map to Visio, or even save it as a business view in OpManager.
Saving the Layer 2 Map as a Business View
In the Networks Map, select the menu Actions --> Save As. 1.
Configure a name for the view in the dialog that pops up. 2.
It is saved as a business view which you can assign to a user based on his role. You can access this business view from the Maps tab.
Exporting to Visio
Prerequisites
Make sure you have Microsoft Visio 2007. Visio can be installed on any of your Windows devices and it need not be on the same server as OpManager. Ensure that you are able to access OpManager Weblcient from the machine where Visio is installed.
Installation
Download OpManager Add-in for Microsoft Visio from here. 1.
Unzip the add-in download and extract the file ManageEngineOpManagerMicrosoftVisioAddin.msi. 2.
Double-click the msi file to install the Add-in. 3.
After successful installation, launch Visio and look for OpManager menu in the menubar. The add-in has installed properly if 4.
you find the menu!
Exporting Views from OpManager
Access OpManager webclient from the machine where MS Visio 2007 is installed. 1.
You can export the map to Visio from the Network Maps link using Actions --> Export to Visio menu. 2.
You can also export it from the business views using the Export to Visio button on top of the corresponding business view. 3.
Copyright © 2013 Zoho Corporation
Page 27
desired location on that machine.Loading the exported maps in Visio
From the Visio GUI, access OpManager --> Load Map menu from the menubar. 1.
Browse and select the TopoMap.xml (you can rename the xml after you save it on the machine). The exported map will be 2.
loaded in Visio.
Make the desired changes and save. You can save the diagram as a vsd file or in standard Visio formats. 3.
OpManager User Guide
Managing Devices
Managing and Unmanaging a Device
By default, OpManager manages all the discovered devices. However, there might be some known devices that are under
maintenance and hence cannot respond to status polls sent by OpManager. These devices can be set to unmanaged status to avoid unnecessary polling. Once maintenance gets over, they can be set to managed status.
To unmanage a device
Go to the device snapshot page. 1.
Under Actions, select Unmanage. 2.
This stops the status polling and data collection for the device and changes the device status icon to gray . To start managing an unmanaged device
Go to the device snapshot page. 1.
Under Actions, select Manage. 2.
This resumes the status polling and data collection for the device. The status icon shows the current status of the device.
To manage or unmanage many devices at a time, you can use Quick Configuration wizard of OpManager. To do so, follow the steps below:
In the Admin tab, under Tools, click Quick Configuration Wizard. 1.
Select Manage/Unmanage devices and click Next. 2.
Select the category from which you want to unmanage. 3.
To stop managing the devices, move them to the list in the right. To start managing the unmanaged devices, move them to 4.
the list in the left. Click Finish. 5.
Copyright © 2013 Zoho Corporation
Page 29
Device Snapshot
OpManager's Device Snapshot shows the device health and that of its resources at a glance.
To view the snapshot page of the device, click the device name link in the map, or type the name of the device in the Device Search box and hit Go. If there are many devices satisfying the specified criteria, a list of devices are displayed with their IP Address and category. Click the device whose snapshot you want to view.
The descriptions for various sections of Device Snapshot are as follows:
Device Details: Displays the system's details such as the IP address, operating system, time stamp of previous and next polls and a description on the system hardware details. System description is seen on the SNMP-enabled devices.
Device Notes: This tab shows additional device details. You can add additional fields to denote the device details. Click the . The added fields are displayed in the snapshot page.
Tools: The following actions can be done by clicking the respective icon:
Ping ● Trace Route ● Browse ●
Open a Telnet session [Note: Telnet is not enabled in IE7 in Windows and Firefox in Linux. Click here to configure the steps ●
to enable Telnet in IE7 and Firefox.]
Open Remote desktop connection [Note: RDP is not enabled in IE7 in Windows. Click here to enable.] ●
Today's Availability: Displays the device availability of the current day in the form of a pie graph. Click or to view the availability report for the past 7 days or 30 days respectively.
Response Time: Shows the current response time of the device. Click or to view the response time details for the past 7 days or 30 days respectively. Click to configure response-time based threshold.
Packet Loss: Shows the packet loss percentage for the device on that day. By default, OpManager sends 1 ping packet during a poll. The ping counts, retries, timeout etc are configurable in the file /conf/Ping.properties.
CPU Utilization: Shows the current CPU load of the device. Clicking the graph shows the trend chart of CPU utilization Memory Utilization: Displays the current memory utilization of the device.
Disk Utilization: Displays the current disk usage of the device in case of servers.
Monitors: This tab lists different monitors for the device. Select each monitor section to view the monitors. You can add more monitors from the available template, or even remove the unwanted monitors from the device.
Notification Profiles: This tab lists the notification profiles associated to the device. You can add more profiles from here. Interfaces: Displays the list of interfaces in the selected device with their status and other details. Click the interface name link to view its availability and graphs on traffic and bandwidth utilization.
Custom Links: You can links to other applications, websites or other pages of OpManager and access them from the snapshot page. Click on the Add link to add a custom link.
Actions Menu: List of actions that can be performed on the device include: Configure IPMI ● Update Status ● Rediscover Now ● Show Alarms ● Suppress Alarms ● Monitoring ● Delete ● Manage/UnManage ●
Event Log Rules ●
Device Info Menu: The device information that can viewed from this menu include:
Asset Details- The Hard Disk and RAM details are shown here. More detailed information is shown when integrated with ●
ServiceDesk Plus.
Installed Software- A list of software installed on the server is shown here and this information is retrieved using SNMP. ●
Active Processes- A list of processes up and running in the server is shown and is again retrieved from SNMP. ●
Reports: Provides the report of the following At a Glance Report
●
Custom Report ●
OpManager User Guide
Managing Devices
Top Clients●
Top Triggered Rules ●
Top URLs ●
Top Denied Requests ●
Top Attacks ●
Top Conversations ●
Top Protocol Groups ●
Copyright © 2013 Zoho Corporation
Page 31
Viewing Asset Details
If you have both, OpManager and ServiceDesk Plus running in your network, you can view a detailed asset information of a device, provided the device is discovered in both the applications, and the ServiceDesk settings are configured in OpManager.
To view the Asset Details, select the device and click Device Info --> Asset Details. This will show the detailed asset information from ServiceDesk Plus.
If ServiceDesk Plus is not integrated, then make sure SNMP is enabled. The device name, the hard disk size, and the RAM size is gathered for SNMP-enabled devices.
To update these details incase you upgrade your systems, follow the steps given below: Select the device and click Device Info --> Asset Details.
1.
Enter the values of RAM size and Hark Disk. 2.
Click Save to apply the changes. 3.
OpManager User Guide
Managing Devices
Viewing Installed Software
OpManager provides you the information on the software installed and currently running on the managed device. You need to have SNMP agent running in the device to view this information.
Copyright © 2013 Zoho Corporation
Page 33
Configuring Additional Device Properties
Configure additional properties of a device by adding additional fields. This makes device management easy. From Admin tab, select Additional Fields. A list of pre-populated fields is shown.
1.
Select Device from Associate pre-defined fields to all list-box. 2.
Click Add Field button on the top right corner of this table and configure the following values. 3.
Field Name: Configure the name of the additional 1.
Type: Select the property type 2.
Field Length: Set the length of the field. 3.
Description : Add a meaningful description for the field. 4.
Click Save to apply the configuration. 5.
The properties added is applied to all the devices. The additional fields are displayed when you click the Device Notes tab in the device snapshot page. These properties are useful when configuring notification profiles. To delete these fields, select the corresponding check-box, and click the Delete link on the top right corner of this table.
Adding field properties in bulk
You can add field properties to multiple devices via a CSV file. Follow the steps given below: Click on Import Field properties from CSV button.
1.
Browse and select the CSV file. The CSV file should be in the following format 2.
Click OK. 3.
Map the Field Name with the CSV Header. 4.
Click OK. 5.
OpManager User Guide
Managing Devices
Configuring Additional Interface Properties
Configure additional properties of a device by adding additional fields. This makes device management easy. From Admin tab, select Additional Fields. A list of pre-populated fields is shown.
1.
Select Interfaces from Associate pre-defined fields to all list-box. 2.
Click Add Field button on the top right corner of this table and configure the following values. 3.
Field Name: Configure the name of the additional property 1.
Type: Select the property type 2.
Field Length: Set the length of the field. 3.
Description : Add a meaningful description for the field. 4.
Click Save to apply the configuration. 5.
These properties are useful when configuring notification profiles. To delete these fields, select the corresponding check-box, and click the Delete link on the top right corner of this table.
Copyright © 2013 Zoho Corporation
Page 35
Configuring Device Dependencies
The status polling for a device can be controlled based on its dependency on some other device. This prevents the unnecessary status checks made to the dependent nodes.
For instance, many devices will be connected to a switch. If the switch goes down, all the devices connected to it will not be reachable. In this case, it is unnecessary to check the status of the dependent devices.
To configure the dependency for devices, follow the steps given below:
In the Admin tab, under Configuration, click Quick Configuration Wizard. ●
Select Configure Device Dependencies and click Next. ●
Select the category of the device, Router, Switch, Firewall or Server on which the dependency is to be configured. The devices ●
managed under the chosen directory is listed. Choose a device and click Next. Configuring dependencies in individual devices
You can also configure dependencies for a single device from the device snapshot page. Here are the steps: Go to the device snapshot page.
1.
From the device details, click the link against the property Dependency. 2.
Select the device on which it is dependent. 3.
OpManager User Guide
Managing Devices
Adding Custom Links to Devices
You might want to access another link either for reference or to another machine in your network over the web (like a VNC to another device for instance). You can add custom links from the snapshot page.
Here are the steps for creating custom links: Go to the device snapshot page. 1.
Click Custom Links > Add. 2.
Provide a link name 3.
Specify the Url that you intend accessing from this device. 4.
Associate the link either to that device, or to all devices, or select devices, and save the configuration. 5.