Introduction to leJOS and this Tutorial
This tutorial will teach you how to use leJOS NXJ to run Java programs on your LEGO MINDSTORMS NXT ®.
leJOS NXJ is a firmware replacement for the NXT and you will need to flash the leJOS firmware replacing the existing LEGO Mindstorms firmware. (Don’t worry you can put the original firmware back whenever you want).
The tutorial gives step by step instructions for setting up the leJOS NXJ software up on your PC and replacing the firmware on the NXT. It covers all supported PC operating systems: Microsoft Windows, MAC OS X and Linux.
The tutorial will teach you how to write Java programs that control a variety of different types of robots. You will learn how to program all the sensors and motors that come with the NXT.
leJOS is not for beginners. You will need to understand at least the basics of the Java language to use it. However, it is much more powerful than the graphical programming environment that comes with the NXT: you will be able to program robots with more complex and interesting behaviors.
leJOS NXJ gives you all the power of the Java language. You can you a variety of data types including strings, floating point number and arrays, including multi-dimensional arrays. You can do complex mathematical calculations using a all the standard Java math functions. You can program concurrent threads, and you can use Java events.
Java is an Object Oriented environment that lets you define your own classes and objects. This makes program simple to understand but capable of any degree of complexity.
leJOS NXJ has been used to program many sophisticated robots for the LEGO
Mindstorms NXT. See http://lejos.sourceforge.net/forum/viewforum.php?f=5 for some examples. It is very popular with universities and university students.
The tutorial will lead you on to more advanced topics such as using third-party sensors communicating with the PC, other NXTS, mobile phones and other Bluetooth devices. It will teach you advanced robotic programming techniques such as behaviour
What is leJOS NXJ?
leJOS NXJ is a Java programming environment for the LEGO MINDSTORMS NXT ®. It allows you to program LEGO ® robots in Java.
It consists of:
• Replacement firmware for the NXT that includes a Java Virtual Machine.
• A library of Java classes (classes.jar) that implement the leJOS NXJ Application Programming Interface (API).
• A linker for linking user Java classes with classes.jar to form a .binary file that can be uploaded and run on the NXT.
• PC tools for flashing the firmware, uploading programs, debugging, and many other functions.
• A PC API for writing PC programs that communicate with leJOS NXJ programs using Java streams over Bluetooth or USB, or using the LEGO Communications Protocol.
• Many sample programs
As leJOS is a firmware replacement, the new firmware leJOS NXJ firmware must be flashed onto the NXT, and will replace the standard LEGO MINDSTORMS firmware. This wipes out any files currently held on the LEGO firmware. The LEGO firmware can be restored using the LEGO supplied software.
leJOS is an open source project hosted in the sourceforge repository. It was originally created from the TinyVM project that implemented a Java VM for the LEGO Mindstorms RCX system. The RCX version of leJOS proved very popular with the LEGO
Mindstorms Robotic Inventions Systems owners, and close to 200,000 downloads of all versions of leJOS have been done. The original author of TinyVM and the RCX version of leJOS was Jose Solorzano.
What are the advantages of leJOS NXJ?
There are many advantages of using leJOS NXJ rather than the NXT-G or other programming environments for the NXT. These include:
• It uses the industry-standard Java language.
• It provides object-oriented programming.
• It is an open source project with many contributors.
• It allows you a choice of professional Integrated Development Environment such as Eclipse and Netbeans that support syntax directed editors and many other features.
• It has cross platform support – Windows, Linux, Mac OS X.
• It is much faster than NXT-G.
• It has full support for Bluetooth.
• It provides highly accurate motor control.
• It has advanced navigation support.
• It provides Behavior classes that support the subsumption architecture foe ease of programming of complex robot behaviors.
• It supports third party sensors.
• It supports remote monitoring and tracing of your leJOS NXJ program from the PC.
• It provides trigonometry and other Math functions
• It supports the J2ME LCD user Interface including many graphics functions.
• It supports multithreading.
• It supports listeners and events.
• It supports safe memory management with garbage collection
• It has USB support including Java streams over USB and USB debugging.
• It supports standard Java Communication streams
• It has a flash file system accessed by the standard java.io classes.
• It supports data logging and remote capturing of the logs.
• It has sound support including playing 8-bit WAV files
• It provides dozens of sample programs.
• It supports remote execution from the PC using iCommand.
• The Web site has online forums to help solve any problems you might have, to share projects ideas, and to communicate with the development team.
• It has telerobotics support via standard TCP/IP sockets.
• It supports NXT to NXT Bluetooth communications.
• It supports Bluetooth communication with other devices.
• It supports two-way communication with RCX via third party adapters such as the Mindsensors NRLink.
• It provides compatibility with Lego Communications Protocol, so that many tools that work with the standard LEGO firmware, also work with leJOS.
• It has an easy to use menu system.
• It is widely used by universities and other education establishments.
Getting
Started
on
Getting started on Microsoft Windows
This section tells you how to get started if your PC runs Microsoft Window. If you use Linux or MAC OS X, see the sections at the end of this document.
To get started on Microsoft Windows you will need installed on your PC:
• The LEGO Mindstorms software.
• The libusb-win32 filter driver.
• A Java Standard Edition SDK.
• Apache ant (optional)
• The leJOS NXJ software.
You will then need to set up environment variables on your PC and start a command window to type commands into.
When all that is done, your PC is ready. You then need to flash the leJOS NXJ firmware, and after that you can compile and run your first program.
.
These steps are described in the sections below.
LEGO Mindstorms software
You will need the LEGO Mindstorms software installed on your PC, as its USB driver is used by leJOS. Follow the LEGO instructions to install it.
Libusb
You will also need the libusb-win32 filter driver – you can download it from
http://libusb-win32.sourceforge.net/#downloads.
On Windows XP systems, you can just download it and execute it.
On Windows Vista systems, however, you must install it in Windows XP compatibility mode. To do this:
1. Download libusb-win32-filter-bin-0.1.12.1.exe (the version current @ 27/09/07) 2. Right click on this file. Select Properties | Compatibility Click the "Run this
program in compatibility mode" box and select "Windows XP (Service Pack2)" from the drop down list.
3. Right click again and select "Run as Administrator". Follow the installation instructions.
You should install libusb in a folder that does not have spaces in its name – for example, do not install it in “Program Files”.
Java SDK
You will need a Java Standard Edition SDK on your PC. You can download the latest from http://java.sun.com/. Follow the instructions for installing it. leJOS NXJ works has been tested with versions 1.5 and 1.6, but will not work with earlier version.
Apache ant
Apache ant is useful for running the leJOS samples. If you have a Java IDE on your system, such as Eclipse, it might already be installed. You can download ant from
http://ant.apache.org/bindownload.cgi. Installing ant is simple – you just unzip it into a folder of your choice (e.g. c:\ant). leJOS needs ant 1.7 or later.
Installing leJOS
You can download leJOS NXJ for Windows from
http://lejos.sourceforge.net/p_technologies/nxt/nxj/downloads.php. Unzip it to a folder of your choice (e.g. c:\lejos0.6). Note that it creates a subfolder called lejos_nxj.
Settting up environment variables
You need to set:
Env. Var. Value Example
NXJ_HOME the folder you installed leJOS NXJ into
C:\lejos0.6\lejos_nxj
JAVA_HOME the folder you installed the Java SDK into
C:\Program Files\Java\jdk1.6.0_06
ANT_HOME the folder you installed ant into
C:\ant
PATH Add the bin folders for Java, leJOS and ANT
%NXJ_HOME%\bin;%JAVA_HOME%\bin; %ANT_HOME%\bin;%PATH%
You can set these environment variables for all users on the PC by going to Control Panel > System > Advanced > Environment Variables and creating them or editing existing values.
Using a Command Window
You can start a command window by Start > Run and typing cmd.
Flashing the NXJ firmware
Make sure your NXT is attached to the PC by its USB cable, and switch it on by pressing the orange button.
Compiling
and
running
your
Compiling and running your first program
Java programs need to be compiled to class files before they can be run. For leJOS NXJ, all the class files that are to be run on the NXT needed to be linked to produce a binary file (with the extension .nxj) and this must then be uploaded to the NXT.
To run a sample program, such as the View.java sample, follow these steps:
Start a command window, and change directory to the View sample folder:
Compile the program with the nxjc command:
Then link, upload and run it with the nxj command:
You should see the menu of the View sample on your NXT. cd %NXJ_HOME%\samples\View
nxjc View.java
Setting up
the
Setting Up the Eclipse IDE
Programming for leJOS NXJ is best done using an Integrated Development Environment. IDEs have syntax-directed editors that immediately show you any syntax errors in your program, rather than waiting until you compile the program and then showing a list of errors. This, together with color coding of the source, automatic formatting of the code, prompting for method names and signatures, expanding and collapsing parts of your program, and many other editing features, makes creating your program a much faster and more enjoyable experience. But the advantages of the IDE do not end there: they also help you with creating and building projects, debugging, generating documentation, and creating user interfaces. Java IDEs put all the Sun Java tools and a variety of third-party tools at your fingertips. They make supporting new tools simple, either by use of plug-ins or by integration of external tools.
IDEs are easy to set and use and you should use them for all your leJOS programming – even the simplest of projects.
This tutorial concentrates the Eclipse Java Integrated Development Environment, as this is currently the most popular one for leJOS programmers, but there are many other Java IDEs, such as Netbeans and BlueJ, each with their own strengths,
There are three ways of building leJOS programs in Elclipse:
• Using external tools
• Using ant build files
• Using a leJOS plug-in
It is worth understanding all of these techniques as they each have there advantages, and a combination of the techniques may well work best for your projects.
Setting up Eclipse
Creating a leJOS project
Creating external tools
Using ant build files
Programming
with
Writing
Your
Writing your first leJOS NXJ program
Let us start with a simple “Hello World” program. We will create a HelloWorld class in the default java package:
leJOS requires the standard main method for the program entry point:
Recent versions of leJOS NXJ support the standard java System.out.println method and scroll the output on the NXT LCD screen.
If you run this program as it is, it will display Hello World” and then immediately return to the menu, so you will not be able to see what is displayed (unless you are very quick).
We either need the program to sleep for a while to allow the text to be read, or to wait for a button to be pressed. Let us wait for a button to be pressed. To do this we need to include the leJOS NXJ Button class in the program. Button is in the lejos.nxt package. We can either include lejos.nxt.Button or lejos.nxt.* to allow any of the standard lejos.nxt classes to be used in the program. The Button class has a method waitForPress() that waits for any button to be pressed. You can find out what methods a class supports by looking at the API documentation:
public class HelloWorld
{ }
public class HelloWorld
{
public static void main (String[] args)
{ } }
public class HelloWorld
{
public static void main (String[] args)
{
System.out.println("Hello World"); }
The API documentation is on the leJOS wseb site and included in the leJOS download in lejos_nxt/docs/apidocs/index.html.
The complete HelloWorld program is:
import lejos.nxt.*;
public class HelloWorld
{
public static void main (String[] args)
{
System.out.println("Hello World"); Button.waitForPress();
Controlling
the
LCD,
Buttons
LCD, Sound and Buttons
The NXT can be used as a simple computer with an LCD display, 4 buttons and sound capabilities. These functions are supported by the LCD, Button, and Sound classes.
LCD
The LCD can be used in text mode and graphics mode.
Text LCD methods
As a text display, the NXT LCD screen is 16 characters wide and eight characters deep. It is addressed using (x, y) co-ordinates as follows:
x ranges from 0 to 15, and y from 0 to 7.
The methods to write to the LCD in text mode are:-
• public static drawString(String str, int x, int y);
This draws a string of text to the LCD screen starting at text co-ordinate (x, y).
• drawString(String str, int x, int y, boolean invert);
This variant of drawString supports inverting the text drawing white characters on a black background.
• public static drawInt(int i, int x, int y);
This draws an integer starting at co-ordinate (x,y). The integer is left aligned and takes up as many characters as are necessary.
x
• public static drawInt(int i, int places, int x, int y);
This variant of drawInt right-aligns the integer and always uses the number of characters indicated by places.
• drawChar(char c, int x, int y, boolean invert);
This draws a character at text co-ordinate (x, y) with optional inversion of the character.
• public static clear();
Clears the display.
Example:
Buttons
The NXT buttons are accessed by static fields:
• Button.ENTER
• Button.ESCAPE
• Button.LEFT
• Button.RIGHT
To test is a button is pressed, you use:
• public final boolean isPressed();
Example:
import lejos.nxt.*; import java.io.*;
public class LCDTest {
public static void main (String[] args) throws Exception
{
LCD.drawString("Free memory:", 0, 0); LCD.drawString("RAM:", 1, 1, true);
LCD.drawInt((int) System.getRuntime().freeMemory(), 6, 8, 1); LCD.drawString("Flash:", 1, 2, true);
LCD.drawInt(File.freeMemory(), 6, 8, 2); Thread.sleep(2000);
To wait for a specific button to be pressed and released, you use:
• public final void waitForPressAndRelease() throws InterruptedException;
Example:
To wait for any button to be pressed, you do:
• public static int waitForPress();
The returns the id of the button that is pressed.
To specify a listener to listen for button events for this button, you:
• public synchronized void addButtonListener (ButtonListener aListener)
See “Listeners and Events” below for how button listeners work.
To read the current state of all the buttons, you do:
• public static native int readButtons();
import lejos.nxt.*;
public class ButtonPresses {
public static void main (String[] args) throws Exception
{
while (true) { LCD.clear();
If (Button.ENTER.isPressed()) LCD.drawString("ENTER",0,0); if (Button.ESCAPE.isPressed()) LCD.drawString("ESCAPE",0,0); if (Button.LEFT.isPressed()) LCD.drawString("LEFT",0,0); if (Button.RIGHT.isPressed()) LCD.drawString("RIGHT",0,0); }
} }
import lejos.nxt.*;
public class ButtonTest {
public static void main (String[] args) throws Exception
{
Button.ENTER.waitForPressAndRelease(); LCD.drawString("Finished", 3, 4); Thread.sleep(2000);
Sound
There is a static method to play a tone:
public static playTone(int aFrequency, int aDuration);
Example:
There are methods that use playTone to play a variety of sounds. These are compatible with the RCX version of leJOS:
• public static void systemSound (boolean aQueued, int aCode);
The aQueued parameter is ignored on the NXT.
The values of code are:
code = 0 Short beep code = 1 Double beep
code = 2 Descending arpeggio code = 3 Ascending arpeggio code = 4 Long, low buzz
There are also methods for each of the system sounds:
• public static void beep();
• public static void twoBeeps();
• public static void beepSequence();
• public static void beepSequenceUp();
• public static void buzz();
import lejos.nxt.*;
public class Tune {
// NOTE: This tune was generated from a midi using Guy
// Truffelli's Brick Music Studio www.aga.it/~guy/lego
private static final short [] note = {
2349,115, 0,5, 1760,165, 0,35, 1760,28, 0,13, 1976,23,
0,18, 1760,18, 0,23, 1568,15, 0,25, 1480,103, 0,18, 1175,180, 0,20, 1760,18, 0,23, 1976,20, 0,20, 1760,15, 0,25, 1568,15, 0,25, 2217,98, 0,23, 1760,88, 0,33, 1760,75, 0,5, 1760,20, 0,20, 1760,20, 0,20, 1976,18, 0,23, 1760,18, 0,23, 2217,225, 0,15, 2217,218};
public static void main(String [] args) { for(int i=0;i<note.length; i+=2) { final short w = note[i+1]; final int n = note[i];
if (n != 0) Sound.playTone(n, w*10);
try { Thread.sleep(w*10); } catch (InterruptedException e) {} }
This is also a method to produce a rest when playing a tune:
• public static void pause(int t);
Controlling
the
Controlling the Sensors
The NXT comes with four sensors; the touch sensor, the sound sensor, the light sensor and the ultrasonic sensor.
Touch Sensor
To use a touch sensor, you create an instance of it attached to a sensor port, using the constructor:
• public TouchSensor(ADSensorPort port);
The port is usually SensorPort.S1, S2, S3 or S4, but it could be a remote sensor port (see the RemoteNXT class) or a port attached to a third-party port expander. It can be an instance of any class that implements the ADSensorPort interface. (“AD” stands for “Analog/Digital” – the touch sensor is an example of an Analog to Digital sensor).
To test is the touch sensor is pressed, you use the isPressed() method:
• public boolean isPressed();
Example:
Light Sensor
To use a light sensor, you create an instance of it attached to a sensor port, using the constructor:
• public LightSensor(ADSensorPort port);
The port is usually SensorPort.S1, S2, S3 or S4, but it could be a remote sensor port (see the RemoteNXT class) or a port attached to a third-party port expander. It can be an instance of any class that implements the ADSensorPort interface. (“AD” stands for “Analog/Digital” – the light sensor is an example of an Analog to Digital sensor).
import lejos.nxt.*;
public class TouchTest {
public static void main (String[] args) throws Exception {
TouchSensor touch = new TouchSensor(SensorPort.S1); while (!touch.isPressed());
LCD.drawString("Finished", 3, 4); Thread.sleep(2000);
Example:
Sound Sensor
The sound sensor is an Analog/Digital sensor. It supports two modes:
To use a sound sensor, you create an instance of it attached to a sensor port, using the constructor:
• public SoundSensor(ADSensorPort port);
The port is usually SensorPort.S1, S2, S3 or S4, but it could be an instance of any class that implements the ADSensorPort interface.
Example:
import lejos.nxt.*;
public class LightTest {
public static void main (String[] args) throws Exception
{
LightSensor light = new LightSensor(SensorPort.S1); while (true) {
LCD.drawInt(light.readValue(), 4, 0, 0);
LCD.drawInt(light.readNormalizedValue(), 4, 0, 1); LCD.drawInt(SensorPort.S1.readRawValue(), 4, 0, 2); LCD.drawInt(SensorPort.S1.readValue(), 4, 0, 3); Thread.sleep(2000);
The above example gives a graphical display of the way the sound reading varies over a two-second period.
Ultrasonic Sensor
The Ultrasonic Sensor is an I2C sensor. The classes that support I2C sensors all extend the I2CSensor class.
Example:
import lejos.nxt.*;
public class SonicTest {
public static void main(String[] args) throws Exception { UltrasonicSensor sonic = new
UltrasonicSensor(SensorPort.S1); while(!Button.ESCAPE.isPressed()) {
LCD.clear();
LCD.drawString(sonic.getVersion(), 0, 0); LCD.drawString(sonic.getProductID(), 0, 1); LCD.drawString(sonic.getSensorType(), 0, 2); LCD.drawInt(sonic.getDistance(), 0, 3); }
} }
import lejos.nxt.*;
public class SoundScope {
public static void main (String[] args) throws Exception { SoundSensor sound = new SoundSensor(SensorPort.S1); while (!Button.ESCAPE.isPressed()) {
LCD.clear();
for(int i=0;i<100;i++) {
LCD.setPixel(1,i,60 - (sound.readValue()/2)); Thread.sleep(20);
Controlling
the
Controlling the Motors
Motors connected directly to the NXT motor ports can be accessed using static variables:
• Motor.A
• Motor.B
• Motor.C
The most basic methods for controlling motors are:
• public setSpeed(int speed);
• public forward();
• public backward();
• public stop();
• public flt();
flt() puts the motor in float mode and it will gracefully come to rest. stop() stops the
motor immediately.
By default, the speed of a motor is regulated by the motor’s regulation thread. This keeps the motor running at the desired speed, by changing the power applied to the motors.
You can determine how well this is working by getting the actual speed of the motor:
• public int getActualSpeed()
If you do not want speed regulation, you can call:
• public void regulateSpeed(boolean yes)
and switch regulation off. When motors are not being regulated, you may wish to set the power directly, rather than to set the speed. To do this you can call:
• public synchronized void setPower(int power)
The direction of the motor can be changed with:
• public void reverseDirection();
The built-in tachometer in the NXT motor can be read and reset by:
• public void resetTachoCount()
• public int getTachoCount()
• public void rotate(int angle);
• public void rotate(int angle, boolean immediateReturn);
An absolute rather than relative angle can also be specified:
• public void rotateTo(int limitAngle);
• public void rotateTo(int limitAngle,boolean immediateReturn);
You can test if a motor is moving by:
• public boolean isMoving();
This is useful to test if the motor has finished rotating. isMoving() returns true when the Motor is moving for any reason (e.g. forward() or backward() have been called), and not only if a rotate operation is in place. To specifically test to see if a rotate operation is currently in progress, call:
• public boolean isRotating()
The angle that you are currently rotating to can be determined by calling:
• public int getLimitAngle()
The regulation thread also implements smooth acceleration to prevent jerking motion when speed is increased or decreased. This can be switched on and off, by:
• public void smoothAcceleration(boolean yes)
There are set of methods for getting information about the current state of the motor:
• public int getSpeed()
• public int getMode()
• public int getPower()
• public boolean isRegulating()
• public boolean isForward()
• public boolean isBackward()
• public boolean isFloating()
As well as controlling speed regulation and smooth acceleration, the regulation thread also controls rotation and bringing the motors to a smooth stop at the limit angle. If a motor is being used in a very simple way that does not require any of these regulation functions, you can shut down the regulation thread by calling:
Other
Reading the Battery
There are two static methods to get the battery voltage:
• public static native int getVoltageMilliVolt();
• public static float getVoltage()
Example:
import lejos.nxt.*;
public class BatteryTest {
public static void main (String[] args) throws Exception { LCD.drawString("Battery: " + Battery.getVoltage(),0,0); Thread.sleep(2000);
Controlling Wheeled Vehicles
One of the most common form of robots created using the Mindstorms NXT are wheeled vehicles, and leJOS contains several classes that specifically support wheeled vehicles.
Pilot
The Pilot class is used to control vehicles with two independently driven wheels, that can turn on the spot.
It steers such a vehicle using two regulated motors. A pilot does not keep track on the position or bearing of a robot – that is the job of a Navigator.
The Pilot constructor needs to know the diameter of the wheels of the vehicle and the width of the track, i.e. the distance between the centers of the tracks of the two wheels. These measurements can be in any units as it is the ratio between them that is important, not the measurement units.
The Pilot constructor also needs to know what Motors are used, and whether driving them forwards drives the robot forward or backward.
The constructors are:
• public Pilot(float wheelDiameter,float trackWidth,Motor leftMotor, Motor rightMotor)
• public Pilot(float wheelDiameter,float trackWidth,Motor leftMotor, Motor rightMotor, boolean reverse)
Use the second constructor if you need to set the reverse Boolean.
The main methods of a pilot are:
• public void setSpeed(int speed);
• public void forward()
• public void backward()
• public void stop()
• public void rotate(int angle)
• public void rotate(int angle, boolean immediateReturn )
• public boolean isMoving()
• public void travel(float distance)
• public void travel(float distance,boolean immediateReturn)
• public void steer(int turnRate)
• public void steer(int turnRate, int angle)
• public void steer(int turnRate, int angle, boolean immediateReturn)
forward moves the robot forward until it is stopped or another movement method is
called. backward moves the robot backwards. stop stops the robot.
rotate rotates the robot on its axis by the number of degrees specified. If you want the thread to do other things while the robot is rotating, use the second variant of the method and set immediateReturn = true.
CompassPilot
The CompassPilot is an extension of the Pilot class that implements the same methods, but uses a compass sensor to ensure that the pilot does not deviate from the correct angle.
It needs a HiTechnic or Mindsensors compass sensor plugged in to one of the sensor ports.
The constructors are:
• public CompassPilot(SensorPort compassPort, float wheelDiameter,float trackWidth,Motor leftMotor, Motor rightMotor)
• public CompassPilot(SensorPort compassPort, float wheelDiameter,float trackWidth,Motor leftMotor, Motor rightMotor, boolean reverse)
• public CompassPilot(CompassSensor compass, float wheelDiameter,float trackWidth,Motor leftMotor, Motor rightMotor)
• public CompassPilot(CompassSensor compass, float wheelDiameter,float trackWidth,Motor leftMotor, Motor rightMotor, boolean reverse)
Navigator
TachoNavigator
Debugging
leJOS NXJ
Error handling and debugging
leJOS NXJ provides several features for error handling and debugging, including:
• Exceptions
• Data Aborts
• USB Debugging
The Remote Monitoring and Tracing facility, which is described in its own section below, can also be used for debugging.
Exceptions
Most of the standard Java language exception classes are supported by leJOS, and user can create their own exception classes.
Example:
The following simplified version of the ExceptionTest example demonstrates what happens for an exception that is not caught – in this case an ArrayIndexOutOfBounds exception.
Data Aborts
If the leJOS firmware crashes you will normally a Data Abort. The screen shows the PC value where the failure occurred, and other details of the failure.
The screen is something like:
The most common reason for data aborts is executing a file that is not a leJOS NXJ binary, or executing an incomplete leJOS NXJ file.
If you get a data abort in any other case, you should report trhe error to the leJOS development team by posting the details on the leJOS NXJ forums.
import lejos.nxt.*;
public class ExceptionTest {
public static void main (String[] args) {
SensorPort p = SensorPort.PORTS[5]; }
Remote USB Debugging
Tracing statements can inserted into leJOS NXJ programs using the lejos.nxt.Debug class.
To start debugging, you use one of the static open() methods:
• public static void open(int timeout)
• public static void open()
This waits for the PC based monitor to connect.
To run the debug monitor on the PC, you execute nxjdebug.
This connects to the debugger on the NXT over USB – the USB cable must be connected.
If you use the variant of open with a timeout, it waits the specified number of seconds and if the debug monitor has not connected, proceeds without debugging.
Debug statements can be output using the method:
• public static void out(String s)
If no successful open statement has been executed, the debug output is discarded. If there was a successful output, the string appears on standard out in the window or terminal that
nxjdebug was run from, on the PC.
When debugging is completed, you should call the static close() method:
Bluetooth
Bluetooth Communications
leJOS supports a multitude of methods of communicating NXT to NXT, PC to NXT, Mobile phone to NXT, NXT to remote Bluetooth device, etc.
Java Data Streams over Bluetooth
leJOS NXJ supports data streams over Bluetooth and USB.
The initiator program for a Java data stream over Bluetooth can be on a NXT, a PC, a mobile phone or another device that supports the Bluetooth Serial Port Profile (SPP).
Receiver
The receiver program on the NXT wait for a connection by calling one of the waitForConnection methods in the Bluetooth class.:
• public static BTConnection waitForConnection(byte[] pin);
• public static BTConnection waitForConnection();
The second version of waitForConnection assumes the default pin: “1234”.
You need to ensure that Bluetooth power and visibility are on. The leJOS NXJ start-up menu can be used to do this.
Example:
Input and output streams or data input and output streams can then be opened by calling the following methods from the BTConnection class:
• public InputStream openInputStream() throws IOException;
• public OutputStream openOutputStream() throws IOException;
• public DataInputStream openDataInputStream() throws IOException;
• public DataOutputStream openDataOutputStream() throws IOException;
Example:
BTConnection btc = Bluetooth.waitForConnection();
Data items can then be read from the DataInputStream by:
• public final int read(byte b[]) throws IOException
• public final int read(byte b[], int off, int len) throws IOException
• public final boolean readBoolean() throws IOException
• public final byte readByte() throws IOException
• public final short readShort() throws IOException
• public final int readInt() throws IOException
• public final char readChar() throws IOException
• public final float readFloat() throws IOException
• public String readLine() throws IOException
Data can be written to the DataOutputStream by:
• public synchronized void write(byte b[], int off, int len) throws IOException
• public final void writeBoolean(boolean v) throws IOException
• public final void writeByte(int v) throws IOException
• public final void writeShort(int v) throws IOException
• public final void writeChar(int v) throws IOException
• public final void writeInt(int v) throws IOException
• public final void writeFloat(float v) throws IOException;
• public final void writeChars (String value) throws IOException
Example:
The DataInputStream, DataOutputstream and BTConnection can then be close using the close() method.
The full BTReceive example is:
for(int i=0;i<100;i++) {
int n = dis.readInt(); LCD.drawInt(n,7,0,1); LCD.refresh();
NXT Initiator
To initiate a Bluetooth connection from one NXT to another NXT, you first need to add the receiver NXT to the initiator NXT’s Bluetooth devices.
To do this, you go to the Bluetooth menu in the leJOS NXJ start-up menu and select “Search”. Providing the Bluetooth power is on and visibility is on for the receiving NXT, it will be found and you can select “Add” to add it to the initiator’s Bluetooth devices.
To check it is in the Devices list, you can select “Devices” from the Bluetooth menu of the initiator NXT.
You can then create a BTRemoteDevice class on the initiator NXT:
Example:
public class BTReceive {
public static void main(String [] args) throws Exception
{
String connected = "Connected"; String waiting = "Waiting..."; String closing = "Closing...";
while (true) {
LCD.drawString(waiting,0,0);
BTConnection btc = Bluetooth.waitForConnection();
LCD.clear();
LCD.drawString(connected,0,0);
DataInputStream dis = btc.openDataInputStream(); DataOutputStream dos = btc.openDataOutputStream();
for(int i=0;i<100;i++) { int n = dis.readInt(); LCD.drawInt(n,7,0,1); dos.writeInt(-n); dos.flush(); } dis.close(); dos.close();
Thread.sleep(100); // wait for data to drain LCD.clear(); LCD.drawString(closing,0,0); btc.close(); LCD.clear(); } } }
You can connect to the remote device by its address, which you can get by:
• public byte[] getDeviceAddr()
You can then connect to the remote device by calling one of the connect() methods in the Bluetooth class:
• public static BTConnection connect(BTRemoteDevice remoteDevice)
• public static BTConnection connect(byte[] device_addr)
• public static BTConnection connect(byte[] device_addr, byte[] pin)
Example:
Having got a BTRemoteDevice object you can open the data input and output streams and read data as in the receiver example above.
The complete BTConnectTest example, which works as the initiator program for the BTReceive receiver program, is:
BTRemoteDevice btrd = Bluetooth.getKnownDevice(name);
if (btrd == null) { LCD.clear();
LCD.drawString("No such device", 0, 0); Thread.sleep(2000);
System.exit(1); }
BTConnection btc = Bluetooth.connect(btrd);
if (btc == null) { LCD.clear();
LCD.drawString("Connect fail", 0, 0); Thread.sleep(2000);
public class BTConnectTest {
public static void main(String[] args) throws Exception {
String name = "NXT";
LCD.drawString("Connecting...", 0, 0); LCD.refresh();
BTRemoteDevice btrd = Bluetooth.getKnownDevice(name);
if (btrd == null) { LCD.clear();
LCD.drawString("No such device", 0, 0); LCD.refresh();
Thread.sleep(2000); System.exit(1); }
BTConnection btc = Bluetooth.connect(btrd);
if (btc == null) { LCD.clear();
LCD.drawString("Connect fail", 0, 0); LCD.refresh();
Thread.sleep(2000); System.exit(1); }
LCD.clear();
LCD.drawString("Connected", 0, 0); LCD.refresh();
DataInputStream dis = btc.openDataInputStream(); DataOutputStream dos = btc.openDataOutputStream();
for(int i=0;i<100;i++) {
try {
LCD.drawInt(i*30000, 8, 0, 2); LCD.refresh();
dos.writeInt(i*30000); dos.flush();
} catch (IOException ioe) {
LCD.drawString("Write Exception", 0, 0); LCD.refresh();
}
try {
LCD.drawInt(dis.readInt(),8, 0,3); LCD.refresh();
} catch (IOException ioe) {
LCD.drawString("Read Exception ", 0, 0); LCD.refresh();
} }
try {
LCD.drawString("Closing... ", 0, 0); LCD.refresh();
dis.close(); dos.close(); btc.close();
} catch (IOException ioe) {
LCD.drawString("Close Exception", 0, 0); LCD.refresh();
}
LCD.clear();
LCD.drawString("Finished",3, 4); LCD.refresh();
PC Initiator
A PC program can initiate a connection to a NXT and open a Java data stream.
The API on the PC is different to the NXT API. See pcapidocs.
To connect to the NXT, you need a NXTComm object that can be obtained using the NXTCommFactory class:
• public static NXTComm createNXTComm(int protocol)
Example:
The reason for using a factory method is that there are several implementations of comms drivers for Bluetooth and USB on the PC and the one that is used depends on what operating system you are using and the contents of he nxj.properties file.
You can connect to the NXT by address or by do a Bluetooth inquiry:
To connect by address, you create a NXTInfo object using the constructor:
• public NXTInfo(String name, String address)
Example:
To find the available NXTs doing a Bluetooth inquiry, you do:
Once you have a NXTInfo object, you can call the open() method of the NXTComm object to connect to the NXT:
• public boolean open(NXTInfo nxt) throws NXTCommException;
Once the NXT is open, you can obtain an InputStream and an OutputSttream, by calling the getInputStream() anf getOutputStream() methods of the NXTComm object:
NXTComm nxtComm = NXTCommFactory.createNXTComm(NXTCommFactory.BLUETOOTH);
NXTInfo nxtInfo = new NXTInfo(“NXT”, “00:16:53:00:78:48”);
NXTInfo[] nxtInfo = nxtComm.search(“NXT”, NXTCommFactory.BLUETOOTH);
if (nxtInfo.length == 0) {
System.out.println("No NXT Found"); System.exit(1);
• public OutputStream getOutputStream();
• public InputStream getInputStream();
From these you can construct a DataInputStream and a DataOutputStream and send data to the receiving NXT.
Programming
Listeners,
Events
and
Listeners and Events
leJOS implements a listener thread that listens for particular events.
The listener thread supports:
• Button Listeners
• Sensor Port Listeners
Button listeners are used to detect when a button is pressed, whatever your program is doing at the time.
To listen for a press of a specific button, you must call:
Example:
import lejos.nxt.*;
public class ListenForButtons {
public static void main (String[] args) {
Button.ENTER.addButtonListener(new ButtonListener() { public void buttonPressed(Button b) {
LCD.drawString("ENTER pressed",0,0); }
public void buttonReleased(Button b) { LCD.clear(); ();
} }); while (true); }
Java Threads
When a Java program starts, there is a single thread running – the main thread.
Many of the leJOS classes start extra threads running for various purposes, for example:
• Button and SensorPort star a listener thread if listeners are used
• Each Motor has a regulator thread
• The Bluetooth class starts a thread to talk to the separate Bluetooth chip
• Each Timer object starts a timer thread
User program can create their own threads by subclassing Thread, and then using the start method to start the thread. Note that the Runnable interface is not implemented by leJOS, and new threads cannot be created by implementing Runnable classes. User threads in leJOS must subclass Thread and implement the run() method.
Background threads that do not need to terminate in order for the user program to terminate, should be marked as daemon threads by calling setDaemon(true).
When using threads, care should be taken with concurrency issues. When data items are accessed by multiple threads, synchronization is necessary to ensure that data is not read when it is in an inconsistent state.
leJOS supports the standard Java synchronization mechanisms: synchronized methods and synchronized statements using a monitor object. There are some restrictions in the way leJOS handles concurrency and synchronization – see the leKOS NXJ
README.html file.
As an example of a leJOS thread, consider the Indicators thread in the leJOS StartUpText menu. This is used to keep the display of the battery level up to date, by reading its value every second, and to indicate when the menu is uploading files or doing other
communication from the PC:
The main method starts this thread by:
class Indicators extends Thread {
private boolean io = false;
public void ioActive() {
io = true; }
public void run() {
String dot = ".";
String [] ioProgress = {". ", " . ", " ."}; int ioIndex = 0;
int millis; while(true) {
try {
if (io) {
ioIndex = (ioIndex + 1) % ioProgress.length; LCD.drawString(ioProgress[ioIndex], 13, 0); io = false;
} else {
millis = Battery.getVoltageMilliVolt() + 50; LCD.drawInt((millis - millis%1000)/1000,13,0); LCD.drawString(dot, 14, 0);
LCD.drawInt((millis% 1000)/100,15,0); }
Thread.sleep(1000);
} catch (InterruptedException ie) {} }
} }
Indicators ind = new Indicators(); ind.setDaemon(true);
Behavior
Behavior programming
Programming Behavior with leJOS NXJ
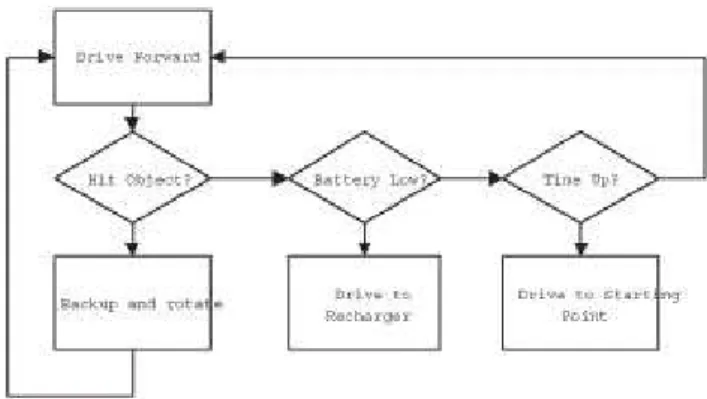
When most people start programming a robot, they think of the program flow as a series of if-thens, which is remeniscent of structured programming (Figure 1). This type of programming is very easy to get started in and hardly requires any thought or design beforehand. A programmer can just sit at the computer and start typing. The problem is, the code ends up as spaghetti code; all tangled up and difficult to expand. The behavior control model, in contrast, requires a little more planning before coding begins, but the payoff is that each behavior is nicely encapsulated within an easy to understand structure. This will theoretically make your code easier to understand by other programmers
familiar with the behavior control model, but more importantly it becomes very easy to add or remove specific behaviors from the overall structure, without negative
repercussions to the rest of the code. Let's examine how to do this in leJOS NXJ.
Figure 1: Structured programming visualized.
The Behavior API
The Behavior API is very simple, and is composed of only one interface and one class. The Behavior interface is used to define behaviors. The Behavior interface is very
general, so it works quite well because the individual implementations of a behavior vary widely. Once all the Behaviors are defined, they are given to an Arbitrator to regulate which behaviors should be activated. All classes and interfaces for Behavior control are located the lejos.subsumption package. The API for the Behavior interface is as follows.
lejos.subsumption.Behavior
Returns a boolean value to indicate if this behavior should become active. For example, if a touch sensor indicates the robot has bumped into an object, this method should return true.
• void action()
The code in this method initiates an action when the behavior becomes active. For example, if takeControl() detects the robot has collided with an object, the action() code could make the robot back up and turn away from the object.
• void suppress()
The code in the suppress() method should immediately terminate the code running in the action() method. The suppress() method can also be used to update any data before this behavior completes.
As you can see, the three methods in the Behavior interface are quite simple. If a robot has three discreet behaviors, then the programmer will need to create three classes, with each class implementing the Behavior interface. Once these classes are complete, the code should hand the Behavior objects off to the Arbitrator to deal with.
lejos.subsumption.Arbitrator
• public Arbitrator(Behavior [] behaviors)
Creates an Arbitrator object that regulates when each of the behaviors will become active. The higher the index array number for a Behavior, the higher the priority level.
Parameter: an array of Behaviors
• public void start()
Starts the arbitration system.
Figure 2: Higher level behaviors suppress lower level behaviors.
Now that we are familiar with the Behavior API under leJOS, let's look at a simple example using three behaviors. For this example, we will program some behavior for a simple robot with differential steering. This robot will drive forward as it's primary low-level behavior. When it hits an object, a high priority behavior will become active to back the robot up and turn it 90 degrees. There will also be a third behavior which we will insert into the program after the first two have been completed. Let's start with the first behavior.
As we saw in the Behavior interface, we must implement the methods action(), suppress(), and takeControl(). The behavior for driving forward will take place in the action() method. It simply needs to make motors A and C rotate forward:
That was easy enough! Now the suppress() method will need to stop this action when it is called, as follows:
So far, so good. Now we need to implement a method to tell Arbitrator when this Behavior should become active. As we outlined earlier, this robot will drive forward always, unless something else suppresses it, so this Behavior should always want to take control (it's a bit of a control freak). The takeControl() method should return true, no matter what is happening. This may seem counter intuitive, but rest assured that higher level behaviors will be able to cut in on this behavior when the need arises. The method appears as follows:
public void action() { Motor.A.forward(); Motor.C.forward(); }
That's all it takes to define our first Behavior to drive the robot forward. The complete code listing for this class is as follows:
The second behavior is a little more complicated than the first, but still very similar. The main action of this behavior is to reverse and turn when the robot strikes an object. In this example, we would like the behavior to take control only when the touch sensor strikes an object, so the takeControl() method will be defined as follows:
For the action, we want the robot to back up and rotate when it strikes an object, so we will define the action() method as follows:
Defining the suppress() method for this behavior is quite easy in this example. The action() method above is the sort of method that runs very quickly (1.3 seconds) and is
public boolean takeControl() { return true;
}
import lejos.subsumption.*; import lejos.nxt.*;
public class DriveForward implements Behavior {
public boolean takeControl() { return true;
}
public void suppress() { Motor.A.stop(); Motor.C.stop(); }
public void action() { Motor.A.forward(); Motor.C.forward(); }
}
public boolean takeControl() {
return Sensor.S2.readBooleanValue(); }
public void action() { // Back up:
Motor.A.backward(); Motor.C.backward();
try{Thread.sleep(1000);}catch(Exception e) {} // Rotate by causing one wheel to stop: Motor.A.stop();
try{Thread.sleep(300);}catch(Exception e) {} Motor.C.stop();
usually high priority. We can either stop it dead by stopping motor movement, or we could wait for it to complete the backing up maneuver. To keep things simple, lets just stop the motors from rotating:
The complete listing for this behavior is as follows:
We now have our two behaviors defined, and it's a simple matter to make a class with a main() method to get things started. All we need to do is create an array of our Behavior objects, and instantiate and start the Arbitrator as shown in the following code listing:
import lejos.subsumption.*;
import lejos.nxt.*;
public class HitWall implements Behavior { public boolean takeControl() {
return Sensor.S2.readBooleanValue(); }
public void suppress() { Motor.A.stop(); Motor.C.stop(); }
public void action() { // Back up:
Motor.A.backward(); Motor.C.backward();
try{Thread.sleep(1000);}catch(Exception e) {} // Rotate by causing only one wheel to stop: Motor.A.stop();
try{Thread.sleep(300);}catch(Exception e) {} Motor.C.stop();
} }
import lejos.subsumption.*;
public class BumperCar {
public static void main(String [] args) { Behavior b1 = new DriveForward(); Behavior b2 = new HitWall(); Behavior [] bArray = {b1, b2};
Arbitrator arby = new Arbitrator(bArray); arby.start();
} }
The above code is fairly easy to understand. The first two lines in the main() method create instances of our Behaviors. The third line places them into an array, with the lowest priority behavior taking the lowest array index. The fourth line creates the Arbitrator, and the fifth line starts the Arbitration process. When this program is started the robot will scurry forwards until it bangs into an object, then it will retreat, rotate, and continue with its forward movement until the power is shut off.
This seems like a lot of extra work for two simple behaviors, but now let's see how easy it is to insert a third behavior without altering any code in the other classes. This is the part that makes behavior control systems very appealing for robotics programming. Our third behavior could be just about anything. We'll have this new behavior monitor the battery level and play a tune when it dips below a certain level. Examine the completed
The complete tune is stored in the note array at line 6 and the method to play the notes is at line 30. This behavior will take control only if the current battery level is less the voltage specified in the constructor. The takeControl() method looks a little inflated, and that's because it also displays the battery charge to the LCD display. The action() and suppress() methods are comparatively easy. Action makes a bunch of noise, then exits the program as soon as it is called. Since this behavior stops the program, there is no need to create a suppress() method.
To insert this Behavior into our scheme is a trivial task. We simply alter the code of our main class as follows:
import lejos.subsumption.*; import lejos.nxt.*;
public class BatteryLow implements Behavior { private float LOW_LEVEL;
private static final short [] note = {
2349,115, 0,5, 1760,165, 0,35, 1760,28, 0,13, 1976,23, 0,18, 1760,18, 0,23, 1568,15, 0,25, 1480,103, 0,18, 1175,180, 0,20, 1760,18, 0,23, 1976,20, 0,20, 1760,15, 0,25, 1568,15, 0,25, 2217,98, 0,23, 1760,88, 0,33, 1760, 75, 0,5, 1760,20, 0,20, 1760,20, 0,20, 1976,18, 0,23, 1760,18, 0,23, 2217,225, 0,15, 2217,218};
public BatteryLow(float volts) { LOW_LEVEL = volts;
}
public boolean takeControl() {
float voltLevel = (ROM.getBatteryPower() * 10 / 355); int displayNum = (int)(voltLevel * 100);
LCD.setNumber(0x301f, displayNum, 0x3004); LCD.refresh();
return voltLevel < LOW_LEVEL; }
public void suppress() { // Nothing to suppress }
public void action() { play();
try{Thread.sleep(3000);}catch(Exception e) {} System.exit(0);
}
public static void play() {
for(int i=0;i<note.length; i+=2) { final short w = note[i+1]; Sound.playTone(note[i], w); try {
Thread.sleep(w*10);
} catch (InterruptedException e) {} }
Note: The voltage level of the NXT at rest is different from the voltage when in action. The voltage level at rest might be 7.8 V, but when motors are activated they naturally cause a drop in the voltage reading. Make sure the voltage threshold used in the BatteryLow constructor is low enough.
This example beautifully demonstrates the real benefit of behavior control coding. Inserting a new behavior, no matter what the rest of the code looks like, is simple. The reason for this is grounded in object oriented design; each behavior is a self contained, independent object.
TIP: When creating a behavior control system, it is best to program each behavior one at a time and test them individually. If you code all the behaviors and then upload them all at once to the NXT brick, there is a good chance a bug will exist somewhere in the behaviors, making it difficult to locate. By programming and testing them one at a time it makes it easier to identify where the problem was introduced.
Behavior coding is predominantly used for autonomous robots - robots that work independently, on their own free will. A robot arm controlled by a human would likely not use behavior programming, although it would be possible. For example, a robot arm with four joystick movements could have a behavior for each direction of movement. But as you may recall, behaviors are ordered with the highest order taking precedence over lower order behaviors. Who is to say that pushing left on the joystick would take precedence over pushing up? In other words, behavior control in anything other than autonomous robots is largely overkill.
public class BumperCar {
public static void main(String [] args) { Behavior b1 = new DriveForward(); Behavior b2 = new BatteryLow(6.5f); Behavior b3 = new HitWall();
Behavior [] bArray = {b1, b2, b3}; Arbitrator arby = new Arbitrator(bArray); arby.start();
Advanced Behavior Coding
It would be nice if all behaviors were as simple as the examples given above, but in more complex coding there are some unexpected results that can sometimes be introduced. Threads, for example, can sometimes be difficult to halt from the suppress() method, which can lead to two different threads fighting over the same resources - often the same motor! Another problem that can potentially occur in multi-threaded programs is that events go undetected, such as touch sensor hits. These are a few of the pitfalls we will be examining in this section. Let's start by looking at what is generally the least complicated of the three Behavior methods to implement; the takeControl() method.
Note: The behavior control API used by leJOS NXJ is a modified version of the model proposed by Rodney Brooks. His model is all done at the lowest level possible - the motors. This prevents higher level classes from being used in behaviors. For example, the Navigator class accesses the motors of the NXT directly, so with the original behavior control model Navigator could not be used. Also, if both motors are moving forward, and a higher level behavior takes command it is not clear if all lower level motor movements should be stopped. What if the higher level behavior only uses one of the motors? Should the other keep moving forward? And will this lead to odd behavior? These are the
problems the leJOS Behavior Control API tries to address.
Coding Foolproof takeControl() Methods
It is important for takeControl() methods to be responsive in behavior control systems. When a bumper collides with an object, the robot must stop or reverse direction
immediately; otherwise it will continue to move forward into the object. Sometimes when an event occurs, such as a touch sensor press, the program misses the event because the RCX is executing another thread. By the time it gets to the takeControl() method the sensor has been released and the program misses its opportunity to activate the proper behavior action. In this section we will learn how to make fool-proof takeControl() methods.
In the above example we used single indicators of whether or not to take control. For example, it took one reading from the Sensor class to check if the touch sensor was hit. The takeControl() method can also make a decision to take control based on a number of different values. It could initiate an action if it is facing east, the light reading is greater than 60, and the temperature is less than 20 degrees:
public boolean takeControl() { boolean pass = false; if(direction == EAST)
if(Sensor.S1.readValue() > 60) if(Sensor.S2.readValue() < 20) pass = true;
Likewise, a different behavior could just as easily check on the same data, only react differently based on different values. For example, another Behavior could initiate a different action if the robot is facing west, the light reading is less than 60, and temperature is greater than 20 degrees. So a robot can initiate an unlimited number of responses with only a few sensors at its disposal. This leads to another point about implementing the takeControl() method.
With the Arbitrator cycling through all the takeControl() methods, there could be a significant delay in checking a condition, such as whether a touch sensor has been tapped. It's a feature of the imperfect world we live in that, when the robot strikes an object, the touch sensor may not remain pressed. It sometimes bounces off the object into a position where the bumper is no longer pressing on the touch sensor. You may have noticed in the example that it relies on checking touch very often. What if the touch sensor is
The above code implements a SensorPortListener, and hence implements the
stateChanged() method. It is important to add the sensor listener to Sensor.S2, as shown in line 10. Notice the stateChanged() method does not simply return the value of the bumper Sensor; rather, if the Sensor value is true then it changes the hasCollided variable to true. If, on the next pass, the sensor value is false then hasCollided will remain true until takeControl() has seen the hasCollided value. Once takeControl() sees there has been a collision, then hasCollided is reset back to false (line 20). With this new code, it should be impossible for the robot to miss any collisions with the bumper!
Coding Solid action() and suppress() Methods
In order to code functional action() and suppress() pairs, it is necessary to understand how arbitration works. Arbitrator cycles through each of its Behaviors, checking the
takeControl() method to see if the action() for the Behavior should be executed. It starts with the highest priotiry method and goes down to the lowest priority Behavior. As soon as it comes across a behavior that wants to take control, it executes suppress() for the
import lejos.subsumption.*; import lejos.nxt.*;
public class HitWall implements Behavior, SensorListener { boolean hasCollided;
// Constructor: public HitWall() { hasCollided = false;
SensorPort.S2.addSensorListener(this); }
public void stateChanged(Sensor bumper, int oldValue, int newValue) { if(bumper.readBooleanValue() == true)
hasCollided = true; }
public boolean takeControl() { if(hasCollided) {
hasCollided = false; // reset value return true;
} else
return false; }
public void suppress() { Motor.A.stop(); Motor.C.stop(); }
public void action() { // Back up:
Motor.A.backward(); Motor.C.backward();
try{Thread.sleep(1000);}catch(Exception e) {} // Rotate by causing only one wheel to stop: Motor.A.stop();
try{Thread.sleep(300);}catch(Exception e) {} Motor.C.stop();
previous Behavior (assuming it is not a higher level thread), then runs the action() method for the current Behavior. As soon as the action() method returns, it then starts looping again, checking each behavior. If the takeControl() from the previous Behavior continues to say true, it does not run action() again. This is important; a single Behavior can not be executed twice in a row. If it could, it would constantly be suppressing itself. If Arbitrator moves on to another Behavior, when that behavior completes then it will call action on the lower level behavior again.
Note: If you would like to remove any mystery about what goes on in the Arbitrator class, take a look at the source code located in src/classes/lejos/subsumption/Arbitrator.java.
To program individual behaviors it is important to understand the fundamental differences between types of behaviors. Behavior actions come in two basic varieties:
• Discrete actions which finish quickly (e.g. back up and turn)
• Actions that start running and keep going an indefinite period until they are suppressed (e.g. driving forward, following a wall).
One final word of advice. Discrete actions execute once and return from the action() method call only when it has completed its behavior. These types of Behaviors generally do not need any code in the suppress() method because once the action is done there is nothing to suppress. The second type of action sometimes runs in a separate thread, although not always. For example, the Motor.A.forward() method call acts like a thread because the motor keeps turning after the method returns. In actuality, this is not a thread; the RCX just turns on an internal switch to activate the motor. An example of a true thread would be complex behavior, such as wall following. The action() method could start a thread to begin following a wall until the suppress() method is called. Be careful of never ending loops! If one were to occur within the action() method then the program would become stuck.
Summary
So why use the Behavior API? The best reason is because in programming we strive to create the simplest, most powerful solution possible, even if it takes slightly more time. The importance of reusable, maintainable code has been demonstrated repeatedly in the workplace, especially on projects involving more than one person. If you leave your code and come back to it several months later, the things that looked so obvious suddenly don't anymore. With Behavior control, you can add and remove behaviors without even