OpenL Tablets 5.14
OpenL Tablets BRMS
Document number: OpenL_Inst_G_5.x_1.0 Revised: 03-02-2015
OpenL Tablets Documentation is licensed under a Creative Commons Attribution 3.0 United States License.
Table of Contents
1 Preface ... 4
1.1 How This Book Is Organized ... 4
1.2 Audience ... 4
1.3 Related Information ... 5
1.4 Typographic Conventions ... 5
2 Before You Begin ... 6
3 Install OpenL Tablets WebStudio under Apache Tomcat ... 7
3.1 Step 1: Installing the JDK ... 7
3.2 Step 2: Installing Apache Tomcat ... 8
Installing Apache Tomcat on Windows ... 8
Installing Apache Tomcat on UNIX / Linux Machine ... 10
3.3 Step 3: Deploying OpenL Tablets WebStudio ... 12
On a Windows Machine ... 12
On a Linux Machine ... 13
3.4 Step 4: Configuring External User Database ... 14
3.5 Step 5: Setting Up OpenL Tablets WebStudio with Installation Wizard... 15
3.6 Step 6: Making Settings for Microsoft Excel Application ... 16
3.7 OpenL Tablets WebStudio Customization ... 17
Updating User Database Configuration ... 17
Configuring User Mode ... 18
Configuring Google Analytics ... 18
Configuring Private Key for Repository Security ... 18
4 Install OpenL Tablets WebStudio on WebSphere Application Server ... 20
4.1 Prerequisites ... 20
4.2 Step 1: Set up JVM Options for WebSphere Application Server ... 20
4.3 Step 2: Prepare OpenL Tablets WebStudio WAR File ... 21
4.4 Step 3: Deploy OpenL Tablets WebStudio on WebSphere Application Server ... 21
4.5 Step 4: Make Settings for Microsoft Excel Application ... 22
5 Deploy OpenL Tablets Web Services ... 23
6 OpenL Tablets WebStudio and Web Services Integration ... 25
6.1 Backward Compatibility of OpenL Tablets WebStudio with Previous Versions of Web Services ... 26
7 Troubleshooting Notes ... 27
1
Preface
OpenL Tablets is a Business Rules Management System (BRMS) based on tables presented in Excel documents. Using unique concepts, OpenL Tablets facilitates treating business documents containing business logic specifications as an executable source code.
OpenL Tablets provides a set of tools addressing BRMS related capabilities including OpenL Tablets WebStudio
that can be used for creating, testing and managing business rules and business rule projects, and OpenL Tablets Web Services designed for integration of business rules into customer’s applications.
The OpenL Tablets Installation Guide provides instructions for installing and customizing OpenL Tablets software. The document describes how to install OpenL Tablets under Apache Tomcat. Information on how to deploy and setup OpenL Web Services is provided as well.
1.1
How This Book Is Organized
Information on how to use this guide
Section Description
Before You Begin Lists system requirements for installing and using OpenL Tablets software.
Install OpenL Tablets WebStudio under Apache Tomcat
Explains how to install OpenL Tablets WebStudio under Apache Tomcat.
Install OpenL Tablets WebStudio on WebSphere Application Server
Explains how to install OpenL Tablets WebStudio on WebSphere Application Server.
Deploy OpenL Tablets Web Services Designed for developers and describes how to deploy OpenL Tablets Web Services.
OpenL Tablets WebStudio and Web Services Integration
Explains how to setup OpenL Tablets WebStudio and Web Services as an integrated environment.
Troubleshooting Notes Frequently Asked Questions
Provide useful information related to OpenL Tablets installation.
1.2
Audience
This guide is mainly targeted at business users and rule experts who define, view, and manage their business rules and rule projects via OpenL Tablets WebStudio. Developers can also use this document to learn how to install and setup OpenL Web Services.
1.3
Related Information
The following table lists sources of information related to contents of this guide:
Related information
Title Description
[OpenL Tablets WebStudio User Guide] Document describing OpenL WebStudio, a web application for managing OpenL Tablets projects through web browser.
[OpenL Tablets Reference Guide] Provides overview of OpenL Tablets technology, as well as its basic concepts and principles.
http://openl-tablets.sourceforge.net/ OpenL Tablets open source project website.
1.4
Typographic Conventions
The following styles and conventions are used in this guide:
Typographic styles and conventions Convention Description
Bold Represents user interface items such as check boxes, command buttons, dialog boxes, drop-down list values, field names, menu commands, menus, option buttons, perspectives, tabs, tooltip labels, tree elements, views, and windows.
Represents keys, such as F9 or CTRL+A.
Represents a term the first time it is defined.
Courier Represents file and directory names, code, system messages, and command-line commands. Courier Bold Represents emphasized text in code.
Select File > Save As Represents a command to perform, such as opening the File menu and selecting Save As.
Italic Represents any information to be entered in a field.
Represents documentation titles.
< > Represents placeholder values to be substituted with user specific values.
Hyperlink Represents a hyperlink. Clicking a hyperlink displays the information topic or external source.
2
Before You Begin
This chapter covers system requirements for installing and running OpenL Tablets software provided in the following table:
Software requirements
Software Requirements description
Operating systems Microsoft Windows 7 x86/64; Ubuntu 12.x; Linux 3.x.
Note: OpenL Tablets software can potentially run on any Operating System that supports Java Virtual Machine, e.g. Mac OS. This table only provides operating systems on which the OpenL Tablets software is tested and supported.
Browsers Microsoft Internet Explorer 9/10.x, Firefox 27.x or later, Chrome 31.x or later.
Other Software Java v6/7 x86/64 - JDK 1.7.0_x
Apache Tomcat 7.0.x
Note: Instructions on how to install and configure these software packages are provided further in this document.
Hardware requirements
RAM 4 Gb minimum. 6 Gb is recommended.
1 GHz or faster 32-bit (x86) or 64-bit (x64) processor
User rights requirements
Administrative permissions are required to install the software under Microsoft Windows / UNIX system.
3
Install OpenL Tablets WebStudio under Apache
Tomcat
This chapter describes how to setup an environment for working with OpenL Tablets software; how to deploy OpenL Tablets WebStudio under Apache Tomcat, and also provides information about settings required for proper functioning of the application.
Perform the following steps: 1. Step 1: Installing the JDK
2. Step 2: Prepare OpenL Tablets WebStudio WAR File
3. Step 3: Deploy OpenL Tablets WebStudio on WebSphere Application Server 4. Step 4: Make Settings for Microsoft Excel Application, if required.
5. Step 5: Setting Up OpenL Tablets WebStudio with Installation Wizard 6. Step 6: Making Settings for Microsoft Excel Application, if required.
3.1
Step 1: Installing the JDK
To install the JDK, peform the following steps: 1. Download JDK 1.7.0_x or later from
http://www.oracle.com/technetwork/java/javase/downloads/index.html to the target directory. Further in the document this catalog is referred as <JAVA_HOME>.
Note: It is highly recommended to avoid installing Java in the default Program Files directory because it can cause problems due to space characters in the path to the folder.
2. For installation details if required, refer to http://www.oracle.com/technetwork/java/javase/index-137561.html.
3. Install the JDK according to the instructions.
4. Set the environment variable JAVA_HOME to the pathname of the directory where the JDK is installed as follows:
For Microsoft Windows:
1. Open the System Properties dialog: press <Windows> + <Pause> hotkey or right-click the My Computer icon and select Properties in the pop-up menu.
2. On the Advanced tab, click the Environment Variables button.
3. In the System variables area, click the New button.
4. In the Variable name field, enter JAVA_HOME.
5. Enter the path to the directory where the JDK is installed in the Variable value field, for example, C:\Java\jdk1.7.0_20.
For Unix/Linux environments, assuming the target directory is /usr/lib/jvm/java-6-sun):
Step Description
To set up JAVA_HOME for a single user, proceed as follows:
1 Login to the account and open .bash_profile:nano ~/.bash_profile
2 Add the following line: export JAVA_HOME=/usr/lib/jvm/java-6-sun.
3 Add/correct system PATH
export PATH=$PATH:$JAVA_HOME/bin
4 To save, press CTRL+O and then press CTRL+X to exit.
To set up JAVA_HOME for all users, proceed as follows:
1 Login as root and open /etc/profile: nano /etc/profile
2 Add the following line: export JAVA_HOME=/usr/lib/jvm/java-6-sun
3 Add/correct system PATH
export PATH=$PATH:$JAVA_HOME/bin
3.2
Step 2: Installing Apache Tomcat
Apache Tomcat can be installed from a ZIP file or using Windows Service Installer. The following topics are included in this section:
Installing Apache Tomcat on Windows
Installing Apache Tomcat on UNIX / Linux Machine
Installing Apache Tomcat on Windows
The following topics are included in this section: Installing Apache Tomcat From Zip File
Installing Apache Tomcat Using Windows Service Installer
Installing Apache Tomcat From Zip File
To install Apache Tomcat 7.0.x or later, proceed as follows:
1. Open Apache Tomcat home page at http://tomcat.apache.org/index.html. 2. In the left-hand Download menu, click the latest available Tomcat version.
3. Locate the Binary Distributions area and in the Core list click on the ZIP file corresponding to the required Windows version.
4. Save the ZIP file in a temporary directory.
5. Unpack the downloaded ZIP file into the target folder on the computer. This folder is referred as <TOMCAT_HOME> further in this document. 6. Configure JVM options for Tomcat web server as follows:
set JAVA_OPTS=%JAVA_OPTS% Xms256m Xmx1024m XX:+UseParallelOldGC XX:PermSize=128m -XX:MaxPermSize=384m
2. Open the TOMCAT_HOME/conf/server.xml file and add the URIEncoding="UTF-8" attribute for all <Connector> elements.
For example:
<Connector port="8080" protocol="HTTP/1.1" connectionTimeout="20000" redirectPort="8443" URIEncoding="UTF-8"/>
Installing Apache Tomcat Using Windows Service Installer
This section describes how to install Apache Tomcat using Windows Service Installer.
Note: It is not recommended to select this type of installation when planning to edit rule tables in Excel files from OpenL Tablets WebStudio. See the Modifying Tables section in [OpenL Tablets WebStudio User Guide] because
additional settings are required for that. Please contact your OpenL Tablets administrator to solve the issue.
Note: For OpenL Tablets administrator. To allow editing rule tables in Excel files from OpenL Tablets WebStudio, please enable the Allow service to interact with desktop Tomcat service option using MMC or from the command line.
To install Apache Tomcat using Windows Service Installer, proceed as follows:
1. Navigate to Apache Tomcat site at http://tomcat.apache.org/index.html and n the left-hand Download menu, click the latest available Tomcat version.
2. Locate the Binary Distributions area and in the Core list click the 32-bit/64-bit Windows Service Installer link.
Save the apache-tomcat exe file in a temporary folder.
3. Run the exe file and follow the instructions of the installation wizard.
Click Next to move to the next step or return to the previous step by clicking the Back button. 4. In the License Agreement window, click I Agree.
5. In the Choose Components dialog, leave the default Normal type of installation.
Experienced Tomcat users can also select another installation type from the drop-down list. 6. In the Configuration dialog, leave the settings at their default values.
7. In the next window the Wizard displays the folder where Tomcat will be installed – the Destination Folder. This folder is referred as <TOMCAT_HOME> further in this document.
8. Click Install to start the installation. 9. Click Finish to complete.
As a result, Apache Tomcat is installed and started on the user’s computer. In the Notification Area located next to the clock, the icon appears. Tomcat is managed by using this icon or from the Start menu. 10. Configure JVM options for Tomcat.
For that right click the Apache Tomcat icon in the Notification area and select Configure; or click start->All Programs->Apache Tomcat 7.0-> Configure Tomcat. The Apache Tomcat Properties dialog appears.
Click the Java tab and add in the Java Options text box. Note that every option must be manually entered in a separate row:
-Xms256m -Xmx1024m
-XX:+UseParallelOldGC -XX:PermSize=128m -XX:MaxPermSize=384m Click Apply and then click OK.
11. To restart Tomcat, right click the Tomcat icon in the Notification Area and select Stop service (the Tomcat icon changes to ) and then select Start Service again.
Tomcat can also be restarted from the General tab in the Apache Tomcat Properties dialog which appears after selecting Start->All Programs->Apache Tomcat 7.0-> Configure Tomcat.
From this point OpenL Tablets WebStudio can be run as described in Step 3: Deploying OpenL Tablets WebStudio.
Installing Apache Tomcat on UNIX / Linux Machine
The following topics are included in this section: Installing Apache Tomcat from Repository Installing Apache Tomcat from ZIP File
Configuring JVM Options for Tomcat on UNIX / Linux Machine
Installing Apache Tomcat from Repository
Note: All commands should be entered into a terminal window using an account with sudo privileges.
This section describes how to install Apache Tomcat from repository as a service on Ubuntu 12.x. Proceed as follows:
1. Open a terminal window and enter the following: sudo apt-get install tomcat7
2. Start Tomcat with the next command: sudo /etc/init.d/tomcat7 start
All necessary folders should be located in /var/lib/tomcat7.
3. To ensure that Tomcat works properly, open the browser and enter http://localhost:8080.
If all is correct, Apache Tomcat displays welcome page with a message similar to the following: If you're seeing this, you've successfully installed Tomcat. Congratulations!
In case 404 Error appears, try to restart Tomcat: sudo /etc/init.d/tomcat7 restart
Or stop Tomcat by entering the following command: sudo /etc/init.d/tomcat7 stop
Installing Apache Tomcat from ZIP File
This section describes how to install Apache Tomcat on Ubuntu 12.04 and Centos 6.3. The instructions are valid for other Linux distributions with small changes.
Proceed as follows:
1. Download the appropriate Tomcat archive file, ZIP or tar.gz archive, from its official website: http://tomcat.apache.org/download-70.cgi () to the required user folder.
In this example, Tomcat 7.0.39 is used, and download it to the following folder: /home/myuser
2. Open a terminal window and change directory to the folder containing the Tomcat archive.
3. Extract the archive by entering in the terminal the following command. Tomcat version can be changed as required:
tar -zxvf apache-tomcat-7.0.39.tar.gz
The apache-tomcat-7.0.39 folder appears. For example: /home/myuser/apache-tomcat-7.0.39
4. Change directory to the tomcat/bin: cd apache-tomcat-7.0.39/bin
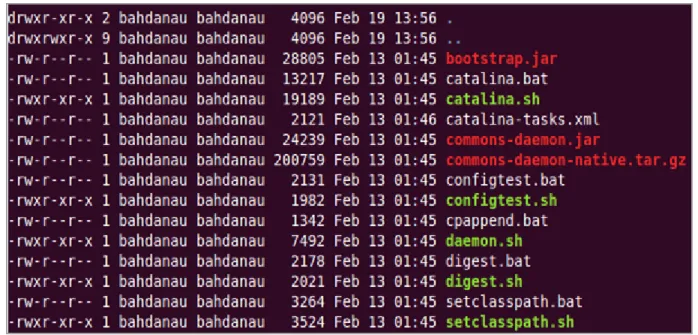
5. Make sure all *.sh files are executable, i.e. they have r in all positions to the left of the file name, for example, -rwxr-xr-x. For that, enter in terminal the following:
ls –la
The following displays:
Figure 1: OpenL Tablets package is added
6. If some sh files are not executable, enter the following command: chmod +x ./*.sh
7. Run the sturtup.sh file: sh ./startup.sh
8. In the browser, enter the following URL: http://localhost:8080
If the installation completed successfully, the Apache Tomcat welcome screen appears. The next thing to be done is to configure JVM options for Tomcat.
Configuring JVM Options for Tomcat on UNIX / Linux Machine
To configuring JVM options for Tomcat on a UNIX / Linux machine, proceed as follows 1. For UNIX, create TOMCAT_HOME/bin/setenv.sh file and write
export JAVA_OPTS="$JAVA_OPTS Xms256m Xmx1024m XX:+UseParallelOldGC -XX:PermSize=128m -XX:MaxPermSize=384m"
2. Locate the TOMCAT_HOME/conf/server.xml file and add the URIEncoding="UTF-8" attribute for all <Connector> elements.
For example:
<Connector port="8080" protocol="HTTP/1.1" connectionTimeout="20000" redirectPort="8443" URIEncoding="UTF-8"/>
From this point deploy OpenL Tablets WebStudio as described in Step 3: Deploying OpenL Tablets WebStudio.
3.3
Step 3: Deploying OpenL Tablets WebStudio
This section describes how to deploy and run OpenL Tablets WebStudio under Tomcat. The following topics are included:
On a Windows Machine On a Linux Machine
On a Windows Machine
This section describes how to deploy and run OpenL Tablets WebStudio under Tomcat on a Windows machine. Proceed as follows:
1. Go to http://openl-tablets.sourceforge.net/downloads page.
2. Click the appropriate WebStudio WARlink.
3. Save the filein a temporary folder and then copy the WebStudio war file.
For example, openl-tablets-webstudio-X.X.X.war) to the <TOMCAT_HOME>\webapps folder. 4. Run Tomcat.
If Tomcat has been installed from the ZIP file, click the startup.bat file in TOMCAT_HOME\bin. If Tomcat is installed using Windows Service Installer, restart Tomcat as described in Step 3: Deploy
OpenL Tablets WebStudio on WebSphere Application Server .
Tomcat unpacks the WAR file into the <TOMCAT_HOME>\webapps\<war file name> folder. For example, for 5.9.4 version the target folder can be <TOMCAT_HOME>\webapps\openl-tablets-webstudio-5.9.4. For
convenience, the folder can be renamed as needed but remember that this name is used to launch WebStudio under Tomcat.
From this point on, run OpenL Tablets WebStudio with default settings or make additional customizations: change User Mode and/or configure an external User Database as described in [OpenL Tablets WebStudio Customization Guide].
5. Run OpenL Tablets WebStudio by entering in the browser the following URL:http://localhost:8080/<war file name>. I.e. for this example enter http://localhost:8080/openl-tablets-webstudio-5.9.4.
OpenLTablets WebStudio opens in the browser on the Welcome to Installation Wizard page. The wizard will guide through the setup process as described in Step 5: Setting Up OpenL Tablets WebStudio with Installation Wizard. After the setup process is complete, users can work in the OpenLTablets WebStudio: create new projects or download existing ones.
Note: After a new release of the WebStudio is installed, click CTRL+F5 or clear cookies and cash manually to reload the page in the browser.
On a Linux Machine
1. To install OpenL Tablets WebStudio under Linux, perform the following steps: Create the <OPENL_HOME> folder where the application will be deployed as follows:
sudo mkdir /<OPENL_HOME> 2. Change access rights for this folder:
sudo chmod 775 -R /<OPENL_HOME> 3. Change the owner for this folder:
sudo chown tomcat7:tomcat7 /<OPENL_HOME>
4. Download OpenL WebStudio war file from http://sourceforge.net/projects/openl-tablets/files/openl-tablets/ to a temporary folder.
5. Copy the downloaded WAR file to the Tomcat webapps folder: cp
/home/myuser/Downloads/<openl-tablets-webstudio-xxxx.war>/home/myuser/<TOMCAT_HOME>/webapps/webstudio.war
6. Stop Tomcat — run the following command from /home/myuser/<TOMCAT_HOME>/bin : sh shutdown.sh
7. Start Tomcat from the same folder: sh startup.sh
8. In the browser enter http://localhost:8080/webstudio
In case the deployment succeeded without any errors, the OpenL Tablets Web Studio Installation Wizard described in the next step opens in the browser.
When encountering any problems, open the following log files for details:
3.4
Step 4: Configuring External User Database
This step is only required if the user is planning to work in the Production application mode. For more information, see Step 5: Setting Up OpenL Tablets WebStudio with Installation Wizardand use an external database such as MySQL for managing users in the WebStudio.
By default, OpenL Tablets WebStudio can run using an internal User Database (User DB) based on the HSQLDB database engine. It is a good idea to use the internal User DB for demonstration purposes because it is provided by default and requires no additional setup. But in this case all user management changes will be lost after server restart.
In a production environment, it is strongly recommended to use an external database. This section explains how to set up a MySQL database.
To configure an external MySQL database, perfom the following steps: . 1. Go to http://dev.mysql.com/downloads/mysql/.
2. Select the appropriate MSI Installer for the system configuration and click Download.
For example, Windows (x86, 32-bit), MSI Installer may be needed. It is recommended to use ZIP Archive version since it is intended for advanced users.
3. In the nextscreen, register or login on MySQL site.
This step can be skipped and users can proceed to No thanks, just start my download! link. 4. Select Save File in the next dialog and save the .msi file in a target folder.
5. Navigate to the folder containing the .msi file and double click on the file to start the installation process. The MYSQL Server Setup Wizard Welcome screen appears.
6. Follow the steps the Wizard takes through leaving the defaults and clicking Next. 7. Click Finish to close the Wizard when installation is complete.
Note: It is recommended to configure the database server to use UTF-8 character set.
After MySQL is successfully installed on the user’s computer, create an empty database for WebStudio in MySQL and grant permissions to modify this database to the user from which the WebStudio will work with this
database.
Proceed as follows:
1. Open MySQL Command Line Client as follows: start > All Programs > MySQL > MySQL Server 5.5 -> MySQL Command Line Client.
2. Type the following commands:
CREATE USER openl_user IDENTIFIED BY 'openl_password'; CREATE DATABASE openl CHARACTER SET utf8;
3.5
Step 5: Setting Up OpenL Tablets WebStudio with
Installation Wizard
This topic describes the steps that must be taken after the first run of OpenL Tablets WebStudio under Tomcat or WAS. For details, see Install OpenL Tablets WebStudio on WebSphere Application Server. Accept the default options provided by the Wizard by clicking Next to move to the next step; or change the options as needed and then click Next to proceed.
All steps are accompanied by detailed explanations that help to choose the right option. Proceed as follows: 1. Click the Start button in the Welcome to OpenL Tablets WebStudio Installation Wizard page.
2. In the next screen, specify a working directory for OpenL Tablets.
By default, the following directory is displayed: c:\Users\username\.openl\. This folder is referred to as <OPENL_HOME> in the documentation.It is highly recommended not to use the system drive for that. Click Next to proceed.
3. Specify production and design repositories.
Connection types for setting up design and production repositories
Type Description
Local The Repository is located on the local machine as a folder. This folder must be specified in the
Repository Directory field.
Remote - RMI The Repository is located on a remote server and can be accessed by the RMI protocol. The
Repository URL field displays URL for remote access to the repository.
Remote - WebDav The Repository is located on a remote server and can be accessed via WebDav protocol. The
Repository URL field displays URL for remote access to the repository.
Database The Repository is located in a database installed either local or remote. Available only for
production repository. Repository URL field displays URL for access to the database.
For more information on repository security, refer in the [OpenL Tablets WebStudio User Guide],Repository Settings section.
4. Select a user mode:
User modes
Mode Description
Single-user Only the user currently logged on to the computer can work with the WebStudio. For details, refer to [OpenL Tablets WebStudio User Guide].
Multi-user (recommended)
Multiple users can run the WebStudio with their unique names.
5. For the Multi-user mode, in the Select application mode area, specify the database for users management:
User management databases
Database Description
Demo The default database which contains a predefined list of users and does not require additional settings.
6. If the Production mode is selected, the Configure database area appears with the following database parameters:
Database parameters
Parameter Description
Database URL By default, localhost:3306/openl must be used.
Username / Password Enter user’s username and password specified for MySQL database. For more information, see
Step 4: Configuring External User Database.
7. Click the Finish button to complete.
As a result, for the Multi-user mode, the logging screen appears for entering user’s credentials to start working with OpenL Tablets WebStudio.
Note: List of predefined users defined in Demo application mode can be found in [WebStudio User Guide], User Management > Manage Users.
3.6
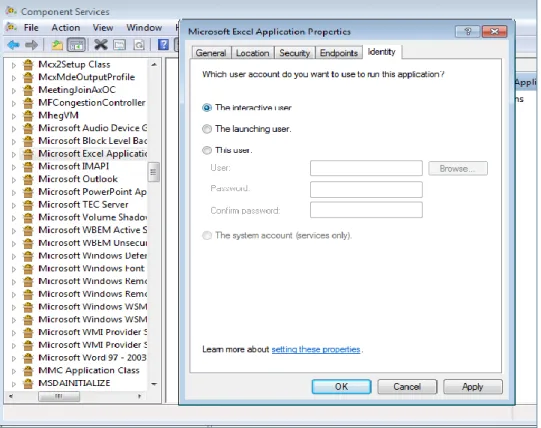
Step 6: Making Settings for Microsoft Excel Application
“Open in Excel” functionality does not work under the default settings if Apache Tomcat is installed on Windows using Windows Service Installer as desribed in Installing Apache Tomcat Using Windows Service Installer. This case requires a user to make several configuration changes.
To change DCOMConfig settings for Excel, proceed as follows: 1. Run the dcomconfig.exe utility:
start -> dcomcnfg.exe
Note: Administrator credentials can be required.
The Component Services dialog appears.
2. In the Console Root select Component Services -> Computers -> My Computer -> DCOM Config. 3. Navigate to the Microsoft Excel Application at the right.
4. Right click Microsoft Excel Application and select the Properties item in the drop-down menu. 5. In the Microsoft Excel Application dialog, click the Identity tab.
6. Select the This user option. 7. Click OK to complete.
Figure 2: Microsoft Excel Application Properties
Note: If Microsoft Excel Application is not available under dcomcnfg settings, follow the next steps to set it: On 64 bit system with 32 bit Office - start -> run mmc -32 -> File -> Add/Remove Snap-in… -> Component Services -> Add -> OK -> Console Root -> Component Services -> Computers -> My Computer -> DCOM Config -> Microsoft Excel Application. And perform remaining steps mentioned in the section.
3.7
OpenL Tablets WebStudio Customization
This section provides information on what additional configurations can be made for OpenL Tablets WebStudio and how to make them.
The following topics are included:
Updating User Database Configuration Configuring User Mode
Configuring Google Analytics
Configuring Private Key for Repository Security
Updating User Database Configuration
If for some reasons the user database settings such as connection, login/password and so on need to be changed, use the <OPENL_HOME>/system-settings/db.properties file for that.
Here is an example of the configuration that can be used for the User Database: db.hibernate.dialect = org.hibernate.dialect.MySQLDialect db.driver = com.mysql.jdbc.Driver
db.url = jdbc:mysql://localhost:3306/openl db.user = openl_user
db.password = openl_password
Configuring User Mode
Normally, user mode in OpenL Tablets WebStudio is set to Multi-user by using OpenL Tablets WebStudio Installation Wizard as described in Step 5: Setting Up OpenL Tablets WebStudio with Installation Wizard. User mode can also be changed as a JVM option for Tomcat. For that, open the Apache Tomcat Properties dialog (as described insection Installing Apache Tomcat Using Windows Service Installer ) and add in the Java Options text box:
-Duser.mode=multi
Note: User mode set as a Java option takes precedence over the corresponding value specified in the OpenL Tablets WebStudio Installation Wizard. So if both of them are defined the Java option value will be used.
Configuring Google Analytics
Google Analytics is a service offered by Google that generates detailed statistics about a website's traffic and traffic sources. To configure Google Analytics for OpenL, open the Apache Tomcat Properties dialog (as described in Installing Apache Tomcat Using Windows Service Installer) and add in the Java Options text box:
-Dwebstudio.analytics=number
Or user can configure Google Analytics for OpenL in config.properties file which located \WEB-INF\conf\ webstudio.analytics=number
Where “number” is a number provided by Google during registration.
Configuring Private Key for Repository Security
WebStudio allows connecting to secured repositories. Then passwords are stored in WebStudio workspace. To improve protection of the passwords, a private key can be used.
Private key is a special secure sentence for coding and encoding of repositories passwords. By default, the private key is empty. But it can be setup as a JVM option for Tomcat by adding and specifying value of the parameter
repository.encode.decode.key.
Note: The private key must be configured prior to creating any secured connections. Otherwise, all stored passwords are not valid.
4
Install OpenL Tablets WebStudio on WebSphere
Application Server
This section explains how to install OpenL Tablets WebStudio on WebSphere Application Server (hereafter referred to as WAS).
The following topics are included: Prerequisites
Step 1: Set up JVM Options for WebSphere Application Server Step 2: Prepare OpenL Tablets WebStudio WAR File
Step 3: Deploy OpenL Tablets WebStudio on WebSphere Application Server Step 4: Make Settings for Microsoft Excel Application
4.1
Prerequisites
The following tasks must be completed prior to deploying OpenL Tablets WebStudio on WAS.
IBM WebSphere Application Server v. 8.5 or later must be installed on user’s local machine, or users need access to a WAS instance with logon that has appropriate permissions to configure JVM options. For information on how to install IBM WebSphere Application Server, visit Oracle Online documentation, section Installing and Configuring WebSphere 8.5 section on
http://docs.oracle.com/cd/E24902_01/doc.91/e23435/inst_config_was85_win.htm
IMPORTANT! When defining the Shared Resource Directory during the installation process, the path to the directory must be specified without spaces. Otherwise, OpenL Tablets WebStudio will fail.
Follow the steps below to deploy OpenL Tablets WebStudio on WAS.
4.2
Step 1: Set up JVM Options for WebSphere Application
Server
Proceed as follows:
1. In the WebSphere Application Server Console, navigate to Servers/ServerTypes/WebSphere Application Servers.
The server can be seen in the right pane.
2. In the right pane, click the server name; by default it is server1.
3. Locate the Server Infrastructure area and expand the Java Process Management node. 4. Click Process Definition.
5. Click the Java Virtual Machine link on the upper right. 6. In the Initial heap size text box, enter 256.
7. In the Maximum heap size text box, enter 1024. 8. In the Generic JVM Arguments add the following string
XX:+UseParallelOldGC XX:PermSize=128m XX:MaxPermSize=384M -Dclient.encoding.override=UTF-8
9. Click OK.
10. In the Message dialog which appears in the top of the form, click the Save directly to the master configuration item to save changes..
11. Restart theWebSphere Application Server.
4.3
Step 2: Prepare OpenL Tablets WebStudio WAR File
Proceed as follows:
1. Go to http://openl-tablets.sourceforge.net/downloads page.
2. Click the appropriate WebStudio (war) link.
3. Save the filein a temporary folder.
4. Open the downloaded WAR file as a ZIP archive.
5. From the \WEB-INF\lib\ folder, remove the following JAR files: xercesImpl-2.8.1.jar
xml-apis-1.3.03.jar 6. Proceed the following steps:
a. Open war file as a zip archive
b. Find the file /WEB-INF/lib/org.openl.rules.security.standalone-5.13.0.jar. Open it as a zip archive.
c. Open the file /META-INF/standalone/spring/security-hibernate-beans.xml for edit.
d. Find in it '<bean id="openlSessionFactory"'. For its <property name="hibernateProperties"> add additional property:
<prop
key="hibernate.transaction.jta.platform">org.hibernate.engine.transaction.jta.platform .internal.WebSphereExtendedJtaPlatform</prop>
e. Save the file. 7. Save the WAR file.
4.4
Step 3: Deploy OpenL Tablets WebStudio on WebSphere
Application Server
Proceed as follows:
Tthis is a default port for local installation. The WebSphere Application Server Console opens. 2. Navigate to Applications / Application Types / WebSphere enterprise applications.
3. Click the Install button in the top line tool bar.
4. In the Path to the new application area, select themodified WebStudio WAR file. The Local file system option is selected by default.
5. Click the Next button to proceed to Step 2: Map modules to servers.
6. In the Step 2: Map modules to servers page, select the checkbox on the left of the file name and click Next to proceed.
7. In the Step 3: Map virtual hosts for Web modules page, select the checkbox on the left of the file name and click Next to proceed.
8. In the Step 4: Map context roots for Web modules page, enter in the Context Root text field /webstudio and click Next to proceed.
9. Click the Finish button in the bottom of the screen to complete.
After the installation process complete, clock the Manage Applications link. 10. In the next screen, click on the webstudio WAR file link in the list of applications.
11. In the next screen, locate the Default Properties area and click the Class loading and update detection link. 12. In the next screen, select the following radio-buttons: Classes loaded with local class loader first (parent
last) and Single class loader for application. 13. Click OK to finish.
14. In the next window, click the Save directly to the master configuration link.
Now the OpenL Tablets WebStudio application is installed and started. If not, start the application. 15. Run OpenL Tablets WebStudio by entering http://localhost:9080/webstudio/ in the browser.
The Welcome to OpenL Tablets WebStudio Installation Wizard page appears allowing to set up the application as needed. For details, refer to Step 4: Configuring External User Database, Step 5: Setting Up OpenL Tablets WebStudio with Installation Wizard and OpenL Tablets WebStudio Customization.
4.5
Step 4: Make Settings for Microsoft Excel Application
“Open in Excel” functionality does not work while using WAS 8.5 under the default settings which requires a user to make several configuration changes described in Step 6: Making Ssttings for Microsoft Excel Application.
5
Deploy OpenL Tablets Web Services
This chapter is designed for rule developers who need to use business rules as separate web services.
Note: A particular case will be considered when users use a file system as a data source for their projects. In such a case all OpenL Tablets projects must be placed into a local folder; this folder will represent a single deployment containing all the projects. In turn, every project must also be represented as a separate folder.
For more information on how to configure OpenL Tablets Web Services, see the [OpenL Tablets Web Services Usage and Customization Guide].
Make sure the following tasks have been performed:
The JDK 1.7.0_x (or later) and Apache Tomcat 7.0.x (or later) is correctly installed. The folder where Tomcat is installed will be referred to as <TOMCAT_HOME>.
An environment variable JAVA_HOME is set to the pathname of the directory where the JDK is installed. JVM options must be set up as described in Step 2: Installing Apache Tomcat.
The deployment process consists of the following steps:
1. To download pre-configured OpenL Tablets Web Services application (war-file), proceed as follows:
1. Go to http://openl-tablets.sourceforge.net/downloads page.
2. Click the appropriate Web Services (war) link.
3. Save the chosen war file to the <TOMCAT_HOME>\webapps directory. 2. Configure a local file system as a data source as follows:
1. Navigate to the <TOMCAT_HOME>\webapps folder and unzip the web services war file. For example, right-click the web services WAR file name and select 7-zip > Open archive.
2. Navigate to the WEB-INF\classes folder, open the openl-ruleservice.properties file and define address to the folder with projects for the following setting ruleservice.datasource.dir.
For example:
ruleservice.datasource.dir = d:/datasource/
3. Check property is defined as ruleservice.datasource.type = local.
4. Put the rule project to the appropriate datasource folder.
Every rule project should be represented as a separate folder. As an example, use OpenL Tablets Tutorial that can be downloaded from http://openl-tablets.sourceforge.net/documentation/tutorials.
5. Run Tomcat by clicking the startup.bat file in <TOMCAT_HOME>\bin.
To ensure the deployment is successful, try to go to the appropriate CXF page with web services. In this case it will be: http://localhost:8080/openl-tablets-ws-X.X.X
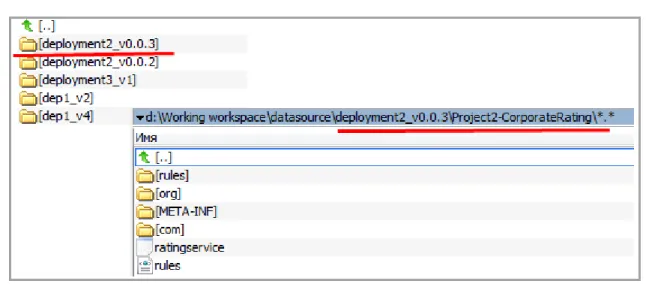
To deploy several projects which use the same java classes inside, change setting for
ruleservice.datasource.filesystem.supportDeployments=true inside openl-ruleservice.properties. User has possibility to save different version of same projects. For that provide
Note: This setting for saving version of projects is only possible when ruleservice.datasource.filesystem.supportDeployments=true
Every project should be located into separated folder with name ended like _v2 (or _v0.0.2)
Figure 3: Example of defining different versions of project
For more information refer to [OpenL Tablets - Web Services Usage and Customization Guide] Step 3 - File System Data Source section.
Note: In the Tomcat log file users can find the URL that must be used to run the Web Service. For file system data source, the URL must look like http://localhost:8080/<ws war file name>/<datasource folder>/<rule project name>?wsdl, where <datasource folder>/<rule project name> can be taken from the Tomcat log file.
6
OpenL Tablets WebStudio and Web Services
Integration
This section describes how to setup an integrated environment that enables work with business rules from OpenL Tablets WebStudio and launch these rules as Web Services. This section describes how to setup OpenL Tablets WebStudio and Web Services integration via RMI.
Note: In the given example OpenL Tablets WebStudio must be run under Tomcat.
All sources related to JCR repository can be downloaded from from
http://openl-tablets.sourceforge.net/downloads page, Repository (ZIP file) link. Repository package is a ZIP file containing repository server, configuration files and an empty JCR repository.
Proceed as follows:
1. Copy openl-tablets-remote-repository-server-X.X.X.war file from the repository package into \<TOMCAT_HOME>\webapps.
2. Copy repository folder into <OPENL_HOME> folder.
Note: By default, the repository folder name is repository. It is recommended to rename it as production-repository in case of setting up a remote production repository. Settings described below use this name.
3. Copy content of jackrabbit folder(bootstrap.properties and jackrabbit-repository.xml files) into
\webapps\<openl-tablets-remote-repository-server-X.X.X.war>\WEB-INF\ and set up repository settings:
File \<openl-tablets-remote-repository-server-X.X.X.war>\WEB-INF\bootstrap.properties must contain the following settings:
repository.config=/WEB-INF/jackrabbit-repository.xml repository.home=<OPENL_HOME>/production-repository repository.name=production-repository
# RMI Settings rmi.enabled=true rmi.port=1099 rmi.host=localhost
Open \<openl-tablets-remote-repository-server-X.X.X.war>\WEB-INF\web.xml file and change <param-value> inside tag <init-param> in sections “Repository Startup Servlet” and “Repository Servlet” as follows:
<param-value>/WEB-INF/bootstrap.properties</param-value> 4. Set up Web Services as follows:
1. Open the \<TOMCAT_HOME>\webapps\<ws project name>\WEB-INF\classes\rules-production.properties file. Update the rules-production.properties file.
2. Mark as comment the following lines: # production-repository.factory =
org.openl.rules.repository.factories.LocalJackrabbitProductionRepositoryFactory # production-repository.local.home=/openl/production-repository
production-repository.factory =
org.openl.rules.repository.factories.RmiJackrabbitProductionRepositoryFactory production-repository.remote.rmi.url = //localhost:1099/production-repository
3. Open the \<TOMCAT_HOME>\webapps\<ws project name>\WEB-INF\classes\openl-ruleservice.properties file.
Update the openl-ruleservice.properties file. Define ruleservice.datasource.type = jcr. 5. Run WebStudio by entering http://localhost:8080/<webstudio war file name>in the browser.
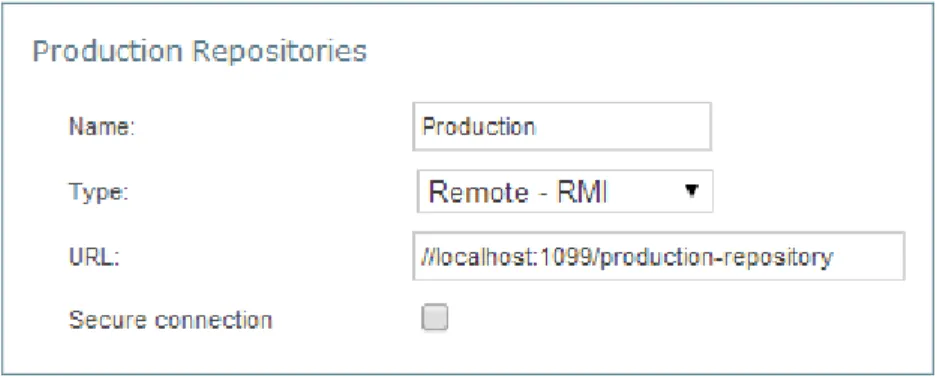
Set up appropriate design and production repositories settings in Installation Wizard. In this case production repository settings must be as follows:
Figure 4: Production repository settings
From this point any changes can be made in user’s rule in WebStudio, then save the project with these updates and redeploy it, these change will immediately affect the rule represented as Web Service.
6.1
Backward Compatibility of OpenL Tablets WebStudio
with Previous Versions of Web Services
To configure the compatibility of OpenL Tablets WebStudio deployment configuration with previous versions of OpenL Tablets Web Services (v.5.9.3 and earlier), switch the deployment.format.old parameter in the
7
Troubleshooting Notes
If OpenL Tablets WebStudio is deployed under Tomcat in Unix/Linux environment, the following troubleshooting recommendations can be taken into account:
1. Before starting tomcat under Linux, make sure that no Java processes are running: sudo ps -A | grep j
If found, the process name and number will be displayed. 2. If any Java process is running, stop it:
kill -9 <process number>
3. Make sure that port 8080 is available: sudo netstart –an | grep 8080 4. Run Tomcat under Linux:
<TOMCAT_HOME>/bin/startup.sh
5. If the 'command not found' error appears, mark the .sh file as an executable script: chmod +x startup.sh
6. If one of the errors “Permission denied” or “The BASEDIR environment variable is not defined correctly” is shown, make all .sh files in the bin folder executable:
chmod 777 *.sh
7. Verify that all .sh files in the bin folder are executable: ls –la
8. Run Tomcat
8
Frequently Asked Questions
This section provides the most common questions and answer related to the OpenL Tablets installation procedure. For detailed Information about working with Java, Tomcat, etc.,refer to the corresponding sites of the software manufacturers.
Frequently Asked Questions
# Question Answer
1 How can I check if Java is installed on my PC? Proceed as follows:
1. Open Start > Control Panel.
2. Perform either of the following:
For Windows XP, double click Add or Remove Programs. For Windows 7/Vista, click Programs > Programs and
Features.
3. Look through the list for Java(TM)… or Java(TM) Update…
items. If any of them are present, then you have Java installed on your PC.
2 During Java installation, the page for Java registration appears. Do I have to register Java?
No, it is optional. You can just close the registration page.
3 How can I check which version of Java is installed on my PC?
Open the Verify Java Version page and click the Verify Java Version button.
In a few seconds a new page appears where you will find the message similar to the following one: Your Java version: Version 6 Update 26.
4 How can I see the error message in the Tomcat console that appears when I start Tomcat? The error screen disappears too quickly.
Proceed as follows: 1. Click Start > Run.
2. Browse to the <TOMCAT_HOME>\bin folder.