Oracle Database
78-0607B MFG/PRO eB2.1 SP3 and higher September 2005
subject to change without notice.
QAD Inc. provides this material as is and makes no warranty of any kind, expressed or implied, including, but not limited to, the implied warranties of merchantability and fitness for a particular purpose. QAD Inc. shall not be liable for errors contained herein or for incidental or consequential damages (including lost profits) in connection with the furnishing, performance, or use of this material whether based on warranty, contract, or other legal theory.
QAD and MFG/PRO are registered trademarks of QAD Inc. The QAD logo is a trademark of QAD Inc.
Designations used by other companies to distinguish their products are often claimed as trademarks. In this document, the product names appear in initial capital or all capital letters. Contact the appropriate companies for more information regarding trademarks and
registration.
Copyright © 2005 by QAD Inc. QAD Inc. 6450 Via Real Carpinteria, California 93013 Phone (805) 684-6614 Fax (805) 684-1890 http://www.qad.com
About This Guide . . . 1
What Is in This Guide? . . . 2
Installation Checklists . . . 2
Audience . . . 2
Installation Documentation . . . 3
Related MFG/PRO Installation Documentation . . . 3
Additional Web Resources . . . 3
Document Conventions . . . 4
UNIX and Windows Installations . . . 4
QAD Services and Support . . . 4
QAD Consulting and Technical Services . . . 4
QAD Support . . . 5
Chapter 1
Planning an MFG/PRO Oracle Installation . . . 7
Planning an Installation . . . 8
Security Plan . . . 9
Service Pack Installs . . . 9
DataSynchronization Users . . . 10
Deployment . . . 10
Database Server Installation . . . 12
File Server Installation . . . 13
Remote Client Installation . . . 14
Installation Utilities . . . 15
OID Generator Codes . . . 18
Installing Multiple Languages . . . 18
Installing Shared and Compatible Code Page Languages . . . 19
Install a Single, Non-US English Language . . . 21
Edit MFG/UTIL for Multiple Languages . . . 22
Client CD Contents . . . 24
Installation Summary . . . 24
Chapter 2
System Requirements . . . 25
General Requirements . . . 26 Database Server . . . 26 Hardware Requirements . . . 26 Operating Systems . . . 27 Software Prerequisites . . . 27 File Server . . . 28 Hardware Requirements . . . 28 Software Prerequisites . . . 28 Remote Clients . . . 28 Hardware Requirements . . . 28 Software Prerequisites . . . 29 Network . . . 29
Chapter 3
Database Server Install . . . 31
Preliminary Steps . . . 32
Oracle Installation . . . 32
Rebuild the Progress Executable on UNIX . . . 33
Setup for Non-Western European Languages . . . 33
Windows Installation Setup (Windows Only) . . . 33
Create the Installation User and Group (UNIX Only) . . . 34
Permissions . . . 35
Modify the Services File (Optional) . . . 35
Installing Server Files . . . 36
Load Tape Media (UNIX Only) . . . 36
Installation Directory . . . 37
Install Database Server Files . . . 37
Install Language Files . . . 39
Modify mfgutpro.ini File (Single Non-US English Only) . . . 40
Modify the Workflow .ini File . . . 40
Set Up MFG/UTIL Clients (Windows Only) . . . 41
Modify mfgutil.ini . . . 42
Creating the Oracle Database . . . 42
Copy MFG/PRO Files to Oracle . . . 42
Create the Oracle Databases . . . 43
Run SQL Scripts to Load Schema . . . 49
Creating the Schema Holders . . . 50
Build the Schema Holders . . . 50
Load MFG/PRO Schema . . . 53
Truncate Before-Image Files . . . 55
Specify the Database OID Values . . . 56
Load System Data . . . 57
Truncate Before-Image Files . . . 60
Copy the Schema Holders . . . 60
Copy Empty Schema Holders (Multi-Language Only) . . . 62
Load Translated Labels (Multi-Language Only) . . . 63
Load Source Code System Cross-Reference (Optional) . . . 64
Chapter 4
File Server and Host Client Installs . . . 65
Overview . . . 66
Preliminary Steps . . . 66
Installing UNIX Host Clients . . . 67
Additional UNIX Clients . . . 68
Installing Windows File Servers . . . 68
Preliminary Steps . . . 68
Installation Steps . . . 69
Building the Progress Schema Holder . . . 70
Setting Up Remote Clients . . . 73
Preliminary Steps . . . 73
Installation Steps . . . 74
Create Locales . . . 75
Chapter 5
Database Setup and Application Compile. . . 77
Configuring Database Sets . . . 78
Database Set Configuration Screen . . . 78
Set Up Database Sets . . . 79
Compiling Application Code . . . 83
Non-US English Base Language Compiles . . . 84
Multiple Language Compiles . . . 84
Set the Correct PROPATH . . . 84
Multithreaded Compiles . . . 85
Compile MFG/PRO . . . 86
Generating Scripts and Shortcuts . . . 91
Edit UNIX Scripts . . . 94
Create Language-Specific Windows Shortcuts . . . 94
Modify Windows Startup Parameters . . . 95
Test the Client Installation . . . 96
Express Setup for Remote Clients . . . 96
Setup Prerequisites for Remote Clients . . . 97
Use Express Setup . . . 97
Change Express Setup Settings . . . 98
Progress Initialization File . . . 98
Initialization File Entries . . . 99
Chapter 6
Setting Up MFG/PRO . . . 101
Starting and Registering MFG/PRO . . . 102
Register MFG/PRO . . . 102
Load Online Help . . . 103
Test the Language Installation . . . 104
Backing Up the Database . . . 106
Next Steps . . . 106
Chapter 7
Installing Additional Databases . . . 109
Summary . . . 110
Recommended Configuration . . . 110
Additional Configuration . . . 111
Creating Schema Holders . . . 113
Copy the Empty Schema Holder . . . 113
Changing the Database Owner . . . 114
Modifying SQL Scripts . . . 115
Modify the MFG/PRO Schema Scripts . . . 115
Modify the MFG/PRO Database Build Script . . . 117
Running SQL Scripts . . . 119
Loading MFG/PRO Data . . . 119
Database-Specific Data . . . 119
Running Index SQL Scripts . . . 119
Configuring Database Sets . . . 120
Generating Startup Scripts . . . 120
Setting Up Windows Clients . . . 120
Chapter 8
Additional Setup. . . 121
Modifying the Oracle Database . . . 122
Migrating a Custom Progress Database to Oracle . . . 122
Changing Installation Script Commands . . . 124
Using the Sequence Synonym Script . . . 125
Changing the Client PROPATH . . . 126
Verifying SQL Scripts . . . 127
Identifying Unexpected Errors . . . 127
Resolving Oracle Error ORA-12805 . . . 128
Appendix A Installation Checklists . . . 129
Standard US English Installation . . . 130
Single Non-US English Installations . . . 139
Multi-Language Installations . . . 146
Glossary . . . 153
What Is in This Guide? 2
Installation Documentation 3
Document Conventions 4
What Is in This Guide?
The instructions in this guide cover how to:• Install MFG/PRO on Oracle on UNIX or Windows servers. • Install the MFG/PRO character client software.
• Install the MFG/PRO Windows client software.
• Configure a standard MFG/PRO environment including character and GUI clients.
This installation covers the current service pack level of eB2.1. If you are installing only the service pack to upgrade an existing environment, use only Installation Guide: MFG/PRO eB2.1 Service Pack X, where X is the latest service pack level. The guide ships with the service pack CD. Use this guide to install production databases, as well as training, demonstration, and other MFG/PRO databases. It also enables you to install these databases with one or more user languages.
Installation Checklists
¶See Appendix A,“Installation Checklists,” on page 129.
For advanced users, or for less experienced users who want to track their progress on the installation, this guide includes an appendix that contains checklists for:
• Standard US English installation • Client installations
• Single non-US English language installation • Multiple-language installation
These checklists provide the sequence, the tool set required, the default or recommended values if applicable, and the page reference for the more detailed description of the steps in the guide.
Audience
These instructions are for the MFG/PRO system administrator who is installing the MFG/PRO database and is familiar with UNIX operating systems, Oracle database environments, Microsoft Windows, Progress software, and networking as needed for the planned installation.
Installation Documentation
This document is available on the QAD ServiceLinQ Web site:
http://support.qad.com/
Before you start the installation, make sure you have the most recent version of this document.
This document supports the installation of the following CDs: • Database server
• Database server language files • Character client
• GUI client
Note CD item numbers are dependent on your purchased configuration. If you are doing this install as part of a conversion, you should also have the latest MFG/PRO eB2.1 Conversion Guide: Oracle Database.
Related MFG/PRO Installation Documentation
The MFG/PRO on Oracle installation creates your production and support databases, and any training, development, or pilot databases you need.
• To install QAD Desktop, see Installation Guide: QAD Desktop. • To install QXtend Inbound, see Technical Reference: QXtend
Inbound.
• To install QXtend Outbound, see Technical Reference: QXtend Outbound.
For a full list of other documentation see the QAD ServiceLinQ site.
Additional Web Resources
For Progress problems, use the Progress Knowledge Center accessed from their support Web site:
http://www.progress.com/support/index.ssp
For OS-related problems, use standard vendor support, or use other search engines on the Web.
Document Conventions
This guide uses the conventions listed in the following table.
UNIX and Windows Installations
This document supports the installation of MFG/PRO on both UNIX and Windows platforms. The instructions use character screens and UNIX file and path conventions. In the few places where the two sets of instructions diverge, the headings and text state explicitly which operating system is the focus of the current set of instructions.
QAD Services and Support
During your implementation of QAD products, you should be aware of available service and support offerings.
QAD Consulting and Technical Services
MFG/PRO installations have a wide variety of configuration possibilities, are highly scalable, and are easily customized. While this guide provides basic installation information, it cannot consider every possible
computing environment or configuration.
If you see: It means:
monospaced text A command, file name, or path. italicized
monospaced text
A variable name for a value you enter as part of an operating system command; for example, cdrom. indented
command line
A long command that you enter as one line although it appears in the text as two lines.
Note Exceptions or special conditions.
Important Critical information.
Warning Situations where you can overwrite or corrupt data, unless you follow the instructions.
To take full advantage of MFG/PRO’s flexibility and potential in your specific environment, QAD offers Consulting and Technical Services specializing in installations and customizations. These offerings include performance enhancements as well as technical and administration training. For more information, contact your nearest QAD office or go to:
http://www.qad.com/services/
QAD Support
Before beginning an installation, it is recommended that you contact QAD Support to notify them of your plans, schedule, and if you will have a consultant onsite to assist in the process. Be sure to identify who the consultant is, and how they can be reached. QAD Support provides a number of online resources to help you find answers to your questions and avoid problems beforehand. These include, but are not limited to, the following:
• QAD Knowledgebase • QAD Learning Portal • Customer Advisories • Platform Availability Guide • QVillage Discussion Forums
Go to QAD ServiceLinQ to access the full array of online Support resources at:
Planning an MFG/PRO
Oracle Installation
This chapter presents basic topics that you should understand before beginning an MFG/PRO on Oracle installation or conversion.Planning an Installation 8
Installing Multiple Languages 19
Important If you have experience installing MFG/PRO from previous versions, numerous significant changes have occurred to streamline the process. Review this chapter prior to starting the install and read the instructions.
Planning an Installation
There are three types of installation:• A new installation
• A new installation including a service pack
• An installation to support a conversion from an earlier MFG/PRO version to the current release
If you are migrating from an earlier version of MFG/PRO, start your planning with the MFG/PRO eB2.1 Conversion Guide: Oracle Database. The installation steps covered in this guide are treated as a step within the larger conversion process. Starting with eB2.1, there are several changes to the conversions, including the introduction of an in-place conversion option. The steps you complete to install your new MFG/PRO version in this guide depend on which conversion method you choose to follow. This guide provides instructions for installing the core databases on the server, the UNIX host client, and remote Windows clients.
Tip
For new terms see “Glossary” on page 153.
For the installation component of both new installs and conversions, you must plan for the following:
• An installation addressing:
• Pilot and production databases • Training databases
• A development database
• The languages you are implementing
• Configuration of side tables including MFG/PRO administration and help databases, as well as custom and other side databases
• The resulting network, disk, and client layouts
Note The Enhanced Controls module, available for MFG/PRO on Progress implementations, is not yet available for MFG/PRO on Oracle implementations. However, an audit schema holder is required to support compiles.
Security Plan
¶See the “Users and Security” chapter in User Guide:
MFG/PRO eB2.1 New Features. A successful MFG/PRO installation includes a complete security plan.
During an installation or conversion, full permissions are required for system and application tools that can be used to load, edit, or delete data. In addition, an installation results in at least one user, mfg, with full administrative access to MFG/PRO. For these reasons, a security plan is essential. The basic components of a security plan are:
• Operating-system-level security for intrusive tools such as: • Oracle tools
• Progress tools • QAD MFG/UTIL
• Operating-system log-in security
• Operating-system permissions and ownership set appropriately for: • Database files
• Before-image and after-image files • Log files
• Application source and compiled source files • Application startup and shutdown scripts • Log-in security for MFG/PRO
• Domain security for MFG/PRO
• Specific MFG/PRO security features such as menus, fields, and sites A security plan should address the tasks of the initial administrative user in setting up valid users and securing MFG/PRO by user and group prior to giving users access to the application.
Service Pack Installs
If you are installing or converting from a prior release of MFG/PRO to eB2.1 with a service pack, this guide covers all steps. If you are installing a service pack for an existing eB2.1 installation, use the instructions shipped with the service pack.
DataSynchronization Users
With eB2.1, DataSync no longer requires a separate installation; the DataSync database has been merged with the main MFG/PRO database.
Deployment
You can install MFG/PRO eB2.1 on UNIX or Windows servers with character or GUI clients, or a mix of these. MFG/PRO consists of three distinct components:
• A database server • A file server • Remote clients Database Server
The database server consists of the MFG/PRO databases. You build these databases as part of the installation. Clients connect to these databases directly or through a file server.
File Server
The file server is the location of the MFG/PRO source code, compiled specifically for this machine. The resulting .r code is run by the connected clients.
If the file server is a UNIX machine, shown as the host client connecting to the database server in Figure 1.1, then additional UNIX character clients can connect to MFG/PRO on this machine using telnet startup scripts generated for the host client.
If the file server is a Windows machine using character or GUI clients as in Figure 1.2, or if you want to run GUI clients against a UNIX file server as in Figure 1.1, a remote client setup is required for each client PC.
Fig. 1.1 UNIX Deployment Remote Clients ¶For more information, see “Installation Utilities” on page 16. A remote client setup is required for all GUI clients and for all character
clients connecting to a Windows file server. The remote client setup creates a copy of MFG/UTIL on the client PC. You then run MFG/UTIL on the client, connected to the file server, to generate local startup scripts. The resulting client runs source code on the file server and accesses the databases on the database server.
Fig. 1.2 Windows Deployment Database Server Database Server Remote Char. Client Remote GUI Client Windows Character File Server Windows Character File Server Remote Char. Client Remote GUI Client
Host client Remote telnet character client Remote telnet character client UNIX Deployment Database Server Database Server Remote GUI Client Remote GUI Client GUI File Server GUI File Server Remote GUI Client Remote GUI Client Host client Windows Deployment Remote Char. Client Remote Char. Client Character File Server Character File Server Remote Char. Client Remote Char. Client Host client
Database Server Installation
Working MFG/PRO databases on Oracle are created in two stages. First, create a Progress schema holder database. Then create the Oracle database and use the schema holder to load the schema and data into the Oracle database.
Create the Schema Holder
The schema holder is a Progress database that consists only of a metaschema. The metaschema is the data structure—a description of tables and fields, indexes, triggers, and database-level validations—that MFG/PRO uses to connect with an Oracle database.
The installation process creates empty Progress schema holder databases, and then loads the MFG/PRO schema into them. In Progress installations, four separate databases are created and connected simultaneously: the main or production database, the admin database, the audit database, and the help database. On Oracle, the main, admin, and help databases are combined into a single instance. For this database, you perform three separate schema loads to load all three database schemas into a single schema holder. The audit database schema is only required for compiles. Create the Oracle Database
The Oracle database is created using QAD-provided templates. These templates are used in conjunction with the Oracle Database Configuration Assistant (ODCA), which lets you tailor tablespaces and other parameters prior to the creation step.
One of the most important requirements of an MFG/PRO on Oracle installation is the laying out of the database on multiple disks on the server. If you are doing a conversion, this process is easier since you have the existing database for comparison. However, if this is a first-time install of MFG/PRO on Oracle, you will need to make some educated guesses about laying out your tablespaces across disks and setting the sizes of those tablespaces.
Oracle installations typically install multiple database instances to support demo, development, training, and production requirements. You create a separate schema holder and Oracle database instance for each.
Load Default Data
Once your databases are created, you load default MFG/PRO data into them. The data is separated into independent and language-dependent data, as well as into standard manufacturing data and
administration data. Perform the load of the language-dependent data for each language you plan to implement.
¶See “Installing Additional Databases” on page 109 for additional information. The main databases you load data into are:
mfgprod. This is your production Oracle database. The database name can be anything. In this guide the name of the database is eb21ora. mfgdemo. Optional. This is your conference-room pilot database. QAD supplies working data for mfgdemo that you can use to support a pilot or for development testing.
mfgtrain. QAD supplies data for this database specifically designed to support MFG/PRO training materials and scenarios.
seattle, chicago, newyork. These databases are used for multi-site implementation training. Like mfgtrain, they have their own data
and you need as many copies as you have students in the training sessions.
Copy the Schema Holder
For each empty schema holder you create, once the data is loaded, you create a new schema holder that references the new Oracle database. This leaves the empty schema holders for compiles and as backups to create future copies of the schema holders if needed.
File Server Installation
The file server is often installed on the same machine as the database server, though this is not required. The creation of a file server consists of the following steps:
• Install MFG/PRO source code. • Install host client code.
• Compile the source code.
• Generate startup scripts for the host client (and for remote UNIX clients).
The file server is either a character server or a GUI server or both. You install the character file server from the character client CD and the GUI file server from the GUI client CD. If you plan to use both types of clients, both file servers are required.
Database Sets
Database sets are the group of databases launched by a startup script or stopped by a shutdown script from a client machine. On Oracle, database sets consist of the Oracle database and the Progress schema holders. These databases are included in database sets, and startup and shutdown scripts are generated for each. You define database sets as part of the installation. The typical sets are:
• TrainN (one for each student) • Development or Demo • Production
• Compile
Important One connected empty audit schema holder is required during compiles for all installations, even though Enhanced Controls is not being used. Standard MFG/PRO code references tables in the audit schema. Once you have created the database sets, you generate the startup and shutdown scripts that launch or stop the databases within each set.
Remote Client Installation
Installing remote clients for Windows character or GUI clients requires that you have first installed a file server for the specific interface— character or GUI. You then install remote clients by connecting to that file server and running the client installation routine on the remote machine.
Online Help
The help database is loaded after the client install. You can add custom help to the database using Field Help Maintenance (36.4.13). Data is shipped translated when you order additional languages. Help is accessible on GUI, character, and Desktop clients.
Network, Disk, and Client Layout
At the machine level, QAD recommends deployment of MFG/PRO on Oracle on a single database server with the character client installed on the main server for administration and batch processes. On UNIX, this character client supports additional terminal connections to the database. If you are planning to use Windows clients—GUI or character—QAD recommends that you install the appropriate client files on a file server separate from the database server.
Additional databases—training, development, demonstration—require less overhead if they share the Oracle instance created for your production MFG/PRO on Oracle database.
Installation Utilities
A large portion of the installation is managed by a QAD utility called MFG/UTIL. This product can be used for numerous database
management tasks. For the installation, several of these tasks are scripted together to guide you through the installation steps.
Guided Setup
The entire installation process is semi-automated by a Guided Setup within MFG/UTIL. Guided Setup uses initialization files to control which install steps are followed in what order. The files step you through the creation of the schema holder, the creation and running of the SQL scripts, the data loads, and the compile.
This installation guide follows the installation method defined by the Guided Setup initialization files:
• Database server—wk0200.ini
• Character client—wk0400.ini
• Windows clients—wk0410.ini
MFG/UTIL keeps track of where you are in the steps so that you can leave the installation and restart later. Text tokens for each group of steps are written to the initialization files to create this status: Not Run, Started, Error, and Done.
Important If you need to rerun the last set of steps from the beginning, the Guided Setup may not let you return to the initial entry screen to reenter setup data. In this case, use a text editor to change the Status token back to Not Run for that set of steps in the initialization file.
Editing Workflow .ini Files for US English Installs
You will probably need to edit the Guided Setup production database workflow, wk0200.ini. For each installation, review the workflow file and determine which databases you are implementing. The default
wk0200.ini creates the empty and production schema holders.
¶See the MFG/PRO eB2.1 Conversion Guide: Oracle Database for details.
For example, if you are converting an existing MFG/PRO database using the buffer-copy method, you must comment out the two data loads and the OID generator code load program for the production database in
wk0200.ini as shown in the example. Use the semicolon (;) to comment
lines out.
;Enter OID Seed Value [GetOID] Status=Not Run Program=menuoid.p ; ;[OIDSeed] ;Status=Not Run ;Program=oidseed.p ;DBName=./db/oraempty.db ;LDBName=mfgprod ; ;[SysLoadDataOID] ;Status=Not Run ;Program=oidloadd.p ;DataDir=./us/mfg ;DBName=./db/oraempty.db ;LDBName=mfgprod
; ;[SysLoadDataOID] ;Status=Not Run ;Program=oidloadd.p ;LDBName=mfgprod ;DataDir=./mfg ;DBName=./db/oraempty.db ; [SysLoadDataOID] Status=Not Run Program=oidloadd.p LDBName=mfgprod DataDir=./us/admin DBName=./db/oraempty.db
Note You do not need to edit the Guided Setup initialization files specifically for Windows installations. MFG/UTIL translates the UNIX path statements (./db) to Windows paths (c:\mfgsvr\db). This is true
for both .ini files and structure files (.st). MFG/UTIL Keyboard Commands
Keyboard commands for MFG/UTIL are listed in Table 1.1.
Table 1.1 MFG/UTIL Character Interface Commands
Note In the character interface, buttons appear within angle brackets:
<OK>. To choose a button, Tab to the button and press Enter.
Keyboard Entry Command Name Description
F1 Go Moves to next frame or runs a program F2 Help Displays context-sensitive help (may not be
available for all functions) F3 Menu Bar Accesses the menu bar
F4 End Exits a frame, program, or menu Spacebar Select Selects check boxes and on/off options Enter or Tab Tab Moves to next field or command Shift+Tab or
Control+U
OID Generator Codes
During a standard MFG/PRO eB2.1 installation, you must specify an OID generator code for each database. This code is used to create values that uniquely identify database records. If you are performing a conversion, the OID code is specified during the conversion process.
Note Currently, only some records take advantage of this new feature. However, it will be used more extensively in future QAD development. You can choose any numeric code you want. The OID generator code you enter is used by MFG/PRO as the registration ID of the full OID value written to database records as they are created. The generator code is stored and displayed in Database Control (36.24) in MFG/PRO and can be modified later, if necessary.
Once the OID generator code has been specified, OID fields in the database are populated using an algorithm that ensures uniqueness across all records, tables, and databases within the company. The value stored in the OID field for each record has the following decimal format:
<date><seq_value>.<registration_id> Where:
<date> is the server date with format yyyymmdd.
<seq_value> is obtained from a Progress database sequence.
<registration_id> identifies the origin of the OID value.
The registration ID is derived from the OID generator code by reversing the digits of the generator code.
Installing Multiple Languages
All installs, including English-only installs, are language specific. You receive media for your database server and client installs, as well as separate media for each language you are implementing.
To create a US English-only install, no special steps are required. To create a single-language install that is not US English, you load your base language data, as well as a set of translated schema definitions. You then set your compile destination and client scripts to point to the language-specific directories.
To support multiple languages, you create a schema holder for each language, loading each with translated schema definitions. You then compile each language separately against these schema holders, setting the compile destination to point to the language-specific directory. You create one set of production schema holders from the empty ones and load the language-specific data files for each language you are implementing into them.
The steps you follow are documented in this guide. See the following checklists for a summary of steps:
• “Single Non-US English Installations” on page 139 • “Multi-Language Installations” on page 146
Installing Shared and Compatible Code Page Languages
If all the languages you are implementing share the same code page—for example, English, French, German, Spanish that share the ISO-8859-1 code page, or Russian, Ukranian, and Romanian that share theISO-1251-1 code page—no special install steps are required.
If you are installing multiple languages with a compatible code page, such as non-Western European languages like Japanese or Chinese and US English, you must first follow the instructions in the Progress
documentation for setting up Progress for a non-Western European language. Then the steps in this guide apply.
If you are installing a double-byte language such as Korean or Chinese, always install the double-byte language media before installing any other languages.
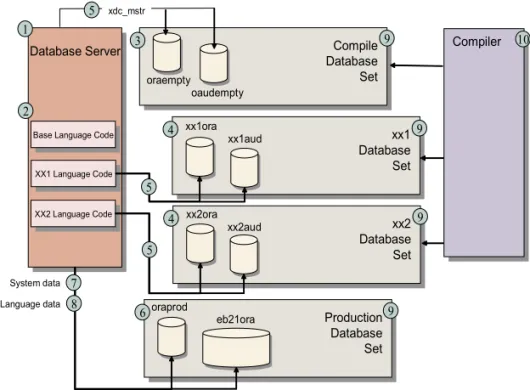
Figure 1.3 provides a graphic overview of a multi-language install. The numbered steps are described following the graphic.
Fig. 1.3
Multiple Language Installation Stages
Note The header record for oraempty.df uses the ISO8859-1 codepage. If this is not the correct codepage for the target install language, edit the oraempty.df codepage before loading the file. A general overview of the required steps is as follows:
1 Install the MFG/PRO database server. 2 Install language media for each language.
3 Create empty schema holders (oraempty and oaudempty). 4 Copy the empty schema holders for each language-specific schema
holder (XX1ora, XX1aud, XX2ora, XX2aud, and so forth, where XX1
is the language code).
5 Load translated labels (xdc_mstr.d) into each language-specific schema holder. If you are not implementing US English, load the base language xdc_mstr. oraempty Database Server Database Server 1 2 3 9 XX1 Language Code XX1 Language Code XX2 Language Code XX2 Language Code
Base Language Code
Base Language Code
oaudempty Compile Database Set xx1ora 4 xx1aud xx1 Database Set xx2ora 4 xx2aud xx2 Database Set oraprod 6 eb21ora Production Database Set 7 8 9 9 9 System data Language data Compiler 10 5 5 xdc_mstr 5
6 Create the production schema holder and database (oraprod and
eb21ora).
7 Load system data into the production database.
8 Load language-specific data for each language into the production database.
9 Create database sets and generate scripts.You will need a compile database set pointing to the language-specific empty schema holders for each language.
10 Compile each language against a language-specific empty database set.
11 Install clients.
12 Generate client scripts and edit for language specifics.
Note Each user can have a separate client script that sets language-specific components such as date format. Then in MFG/PRO, each user’s default language for menus, messages, and labels is set in User Maintenance (36.3.1).
Install a Single, Non-US English Language
The following are the steps to create a single-language installation that is not a US English installation. This scenario assumes that you have installed a version of Progress in the same language. A general overview of the required steps is as follows:
1 Install the MFG/PRO database server. 2 Install the language media.
3 Create the empty MFG/PRO schema holder.
4 Load translated schema labels (xdc_mstr.d) into the empty schema
holder.
5 Create the production schema holder and database. 6 Load system data into the production database.
8 Create database sets and generate scripts. You will need a compile database set pointing to the language-specific empty databases for each language.
9 Compile against the empty compile database sets. 10 Create database sets and generate scripts.
11 Install clients.
12 Generate client scripts and edit for language specifics.
Edit MFG/UTIL for Multiple Languages
Not all steps in a multiple-language installation can be added to a workflow. The copy of empty databases and the subsequent load of translated schema labels is best accomplished using Progress and MFG/UTIL tools. You can, however, incorporate the language-specific data loads to the eb21ora database.
To add languages to wk0200.ini, which loads the language-specific data into the production database, search for all instances of the base language (/us) and copy the section where it is found. There will be two in the original: one for /us/mfg, and one for /us/admin.
Paste the section below the copied section and modify the base language abbreviation to reflect the correct language abbreviation for the additional language. Figure 1.4 shows the addition of a French data load to a US English base.
Fig. 1.4
Language-Specific Load
The only change to the copied section is the change from /us to /fr. Add a section for each language you are implementing for the production database and the administration database.
Loading Translated Labels Using a Workflow
If you want to load translated labels (xdc_mstr) in the database creation workflow, you can add the following step into wk0200.ini for the
mfgempty and oaudempty schema holders. A French load would look
like the following:
[LoadXlat] Status=Not Run Program=rapldlbl.p DBName=./db/mfgempty.db Language=fr [LoadXlat] Status=Not Run Program=rapldlbl.p DBName=./db/oaudempty.db Language=fr [LoadData] Status=Not Run Program=raploadd.p DataDir=./us/mfg DBName=./db/oraempty.db LDBName= ; [LoadData] Status=Not Run Program=raploadd.p DataDir=./fr/mfg DBName=./db/oraempty.db LDBName= ; [LoadData] Status=Not Run Program=raploadd.p DataDir=./mfg DBName=./db/oraempty.db LDBName= ;
Client CD Contents
Each customer receives a printed Release Media Report as part of the product shipment. This is an important document. It is not available on the release media, so locate this and store it in a safe location.
The Release Media Report lists the MFG/PRO modules you are licensed to run. If you ordered source code for a module, an X appears under Src. On the release media are files with an .lst extension under the
mfgpro/dist/lst directory. These list the individual programs that are
licensed within each module. For example, valid Purchase Order module programs are listed in po.lst. The installation process places these lists
on your disk under MFGPROInstallDir/dist/lst.
The .rp files contain a list of reports and inquiries for each module. The iv.lst file is a listing of shared include files.
If you attempt to run a program and get a message that says you are not licensed to run it, first check your Release Media Report to make sure the module is licensed. Then check the module list to make sure the program is in the module you expect it to be in.
Installation Summary
For a full checklist of the installation process, see “Installation Checklists” on page 129.
System Requirements
An MFG/PRO installation requires planning for adequate system resources. This chapter provides system requirements and software prerequisites for database server, file server, clients, and the network.General Requirements 26
Database Server 26
File Server 28
Remote Clients 28
An MFG/PRO on Oracle system consists of a database server, a character client, optionally a file server (for remote Windows clients), and remote clients with an adequate network. For requirements for QAD Desktop, see
Installation Guide: QAD Desktop.
General Requirements
The system administrator must be a certified Oracle database
administrator with at least 1 to 2 years of experience, and must know how to manage Progress client processes.
Before installing MFG/PRO, both Oracle and Progress must be installed following the installation guides for both products. Oracle has an install guide for each platform that may include UNIX kernel changes and patches.
Database Server
The database server contains MFG/PRO and Progress server software, as well as your production data in the Oracle database. You should estimate the eventual size of your production database and the demands placed on different components of the database prior to starting an installation so that you can lay out your disks appropriately.
Hardware Requirements
• 3 GB of free disk space (includes Oracle, Progress, and MFG/PRO). This may be lower or higher depending on the Oracle installation type selected. Refer to the Oracle installation guides for additional memory and system requirements.
• 700 MB for each additional language
• 100 MB of temporary space if installing from tape
• Approximately 10 GB disk space spread across three or more disks for data structures. This is an estimate based on a 5 to 7 GB production database.
• High-speed 100 mbps network card. • ISO9660 CD-ROM or tape drive.
• 2 disk controller channels (minimum).
• 200 system file handles per simultaneous MFG/PRO process.
Operating Systems
• HPUX 11i 32- and 64-bit; HPUX 11.0 32-bit • AIX 5.1 and 5.2
• Solaris 7; Solaris 8 32- and 64-bit
• Red Hat Linux 7.2–8.0; Red Hat Linux Advanced Server 2.1 • SuSe Linux Enterprise Server 8.0
• Compaq Tru64 5.1A
• Microsoft Windows Win2003, Win2000, XP, NT 4.0
Software Prerequisites
• Operating system patches. Check both the Oracle Installation Guide
and the Progress Product Availability Guide for required OS patches. • Oracle Version 9iR2 (9.2.0.1.0 and higher), 10gR1 (10.1.0.4.0), and
10gR2. Complete a full installation.
• For your Oracle installation, use the Cost Based Optimizer and turn Statistics on. See your Oracle documentation or refer to
http://docs.oracle.com/ for further information. • Progress OE10B02 + 03 DataServer patch from Progress. • Progress OE10B02 DataServer for Oracle.
Important On the required Progress products, select a Complete installation, not Typical or Custom.
• In a multi-language installation, Progress language-specific releases for each language.
• Optionally, a Web browser (Netscape or Internet Explorer) to view MFG/UTIL help files in HTML format and to access online support.
File Server
The file server requirements cover shared Windows remote client requirements, implemented on a separate server.
Hardware Requirements
• 1 GB of free disk space (includes Progress and MFG/PRO) • 700 MB for each additional language
Software Prerequisites
• Operating system patches• Progress OE10B02 Query Results • Progress patches
• Progress OE10B02 DataServer license on Windows, depending upon configuration
• Oracle Client Software (requires about 600 MB) to connect via Oracle NetServices
Remote Clients
The requirements for remote client PCs assume that all shared files are on a file server.
Hardware Requirements
• 10 MB of disk space• 600 MHz or faster Intel Pentium (or compatible) processor • 128 MB of RAM
• Super VGA video
• 1 GB or larger hard drive for future data storage • 100 Mbps network card
Software Prerequisites
• Microsoft Windows Win2003, Win2000, XP, NT 4.0, 98 and/or current UNIX server software
• MFG/PRO client media • Progress OE10B02 software:
• Query/Results (one Query license per client required) • Client Networking
• Optionally, a Web browser (Netscape or Internet Explorer) to view MFG/UTIL help files in HTML format and to access online support resources
Network
¶See the Progress Networking Guide. Set up your network to support Progress specifications. Minimum
requirements from the MFG/PRO standpoint are: • 10 Megabit (Mb) Ethernet or faster network
Database
Server Install
Use this chapter to load the MFG/PRO eB2.1 database server media, create the MFG/PRO and audit database schema holders and SQL scripts, generate the Oracle databases, and load system data. The audit database schema holder is required for all customers in order to compile the code. If you are not using the optional Enhanced Controls module, you do not need to create the Oracle audit database.¶See “Installing Windows File Servers” on page 68 for instructions.
Note While setting up the database server, you can simultaneously load the MFG/PRO remote GUI or character client media onto the file server—provided it is a separate machine.
Preliminary Steps 32
Installing Server Files 36
Creating the Oracle Database 42
Run SQL Scripts to Load Schema 49
Preliminary Steps
Prior to install, review the following cautions and requirements: • Install the latest operating system patches.
• For multi-language installations on Windows and SunOS, load any OS-specific language files to support multi-language character displays. Other operating systems may have similar requirements; check with your operating system vendor.
• Set your $TERM variable to a standard terminal type such as vt100 or vt200 while installing MFG/PRO. You can switch to a language-specific terminal if necessary when you launch the clients. • Make sure Progress and the latest Progress patches are installed. • Change to the Korn shell.
• Determine the following information:
• The directory where you want to install the MFG/PRO database server files, referred to as MFGPROInstallDir
• The Progress directory
• The host name for the database server
Oracle Installation
During your Oracle installation, make sure you complete the following: • Install the Enterprise Edition.
• Do not create a starter database.
• Select the Use Database Control for Database Management option. • Use the File System storage option.
• The recommended password for the database schema is qad. • Use the Cost Based Optimizer and turn Statistics on.
Rebuild the Progress Executable on UNIX
Some UNIX and Linux platforms require a rebuild of the Progress executable in order to run under Oracle. For example, HP and AIX platforms require rebuilds. If you get Progress errors—typically error numbers 47, 48, or 49—when you attempt to connect to Oracle using
_progres, you will need to rebuild the executable.
If your platform does require a rebuild, refer to the “Requirements for Building the DataServer Executables” in the Progress OpenEdge 10
DataServer for Oracle Guide.
Setup for Non-Western European Languages
If you are installing non-Western European languages:• Back up the startup.pf and empty.db files in the Progress
directory.
• From the appropriate Progress language-code directory, copy the following files to the top-level Progress directory:
• The parameter file (extension .pf) corresponding to the language
you are installing
• The empty database file (empty.db) and associated files
• Edit the following startup.pf values to reflect your base language:
-cpinternal ISO8859-1 -cpstream ISO8859-1 -d mdy
-numsep 44 -numdec 46
See the Progress Internationalization Guide for details.
Windows Installation Setup (Windows Only)
If you are installing on Windows clients, you will need to set up the Windows server as an application server.
1 Choose Start|Settings|Control Panel.
2 Double-click Network and Dial-Up Connections. 3 Right-click Local Area Connection and click Properties.
4 Click File and Print Sharing for Microsoft Networks, then click Properties.
5 Click Maximize Throughput for Network Applications and click OK.
Create the Installation User and Group (UNIX Only)
MFG/PRO installations on UNIX require a group called qad and a user
called mfg on the database server. All MFG/PRO installation and maintenance programs store pertinent information under the mfg user
home directory. This enables QAD scripts to find data about installed products automatically and reliably and lets you maintain your system without logging on as root.
• Create a group called qad with a group ID (gid) of 65535 with your
UNIX system administration utility. (65535 is the user ID of the files on MFG/PRO media.)
• Create a user called mfg, with a user ID of 65535.
• Assign the Korn shell to this user. All of the scripts delivered on QAD media use Korn shell (ksh) syntax.
• For the mfg user, set the $HOME environment to a user directory
where working and temporary files can be written.
• Assign the standard umask of 022 to set permissions and security. • Update the mfg user .profile to include ORACLE_HOME,
ORACLE_SID, DLC, and PATH variables. For example: ORACLE_HOME=/dr01/oracle/OraHome1;export ORACLE_HOME ORACLE_SID=eb21ora;export eb21ora
DLC=/dr01/progress/dlcOE10;export DLC
PATH=$PATH:$DLC/bin:$ORACLE_HOME/bin;export PATH
• Create directory cfg under the home directory of user mfg. This directory is mandatory for storing installation and configuration information. The cfg directory must have read, write, and access permissions (755) for the owner group and others.
Important You will need to switch to an Oracle system admin user such
Permissions
The MFG/PRO installation uses or creates several directories. If you choose to use the default directories and they do not exist at the time of the install, they are created automatically. This applies the ownership and appropriate permissions for the installation user (mfg). However, if you choose to create or use other directories outside of the installation process, make sure these are owned by mfg and have read and write permissions for mfg assigned.
Modify the Services File (Optional)
If you are implementing a client/server environment, you may want to tailor your services files. This is not a required step for Oracle since database service connections are maintained by Oracle without the
services file. If you add any new service names after installation, you
must modify your services file. All service names, host names, and
port numbers must match in the services files of each client and each database server on the network. The location of the UNIX services file
on the server is typically the /etc directory. On Windows it is located in: c:\winnt\system32\drivers\etc
Tip
The more users you expect to have, the more numbers you should leave open between port numbers. Add the names of your database services to your services file. Add one
for each main database and support database you plan to connect to. Limit the service name to 16 characters. You can use any unused port numbers. Table 3.1 shows example service names and port numbers for a
production database set.
Table 3.1 Services File Example
Service Name Port #/Protocol Comment
Installing Server Files
In this set of steps, you mount the Database Server media and copy the files to the server. Choose the steps for the media you received. For Windows servers, insert the CD and go to “Install Database Server Files” on page 37.
Mount the CD-ROM (UNIX only)
For Windows installs, just insert the CD in the CD-ROM drive. For UNIX installations, use the following instructions:
1 Log on as mfg.
2 Mount the CD-ROM. Example commands are listed in Table 3.2. Table 3.2
UNIX CD Drive Mount Commands
3 Continue with “Install Database Server Files” on page 37.
Load Tape Media (UNIX Only)
Load the tape media into a temporary directory, then extract the MFG/PRO files from there into a permanent install directory. All MFG/PRO tapes are written using a block size of 5120 bytes. 1 Log on as mfg.
2 Create a temporary directory.
Hardware Mount Command
Sun volcheck cdrom
HP /etc/mount -F cdfs /dev/dsk/YourCDDevice /cdrom Digital mount -r -o noversion -t cdfs
/dev/YourCDDevice /cdrom AIX smitty mountfs
Then select file system, directory, and file system type (cdrfs). Linux mount /dev/hdb /mnt/cdrom
Where /hdb could be hdc or hdd among other possibilities. All others Refer to your operating system documentation or vendor for
requirements to mount a CD-ROM. You may be able to type man mount to determine the correct command.
3 Load your tape into the appropriate server drive. 4 Change to the temporary installation directory:
cd TemporaryTapeDir
5 Enter the applicable load command from Table 3.3.
Table 3.3
UNIX Tape Extract Commands
6 Remove the tape and store it.
Installation Directory
Your selection of an installation directory for MFG/PRO can be important. If this is a new install, the easiest and simplest method to support is to accept the default. If this is a conversion from a previous version of MFG/PRO, install to a separate directory structure.
In addition, do not select a directory path that has spaces in it such as
C:\Program Files\mfgpro. Database scripts generated by
MFG/UTIL cannot locate a database in a path with spaces.
Install Database Server Files
Complete this section to install the MFG/PRO database server files on the server.
1 In UNIX, log on as user mfg under the group qad. For Windows, log in as a user with Administrator privileges.
2 On the CD, change to the directory containing the database server media. This is the temporary tape directory for tape installs. 3 Change to the install directory:
cd install
4 Launch the database server installation script in that directory: ./install.ksh
On this hardware... Enter this load command...
HP 9000/800 Series,
1/4" cartridge tcio -i /dev/rct/YourTapeDevice | cpio -iumvdBc All others cpio -iumvdBc < /dev/YourTapeDevice
For Windows, run install.exe from Run on the Start menu.
A welcome screen displays. Press Enter.
Welcome to QAD’s MFG/PRO eB2.1 Database Server installation. We are installing MFG/PRO eB2.1 Database Server for hpux. Press <Enter> to view license agreement.
5 Accept the MFG/PRO software license agreement. Press Ctrl+C to jump to the end of the agreement.
Do you accept all the terms of the preceding License Agreement?
If you choose no, the install will stop.
To install MFG/PRO eB2.1 Database Server, you must accept this agreement. (y/n)?
Default is n ->y
6 Accept the default or enter a different installation log files location. Later installs (language files, host client, and others) look in this location for installation information. If you enter a different location, make a note of it for later installations.
Please enter the location where the log file should be written.
Default is /users/mfg/instlog ->/users/mfg/instlog
On Windows the default location is c:\instlog.
The log directory is used to record information about this installation. That information is used during the installation of subsequent media. If you choose not to use the default location, remember the location that you choose so you can use the same location during installation of subsequent media.
7 Enter the Progress installation directory path or accept the default. The script verifies the location and version. Specify Yes to confirm. 8 Enter the path and directory where you want to install the MFG/PRO
database server files (MFGPROInstallDir). If this directory does not exist, it is created.
9 Respond Yes to the prompt, “Is this install for an Oracle dataserver?” 10 On Windows, you are prompted to enter the folder name for the
MFG/UTIL program icons. The default is MFG/PRO eB2.1 Database Server. Modify or accept the default, and press Enter.
11 Review the summary and confirm by entering y and pressing Enter.
By default, the installation log is written to c:\instlog on Windows and /users/mfg/instlog on UNIX.
12 Choose the Finish button and press Enter to begin copying the files. The log is written to /instlog/mfgdbsv.log.
Install Language Files
Complete these steps to install the MFG/PRO language files, which include the language-specific menu and message data files. This is a required step even if you are installing only one language.
The first language you install becomes the base language. This cannot be changed without a re-installation. If you are installing an MFG/PRO environment with multiple languages, you must repeat these language file installation steps for each language. Always install a double-byte
language first if you are installing any double-byte languages at all. The US language media is required for all installations, even if you are not implementing US English.
The language files for each language you purchased are installed in subdirectories below MFGPROInstallDir. The language subdirectories are identified by the two-letter MFG/PRO language code. For example, for US-English the subdirectory is /us.
1 For Windows, insert the language CD. For UNIX, load the language media on your system using the instructions appropriate to the type of media you have:
• For tape media, use “Load Tape Media (UNIX Only)” on page 36.
• For CD-ROMs, use “Mount the CD-ROM (UNIX only)” on page 36.
2 In UNIX, log on as user mfg under the group qad. For Windows, log in as a user with Administrator privileges.
3 On the CD, change to the directory containing the language media. For tape installs, this is the temporary tape directory.
4 Change to the install directory:
cd install
5 Launch the database server installation script in that directory: ./install.ksh
For Windows, run install.exe from Run on the Start menu.
The welcome screen displays. Press Enter to continue. 6 Accept the MFG/PRO software license agreement.
7 Enter the log file location from step 6 in “Install Database Server Files” on page 37. If you used the default, accept the default here. 8 Enter the Progress installation directory.
9 Enter the MFGPROInstallDir from step 8 in “Install Database
Server Files” on page 37.
10 Review the summary and confirm by entering y and pressing Enter.
The log is written to /instlog/mfglang.log.
If you are installing multiple MFG/PRO languages, repeat steps 1 to 10 for each language. If you are installing a single non-US English version, you must load the base language media and the US English language media.
Modify mfgutpro.ini File (Single Non-US English Only)
To use MFG/UTIL in a language other than English, openmfgutpro.ini from the MFGPROInstallDir and alter all instances of
/us with the two-letter code for the installed language.
Modify the Workflow .ini File
¶For more information, see “Guided Setup” on page 15.
The wk0200.ini file controls the MFG/PRO Guided Setup creation of
the MFG/PRO schema holders. Use a text editor to edit these files. Note For conversions, the workflow should need no additional
adjustments if you installed the new version of MFG/PRO into a separate directory structure.
• Change any path or database name references that do not match your intended installation.
• Add language-specific loads of schema labels as necessary for multi-language installs.
• Modify all paths to reflect the correct language. For example, if you are installing French as the base language, you would change all instances of /us to /fr.
• Add additional language loads. For example, if you are installing French, you would add data loads for both /fr/mfg and
/fr/admin. ¶See MFG/PRO eB2.1 Conversion Guide: Oracle Database for additional information. • For buffer copy conversions, comment out the following sections:
• [OIDSeed]
• [SysLoadDataOID] where DataDir=./us/mfg and ./mfg (two
instances)
• [TruncBI] where LBName=mfgprod.db
• For in-place conversions, comment out the same sections as for buffer copy conversions above, and in addition, comment out the
[CreateOraSH] section.
Set Up MFG/UTIL Clients (Windows Only)
If you are installing on a Windows machine, you must make some temporary settings to enable the tools and DOS windows to work correctly.
• The graphical interface does not perform some functions, such as compiling, at high screen resolutions. Reset your screen resolution to 800 x 600 prior to starting the graphical MFG/UTIL.
• The character interface requires resetting your DOS window layout. The symptoms of incorrect settings are deceptive; the screens do not refresh properly after tabbing through menu and button selections. To reset the DOS window for MFG/UTIL, complete the following steps: 1 Launch the character MFG/UTIL from the Start menu icon.
2 Right-click on the DOS window title bar and select Properties. 3 Select the Layout tab.
4 Set Screen Buffer Size Width to 80 and Height to 25 and select OK. 5 When you are prompted, select Modify Shortcut.
6 Restart MFG/UTIL to enable the change.
Reset these to the defaults (Width 80, Height 300) after you have
completed the Windows client installations to ensure adequate buffers for other applications.
Modify mfgutil.ini
After installing the MFG/PRO files to the server, modify the copy of
mfgutil.ini in the MFGPROInstallDir:
Startparms=-d mdy
Creating the Oracle Database
The first stage of database creation requires several steps outside of MFG/UTIL. You copy MFG/PRO source files into Oracle directories, and then run the Oracle Database Configuration Assistant (DBCA) to create the databases.
Copy MFG/PRO Files to Oracle
1 Depending on your operating system, copy either QAD_UNIXx.dbt
or QAD_WINx.dbt, where x is the version of Oracle you are using,
from:
MFGPROInstallDir/db To:
Create the Oracle Databases
The following sequence of screens will be different depending on which version of Oracle, 9i or 10g, you are running.
Important For UNIX and Linux implementations, the display value must be set before running the Database Configuration Assistant (DBCA). See the Oracle documentation for information on the DBCA. 1 Start the Oracle DBCA.
• On UNIX:
cd $ORACLE_HOME/bin dbca
• On Windows:
Start|All Programs|Oracle|Configuration and Migration Tools|Database Configuration Assistant
The Database Configuration Assistant welcome screen displays. Click Next to continue.
Fig. 3.1
Oracle Database Configuration Assistant
2 In the Operations screen, select Create a Database and click Next. Fig. 3.2
Oracle DBCA Operations Screen
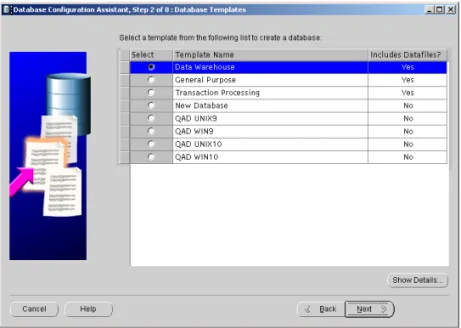
3 In the Database Templates screen, select the QAD WINx or QAD UNIXx template, where x is the version of Oracle you are using, depending on your operating system.
Fig. 3.3 Oracle DBCA Database Templates Screen
4 In the Database Identification screen, update the Global Database Name and/or SID prefix to the values you want.
Fig. 3.4 Oracle DBCA Database Identification Screen
The global database name can be up to 30 characters in length and must begin with an alphabetical character. The SID prefix must begin with an alphabetical character and contain no more than 561
characters. The DBCA uses the SID prefix to generate a unique value for the ORACLE_SID for each instance.
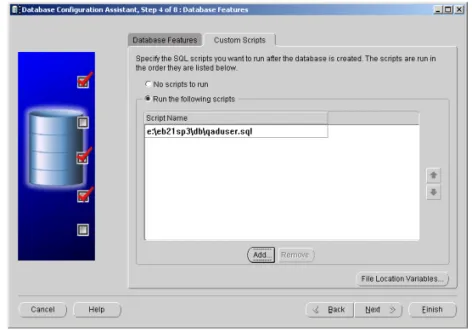
6 In Database Features, select the Custom Scripts tab and choose Add to enter the location of qaduser.sql; for example
/MFGPROInstallDir/db/qaduser.sql. Select Run the following
scripts and click Next. Fig. 3.5
Oracle DBCA Database Features Screen
7 In the Database Connection Options screen, select the mode you want to use for your Oracle database, dedicated or shared, and click Next. Fig. 3.6
Oracle DBCA Database
Connection Options Screen
8 In the Initialization Parameters screen, modify the initialization parameters, character sets, file locations, and archive mode as required. Then click Next to continue.
Fig. 3.7 Oracle DBCA Initialization Parameters Screen
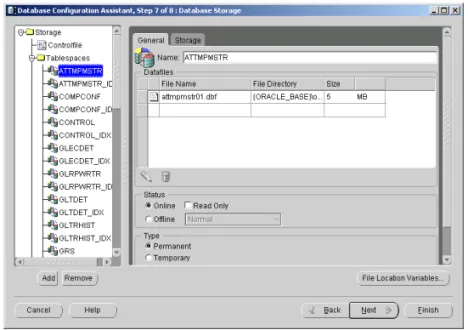
9 In the Database Storage screen, expand the Tablespaces tab in the navigation pane, and select any tablespace to modify tablespace datafile names, locations, or sizes as required. Do not replace any of the QAD-provided tablespaces or the MFG/PRO SQL scripts will fail. Click Next to continue.
Fig. 3.8 Oracle DBCA Database Storage Screen
10 In the Creation Options screen, choose Create Database to create the database now. If you plan to create the database at a later time, choose one or both of the other options. All options can be selected
simultaneously if you want. Click Next to create the database, template, and/or script.
Fig. 3.9 Oracle DBCA Creation Options Screen
11 This ends the database creation step for the Oracle database.
If the qaduser.sql script was not run for some reason during database creation, then the sysdba user must run the script in the Oracle database.
The qaduser.sql file is located in MFGPROInstallDir/db.
Run SQL Scripts to Load Schema
Several scripts are supplied by QAD to create the Oracle database schema. These are run from a command line interface in SQL*Plus. 1 Run a command window and log in as the qad user.
2 Change directories to MFGPROInstallDir/db.
3 Use the following syntax to run the first script to build the oraempty tablespaces.
4 Once the script is complete, run the scripts listed in Table 3.4 using the same syntax.
Table 3.4 Oracle Database Tablespace Scripts
Creating the Schema Holders
Complete these steps to build the Progress schema holder databases for your empty databases, and load the MFG/PRO schema. After the schema holders have been created, the OID value is loaded in the Oracle database and the production schema holder is created.
Build the Schema Holders
¶For information on MFG/UTIL keyboard commands, see “MFG/UTIL Keyboard Commands” on page 17.1 Launch MFG/UTIL from the MFGPROInstallDir using the command:
./mfgutil
For Windows, launch MFG/UTIL from the icon on the Start menu.
Script Name Purpose
oraempty-idx.sql oraempty index tablespaces oraempty-seq.sql oraempty sequences oadmempty-tbl.sql admin tablespaces oadmempty-idx.sql admin index tablespaces ohpempty-tbl.sql help tablespaces ohpempty-idx.sql help index tablespaces
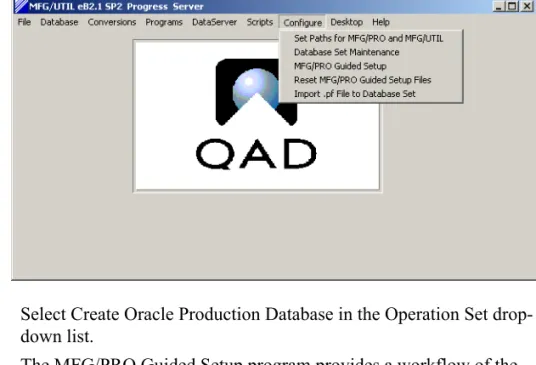
2 Choose MFG/PRO Guided Setup from the Configure menu.
Fig. 3.10 MFG/UTIL Configure Menu
3 Select Create Oracle Production Database in the Operation Set drop-down list.
The MFG/PRO Guided Setup program provides a workflow of the operations involved in setting up your MFG/PRO environment. You can use this program to access the different configuration utilities in MFG/UTIL with proper default information and in the proper sequence. Review the following figure to become familiar with Guided Setup.
Note The number of operations is determined by the number of uncommented sections in wk0200.ini. See “Guided Setup” on page 15 for information on configuring this file.