CodeWarrior
™
Development Studio
IDE 5.5 User’s Guide
other countries. All other tradenames and trademarks are the property of their respective owners. Copyright © Metrowerks Corporation. 2003. ALL RIGHTS RESERVED.
The reproduction and use of this document and related materials are governed by a license agreement media, it may be printed for non-commercial personal use only, in accordance with the license agreement related to the product associated with the documentation. Consult that license agreement before use or reproduction of any portion of this document. If you do not have a copy of the license agreement, contact your Metrowerks repre-sentative or call 800-377-5416 (if outside the US call +1 512-997-4700). Subject to the foregoing non-commercial personal use, no portion of this documentation may be reproduced or transmitted in any form or by any means, electronic or mechanical, without prior written permission from Metrowerks.
Metrowerks reserves the right to make changes to any product described or referred to in this document without further notice. Metrowerks makes no warranty, representation or guarantee regarding the merchantability or fitness of its prod-ucts for any particular purpose, nor does Metrowerks assume any liability arising out of the application or use of any product described herein and specifically disclaims any and all liability. Metrowerks software is not authorized for and has not been designed, tested, manufactured, or intended for use in developing applications where the fail-ure, malfunction, or any inaccuracy of the application carries a risk of death, serious bodily injury, or damage to tangible property, including, but not limited to, use in factory control systems, medical devices or facilities, nuclear facilities, aircraft or automobile navigation or communication, emergency systems, or other applica-tions with a similar degree of potential hazard.
USE OF ALL SOFTWARE, DOCUMENTATION AND RELATED MATERIALS ARE SUBJECT TO THE METROWERKS END USER LICENSE AGREEMENT FOR SUCH PRODUCT.
How to Contact Metrowerks
Corporate Headquarters Metrowerks Corporation 7700 West Parmer Lane Austin, TX 78729 U.S.A.
World Wide Web http://www.metrowerks.com
Table of Contents
I
Introduction
1 IDE User’s Guide Overview
15
Release Notes . . . 15
CodeWarriorU.com . . . 15
Documentation Structure . . . 16
Documentation Formats . . . 16
Documentation Types . . . 17
Manual Conventions . . . 17
Figure Conventions . . . 17
Keyboard Conventions . . . 18
Special note for Solaris users and Linux users. . . 18
2 CodeWarrior IDE Overview
19
Development Cycle . . . 19CodeWarrior IDE Advantages . . . 21
IDE Tools Overview . . . 22
II Projects
3 Working with Projects
27
About Projects . . . 27Project Manager . . . 27
Build Targets . . . 29
Managing Projects . . . 31
Advanced Projects . . . 38
Custom Project Stationery . . . 38
Strategies . . . 40
4 Project Window
43
About the Project Window . . . 43Project Window Pages . . . 45
Files Page . . . 45
Link Order Page . . . 47
Targets Page . . . 48
File, Group, Layout, and Target Management . . . 49
Build-Target Management . . . 53
5 Working with Files
59
Managing Files . . . 596 Dockable Windows
67
About Dockable Windows . . . 67Working with Dockable Windows . . . 69
Dock Bars . . . 74
7 Workspaces
77
About Workspaces . . . 77Using Workspaces. . . 77
8 Creating Console Applications
81
About Console Applications . . . 81Creating Console Applications . . . 82
III Editor
9 The CodeWarrior Editor
87
Editor Window . . . 87Editor Toolbar . . . 89
Functions Menu . . . 91
Markers Menu . . . 91
Document Settings Menu . . . 92
Version Control System Menu . . . 92
Other Editor Window Components . . . 93
Path Caption . . . 93
File Modification Icon . . . 93
Breakpoints Column. . . 94
Text Editing Area . . . 94
Line and Column Indicator . . . 94
Pane Splitter Controls . . . 94
10 Editing Source Code
97
Text Manipulation . . . 97Symbol Editing Shortcuts . . . . 100
Punctuation Balancing . . . . 101
Code Completion . . . . 102
Code Completion Configuration . . . . 103
Code Completion Window . . . . 105
11 Navigating Source Code
111
Finding Interface Files, Functions, and Lines . . . . 111Finding Interface Files . . . . 112
Locating Functions . . . . 112
Going Back and Forward . . . . 114
Using Markers . . . . 115
Remove Markers Window . . . . 115
Symbol Definitions . . . . 117
Reference Templates (Macintosh) . . . . 119
12 Finding and Replacing Text
121
Single-File Find . . . . 121Single-File Find and Replace . . . . 124
In Folders . . . . 129
In Projects. . . . 131
In Symbolics. . . . 133
In Files . . . . 135
Search Results Window . . . . 138
Text-Selection Find . . . . 140
Regular-Expression Find . . . . 142
Using the Find String in the Replace String. . . . 144
Remembering Sub-expressions . . . . 144
Comparing Files and Folders . . . . 145
Comparison Setup . . . . 145
File Comparison . . . . 149
Folder Comparison . . . . 152
IV Browser
13 Using the Browser
157
Browser Database . . . . 157Browser Data . . . . 158
Browser Symbols . . . . 160
Browser Contextual Menu . . . . 160
14 Using Class Browser Windows
163
Class Browser window . . . . 163Classes pane . . . . 169
Member Functions pane . . . . 171
Data Members pane . . . . 172
Source pane . . . . 172
Status Area . . . . 173
Single-Class Hierarchy Window . . . . 178
Browser Contents window . . . . 179
Symbols window . . . . 181
Symbols toolbar . . . . 183
Symbols pane . . . . 183
Source pane . . . . 183
16 Using Browser Wizards
185
The New Class Wizard . . . . 185The New Member Function Wizard . . . . 190
The New Data Member Wizard . . . . 193
V Debugger
17 Working with the Debugger
199
About the CodeWarrior Debugger . . . . 199About Symbolics Files . . . . 200
Thread Window. . . . 200
Common Debugging Actions . . . . 204
Symbol Hint . . . . 207
Contextual Menus . . . . 209
Multi-core Debugging . . . . 210
18 Manipulating Program Execution
211
Breakpoints . . . . 212Breakpoints Window . . . . 212
Working with Breakpoints . . . . 215
Working with Breakpoint Templates . . . . 220
Eventpoints . . . . 223
Log Point . . . . 224
Pause Point . . . . 226
Skip Point . . . . 228
Sound Point . . . . 228
Trace Collection Off. . . . 230
Trace Collection On . . . . 230
Working with Eventpoints . . . . 231
Watchpoints . . . . 233
Special Breakpoints . . . . 237
19 Working with Variables
239
Global Variables Window . . . . 239Variable Window . . . . 241
Expressions Window. . . . 244
20 Working with Memory
247
Memory Window . . . . 247Array Window . . . . 252
Registers Window . . . . 254
General Registers . . . . 255
FPU Registers . . . . 255
Host-specific Registers. . . . 255
Register Details Window . . . . 258
Description File . . . . 262
Register Display . . . . 262
Text View . . . . 262
21 Working with Debugger Data
265
Symbolics Window . . . . 265Processes Window . . . . 268
Log Window . . . . 271
22 Working with Hardware Tools
273
Flash Programmer Window . . . . 273Target Configuration . . . . 275
Program / Verify . . . . 278
Erase / Blank Check . . . . 281
Checksum . . . . 282
Hardware Diagnostics Window . . . . 284
Configuration . . . . 286
Memory Read / Write . . . . 287
Scope Loop . . . . 289
Memory Tests . . . . 291
Working with a Logic Analyzer . . . . 297
Configuring the Project . . . . 297
Using the Logic Analyzer . . . . 299
Trace Window . . . . 301
Cache Window . . . . 302
Profile Window . . . . 302
Command Window . . . . 303
VI Compilers and Linkers
23 Compilers
307
Choosing a Compiler . . . . 307Compiling Projects . . . . 308
24 Linkers
313
Choosing Linkers . . . . 313Linking Projects . . . . 314
Commands Tab. . . . 319
Pre-defined Variables in Command Definitions . . . . 323
Customize Toolbars . . . . 328
Kinds of Toolbars . . . . 329
Toolbar Elements . . . . 329
Modify a Toolbar . . . . 330
Customize Key Bindings . . . . 334
26 Working with IDE Preferences
339
IDE Preferences Window . . . . 339General Panels . . . . 341
Build Settings . . . . 341
Concurrent Compiles . . . . 343
IDE Extras . . . . 344
Help Preferences . . . . 348
Plugin Settings . . . . 348
Shielded Folders . . . . 349
Source Trees . . . . 351
Editor Panels . . . . 355
Code Completion . . . . 355
Code Formatting . . . . 356
Editor Settings . . . . 358
Font & Tabs . . . . 360
Text Colors . . . . 362
Debugger Panels . . . . 366
Display Settings . . . . 366
Window Settings . . . . 368
Global Settings . . . . 369
Remote Connections . . . . 371
27 Working with Target Settings
375
Target Settings Window . . . . 375Target Settings . . . . 378
Access Paths . . . . 379
Build Extras . . . . 382
Runtime Settings . . . . 384
File Mappings . . . . 386
Source Trees . . . . 388
Code Generation Panels . . . . 388
Global Optimizations . . . . 388
Editor Panels . . . . 391
Custom Keywords . . . . 391
Debugger Panels . . . . 393
Other Executables . . . . 393
Debugger Settings . . . . 396
Remote Debugging . . . . 397
28 Preference and Target Settings Options
399
VIIIMenus
29 IDE Menus
439
Windows Menu Layout. . . . 439File Menu . . . . 439
Edit Menu. . . . 441
View Menu . . . . 442
Search Menu. . . . 443
Project Menu . . . . 445
Debug Menu . . . . 447
Data Menu . . . . 449
Window Menu . . . . 450
Help Menu . . . . 451
Macintosh Menu Layout . . . . 452
CodeWarrior Menu . . . . 452
File Menu . . . . 452
Edit Menu. . . . 454
Search Menu. . . . 455
Project Menu . . . . 457
Debug Menu . . . . 459
Data Menu . . . . 461
Window Menu . . . . 463
VCS Menu . . . . 464
Tools Menu . . . . 464
Scripts Menu . . . . 465
Help Menu . . . . 465
30 Menu Commands
467
I
Introduction
This section contains these chapters: • IDE User’s Guide Overview
1
IDE User’s Guide Overview
This chapter of the CodeWarrior™ IDE User’s Guide is a high-level description of documentation and training resources for learning to use the IDE:
• CodeWarriorU.com—free, Internet-based instruction for CodeWarrior products. Use this resource to learn more about the CodeWarrior Integrated Development Environment (IDE) and computer programming.
• Documentation structure—a guide to the various CodeWarrior manuals available. This guide notes the location of generic and specific product documentation.
• Common conventions—some common typographical conventions used in this manual and other Metrowerks documentation.
This chapter has these sections: • “Release Notes” on page 15
• “CodeWarriorU.com” on page 15
• “Documentation Structure” on page 16
• “Manual Conventions” on page 17
Release Notes
Please read the release notes. They contain important last-minute additions to the documentation. The Release Notes folder on the CodeWarrior CD contains the information.
CodeWarriorU.com
Documentation Structure
CodeWarriorU.com courses have these features: • Text-based instruction
• Expert instructors
• A variety of self-assessment and study materials
• Interactive message boards for communicating with instructors and fellow students
CodeWarriorU offers many courses, such as these: • Learn Programming in C
For beginning programmers. Take this course to learn how to create C software. • Introduction to Java
For beginning and experienced programmers. Take this course to learn how to create Java software.
• Introduction to C++
For beginning and experienced programmers. Take this course to learn how to create C++ software.
• Intermediate C++
For programmers who completed the Introduction to C++ course and have basic C++ programming knowledge. Take this course to learn the foundation needed to create more sophisticated C++ software.
To find out more, visit this web site:
http://www.CodeWarriorU.com/
Documentation Structure
CodeWarrior products include an extensive documentation library of user guides, targeting manuals, and reference manuals. Take advantage of this library to learn how to efficiently develop software using the CodeWarrior programming environment.
Documentation Formats
CodeWarrior documentation presents information in various formats:
• Print—Printed versions of CodeWarrior manuals, including the IDE User’s Guide, MSL C Reference, C/C++ Reference, and product-focused
Manual Conventions
• PDF (Portable Document Format)—Electronic versions of CodeWarrior manuals. The CodeWarrior CD Documentation folder contains the electronic PDF manuals.
• HTML (Hypertext Markup Language)—HTML or Compressed HTML (.CHM) versions of CodeWarrior manuals.
Documentation Types
Each CodeWarrior manual focuses on a particular information type:
• User guides—User guides provide basic information about the CodeWarrior user interface. User guides include information that supports all host platforms on which the software operates, but do not include in-depth platform-specific information. An example is the PowerParts User Guide.
• Targeting manuals—Targeting manuals provide specific information required to create software that operates on a particular platform or microprocessor. Examples include the Targeting Windows, Targeting Java, and Targeting DSP56800 manuals.
• Reference manuals—Reference manuals provide specialized information that supports coding libraries, programming languages, and the IDE. Examples include the C Compiler Reference, MSL C Reference, and Extending the CodeWarrior IDE manuals.
• Core manuals—Core manuals explain the core technologies available in the CodeWarrior IDE. Examples include:
– IDE User’s Guide
– C/C++ Compilers Reference
– MSL C Reference and MSL C++ Reference
– Extending the CodeWarrior IDE – Command-Line Tools Reference
Manual Conventions
This section explains conventions in the IDE User’s Guide.
Figure Conventions
Manual Conventions
host. However, some interface elements are unique to a particular host. In such cases, clearly labelled images identify the specific host.
Keyboard Conventions
The CodeWarrior IDE accepts keyboard shortcuts, or key bindings, for frequently used operations. For each operation, this manual lists corresponding key bindings by platform. Hyphens separate multiple keystrokes in each key binding.
Special note for Solaris users and Linux
users
The Solaris and Linux IDE use Macintosh symbols to represent modifier keys in key bindings. Table 1.1 shows the relationship between the Macintosh symbols and the equivalent modifier keys on Solaris and Linux computers.
[image:18.612.100.525.371.551.2]Solaris and Linux computers can map a modifier key to any key on the keyboard. The preceding table reflects the default modifier key configuration for these computers. Remember that custom mappings supersede the default configuration noted in the table.
Table 1.1 Macintosh modifier-key equivalents for Solaris and Linux
Symbol Macintosh Name
Solaris Equivalent
Linux Equivalent
Control Control Ctrl
Option Alt Alt
Command Meta Alt
2
CodeWarrior IDE Overview
The CodeWarrior™ Integrated Development Environment (IDE) provides an efficient and flexible software-development tool suite. This chapter explains the advantages of using the CodeWarrior IDE and provides brief descriptions of the major tools that make up the IDE.
This chapter contains these sections: • “Development Cycle” on page 19
• “CodeWarrior IDE Advantages” on page 21
• “IDE Tools Overview” on page 22
Development Cycle
A software developer follows a general development process: • Begin with an idea for new software.
• Implement the new idea in source code.
• Have the IDE compile source code into machine code. • Have the IDE link machine code and form an executable file. • Correct errors (debug).
• Compile, link, and release a final executable file.
The stages of the development cycle correspond to one or more chapters in this manual.
Development Cycle
Figure 2.1 The Development Cycle diagram
Start
Create
Edit
Compile Compile
Errors? Yes
Link Link
Errors? Yes No
Debug Debug
Errors? Yes No
Release No
End Start or End of
the process Legend
Development Cycle stage
Decision stage
CodeWarrior IDE Advantages
CodeWarrior IDE Advantages
Software developers take advantage of CodeWarrior IDE features during software development:
• Cross-platform development
Develop software to run on multiple operating systems, or use multiple hosts to develop the same software project. The IDE runs on popular operating systems, including Windows, Macintosh, Solaris, and Linux. The IDE uses virtually the same graphical user interface (GUI) across all hosts.
• Multiple-language support
[image:21.612.130.560.129.397.2]Choose from multiple programming languages when developing software. The IDE supports high-level languages, such as C, C++, and the Java programming language, as well as in-line assemblers for most processors.
Table 2.1 Stage descriptions and related sections in the IDE User’s Guide
Stage Description Related Sections
Create Create the initial project, source files, and build targets that implement an idea for new software.
• “Projects” on page 25 • “Preferences and Target
Settings” on page 315 • “Menus” on page 437
Edit Transform the idea into working source code, organize interface elements, and correct errors.
• “Editor” on page 85 • “Browser” on page 155
Compile Compile the source code into machine format that operates on the target host.
“Compilers and Linkers” on page 305
Link Link the separate compiled modules into a single binary executable file.
“Compilers and Linkers” on page 305
Debug Find and resolve all coding and logic errors that prevent the program from operating as designed.
“Debugger” on page 197
IDE Tools Overview
• Consistent development environment
Port software to new processors without having to learn new tools or lose an existing code base. The IDE supports many common desktop and embedded processor families, including x86, PowerPC, MIPS, and many others.
• Plug-in tool support
Extend the capabilities of the IDE by adding a plug-in tool that supports new services. The IDE currently supports plug-ins for compilers, linkers, pre-linkers, post-linkers, preference panels, version controls, and other tools. Plug-ins make it possible for the CodeWarrior IDE to process different languages and support different processor families.
IDE Tools Overview
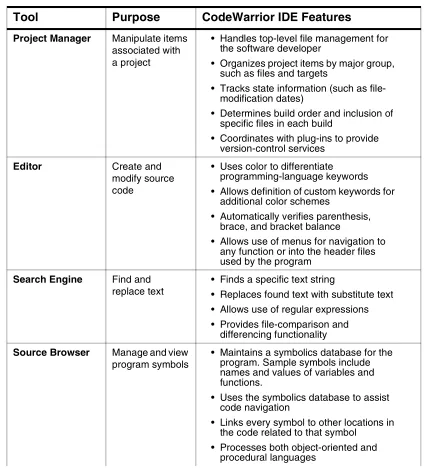
The CodeWarrior IDE is a tool suite that provides sophisticated tools for software development. This section explains the standard tools available in the IDE:
• a project manager • an editor
• a search engine • a source browser • a build system • a debugger
IDE Tools Overview
Table 2.2 IDE tools and features
Tool Purpose CodeWarrior IDE Features
Project Manager Manipulate items associated with a project
• Handles top-level file management for the software developer
• Organizes project items by major group, such as files and targets
• Tracks state information (such as file-modification dates)
• Determines build order and inclusion of specific files in each build
• Coordinates with plug-ins to provide version-control services
Editor Create and modify source code
• Uses color to differentiate programming-language keywords • Allows definition of custom keywords for
additional color schemes
• Automatically verifies parenthesis, brace, and bracket balance
• Allows use of menus for navigation to any function or into the header files used by the program
Search Engine Find and replace text
• Finds a specific text string
• Replaces found text with substitute text • Allows use of regular expressions • Provides file-comparison and
differencing functionality
Source Browser Manage and view program symbols
• Maintains a symbolics database for the program. Sample symbols include names and values of variables and functions.
• Uses the symbolics database to assist code navigation
• Links every symbol to other locations in the code related to that symbol
IDE Tools Overview
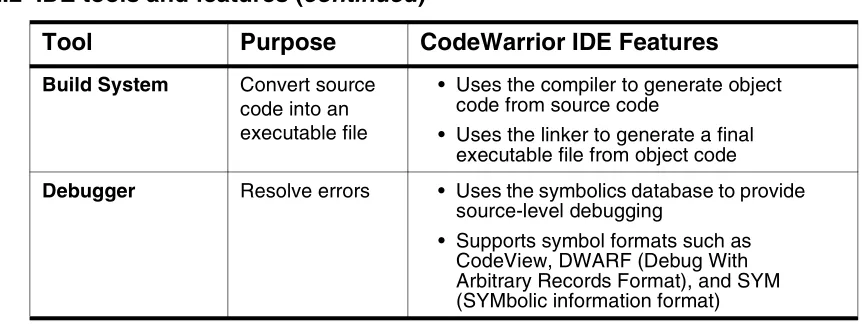
Build System Convert source code into an executable file
• Uses the compiler to generate object code from source code
• Uses the linker to generate a final executable file from object code
Debugger Resolve errors • Uses the symbolics database to provide source-level debugging
[image:24.612.93.524.115.277.2]• Supports symbol formats such as CodeView, DWARF (Debug With Arbitrary Records Format), and SYM (SYMbolic information format) Table 2.2 IDE tools and features (continued)
II
Projects
This section contains these chapters: • Working with Projects
• Project Window
• Working with Files
• Dockable Windows
• Workspaces
3
Working with Projects
This chapter explains how to work with projects in the CodeWarrior™ IDE. Projects organize several file types associated with a computer program:
• Text files—files that contain any kind of text. Sample text files include Read Me files and source files.
• Source files—files that contain source code only. Sample source files include C++ files and Java files.
• Library files—files that contain special code designed to work together with a particular programming language or operating environment.
• Generated files—files created by the IDE while building or debugging the project.
This chapter contains these sections: • “About Projects” on page 27
• “Managing Projects” on page 31
• “Advanced Projects” on page 38
About Projects
The IDE uses build targets and a Project Manager to organize source code and support files. This section explains both components.
Project Manager
The IDE gathers source, library, resource, and other files into a project. The Project Manager manipulates the information stored in the project.
About Projects
[image:28.612.68.521.130.713.2]Figure 3.1 Project Manager
Table 3.1 Project Manager interactions
IDE Tool Project Manager Interactions
Editor • Coordinating internal data flow among editor windows, the search engine, and the source browser
• Matching find-and-replace results between related header files and source files
• Associating functions and variables with their corresponding source code
Compiler • Synchronizing with source code a symbolics database of program functions, variables, and values
• Coordinating internal data flow between the symbolics database and the source browser
• Determining the files to include in the build process
The build system generates symbolics information for a program. The debugger generates a database from the symbolics information.
Build System Search Engine Editor Source Browser Compiler Symbolics Information Linker Debugger
Main IDE tool
Support tool
Information that the IDE generates
Development flow Legend
IDE internal data flow
About Projects
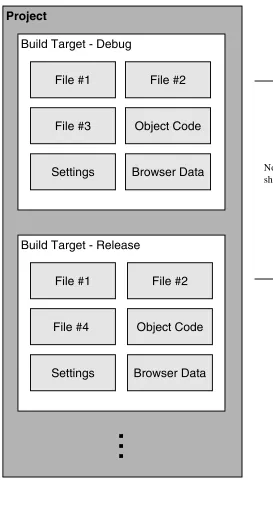
Build Targets
For any given build, the project manager tracks: • files and libraries
• link order • dependencies
• compiler, linker, and other settings
The IDE stores this information in a build target. As the project changes, the project manager automatically updates the build target. The project manager also coordinates program builds, using the build-target information to call the appropriate tools in the correct order with the specified settings.
For example, the project manager directs the build system to compile only those source files that rely on the information in a modified file.
Note that all of this operation happens automatically. The software developer does not need to remember makefile syntax or semantics, and never has to debug makefile syntax errors. The IDE simplifies the process, making it easier to develop software. The project manager also supports multiple build targets within the same project file. Each build target can have its own unique settings, and even use different source and library files. For example, it is common to have both debug and release build targets in a project.
Figure 3.2 on page 30 shows a sample project with debug and release build targets.
Linker • Sending compiled object code to the linker for conversion to executable code
• Setting the link order for processing compiled object code
Debugger • Matching debugging data to source code
• Updating the symbolics database to reflect changing values during a debugging session
Table 3.1 Project Manager interactions (continued)
About Projects
Figure 3.2 Project with multiple build targets
Project
Build Target - Debug
File #1 File #2
File #3 Object Code
Settings Browser Data
Build Target - Release
File #1 File #2
File #4 Object Code
Settings Browser Data
...
Managing Projects
Managing Projects
Use these tasks to manage projects: • Create a new project
• Open an existing project • Save an existing project • Close an open project • Inspect an open project • Print an open project
Creating New Projects using Project Stationery
Use the project stationery provided with the IDE to quickly create new projects. The stationery contains everything needed for a minimal, ready-to-run project. Use project stationery as a foundation upon which to add features for each new programming endeavor.
1. Choose File > New.
2. Click the Project tab and select a project type.
3. Enter a project name (include the .mcp extension) in the Project Name field and set the Location for the new project.
4. Click OK in the New window.
5. Select the appropriate project stationery from the New Project window. 6. Click OK in the New Project window.
Managing Projects
Creating New Projects from Makefiles
Use the Makefile Importer wizard provided with the Windows, Solaris, and Linux IDE to convert most Visual C nmake or GNU make files into projects. The wizard
performs these tasks:
• Parses the makefile to determine source files and build targets • Creates a project
• Adds the source files and build targets determined during parsing
• Matches makefile information, such as output name, output directory, and access paths, with the newly created build targets.
• Selects a project linker 1. Choose File > New. 2. Click the Project tab.
3. Select Makefile Importer Wizard.
4. Enter a project name (include the .mcp extension) in the Project Name field and set the Location for the new project.
5. Click OK in the New window.
6. Enter the path to the makefile in the Makefile location field or click Browse to navigate to the makefile.
7. Choose the tool set used for makefile conversion and linker selection.
• Tool Set Used In Makefile—Choose the tool set whose build rules form the basis of the makefile.
• Metrowerks Tool Set—Choose the linker tool set to use with the generated project.
8. Select the desired diagnostic settings.
• Log Targets Bypassed—Select to log information about makefile build targets that the IDE fails to convert to project build targets.
Managing Projects
• Log All Statements Bypassed—Select to log targets bypassed, build rules discarded, and other makefile items that the IDE fails to convert.
9. Click Finish, then Generate.
The Makefile Importer wizard performs the conversion process and displays additional information.
Creating Empty Projects
Unlike project stationery, empty projects do not contain a pre-configured collection of template source files, library files, or build targets. Empty projects allow advanced software engineers to custom-build new projects from scratch.
NOTE Avoid creating empty projects. Instead, modify a project created with project stationery. Project stationery pre-configures complicated settings to quickly get started.
1. Choose File > New.
2. Click the Project tab and select Empty Project.
3. Enter a project name (include the .mcp extension) in the Project Name field and set the Location for the new project.
4. Click OK in the New window.
The IDE creates an empty project. Add files and libraries, create build targets, and choose the appropriate target settings to complete the new project.
Opening Projects
Use the IDE to open previously saved projects. CodeWarrior projects normally end in the Metrowerks CodeWarrior Project extension of .mcp. Open projects to add, remove, or modify files to enhance the capabilities of the final executable file.
1. Choose File > Open.
Managing Projects
3. Click Open.
The IDE opens the project and displays its Project window.
NOTE The IDE prompts you for confirmation to update projects created in older CodeWarrior versions.
Opening Projects Created on Other Hosts
CodeWarrior projects whose names end in .mcp are cross-platform. However, the object code stored inside each project folder is not cross-platform. Use these procedure to properly open the project on a different host computer.
1. If not present, add the .mcp file-name extension to the project name. 2. Copy the project folder from the original host to the new host. 3. Delete the Data folder inside the newly copied project folder. 4. Open the newly copied project on the new host IDE.
5. Recompile the project to generate new object code.
Saving Projects
The IDE automatically saves projects and updates project information after performing these actions:
• Closing the project
• Applying or saving a preference or target-setting option • Adding, deleting, or compiling a file
• Editing group information
Managing Projects
Inspecting Project Files
Use the Project Inspector command to review and configure source-file attributes and target information in the Project Inspector window.
1. Select a file in the Project window.
2. Open the Project Inspector window, as explained in Table 3.2.
3. Examine the source-file attributes and target settings. • Click the Attributes tab to view the file attributes.
• Click the Targets tab to view the build targets that use the file.
Printing Projects
The Project Manager can print a complete listing of the Files, Designs, Link Order, or Targets tab currently displayed in the Project window.
1. Select the Project window.
2. Click the Files, Designs, Link Order, or Targets tab. 3. Choose File > Print.
4. Set the print options in the print dialog.
5. Print the Project window contents, as explained in Table 3.3.
Table 3.2 Opening the Project Inspector window
On this host… Do this…
Windows Select View > Project Inspector.
Macintosh Select Window > Project Inspector.
Solaris Select Window > Project Inspector.
Managing Projects
The IDE prints the contents of the selected tab in the Project window.
Choosing a Default Project
The IDE allows multiple open projects at the same time. However, a given source file can belong to more than one open project, making it ambiguous as to which project a source-file operation applies.
To resolve ambiguity, choose the default project to which the IDE applies operations. 1. If only one project is open, it automatically becomes the default project.
2. If more than one project is open, choose Project > Set Default Project to select the desired default project.
In ambiguous situations, the IDE applies operations to the selected default project.
Exporting Projects to XML Files
The IDE can export a project to an Extensible Markup Language (XML) file. Use this capability to store projects in text-oriented environments, such as a version control system.
1. Bring forward the project to export.
2. Choose File > Export Project.
Table 3.3 Printing the Project window contents
On this host… Do this…
Windows Click OK.
Macintosh Click Print. Solaris Click Print.
Managing Projects
3. Name the exported XML file and save it in the desired location. The IDE converts the project to an XML file.
Importing Projects Saved as XML Files
The IDE can import a project previously saved in Extensible Markup Language (XML) format. Use this capability to recreate projects stored in text-oriented environments, such as a version control system.
1. Choose File > Import Project.
2. Create a new folder in which to save the converted project and all of its generated files.
3. Find the XML file that you want to import. 4. Save the XML file in the newly created folder.
The IDE converts the XML file to a project.
Closing Projects
Use the Close command to close a CodeWarrior project file at the end of a programming session. The IDE automatically saves changes to a closed project.
1. Select the Project window to close. 2. Close the project.
• Choose File > Close.
Advanced Projects
Advanced Projects
Advanced projects deal with these topics:
• Custom project stationery—modified project stationery tailored to advanced programming needs.
• Subprojects—projects within projects.
• Strategies—obtaining the maximum benefit from advanced projects.
Custom Project Stationery
Use custom project stationery to develop streamlined templates to meet advanced programming needs:
• Pre-configure new project stationery to include often-used files, libraries, and source code
• Configure build targets and options to any desired state • Set up a reusable template to use for creating projects
NOTE Custom project stationery requires in-depth knowledge about project structure and operation. Before creating custom stationery, be sure to fully understand existing project stationery included with the
CodeWarrior product.
Creating Custom Project Stationery
Use custom project stationery to develop a convenient template for creating new projects. An efficient way to develop custom stationery is to modify existing project stationery and save it under a new name in the Stationery or Project Stationery
folder.
1. Follow the usual process for creating a project from project stationery. See “Creating New Projects using Project Stationery” on page 31 for more information.
2. Choose File > Save A Copy As.
Advanced Projects
4. Create a folder inside the Project Stationery folder to store the newly created project.
5. Save the project to its new folder. Use a descriptive project name with the .mcp
extension.
6. Customize the newly saved project so that it becomes a template for creating other projects:
• Add source files to the project. Save these files in the same folder as the project itself.
• Add build targets for building the project with frequently used settings. • Configure other project preferences as desired.
7. Close the customized project to save it.
8. Open the customized project folder inside the Project Stationery folder.
9. Find and delete the _Data folder.
The IDE now treats the customized project as project stationery. The descriptive name appears in the Project tab of the New window.
Subprojects
A subproject is a project nested inside a parent project. Subprojects organize source code for the IDE to build prior to building the parent project. For example, the IDE builds subprojects for an application’s plug-ins before building the parent project for the application itself.
Adding Subprojects to a Project
Use a subproject to organize a separate set of source files and build targets inside a parent project.
1. Open the parent project in which to add a subproject. The parent Project window opens.
Advanced Projects
3. If the parent project has more than one build target, use the build-target list box in the Project window toolbar to choose the desired build target.
4. Add a separate project to the Project window:
• Drag and drop the .mcp file of the separate project into the Project window, or
• Choose Project > Add Files to add the .mcp file of the separate project. The IDE treats the added project as a subproject. The subproject appears in the
Files view of the parent Project window.
Opening Subprojects
The IDE can open a subproject from the parent Project window. Use this feature to more conveniently open the subproject.
1. Double-click the subproject in the Files view of the parent Project window. 2. The IDE opens the subproject in its own Project window.
Strategies
Projects can organize files into build targets or subprojects. Each of these structures has its own advantages. Choose the structure best suited to the programming need.
Build Targets
Build targets organize collections of files inside a project. Build targets have these advantages:
• Using multiple build targets inside a single project allows access to all source code for that project.
• Build targets organize different collections of build settings for a single project. • Each project accommodates up to 255 build targets.
Subprojects
Advanced Projects
• Subprojects separate distinct parts of a complex program, such as an application and its various plug-ins.
• Using subprojects streamlines a complicated build. For example, create a project that builds all plug-ins for an application. Add this project as a subproject of the main application. The IDE then builds all plug-ins before building the main application.
4
Project Window
This chapter explains how to work with the Project window in the CodeWarrior™ IDE. The Project window provides these features:
• view and modify all files created for use with a computer program. • manipulate files arranged by type.
• control the way the IDE handles files. This chapter contains these sections:
• “About the Project Window” on page 43
• “Project Window Pages” on page 45
• “File, Group, Layout, and Target Management” on page 49
• “Build-Target Management” on page 53
About the Project Window
The Project window organizes files in a computer program. Use this window to control various aspects of each file. The window includes these items:
• Project window toolbar • Tabs
• Columns
Figure 4.1 on page 44 shows a sample Project window. Table 4.1 on page 44 explains the items in the Project window.
About the Project Window
Figure 4.1 Project window
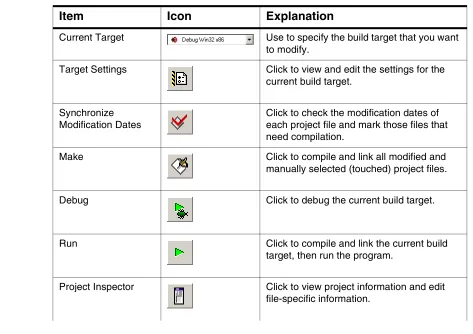
Table 4.1 Project window—items
Item Icon Explanation
Current Target Use to specify the build target that you want to modify.
Target Settings Click to view and edit the settings for the current build target.
Synchronize Modification Dates
Click to check the modification dates of each project file and mark those files that need compilation.
Make Click to compile and link all modified and
manually selected (touched) project files.
Debug Click to debug the current build target.
Run Click to compile and link the current build
target, then run the program.
[image:44.612.55.528.376.710.2]Project Window Pages
Project Window Pages
The Project window uses pages to organize items: • Files
• Link Order • Targets
• Frameworks (for projects supporting code frameworks)
Files Page
The Files page shows information about individual files in a project. The Files page shows information about these file types:
• Text files—files that contain any type of text. Sample text files include Read Me files and source files.
• Source files—files that contain source code only. Sample source files include C++ files and Java files.
• Library files—files that contain special code designed to work together with a particular programming language or operating environment.
Table 4.2 explains the items in the Files page.
Files Click to display the Files page. This page shows a list of files in the project and their associated properties.
Link Order Click to display the Link Order page. This page shows the link order of files in the current build target.
Frameworks Click to display the Frameworks page. This page shows available programming
frameworks to link against. The Frameworks tab appears only for projects that support frameworks.
Targets Click to display the Targets page. This page shows a list of all build targets, sub-projects, and target-linking information.
Table 4.1 Project window—items (continued)
Project Window Pages
Table 4.2 Files page—items
Item Icon Explanation
Touch Indicates the touch status of each file. Click in this column to toggle touching a file. Touching a file manually selects it for compilation during the next build. Click the Touch icon to sort files by touch status.
File Displays a hierarchical view of the file and group names used by the project. Click the column title to sort files by name. Double-click a file to open it. Use the hierarchical controls to display and hide group contents.
Code Displays the size, in bytes or kilobytes, of the compiled executable object code for files and groups. Click the column title to sort files by code size.
Data Displays the size, in bytes or kilobytes, of non-executable data in the object code for files in the project. Click the column title to sort files by data size.
Target Indicates whether each file belongs to the current build target. Click in this column to toggle inclusion status. Click the Target icon to sort files by inclusion status. The Target column appears only when the project has more than one build target.
Debug Displays debugging status. Click in this column to toggle generation of debugging information for a file or group. Click the Debug icon to sort files by debugging status.
Checkout Status
Displays icons representing the current file status in a version-control system. The Checkout Status column appears only when the project uses a version-control system to manage files.
Interfaces Click to display a list of files inside a group or a list of #include
files inside a source file. Choose a file to open it.
Project Window Pages
Viewing a File Path
To distinguish between two files that have identical names but reside in different folders, examine the file path.
To view the complete file path of a file, perform the task explained in Table 4.3.
The File Path submenu shows the path to the file.
Link Order Page
The Link Order page shows information about the order in which the IDE links project files. Manipulate the files in this page to change the link order. For example, if file B depends on file A in order to function, move file B below file A in the Link Order page.
Table 4.4 on page 48 explains the items in the Link Order page.
Table 4.3 Viewing a file path
On this host… Do this…
Windows Right-click the filename and select
Open in Windows Explorer
Macintosh Control-click the filename and select File Path.
Solaris Click and hold on the filename, then select File Path.
Project Window Pages
Targets Page
The Targets page presents information about the build targets in a project. Use this page to create, manage, or remove build targets. Different build targets can store different IDE settings. For example, two build targets can handle the same project. One build target handles debugging the software, while the other build target handles building the software for final release.
Table 4.5 explains the items in the Targets page.
Table 4.4 Link Order page—items
Item Explanation
Synchronize Modification Dates
To update the modification dates of the files stored in a project file, click the checkmark icon.
Use the Synchronize Modification Dates command to update files modified outside of the CodeWarrior IDE, perhaps by a third-party editor which cannot notify the CodeWarrior IDE of the changes.
Synchronize Status To update version-control status information, click the Pencil icon.
Table 4.5 Targets page—items
Item Explanation
Targets Displays all build targets and subprojects that the IDE processes to create a binary file. These icons denote build-target status:
• active build target
• inactive build target
File, Group, Layout, and Target Management
File, Group, Layout, and Target
Management
Use these tasks to manage files, groups, layouts, and targets: • Create an item.
• Delete an item. • Move an item. • Rename an item. • Touch an item. • Manage items. • Set default items. • Configure item settings.
Removing Files/Groups/Layouts/Targets
The Remove command deletes files, groups, layouts, and build targets from the Project window. Removing files from the Files tab removes them from the project itself and from all build targets that use the files. Removing a file from the Link Order, Segments, or Overlays tab only removes the file from the current build target.
Removing files/groups/layouts/targets from a project
1. Click the Files, Designs, or Targets tab in the Project window. 2. Select the item to remove.
3. Remove the selected item from the project, as explained in Table 4.6.
Table 4.6 Removing a selected item from a project
On this host… Do this…
Windows Select Edit > Delete.
Macintosh Select Edit > Clear.
Solaris Select Edit > Clear.
File, Group, Layout, and Target Management
The IDE removes the selected item from the project. For deleted files, the IDE updates all build targets that formerly used the file. For deleted build targets, the IDE deletes build-target information and leaves files intact.
Removing files from a build target
1. Click the Link Order, Segments, or Overlays tab in the Project window. 2. Select the item to remove.
3. Remove the selected item from the active build target, as explained in Table 4.7.
The IDE removes the file from the build target, but leaves the file itself intact. The file can be re-assigned to other build targets in the project.
Moving Files/Groups/Layouts/Targets
Reposition files, groups, layouts, or build targets in the Files, Design, Link Order, or
Targets pages with the cursor.
1. Select one or more files, groups, layouts, or build targets to move with the pointer. 2. Drag the selected items to a new position in the current page, using the focus bar
as a guide.
3. Release the mouse button.
The IDE repositions the selected files, groups, layouts, or build targets to the new location.
Table 4.7 Removing a selected item from the active build target
On this host… Do this…
Windows Select Edit > Delete.
Macintosh Select Edit > Clear.
Solaris Select Edit > Clear.
File, Group, Layout, and Target Management
NOTE In the Link Order page, repositioning files changes the link order that the Make command uses to build the final executable file.
Renaming Files/Groups/Targets
The Rename command renames files, groups, or build targets in the project.
Rename files
1. Open the file to rename. 2. Choose File > Save As.
3. Type a new filename in the Name text box. 4. Click Save.
The IDE saves the file under the new name. The new filename appears in the Project window. Subsequent modifications affect the renamed file, leaving the original file intact.
Rename one or more groups
1. Click the Files tab in the Project window. 2. Select the group(s) to rename.
3. Press the Enter key.
4. Type a new name into the Enter Group Name text box of the Rename Group
window. 5. Click OK.
The IDE renames the group. For selections of more than one group, the Rename Group window appears for each group.
Rename build targets
File, Group, Layout, and Target Management
3. Select Target Settings in the Target Settings Panels list. 4. Type a new name in’ the Target Name text box.
5. Click Save.
The Project window displays the new build-target name.
Touching Files and Groups
The Touch command manually selects source files or groups for compilation during the next Bring Up To Date, Make, Run, or Debug operation. A red check mark in the
Touch column of the Project window indicates a touched file. 1. Click the Files tab in the Project window.
2. Touch a source file or group for compilation.
• Click the Touch column next to the file or group name. OR
• Choose Touch from the Interface menu for the file or group.
A red check mark appears in the Touch column next to the file or group name.
Touch all project files for recompiling
1. Perform the task explained in Table 4.8 on page 52.
2. Red check marks appear next to all files and groups.
Table 4.8 Touching all project files for recompiling
On this host… Do this…
Windows Alt-click the Touch column.
Macintosh Option-click the Touch column.
Solaris Alt-click the Touch column.
Build-Target Management
Untouching Files and Groups
The Untouch command manually excludes source files or groups from compilation during the next Bring Up To Date, Make, Run, or Debug operation.
1. Click the Files tab in the Project window.
2. Untouch a source file or group to remove it from the compilation list.
• Click the red check mark in the Touch column next to the file or group name. OR
• Choose Untouch from the Interface menu for the file or group.
The red check mark disappears from the Touch column next to the file or group name.
Untouch all project files
1. Perform the task explained in Table 4.9.
2. The red checkmarks next to all files and groups disappear.
Build-Target Management
These tasks help you manage build targets: • Create a build target.
• Remove a build target. • Set the default build target. • Rename a build target.
Table 4.9 Untouching all project files
On this host… Do this…
Windows Alt-click a red checkmark in the Touch column.
Macintosh Option-click a red checkmark in the Touch column.
Solaris Alt-click a red checkmark in the Touch column.
Build-Target Management
• Configure build-target settings.
Creating Build Targets
The Create Target command adds new build targets to a project. 1. Open the Project window.
2. Click the Targets tab in the Project window. 3. Choose Project > Create Target.
4. Type a name in the Name text box of the New Target window.
5. Select the Empty target or Clone Existing Target radio button as desired. • Empty Target—create a new build target from scratch.
• Clone Existing Target—duplicate an existing build target in the New Target
window. 6. Click OK.
The IDE adds the new build target to the project.
Removing Build Targets from a Project
The Remove command deletes unneeded build targets from the Project window. 1. Click the Targets tab in the Project window.
2. Select the item to remove.
3. Remove the selected item from the active build target, as explained in Table 4.10.
Table 4.10 Removing the selected item from the active build target
On this host… Do this…
Windows Select Edit > Delete.
Macintosh Select Edit > Clear.
Solaris Select Edit > Clear.
Build-Target Management
The IDE removes the file from the build target, but leaves the file itself intact. The file can be re-assigned to other build targets in the project.
Setting the Default Build Target
The CodeWarrior Project Manager can handle up to 255 build targets in a single project. One build target must be defined as the default target when more than one project is open. The default target is the target affected by project commands, such as
Make and Run.
The Project menu
1. Choose Project > Set Default Target > buildtarget. 2. A checkmark indicates the default target.
Using the Project window toolbar
1. Enable the Project window.
2. Choose the build-target name from the Current Target pop-up menu. The build-target name appears in the pop-up menu.
The Targets page
1. Enable the Project window. 2. Click the Targets tab.
3. Click the desired build-target icon.
The icon changes to indicate that the build target is now the default.
Renaming Build Targets
Build-Target Management
2. Choose Edit > targetname Settings.
3. Select Target Settings in the Target Settings Panels list. 4. Type a new name in the Target Name text box.
5. Save the new name, as explained in Table 4.11.
The new build-target name appears in the Project window.
Configuring Build Target Settings
The Target Settings panel options determine:
• The compiler used to process the project and produce object code • The linker used to combine object code and produce a binary file
• The pre-linker and post-linker options that further process the object code • The name assigned to a build target
Follow these steps to configure build-target settings.
1. Choose Edit > targetname Settings.
2. Select Target Settings from the Target Setting Panels list. 3. Specify target options as desired.
4. Save the new options, as explained in Table 4.12.
Table 4.11 Saving a new name for a build target
On this host… Do this…
Windows Click OK.
Macintosh Click Save.
Solaris Click Save.
Build-Target Management
NOTE The panels available in the Target Settings Panels list update to reflect the choices in the Target Settings panel.
Table 4.12 Saving the build-target settings
On this host… Do this…
Windows Click OK.
Macintosh Click Save.
Solaris Click Save.
5
Working with Files
This chapter explains how to work with files in the CodeWarrior™ IDE. Most computer programs use these file types:
• Text files—files that contain any type of text. Example text files include Read Me files and source files.
• Source files—files that contain source code only. Example source files include C++ files and Java files.
Managing Files
These tasks manage files: • Create a new file. • Open an existing file. • Save a file.
• Close a file. • Print a file.
• Revert a file to a previously saved state.
Creating Text Files (Windows)
The New command opens a window from which you create new text files. You can use new text files as source files in a project or as plain-text files.
1. Select File > New.
The New window appears.
2. Click the File tab in the New window. 3. Select Text File in the list.
Managing Files
5. Click Set to specify the location to save the new file. 6. Click OK.
The IDE creates the new text file and displays its contents in a new editor window.
TIP Use the Customize IDE Commands window to add the New Text File menu command to the File menu. Adding this menu command reduces the process of creating a new text file to one step: select File > New Text File. See “Customizing the IDE” on page 317 for more information about using the Customize IDE Commands window.
Creating Text Files (Macintosh, Solaris, Linux)
The New Text File command creates new text files. You can use new text files as source files in a project or as plain-text files.
Select File > New Text File to create a new text file. The IDE creates the new text file and displays its contents in a new editor window.
Opening Source Files
The Open command opens one or more editable source files at a time. Each open file appears in its own editor window.
NOTE The CodeWarrior editor cannot open files that prohibit editing. For example, the editor cannot open library files.
From the File menu
1. Choose File > Open.
2. Windows: Use the Files of type pop-up menu to select All Files. 3. Select a file.
4. Click Open.
Managing Files
From the Project window
1. Perform one of these:
• Double-click a filename in the Files tab of the Project window, or • Select an interface filename from the Interface menu.
2. The IDE finds, opens, and displays the selected source file in an editor window.
From an editor window
1. Select an interface filename from the Interface menu.
2. The IDE selects, opens, and displays the source file in an editor window.
NOTE The menu does not show files that lack source code or are not yet compiled.
Using Find and Open Files
1. Select text in an editor window containing the name of an interface file. 2. Choose File > Find and Open File.
The IDE finds, opens, and displays in an editor window the source file matching the text selection.
To open a recent file or project
1. Choose File > Open Recent > recentfilename | recentprojectname. 2. The IDE finds and opens the selected source file or project.
Saving Files
Use the Save command to save source files to ensure their continued existence between development sessions.
Managing Files
NOTE If the file has no title, a save dialog appears. Type a filename and specify a location for the file, then click Save.
2. The IDE saves the file.
Saving All Modified Files
Use the Save All command to save the contents of all modified files. This command is useful for saving all files at the same time, rather than saving each file individually. 1. Save all currently opened and modified files, as explained in Table 5.1.
2. The IDE saves the files.
Saving File Copies
Use the Save a Copy As command to save a back-up copy of a project or file before modifying the original. Working on a copy of the original file provides a way to return to the original copy should modifications fail.
1. Choose File > Save A Copy As.
2. Type a new filename in the Name text box. 3. Click Save.
The IDE creates a copy of the file under the new name, leaving the original file unchanged.
Table 5.1 Saving all currently opened and modified files
On this host… Do this…
Windows Select File > Save All.
Macintosh While pressing Option, select File > Save All.
Solaris While pressing Alt, select File > Save All.
Managing Files
Closing Files
The Close command closes open source files when you finish working on them. Close editor windows to close a file.
1. Select an editor window to close. 2. Close the file window.
• Choose File > Close, or • Click the close box.
NOTE The IDE displays an alert if the file is modified. The alert asks whether to save changes to the file.
The IDE closes the file window.
Closing All Files
The Close All command closes all currently open files. This command is useful for closing all files at the same time, rather than closing each file individually.
1. Close all currently open files, as explained in Table 5.2.
2. The IDE closes the files.
Table 5.2 Closing all currently open files
On this host… Do this…
Windows Select Window > Close All or
Window > Close All Editor Windows.
Macintosh While pressing Option, select File > Close All.
Solaris While pressing Alt, select File > Close All.
Managing Files
Printing Source Files
The Print command prints the entire contents of a selected file window. 1. Activate the desired editor window to print.
2. Choose File > Print.
3. Set print options in the Print dialog. 4. Print the file, as explained in Table 5.3.
The IDE prints the selected file.
NOTE Use the same process to print the contents of a window, such as a Project window.
Printing Source-File Selections
The Print command prints the currently selected contents in an editor window. 1. Activate the desired editor window to print.
2. Select the portion of text to print. 3. Choose File > Print.
4. Set print options in the Print dialog. 5. Print the file, as explained in Table 5.4.
Table 5.3 Printing a source file
On this host… Do this…
Windows Click OK.
Macintosh Click Print. Solaris Click Print.
Managing Files
The IDE prints the selected text in the file.
Reverting Files
Use the Revert command to replace the current file with its previously saved version.
1. Choose File > Revert.
2. Click OK in the Revert changes to file dialog.
The IDE replaces the file with its previous version. The replaced file appears in the editor window.
Table 5.4 Printing a source-file selection
On this host… Do this…
Windows Click OK.
Macintosh Click Print. Solaris Click Print.
6
Dockable Windows
This chapter explains how to work with dockable windows in the Windows-hosted CodeWarrior™ IDE. Use dockable windows to do these tasks:
• Organize—attach, or dock, various windows to the edges of the screen for quick access.
• Group—dock windows of the same type to create a single window with multiple tabs, where each tab represents one of the original docked windows.
NOTE The dockable windows feature is available in Multiple Document Interface (MDI) mode only. This feature is not available in Floating Document Interface (FDI) mode. Toggle the Use Multiple
Document Interface option in the IDE Extras preference panel to change between these two modes.
This chapter contains these sections:
• “About Dockable Windows” on page 67
• “Working with Dockable Windows” on page 69
• “Dock Bars” on page 74
About Dockable Windows
You can dock certain windows to the edges of the main frame window of the IDE.
Table 6.1 on page 68 explains possible states for dockable windows. Figure 6.1 on page 68 shows the different window states.
About Dockable Windows
[image:68.612.54.519.268.718.2]Figure 6.1 Window states Table 6.1 Window states
State Characteristics
Docked • Attached to the left, right, top, or bottom edge of the client area • restricted to the client a