Test-Driven iOS Development
with Swift
Create fully-featured and highly functional iOS apps by
writing tests first
Dr. Dominik Hauser
Copyright © 2016 Packt Publishing
All rights reserved. No part of this book may be reproduced, stored in a retrieval system, or transmitted in any form or by any means, without the prior written permission of the publisher, except in the case of brief quotations embedded in critical articles or reviews.
Every effort has been made in the preparation of this book to ensure the accuracy of the information presented. However, the information contained in this book is sold without warranty, either express or implied. Neither the author, nor Packt Publishing, and its dealers and distributors will be held liable for any damages caused or alleged to be caused directly or indirectly by this book.
Packt Publishing has endeavored to provide trademark information about all of the companies and products mentioned in this book by the appropriate use of capitals. However, Packt Publishing cannot guarantee the accuracy of this information.
First published: February 2016
Production reference: 1170216
Published by Packt Publishing Ltd. Livery Place
35 Livery Street
Birmingham B3 2PB, UK. ISBN 978-1-78588-073-5
Credits
Author
Dr. Dominik Hauser
Reviewer Ravi Shankar
Commissioning Editor Kunal Parikh
Acquisition Editor Reshma Raman
Content Development Editor Parshva Sheth
Technical Editor Rahul C. Shah
Copy Editor Sonia Cheema
Project Coordinator Nikhil Nair
Proofreader
Safis Editing
Indexer
Mariammal Chettiyar
Production Coordinator Nilesh Mohite
About the Author
Dr. Dominik Hauser
completed his PhD in physics at Heidelberg University, Germany. While working as a university professor, he started iOS development in his spare time. His first app on physics has been an astounding success worldwide. Since then, he's turned himself into a full-time iOS developer, crediting a number of successful apps to his name. He has been a Swift developer since day one and runs a blog on iOS development at http://swiftandpainless.com/.About the Reviewer
Ravi Shankar
is a multiskilled software consultant with over 15 years ofexperience in the IT industry. He has the ability to work with different technologies and has extensive experience in product development, system maintenance, and support. Ravi is a polyglot and self-taught programmer, with hands-on experience in Swift, Objective-C, and Java. He believes in gaining knowledge through sharing and helping others learn about technology.
www.PacktPub.com
Support files, eBooks, discount offers, and more
For support files and downloads related to your book, please visit www.PacktPub.com. Did you know that Packt offers eBook versions of every book published, with PDF and ePub files available? You can upgrade to the eBook version at www.PacktPub. com and as a print book customer, you are entitled to a discount on the eBook copy. Get in touch with us at [email protected] for more details.At www.PacktPub.com, you can also read a collection of free technical articles, sign up for a range of free newsletters and receive exclusive discounts and offers on Packt books and eBooks.
TM
https://www2.packtpub.com/books/subscription/packtlib
Do you need instant solutions to your IT questions? PacktLib is Packt's online digital book library. Here, you can search, access, and read Packt's entire library of books.
Why subscribe?
• Fully searchable across every book published by Packt • Copy and paste, print, and bookmark content
• On demand and accessible via a web browser
Free access for Packt account holders
Table of Contents
Preface v
Chapter 1: Your First Unit Tests
1
Building your first automatic unit test 2
What are unit tests? 3 Implementing a unit test example 3 Important built-in assert functions 8
Understanding TDD 10
The TDD workflow – red, green, and refactor 11
Red 12
Green 12
Refactor 12
TDD in Xcode 13
An example of TDD 13
Red – example 1 14
Green – example 1 15
Refactor – example 1 16
Red – example 2 16
Green – example 2 17
Refactor – example 2 17
A recap 19
Finding information about tests in Xcode 19
Test Navigator 20
Tests overview 21
Running tests 22
The setUp() and tearDown() methods 25
Debugging tests 25
Breakpoint that breaks on test failure 27
Test again feature 28
Advantages of TDD 28
What to test 30 Summary 31
Chapter 2:
Planning and Structuring Your Test-Driven iOS App
33
Task list view 34
Task detail view 36
Task input view 36
Structure of the app 38
The Table View Controller, the delegate and the data source 38
Table view cells 39
A model 39
Other view controllers 40
Development strategy 40
Getting started with Xcode 40
Setting useful Xcode behaviors for testing 41
Useful build behaviors 42
Testing behaviors 43
Summary 44
Chapter 3: A Test-Driven Data Model
45
Implementing the ToDoItem struct 46
Adding a title property 46
Adding an itemDescription property 49
Removing a hidden source of bugs 50
Adding a timestamp property 51
Adding a location property 52
Implementing the Location struct 53
Adding a coordinate property 54
Implementing the ItemManager class 55
Count 55
Adding and checking items 57
Equatable 64
Removing all items 74
Ensuring uniqueness 75
Summary 76
Chapter 4: A Test-Driven View Controller
77
Implementing ItemListViewController 78 Implementing ItemListDataProvider 87
Conducting the first tests 87
Fake objects 93
Using mocks 93
Implementing ItemCell 107
Implementing DetailViewController 113
Implementing InputViewController 119
Summary 125
Chapter 5:
Testing Network Code
127
Implementing asynchronous tests 128
Implementing a login request to a web service 131
Handling errors 140
Summary 144
Chapter 6: Putting It All Together
145
Connecting parts 146
The initial View Controller 146
Showing the input view 147
Showing the detail view 155
Serialization and deserialization 159
Functional tests 167
Adding a UI test target 168
Recording and testing 168
Summary 174
Chapter 7: Code Coverage and Continuous Integration
175
Enabling code coverage 175
Code coverage in Xcode 176
What code coverage is enough? 179
Continuous integration 179
Installing and setting up Xcode Server 180
Adding bots 183
Automatic deployment with fastlane 188
Installing fastlane 189
Setting up 189
Summary 190
Chapter 8: Where to Go from Here
191
What we have learned so far 191
Integration tests 192
UI tests 192
Behavior-Driven Development 193
TDD in existing projects 194
More information about TDD 195
Summary 195
Preface
iOS projects have become bigger and more complex. Many projects have already surpassed desktop applications in their complexity. One important strategy to manage this complexity is through the use of unit tests. By writing tests, a developer can point out the intention of the code and provide a safety net against theintroduction of bugs.
By writing the tests first (Test-Driven Development), the developer focuses on the problem. This way, they are forced to think about the domain and rephrase a feature request using their own understanding by writing the test. In addition to this, applications written using Test-Driven Development (TDD) only contain code that is needed to solve the problem.
As a result, the code is clearer, and the developer gains more confidence that the code actually works.
In this book, you will develop an entire iOS app using TDD. You will experience different strategies of writing tests for models, View Controller, and networking code.
What this book covers
Chapter 1, Your First Unit Tests, walks you through your first unit tests using Xcode and discusses the benefits of of using TDD.
Chapter 2, Planning and Structuring Your Test-Driven iOS App, introduces the app you are going to write through the course of this book and how to set up a project in Xcode.
Chapter 3, A Test-Driven Data Model, discusses the TDD of a data model.
Chapter 5, Testing Network Code, teaches you to test network code using stubs to fake a server component before it is developed.
Chapter 6, Putting It All Together, walks you through the integration of all the different parts developed in previous chapters and shows the use of functional tests.
Chapter 7, Code Coverage and Continuous Integration, shows you how to measure the code coverage of your tests using Xcode and introduces you to continuous integration.
Chapter 8, Where to Go from Here, wraps up and shows you the possible next steps to improve your acquired testing skills.
What you need for this book
The following hardware and software is needed to follow the code examples in the book:
• Mac with El Capitan (OS X 10.11) • Xcode 7
Who this book is for
If debugging iOS apps is a nerve-racking task for you and you are looking for a fix, this book is for you.
Conventions
In this book, you will find a number of text styles that distinguish between different kinds of information. Here are some examples of these styles and an explanation of their meaning.
Code words in text, database table names, folder names, filenames, file extensions, pathnames, dummy URLs, user input, and Twitter handles are shown as follows: "To be able to write tests for your code, you need to import the module with the @ testable keyword."
A block of code is set as follows:
func makeHeadline(string: String) -> String { return "This Is A Test Headline"
When we wish to draw your attention to a particular part of a code block, the relevant lines or items are set in bold:
override func setUp() { super.setUp()
viewController = ViewController() }
New terms and important words are shown in bold. Words that you see on the screen, for example, in menus or dialog boxes, appear in the text like this: "To edit the build scheme, click on Scheme in the toolbar in Xcode, and then click on Edit Scheme…."
Warnings or important notes appear in a box like this.
Tips and tricks appear like this.
Reader feedback
Feedback from our readers is always welcome. Let us know what you think about this book—what you liked or disliked. Reader feedback is important for us as it helps us develop titles that you will really get the most out of.
To send us general feedback, simply e-mail [email protected], and mention the book's title in the subject of your message.
If there is a topic that you have expertise in and you are interested in either writing or contributing to a book, see our author guide at www.packtpub.com/authors.
Customer support
Now that you are the proud owner of a Packt book, we have a number of things to help you to get the most from your purchase.
Downloading the example code
Downloading the color images of this book
We also provide you with a PDF file that has color images of the screenshots/ diagrams used in this book. The color images will help you better understand the changes in the output. You can download this file from https://www.packtpub. com/sites/default/files/downloads/TestDriven_Development_with_Swift_ ColoredImages.pdf.
Errata
Although we have taken every care to ensure the accuracy of our content, mistakes do happen. If you find a mistake in one of our books—maybe a mistake in the text or the code—we would be grateful if you could report this to us. By doing so, you can save other readers from frustration and help us improve subsequent versions of this book. If you find any errata, please report them by visiting http://www.packtpub. com/submit-errata, selecting your book, clicking on the Errata Submission Form link, and entering the details of your errata. Once your errata are verified, your submission will be accepted and the errata will be uploaded to our website or added to any list of existing errata under the Errata section of that title.
To view the previously submitted errata, go to https://www.packtpub.com/books/ content/support and enter the name of the book in the search field. The required information will appear under the Errata section.
Piracy
Piracy of copyrighted material on the Internet is an ongoing problem across all media. At Packt, we take the protection of our copyright and licenses very seriously. If you come across any illegal copies of our works in any form on the Internet, please provide us with the location address or website name immediately so that we can pursue a remedy.
Please contact us at [email protected] with a link to the suspected pirated material.
We appreciate your help in protecting our authors and our ability to bring you valuable content.
Questions
Your First Unit Tests
When the iPhone platform was first introduced, applications were small and focused on one feature. It was easy to make money with an app that only did one thing (for example, a flash light app that only showed a white screen). The code for these apps only had a few hundred lines and could easily be tested by tapping the screen for a few minutes.Since then, the App Store has changed a lot. Even now, there are small apps with a clear focus in the App Store, but it's much harder to make money from them. A common app is complicated and feature-rich but still needs to be easy to use. There are companies with several developers per platform working on one app all the time. These apps sometimes have a feature set, which is normally found in desktop applications. It is very difficult and time consuming to test all the features on such apps by hand.
One reason for this is that manual testing needs to be done through a user interface, and it takes time to load the app to be tested. In addition to this, human beings are very slow as compared to the capabilities of computers. Most often, you'll notice that a computer waits for the next input of the user. If we could let a computer insert values, testing could be drastically accelerated. Additionally, the computer could test the features of the app without loading the user interface; thus, the complete app could be tested within seconds. This is exactly what unit tests are all about.
We will cover the following topics in this chapter: • Building your first automatic unit test • Understanding TDD
• TDD in Xcode • Advantages of TDD • Disadvantages of TDD
Building your first automatic unit test
If you have done some iOS development (or application development in general) before, the following example might seem familiar to you.
You are planning to build an app. You start collecting features, drawing some
sketches, or your project manager hands the requirements to you. At some point, you start coding. After you have set up the project, you start implementing the required features of the app.
Let's say the app is an input form, and the values the user puts in have to be validated before the data can be sent to the server. The validation checks, for example, whether the e-mail address looks like it's supposed to and the phone number has a valid format. You implement the form and check whether everything works. But before you can test, you need to write code that presents the form on the screen. Then, you build and run your app in the iOS simulator. The form is somewhere deep in the view hierarchy. So, you navigate to this view and put the values into the form. It doesn't work. Next, you go back to the code and try to fix the problem. Sometimes, this also means that you need to run the debugger, and build and run to check whether the code still has errors.
Eventually, the validation works for the test data you put in. Normally, you would need to test for all possible values to make sure that the validation not only works for your name and your data but also for all valid data. But there is this long list of requirements on your desk, and you are already running late. The navigation to the form takes three taps in the simulator, and putting in all the different values just takes too long. You are a coder after all.
What are unit tests?
Automatic unit tests act like a robot for you. They execute code but without the need of navigating to the screen with the feature to test. Instead of running the app over and over again you write tests with different input data and let the computer test your code in the blink of an eye. Let us see how this works in a simple example.
Implementing a unit test example
Open Xcode and go to File | New | Project. Navigate to iOS | Application | Single ViewApplication, and click on Next. Put in the name FirstDemo, select the Swift language, iPhone for Devices, and check IncludeUnitTests. Uncheck UseCore Data and IncludeUITests, and click on Next. The following screenshot shows the options in Xcode:
What you see here is a test case. A test case is a class comprising several tests. It's good practice to have a test case for each class in the main target.
Let's go through this file step by step: import XCTest
@testable import FirstDemo
Every test case needs to import the XCTest framework. It defines the XCTestCase class and the test assertions that you will see later in this chapter.
The second line imports the FirstDemo module. All the code you write for the app will be in this module. By default, classes, structs, enums, and their methods are defined as internal. This means that they can be accessed within the module. But the test code lives outside of the module. To be able to write tests for your code, you need to import the module with the @testable keyword. This keyword makes the internal elements of the module accessible to the test case.
Next we'll take a look at the class declaration: class FirstDemoTests: XCTestCase {
Nothing special here. This defines a class FirstDemoTests as a subclass of XCTestCase.
The first two methods in the class are as follows: override func setUp() {
super.setUp()
// Put setup code here. This method is called before the invocation of each test method in the class.
}
override func tearDown() {
// Put teardown code here. This method is called after the invocation of each test method in the class.
super.tearDown() }
The setUp() method is called before the invocation of each test method in the class. Here, you can insert code that should run before each test. You will see an example of this later in this chapter.
There are two test methods in the template provided by Apple: func testExample() {
// This is an example of a functional test case.
// Use XCTAssert and related functions to verify your tests produce the correct results.
}
func testPerformanceExample() {
// This is an example of a performance test case. self.measureBlock {
// Put the code you want to measure the time of here. }
} }
The first method is a normal test. You will use this kind of test a lot in the course of this book.
The second method is a performance test. It is used to test methods or functions that perform time-critical computations. The code you put into measureBlock is called several times, and the average duration is measured. Performance tests can be useful when implementing or improving complex algorithms and to make sure that their performance does not decline. We will not use performance tests in this book. All the test methods that you write have to have the test prefix; otherwise, the test case can't find and run them. This behavior allows easy disabling of tests: just remove the test prefix of the method name. Later, you will take a look at other possibilities to disable some tests without renaming or removing them.
Now, let's implement our first test. Let's assume that you have a method that counts the vowels of a string. A possible implementation could look like this:
func numberOfVowelsInString(string: String) -> Int {
let vowels: [Character] = ["a", "e", "i", "o", "u", "A", "E", "I", "O", "U"]
var numberOfVowels = 0
for character in string.characters { if vowels.contains(character) { ++numberOfVowels
} }
Add this method in the ViewController class in ViewController.swift. This method does the following things:
• First, an array of characters is defined containing all the vowels in the English alphabet.
Note that without the [Character] type declaration right after the name of the constant, this would be created as an array of strings, but we need an array of characters here.
• Next, we define a variable to store the number of vowels. The counting is done by looping over the characters of the string. If the current character is contained in the vowels array, numberOfVowels is increased by one. • Finally, numberOfVowels is returned.
Open FirstDemoTests.swift, and remove the two test methods (the methods with the test prefix). Add the following method to it:
func testNumberOfVowelsInString_ShouldReturnNumberOfVowels() { let viewController = ViewController()
let string = "Dominik"
let numberOfVowels = viewController.numberOfVowelsInString(string)
XCTAssertEqual(numberOfVowels, 3, "should find 3 vowels in Dominik")
}
Downloading the example code
You can download the example code files for all Packt books you have purchased from your account at http://www.packtpub.com. If you purchased
this book elsewhere, you can visit http://www. packtpub.com/support and register to have the
files e-mailed directly to you.
This test creates an instance of ViewController and assigns it to the constant viewController. It defines a string to use in the test. Then, it calls the function that we want to test and assigns the result to a constant. Finally, the test method calls the XCTAssertEqual(_, _) function to check whether the result is what we expected.
The green diamond with a checkmark on the left-hand side of the editor indicates that the test passed. So, this is it. This is your first unit test. Step back for a moment and celebrate. This could be the beginning of a new development paradigm for you. Now that we have a test that proves that the method does what we intended, we are going to improve the implementation. The method looks like it has been translated from Objective-C. But this is Swift. We can do better. Open ViewController. swift, and replace the numberOfVowelsInString(_:) method with this swift implementation:
func numberOfVowelsInString(string: String) -> Int {
let vowels: [Character] = ["a", "e", "i", "o", "u", "A", "E", "I", "O", "U"]
return string.characters.reduce(0) { $0 + (vowels.contains($1) ? 1 : 0) }
}
Here, we make use of the reduce function, which is defined in the array type. Run the tests again (command + U) to make sure that this implementation works like the one earlier.
Before we move on, let's recap what we have seen here. Firstly, we learned that we could easily write code that tests our code. Secondly, we saw that a test helped improve the code because we now don't have to worry about breaking the feature when changing the implementation.
To check whether the result of the function is as we expect, we used
Important built-in assert functions
Each test needs to assert some expected behavior. The use of the XCTAssert functions tells Xcode what should happen. A test method without an XCTAssert function will always pass as long as it compiles. The most important assert functions are:
• XCTAssertTrue(_:_:file:line:): Asserts that an expression is true • XCTAssertFalse(_:_:file:line:): Asserts that an expression is false • XCTAssertEqual(_:_:_:file:line:): Asserts that two expressions are
equal
• XCTAssertEqualWithAccuracy(_:_:accuracy:_:file:line:): Asserts that two expressions are the same, taking into account the accuracy defined in the accuracy parameter
• XCTAssertNotEqual(_:_:_:file:line:): Asserts that two expressions are not equal
• XCTAssertNil(_:_:file:line:): Asserts that an expression is nil
• XCTAssertNotNil(_:_:file:line:): Asserts that an expression is not nil • XCTFail(_:file:line:): Always fails
To take a look at the full list of the available XCTAssert functions, press
control, and click on the word XCTAssertEqual in the test that you have
just written. Then, select Jump to Definition in the pop-up menu.
Note that all the XCTAssert functions could be written using
XCTAssertTrue(_:_:file:line:). For example, these two lines of code are equivalent to each other:
// This assertion is equivalent to...
XCTAssertEqual(2, 1+1, "2 should be the same as 1+1")
// ...this assertion
XCTAssertTrue(2 == 1+1, "2 should be the same as 1+1")
In all the XCTAssert functions, the last three parameters are optional. To take a look at an example for the use of all the parameters, let's check out what a failing test looks like in Xcode. Open FirstDemoTests.swift, and change the expected number of vowels from 3 to 4:
Now, run the tests. The test fails. You should see something like this:
Xcode tells you that something went wrong with this test. Next to the test function, there is a red diamond with x on it. The same symbol is in the line that actually failed. Beneath this line is the explanation of what actually went wrong, followed by the string you provided in the test. In this case, the first parameter, numberOfVowels, is Optional(3), and the second parameter is Optional(4). The Optional(3)
parameter is not equal to Optional(4); therefore, the test fails.
As mentioned earlier, XCTAssertEqual(…) has two more parameters—file and line. To take a look at the use of these additional parameters, go to View | Debug Area | ActivateConsole to open the debug console. If the debug area is split in half, click on the second right-most button in the bottom-right corner to hide the variables' view:
There is one line in the output that shows the failing test:
/Users/dom/Documents/development/book/FirstDemo/FirstDemoTests/ FirstDemoTests.
swift:31: error: -[FirstDemoTests.FirstDemoTests
testNumberOfVowelsInString_ShouldReturnNumberOfVowels] :
XCTAssertEqual failed: ("Optional(3)") is not equal to ("Optional(4)") - should find 4 vowels in Dominik
The output starts with the file and line parameters where the failing tests are located. With the file and line parameters of the XCTAssert functions, we can change what is printed there. Go back to the test method, and replace the assertion with this:
XCTAssertEqual(numberOfVowels, 4, "should find 4 vowels in Dominik", file: "FirstDemoTests.swift", line: 24)
The test method starts at line number 24. With this change, the output is as follows:
FirstDemoTests.swift:24: error: -[FirstDemoTests.FirstDemoTests testNumberOfVowelsInString_ShouldReturnNumberOfVowels] :
XCTAssertEqual failed: ("Optional(3)") is not equal to ("Optional(4)") - should find 4 vowels in Dominik
The debug output of the test now shows the filename and line number that we specified in the assertion function.
As I mentioned earlier, in all XCTAssert functions, the last three parameters are optional. In cases where you don't need the message because the used assertion function makes clear what the failure is, you can omit it.
Before we move on with the introduction to TDD, change the test so that is passes again (either by changing the used test string or the expected number of vowels).
Understanding TDD
Now that we have seen what unit tests are and how they can help in development, we are going to learn about TDD.
One of the rules states that developers have to write unit tests, and all parts of the software have to be thoroughly tested. All tests have to pass before the software (or a new feature) can be released to customers. The tests should be written before the production code that they test.
This so called Test-First Programming leads to Test-Driven Development. As the name suggests, in TDD, tests drive development. This means that the developer writes code only because there is a test that fails. The tests dictate whether code has to be written, and they also provide a measure when a feature is implemented: it is implemented when all tests for this feature pass.
Robert C. Martin (known as Uncle Bob) has come up with three simple rules for TDD:
• You are not allowed to write any production code unless it is to pass a failing unit test
• You are not allowed to write any more of a unit test than is sufficient to fail; and compilation failures are failures
• You are not allowed to write any more production code than is sufficient to pass the one failing unit test
For more information, visit http://www.butunclebob.com/ArticleS.UncleBob. TheThreeRulesOfTdd.
These rules sound kind of silly because when you start with a feature that uses a new class or method that is not declared yet, the test will fail immediately, and you have to add some code just to be able to finish writing the test. But by following these rules, you will only write code that is actually needed to implement the features. And you will only write testing code that is needed as well. All the code you write will either end up being part of the final product or it will be a part of your test suite. Because of the focus on just one feature at a time, you will have a working piece of software almost all the time. So, when your boss enters your office and asks you for a demonstration of the current status of the project, you are only a few minutes away from a presentable (that is, compiling), thoroughly tested piece of software.
The TDD workflow – red, green, and refactor
Red
You start by writing a failing test. It needs to test a required feature of the software product that is not already implemented or an edge case that you want to make sure is covered. The name "red" comes from the way most test frameworks indicate a failing test. Xcode uses a red diamond with a white x on it.
It is very important that the test you write in this step initially fails. Otherwise, you can't ensure that the test works and really tests the feature that you want to implement. It could be that you have written a test that always passes and is, therefore, useless. Or, it may be possible that the feature is already implemented.
Green
In the green step, you write the simplest code that makes the test pass. It doesn't matter whether the code you write is good and clean. The code can also be silly and even wrong. It is enough when all the tests pass. The name "green" refers to how most test frameworks indicate a passing test. Xcode uses a green diamond with a white check mark.
It is very important that you try to write the simplest code to make the tests pass. By doing so, you only write code that you actually need and one with the easiest possible implementation. When I say simple, this means that it should be easy to read, understand, and change.
Often the simplest implementation will not be enough for the feature you try to implement but still enough to make all the tests pass. This just means that you need another failing test to further drive the development of the feature.
Refactor
During the green step, you wrote just enough code to make all the tests pass again. As I just mentioned, it doesn't matter what the code looks like in the green step. In the refactor step, you will improve the code. You remove duplication, extract common values, and so on. Do what is needed to make the code as good as possible. The tests help you to not break already implemented features while refactoring.
Don't skip this step. Always try to think how you can improve the code after you have implemented a feature. Doing so helps to keep the code clean and maintainable. This ensures that it is always in good shape.
TDD in Xcode
In 1998, the Swiss company Sen:te developed OCUnit, a testing framework for Objective-C (hence, the OC prefix). OCUnit was a port of SUnit, a testing framework that Kent Beck had written for Smalltalk in 1994.
With Xcode 2.1, Apple added OCUnit to Xcode. One reason for this step was that they used it to develop Core Data at the same time that they developed Tiger, the OS with which Core Data was shipped. Bill Bumgarner, an Apple engineer, wrote this later in a blog post:
"Core Data 1.0 is not perfect, but it is a rock solid product that I'm damned proud of. The quality and performance achieved could not have been done without the use of unit testing. Furthermore, we were able to perform highly disruptive operations to the codebase very late in the development cycle. The end result was a vast increase in performance, a much cleaner code base, and rock solid release."
Apple realized how valuable unit tests can be when developing complex systems in a changing environment. They wanted third-party developers to benefit from unit tests as well. OCUnit could be (and has been) added to Xcode by hand before version 2.1. But by including it into the IDE, the investment in time that was needed to start unit testing was reduced a lot, and as a result, more people started to write tests. In 2008, OCUnit was integrated into the iPhone SDK 2.2 to allow unit testing of iPhone apps. Four years later, OCUnit was renamed XCUnit (XC stands for Xcode). Finally, in 2013, unit testing became a first class citizen in Xcode 5 with the
introduction of XCTest. With XCTest, Apple added specific user interface elements to Xcode that helped with testing, which allowed the running of specific tests, finding failing tests quickly, and getting an overview of all the tests. We will go over the testing user interface in Xcode later in this chapter. But, first, we will take a look at TDD using Xcode in action.
An example of TDD
For this TDD example, we are going to use the same project we created at the
beginning of this chapter. Open the FirstDemo project in Xcode, and run the tests by hitting command+U. The one existing test should pass.
To start the TDD workflow, we need a failing test. The following questions need to be considered when writing the test:
• Precondition: What is the state of the system before we invoke the method? • Invocation: How should the signature of the method look? What are the
input parameters (if any) of the method?
• Assertion: What is the expected result of the method invocation? For the example of our blogging app, here are some possible answers for these questions:
• Precondition: None
• Invocation: The method should take a string and returns a string. The name could be makeHeadline
• Assertion: The resulting string should be the same, but all the words should start with an uppercase letter
This is enough to get us started. Enter the Red step.
Red – example 1
Open FirstDemoTests.swift, and add the following code to the FirstDemoTests class:
func testMakeHeadline_ReturnsStringWithEachWordStartCapital() { let viewController = ViewController()
let string = "this is A test headline"
let headline = viewController.makeHeadline(string) }
This isn't a complete test method yet because we aren't really testing anything. The assertion is missing. But we have to stop writing the test at this point because the compiler complains that 'ViewController' does not have a member named `makeHeadline`.
Open ViewController.swift, and add the following method to the ViewController class:
func makeHeadline(string: String) {
}
The error still remains. The reason for this is that we need to compile to make the test target aware of this change. Run the tests to check whether this change is enough to make the test green again. We get a warning that the headline constant isn't used, and we should change it to _. So, let's use it. Add the following assert function at the end of the test:
XCTAssertEqual(headline, "This Is A Test Headline")
This results in another compiler error:
Cannot invoke 'XCTAssertEqual' with an argument list of type '((), String)'
The reason for this error is that the makeHeadline(_:) method at the moment returns Void or (). But XCTAssertEqual can only be used if both expressions are of the same type. This makes sense as two expressions of different types can't be equal to each other.
Go back to ViewController, and change makeHeadline(_:) to this:
func makeHeadline(string: String) -> String { return ""
}
Green – example 1
Now, the method returns an empty string. This should be enough to make the test compile. Run the test. The test fails. But this time it's not because the code we've written does not compile but due to the failed assertion instead. This is not a surprise because an empty string isn't equal to "This Is A Test Headline". Following the TDD workflow, we need to go back to the implementation, and add the simplest code that makes the test pass.
In ViewController, change makeHeadline(_:) to read like this:
func makeHeadline(string: String) -> String { return "This Is A Test Headline"
This code is stupid and wrong, but it is the simplest code that makes the test pass. Run the tests to make sure that this is actually the case.
Even though the code we just just wrote is useless for the feature we are trying to implement it still has value for us, the developers. It tells us that we need another test.
Refactor – example 1
But before writing more tests, we need to refactor the existing ones. In the
production code, there is nothing to refactor. This code couldn't be simpler or more elegant. In the test case, we now have two test methods. Both start by creating an instance of ViewController. This is a repetition of code and a good candidate for refactoring.
Add the following property at the beginning of the FirstDemoTests class:
var viewController: ViewController!
Remember that the setUp() method is called before each test is executed. So, it is the perfect place to initialize the viewController property:
override func setUp() { super.setUp()
viewController = ViewController() }
Now, we can remove this let viewController = ViewController() line of code from each test.
Red – example 2
As mentioned in the preceding section, we need another test because the production code we have written to make the previous test pass only works for one specific headline. But the feature we want to implement has to work for all possible headlines. Add the following test to FirstDemoTests:
func testMakeHeadline_ReturnsStringWithEachWordStartCapital2() { let string = "Here is another Example"
let headline = viewController.makeHeadline(string)
XCTAssertEqual(headline, "Here Is Another Example") }
Green – example 2
Open ViewController.swift, and replace the implementation of makeHeadline(_:) with the following lines of code:
func makeHeadline(string: String) -> String { // 1
let words = string.componentsSeparatedByString(" ")
// 2
var headline = "" for var word in words {
let firstCharacter = word.removeAtIndex(word.startIndex) headline += "\(String(firstCharacter).uppercaseString)\ (word) "
} // 3
headline.removeAtIndex(headline.endIndex.predecessor()) return headline
}
Let's go through this implementation step by step: 1. Split the string into words.
2. Iterate over the words, and remove the first character and change it to
uppercase. Add the changed character to the beginning of the word. Add this word with a trailing space to the headline string.
3. Remove the last space and return the string.
Run the tests. All the tests pass. The next thing to perform in the TDD workflow is refactoring.
Do not skip refactoring. This step is as important as the red and the green step. You are not done until there is nothing to refactor anymore.
Refactor – example 2
Replace the two tests with the following code:
func testMakeHeadline_ReturnsStringWithEachWordStartCapital() { let inputString = "this is A test headline"
let expectedHeadline = "This Is A Test Headline"
let result = viewController.makeHeadline(inputString) XCTAssertEqual(result, expectedHeadline)
}
func testMakeHeadline_ReturnsStringWithEachWordStartCapital2() { let inputString = "Here is another Example"
let expectedHeadline = "Here Is Another Example"
let result = viewController.makeHeadline(inputString) XCTAssertEqual(result, expectedHeadline)
}
Now, the tests are easy to read and understand. They follow a logical structure: precondition, invocation, and assertion.
Run the tests. All the tests should still pass. But how do we know whether the tests still test the same thing as they did earlier? In most cases, the changes we'll make while refactoring the tests don't need to be tested themselves. But, sometimes (like in this case), it is good to make sure that the tests still work. This means that we need a failing test again. Go to makeHeadline(_:) and comment out (by adding // at the beginning) the line:
headline.removeAtIndex(headline.endIndex.predecessor())
Run the tests again. Eureka! Both tests fail.
As you can see here, a failing test does not stop the tests in general. But you can change this behavior by setting continueAfterFailure to
false in setUp().
func makeHeadline(string: String) -> String {
let words = string.componentsSeparatedByString(" ")
let headline = words.map { (var word) -> String in
let firstCharacter = word.removeAtIndex(word.startIndex) return "\(String(firstCharacter).uppercaseString)\(word)" }.joinWithSeparator(" ")
return headline }
In this implementation, we use the function map to iterate the words array and return another array containing the same words but starting with uppercase letters. The result is then transformed into a string by joining the words using a space as the separator.
Run the tests again to make sure we didn't break anything with the refactoring. All the tests should still pass.
A recap
In this section, we have added a feature to our project using the TDD workflow. We started with a failing test. We made the test pass. And, finally, we refactored the code to be clean. The steps you have seen here seem so simple and stupid that you may think that you could skip some of the tests and still be good. But then, it's not TDD anymore. The beauty of TDD is that the steps are so easy that you do not have to think about them. You just have to remember what the next step is.
Because the steps and the rules are so easy, you don't have to waste your brainpower thinking about what the steps actually mean. The only thing you have to remember is red, green, and refactor. As a result, you can concentrate on the difficult part: write tests, make them pass, and improve code.
Finding information about tests in Xcode
Test Navigator
To open the Test Navigator, click on the diamond with a minus sign (-) in the navigator panel:
The Test Navigator shows all the tests. In the preceding screenshot, you can see the test navigator for our demo project. In the project, there is one test target. For complex apps, it can be useful to have more than one test target, but this is beyond the scope of this book. Right behind the name of the test target, the number of tests is shown. In our case, there are three tests in the target.
The demo project has only one test case with three tests.
At the bottom of the navigator is a filter control with which you can filter the shown tests. As soon as you start typing, the shown tests are filtered using fuzzy matching. In the control is also a button showing a diamond with an x:
Tests overview
Xcode also has a test overview where all the results of the tests are collected in one place. To open it, select the Result Navigator in the navigator panel, and select the last test in the list:
You can also select other tests in the list if you want to compare test runs with each other. In the editor on the right-hand side, an overview of all the tests from the selected test run are shown:
In the overview, there is also a Logs tab. It shows all the tests in a tree-like structure. Here is an example of what this looks like for one passing and two failing tests:
The logs show the test cases (in this example, one test case), the tests within the test cases (in this example, two failing and one passing test), and in addition to this, the time each test case and even each test needs to execute.
In TDD, it is important that the tests execute fast. You want to be able to execute the whole test suite in less than a second. Otherwise, the whole workflow is dominated by test execution and testing can distract your focus and concentration. You should never be tempted to switch to another application (such as Safari) because the tests will take half a minute.
If you notice that the test suite takes too long to be practical, open the logs and search for the tests that slow down testing, and try to make the tests faster. Later in the book, we will discuss strategies to speed up test execution.
Running tests
Xcode provides many different ways to execute tests. You have already seen two ways to execute all the tests in the test suite: go to the Project | Test menu item, and use the command + U keyboard shortcut.
Running one specific test
Nevertheless, sometimes, you need to run one specific test, but don't let it become a habit.
To run one specific test, you can click on the diamond shown next to the test method:
When you click on it, the production code is compiled and launched in the simulator or on the device, and the test is executed.
There is another way to execute exactly one specific test. When you open Test Navigator and hover over one test, a circle with a play icon is shown next to the test method name:
Again, if you click on this test, it is run exclusively.
Running all tests in a test case
In the same way as running one specific test, you can run all the tests of a specific test case. Click on the diamond next to the definition of the test case, or click on the play button that appears when you hover over the test case name in the Test Navigator.
Running a group of tests
You can choose to run a group of tests by editing the build scheme. To edit the build scheme, click on Scheme in the toolbar in Xcode, and then click on Edit Scheme…:
Then, select Test, and expand the test suite by clicking on the small triangle. On the right-hand side is a column called Test:
As an alternative, you can add a build scheme for a group of tests that you want to run regularly without running all tests.
But as mentioned earlier, you should run the complete test suite as often as possible.
The setUp() and tearDown() methods
We have already seen the setUp() and tearDown() instance methods earlier in this chapter. The code in the setUp()instance method is run before each test invocation. In our example, we used setUp() to initialize the View Controller that we wanted to test. As it was run before each test invocation, each test used its own instance of ViewController. The changes we made to that instance in one test, didn't affect the other test. The tests executed independently of each other.
The tearDown()instance method is run after each test invocation. Use tearDown() to perform the necessary cleanup.
In addition to the instance methods, there are also the setUp() and tearDown()class methods. These are run before and after all the tests of a test case, respectively.
Debugging tests
Sometimes, but usually rarely, you may need to debug your tests. As with normal code, you can set breakpoints in test code. The debugger then stops the execution of the code at a breakpoint. You can also set breakpoints in code that is to be tested to check whether you have missed something or if the code you'd like to test is actually executed.
To get a feeling of how this works, let's add an error to a test in the preceding example and debug it. Open FirstDemoTests.swift, and replace the
testMakeHeadline_ReturnsStringWithEachWordStartCapital2() test method with this code:
func testMakeHeadline_ReturnsStringWithEachWordStartCapital2() { let inputString = "Here is another Example"
let expectedHeadline = "Here iS Another Example"
let result = viewController.makeHeadline(inputString) XCTAssertEqual(result, expectedHeadline)
Have you seen the error we have introduced? The value of the string
expectedHeadline has a typo. The letter "s" in iS is an uppercase letter, and the letter "i" is a lowercase letter. Run the tests. The test fails and Xcode tells you what the problem is. But for the sake of this exercise, let's set a breakpoint in the line with the XCTAssertEqual() function. Click on the area on the left-hand side of the line where you want to set a breakpoint. You have to click on the area next to the red diamond. As a result, your editor will look similar to what is shown here:
Run the tests again. The execution of the tests stops at the breakpoint. Open the debug console if it is not already open (go to View | Debug Area | Activate Console). In the console, some test output is visible. The last line starts with (lldb) and a blinking cursor. Put in po expectedHeadline and hit return. The term po in the code indicates print object. The console prints the value of expectedHeadline:
(lldb) po expectedHeadline "Here iS Another Example"
Now, print the value of result:
(lldb) po result
"Here Is Another Example"
So, with the help of the debugger, you can find out what is happening.
To learn more about the debugger, search for lldb in the Apple
documentation.
Breakpoint that breaks on test failure
Xcode has a built-in breakpoint on test failures. When this breakpoint is set, the execution of the tests is stopped, and a debug session is started whenever a test fails. Usually, this is not what you want in TDD because failing tests are normal in TDD, and you don't need a debugger to find out what's going on. You explicitly wrote the test to fail at the beginning of the TDD workflow cycle.
But in case you need to debug one or more failing tests, it's good to know how this breakpoint is activated. Open the Debug Navigator:
At the bottom of the navigator view is a button with a plus sign (+). Click on it, and select Add Test Failure Breakpoint:
The debugger stops at the line with the assertion because the tests fail. Like in the preceding example, you get a debug session so that you can put in LLDB commands to find out why the test failed.
Remove the breakpoint again because it's not very practical while performing TDD.
Test again feature
Now, let's fix the error in the tests and learn how to run the previous test again. Open FirstDemoTests.swift, and run only the failing test by clicking on the diamond symbol next to the test method. The test still fails. Fix it by changing iS to Is in expectedHeadline. Then, go to Product | PerformAction | Run testMakeHeadline_ReturnsStringWithEachWordStartCapital2() Again or use the shortcut control + option + command + G to run just the previous test again. The shortcut is especially useful when you are working on one specific feature and you need to test whether the implementation is already enough.
Advantages of TDD
TDD comes with advantages and disadvantages. These are the main advantages: • You only write code that is needed: Following the rules, you have to stop
writing production code when all your tests pass. If your project needs another feature, you need a test to drive the implementation of the feature. The code you write is the simplest code possible. So, all the code ending up in the product is actually needed to implement the features.
• More modular design: In TDD, you concentrate on one micro feature at a time. And as you write the test first, the code automatically becomes easy to test. Code that is easy to test has a clear interface. This results in a modular design for your application.
• Easier to refactor: Every feature is thoroughly tested. You don't need to be afraid to make drastic changes because if all the tests still pass, everything is fine. This point is very important because you, as a developer, improve your skills each and every day. If you open the project after six months of working on something else, most probably, you'll have many ideas on how to improve the code. But your memory about all the different parts and how they fit together isn't fresh anymore. So, making changes can be dangerous. With a complete test suite, you can easily improve the code without the fear of breaking your application.
• High test coverage: There is a test for every feature. This results in a high test coverage. A high test coverage helps you gain confidence in your code. • Tests document the code: The test code shows you how your code is meant
to be used. As such, it documents your code. The test code is sample code that shows what the code does and how the interface has to be used.
• Less debugging: How often have you wasted a day to find a nasty bug? How often have you copied an error message from Xcode and searched for it on the Internet? With TDD, you write fewer bugs because the tests tell you early on whether you've made a mistake. And the bugs you write are found much earlier. You can concentrate on fixing the bug when your memory about what the code is supposed to do and how it does it.
Disadvantages of TDD
Just like everything else in the world, TDD has some disadvantages. The main ones are:
• No silver bullet: Tests help to find bugs, but they can't find bugs that you introduce in the test code and in implementation code. If you haven't understood the problem you need to solve, writing tests most probably doesn't help.
• All the members of a team need to do it: As TDD influences the design of code, it is recommended that either all the members of a team use TDD or no one at all. In addition to this, it's sometimes difficult to justify TDD to the management because they often have the feeling that the implementation of new features takes longer if developers write code that won't end up in the product half of the time. It helps if the whole team agrees on the importance of unit tests.
• Tests need to be maintained when requirements change: Probably, the strongest argument against TDD is that the tests have to be maintained as the code has to. Whenever requirements change, you need to change the code and tests. But you are working with TDD. This means that you need to change the tests first and then make the tests pass. So, in reality, this disadvantage is the same as before when writing code that apparently takes a long time.
What to test
What should be tested? When using TDD and following the rules mentioned in the previous sections, the answer is easy—everything. You only write code because there is a failing test.
In practice, it's not that easy. For example, should the position and color of a button be tested? Should the view hierarchy be tested? Probably not. The color and exact position of the button are not important for the functioning of an app. In the early stages of development, these kind of things tend to change. With Auto Layout and different localizations of the app, the exact position of buttons and labels depend on many parameters.
In general, you should test the features that make the app useful for a user and those that need to work. The user doesn't care whether the button is exactly 20 points from the rightmost edge of the screen. All the user is interested in is that the button does what they expect it to and the app looks good.
Summary
In this chapter, we saw unit tests in action and how they are set up in Xcode. We learned what TDD is and why it can help build better apps. With the help of TDD, we implemented a feature of a demo app to get used to the workflow. We saw many different possibilities to run tests and how we can find bugs in our tests using LLDB, the debugger built into Xcode. Finally, we discussed the advantages and disadvantages of TDD and what should be tested with unit tests.
Planning and Structuring
Your Test-Driven iOS App
In the previous chapter, we learned how to write unit tests, and we saw an easy example of TDD. When starting TDD, writing unit tests is easy for most people. The hard part is to transfer the knowledge from writing the test to driving the development. What can be assumed? What should be done before one writes the first test? What should be tested to end up with a complete app?As a developer, you are used to thinking in terms of code. When you see a feature on the requirement list for an app, your brain already starts to layout the code for this feature. And for recurring problems in iOS development (such as building table views), you most probably have already developed your own best practices.
In TDD, you should not think about the code while working on the test. The tests have to describe what the unit under test should do and not how it should do it. It should be possible to change the implementation without breaking the tests.
To practice this approach of development, we will develop a simple to-do list app in the remainder of this book. It is, on purpose, not a very sophisticated app. We want to concentrate on the TDD workflow, not complex implementations.
We will cover the following topics in this chapter: • Task list view
• Task detail view • Task input view • Structure of an app
• Getting started with Xcode
• Setting useful Xcode behaviors for testing
Task list view
User stories:
• As a user, I want to see the list of to-do items when I open the app • As a user, I want to add to-do items to the list
In a to-do list app, the user will obviously need to be able to check items when they are finished. The checked items are shown below the unchecked items, and it is possible to uncheck them again. The app uses the delete button in the UI of UITableView to check and uncheck items. Checked items will be put at the end of the list in a section with the Finished header. The user can also delete all the items from the list by tapping the trash button. The UI for the to-do item list will look like this:
User stories:
• As a user, I want to check a to-do item to mark it as finished
• As a user, I want to see all the checked items below the unchecked items • As a user, I want to uncheck a to-do item
• As a user, I want to delete all the to-do items
Task detail view
The tasks detail view shows all the information that's stored for a to-do item. The information consists of a title, due date, location (name and address), and a description. If an address is given, a map with an address is shown. The detail view also allows checking the item as finished. The detail view looks like this:
User stories:
• As a user, given that I have tapped a to-do item in the list, I want to see its details
• As a user, I want to check a to-do item from its details view
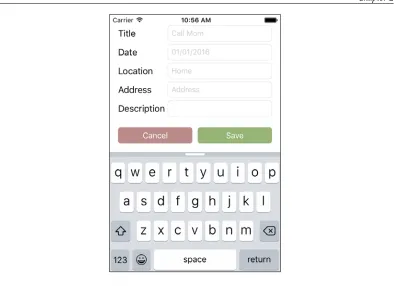
Task input view
User stories:
• As a user, given that I have tapped the add (+) button in the item list, I want to see a form to put in the details (title, optional date, optional location name, optional address, and optional description) of a to-do item
• As a user, I want to add a to-do item to the list of to-do items by tapping on the Save button
We will not implement the editing and deletion of tasks. But when you have worked through this book completely, it will be easy for you to add this feature yourself by writing the tests first.
Keep in mind that we will not test the look and design of the app. Unit tests cannot figure out if an app looks like it was intended. Unit tests can test features, and these are independent of their presentation. In principle, it would be possible to write unit tests for the position and color of UI elements. But such things are very likely to change a lot in the early stages of development. We do not want to have failing tests only because a button has moved 10 points.
Structure of the app
The following diagram shows the structure of the app:
The Table View Controller, the delegate and
the data source
In iOS apps, data is often presented using a table view. Table views are highly optimized for performance; they are easy to use and to implement. We will use a table view for the list of to-do items.
It is a good practice to split up the responsibility into several classes. Therefore, we will use a helper class to act as the data source and delegate for the table view. The communication between the Table View Controller and the helper class will be defined using a protocol. Protocols define what the interface of a class looks like. This has a great benefit: if we need to replace an implementation with a better version (maybe because we have learned how to implement the feature in a better way), we only need to develop against the clear interface. The inner workings of the other classes do not matter.
Table view cells
As you can see in the preceding screenshots, the to-do list items have a title and, optionally, they can have a due date and a location name. The table view cells should only show the set data. We will accomplish this by implementing our own custom table view cell.
A model
Other view controllers
The application will have two more view controllers, a task detail View Controller, and a View Controller for the input of the task.
When the user taps a to-do item in the list, the details of the item are presented in the task detail View Controller. From the Details screen, the user will be able to check an item.
New to-do items will be added to the list of items using the view presented by the input View Controller.
Development strategy
In this book, we will build the app from inside out. We will start with the model, and then build the controllers and networking. At the end of the book, we will put everything together.
Of course, this is not the only way to build apps. But by separating on the basis of layers instead of features, it is easier to follow and keep an overview of what is happening. When you later need to refresh your memory, the relevant information you need is easier to find.
Getting started with Xcode
To take a look at how the application target and test target fit together, select the project in Project Navigator, and then select the ToDoTests target. In the General tab, you'll find a setting for the host application that the test target should be able to test. It should look like this:
Xcode has already set up the test target correctly to allow the testing of the implementations that we will write in the application target.
Xcode has also set up a scheme to build the app and run the tests. Click on the Scheme selector next to the stop button in the toolbar, and select Edit Scheme.... In the Test action, all the test bundles of the project will be listed. In our case, only one test bundle is shown: ToDoTests. On the right-hand side of the shown window is a column named Test, with a checked checkbox. This means that if we run the tests while this scheme is selected in Xcode, all the tests in the selected test suite will be run.
Setting useful Xcode behaviors for
testing
Xcode has a feature called behaviors. With the use of behaviors and tabs, Xcode can show useful information depending on its state.
Useful build behaviors
When building starts, Xcode compiles the files and links them together. To see what is going on, you can activate the build log when the building starts. It is recommended that you open the build log in a new tab because this allows us to switch back to the code editor when no error occurs during the build. Select the Starts stage and check Show tab named. Put in the name Log and select inactive window. Check the Show navigator setting and select Issue Navigator. At the bottom of the window, check Navigate to and select current log. After you have made these changes, the settings window should look like this:
Testing behaviors
To write code, I have an Xcode tab called Coding. Usually, in this tab, the test is open on the left-hand side, and in the Assistant Editor on the right-hand side is the code to be tested (or in the case of TDD, the code to be written). It looks like this:
When the test starts, we want to see the code editor again. So, we add a behavior to show the Coding tab. In addition to this, we want to see the Test Navigator and debugger with the console view.
When the test succeeds, Xcode should show a bezel to notify us that all tests have passed. Go to the Testing | Succeeds stage, and check the Notify using bezel or
system notification setting. In addition to this, it should hide the navigator and the
In case testing fails (which happens a lot in TDD), Xcode should show a bezel again. I like to hide the debugger because usually it is not the best place to figure out what is going on in the case of a failing test. And in TDD, in most cases, we already know what the problem is. But we want to see the failing test. Therefore, check Show navigator and select Issue navigator. At the bottom of the window, check Navigate to and select first new issue.
You can even make your Mac speak the announcements. Check Speak
announcements using and select the voice you like. But be careful not to annoy your coworkers. You might need their help in the future.
Now, the project and Xcode are set up, and we can start our TDD journey.
Summary
In this chapter, we took a look at the app we are going to build throughout the course of this book. We took a look at how the screens of the app will look when we are finished. We created the project that we will use later on, and we learned about Xcode behaviors.