-1-
~t
ATSaT
AT&T 3270
lEmWlUa1.tCrf
+
ESCORTTM
User's Guide
308-380 Issue 1
~.
-D-.-.-.-.-.-.-.-.-.-.-.-.-.-.-.-.-.-.-.-.-.-.-.-.-.-.-.-.-.-.-.-.-.-..
L-o ••••••••••••••••••••••••••••••••••••••••••••••••••••••••••••••••••••••• 1
r!:. •••••••••••••••••••••••••••••••••••••••••••••••••••••••••••••••••••••
1...
:.:.:.:.:.:.:-:.:.:.:.:.:.:.:.:.:.:.:.:.:.:.:.:.:.:.:.:.:.:.:.:.:.:.:
...
• r· - " • • • • • • • • • • • • • • • • • • • • • • • • • • • • •• I • • • • • • • • • • • • • • • • • • • • • • • • • • • • •
• I • • • • • • • • • • • • • • • • • • • • • • • • • • • • • • "'_-'T1I" • • • • • • • • • • • • • • • • • • • • • • • • • • • • •
• • • • • • • • • • • • • • • • • • • • • • • • • • • • • •
·
... .
iii •·
... .
....
-
... .
• I I • • • • • • • • • • • • • • • • • • • • • • • • • • • • •
.
·
,... .
... .
·
·
... .
... .
·
·
... .
.. ~,... .
• I • • • • • • • • • • • • • • • • • • • • • • • • • • • • •
• 1 • • • • • • • • • • • • • • • • • • • • • • • • • • • • • •
....
·
... .
"'... .
·
·
... .
...
..,.
·.·A·.·.·.·.·.·.·.·.·.·.·.·.·.·.·.·.·.·.·.·.·.·.·.·.·.·.·.·.x ••
:.:1
·
... .
~.:.:.:.:.:.:.:.:.: .:.:.:
.:.:.:.:.:.:.:.:.:.:.:.:.:.:.:.x
·
·
... .
... .
· .
• r.
~. . .
• • • [.
- . . . .. . .
. .
.
.
. .
.
.
.
. .. .
.. ....
'... .
•• J ~... ••• ' ••••••••••••••••••••••••••••••••••••••••••
• • • • • • I • • • • • • • • • • • • • • • • • • • • •
· .
. . .
,... .
. : ·;"!r:·:·:·:· .• :-: .:.:.:.:. :.:.:.:.:.:.:.:.:.:.:.:.:.:.:-:.:.:
..
.
... .
•• •
·
L._~·... .
••••••••••••••••••••••••••••••••••••••••••••••••••••••••
·
... .
. :
·rr~~:.:.:.:.:.:.:.:.:.:. :.:.:.:.:.:.:.:.:.:.:.:.:.:.:.:.:.:.: ...
..
•••·
L. .•... .
..J ••••••••••••••••••••••••••••••••••••••••••••••••••••••••••.
... .
·
·
... .
... .
:.
:I~.:.:.:.:.:.:.:.:
.:.:.:.:.:.:.:.:.:.:.:.:.:.:.:.:.:.:.:.:.x
• t..-...I • • • • • • • • • • • • • • • • • • • • • • • • • • • • •
·
·
... .
... .
·
..
... .
~...•...•.•.•••
~... .
• I f • • • • • • • • • • • • • • • • • • • • • • • • • • • • • •
.. .
·
~... .
... .
·
·
... .
... .
©1988 AT&T
All Rights Reserved Printed in USA
NOTICE
The information in this document is subject to change without notice. AT&T assumes no responsibility for any errors that may appear in this document. DEC is a registered trademark and VT100 is a trademark of Digital Equipment Corporation.
I BM is a registered trademark and CICS is a trademark of International Business Machines Corporation.
1
2
Contents
Getting Started
Overview
What Is In This Guide Before You Begin
Other ESCORT Documentation
Using ESCORT
OverView
Using Interactive, Script, and Tutorial Modes Working in Host and Local Sessions
ESCORT Utility Files Command Line
Special Key Combinations
Glossary
Appendix A: Key Sequences
Appendix B: Environment
Variables
1
Getting Started
Overview 1 -1
What Is In This Guide 1 -3
Organization of This Guide 1 -3
Conventions 1 -4
Before You Begin 1 -7
Overview
This user's guide contains the information you need to know to use ESCORT™.
This guide assumes that a user knows how to
o
operate an IBM® 3278 or DEC® VT100™ (or similar) terminalo
use an application running on a synchronous or asynchronous host (for exampleiMan IBM host system under IMS, TSO, VM/CMS, CICS ,or VTAM)o
use an application running on a UNIX® operating system .. based AT&T 3B processor.Before you begin using ESCORT, you should understand
o
the modes of operation featured in ESCORTo
the special features of the softwareo the concept of accessing multiple sess'ions.
What Is In This Guide
Organization of This Guide
This guide is divided into five parts:
Getting Started
contains information about this user's guide. Read this chapter to learn how the guide is organized, and what conventions are used throughout the guide.
Using ESCORT
discusses the procedures for using ESCORT and accessing multiple sessions. Special features, the types of ESCORT utility files available, ~nd ESCORT special key combinations are also presented in this chapter.
Appendices
Appendix A: Key Sequences
consists of tables that present functions and the associated keys and/or key sequences for specific terminal types.
Appendix B: Environment Variables
provides informatton on setting environment variables.
Appendix C: Interpretation of Attrib~te Bytes contains information on reading attribute bytes.
Glossary
contains definitions for terms and acronyms used in this guide.
Index
lists page references for locating specific items in this guide.
Conventions
Documentation Conventions
The conventions listed below are used throughout this guide:
o
Special function keys on your terminal keyboard are enclosed in a rectangle with rounded comers; for example,@.
o Standard alphabetic and numeric keys on your terminal keyboard are printed in bold; for example,
f.
o
Two or more keys separated by spaces indicate tfatYjU
should press each key sequentially; for example, ESCf
1.o
Two keys separated by a hyphen indicate that you should hold down the first key while simultaneously pressing the second key; for example, ( CTRL) -d.
o
Commands, functions, and keyword operands are printed in bold capital letters. Functions always start with a dollar sign ($). For example, $SCAN is a function.o
ESCORT specific key functions and other key functions are printed in capital letters; for example, CLEAR.o
The following type is used to indicate data that the user types at the terminal:escort scrlpt-IJame
o
The following type is used to indicate information that the system displays on the screen:auto script generation started
o
The following type is used to indicate program text:CONNECT (HI)
o
Multi .. word operands are separated by an underscore. For example, str_expr represents the words, string expression.o Brackets [ ] indicate optional operands.
o
Braces { } indicate a choice of operands.o
The UNIX file path names are shown with the standard slash character (I). Scripts are portable between the UNIXoperating system and the MS .. DOS® operating system versions of ESCORT and you may, therefore, substitute the
standard UNIX operating system slash character with the MS .. DOS operating system back .. slash (\) file name separation character. .
Note
Throughout this guide, default key combinations are shown for ESCORT specific functions, for example, the ESCORT Interrupt/Resume (I/R) key combination is shown as the key sequence ~
f
2. These default key combinations may be amended by the System Administrator for your particular environment.If the ESCORT default key combinations are amended you must substitute the amended key combinations for the default
combinations shown in the document text, the example scripts and the sample programs in this user's guide.
Data Entry Conventions
o
ESCORT is case insensitive, which means that it treats lowercase characters the same as uppercase. The exception to this is string constants.o The UNIX shell is case sensitive, which means that it treats lowercase characters differently from uppercase. Thus, when you invoke ESCORT with parameters from the UNIX shell command line, the parameters, such as file names, must be exactly the same as those in the file system.
Definitions
The following term is used throughout this user's guide. Host A host session refers to either a synchronous
session or an asynchronous session, unless otherwise specifically noted.
Before You Begin
Before you begin using ESCORT, you should review your specific operating procedures with your System Administrator and
familiarize yourself with the key sequences used in ESCORT:
o Your System Administrator will install the ESCORT software on the 3B computer and will arrange for the customization of ESCORT to suit your particular location and operating environment. When you review with your System Administrator the environment in which you will be operating ESCORT, your System Administrator will advise you of any specific restrictions or requirements.
o You should familiarize yourself with the key sequences applicable to your terminal. Refer to Appendix A or your Quick Reference Card for the appropriate key sequences for your specific ASCII terminal.
Some of the key sequences listed may not be applicable in an asynchronous environment. Refer to the key sequence table for the VT100 terminal, in Appendix A, for the key
sequences applicable in an asynchronous environment.
o The Escape key, ~, used with certain other terminal keys, performs special tasks in ESCORT. These special key combinations are defined in this section and are also listed in your Quick Reference Card. Familiarize yourself with these ESCORT specific key combinations.
o Part of the System Administrator's installation procedure includes the customization of the key sequences for the different types of terminals that will be used in your system. Review with your System Administrator any additional key combinations that have been defined for your operating environment. Your System Administrator will also advise of any changes to the ESCORT specific key combinations. You can list these customized key sequences in the space provided on your Key Sequence Card.
Refer to Appendix B for information on setting the various ESCORT environment variables.
Once you become familiar with the keyboard layout, you can proceed to the next section, which describes the procedures for entering the three different modes of ESCORT.
Other ESCORT
Documentation
This User's Guide is part of the AT&T 3270 Emulator+
ESCORT documentation. The entire documentation package
includes the following:
o AT&T 3270 Emulator+ ESCORT User's and Programmer's Guides
AT&T publication number 308 .. 402.
This binder contains the following three documents:
ESCORT Overview
ESCORT User's Guide
ESCORT Programmer's Guide
o ESCORT Quick Reference Card and Key Sequence Card, AT&T publication number 308 .. 389.
2 Using ESCORT
Overview
Using Interactive, Script, and Tutorial Modes
Interactive Mode Script Mode Tutorial Mode
Interactive Mode Special Features
Working in Host and Local Sessions
Session Identification
Active and Displayed Sessions in Script Mode
Active and Displayed Sessions in Interactive Mode Status Line Information Modes of Operation Summary
ESCORT Utility Files
Command Line
Special Key Combinations
Overview
The first section of this chapter describe the three operating modes of ESCORT. The next section provides a detailed description of the multiple sessions abilities of the software. Read these sections to understand how to access different host and local sessions either interactively or via script control.
The next two sections of this chapter contain information on utility files and command line structure, and the final section describes the operation of the ESCORT specific key
combinations. An understanding of the information in this chapter will allow you to make optimal use of ESCORT.
Using Interactive, Script,
and Tutorial Modes
There are three modes of operation in ESCORT: Interactive Mode, Script Mode, and Tutorial Mode.
o
Interactive (or Terminal Emulation) Mode. This mode provides simultaneous access to multiple host applications. Special ESCORT features are available in this mode.o
Script Mode. This mode allows you to simulate a user on one of the multiple sessions. While in Script mode, ESCORT accepts data from a script instead of from the keyboard. ESCORT can simulate a user by executing the instructions contained in the script.o
Tutorial Mode. This mode is similar to Interactive mode, however, it can be used to verify data entered by the operator before sending data to the host.This section contains the procedures for using these three modes.
Interactive Mode
In Interactive mode, you can work on your application just as if you were entering data on an IBM 3278 synchronous terminal or DEC VT100 asynchronous terminal connected to a host
computer.
To enter Interactive mode:
1 Enter one of the following commands at the shell prompt, depending on the session type.
D For a synchronous host, type escort and press ( RETURN) •
D For an asynchronous host, type escort async.p
t
and press( RETURN).
You will see the ESCORT banner screen briefly before you get to your initial application screen.
2 Log in to your application and continue to use the terminal as you usually do.
3 To leave Interactive mode and return to the UNIX shell, you can use a special key combination, QUIT. To QUIT
Interactive mode, press ~ f
1.
t The async.p ESCORT script is used to initialize the communication port parameters to a specific asynchronous host. The default operands to the SERINIT command contained in the script must be amended to suit your operating environment.
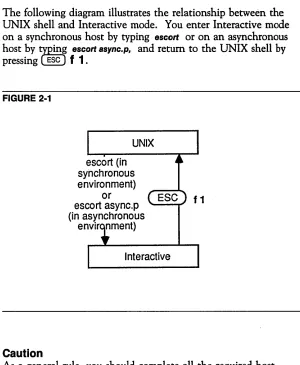
The following diagram illustrates the relationship between the UNIX shell and Interactive mode. You enter Interactive mode on a synchronous host by typing escort or on an asynchronous host by (,piny escort Bsync.p, and return to the UNIX shell by
[image:25.450.79.379.34.399.2]pressing ESC
f
1.FIGURE 2-1
Caution
UNIX
escort (in synchronous environment)
or escort async.p (in asynchronous
envir nment)
Interactive
f1
As a general rule, you should complete all the required host application operations before quitting Interactive mode. Quitting Interactive mode without completing logoff procedures may not, by itself, log you off the application. The process is dependent on the operating environment as follows:
o
Synchronous Communication. When you leave Interactive mode, your terminal session may still be active. This means that if you reenter Interactive mode, you may get back to the same application screen you were at when you executed the QUIT special key combination ( ( ESC)f
1).The ability to resume an application after executing a QUIT special key combination is dependent upon the protocol
being used (bisynchronous communication, bsc, or
Synchronous Data Link Control in an sna environment); the parameter defined in the host system front .. end, VT AM .. GEN; and the application itself. Refer to the appropriate
documentation to determine whether you will be able to resume an application in your particular operating environment.
In addition, the controller configuration file in the sna environment may affect your ability to resume an application after executing a QUIT special key combination. Refer to the AT&T 3270 Emulator+ User's and System Administrator's
Guides for further information.
o Asynchronous Communication. Executing a QUIT special key combination in an asynchronous session produces the same result as ,breaking the host connection by, for example, disconnecting the modem.
If the Interactive asynchronous host operation was executed using the UNIX operating system nohup command, quitting Interactive mode will not affect the operation of the
application. However, unlike the synchronous environment, you will not be able to resume the application after executing the QUIT special key combination.
While in Interactive mode, you can choose any of the following features of ESCORT:
o
Automatic Script Generation (ASG)o
Automatic Screen Logging (ASL)o
Display Screen Attributes (A TTRIB) , (synchronous communication only)o
Local Screen Printingo
Escape to the UNIX shello
Activate, open and close host sessionso
Display active sessions (SHOW)These features are described in more detail later in this section.
Script Mode
Script mode is the most powerful feature of ESCORT. In Script mode, you can simulate a user at a terminal. While in this mode, ESCORT accepts data from a script instead of your keyboard. A script is a set of commands contained in a file. To activate Script mode, type
escort script-IJame
and press ( RETURN).
The script-IJame is the name of the script you want to execute. The ESCORT banner screen appears briefly while ESCORT performs syntax checking and parsing. ESCORT then displays the appropriate host application screen and starts to execute the commands from the parsed list. During execution of the script, data entered on the screen and responses received from the host application may be displayed on the monitor.
When the last statement in the program is reached (the ENDP statement), ESCORT is terminated and control is returned to the UNIX operating system. You can also terminate script execution prematurely (before the ENDP statement is encountered) by quitting script mode (pressing @)
f
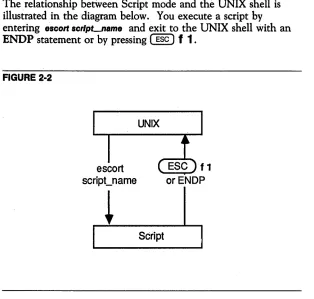
1).The relationship betWeen Script mode and the UNIX shell is illustrated in the diagram below . You execute a script by entering escort scrlpLname and exit to the UNIX shell with an ENDP statement or by pressing
@§) f
1.FIGURE 2·2
escort script_name
~
or ENDP
Script
At any time during active host script execution, you can interrupt script execution, exit to Interactive mode, and then later resume script execution at exactly the same place where you left off earlier.
Use the special key combination,
@§) f
2, to perform an InterruptlResume (IIR) operation.This key combination acts as
a
toggle switch that alternates between interrupting and resuming SC(ipt ejecution. When you interrupt script execution by pressing ESCf
2, you exit toInteractive mode, not to the UNIX shell.
In the synchronous environment, you may not be able to use Interactive mode immediately. Interactive mode is entered when the current transaction is completed (for example, when the keyboard is unlocked by the application running on the synchronous host system).
Interactive mode is entered immediately when you interrupt asynchronous host script execution. However, the current transaction may continue to execute.
Another way to enter Interactive mode from active host Script mode is to use an EXIT command in a script. The EXIT command can be coded anywhere in your program. ESCORT commands are discussed in detail in the ESCORT Programmer's
Guide.
Once you are in Interactive mode (either due to a manual
interrupt by pressing
@
f
2 or due to an EXIT command in a script), you can press @f
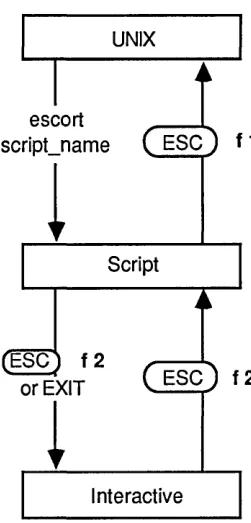
2 (the Interrupt/Resume (I/R) key combination) to go back to Script mode.The following diagram illustrates the relationship of host Script mode to Interactive mode and the UNIX shell. Use @
f
1 if you want to quit script execution and return to the UNIX shell. Use @ f 2 if you want to interrupt script execution and enter Interactive mode.FIGURE 2-3
escort script_name
~
UNIX
Script
f2
or EXIT
~
Interactive
f 1
f2
The ability to exit to Interactive mode while executing a script can be used to notify you of an error condition. For instance, if a script cannot handle a particular situation it encounters, the script can inform you of the condition by displaying a message and can then exit to Interactive mode. You can then attempt to recover from the problem condition and resume script execution.
You will automatically be put back into Interactive mode by ESCORT if two error conditions occur. Both of these error conditions cause an error message to be printed in an ESCORT print file and displayed in the operator information area, before exiting to Interactive mode. The two conditions are:
o A response has not arrived from the host system before a user .. specified time .. out occurs. The default time .. out period is 60 minutes.
o
A script attempts to enter data in a protected field on a screen. This situation occurs if you have a bug in a script or if an unexpected screen is received from the host system, in which case the script gets out of synchronization with the application screen.Tutorial Mode
Tutorial mode provides you with the ability to perform edit checks and validate data entry before sending data to the host for execution. This mode is also useful as an on .. line tutorial for your application.
Tutorial mode can be entered from a script by executing one of two EXIT commands, depending upon which session is currently connected. Host and local connections are described in more detail later in this section.
If connected to a host session, Tutorial mode is entered by executing
EXIT (TUTORIAL)
If connected to a local session, Tutorial mode is entered by executing
EXIT
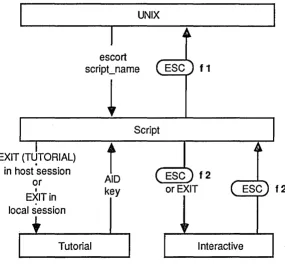
The following diagram summarizes the means of getting from Script mode to Tutorial mode, Interactive mode, and the UNIX shell.
FIGURE 2-4
EXIT (T~TORIAL)
in host session or
I
EXIT in local session
UNIX
escort script_name
t
Scriptt
AID key
Tutorial
f 1
f2
or EXIT f2
Interactive
Entering Tutorial mode is similar to entering Interactive mode from a script since you enter Tutorial mode by using an EXIT command. However, unlike Interactive mode, when you press an Attention Identifier (AID) key (after entering data on the
screen), script execution is resumed automatically but the entered data is not sent to the host system.
The AID keys are
o
in the synchronous environment, ENTER, PFl to PF24, CLEAR, PAl to PA3, ATTN, and SYS~EQo
in the asynchronous environment, ENTER, PFI to PF8 (corresponding to soft function keys @ to @ ) and CLEAR.In Tutorial mode it is up to the script to decide whether or not to send data to the host. This provides the ability to have a script perfonn edit checks on entered data and on the AID key pressed. The script may then send the data to the host and use the data as an input parameter later in the script, or reject the data and send a message to you to correct and reenter it. The way ESCORT handles AID commands and AID keys is discussed under the CONNECT command in the ESCORT
Programmer's Guide.
Interactive Mode Special Features
This section describes the additional features of ESCORT that you can use from Interactive mode. They are Automatic Script Generation (ASG), Automatic Screen Logging (ASL) , Displaying Screen Attributes, Local Screen Print, and Escape to the UNIX shell.
Automatic Script Generation (ASG)
ESCORT has a feature that automatically generates a script to simulate the actions you perform at a terminal.
To generate a script automatically, you must be in Interactive mode. From Interactive mode, press
@
f
3. The messageauto script generation started
appears at the bottom of the screen. Continue to perform the tasks you wish oil you~ication. After you complete your work, you again press ~
f
3 to turn off ASG. The following message is displayed:auto script generation stopped
Each time you automatically generate a script, it is written to a file, in the directory defined by the ESCDIR environment variable, named escort.ky{proc,id}.
To execute the automatically generated script:
1 Exit Interactive mode. Press
@
f 1.2 Execute the script by typing escort escort.ky{proc-Id}.
When you run the script, ESCORT automatically performs the same tasks that you just did at your terminal.
Try using this feature to generate a script to perform your login procedures for you. This is a good way to see how ESCORT works for yourself, and you can use this script whenever you need to log in to your application. Sample login and logoff scripts for IMS and TSO are provided on your ESCORT installation diskette.
Note
The generated script may require editing prior to execution so that both variable responses and multiple responses from the host may be anticipated.
Refer to the section, "Synchronizing Data Transmissions" in Chapter 2 in the ESCORT Programmer's Guide for further information.
Automatic Screen Logging (ASL)
The automatic screen logging feature saves the image of a specific application screen and any data entered on it. While in
Interactive mode in an active host session, you can select the special k(y cjmbination for Automatic Screen Logging by pressing ESC f 6. The message
auto screen logging started
appears at the bottom of your screen. Continue to perform all the tasks you wish on your application. After you complete your work, you again press
@
f 6 to tum off ASL. The following message is displayed:auto screen logging stopped
Screen images are captured when an AID key is pressed.
o
In the synchronous environment, press ENTER, PFn, PAn,CLEAR, ATTN or SYS.-REQ.
o
In the asynchronous environment, press ENTER, PFI to PF8 (corresponding to soft function keys @ to® )
or CLEAR.The screen image is logged in the directory defined by the ESCDIR environment variable, in the file named
escort.lg{proc~id} .
Displaying Screen Attributes
The Displaying Screen Attributes feature shows you attributes of a specific synchronous host application screen, such as protected and unprotected fields. While you are using an application screen in Interactive mode, you can see the attributes on the screen by pressing the special key combination
@
f
5. Refer to Appendix C for information on translating the characters displayed at the attribute positions on the screen.The Displaying Screen Attributes feature has no effect in the asynchronous environment.
Local Screen Print
The Local Screen Print feature saves the current screen image. While in Interactive mode in either a host or local session you can save the current screen image by pressing the appropriate key sequence for the PRINT function. Refer to Appendix A for the specific key combination for the PRINT function for your terminal.
The information contained in the screen image is saved in accordance with the following:
Synchronous session Local Screen Print
D If the 3270 Emulator+ variable PRNT is specified, Local Screen Print images are saved in the specified file.
D If the 3270 Emulator+ variable PRNT is not set, Local Screen Print images are saved in the directory defined by the ESCDIR environment variable, in a file named
escort.pr{proc-id} .
D Local Screen Print output can be directed using the IDENT function.
Asynchronous session Local Screen Print
D If the variable PRNT is set in your profile, Local Screen Print images are saved in the specified file.
D If the variable PRNT is not set in your profile, Local Screen Print images are saved in the directory defined by the ESCDIR environment variable, in a file named
escort.pr{proc-id} .
D Local Screen Print output can be directed using the IDENT function.
Directing Local Screen Print Using IDENT
While in Interactive mode in a host or local session, you can direct Local Screen Print output by pressing the appropriate key sequence for the IDENT function. You can select one of four screen print modes:
D Press 0 to disable Local Screen Print.
The PRINT function key is disabled and any attempt to use Local Screen Print causes the following message to be displayed in the operator information area:
Screen Print Disabled
o
Press 1 to direct Local Screen Print output to a file.ESCORT prompts for a pathname; if you do not have write permission for the specified pathname, a message is displayed and you must reenter the required mode number.
o
Press 2 to pipe Local Screen Print output to a UNIX operating system command.ESCORT prompts for a valid command line; for example,
lusrlblnllp
specifies the printer spooler lp. Subsequent use of the PRINT function causes Local Screen Print output to be directed to the system default printer.
o
Press 9 to retain the present screen print mode.Escape to the UNIX Shell
While in Interactive mode in either a host or local session, you can escape to the UNIX shell on the machine on which ESCORT is executing. Press the appropriate key sequence for the SHELL function, to escape from Interactive mode to the UNIX shell. Refer to Appendix A for the specific key
combination for the SHELL function for your terminal. Once in the UNIX shell you will be able to perform any of the Restricted Shell mode functions. Press ( CTRL) -
d
or type at the shell promptexit
to return to ESCORT Interactive mode.
This feature is useful, for example, in providing you with the ability to check the contents of a UNIX file to ensure that a download of data from a host system has been completed successfully.
Working in Host and
Local Sessions
ESCORT scripts are able to access various host and local sessions. This section describes the concept of multiple sessions and contains the procedures for accessing and displaying these sessions.
Session Identification
ESCORT provides the user with the ability to access a maximum of 10 concurrent sessions from a single script. Sessions are either host or local. Each session in ESCORT has a session
identification:
D Host Sessions. Host sessions may utilize either synchronous or asynchronous communications. ESCORT can access up to eight host applications, of which four may be synchronous and four may be asynchronous.
ESCORT allows for automatic or interactive switching between sessions and for the exchange of data between applications.
The synchronous host session identifications are HI, H2, H3, and H4.
The asynchronous host session identifications are AI, A2, A3, and A4.
D Local Sessions. Up to two local sessions can be connected from an ESCORT script. Local sessions can provide a front, end user interface, for data entry or display.'
- The local session identifications are Ll and L2.
Each session has its own presentation space; presentation space and session are synonymous. Sessions can be considered as virtual terminals, while the presentation spaces are the associated screen buffers for those terminals.
Active and Displayed Sessions
in Script Mode
Active Sessions
Only one session can be active at any given time; an active session is any host or local session that is connected to the ESCORT script. All other sessions are dormant. You can change a dormant session into an active session by using the CONNECT command.
The communication ports used in asynchronous host sessions are initialized by using the SERINIT command.
All terminal keyboard keys are available for you to use with an active session. However, in relation to all dormant sessions, the keyboard is disabled, with the exception of two reci)l key combinations, QUIT ( ~ f 1) and SHOW ( ESC f 9). These special key combinations are described in more detail later in this section.
When ESCORT is started in Script mode, the synchronous host session HI is connected and is the active session by default. This session's relevant application screen is also displayed. This default can be changed by specifying a session identification as a parameter in the PROG statement. ESCORT commands are discussed in detail in the ESCORT Programmer's Guide.
The flexible multiple session features of ESCORT allow you to exchange data easily and quickly between sessions. Data can be manipulated by using reading, writing and searching commands in the active session's presentation space.
A session is made active by use of the CONNECT command in a script. The following procedure illustrates how you can move data from one active session to another. In this example, data is moved from local session LI to synchronous host session HI:
1 Use the CONNECT command to make the source session active, for exampie,
CONNECT (ll)
2 Capture the desired data.
3 Use the CONNECT command to make the target session active, for example,
CONNECT (HI)
4 Write the previously captured data from the local session to the host session.
Each active or dormant host session in an ESCORT script utilizes a host system connection. Host system connections are a limited resource. You can release host system connections, that are associated with host applications that you no longer need to access in your script, by using the DISCON command.
Displayed Sessions
The presentation space of the active session displayed on the terminal can be changed so that any dormant session's
presentation space is displayed. You can change the display by using the SHOW command.
The SHOW and CONNECT commands in the script determine which session is displayed and which session is active. Since the displayed and active sessions need not be the same, it is possible to display (SHOW) one session while another session is active and possibly executing (through the CONNECT command) in the background.
When the displayed and active sessions are not the same, the display on the terminal monitor is not updated, or refreshed, by the active session executing in the background. You can use the SHOW command to refresh the terminal monitor display. ESCORT will automatically refresh the terminal monitor display with the active session presentation space when you enter Interactive mode.
Active and Displayed Sessions
in Interactive Mode
Active Sessions
ESCORT provides you with the ability to connect or disconnect host sessions in Interactive mode, through the use of six
functions. The Interactive mode host session connection functions are
o
connect to next host session, NEXTSo
connect to previous host session, PREYSo
open a new synchronous host session, OPENSo
open a new asynchronous host session, OPENAo
close a host session, EXITo
close all host sessions, QUIT.NEXTS, PREYS and EXIT are key functions; refer to Appendix A for the specific key combinations for these functions for your terminal.
OPENS, OPENA and QUIT are ESCORT key functions; refer to "Special Key Combinations" at the end of this chapter for the specific key combinations for these functions. .
The following describes the operation of each host connection function in Interactive mode.
The cycling order of host sessions is synchronous connections, followed by asynchronous connections. In the hierarchy of these connections, HI is the lowest and H4 the highest synchronous host sessions, and Al the lowest and A4 the highest
asynchronous host sessions.
NEXTS Connects to next host session.
If you press the NEXTS key combination, ESCORT connects to and makes active the previously opened, next higher host session.
For example, your ESCORT script has opened host sessions HI, H3, AI, and A2. Synchronous host session HI is the active (connected) and
PREVS
OPENS
displayed session when you enter Interactive mode, sessions H3, Al and A2 remain dormant. If you now press the NEXTS key combination, synchronous host session H3 is connected and displayed. Repeated use of the NEXTS key combination, in this example, connects and displays the asynchronous sessions AI, A2, and then the synchronous session HI, and so on. If only one session is connected when you enter Interactive mode, use of the NEXTS key
combination displays the following message in the operator information area:
No other host session active
Connects to previous host session.
The PREYS key combination works in a similar manner to the NEXTS function, however, host sessions are connected and displayed in
descending order.
Using the example detailed in NEXTS, pressing the PREYS key combination in Interactive mode when connected to synchronous host session HI connects and displays the asynchronous session
A2.
Similarly, if only one session is connected when you enter Interactive mode, pressing the PREYS key combination displays the following message in the operator information area:
No other host session active
Opens new synchronous host session.
Pressing the OPENS key combination opens the next available higher synchronous host session. For example, if synchronous host session HI is the active session when you enter Interactive mode, synchronous host session H3 being dormant, and you press the OPENS key
combination, ESCORT opens synchronous host
OPENA
session H2. This session then becomes the active session. If the OPENS key combination is pressed again, in this example, ESCORT opens the nex,t available higher synchronous host session, H4.
ESCORT displays the following message in the operator information area when you press the OPENS key combination:
Connecting to new synchronous session
If all four synchronous host sessions are connected, and you attempt to open a further synchronous host session by pressing the OPENS key combination, the following message is displayed:
Max. number of synchronous sessions already active
If no host system logical unit connections are available when you attempt to open a
synchronous host session using OPENS, or the logical unit open failed, the following message is displayed:
Unable to open new synchronous session
Opens new asynchronous host session.
Pressing the OPENA key combination opens the next available higher asynchronous host session. You are prompted for the asynchronous
cOlnmunication port initialization parameters, the defaults for which are the last parameters
established either interactively or via a SERINIT
command in a script.
To abort the asynchronous host connection after the communication port initialization parameters have been entered but before the connection is established, press the EXIT key combination.
For example, if asynchronous host session Al is the active session when you enter Interactive
mode and asynchronous host session A 4 (being the last session established) is dormant, and you press the OPENA key combination, ESCORT opens asynchronous host session A2 . You are prompted for the asynchronous communication port initialization parameters (speed, parity, stopbits, length, duplex, telephone
number/machine name, TIY port, and flow control). By default, the initialization parameters for asynchronous host session A4 are displayed; these defaults can be amended. Asynchronous host session A2 then becomes the active session. Repeated use of the OPENA key combination, in this example, opens and makes active the
asynchronous session A3.
ESCORT displays the following message in the operator information area when you press the OPENA key combination:
Connecting to new asynchronous session
If all four asynchronous host sessions are connected, and you attempt to open a further asynchronous host session by pressing the OPENA key combination, the following message is displayed:
Max. number of asynchronous sessions already active
If ESCORT is unable to establish a connection when you attempt to open an asynchronous host session using OPENA, the following message is displayed:
Unable to open new asynchronous session
ESCORT writes specific error messages to the
escort,pr{proc,id} file, created in the directory
c1pfinprl hu t-hp 'P~rnT1~ ~n";rf"\n1'Y'l~nf-'Hl')r1l')hlo
- - - - - J _ ... - - - - _ ... _ .. _ ... &" .A.A."""... • ... ...., ... "".
Some asynchronous applications request terminal type information. You should specify your terminal as a VT100 on these remote
EXIT
QUIT
asynchronous hosts, regardless of the actual terminal type being used.
Closes a host session.
The EXIT key combination closes the active host session and automatically activates the lowest host session, if any, within the same
environment. If no other host session is available in the same environment, the lowest available host session is activated.
If synchronous host sessions H2 and H3, and asynchronous host sessions Al and A2 are open, for example, and you press the EXIT key
combination in Interactive mode when
synchronous host session H3 is active, this session is terminated, the following message is displayed briefly:
TERMINAL SESSION TERMINATED
and synchronous host session H2 becomes the active session.
Repeated use of the EXIT key combination, in this example, closes the synchronous host session H2 and makes active the asynchronous host session AI, and so on.
If the EXIT function is used when only one host session is connected, the ESCORT process is terminated.
Close all host sessions.
The QUIT key combination terminates all connected host sessions, quits ESCORT and returns to the UNIX shell. The following message is displayed briefly:
TERMINAL SESSION TERMINATED
Caution
You should ensure that the status of host sessions (that is, which sessions are open but dormant and which session is active) on resuming a script from Interactive mode, duplicates the status at the point when script execution was interrupted by entering Interactive mode. Script execution may be affected and results may be unpredictable if the script anticipates host sessions to be available and the status of the sessions has been altered in any way.
Displayed Sessions
While in Interactive mode in a host session, or Tutorial mode in a host or local session, you can display another session's
presentation space by using the SHOW special key combination. To SHOW the next presentation space press ~ f 9.
Each time the SHOW key combination is pressed the next presentation space is displayed in a circular manner. For
example, if the synchronous host session HI presentation space is currently displayed and you press the SHOW key combination
(
~f
9) the synchronous host session H2 presentation space is displayed.Repeated use of the SHOW key combination displays other synchronous and asynchronous host, and local sessions, if any, and eventually redisplays the presentation space for the HI synchronous host session.
The SHOW function only displays the appropriate session and does not change the active session. The session identification of the displayed session is shown in the operator information area and the session identification is highlighted if the displayed session and the active session are the same. See II Status Line
Information II in this section for more information.
Status Line Information
The session identification of the session that you display when you use the SHOW command in a script or the SHOW key combination
( @ f
9), is displayed in the operatorinformation area on the terminal. The session identification is highlighted if the displayed session and the active session are the same.
If your terminal has a 24 .. line screen, the operator information area, or status line, must first be toggled on using the appropriate key sequence for the STAT function. Refer to Appendix A for the specific key combination for the STAT function for your terminal. The operator information area is automatically displayed on terminals with 25 .. line screens.
The mode of operation is also displayed in the operator
information area on the terminal by use of the following codes: I for Interactive mode, S for Script mode and T for Tutorial mode.
Modes of Operation Summary
The following diagrams illustrate the relationship between Script, Interactive and Tutorial modes, and summarize the Interactive mode special features and the methods of changing active sessions and displays.
Changing Modes
FIGURE 2-5
or
/,Orl Bsync.
p,
ENDPor
"
escort script. nameInteractive Mode
' "
r----~
~ f 2 (Interrupt) - - - I
Script Mode
---1.~
'-_--,_...,... ...
EXIT or
7UTOR'AL)
_ _ --f---r-u-to-ri-a-I
--.1 ... ----
AID - - - -...MOde. key
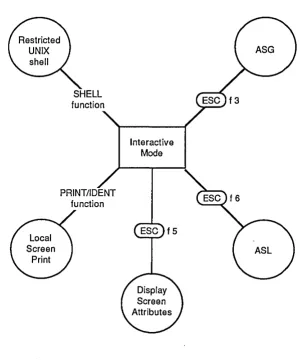
Interactive Mode Special Features
FIGURE 2·6
SHELL function
PRINT/IDENT function
Interactive Mode
· ns Active and Displayed Sesslo
CONNECT
command
Local sessions L1 and L2
Synchronous sessions,
H1 to H4
Interactive Mode
OPENA function
~
NEXTS function I Asynchronous sessions,A1 to A4
I EXIT function / SynChrOnous sessions,
H1 to H4
;
OPENS
function
Using ESCORT
2-38
/
QUIT function
~C)
f9(SHOW)ES ~
ESCORT Utility Files
This section describes five utility files that ESCORT
automatically creates in the directory defined by the ESCDIR environment variable. Refer to the section, II Directory
Environment Variable II in Appendix B for information on setting
the directory environment variable.
The five utility file names have the following format
escort. {type} {proc~id}
The five {type}s produced are cp
dp
ky
19
pr
Data saved as a result of a CAPTURE ON
command in a script is written to this file type. A DUMP command in a script or a fatal error produces an ESCORT dump to this file type. In Automatic Script Generation (ASG) mode the generated script is automatically written to this file type. See II Automatic Script Generation II in
this section for more information.
In Automatic Screen Logging (ASL) mode screen images are automatically written to this file type. See II Automatic Screen Logging II in this section
for more information.
Data specified by a LOG command in a script is written to this file type.
Data specified by a PRINT command in a script is written to this file type.
If an error occurs during syntax checking or script execution, ESCORT will write certain error message information to a pr type utility file.
The identifier, {proc,id}, refers to the unique process identification number that the UNIX operating system automatically assigns to each process.
For example the file named
escort.ky23658
contains a script automatically generated by ESCORT through the Automatic Script Generation feature; the UNIX operating system assigned the unique process identification number 23658 to the process.
When an ESCORT session is terminated, the process
identification number is displayed on the terminal, for example
Process Id of your ESCORT session was: 23658
Use the process identification number to access the various utility files created by ESCORT during the session.
Command Line
The ESCORT command line allows you to
D operate interactively
D run a script
D perform syntax checking on a script without execution, and create an executable run .. time script.
The syntax of the command line is
escort [script-.name [p1,p2, ..•. ,p9] [NORUN] [NOLOGO]]
where the items enclosed in brackets are optional.
The script-.name is the name of a script file. You can specify the full path for the script; for instance,
lusrlescortlsliblupload
The p1,p2 .•.. ,p9 are parameters passed to the script from the command line. You may pass up to nine parameters on the command line. You must not insert any blanks between parameters. Parameters may be passed when you run (parse and interpret) a non .. run .. time script. See the section II Parameter
Passingll
in Chapter 2 in the ESCORT Programmer's Guide for further information.
The NORUN keyword parameter is used to create an executable
run .. time version of a script. You may specify the parameter in lowercase letters. When you execute a script with the NORUN
parameter, the script is parsed only (that is, the syntax is checked) and, provided no syntax errors occur, a new script is created with the file extension, x, in the form script_name.x. This new script is a binary file and the parsing phase is
eliminated when this script is executed. Eliminating parsing, and interpreting the script immediately, saves time.
No parameters may be passed to the script from the command line when executing a run .. time script. Use one of the following options if you need to pass parameters when executing a run .. time script:
D Set UNIX environment variables to the value of the
parameters and read these environment variables from within your script using the $GETENV function.
D Store the required parameters in a file and read the contents of the file using the READ command.
The
NOLOGO keyword parameter is used to eliminate the banner screen. This keyword may be specified in lowercase letters. Examples of using the command line follow:escort
escort script-.l1ame escort script-.l1ame NORUN escort script-.l1ame.x escort script-.l1ame p1,p2,p3 escort script-.l1ame p1,p2,p3 NOR UN
escort script-.l1ame p1,p2,p3 NOLOGO
escort script-.l1ame 2 > /usr/errors
escort script-.l1ame 1 > /dev/null &
2-42 Using ESCORT
Enter Interactive mode Parse and interpret (execute) a script
Parse script and create run .. time script
Interpret (execute) run .. time script
Parse and interpret a script and pass 3 parameters
Parse script, pass 3 parameters and create run .. time script Parse and interpret script, pass 3 parameters and eliminate banner
Parse and interpret script, redirect standard error to specified file
Special Key Combinations
Use of the default special key combinations, ( ESC) (Escape), and
letter
f
and numeric keys, or ( ESC) and letters 0,a
ands
keys, simulate function keys with special meaning in ESCORT.To access these functions press the following sequentially:
o
@,
the letterf
key and the appropriate numeric key,o
@,
the letter 0 key and the letter S key,o
@,
the letter 0 key and the lettera
key.The list of special key combinations is also contained in your Quick Reference Card.
The use of the special key combinations is summarized below. Most of the key combinations have been explained in greater detail earlier in this chapter.
If the ESCORT default key combinations have been amended by your System Administrator, you must substitute the amended key combinations for the default combinations shown in this section.
[Esc)f1 Quit (QUIT)
Terminates ESCORT execution and returns to the UNIX shell with a default exit code O. All open files are closed. For example, the files escort.lg{proc,id} and
escort.ky{proc,id} are automatically closed.
( ESC)
f
1 may be used from eitherInteractive mode when connected to a host session, or Script mode when connected to a host or local session.
@£)f2
@£)f3
@£)f4
@£)f5
2-44 Using ESCORT
InterruptlResume (l!R)
Interrupts active host script execution and enters Interactive mode. You may also use this key combination to resume script execution.
Automatic Script Generation (AS G) Activates or deactivates automatic script generation (ASG). @£) f 3 may be used only from Interactive mode in an active host session. After you press @£) f 3
ESCORT generates a script containing all keyboard entries after the @£) f 3 was pressed. You may deactivate automatic script generation by pressing @£) f 3.
The automatically generated script appears in the escort.ky{proc,id} file.
Cursor Position (CURSIL-POS) Displays the current cursor position in the operator information area. Both the absolute position and row and column position appear. (ESC)
f
4 may be used from Interactive mode in a synchronous host session or from Tutorial mode in a local session.@£) f 4 has no effect when the active session is an asynchronous session. Display Attributes (A TTRIB)
Fispltys all field attributes on the screen. ESC
f
5 may be used from Interactive mode in a synchronous host session or from Tutorial mode in a local session.[EscJf6
~f7
[EscJf8
~f9
~fO
Automatic Screen Logging (ASL)
Activates or deactivates automatic screen logging. The escort.lg{proc.i1
1
fillcontains the screen images. ESC f 6 may be used from Interactive mode in a host session or from Tutorial mode in a local session.
Key Status (KEY_STATUS).
Displays the status of the special keys for Automatic Script Generation, Automatic Screen Logging, and AID Substitution. ~
f
7 may be used only in Interactive mode in an active host session.No effect.
This key combination has no effect in ESCORT.
Show Session (SHOW).
Displays the next session on the terminal in circular manner. Use of this function does not change the active session. (ESC J
f
9 may be used in either Interactive mode in an active host session or Tutorial mode in an active host or local session.AID Substitution (AID_SUB).
Activates or deactivates AID subroutine substitution while in Automatic Script Generation. [ ESC J f 0 may be used only while you are in Automatic Script Generation in Interactive mode in an active synchronous host session. Each time an AID key is encountered in the automatically generated script, ESCORT generates a subroutine call to a script named aid_resp.
@£)os
@£)oa
2·46 Using ESCORT
This feature is required for synchronous host applications that have no .. response mode transactions.
For further information on AID key subroutines, see the section "Synchronous ResponselNo .. Response Mode
Transactions" in Chapter 2, and the appendix, "AID Subroutines Library" in
the ESCORT Programmer's Guide.
@£) f
0 has no effect when the activesession is an asynchronous session.
Open Synchronous Host Session (OPENS).
Opens the next available fighjr
synchronous host session. ESC 0 S may be used in Interactive mode while
connected to either a synchronous host or an asynchronous host session. The
synchronous host session opened when you press
@£)
0 S becomes the connected session.Open Asynchronous Host Session (OPENA).
Opens the next available htgher)
asynchronous host session. ESC 0
a
may be used in Interactive mode whileA
B
c
Appendices
Key Sequences A-1
Key Sequences for
Standard ASCII Terminals A -2
Key Sequences for AT&T 4410
and Teletype 5410 Terminals A-4
Key Sequences for AT&T 4418
and Teletype 5418 Terminals A-6
Key Sequences for AT&T 4425
and Teletype 5425 Terminals A-8
Key Sequences for AT&T 605
Business Communications Terminal A - 10
Key Sequences for AT&T 610, 615, 620,
and 630 Business Communications Terminals A - 12
Key Sequences for
DEC VT100 Terminal A-14
Environment Variables 8-1
Setting 3270 Emulator+
ESCORT Environment Variables 8-2
Key Sequences
This appendix lists the key sequences that emulate IBM 3278 key functions for the following terminals:
Synchronous Terminals
o Standard ASCII terminals
o
AT&T 4410 and Teletype® 5410 terminalso
AT&T 4418 and Teletype 5418 terminalso
AT&T 4425 and Teletype 5425 terminalso
AT&T 605 Business Communications Terminal (BCT)o
AT&T 610,615,620, and 630 Business Communications Terminals (BCTs).Asynchronous Terminals
o
DEC VT100 terminal.Note that certain key functions are ignored if either ESCORT or the terminal does not support them. The following key functions are not supported by ESCORT:
ALLCAP COLR
ALT_CR CTRL
BLINK CURSR-SEL
BOT NULLEND
CAN NU~OV
CLICK TOP
The synchronous keyboard files are the same as the keyboard files used by the AT&T 3270 Emulator+ software.
Key Sequences for
Standard ASCII Terminals
The AT&T 4415,5420 and the Tektronix™ 4105 terminals use these key sequences.
3278 Key Standard ASCII Terminal
Function Key Sequence
ATTN @ a ( RETURN)
BAKTAB ( CTRL) e
BS ( CTRL) h
CENT A
CLEAR @ z
DEL
(@
DEV_CNCL @ d
DOWN~ [ CTRL) V
DUP [CTRL)d
EJOF @ e f
E_INPUT @ e i
ENTER ( RETURN )
ENTER 1 [ RETURN )
EXIT @ x x
FM (CTRL)k
HOME ( CTRL) 0
IDENT @ i
INS (CTRL)U
LDUB ( CTRL) r
LEFT~ (CTRL)f
NEWL ( CTRL )
j
NEXTS @ +
NOT
~
a key number ( RETURN ) PAl to PA3PF1 to PF24 @ key number ( RETURN )
PREYS @
-PRINT @ p
RDUB ( CTRL)
Y
REDRAW @ r
RESET ( CTRL) a
Key Sequences for
Standard ASCII Terminals (continued)
3278 Key Standard ASCII Terminal
Function Kev Sequence
SHELL ~s
SOLID
~I
STATSYS~EQ (SNA only) ~q
TAB ( CTRL )
i
TEST ~EQ (BSe ~q
only)
UP~ ( CTRL ) t
Key Sequences
for
AT&T 4410
and Teletype 5410 Terminals
3278 Key AT&T 4410 and Teletype 5410
Function Kev Sequence
ATIN @ a ( RETURN)
BAKTAB
0
BS ( CTRL ) "
h
CENT
"
CLEAR @ z
DEL [@
DEV_CNCL @ d
DOWN~ IT)
DUP ( CTRL) d
EJOF ( ESC) e
f
E_INPUT @ e i
ENTER ( RETURN )
ENTERl ( RETURN )
EXIT @ x x
FM ( CTRL )
k
HOME
G
IDENT @ i
INS ( CTRL) U
LDUB ( CTRL)
r
LEFT~
B
NEWL ( CTRL )
j
NEXTS @ >
NOT
~
a key number ( RETURN )PAl to PA3
PFl to PF9 @ key number
PFlO @O
PFll @
-PFl2 @ =
PFl3 @ (SHIFT) 1
PFl4 @ (SHIFT) 2
PFl5 ( ESC) ( SHIFT)
3
Key Sequences for AT&T 4410
and Teletype 5410 Terminals (continued)
3278 Key AT&T 4410 and Teletype 5410
Function Kev Sequence
PF16 ~ (SHIFT]
4
PF17 ~ (SHIFT]5
PF18 ~ (SHIFT]6
PF19 ~ (SHIFT]7
PF20 ~ (SHIFT]8
PF21 ~ (SHIFT] 9 PF22 ~ (SHIFT) 0 PF23 ~ (SHIFT) -PF24 ~ (SHIFT) =PREYS ~<
PRINT ~p
RDUB ( CTRL )
Y
REDRAW ~r
RESET ( CTRL )
a
RIGHT-A
B
SHELL ~s
SOLID
~I
STATSYS~EQ (SNA only) ~q
TAB ( CTRL )
i
TEST ~EQ
(Bse
~qonly)
UP-A
OJ
Key Sequences for AT&T 4418
. and Teletype 5418 Terminals
Note that on these terminals there is no key marked ~ or (CTRLJ.
To emulate ~ , press ( ALT ) and
I.
For ( CTRL ) use the key immediately to the left of the space bar.
3278 Key AT&T 4418 and Teletype 5418
Function Kev Sequence
ATTN (ATIN)
BAKTAB ( BACK TAB )
BS ( BACK SPACE )
CENT 1\
CLEAR ( CLEAR )
DEL @)
DEV_CNCL ( DEV CNCL )
DOWN~
rn
DUP ~
EJOF ( ERASE EOF)
E_INPUT ( ERASE INPUT )
ENTER ( ENTER ) (lower right side) ENTERl ( ENTER ) (upper left side)
EXIT ~xx
FM ( FIELD MARK )
HOME ( HOME)
IDENT ( IDENT )
INS
Q@
LDUB ~
LEFT~
B
NEWL ( NEW LINE )
NEXTS ~+
NOT
]
Key Sequences for AT&T 4418
and Teletype 5418 Terminals (continued)
3278 Key AT&T 4418 and Teletype 5418
Function KeyS~uence
PAl @D
PA2 @D
PA3 (SHIFT]
@
PFl to PF24
@D
to (PF24]PREYS
~-PRINT ( PRINT LCL ]
RDUB
G2J
REDRAW ~r
RESET
[RESET]
(lower left side)RIGHT-A
G
SHELL ( SHIFT] ( RESET] (upper left side)
SOLID
~
RESET) (upper left side)STAT
SYS~EQ (SNA only) ( SYS REO ]
TAB ( CURSOR TAB ]
TEST ~EQ (BSC ( SYS REO ]
only)
UP-A
CD
Key Sequences for AT&T 4425
and Teletype 5425 Terminals
3278 Key AT&T 4425 and Teletype 5425
Function . Key Sequence
ATIN ( ESC)
a (
RETURN ) BAKTAB ( SHIFT) ( TAB)-BS