SINGLE ACTION ARMY REVOLVER
SHERIFF'S AND STOREKEEPER'S
MODEL REVOLVERS
NEW FRONTIER@ SINGLE ACTION
ARMY REVOLVER
Copyright @ 1993 Colt's Manufacturing Company, Inc. All Rights ReselVed. This instruction manual should always accompany this flresnn.
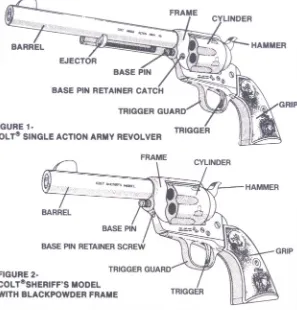
FRAME
HAMMER
FIGURE
1-COLT~ SINGLE ACTION ARMY REVOLVER
FIGURE
2-COL T~SHERIFF'S MODEL WITH BLACKPOWDER FRAME
FRAME
CYLINDER
HAMMER
I
THIS IS A COLLECTOR'S FIREARM
I.
A'WARNING:
THIS REtlO'I)JER-AAS-SEEIirFfECREATED FROM A.
HISTORIC DESIGN AND IS EXTREMELY DANGEROUS TO
HANDLE WHEN LOADED.,
Collectors of fine firearms, such as this Colt revolver, should be
aware that:
1. Loading and unloading the firearm will show wear and lead
to loss of collector value.
2. Excessive handling will lead to premature wear and cause
loss of value.
3. Firing this revolver will cause immediate extreme loss of
collector's value.
ACAUTION:
IF YOU HAVE READ THE WARNING ABOVE, AND
ACCEPT THE LOSS OF COLLECTOR'S VALUE AND THE RISK
OF DANGER FROM LOADING THIS REVOLVER USE THE
INFORMATION IN THE REST OF THIS MANUAL TO MINIMIZE
THE RISK OF INJURY, DEATH OR DAMAGE TO PROPERTY.
SAFETY DEPENDS ON YOU
SECTION
1
PRECAUTIONS
READ AND UNDERSTAND ALL THE FOLLOWING
PRECAU-TIONS
BEFORE
REMOVING
THIS
FIREARM
FROM
ITS
PACKAGE.
This Colt product is classified by the Alcohol, Tobacco and
Firearms
Division of the Internal
Revenue
Service,
U.S.
Treasury Department,
as a firearm or dangerous
weapon; it
is, therefore, potentially lethal!
&'WARNING:
IF,AfS-FIREARM rs CARELESSLY OR
IMP'R'trP-~
RLV
.
HANDLED, UNINTENTIONAL DISCHARGE COULD
RE-SULT AND COULD CAUSE INJURY, DEATH, OR DAMAGE
TO-fBj)J~EBJ-Y.
&CAUTION:
CAREFULLY READ THIS INSTRUCTION MANUAL
WHICH GIVES BASIC ADVICE ON THE PROPER HANDLING
AND FUNCTIONING
OF THIS COLT FIREARM PRIOR TO
LOADING AND FIRING. However,
your safety
and the safety
of others
(including
your family)
depends
on your mature
compliance
with that advice, and your adoption,
development
and constant employment of safe practices.
If unfamiliar
with firearms,
seek further
advice through
safe
handling
courses
run by your local gun clubs,
NRA
ap-proved
instructor,
or similar qualified
organizations.
NOTICE
Colt shall not be responsible for injury, death, or damage to property re-sulting from either intentional or accidental discharge of this firearm, or from its function when used for purposes or subjected to treatment for which it was not designed. Colt will not honor claims involving this fire-arm which result from careless or improper handling, unauthorized ad-justment or parts replacement, corrosion, neglect, or the use of wrong caliber ammunition, or the use of ammunition other than original high quality commercially manufactured ammunition in good condition, or any combination thereof. Colt will not honor claims involving this firearm for any reason or cause when such claims are made by the second or sub-sequent owner.
IMPORTANT
Before it left the factory this firearm was tested, carefully inspected, and packaged. Colt cannot control product handling after it leaves the fac-tory; therefore, please examine this firearm carefully at the time of pur-chase to insure that it is unloaded and undamaged. The dealer will be pleased to assist you in making this examination and endeavor to answer your further questions.
This instruction manual should always accompany this firearm and be transferred with it upon change of ownership.
Revolver Chamber
Size Suitable Ammunition
44 Spec. 44.40 45 Colt 45 ACP 357 Mag. 38 Spec. 38 Spec.+P 9mm 38.40
44 Special Yes No No No No No No No No 44.40 No Yes No No No No No No No
45 Colt No No Yes No No No No No No
45 ACP No No No Yes No No No No No
357 Mag. No No No No Yes Yes Yes No No
9mm No No No No No No No Yes No
38-40 No No No No No No No No Yes
IMPORTANT:
Before
going further
be sure you have read and
fully understand
the message
on page 1.
ACAUTION:
IF YOU DECIDE TO FIRE THIS COLLECTOR'S
REVOLVER, USE ONLY ORIGINAL HIGH QUALITY
COMMER-CIALLY MANUFACTURED AMMUNITION IN GOOD CONDITION
WHICH IS APPROPRIATE TO THE CALIBER OF YOUR
RE-VOLVER -
SEE TABLE BELOW.
SECTION TITLE PAGE
1 PRECAUTIONS 2
2 Main Features 6
3 Safety Instructions: 7
Cautions 8
Safety Features: 15
Hammer Safety Position 15 Half-Cock Position (for loading) 17
4 Function: 20
Loading 20
Carrying Modes 23
Unloading 24
To Unload Revolvers with ejector rods 24 To Unload Revolvers without ejector rods 26 Firing and Sight Adjustments 27
5 Maintenance: 32
Stripping for Cleaning 32 Assembling after Cleaning 33
When to Clean 33
How to Clean 34
Storage 36
Servicing and Repair 36
6 Parts Illustration and List 39
7 The Customized Gun 42
SAFETY DEPENDSON YOU
0
SECTION 2 MAIN FEATURES The Colt Single Action Army (SAA) revolver, like the 1873 original, is built the Colt way. The New Frontier Single Action Army (NFSAA) and some Sheriff's Model revolvers are functionally identical to the Single Action Army except that the NFSAA has a ramp style front sight and adjustable rear sight, while the Sheriff's Model has no ejector rod and special issues have dual cylinders. Some other Sheriff's Models and the Storekeeper's Model have Blackpowder frames with no ejector rod and a screw instead of a spring loaded catch to retain the basepin. This instruction manual applies to these revolvers, commemorative issues of these revolvers and to the variations of them shown in the table below.
Barrel
Lengths
4%-, 5Y2- 7112-or 1'Z' Revolver TypeSingle Action Army Revolver, 45 Colt, 357 Magnum, 44 Special, 44-40, 45 ACP, 9mm or 38-40 New Frontier Single Action
Army Revolver, 45 Colt, 357 Magnum, 44 Special, or 44-40
Storekeeper's and Sheriff's Models, 44 Special or 44-40
0
43/4-, 5112-or 7112-~ or 4-FinishesColt Blue (color
SECTION
3
SAFETY INSTRUCTIONS
If you have read the warning on page 1 andaccept
the loss of value and the risk of danger from loading this revolver then follow these safety instructions to reduce the risk of accidental discharge resulting in injury, death or damage to property. You may be an experienced safe shooter already familiar with the procedures in this instruction manual, or you may never have handled a gun before but if you decide to load live ammunition into this revolver we urge you toread this entire
instruc-tion manual carefully. You must follow the safety Instructions for your safety and the safety of others.
AiWAR~nn~:[rorrcrT-eAR'RYIAIS-FI"RCAR'fWITA-ALOAD"EDI
!CHAMBER IN FRONT OF THE HAMMER. THIS WILL MINIMIZE
A
~
HE RISK OF AN ACCIDENTALDISCHARGE.
Iill
ARNING:
IF REVOLVER IS DROPPED
ON HAMMER, IF
REVOLVER IS FANNED, OR IF EXCESSIVE FORCE IS APPLIED
~
o
THE
TRIGGER-"SAFETY"
AND
"HALF-COCK"
NOTCHES
COULD
BREAK,
CAUSING
ACCIDENTAL
DIS-I
CHARGE WHICH COULD RESULT IN INJURY, DEATH, OR
jDAMAGETO PROPERTY. (Note: Normal trigger pull is 5 Ibs'l
,maximum-excessive
force is 35 Ibs. or more.)
A
WAR'"H1N(;:"Wtienyou squeeze tJii"'tiigger, you must expecf
the gun to fire, and you must take full responsibility for firing
it. Your care can avoid accidental
discharge,
and you Will
,
'
thereb avoid accidental injury and death.
CAUTIONS:
A
IGENERAL HANDLING CAUTIONS
I1. ALWAYS HANDLE YOUR REVOLVER AS IF IT WERE
LOADEDso that you never fire it accidentally when you think
it is unloaded.
2. NEVER POINT YOUR REVOLVER AT ANYTHING YOU DO
NOT INTENDTO SHOOT so that if it fires accidentally, injury,
death, or damage to property will be prevented.
3. NEVER TAKE ANYONE'S WORD THAT A GUN IS
UN-LOADED; check for yourself with fingers off the trigger and
gun pointed in a safe direction, so that you never fire the gun
accidentally
when you think it is unloaded.
4. ALWAYS KEEP AND CARRY YOUR REVOLVER EMPTY,
WITH THE HAMMER IN THE SAFETY POSITION,
except when
you intend to shoot, so that your revolver cannot be fired
when you do not mean to fire
it.
5. ALWAYS MAKE SUREYOUR REVOLVERIS NOT LOADED,
THE HAMMER IS AT HALF COCK AND LOADING GATE IS
OPEN BEFORE LAYING IT DOWN, OR HANDING IT TO
ANOTHER PERSON,
so that it cannot be fired when it is
unsafe to do so.
6. NEVER
LEAVE REVOLVER COCKED READY TO FIRE. Thiscondition is extremely dangerous, and revolver could easily
be accidentally discharged, causing injury, death, or damage
to property.
7. NEVER LEAVE A LOADED REVOLVER UNATTENDED.
Someone,
especially
a child, may fire it and cause injury,
death, or damage to property.
8. ALWAYS INSTRUCT CHILDREN TO RESPECT FIREARMS.
Ifyou teach your children to shoot, teach them to treat and
use the revolver properly, and always supervise them closely.
Always stress safety so that your children will not fire the
revolver when it is unsafe to do so.
AI
RANGE CAUTIONS
I9. ALWAYS BE SURE YOUR BACKSTOP
IS ADEQUATE to
stop and contain bullets before beginning target practice so
that you do not hit anything outside the range shooting area.
THINK! What will you HIT if you MISS the target?
10. ALWAYS PUT A KNOWLEDGEABLE AND RESPONSIBLE
PERSON IN CHARGE TO MAINTAIN SAFETY CONTROL WHEN
A GROUP IS FIRING ON A RANGE. Obey his commands
so
that discipline
is maintained
to reduce
the likelihood of
accidents.
11. ALWAYS CARRY YOUR REVOLVER EMPTY WITH THE
LOADING GATE OPEN WHILE ON A RANGE until preparing
to fire. Keep It pointing towards the backstop when loading,
firing and unloading, to eliminate the risk of injury, death, or
damage to property.
AI
LOADING/UNLOADING CAUTIONS
I12. ALWAYS BE SURE BARREL BORE AND CYLINDER
CHAMBERS ARE CLEAR OF OBSTRUCTIONS. Clean a fouled
revolver immediately
so that it will function correctly and
safely.
13. ALWAYS USE ONLY CLEAN, DRY, ORIGINAL HIGH
QUALITY COMMERCIALLY MANUFACTURED AMMUNITION
IN GOOD CONDITION WHICH IS APPROPRIATE TO THE
CALIBER OF YOUR REVOLVER. (See page 4.) Gun and
ammunition
manufacturers
design their products within
ex-acting engineering
safety limits. Handloads are sometimes
outside those limits and can be so unsafe as to blow up the
cylinder and frame and cause injury, death, or damage to
property.
14. ALWAYS EXERCISE EXTREME CARE TO KEEP MUZZLE
POINTING IN A SAFE DIRECTION, WELL CLEAR OF YOUR
BODY,
PARTICULARLY
WHEN UNLOADING
REVOLVERS
THAT DO NOT HAVE EJECTOR RODS.
AI
SHOOTING CAUTIONS
I15. NEVER DRINK ALCOHOLIC BEVERAGES OR TAKE
DRUGS BEFORE OR DURINGSHOOTING, as your vision and
judgment could be seriously Impaired making your gun
handling unsafe.
TAK-ING MEDICATION,
to be sure you are fit to shoot and handle
your revolver
safely.
17. ALWAYS WEAR AND ENCOURAGE OTHERS TO WEAR
EAR PROTECTION WHEN SHOOTING, especially
on a range.
Without ear protection,
the noise from your revolver and
other guns close to you, could leave a "ringing" in the ears
for some time after firing, while the cumulative
long term
effect could be permanent hearing
loss.
18. ALWAYS WEAR AND ENCOURAGEOTHERSTO WEAR
PROTECTIVESHOOTING GLASSES.
Flying particles could
damage eyes and cause blindness; but protective shooting
glasses should prevent such injury.
19. ALWAYS
KEEP AN EMPTY CHAMBER IN FRONT OF
HAMMER WITH HAMMER IN SAFETY POSITION WHEN
RE-VOL VER IS LOADED UNTIL YOU ARE READY TO FIRE.
This
will minimize
risk of an accidental
discharge.
20. ALWAYS HOLD REVOLVER BY THE GRIP AND KEEP
BOTH HANDS WELL CLEAR OF, AND BEHIND THE
Cy-LINDER. Never
hold it near the cylinder as very hot gas and
lead particles may be sprayed out around the cylinder. . .
these would Injure your hands.
21. NEVER SQUEEZE THE TRIGGER OR PUT YOUR FINGER
IN THE TRIGGER GUARD UNTIL YOU ARE AIMING AT A
TARGET AND READY TO SHOOT. This will prevent
you firing
the revolver
whenit is pointing
in an unsafe
direction.
22. AL WAVS BE ABSOLUTEL V SURE OF YOUR TARGET AND
THE AREA BEHIND IT BEFORE YOU SQUEEZE THE TRIGGER.
A bullet could travel through
or past your target up to 11/2
miles. . . if in doubt, don't shoot. THINKI
What will
you HIT
if you MISS the target?
23. NEVER SHOOT AT A HARD SURFACE SUCH AS ROCK,
OR A LIQUID SURFACE SUCH AS WATER. A bullet
may
ricochet
and travel in any direction
to strike you, another
person or an object you cannot see, causing Injury, death,
or damage to property.
24. NEVER
DISCHARGE
A FIREARM
NEAR
FLAMMA-BLE MATERIAL. Flame and sparks erupt from the firearm
when discharged.
They could start a fire or cause
flamma-ble liquids
and gases to explode.
25. NEVER FIRE YOUR REVOLVER NEAR AN ANIMAL unless
It Is trained to accept the noise; an animal's startled reaction
could injure it or cause an accident.
AI
UNLOADING CAUTION
I28. ALWAYS EXERCISE EXTREMECARE TO KEEP MUZZLE
POINTING IN A SAFE DIRECTION, WELL CLEAR OF YOUR
BODY,particularly when unloading revolvers that do not have
ejector rods.
AI
MALFUNCTIONCAUTIONS
I29. FAILURE TO FIRE: ALWAYS HOLD REVOLVER, KEEPING IT POINTED TOWARDS THE TARGET OR A SAFE OPEN AREA
AND WAIT 30 SECONDS when revolver falls to fire. If a
hangfire (slow ignition) has occurred, round will fire within
30 seconds. If round does not fire, eject round and examine
primer in base of misfired round. Iffiring pin Indent on primer
is light, misaligned or non-existent, have revolver examined
by a competent gunsmith. If firing pin Indent on primer
appears normal (In comparison with similar previously fired
rounds) assume faulty ammunition; segregate misfired round
from other liveammunition and empty cases, reload and carry
on firing.
NOTE:Dispose of misfired rounds in accordance with
ammuni-tion manufacturer's instrucammuni-tions.
30. NEVER USE YOUR REVOLVER IF IT FAILS TO FUNCTION
PROPERLY, AND NEVER FORCE A JAMMED ACTION, as a
round may explode causing serious injury, possible death, or
severe damage to your revolver.
AI
CLEANING
AND STORAGE CAUTIONSI
31. ALWAYS MAKE SURE YOUR REVOLVER IS NOT LOADED
BEFORE CLEANING,
STORING,
TRAVELING,
LAYING
IT
DOWN, OR HANDING IT TO ANOTHER PERSON,
so that it
cannot be fired when it is unsafe
to do so.
32. ALWAYS
KEEP AND STORE YOUR REVOLVER AND
AMMUNITION IN SEPARATE LOCKED RECEPTACLES OUT
OF REACH AND SIGHT OF CHILDREN AND UNTRAINED
PEOPLE,
to minimize the risk of revolver and ammunition
being easily available
for loading
and firing.
AI
GUN ABU~E
CAUTIONS
I
33. NEVER "FAN"
YOUR REVOLVER. YOU COULD BREAK
THE FIRING MECHANISM AND MAKE REVOLVER UNSAFE.
Your accuracy
will be reduced and you may hit something
other than target aimed at. Altering the single action
mech-anism for fanning would also make the revolver unsafe; do
not make or attempt to make this alteration.
34. NEVER ABUSE YOUR REVOLVER
by using it for any
purpose other than collecting
or
shooting.
IMPORTANT: Do not dry fire your Colt Single Action Revolver as repeated dry firing could damage the firing pin. (Dry firing is snap-ping the hammer on an empty chamber.)
NOTE: Please note that we have chosen to use the word "SQUEEZE" in this instruction manual instead of "PULL" or
"PRESS" when trigger movement is described; this is simply to
remind you of the need for a gentle squeezing action to achieve
accuracy.
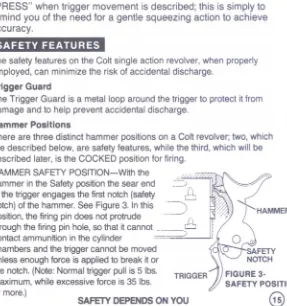
SAFETY FEATURES
The safety features on the Colt single action revolver, when properly employed, can minimize the risk of accidental discharge.
Trigger Guard
The Trigger Guard is a metal loop around the trigger to protect it from damage and to help prevent accidental discharge.
Hammer Positions
There are three distinct hammer positions on a Colt revolver; two, which are described below, are safety features, while the third, which will be described later, is the COCKED position for firing.
HAMMER SAFETY POSITION-With the ..!LLLF hammer in the Safety position the sear end .:'~ of the trigger engages the first notch (safety
~
notch) of the hammer. See Figure 3. In this-jposition, the firing pin does not protrude. ---" . through the firing pin hole, so that it cannot
_~8
contact ammunition in the cylinder- J chambers and the trigger cannot be moved unless enough force is applied to break it or the notch. (Note: Normal trigger pull is 5 Ibs. maximum, while excessive force is 35 Ibs. or more.)FIGURE 3-SAFETY POSITION
@
TRIGGER
&
CAUTION:
ALWAYS CARRY YOUR SINGLE ACTION
REVOL-VER
IN THIS
"SAFETY"
POSITION
WITH
AN
EMPTY
CHAMBER IN FRONT OF THE HAMMER.
To put the hammer in the safety position, place your thumb firmly on the hammer spur, (DO NOT TOUCH THE TRIGGER) and draw the hammer back about a quarter inch. When you hear a "click," gently ease ham-mer slightly forward, allowing safety notch to engage and hold hammer
A
in safety position.LhCAUTION:
DO NOT ATTEMPT TO ENGAGE SAFETY NOTCH
DIRECTLY FROM HALF-COCK OR COCKED POSITIONS
un-less you release the trigger completely
before the hammer
reaches the safety position,
as the safety notch may not be
engaged correctly.
SAFETY POSITION
- HALF.COCKPOSITION FIGURE
HALF-COCK (OR LOADING) POSITION-With the hammer in the Half-Cock position the sear end of the trigger engages the half cock notch and the cylinder is free to rotate for loading, unloading, inspection and further maintenance. See figure 4. Once in this position the trigger
A
cannot be moved unless enough force is applied to break it or the notch.lhCAUTION: NEVER CARRY YOUR REVOLVER IN THE
HALF-COCK POSITION AS ACCIDENTAL DISCHARGE MAY BE
POSSIBLE IF REVOLVER IS SUBSEQUENTLY DROPPED,
MIS-HANDLED OR MISTREATED.
,liLLT
FIGUREs-HALF-COCKPOSITION
8 ._~ .~
8
.---.../
To place the hammer in Half-Cock position (DO NOT TOUCH THE TRIGGER) put thumb firmly on the hammer spur and draw hammer back about three quarters inch from Safety position. When you hear a "click" gently ease hammer slightly forward allowing Half-Cock notch to be en-gaged to hold hammer in Half-Cock position.
IMPORTANT: If you draw the hammer too far back another "click" will be heard. This "click" is caused by the bolt engaging the cylinder which will not be free to rotate when hammer is lowered into Half-Cock posi-tion. If you find the cylinder locked DO NOT FORCE IT. Simply return the hammer to the Safety position and draw it back again into the Half-Cock position as described in this manual.
The Safety and Half-Cock positions also serve to arrest the forward movement of the hammer and prevent a round being fired should your thumb accidentally slip from the hammer spur. This safety feature is effective provided YOU DO NOT TOUCH THE TRIGGER.
IMPORTANT: The Safety and Half-Cock notches in the mechanism are designed to prevent the trigger from being pulled, so DO NOT FORCE THE TRIGGER WITH HAMMER IN "SAFETY" or "HALF-COCK" POSI-TIONS. The mechanism could be damaged by such action, rendering the revolver unsafe.
AWARNING:IF
YOD -DO
~OT -R'ELEASE
TRiGGER-FULLY
.BEFORE
REACHING
SAFETY
POSITION,
SAFETY
NOTCH
MAY
NOT
BECOME
FULLY
AND
SAFELY
ENGAGED,
/).IRENDERING
IT INEFFECTIVE
AS A SAFETY
DEVICE.
I
ill
WARNING:
IF REVOLVER
IS DROPPED
ON
HAMMER,
IF
REVOLVER
IS FANNED,
OR IF EXCESSIVE
FORCE IS APPLIED
TO
TRIGGER-"SAFETY"
AND
"HALF-COCK"
NOTCHES
COULD
BREAK,
CAUSING
ACCIDENTAL
DISCHARGE
WHICH
I
COULD
RESULT
IN INJURY,
DEATH,
OR DAMAGE
TO
PROP-ERTY.
(Note:
Normal
trigger
pull is 5 Ibs. maximum-excisJ
sive force
is 35 Ibs. or more.)
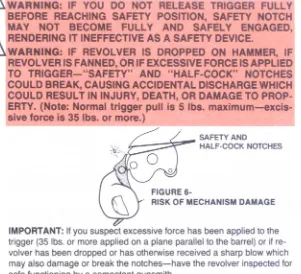
SAFETY AND
HALF-COCK NOTCHES
FIGURE 6-.
RISK OF MECHANISM DAMAGE
IMPORTANT: If you suspect excessive force has been applied to the trigger (35 Ibs. or more applied on a plane parallel to the barrel) or if re-volver has been dropped or has otherwise received a sharp blow which may also damage or break the notches-have the revolver inspected for safe functioning by a competent gunsmith.
SECTION 4 FUNCTION
Your Colt Single Action revolver will be ready to fire when chambers in the cylinder are loaded with ammunition (see loading instructions), and hammer has been drawn all the way back past Safety and Half-Cock positions to the Cocked position. The Action of "cocking" lowers cylinder locking bolt, rotates cylinder to carry a round of ammunition into align-ment with barrel and hammer, raises cylinder locking bolt to lock cy-linder and holds hammer under spring tension. When trigger is squeezed, hammer falls forward causing firing pin to pass through the firing pin hole and strike primer of base of cartridge. The energy im-parted to the primer ignites it, in turn igniting the main charge which, in burning, rapidly generates extremely high gas pressure to drive the bullet down the barrel. Rifling grooves in the barrel impart stabilizing spin to the bullet so that it will follow a more accurate path to the target.
ImlmI!I
&CAUTION:
TO MINIMIZE RISK OF UNINTENTIONAL DAMAGE,
LOAD LIVE AMMUNITION INTO REVOLVER ONLY WHEN YOU
A
ARE ABOUT TO SHOOT.
illCAUTION:
BEFORE LOADING STOREKEEPER'S OR
I
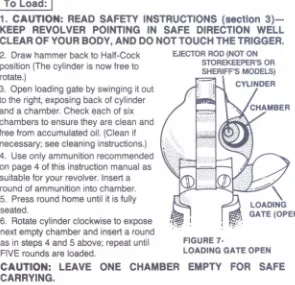
To load:
IA
1. CAUTION:
READ SAFETY INSTRUCTIONS
(section
3)-KEEP REVOLVER POINTING IN SAFE DIRECTION WEll
CLEAR OF YOUR BODY, AND DO NOT TOUCH THE TRIGGER.2. Draw hammer back to Half-Cock
EJECTORROD (NOT ON..
(ThI. d . f STOREKEEPER'SOR
position e cy In er IS now ree to
SHERIFF'S MODELS) rotate.)
3. 0pen oa Ing ga eI d. t by sWinging lOut
..
.
t
CYLINDERto the right, exposing back of cylinder and a chamber. Check each of six chambers to ensure they are clean and free from accumulated oil. (Clean if necessary; see cleaning instructions.) 4. Use only ammunition recommended on page 4 of this instruction manual as suitable for your revolver. Insert a round of ammunition into chamber. 5. Press round home until it is fully seated.
6. Rotate cylinder clockwise to expose next empty chamber and insert a round
as in steps 4 and 5 above; repeat until FIGURE 7. A. FIVE rounds are loaded.
LOADING GATE OPEN
ill
CAUTION: lEAVE
ONE CHAMBER EMPTY FOR SAFE
CARRYING.
-~\
LOADING
GATE (OPEN)
&CAUTION:
INSURE EMPTY CHAMBER REMAINS IN FRONTOF HAMMER AND IN LINE WITH BARREL, so that if hammer
falls forward, firing pin will not strike live round to cause
accidental discharge.
7. KEEP REVOLVER POINTING IN SAFE DIRECTION. With thumb firmly on hammer spur, draw hammer back slightly to disengage the Half-Cock notch. Squeeze the trigger only long enough to allow hammer to move forward and clear Half-Cock notch, then release trigger com-pletely so that Safety Notch can be properly engaged, and lower
A
hammer controlling its movement with your thumb, into Safety position.ill
CAUTION: IF YOU DO NOT RELEASE TRIGGER FULLYBE-FORE REACHING "SAFETY" POSITION, THE SAFETY NOTCH
MAY NOT BECOME FULLY AND SAFELY ENGAGED,
render-ing it ineffective as a safety device.
IMPORTANT: It is sometimes possible that the bolt will not correctly engage cylinder to lock it so that empty chamber may not remain in front of hammer. Check for correct locking by attempting to rotate cylinder gently counterclockwise by hand. If it is already locked, the cylinder will not move. If it was unlocked, you should hear the bolt "click" into engagement with the cylinder to lock it.
Alternate Loading Sequence
Follow "To Load" sequence except at Step 6 do this:
After loading first round as in Steps 4 and 5, leave next chamber empty. Then load remaining 4 chambers. This will position the empty chamber under the hammer when you rotate the cylinder and again see the first chamber you loaded.
CARRYING
MODESNOTE: This pistol may be carried in either of the following modes according to your needs:
Mode 1: - CYLINDER EMPTY
- Revolver cannot be discharged.
- Use Mode 1 for storage, transporting, cleaning, repair, demonstrating and dry practice.
Mode 2: - 5 CHAMBERS LOADED, WITH EMPTY CHAMBER UNDER HAMMER
- Revolver can be fired when hammer is cocked and trigger is squeezed.
- Use Mode 2 when you MUST BE PREPARED to use the revolver IMMEDIATELY without warning.
A
"Wiii""NiNG:""Yiheii"'YOu squeeze the trigger, you-mustexpect-the gun to fire, and you must take full responsibility for firing
it. Your care can avoid accidental discharge, and you will,
ItI!ereby avoic!accidental inj!lrY.and death.
-
_I
UNLOADING
&CAUTION: ALWAYS UNLOAD YOUR REVOLVER
IMME-DIATEL Y AFTER USE, AND PRIOR TO CLEANING AND STOR-A. AGE, to minimize the risk of accidental discharge.
illCAUTION: ALWAYS EXERCISE EXTREME CARE TO KEEP
MUZZLE POINTING IN A SAFE DIRECTION, WELL CLEAR OF
YOUR BODY, PARTICULARLY WHEN UNLOADING
RE-VOL VERS THAT DO NOT HAVE EJECTOR RODS.
I
TO UNLOAD REVOLVERS WITH EJECTOR RODSI
1. Be sure you are familiar. with Safety Instruction in Section 3. KEEP REVOLVER POINTING IN SAFE DIRECTION AND DO NOT TOUCH TRIGGER.
2. Draw hammer back to Half-Cock position. (The cylinder is now free to rotate clockwise.)
3. Open loading gate.
5. Rotate cylinder clockwise to align next chamber with ejector rod and repeat step 4 above; repeat until all chambers are empty.
6. Close loading gate.
7. With thumb firmly on hammer spur, draw hammer back slightly to dis-engage Half-Cock notch. Squeeze trigger only long enough to allow hammer to move forward and clear Half-Cock notch, then release trigger completely so that the Safety notch can be properly engaged. Lower hammer controlling its movement with your thumb, into Safety position. 8. Collect live ammunition for safe
storage and empty cartridge cases for disposal.
FIGURE B-EJECTION
A
I
TO UNLOAD REVOLVERS WITHOUT EJECTOR RODSI
ill
CAUTION: ALWAYS EXCERCISE EXTREME CARE TO KEEPMUZ-ZLE POINTING IN A SAFE DIRECTION, WELL CLEAR OF YOUR BODY, PARTICULARLY WHEN UNLOADING REVOLVERS THAT DO
NOT HAVE EJECTOR RODS.
1. Be sure you are familiar with Safety Instructions in Section 3. KEEP REVOLVER POINTING IN SAFE DIRECTION AND DO NOT TOUCH TRIGGER.
2. Draw hammer back to Half-Cock position. (The cylinder is now free to rotate clockwise.)
3. Open loading gate.
4. KEEP FINGERS AWAY FROM TRIGGER, align chamber as shown in Figure 8, tilt revolver muzzle up and remove cartridge as it slides back out of the chamber.
5. Rotate cylinder clockwise to align next chamber and repeat step 4 above; repeat until all chambers are empty.
NOTE: If cartridges or spent cases cannot be removed as described in steps 4 and 5, remove the cylinder as follows and use the base pin to push out the remaining rounds. See Figure 12.
a. KEEP MUZZLE POINTING IN A SAFE DIRECTION WELL CLEAR OF YOUR BODY AND depress base pin retaining catch to release base pin. On Blackpowder frame revolvers use a properly fitting screwdriver to remove the base pin retaining screw.
b. Remove base pin.
c. Carefully remove cylinder to the right of frame avoiding contact be-tween the ratchet and loading gate and contact with remaining live primers. Take great care to avoid dropping cylinder and car-tridges because one or more rounds may fire.
d. Use base pin to remove remaining rounds until all chambers are empty.
e. Install empty cylinder and base pin.
f. On Blackpowder frame revolvers install and tighten base pin retain-ingscrew.
6. Close loading gate.
7. With thumb firmly on hammer spur, draw hammer back slightly to dis-engage Half-Cock notch. Squeeze trigger only long enough to allow hammer to move forward and clear Half-Cock notch, then release trigger completely so that the Safety notch can be properly engaged, and lower hammer, controlling its movement with thumb, into Safety position. 8. Collect live ammunition for safe storage and empty cartridge cases for disposal.
FIRING AND SIGHT ADJUSTMENT
Before firing your Colt Single Action revolver, practice your stance, aim, rhythm and breathing for steady aim with your revolver UNLOADED. Practice firing on a range before going hunting or using your revolver for any other type of shooting. If you have a dual cylinder revolver learn to allow for the customary variation in point of bullet impact with different caliber cylinders installed. Different ammunition may also affect perlormance.
The New Frontier is fitted with the adjustable Colt Accro rear sight. (See Figure 9). To adjust sight, tum windage screw clockwise and sight
moves
to left; counterclockwise and it moves to right. Tum elevation screw clockwise to lower sight;counterclockwise to raise it.Poinl of bullet impact will move in the same direction. It is recommended that adjustments for other than windage and elevation be made only by A. experienced persons.
L.!..lCAUTIONS:
1. ALWAYS WEAR AND ENCOURAGEOTHERS NEAR YOU
TO WEAREAR PROTECTIONWHENSHOOTING,
.speclally on
s
range.
Without ear protection, the noise
from your revolver
and other guns close to you could
leave a
"ringing"
in the
ears for some
time
after
firing, while the cumulative long
term
effect
could be permanent hearing
loss.
2. ALWAYS WEAR AND ENCOURAGE OTHERS TO WEAR
PROTECTIVESHOOTING GLASSES. Flying particles
could
damage eyes and cause blindness; but protective shooting
glasses should prevent such Injury.
ARNING: When you squeeze
the trigger, you mus
expec
un to fire. and you must take full responsibility
for firing It. You
are can avoid accidental
discharge,
and you will thereby avol
A
ITo Fir.:
Iill 1. CAUTION:
READ SAFETY INSTRUCTIONS (Section 3) - KEEP REVOLVER POINTING IN SAFE DIRECTION AND DO NOT TOUCH THE TRIGGER.2. load revolver as previously described.
3. DO NOT TOUCH TRIGGER. With your thumb firmly on hammer spur, draw hammer FULLY back (about an inch and three quarters) to "cocked" posrtion and allow hammer to go slightly forward until "cocked" notch is engaged. Remove thumb from hammer spur.
4. Grasp revolver by grip and, with index finger resting along the outside of trigger guard, take aim. (Aim by
align-ing target with front and rear sights. See Figure 11. Then focus on the front sight.)
5. Keeping steady aim, place index fin-ger on trigfin-ger and squeeze gently. Don't jerk the trigger as you will disturb your aim and spoil your accuracy.
TRIGGER
"'-HAMMER
COLT SINGLE COLT ACTION ARMY NEW FRONTIER AND SHERIFF'S SINGLE ACT10N
MODEL ARMY FIGURE11-AIMING
Q
29
SAFETYDEPENDSON YOU
A
6. Release trigger and remove index finger from trigger.iliCAUTION:
IF YOUR FIREARM FAILS TO FIRE, HOLD IT, KEEPING IT POINTED TOWAROS THE TARGET OR SAFE OPEN AREA AND WAIT 30 SECONDS. II a hangllr. (slowignition) has occurred, round will fire within 30 seconds. If
round does not fire, eject It and examine primer; I. firing pin indent 01 primer is light, off center, or non-existent, unload
remaining rounds and have revolver examined by a
compe-tent gunsmith. If firing pin Indent on primer appears normal
{in comparison with similar previously fired rounds}
assume
faulty ammunition; segregate misfired rOUj'1dfrom other live
ammunition and
empty
cases, and carry on firing.NOTE: Dispose of misfired rounds
in accordance
with the ammunition manufacturer's instructions.7. To fire second and subsequent rounds, repeat steps 31hrough 6 above.
8. KEEP REVOLVER POINTING IN SAFE DIRECTION. Unload revolver
A
as previously described.iliCAUTION:
NEVER LEAVE REVOLVER COCKED READY TOFIRE as this condition Is EXTREMELY dangerous, and
IMPORTANT: If you cock your revolver but do not fire it, retum
hammer to Safety position
by
placing thumb firmly on hammer
spur and draw hammer back slightly to disengage Cocked notch.
Squeeze trigger only long enough to allow hammer to move
forward and clear Cocked notch,
then
release trigger completely.
Half.Cock notch will then be engaged and cylinder must be
rotated until empty chamber is in front of hammer. Draw hammer
back slightly to disengage halt-cock notch. Squeeze trigger only
long enough to allow hammer to move forward and clear
halt-cock notch, then release trigger completely so that safety notch
can be properly
engaged.
"
you lose the opportunity to fire,
unload your
revolver as previously described.
&'CAUTION:
IF YOU DO NOT RELEASE TRIGGER FULLY
BEFORE REACHING SAFETY POSmON, SAFETY NOTCH
MAY NOTBECOMEFULLY ENGAGED,
renderingItIneffective
as a safety device.
SECTION
5
MAINTENANCE
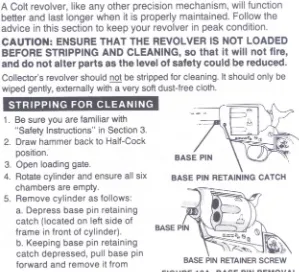
A Colt revolver, like any other precision mechanism, will function
better and last longer when it is properly maintained. Follow the
A
advice in this section to keep your revolver in peak condition.
illCAUTION:
ENSURE THAT THE REVOLVER IS NOT LOADED
BEFORE STRIPPING AND CLEANING,
so that
it will not fire,
and do not alter parts as the level of safety could be reduced.
Collector's revolver should not be stripped for cleaning. It should only be wiped gently, externally with a very soft dust-free cloth.
:.=--=~~Q)~
\>iF;..~ -~!'
BASE PIN RETAINERSCREW FIGURE 12A. BASE PIN REMOVAL
STRIPPING
FOR CLEANING
1. Be sure you are familiar with "Safety Instructions" in Section 3. 2. Draw hammer back to Half-Cock
position.
3. Open loading gate.
4. Rotate cylinder and ensure all six chambers are empty.
5. Remove cylinder as follows: a. Depress base pin retaining catch (located on left side of frame in front of cylinder). b. Keeping base pin retaining catch depressed, pull base pin forward and remove it from
revolver. Release retaining catch.
NOTE: Blackpowder frame re-volvers have a base pin retaining screw in front of the frame which must be removed before base pin can be removed.
c. Carefully remove cylinder to the right of frame and avoid con-I
-tact between the ratchet and . loading gate.
RATCHET
I I
FIGURE 128.
CYLINDER REMOVAL
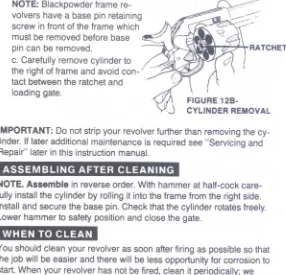
IMPORTANT: Do not strip your revolver further than removing the cy-linder. If later additional maintenance is required see "Servicing and Repair" later in this instruction manual.
ASSEMBLING
AFTER CLEANING
NOTE. Assemble in reverse order. With hammer at half-cock care-fully install the cylinder by rolling it into the frame from the right side. Install and secure the base pin. Check that the cylinder rotates freely. Lower hammer to safety position and close the gate.
WHEN TO CLEAN
You should clean your revolver as soon after firing as possible so that the job will be easier and there will be less opportunity for corrosion to start. When your revolver has not be fired, clean it periodically; we
suggest once or twice a year in a temperate climate, or as often as once a month in a tropical climate. If you carry a loaded revolver, UN-LOAD it and clean it at least once a month. If you get your revolver wet, clean it as soon as possible.
HOW TO CLEAN
A collector's revolver should only be wiped gently on the outside sur-faces with a very soft dust-free cloth.
Others should be cleaned as follows:
The following cleaning procedure may be used both periodically and after firing; however, those items marked ..*.. are unnecessary for perio-dic cleaning.
Materials: Cleaning rod, cotton flannel patches (cut to fit snugly into the bore), a small tooth-brush, good quality light gun oil, *gun clean-ing solution, and a brass wire bristle bore cleanclean-ing bush.
NOTE: In freezing conditions (below 32°F or a°C) avoid the use of oil for lubrication; instead, apply a dry lubricant sparingly.
/:... CLEANING PROCEDURE:
ill
1. CAUTION: ENSURE THAT THE FIREARM IS NOT LOADED.
2. Strip for cleaning as previously described.NOTE: Avoid contact between cleaning rod and muzzle as resultant
3. Attach cotton flannel patch to end of cleaning rod, insert ~ in muzzle and pass rod and patch down through barrel. Repeat, changing patches until last patch comes out clean.
4. Clean each of the six chambers in cylinder with similar method to step 3above.
5. Visually inspect barrel and chambers; if they are clean, proceed di-rectly to step 8, but if ~ remains dirty, continue w~ step 6.
6. *(NOTE: This ~em should be applicable only after firing.) Attach brass wire bristle brush to cleaning rod and dip brush in gun cleaning solution. Thoroughly scrub out barrel and cylinder chambers, passing the brush all the way through before reversing the movement If you try to change direction with brush in barrel, the brush will stick.
7. Repeat steps 3, 4 and 5 above.
8. Clean rear face of barrel and revolver frame, using a small tooth-brush.
9. Lightly moisten a flannel patch with gun oil and pass ~ once through the barrel, so leaving a thin film of oil on the inside surface. Leave this film of oil on the metal surface if revolver is to be stored. If ~ is not to be stored, or if ~ is being removed from storage for use, pass a dry patch through barrel and chambers to remove as much oil as possible. (See note on cold weather lubrication.)
1O. Check that flannel or brush bristles have not become lodged in any part of revolver, then wipe all extemal surfaces with a flannel patch moistened with gun oil. (See note on cold weather lubrication.)
11. Reassemble revolver. See "Assembling After Cleaning."
12. Again wipe external surfaces with oil moistened patch to remove any fingerprints. (Finger moisture, if left, could start a corrosion process). (See note on cold weather lubrication).
13. Remove any gun cleaning solution and oil from grip.
~
&
CAUTION:
ALWAYS UNLOAD YOUR REVOLVER FOR STORAGEAND STORE AMMUNITION SEPARATELY. Keep and store your
revolver and ammunition securely locked in separate locations
out of reach and sight of children. (Children are naturally curious and do not always believe the real danger of guns).
NOTE: Do not store your revolver in an air-tight container, and do
not seal or attempt to seal the barrel or chambers to exclude dust, as the internal steel surfaces are more likely to corrode.
..
"
.
Should your revolver require adjustment, or repair, make sure it is NOT loaded and send it to Colt's. For spare parts, seek advice from the Dealer who should have up to date information on how best to obtain genuine Colt parts.
of this instruction manual to help you identify the part you need, but it is important to note that all parts are not available for sale. Those parts which are available should be installed by Colt's or a compe-tent gunsmith. When ordering parts, please give part name as given on the Parts List. Also give the caliber, model name, serial number and metal finish of your revolver, i.e., whether blue, nickel or stainless steel.
IMPORTANT: If you make unauthorized adjustments or use unau-thorized parts, Colt will not assume responsibility for the functioning of this revolver.
THIS GUN IS MANUFACTURED TO PERFORM PROPERLY WITH THE ORIGINAL PARTS AS DESIGNED. IT IS YOUR DUTY TO MAKE SURE ANY PARTS YOU BUY ARE INSTALLED COR-RECTLY AND THAT NEITHER REPLACEMENTS NOR ORIGINALS ARE ALTERED OR CHANGED. This is why we say return it to Colt's. YOUR GUN IS A COMPLEX TOOL WITH MANY PARTS THAT MUST RELATE CORRECTLY TO OTHER PARTS. PUTTING A GUN TOGETHER WRONG OR WITH MODIFIED PARTS CAN RESULT IN A DAMAGED GUN, DANGER, AND INJURY OR DEATH TO YOU AND OTHERS THROUGH MALFUNCTION. ALWAYS LET A QUALIFIED GUNSMITH WORK ON YOUR GUN AND CHECK ANY WORK yOU THINK WAS NOT PERFORMED BY A GUNSMITH. Wr:: at Colt think this is a small price to pay for firearms safety.
NOTE: Various Federal and State laws and local ordinances govern
the transfer and transportation of firearms, so take the advice of the Dealer in your state on how to send your firearm to Colt's. Before
""
shipping your revolver, here are some important points to remember:
LU
1.
CAUTION:
MAKE SURE THAT THE FIREARM IS NOT LOADED.2. Write a letter explaining the problem and your requirements in as much detail as possible. Include the model name and serial number of your revolver together with your return address, then enclose it with the gun in a well padded package.
3. Do not send presentation boxes, accessories or ammunition.
4. Colt's address for receiving packages is: CMCI Talcott Road
West Hartford, CT 06110
5. Do not indicate the contents, or include "COLT" in the address on the package so that an inquisitive thief is not attracted to it by such information.
6. Insure the package contents against loss or theft.
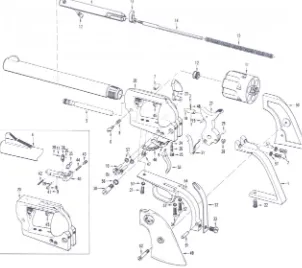
SECTION 6 PARTS IllUSTRATION AND liST
This section is provided so that you may identify names of parts
for your own interest. However, for adjustment, repair or spare
parts information, see Section 5 "Servicing and Repair."
See page 40 for illustration. See page 41 for names of parts.
11
I ~
DESCRIPTION
1. Backstrap 2. Backstrap Screw (2) 3. Ball (2) (same as no. 36) 4. Barrel
43,4" 5Y2" 7%" or 12" 5. Base Pin 6. Base Pin Screw 7. Base Pin Screw Nut 8. Base Pin Spring 9. Boll
10. Boll Screw 11. Cylinder 12. Cylinder Spacer 13. Ejector Head 14. Ejector Rod 15. Ejector Spring 16. Ejector Tube 17. Ejector Tube Screw 18. Firing Pin 19. Firing Pin Rivet 20. Frame
21. Front Guard Screw 22. Front Strap Screw
23. Gate 24. Gate Catch 25. Gate Catch Screw 26. Gate Spring 27. Hammer Assembly 28. Hammer Roll 29. Hammer Roll Pin 30. Hammer Screw 31. Hand 32. Main Spring 33. Main Spring Screw 34. Rear Guard Screw (2) 35. Rear Sight Blade 36. Rear Sight Del Ball (2) 37. Rear Sight Del Spring 38. Rear Sight Elev. Screw 39. Rear Sight Elev. Screw
Pin
40. Rear Sight Leaf 41. Rear Sight Leaf Elev.
Spring (2) 42. Rear Sight Leaf Pin 43. Rear Sight Windage
Screw
44. Rear Sight Windage Spring
45. Recoil Plate 46. Sear and Bolt Spring 47. Sear and Bolt Spring
Screw
48. Spring (same as no. 37) 49-50. Stock Assembly:
Composllion Rubber Wood (Walnut) 51. Stock Pin 52. Stock Screw 53. Trigger 54. Trigger Guard 55. Trigger Screw 56. Washer 57. Washer NO.8 (7)
Note. Items 13through 17 are not applicable to the SHERIFF'S MODel. Black powder frame Sheriff's and Storekeeper's models do not have Items 6 and 8 as Illustrated. Item 6 Is replaced by a screw located on front of frame.
SECTION 7 THE CUSTOMIZED GUN
Our Colt Custom Shop offers a wide range of special services
such as engraving, inlaying and special serializing to the same
high standard of quality long synonymous with the name
"COLT." Sometimes modifications, which meet our customer's
special requirements, necessitate deviations from standard
design and manufacturing tolerances which result in functional
differences from a standard gun. Consequently, this instruction
manual does not apply to a customized gun unless its
FIREARM RECORD
Colt Model
Serial No.
Caliber
Purchased
from
Date
Purchased
Purchase
Price
WARRANTY
STATEMENT
Based on Magnuson-Moss Warranty Act, Colt offers no express
warranty on its product line. However, Colt recognizes its
obligations concerning implied warranty. Colt also stands behind
its products as it has historically, and will continue to provide
services to its product line as it has over the years. Colt products
will be serviced for a period of one year from the date of retail
purchase, for defects in materials or workmanship, at no charge
to the purchaser. Be sure to retain your sales slip as proof of
purchase date when making a claim.
I
HEALTH AND ENVIRONMENTAL WARNINGI
&
Discharging firearms in poorly ventilated areas, cleaning firearms, or handling ammunition may result in exposure to lead and other substances known to cause birth defects, reproductive harm, cancer, and other serious physical injury. Have adequate ventilation at all times. Wash handsIf your instruction manual becomes lost or destroyed, obtain a
replacement by writing to Colt's
Manufacturing
Company,
Inc., Box 1868, Hartford,
Connecticut
06144-1868,
USA
or call 1-800-962-COL
T. Make a note of the address. When
requesting a manual, include the information which is on the
left side of your firearm together with its serial number or
quote the Part No. as shown on the back cover of this manual.
@:r.
, the Rampant Colt figure, New Frontier@and all other
Colt trademarks are the exclusive property of Colt's
Manufacturing Company, Inc. For permission to reprint for
noncommercial instructional purposes, prior approval from Colt's
is required.
This instruction manual should always accompany this firearm.
When you lend, give or sell this firearm, be sure this manual goes
with it.
A
Avvertimento Italiano'Se c'e qualcosa che non riuscite a capire, rivolgetevi a qualcuno che sia quallflcato nel maneggiare in maniera sicura Ie armi da fuoco.
Advertencla en Espanol
Para cualquier aclaracidn de esta manual, consulte con alguna persona perita en el maneJo seguro de armas de fuego.
Message Secutaire en Francais
Pour tous renseignments complementaires, veuillez consulter un armurier qualifie dans Ie maniement de cesarmes.
Deutsche Sicherheitshinweise