Aid (UGTA) for Software Version
9.3/10.3
1 Xerox Nuvera
®User Guide and Training Aid (UGTA) Start
Page for Software Version 9.3/10.3...
1-1
2 What’s new?...
2-1
3 Flex Speed Option...
3-1
4 When to unload Stackers...
4-1
5 About...
5-1
Section 508 Compliance / Keyboard Accessibility...5-1 Copyright and Trademark Declarations...5-1 Symbol Usage...5-1 Flash content...5-2 Third Party Licenses...5-2 About Pitch...5-2 Paper Size/Pitch Relationships...5-2
6 Xerox Nuvera EA/MX Production System...
6-1
Basic Configuration...6-1 Sheet Feed Modules...6-2 Post Process Module...6-3 FreeFlow Print Server and Print Engine...6-3 Additional Configurations...6-3 Finisher Modules...6-4 Licensed Features...6-5 Loading Paper...6-5 Paper Tray Programming...6-6 Solving Image Quality Problems...6-6 Clearing Paper Jams...6-6 Contacting Xerox...6-7 Sheet Feed Modules (SFM)...6-8 Print Engine Module...6-9 Control Console...6-10 Multifunction Finisher (MFF) Interface...6-10 The MFF Pro Plus...6-11 MFF Professional...6-11 Multifunction Finisher (MFF)...6-11 MFF Pro Plus: Insertion Module...6-13
Sheet Enhancement Module(SEM)...6-14
7 Xerox Nuvera 200/288 EA/MX Perfecting Production
System...
7-1
Modules...7-1 Special features...7-2 Module Options...7-2 Licensed Features...7-4 FreeFlow Print Server and Print Engine...7-4
8 Managing System Resources...
8-1
Managing the Printer...8-1 Printer Menu Selections...8-1 Managing Paper Trays...8-2 Managing Finishers...8-2 What Are Internal and External Finishers?...8-2 Managing Stackers...8-3 Managing Image Quality...8-3 User Interface Logging...8-3 Getting Billing Information...8-3 Why would I need to access billing information?...8-4 To access billing information...8-4 Reading the Billing Meters...8-4 Billing Regions...8-4 Descriptions of Billing Meters...8-4
9 Managing System Software and Hardware...
9-1
To access the Xerox System Install Service Utility...9-1 To perform Disk Overwrite...9-1
10 Managing the Stock Library...
10-1
Stock Management...10-1 The Stock List...10-2 To set up/manage paper stock...10-2
11 Advanced Publishing Features...
11-1
Using Build Job...11-1 Build Job is used to...11-1 To use Build Job...11-2 Understanding Job and Segment Level Programming...11-2 Job-Level Programming...11-2
Open a job ticket...11-4 Related Hints and Tips...11-4 Using Front-Back Registration...11-5 The Front-Back Registration window...11-6 To use Front-Back Registration...11-6 Copying Document Sets with Mixed-Size Sheets...11-6 If Mixed Size Originals has NOT been selected:...11-7 When the Mixed Size Originals (MSO) feature IS selected:...11-7 To copy documents with mixed-size originals...11-7 Saving and Storing Jobs...11-7 Copy Jobs...11-8 Scan to File Jobs...11-8 Print from File Jobs...11-8 Related Hints and Tips...11-9 Finding a Saved Job to Print...11-13 To find a saved job in Job Manager...11-13 To find a saved job using Print From File...11-13 Customizing System Default Options...11-14
To view current printer default options for systems with one
queue...11-14 To view current printer default options for systems with multiple
queues...11-14 To customize general system settings...11-15 Using Xerox Freeflow®
Remote Print Server Software...11-15 Adding Annotations to your Jobs...11-16 To Annotate Print or Copy Jobs...11-16 Configuring Annotations...11-16 Generating a Sample Print...11-17
To produce a sample print of a page while the job is
printing...11-17 Sample Print From a Client Computer...11-17 About Pitch...11-18 Paper Size/Pitch Relationships...11-18 Using the Xerox Nuvera with Freeflow®
Makeready...11-19 To print to the Xerox Nuvera from FreeFlow Makeready...11-19
12 Cleaning Procedures...
12-1
Cleaning the Document Glass...12-1 To clean the document glass...12-1 Cleaning the Document Feeder...12-2
Cleaning Dry Ink (Toner) Spills...12-3 Cleaning the Display...12-3 To clean the display...12-3 Cleaning the 'Optical' Mouse...12-3 To clean the 'optical' mouse...12-4 Cleaning the Keyboard...12-4 To clean the keyboard...12-4
13 Setting Up Complex Jobs...
13-1
Printing/Copying on Tabbed and Ordered Stock...13-1 For systems with a Multifunction Finisher (MFF)...13-1 For systems with a DS3500/DS5000 or BFM type finishers...13-2 For the Xerox Nuvera 200/288 Perfecting Production System
-Using Media Optimization mode for tabs...13-2 To set up and use ordered stock...13-3 Load tray with ordered stock...13-3 Submit job and choose ordered stock...13-4 Use Media Optimization Mode to optimize job recovery
on jobs with Serialized Stocks...13-4 More on loading tabbed stock and other special
papers...13-5 Programming Tabs with 2-sided Original for Tab Images...13-5 Supported Tab Media...13-5 Using the Feed Module Tab Guides...13-7 Installing the Feed Module Tab Guides...13-7 Removing the Feed Module Tab Guides...13-15 More on printing with tabbed stock and other special
papers...13-18
14 Using Media Optimization Mode on the Xerox Nuvera
200/288 EA/MX Perfecting Production System...
14-1
Optimizing productivity for jobs containing Pre-cut Tabs...14-1 Optimizing productivity for jobs containing predominantly large stock
mixed with small stock...14-2 Optimizing productivity for jobs containing wide stocks measuring 9
-9.5 process direction...14-3 Optimizing job recovery for jobs containing Serialized Stocks...14-4
15 About Impositions...
15-1
Impositions and Saddle Stitched Books...15-1 Impositions and Perfect Bound Books...15-2 Figures...15-3
Related Hints and Tips...15-5
16 Reducing or Enlarging Images...
16-1
To reduce or enlarge the image...16-1 Entering a custom reduction/enlargement value...16-1
17 Adding Pages to a Document...
17-1
Paper trays must be loaded and programmed with the appropriate
stocks...17-1 Basic workflow to insert pages into a document...17-1 System Level (Administrative) Added Pages...17-2 Adding System Level Pages...17-3 Enabling System Level Pages...17-3 Banner Pages...17-3 Error Pages...17-4 Job Attributes Report...17-4
18 Printing an Image That Extends to the Edge of the
Page...
18-1
Edge-to-edge printing workflow starts at client desktop / driver, and
ends at the Xerox Nuvera...18-2 Workflow to enable a "full-bleed" print job:...18-2
19 Programming Multiple Stocks in a Single Job...
19-1
To program a job to use multiple stocks...19-1
20 Adding Pages to your Document with the SFM Insertion
Module...
20-1
To Add Sheets with the SFM Insertion Module...20-1
21 Using Background Forms...
21-1
When to use a background form...21-1 How to create a background form...21-1 Creating your variable data document...21-2 Printing your variable data document with the background form...21-2 Using your client application and workstation...21-2 Using Copy to create the final output document...21-3 Using a background form from the FreeFlow Print Server...21-3 Managing/Deleting background forms...21-4 Related Hints and Tips...21-4
22 Replacing Consumables...
22-1
Replacing the Developer Waste Container...22-1 To replace the Developer Waste container...22-1
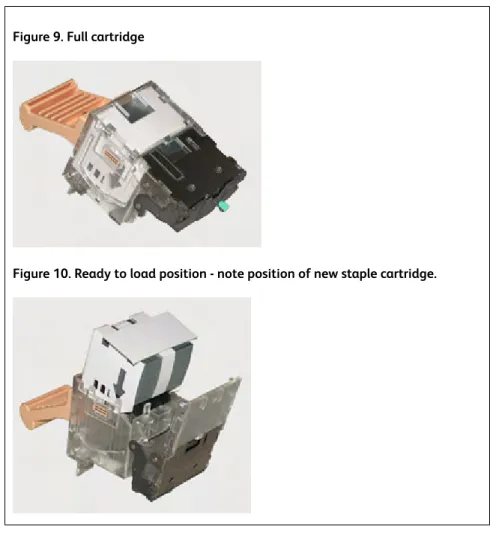
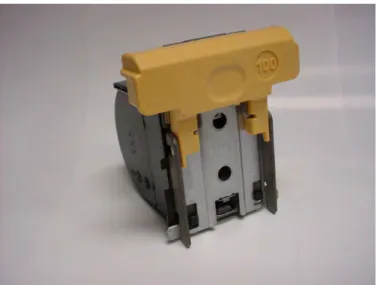
Dry Ink (Toner)...22-2 Replacing the Dry Ink Container...22-2 To replace a Dry Ink Container...22-2 Replacing the Dry Ink Waste Container...22-3 To replace the Dry Ink Waste Container...22-3 Replacing the Hole Punch Waste Container...22-4 To replace the Hole Punch Waste Container...22-4 Replacing the Hole Paper Punch...22-4 To Replace the Hole Paper Punch...22-5 Hole Punch Module...22-5 Replacing Staples in the Finishers...22-5 Systems with Basic Finishing Modules (BFM)...22-6 Systems with Multifunction Finisher (MFF)...22-6 To replace staples...22-6 Main Tray Stapler...22-6 Booklet Tray Stapler...22-7 Replacing Staples in the BFM...22-8 To Replace BFM Stapler Cartridges...22-8
23 How Do I...
23-1
Contacting Xerox...23-1 Service Code / Serial Number Locations...23-1 Xerox prInteract™ Remote Service Offerings...23-2 To submit system data...23-2 Telephone numbers and World Wide Web address...23-2 CRU/Maintenance/Consumables part names and numbers...23-2 Copying your Document...23-3 Setting up a Copy Job...23-4 To set up a copy job...23-4 To Proof 1 Copy and Hold...23-5 Copying 2-Sided Pages...23-5 To copy 2-sided pages from the Document Feeder...23-5 Basic copy workflow using "sides imaged"
programming...23-5 To copy 2-sided pages from the Document Glass
(platen)...23-6 Basic copy workflow using "sides imaged"
programming...23-6 Adjusting Output Page Size...23-6 Managing Copy Jobs: Editing Held Jobs...23-7
Making a Stapled Copy Job...23-7 To generate a stapled copy job...23-8 Using the Document Feeder...23-8 To load the Document Feeder...23-8 Using the Multifunction Finisher (MFF)...23-9 How to select the MFF finishing type as the output device...23-9 Related Hints and Tips...23-9 Using the Multifunction Finisher (MFF) Pro Plus...23-10 To Insert Preprinted Sheets on the MFF Pro Plus...23-10 To Hole Punch Jobs on the MFF Pro Plus...23-10 Delivering Document Sets to the Stacker...23-11 Multifunction Finisher (MFF)...23-11 Basic Finishing Module (BFM)...23-12 To send document sets to the stacker...23-12 To unload the BFM stacker...23-12 What the LED means...23-13 In case of a jam in the paper path or stapler:...23-13 Making a Booklet...23-14 To make a booklet...23-14 Sample Copy workflow...23-14 Sample workflow from client driver...23-14 Related Hints and Tips...23-15 Printing Pads...23-16 To print a pad...23-16 Booklet Size Limitations...23-16 Maximum Booklet Sizes (in sheets)...23-17 Why is there this limitation?...23-17 Using Offset to Separate Documents in a Stack...23-17 Offset Choice Terminology...23-17 To use offset to separate documents...23-17 Creating Folded Documents...23-18 To make a C-Folded document while copying...23-18 To make a Z-Folded document while copying...23-18 To make a Folded document while printing...23-19 Using the Basic Finishing Module (BFM)...23-19 Select the BFM or BFM Plus finisher as the output device...23-19 Define stacker settings and other adjustments affecting the
BFM...23-19 Enable/Disable Automatic Image Permanence for All
Set BFM Registration Values...23-21 Using the Variable Shaped Tray...23-21 To install the Variable Shaped Tray...23-22 To remove the Variable Shaped Tray...23-22 Unloading stock from the Variable Shaped
Tray...23-22 Related Hints and Tips...23-22 Using DFA Compliant Finishers through the DS3500...23-24 External Finishers Available on the Xerox Nuvera System...23-24 What is DFA?...23-24 DFA Configurations and Profiles...23-24 Managing DFA Configurations and Profiles...23-24 Select the 3rd Party External Finisher as the output device...23-25 Changing DFA Configurations for 3rd Party Finishers...23-25
To enable a different profile than the one currently
enabled for a finishing configuration:...23-25 To change from using currently installed finishers and
enable a new configuration:...23-26 Related Hints and Tips...23-26 Related Hints and Tips...23-27 Adjusting Image Quality...23-28 To adjust image quality on copy and scanned jobs...23-28 To adjust image quality on print jobs...23-29
Stroke Thickening (increasing the weight or width of a
character)...23-29 About Toner Saver...23-29 About Image Quality for Copy and Scan to file...23-30 Choosing the Best Original Type (when scanning or
copying)...23-31 To select an Original Type...23-31 Original Types...23-31 Rendering Options...23-31 Mixed Original types...23-32 Text...23-32 Photo...23-32 About Contrast...23-32 Limits of Contrast controls...23-32 Adjusting Contrast (when scanning or copying)...23-33 To adjust contrast...23-33 About Lightness/Darkness...23-34
Adjust Lightness/Darkness for Copying...23-35 Adjust Lightness/Darkness for Printing...23-35 About Sharpness...23-36 Sharpness control...23-36 Adjusting Sharpness (when scanning or copying)...23-37 To adjust sharpness...23-37 Choosing the Best Halftone Setting...23-37 To select a Halftone...23-37 Systems with the Enhanced Line Screen License...23-38 Editing Images...23-38 To edit copy or scanned images...23-38 To edit print images...23-39 Erasing Unwanted Marks On Originals...23-39 Erase Options...23-40 To erase an edge...23-40 Other ways to work with edge-to-edge imaging...23-40 Shifting the Image...23-40 To shift the image for a copy job...23-40 To shift the image for a print job...23-41 Rotating the Image...23-41 To manually rotate the image...23-41 Automatic Image Rotation...23-41 Printing your Document...23-41 Supported File Types...23-42 Related Hints and Tips...23-42 Printing from the Media Drive...23-44 To print from the media drive...23-44 Related Hints and Tips...23-44 Setting up a Print Job...23-44 To set up a basic print job...23-45 Batch Printing...23-47 Using Preview to proof a print job...23-47 Related Hints and Tips...23-48 See also...23-49 Printing 2-Sided Pages...23-49
Basic workflow to change "Sides Imaged" programming at
the user interface...23-49 Printing a Job from your Networked PC...23-50
To submit a print job from your PC using a web
To submit a print job directly from a networked PC
application...23-50 To manage print jobs submitted from a networked
PC...23-51 Using Hot Folders from the Queue Manager...23-51 More information about printing from the
desktop...23-51 Print Drivers and Client Support...23-51 Print Driver Support...23-51 Xerox Custom Drivers...23-51 Generic PPDs...23-51 Print Client Support...23-52 Job Submission...23-52 Related Hints and Tips...23-52 Managing Print Jobs...23-55 To manage multiple jobs submitted from a client...23-55 Basic job management controls...23-56 Printing with the Parallel RIP feature...23-58 How the Parallel RIP process works...23-58 Which Jobs work best...23-58 How to create a queue with Parallel RIP enabled...23-59 Reprinting a Saved Job...23-59 To reprint a saved job...23-60 Printing Directly From a Mainframe Computer with LCDS...23-60 Enabling LCDS Printing: Overview...23-61 Verifying the presence of the LCDS and the Productivity
Pack Licenses...23-62 Viewing LCDS Resources...23-62 Related Hints and Tips...23-62 Related Information...23-62 Using VIPP...23-63 What is VIPP?...23-63 How it Works...23-63 Programming options...23-64 Configuring the system to run a VIPP job...23-64 Working With IPDS...23-64
Verifying the presence of the IPDS and the Productivity
Pack Licenses...23-64 Printing IPDS jobs...23-64 Related Hints and Tips...23-65
To add a new queue on systems with the Productivity Pack
license enabled...23-68 To view or modify queue properties with the Productivity Pack
license enabled...23-69 To view or modify queue properties of a single queue
(Productivity Pack license not enabled)...23-69 To copy a queue with the Productivity Pack license enabled...23-69 Using Parallel RIP (on the Xerox Nuvera 200/288 EA/MX
Perfecting Production System)...23-70 Locking/Unlocking a queue...23-70 When and how to use Hot Folders...23-70
To activate and create Hot Folders for a given
queue:...23-70 To set or change the Hot Folder polling time:...23-71 Job Definition Format Print Submission via Hot
Folders...23-71 Scanning your Document...23-71 Setting up a Scan Job...23-72 To setup a scan job...23-72 Scan to File to a USB thumb drive...23-72 Choosing a Scan File Format...23-73 Reasons for saving your scanned document as TIFF:...23-73 Reasons for saving your scanned document as PDF:...23-73 Setting Scan to File Image Resolution...23-73 To set image resolution...23-74 Scan to File Resolution...23-74 Scanning a 2-sided Document...23-75 To scan a 2-sided document...23-75 Advanced Publishing Features...23-75 Using Build Job...23-75 Build Job is used to...23-76 To use Build Job...23-76 Understanding Job and Segment Level Programming...23-76 Job-Level Programming...23-77 Segment-Level Programming...23-77 Working with Job Tickets...23-77 Open a job ticket...23-78 Related Hints and Tips...23-78 Copying Document Sets with Mixed-Size Sheets...23-79 If Mixed Size Originals has NOT been selected:...23-80 When the Mixed Size Originals (MSO) feature IS
To copy documents with mixed-size originals...23-80 Saving and Storing Jobs...23-80 Copy Jobs...23-81 Scan to File Jobs...23-81 Print from File Jobs...23-81 Related Hints and Tips...23-82 Finding a Saved Job to Print...23-86 To find a saved job in Job Manager...23-86 To find a saved job using Print From File...23-86 Customizing System Default Options...23-87
To view current printer default options for systems with
one queue...23-87 To view current printer default options for systems with
multiple queues...23-87 To customize general system settings...23-88 Using Xerox Freeflow®
Remote Print Server Software...23-88 Adding Annotations to your Jobs...23-88 To Annotate Print or Copy Jobs...23-89 Configuring Annotations...23-89 Generating a Sample Print...23-90
To produce a sample print of a page while the job is
printing...23-90 Sample Print From a Client Computer...23-90 About Pitch...23-90 Paper Size/Pitch Relationships...23-91 Using the Xerox Nuvera with Freeflow®
Makeready...23-92 To print to the Xerox Nuvera from FreeFlow
Makeready...23-92 Setting Up Complex Jobs...23-93 About Impositions...23-93 Impositions and Saddle Stitched Books...23-93 Setting Imposition Options...23-94 To set imposition options...23-95 Related Hints and Tips...23-96 Printing an Image That Extends to the Edge of the Page...23-96
Edge-to-edge printing workflow starts at client desktop /
driver, and ends at the Xerox Nuvera...23-97 Workflow to enable a "full-bleed" print job:...23-97 Reducing or Enlarging Images...23-97
Programming Multiple Stocks in a Single Job...23-98 To program a job to use multiple stocks...23-98 Printing/Copying on Tabbed and Ordered Stock...23-98 For systems with a Multifunction Finisher (MFF)...23-99 For systems with a DS3500/DS5000 or BFM type
finishers...23-99 For the Xerox Nuvera 200/288 Perfecting Production
System - Using Media Optimization mode for
tabs...23-100 To set up and use ordered stock...23-100 Load tray with ordered stock...23-100 Submit job and choose ordered stock...23-101 Use Media Optimization Mode to optimize job
recovery on jobs with Serialized Stocks...23-101 More on loading tabbed stock and other special
papers...23-102 Programming Tabs with 2-sided Original for Tab
Images...23-102 Supported Tab Media...23-102 Adding Pages to a Document...23-104
Paper trays must be loaded and programmed with the
appropriate stocks...23-104 Basic workflow to insert pages into a document...23-104 System Level (Administrative) Added Pages...23-105 Adding System Level Pages...23-105 Enabling System Level Pages...23-106 Banner Pages...23-106 Error Pages...23-106 Job Attributes Report...23-107 Adding Pages to your Document with the SFM Insertion Module...23-107 To Add Sheets with the SFM Insertion Module...23-107
24 Editing Images...
24-1
To edit copy or scanned images...24-1 To edit print images...24-2 Erasing Unwanted Marks On Originals...24-2 Erase Options...24-2 To erase an edge...24-2 Other ways to work with edge-to-edge imaging...24-3 Shifting the Image...24-3 To shift the image for a copy job...24-3 To shift the image for a print job...24-3
To manually rotate the image...24-4 Automatic Image Rotation...24-4
25 Adjusting Image Quality...
25-1
To adjust image quality on copy and scanned jobs...25-1 To adjust image quality on print jobs...25-2
Stroke Thickening (increasing the weight or width of a
character)...25-2 About Toner Saver...25-3 About Contrast...25-3 Limits of Contrast controls...25-3 About Lightness/Darkness...25-4 Lightness/Darkness controls...25-4 About Sharpness...25-5 Sharpness control...25-5
26 Clearing Paper Jams...
26-1
Paper jam notification...26-2 Clearing jams in the Xerox Nuvera 200/288 EA/MX Perfecting
Production System Print Engines...26-2 Clearing jams in the BFM Plus Area 2...26-2 Paper Purge...26-2
27 Maintaining Your Xerox Nuvera...
27-1
Power Procedures...27-1 Powering On the Xerox Nuvera...27-1 To power on the Xerox Nuvera...27-1 Powering Off the System...27-2 To power off the system...27-2 Preferred power off method...27-2 If the preferred power off method is not
successful...27-2 Energy Star...27-2 Power Saver Mode...27-2 Power Saver modes and paper loading...27-3 Ways to exit Low Power Mode...27-3 Ways to exit Sleep Mode...27-3 Restarting the System...27-3 To restart the system...27-3 Method A: Restart the system...27-4 Method B: Shut down the system...27-4
When to enable Pass Through Mode...27-5 To enable and use the Pass Through Mode...27-5 To disable the Pass Through Mode...27-5 Running User Diagnostics...27-6 To access User Diagnostics...27-6 Document Scanner...27-6 Print Engine...27-6 Print Engine A1...27-7 Print Engine A2...27-7 System...27-7 System: System Optimization Customer Setup...27-8 System: Advanced User Diagnostics...27-9 MFF B (not applicable to the Xerox Nuvera 200/288
EA/MX Perfecting Production System)...27-10 Adjustments...27-10 Managing Paper Curl...27-10 What Would Cause Paper to Curl?...27-11 How to Manage Paper Curl on Systems without a
SEM...27-11 How to Manage Paper Curl for Simplex Jobs...27-11 How to Manage Paper Curl for Duplex Jobs...27-11 How to Manage Paper Curl using the Sheet Enhancement
Module...27-12 Use Automatic or Manual Mode...27-12 How to Set the Auto Decurl Mode for Simplex or Duplex
Jobs...27-12 How to Set the Manual Decurl Mode for Simplex or
Duplex Jobs...27-14 Product Recycling and Equipment End of Life Disposal: USA &
Canada...27-15
28 Setup Paper Trays...
28-1
Paper Tray Programming...28-1 Tray Confirmation Options...28-2 To set a confirmation option...28-2 To program paper trays...28-2 Program and Load Method...28-2 Load and Program Method...28-3 Rear Guide Stop for Tray 2 on the 4-Tray Feed
Module...28-4 To enable a tray...28-4 To disable a tray...28-4
Feed Until Empty...28-5 To select Feed Until Empty...28-5 To set tray priority...28-5 Avoiding Multi-Sheet Feeds When Using Special Stocks...28-6 Loading Paper...28-6 Fan the paper first...28-7 To load paper...28-7 Loading Special Paper Types...28-8 Definition of Leading Edge...28-8 Definition of Trailing Edge...28-8 Loading Special Stock for Proper Finishing Output...28-8 Systems with SFM and/or Insertion Module and BFM...28-8 Systems with MFF ONLY...28-9
Special Case: Jobs with drilled paper AND drilled
tabs when using the MFF...28-9 Systems with SFM Insertion Module and MFF
Professional...28-10 Systems with MFF Pro Plus ONLY...28-10 More information about tabbed stocks...28-11 Handling and Storing Paper...28-11 To store and handle paper...28-11 Before you load paper...28-11 Using Special Paper Stocks...28-12 Paper Usage and Expected Paper Performance...28-12
29 Problem Solving...
29-1
Mode Indicator Icons...29-1 Fault Messages...29-2 Attention Light...29-2 Paper Curling...29-2 Poor or Slow System Performance...29-3 Related Hints and Tips...29-3 Restart procedures...29-4 Improving print speed and productivity...29-4 Improving Print Speed Performance...29-4 Use the Parallel RIP feature for complex documents...29-4 Enable the Wide Stock feature when printing 9.25 inches or 9.5
inches wide stock...29-4 How page/image size affects Pitch...29-4 PDF to PS conversion...29-5
Solving Image Quality Problems...29-5 Image quality and system maintenance...29-5 Solving dark or light image problems...29-5 Removing Moiré Patterns from Images (when scanning or
copying)...29-6 Suggestions for removing moiré patterns:...29-6 About Halftones and Gray Levels...29-7 Removing Lines, Streaks or Shadows (when copying or
scanning)...29-8 To remove lines, streaks or shadows...29-8 Correcting Posterization (when scanning or copying)...29-9 To correct posterization...29-9 About Posterization and Gray Levels...29-9 Correcting Halo (when scanning or copying)...29-10 To decrease sharpening...29-11 Removing Background Artifacts (when scanning or
copying)...29-11 To remove background artifacts...29-11 Removing Image Show Through (when scanning or
copying)...29-11 To correct image show through...29-12 Removing Spots & Specks (when scanning or copying)...29-12 Clean the Document Glass...29-12 Clean the Document Feeder...29-13 Recovering Missing Parts of the Image...29-13 To recover missing parts of the image...29-13 Removing Drill Holes From Output (when scanning or
copying)...29-13 To remove drill holes from output...29-14
30 Machine Specifications...
30-1
Supported Paper...30-1 Compatible Stock Types...30-1 Paper size tables...30-1 Supported Paper Sizes: Trays 1 and 2...30-2 Supported Paper Sizes: Trays 3 and 4...30-2 Recommendations for Paper Usage...30-4 Related Information...30-6 Document Feeder & Scanner Specifications...30-6 Document Feeder Paper Capacities and Capabilities...30-7 Print Engine Specifications...30-7
Registration...30-8 Printer Resolution...30-8 RIP (Raster Image Processor) Resolutions...30-8 Print Quality (halftone screens)...30-8 Print Engine Type...30-8 Printer Speed...30-8
Variable Pitch Xerographics for maximum
throughput...30-9 Dry Ink (Toner)...30-9 Paper Sizes Supported...30-9 Machine Warm-up Times...30-9 FreeFlow Print Server Capabilities...30-10 Xerox Nuvera EA Production System...30-10 Xerox Nuvera 200/288 EA/MX Perfecting Production
System...30-10 Multifunction Finisher (MFF) Specifications...30-10 Using the MFF...30-11 Specifications...30-11 The MFF Professional Model...30-13 MFF Stapling...30-13 MFF Capacities...30-13 Top Tray...30-13 Main Tray...30-13 Bottom (Booklet) Tray...30-14 Booklet Making...30-14 Folding Options (single sheets only)...30-15 Finisher Pause Button...30-15 To activate the Finisher Pause feature...30-15 The MFF Pro Plus Model...30-15 Post Process Insertion Tray...30-15 Hole Punching...30-15 Insertion Tray Capacities...30-16 Configurations...30-16 Basic Finishing Module (BFM/BFM Plus) Specifications...30-17 Using the BFM...30-17 Capacities...30-17 Stacker...30-17 Top Tray...30-18 Stapler...30-18
DS3500 Specifications...30-23 DS3500 Capacities and Capabilities...30-24 Stapler Specifications...30-25 Basic Finishing Module Stapler...30-25 Multifunction Finisher...30-25 Document Size Requirements...30-25 Stapling Limit...30-26 Staple Cartridge Limitation...30-26 Stock Weight / Maximum Sheets...30-26 Stapler Maintenance...30-26 Keyboard, Mouse & Display Specifications...30-26 Keyboard Specifications...30-27
Navigating the user interface using only the
keyboard...30-27 Common Keyboard Shortcuts...30-27 User Interface Components Key...30-27 Special Navigation/Activation Keyboard Shortcuts...30-28 Keyboard Shortcuts and Mnemonics...30-34 List of Mnemonics...30-34 Mouse Specifications...30-36 Display (Monitor) Specifications...30-36 Media Drive Specifications...30-36 File Submission...30-37 File Saving/Archiving...30-37 Electrical and Environmental Specifications...30-37 Frequency...30-37 Voltage...30-37 Amps...30-37 Receptacle NEMA Part Number...30-38 Temperature and Humidity...30-38 Altitude...30-38 Heat Emission...30-38 Power Consumption...30-38 Sheet Feed Modules (SFM)...30-38 4-Tray SFM Capabilities and Capacities...30-39 2-Tray SFM (18.5 inches) Capabilities and Capacities...30-39 2-Tray SFM (19.33 inches) Capabilities and Capacities - Available
for Xerox Nuvera 200/288 EA/MX Perfecting Production
System only...30-39 3-Tray SFM Capabilities and Capacities...30-40
31 Adding Pages to a Document...
31-1
Paper trays must be loaded and programmed with the appropriate
stocks...31-1 Basic workflow to insert pages into a document...31-1 System Level (Administrative) Added Pages...31-2 Adding System Level Pages...31-3 Enabling System Level Pages...31-3 Banner Pages...31-3 Error Pages...31-4 Job Attributes Report...31-4
32 Expected Paper Handling...
32-1
Expected Performance Tables...32-1 Paper and Tray Performance Matrix -- 20 lb standard paper...32-1 Paper and Tray Performance Matrix -- 80 gsm standard
paper...32-2 Stock Types Performance Matrix...32-3 Plain Paper Performance Matrix...32-5 Paper and Tray Performance Matrix -- Loading Special
Stock...32-6 Paper Through Document Feeder Performance Matrix...32-9 Paper Weight Conversion Chart...32-11 Paper Weight Conversion Chart...32-11
33 Clearing Stapler Jams...
33-1
Stapler jam notification...33-1 To clear stapler jams...33-1 Access the Main Stapler Mechanism in the MFF...33-1 Access the Main Stapler Mechanism in the BFM or BFM
Plus...33-2
34 Index...
34-1
Index Start Page...34-1 1...34-1 2...34-1 3...34-1 8...34-1 A...34-2 B...34-3 C...34-4
F...34-8 G...34-9 H...34-9 I...34-10 J...34-12 K...34-13 L...34-13 M...34-14 N...34-16 O...34-16 P...34-17 Q...34-20 R...34-20 S...34-21 T...34-24 U...34-25 V...34-25 W...34-25 X...34-26 Z...34-26
1
Xerox Nuvera
®
User Guide
and Training Aid (UGTA)
Start Page for Software
Version 9.3/10.3
Please select one of the sections below or from the sidebar.
What’s new?
Xerox Nuvera 100/120/144 System Tour Xerox Nuvera 200/288 System Tour How Do I...
Problem Solving
Maintaining Your Xerox Nuvera About
2
What’s new?
This page provides a brief revision history of the UGTA. Version 9.3/10.3
• Flex Speed Option
• Alternate sets between stackers status message
• Customer downloadable software package • XPP Basic Enabled on MX Systems
Version 9.2/10.2 • Finisher Modules
• Enable/Disable stacker capability from FreeFlow Print Server
• Printing an Image That Extends to the Edge of the Page
• Enable use of DS3500 with 9.x software Version 10.1
• Xerox Nuvera EA/MX Production System and Xerox Nuvera 200/288 EA/MX Perfecting Production System
- Alternate sets between stackers feature
- MICR support - DS3500
- Stacker comparison table
- Paper purge to top tray and area 5b
• Xerox Nuvera 200/288 Perfecting Production System only - Automatic curl adjustment (Auto SEM)
3
Flex Speed Option
NOTE
The Flex Speed option is only available for 10.x version software and above. Systems that contain a Multifunction Pro or ProPlus finisher are not eligible for the Flex Speed option.
The Flex Speed option allows you to upgrade the license of certain Xerox Nuvera systems for a period of 30, 60 or 90 days.
Available Flex Speed Options Original Xerox Nuvera Speed
Xerox Nuvera 120 EA/MX Production System or Xerox Nuvera 144 EA/MX Production System Xerox Nuvera 100 EA/MX Production System
Xerox Nuvera 144 EA/MX Production System Xerox Nuvera 120 EA/MX Production System
Xerox Nuvera 288 EA/MX Perfecting Production System
Xerox Nuvera 200 EA/MX Perfecting Production System
4
When to unload Stackers
Various stackers are available for use with the Xerox Nuvera. Depending upon the situation, each of these devices may require that paper be unloaded from the stacking tray. The table below shows each of these unload situations for the BFM, DS3500, and DS5000.
DS5000 DS3500
BFM Unload situation
Operator presses the
Unload button on the
finisher or selects
Unload on the UI.
• •
• Tray lowers after a first or single press/selection of
Unload
Tray lowers after a first or single press/selection of
Unload.
Tray lowers just enough so that it can slide out of the device
• Multiple Unload • • button presses or
Unload selections
on the UI do not affect the lowering of the tray.
Tray stops when
Unload is pressed
or selected while the tray is in motion. Tray stops when
Unload is pressed
or selected while the tray is in motion.
• Stacker does not • return to ready status until the front door of the stacker is opened and closed. Sheets
do not have to be
removed from the tray when the door is opened.
Stacker does not return to ready status until the front door of the stacker is opened and closed. Sheets do not have to be removed from the tray when the door is opened. • Stacker does not
return to ready status until the front door is opened and closed. Sheets do have to be removed from the tray when the door is opened.
DS5000 DS3500
BFM Unload situation
Operator opens the front door while the Xerox Nuvera is idle and paper is present in the stacker.
• •
• Door is locked. Door is unlocked. Door is unlocked. • Operator must • •
press Unload to open the door.
No action is necessary. No action is
necessary.
• Stacker does not • return to ready status until the front door of the stacker is closed. Sheets do not have to be removed from the tray when the door is opened.
Stacker does not return to ready status until the front door of the stacker is closed. Sheets do not have to be removed from the tray when the door is opened. • Stacker does not
return to ready until the front door of the stacker is closed.
Sheets do have to be removed from the tray when the door is opened. Job is interrupted due
to: • • Auto unload • Not applicable. command is sent
to device. Auto unload
command is sent
to device. • Not applicable. • Restart
• Resume from a power off/on requires pressing the green button on the stacker. •
•
• Stacker does not return to ready until the front door of the stacker is opened and closed. Operator must remove all sheets from the tray Stacker does not
return to ready until the front door of the stacker is opened and closed. Operator must remove all sheets from the tray Sleep mode
• Printer off/on • Power off/on
•
• Not applicable Not applicable
A paper jam occurs
inside of the stacker. • • • Sheets do not have to be removed from the tray after a jam is cleared. This includes jams that occur in area F.
Sheets do not have to be removed from the tray after a jam is cleared. This includes jams that occur in area F.
Sheets do not have to be removed from the tray after most jams are cleared. • 12-2505 Set Drop Fault Auto unload command is sent to the device. Operator must remove all sheets from the tray.
•
• Not applicable. Not applicable. • Not applicable. • Not applicable.
•
• Not applicable. Not applicable.
• 12-10xx Transport Jam
Remove sheets from the compiler tray through the top cover.
Sheets do not have to be removed from the tray after a jam is cleared. • 12-11xx Bypass
Jam
Remove sheets from the bypass transport through the top cover. Sheets do not have to be removed from the tray after a jam is cleared.
No action required. No action required.
No action required. A paper jam occurs
elsewhere in the Xerox Nuvera configuration.
No action required. Auto unload command
is sent to the device. Stacker does not return to ready until the front door of the stacker is opened and closed.
Sheets do not have to Auto unload command
is sent to the device. Stacker does not return to ready until the front door of the stacker is opened and closed.
Operator must remove Operator cancels,
DS5000 DS3500
BFM Unload situation
Auto unload command is sent to the device. Stacker does not return to ready until the front door of the stacker is opened and closed. Operator must remove
all sheets from the
tray. Auto unload command is sent to the device. Stacker does not return to ready until the front door of the stacker is opened and closed.
Operator must remove
some sheets from the
tray. Auto unload command is sent to the device. Stacker does not return to ready until the front door of the stacker is opened and closed.
Operator must remove
all sheets from the
tray. Xerox Nuvera exits low power mode.
Auto unload command is sent to device Stacker does not return to ready until the front door of the stacker is opened and closed. Operator must remove
all sheets from the
tray. Auto unload command is sent to device Stacker does not return to ready until the front door of the stacker is opened and closed.
Operator must remove
some sheets from the
tray. Auto unload command is sent to device Stacker does not return to ready until the front door of the stacker is opened and closed.
Operator must remove
all sheets from the
tray. The stacker fills to
capacity or set parameters are met.
No action required. No action required.
No action required. The job is paused, the
Xerox Nuvera is out of paper or a xerographic adjustment is required.
Not applicable. Auto unload command
is sent to the device when one of the following criteria is met:
Auto unload command is sent to the device when one of the following criteria is met:
Job is complete.
•
• Page limit Page limit • Job • Job
•
• Set or stack Set or stack • Partition (data •
stream)
Partition (data stream) Stacker does not return to ready until the front door of the stacker is opened and closed.
Operator must remove
all sheets from the
tray. Stacker does not
return to ready until the front door of the stacker is opened and closed.
Operator must remove
all sheets from the
tray.
No action required. No action required.
Auto unload command is sent to the device when one of the following criteria is met:
Stacker does not return to ready until the front door of the stacker is opened and closed.
Operator must remove
all sheets from the
tray. When entering or
exiting diagnostics mode.
5
About
Section 508 Compliance / Keyboard
Accessibility
The Xerox Nuvera User Interface is fully compliant with Section 508 of the Rehabilitation Act Amendments of 1998. All controls on the user interface can be accessed using either keyboard or mouse.
Copyright and Trademark Declarations
©1998-2011 Xerox Corporation. All rights reserved. Xerox®, XEROX and Design®, Xerox Nuvera®, and Freeflow® are registered trademarks of Xerox Corporation in the US and/or other countries. Microsoft is a registered trademark of Microsoft Corporation. Windows® and Windows Vista® are registered trademarks of Microsoft Corporation. Internet Explorer is a copyright protected program of Microsoft Corporation. Novell® and NetWare® are registered trademarks of Novell, Inc. Adobe® and PostScript® are registered trademarks of Adobe Systems Incorporated. TIFF is a copyright of Adobe Systems Incorporated. AppleTalk, LaserWriter, and Macintosh are trademarks of Apple Computer, Inc. PCL® and HP-GL® are registered trademarks of Hewlett-Packard Corporation. WinZip® is a registered trademark of Nico Mak Computing, Incorporated. Digi is a trademark of Digi International. VTAM® is a registered trademark of IBM Corporation. IPDS is a trademark of IBM Corporation. Solaris and Java are trademarks of Oracle and/or its affiliates. 1Apr2011
Symbol Usage
Symbols are used on the Xerox Nuvera to draw your attention to important safety notices and useful information. Observe all cautions, hazards and warnings closely.
Flash content
Macromedia Flash version 6 plugin is required to view interactive content and videos.
Third Party Licenses
This product includes the following Third Party software: • JDOM Project ( http://www.jdom.org )
• Apache Software Foundation ( http://www.apache.org ) • Free Software Foundation ( http://www.gnu.org ) • Java 2 Runtime Environment (J2RE) (
http://www.redhat.com/licenses/thirdparty/sun_j2re.html)
GNU source and object code is subject to the terms of the GNU GPL. Please review the GNU GPL terms and conditions to understand the restrictions under this license. For more information on GNU, please go to http://www.gnu.org/licenses/gpl.txt.
As a requirement of the GNU GPL terms and conditions, a list of the source code for the above programs can be found in the www.xerox.com web site for the product or can be ordered from Xerox.
About Pitch
The Xerox Nuvera is equipped with a variable pitch Xerographic belt. Pitch refers to the number of page images that can be placed on the belt, which are then transferred to the paper. During printing, the system senses paper sizes requested, and optimizes the use of the belt and the paper path to ensure maximum productivity.
Paper Size/Pitch Relationships
The charts below illustrate the expected system throughput, given a certain page/ image size.
NOTE
If you have the Xerox Nuvera 200/288 EA/MX Perfecting Production System and enable the Wide Stock feature from the User Diagnostics screen, the system will run
Maximum Throughput (Pages Per Minute/PPM)
Pitch (Images per PR belt revolution)
Paper/Image Size (Feed Direction) Min-Max 100 5 5.5 in (140mm) - 9.0 in (229mm) 80 4 9.0 in (229mm) - 11 in (297mm) 60 3 11 in (297mm) - 17 in (432mm) 40 2 17 in (432mm) - 18.5 in (470mm)
Table 2. Xerox Nuvera 120 EA Production System
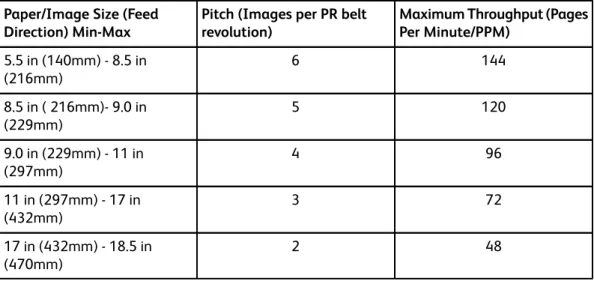
Maximum Throughput (Pages Per Minute/PPM)
Pitch (Images per PR belt revolution)
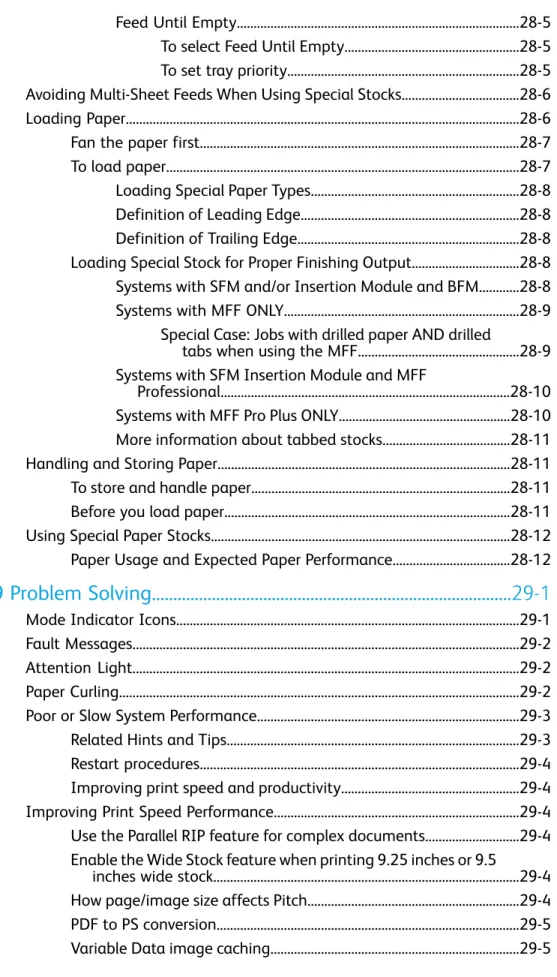
Paper/Image Size (Feed Direction) Min-Max 120 5 5.5 in (140mm) - 9.0 in (229mm) 96 4 9.0 in (229mm) - 11 in (297mm) 72 3 11 in (297mm) - 17 in (432mm) 48 2 17 in (432mm) - 18.5 in (470mm)
Table 3. Xerox Nuvera 144 EA Production System
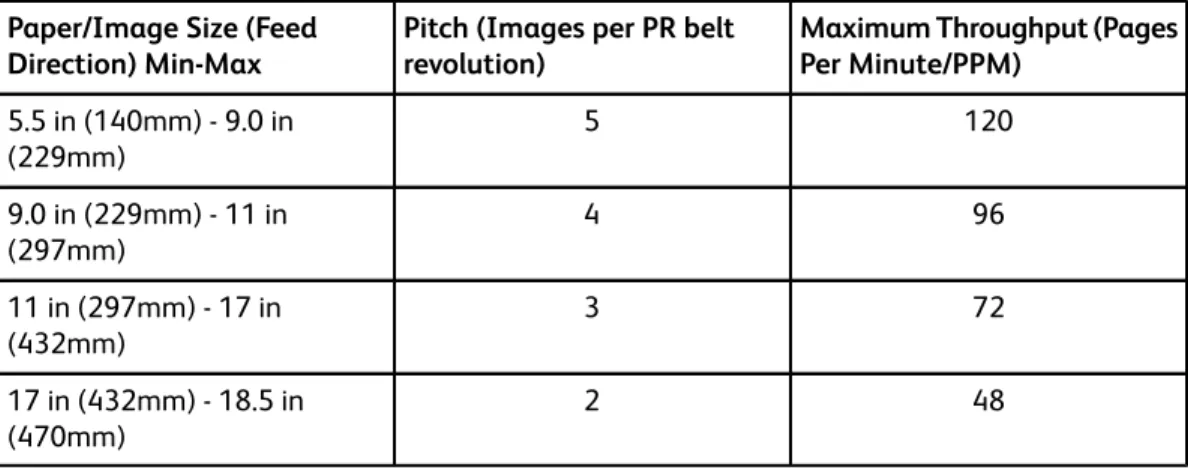
Maximum Throughput (Pages Per Minute/PPM)
Pitch (Images per PR belt revolution)
Paper/Image Size (Feed Direction) Min-Max 144 6 5.5 in (140mm) - 8.5 in (216mm) 120 5 8.5 in ( 216mm)- 9.0 in (229mm) 96 4 9.0 in (229mm) - 11 in (297mm) 72 3 11 in (297mm) - 17 in (432mm) 48 2 17 in (432mm) - 18.5 in (470mm)
Table 4. Xerox Nuvera 200/288 EA/MX Perfecting Production System
Maximum Throughput (Impressions Per Minute/IPM) Duplex
Pitch (Images per PR belt revolution)
Paper/Image Size (Feed Direction) Min-Max
240 5 8.5 in (216mm) - 9.0 in (229mm) 192 4 9.0 in (229mm) - 11 in (297mm) 144 3 11 in (297mm) - 17 in (432mm) 96 2 17 in (432mm) - 19.33 in (491mm) Table 4. (continued)
6
Xerox Nuvera EA/MX
Production System
The Xerox Nuvera EA/MX Production System includes a wide range of configuration options based on your printing and publishing needs. You can select certain types of Sheet Feed Modules and Finishing modules to install with your system, as well as choose certain feature software licenses.
Basic Configuration
The basic configuration of a Xerox Nuvera EA/MX Production System includes the following:
• 4-Tray or 2-Tray Sheet Feeder Module (SFM) • Control Console
• Print Engine
• Sheet Enhancement Module (not available if an MFF module is attached) • Multifunction Finisher (either the Professional MFF or the Pro Plus MFF) or Basic
Finishing Module (BFM)
• The base FreeFlow Print Server licensing includes 100 or 120 print speed, EA dry ink (toner), single print queue, no Stock Library, 125 lpi halftone screen for use with PS/PDL, TIFF, ACSII and PCL
Sheet Feed Modules
4-Tray Feed Module - two standard stock size and two large stock size feed trays. It can
be used with the Roll Feeder option. Sheet Feed Modules (SFM)Sheet Feed Modules (SFM)
2-Tray Feed Module - two high capacity large stock feed trays. 2-tray Feed Module. Click here.
3-Tray Feed Module - The 3-Tray Feed Module is a modification of the 4-Tray Feed
Module. It can be combined with a 4-Tray or a 2-Tray module. It can be used with the Roll Feeder option. 3 Tray Feed Module. Click here.
Roll Feeder - provides up to 25,000 11 x 17 inch size sheets and 5 hours of continuous
run time between roll changes.
Post Process Module
Sheet Enhancement Module - located directly to the right of the print engine, this
module is used to remove upcurl or downcurl in paper as it passes through the module from the print engine.
Sheet Enhancement Module(SEM)Sheet Enhancement Module(SEM)
FreeFlow Print Server and Print Engine
Control Console - houses the computer components that drive your Xerox Nuvera system.
The mouse driven UI provides access to the tools to manage jobs and the system. Control ConsoleControl Console
Print Engine - xerographics module Print Engine ModulePrint Engine Module
Additional Configurations
You can customize the system by identifying whether to include an integrated scanner, a second Sheet Feeder Module, an insertion module and the complexity of your finishing devices. The type of finisher you select can determine what other modules and license configuration options can be included.
The following modules are available for your system:
• An optional second 2-Tray or 4-Tray Sheet Feeder Module for a total of two SFMs • An optional 3-Tray Sheet Feeder Module (either the 3-Tray or 4-Tray SFM can be
used with the Roll Feeder if attached)
• The optional integrated Document Scanner Module (available only with the 4-Tray Sheet Feeder Module)
• An optional Insertion Module (a 2-Tray or 4-Tray SFM) • Multifunction Finisher (Professional or Pro Plus) • One or two Basic Finishing Module (BFM or BFM Plus) • DS3500
Finisher Modules
Multifunction Finisher Professional - Professional model offers stacking/stapling, booklet
making and c/z-folding.Multifunction Finisher (MFF)Multifunction Finisher (MFF)
Multifunction Finisher Pro Plus - The Pro Plus model adds to the Professional capabilities
by also offering hole punching and an insertion module. Multifunction Finisher (MFF)Multifunction Finisher (MFF)
Basic Finisher Module - stacker/stapler with top tray. Basic Finishing Module (BFM/BFM Plus) SpecificationsBasic Finishing Module (BFM/BFM Plus) Specifications
Basic Finisher Module Plus - stacker/stapler with bypass paper path unit Basic Finishing Module (BFM/BFM Plus) SpecificationsBasic Finishing Module (BFM/BFM Plus)
Specifications
Basic Finisher Module Plus Top Tray with Direct Connect - stacker/stapler with bypass
paper path unit with a selectable Top Tray. Directly connects to 3rd party devices via standard DFA interface and locking pins. Basic Finishing Module (BFM/BFM Plus) SpecificationsBasic Finishing Module (BFM/BFM Plus) Specifications
Insertion Module - As an option, both the 4-Tray and the 2-Tray Feed Modules can be
used as Insertion Modules.
DS3500 - enables inline finishing by providing document transport capability and full
DFA support to DFA-compliant finishing devices. DS3500 SpecificationsDS3500 Specifications
Optional Inline Finishers - There are a number of DFA compliant external finishers that
are DFA compliant and can be installed with the system. You must have a DS3500 installed to add an inline finisher.
• Xerox DS5000 High Capacity Stacker • C.P Bourg BDFx Booklet Maker
• Xerox SQUAREFOLD Booklet Maker(SQFBM) • GBC Fusion Punch 11 with Offset Stacker • Xerox DB120-D Document Binder
• Xerox Manual and Book Factory • Xerox Tape Binder
• Dual Xerox Tape Binder - This configuration allows for increased productivity; especially for booklets 10 to 50 pages in length.
Licensed Features
The software options available to you depend on the licenses that were installed and enabled on your system at installation. The following lists some of the major licenses available for the system. Check with your System Administrator for more information on what licenses are enabled.
• Productivity Pack - when enabled, this license provides multiple print queues instead of one queue, Stock Library management, shows all media attributes, and is required for LCDS and IPDS printing. Also includes the ability to enter exactly the paper weight, between 56 gsm and 250 gsm (upper weight depends on finisher type) for the stock that is being loaded.
• Enhanced Line Screen - when enabled, this license allows all valid halftones to print (85 lpi, 106 lpi, 125 lpi, 134 lpi and 156 lpi) and offers additional halftone image quality settings.
• PCL License
• Ethernet License - Bus & Tag are optional • PS License
• DFA License • Imposition License • LCDS License • IPDS License
• VIPP License (FreeFlow VI Interpreter) • Disk Overwrite License
• Full, Basic, CPW (XPP) or ISO Diagnostics License
• Speed License - 100, 120 or 144 ppm are available on systems with a BFM/BFM Plus and/or DS3500. The 100/120 license is on systems with MFF.
Loading Paper
The videos above show you how to load paper into the trays. Take a moment to view them before attempting to load a paper tray.
Load paper as indicated by the labels on each paper tray. If you are using the 2-Tray Feed Module, load paper as indicated for trays 3 and 4 of the 4-Tray Feed Module.
NOTE
NOTE
Stocks greater than 250 gsm are not recommended for use with the Xerox Nuvera . For details on using the correct stocks, see Supported Paper.
NOTE
Loading papers of varying types and weights may warrant adjustment of the Sheet Enhancement Module. For details, see Managing Paper Curl.
NOTE
It may be possible to configure your Xerox Nuvera with two or more SFMs, effectively doubling the feed capacity of the system. See your Xerox sales representative if you wish to configure your system in this way.
Paper Tray Programming
When you load paper in a paper tray, you must program the tray for the paper it contains. To avoid loading a paper stock unsupported by the machine, see Recommendations for Paper Usage.
For details on paper handling and storage, see Handling and Storing Paper.
For details on loading special papers, see Loading Special Stock for Proper Finishing Output.
CAUTION
Paper trays do not lock and can be opened while paper is being fed from the tray, resulting in misfeeds and/or paper jams. Wait for the LED light on the tray to turn OFF before opening the tray.
Solving Image Quality Problems
The Xerox Nuvera is capable of reproducing and generating high-quality images. However, image defects may occur. These image quality problems are usually attributed to a defective original, or the user applying too much, too little, or the wrong type of image quality control.
Clearing Paper Jams
In the event of a paper jam, the paper path has been designed to allow the user to easily clear the jam and continue the job. Take the time to familiarize yourself with the following
of paper stocks will minimize jams. For details, see Handling and Storing Paper.
WARNING
Metallic surfaces in the fuser area are hot. Please use caution when removing paper jams from fuser areas, and avoid touching any metallic surfaces.
TIP
If the system declares a jam in the feeder at area 2, check area 2 and area 1 since the sheet may be stuck in between.
TIP
If you experience multi-sheet feed jams at any of the paper trays, make sure that the paper actually loaded in the tray matches what has been programmed in the user interface.
TIP
If you load any type of drilled paper, to aid in sheet separation and to prevent jams, fan the reams before loading into the tray.
NOTE
The recovery procedure for the 12-2505 fault is improved. The jam clearance procedure instructs you to unload the main stacker. These sheets are now all considered good. After closing the front door, the system instructs you to open the top main cover and remove and discard the sheets from area 3. After the sheets have been removed, close the top main cover. The system will purge any other sheets in the system before resuming the job. If any sheets on the stack are damaged or poorly stapled, the operator may have to remake those sheets/set when the job is done.
There are a few rare cases in which sheets can fall from the Compiler Arms onto the stacker. Check your output for any duplicates. The status message informs the user to mark the stack and check output for duplicates.
Contacting Xerox
Before contacting Xerox for a service problem, perform the following steps:
• For image quality problems, first attempt to resolve the problem using the image quality troubleshooter.
• For worn out customer replaceable units, first attempt to replace the component
Sheet Feed Modules (SFM)
The Sheet Feed Modules hold your paper and feed the appropriate stock for the current job settings. The Xerox Nuvera System can be configured with a 4-Tray Feed Module, a 2-Tray Feed Module or a 3-Tray Feed Module. Your system can include up to two SFMs in any combination of 4-Tray, 2-Tray or 3-Tray.
The 2-Tray Feed Module has two large format large capacity trays. These trays are similar to trays 3 and 4 on the 4-Tray Feed Module but with a larger capacity, holding up to 1,600 sheets. Refer to the Feed Module Specifications.
The 4-Tray and the 2-Tray Feed Modules can be used as post fuser Insertion Modules. The SFMs support automatic tray switching and the ability to load while printing. For details about the 4-Tray Sheet Feed Module and its trays, capacities, features and functions, browse the links below. The links are grouped according to the numbered areas in the diagram.
Feed Module Specifications
• Handling and storing paper
• Using special paper stocks
• Clearing paper jams
• Supported paper types
• Recommendations for paper usage
• Expected paper handling and copy performance
Print Engine Module
The Print Engine houses the xerographic components that transfer the digital image to the paper at the photoreceptor. The toner from the dry ink container is then fused to the paper in the Fuser. The Xerox Nuvera EA Production System and Xerox Nuvera 200/288 EA/MX Perfecting Production System print engines do not support MICR printing and uses EA dry ink only. For details, features and functions of the various components, browse the links below.
For print engine specifications, refer to Printer capabilities.
• 1. Developer Waste Container: Replacing the Developer Waste Container when full
• 2. Dry Ink (toner) Container: Replacing the Dry Ink Container
• 3. Paper Path: Clearing paper jams
• 4. Fuser and Decurler: Clearing paper jams and Adjusting the Decurler
Control Console
Jobs are programmed using the keyboard or mouse to click the buttons on the control screen. The Xerox Nuvera can also print jobs stored on CD. Browse the links below for more details about features and functions.
• 1. Keyboard and mouse: Keyboard, mouse and display specifications, Cleaning the mouse, and Cleaning the keyboard
• 2. Control Screen: Keyboard, mouse and display specifications and Cleaning the display
• 3. Media Drive Bay: Media Drive specifications and Printing from the Media Drive
• 4. Power Switch: Power procedures
Multifunction Finisher (MFF) Interface
The Interface Module on the Multifunction Finisher Professional is part of the paper path that allows the Xerox Nuvera to connect to the Multifunction Finisher. For the Multifunction Finisher Pro Plus, it is also an Insertion Module that includes an Insertion Tray on top and a Hole Punch unit and waste bin inside.
The MFF Pro Plus
To learn about clearing jams in this area, refer to Clearing paper jams.
MFF Professional
Multifunction Finisher (MFF)
The Multifunction Finisher adds a publishing capability to the Xerox Nuvera system. The MFF Professional can fold documents, make booklets, staple bindings, collate and stack output. If your system has the MFF Pro Plus model, Pro Plus provides the same
functionality but adds post process insertion capability (covers, preprinted sheets, tabs) and hole punch finishing.
The Interface Module on the Multifunction Finisher Professional is part of the paper path that allows the Xerox Nuvera to connect to the Multifunction Finisher. For the Multifunction Finisher Pro Plus, it is also an Insertion Module that includes an Insertion Tray on top and a Hole Punch unit and waste bin inside.
To learn more about its features and functions, browse the links below. • 1, 2. Paper Path: Clearing paper jams
• 3. Top Tray: Finisher specifications
• 4. Main Tray / Stacker: Finisher specifications, Using Offset to separate documents in a stack, and Using the stacker
• 5. Main Stapler: Stapler specifications
• 6. Lower Tray: Finisher specifications
MFF Pro Plus: Insertion Module
To learn about the MFF models and their features, refer to Finisher specifications.
To learn about clearing jams in this area, refer to Clearing paper jams.
Automatic Document Feeder
Use the Automatic Document Feeder for rapid scanning of stacks of documents. Browse the links below for more information.
• 1. Document Glass (not shown): Scanning from the Document Glass and Cleaning the Document Glass
• 2. Document Input Tray: Scanning from the Document Feeder, Clearing paper jams,
Document Feeder and Scanner specifications, and Cleaning the Document Feeder
Sheet Enhancement Module(SEM)
The Sheet Enhancement Module on the Xerox Nuvera EA Production System and the Xerox Nuvera 200/288 EA/MX Perfecting Production System is a standard component on all configurations except for those with a Multifunction Finisher.
Located to the right of the print engine, it is used to remove upcurl or downcurl in paper as it passes through the module from the print engine. This feature is performed automatically by the system when the Decurl Automatic Mode is selected. You can also manually adjust the amount of decurl to apply for the job if more decurl is needed. Select the Manual or Automatic mode settings at the FreeFlow Print Server from the Printer menu. For more information, see Managing Paper Curl.
Sheet Enhancement Module Specifications
• Height: 41.5 " • Width: 14.25 " • Depth: 28.25 " • Weight: 168 lbs.
7
Xerox Nuvera 200/288
EA/MX Perfecting
Production System
The basic configuration of a Xerox Nuvera 200/288 EA/MX Perfecting Production System includes:
• Two 4-Tray Feed Modules, 2-Tray Feed Modules or 3-Tray Feed Modules • Control Console
• Dual Print Engines (two Xerox Nuvera 100 ppm or 144 ppm Production System engines)
• Sheet Enhancement Module • Insertion Module (4-Tray or 2-Tray) • DS3500
• Two DS5000 Stacker Modules
Modules
Your Xerox Nuvera 200/288 EA/MX Perfecting Production System can be configured with a variey of modules. Select the link below for information on the modules that can be installed.
4-Tray Feed Module - two standard stock size and two large stock size feed trays. Either
the 4-Tray or 3-Tray SFM must be used with the Roll Feeder option.
Sheet Feed Modules (SFM)Sheet Feed Modules (SFM)
2-Tray Feed Module - two high capacity large stock feed trays.
Sheet Enhancement Module(SEM)Sheet Enhancement Module(SEM)
DS3500 - enables inline finishing by providing document transport capability and full
DFA support to DFA-compliant finishing devices.
DS3500 SpecificationsDS3500 Specifications
Special features
The Xerox Nuvera 200/288 EA/MX Perfecting Production System is a high speed, duplex, black and white Production printing system with the following unique features:
• Two 100/144 Production System print engines that print up to 200/288 IPM in duplex mode
• Pass Through Mode feature • Tabs Optimization Mode feature • Sheet Enhancement Module • EA Toner
• Parallel RIP feature
• Image Quality Matching between the print engines • Ability to connect to many third party finishing devices
Module Options
Basic Finisher Module - stacker/stapler with top tray.
paper path unit with a selectable Top Tray. Directly connects to 3rd party devices via standard DFA interface and locking pins.
Insertion Module - As an option, both the 4-Tray and the 2-Tray Feed Modules can be
used as Insertion Modules.
3-Tray Feed Module - The 3-Tray Feed Module is a modification of the 4-Tray Feed
Module. It can be combined with a 4-Tray or a 2-Tray module. Either the 4-Tray or 3-Tray SFM must be used with the Roll Feeder option.
Roll Feeder - provides up to 25,000 11 x 17 inch size sheets and 5 hours of continuous
run time between roll changes.
Optional Inline Finishers - There are a number of DFA compliant external finishers that
can be installed on a Production System. You must have a DS3500 installed to add an inline finisher.
• Xerox DS5000 High Capacity Stacker • C.P Bourg BDFx Booklet Maker
• Xerox SQUAREFOLD Booklet Maker(SQFBM) • GBC Fusion Punch 11 with Offset Stacker
• Xerox Tape Binder
• Xerox Dual Tape Binder - This configuration allows for increased productivity; especially for booklets 10 to 50 pages in length.
Licensed Features
The software options available to you depend on the licenses that were installed and enabled on your system at installation. The following lists some of the major licenses available for the system. Check with your System Administrator for more information on what licenses are enabled.
• Productivity Pack - when enabled, this license provides multiple print queues instead of one queue, Stock Library management, shows all media attributes, and is required for LCDS and IPDS printing. Also includes the ability to enter exactly the paper weight, between 56 gsm and 250 gsm (upper weight depends on finisher type) for the stock that is being loaded.
• Enhanced Line Screen - when enabled, this license allows all valid halftones to print (85 lpi, 106 lpi, 125 lpi, 134 lpi and 156 lpi) and offers additional halftone image quality settings.
• PCL License
• Ethernet License - Bus & Tag are optional • PS License
• DFA License • Imposition License • LCDS License • IPDS License
• VIPP License (FreeFlow VI Interpreter) • Disk Overwrite License
• Full, Basic, CPW (XPP) or ISO Diagnostics License • Speed License
FreeFlow Print Server and Print Engine
Control Console - houses the computer components that drive your Xerox Nuvera system.
The mouse driven UI provides access to the tools to manage jobs and the system.
8
Managing System
Resources
This section provides an overview of system management and some of the key
configuration tools, such as Queue Manager, that operators may need to use. For detailed information, see the System Administrator's Guide.
• Managing the Printer
• Getting Billing Information
• Reading the Billing Meters
• Managing System Software and Hardware
• Managing the Stocks Library
• Working with Queues
• Changing DFA Configurations for 3rd Party Finishers
Managing the Printer
You can use the Printer menu to globally manage all aspects of the printer, including print quality, what types of papers are loaded, and tray enabling/disabling. Review the sections below to familiarize yourself with this part of the Xerox Nuvera user interface.
Printer Menu Selections
Paper Trays
Shows the status of all the paper trays, as well as the types of stocks assigned to them. The columns show the properties of the stocks and the specifications that have been made for the trays.
Stock Library
If the Productivity Pack license is enabled on your system, the Stock Library database is available. The Stock Library allows you to see the complete list of stocks present, as
Finishing
Used to set up or enable the available finishing options. Right-clicking on a finisher allows you to enable or disable a finisher or display its properties.
Stacking
Allows you to enable and disable the stacker (if stackers are present with your system). It also allows you to view and control settings for all stackers on your system.
Image Quality
Used to modify the printer darkness/IQ parameters for PostScript/PDF jobs, PCL jobs, and TIFF jobs.
Managing Paper Trays
The Paper Trays selection allows you to manage the following operations: • Access paper tray properties
• Set stock properties
• Enable/Disable a paper tray • Refill a tray
• Enable/Disable cleanup
• Enable/Disable stock size checking • Load and program a stock
For more information, see Setup Paper Trays.
Managing Finishers
The Finishing selection allows you to view the status of Internal and External Finishers.
TIP
Before running any jobs, click Printer Menu > Finishing to quickly determine what types of Finishing devices are currently available and configured.
NOTE
See your System Administrator to change any settings on the Finishing window.
What Are Internal and External Finishers?
• Internal Finisher: i.e., the Stapler and Bottom Tray/Booklet Maker. - Name: Shows the name of the device.
Managing Stackers
The Stacking selection allows you to view the status of Stackers which may be configured on the system.
TIP
Before running any jobs, click Printer Menu > Stacking to quickly determine what types of Finishing devices are currently available and configured.
NOTE
See your System Administrator to change any settings on the Stacking window.
Managing Image Quality
The Image Quality selection allows you to globally set the darkness and resolution levels for system supported file types.
If you are having Image Quality problems on a consistent basis (for example, your entire job is either too light or too dark), check image quality settings using the Image Quality selection on the Printer menu. For more information, see Solving Image Quality Problems.
TIP
Before running any jobs, select Image Quality on the Printer menu to quickly determine what global machine darkness and resolution settings are currently configured.
NOTE
See your System Administrator to change the darkness and/or resolution settings on the Image Quality window.
User Interface Logging
This feature logs operator actions. It allows the customer to view the log and determine actions taken by the operator such as changing job parameters, queue settings, system settings or printer properties.
To enable and view the Log Console: 1. Select System > Log console. 2. Click Enable Logging.
Getting Billing Information
Why would I need to access billing information?
A few examples of why you need to access billing data:
• You can gain system usage information to more accurately plan your supplies re-ordering.
• During a service call, you may be asked to retrieve billing information to aid a service representative in identifying any problems with your system.
• Depending on the terms of your purchase agreement, you may need to access and print the billing data in order to be billed by Xerox.
• If the machine is used by personnel in shifts, billing data can be printed to track system usage for each shift.
To access billing information
1. In the user interface, click Administration > Billing. The Billing dialog box appears.
2. With the Billing dialog box open, you can then print the information, or relate it to the service representative if contacting by phone.
For more information about what each Billing Meter is recording, see Reading the Billing Meters.
3. Click Close.
Depending on your system's security setting, you may or not be able to access billing data. Contact your System Administrator for adjusting your system's security setting.
Reading the Billing Meters
Following are descriptions of what each Billing Meter is tracking. Make sure you have correctly identified your region.
Billing Regions
Region 4 Region 3 Region 2 Region 1 FX NASG-CAN ESG NASG-US FXAP DMO-E DMO-W China APODescriptions of Billing Meters
Billing Region 1