Reference Guide
Skybox View
7.0.600
Revision: 11© Copyright 2002-2014 Skybox® Security, Inc. All rights reserved.
This documentation contains proprietary information belonging to Skybox Security and is provided under a license agreement containing restrictions on use and disclosure. It is also protected by international copyright law.
Due to continued product development, the information contained in this document may change without notice. The information and intellectual property contained herein are confidential and remain the exclusive intellectual property of Skybox Security. If you find any problems in the documentation, please report them to us in writing. Skybox Security does not warrant that this document is error-free. No part of this publication may be reproduced, stored in a retrieval system, or transmitted in any form or by any means—electronic, mechanical, photocopying, recording, or otherwise—without the prior written permission of Skybox Security.
Skybox®, Skybox View®, Skybox® Security, Skybox Firewall Assurance, Skybox Network Assurance, Skybox Vulnerability Control, Skybox Threat Manager, Skybox Change Manager, Skybox
5000/5000W/5500/6000 Appliance, are trademarks and registered trademarks of Skybox Security, Inc. Check Point™, SiteManager-1™, FireWall-1®, Provider-1™, SmartDashboard™, VPN-1®, and OPSEC™ are trademarks or registered trademarks of Check Point Software Technologies Ltd. or its affiliates.
All other trademark and registered trademark products mentioned in this document are the property of their respective owners.
Skybox Security, Inc.
Telephone (in the U.S.): 866-6-SKYBOX (866-675-9269) Telephone (outside the U.S.): 1-408-441-8060
Fax: 1-408-441-8068
Website: http://www.skyboxsecurity.com
Skybox View version 7.0.600 3
Intended Audience ... 8
How this manual is organized ... 8
Related documentation ... 8
Technical support ... 8
Part I: Tasks ... 10
Managing tasks ... 11
User roles and tasks ... 11
Setting task parameters ... 11
Task Properties dialog box ... 12
Device access management ... 14
Using Cyber-Ark for device password management ... 15
Quick reference for data collection ... 17
Quick reference: firewall configuration collection ... 17
Quick reference: firewall traffic log and audit log collection ... 21
Quick reference: proxies, VPN devices, and IPS devices ... 22
Quick reference: load balancers ... 23
Quick reference: routers and LAN controllers ... 24
Quick reference: scanners ... 26
Quick reference: alert services ... 28
File import tasks ... 29
Import directory tasks ... 29
Data formats for file import tasks ... 31
Basic file import tasks ... 35
Advanced file import tasks ... 36
Collector file import tasks ... 39
Advanced collector file import tasks ... 39
Script invocation tasks ... 40
Importing interface and routing configuration ... 41
Firewall configuration tasks ... 43
Blue Coat proxy ... 43
Check Point FireWall-1 firewall ... 45
Check Point Provider-1 CMA ... 53
Cisco PIX/ASA/FWSM firewall ... 58
Cisco Security Manager ... 61
Dell SonicWALL firewall ... 63
Fortinet FortiGate firewall ... 64
Fortinet FortiManager Security Management appliance ... 66
Juniper Networks Junos firewall ... 68
Juniper Networks NetScreen firewall ... 69
Juniper Networks Network and Security Manager ... 71
Linux iptables firewall ... 73
McAfee Firewall Enterprise (Sidewinder) firewall ... 73
Skybox View version 7.0.600 4
Palo Alto Networks firewall ... 75
Palo Alto Networks Panorama ... 77
Sidewinder G2 (McAfee Firewall Enterprise) firewall ... 78
VMware vShield Edge firewall ... 80
Firewalls implemented in software ... 81
Firewall log data tasks ... 83
Check Point FireWall-1 activity log data (LEA collection) ... 83
Check Point FireWall-1 change events (audit log data) ... 90
Importing syslog change tracking events ... 91
Syslog traffic events ... 95
IPS tasks ... 101
HP TippingPoint IPS devices ... 101
IBM Proventia G appliances ... 102
Load balancer tasks ... 104
A10 Networks load balancer ... 104
Cisco CSS load balancer ... 106
Citrix NetScaler load balancer ... 107
F5 BIG-IP load balancer ... 108
Radware AppDirector load balancer ... 109
Radware WSD load balancer ... 111
Router tasks ... 114
Cisco IOS router ... 114
Cisco Nexus router ... 118
HP ProCurve router ... 121
Nortel Passport 8600 router ... 122
Scanner tasks ... 125
eEye Retina scanner ... 125
McAfee Foundstone FoundScan Enterprise scanner ... 126
IBM SiteProtector ... 128
Qualys QualysGuard scanner ... 129
Rapid7 Nexpose scanner ... 132
Shavlik NetChk Protect patch management tool ... 133
Tenable Network Security Nessus scanner ... 134
Tripwire nCircle scanner ... 136
Blacklists ... 136
Management systems tasks ... 139
McAfee ePolicy Orchestrator ... 139
Microsoft SCCM ... 140
SolarWinds NCM ... 142
Microsoft Active Directory ... 143
Microsoft WSUS ... 144
CiscoWorks ... 145
HP Software & Solutions (OpenView) ... 145
Symantec Management Suite ... 146
Alerts and vulnerability definition feed tasks... 147
Skybox View version 7.0.600 5
VeriSign iDefense alert services ... 148
Network tasks ... 149
Network scan tasks ... 149
Topology discovery tasks... 151
Analysis tasks... 152
Access requests tasks ... 152
Change tracking tasks ... 152
Exposure tasks ... 153
False positive reduction tasks ... 154
Policy compliance tasks ... 154
Security Metrics calculation tasks ... 155
Shadowed rules tasks ... 156
Vulnerability detection tasks ... 156
Model maintenance tasks ... 160
Model completion and validation tasks... 160
Copy model tasks ... 163
Model integrity tasks ... 163
Outdated entities removal tasks ... 164
Back up model and settings tasks ... 165
Server software update tasks ... 166
Collector software update tasks ... 166
Dictionary update tasks ... 166
Report and ticket tasks ... 168
Report generation tasks ... 168
Ticket generation tasks... 168
CSV access rule review export tasks ... 168
CSV analysis export tasks ... 169
CSV change tracking export tasks ... 170
CSV compliance results export tasks ... 171
CSV Configuration Compliance export tasks ... 172
CSV firewall assurance export tasks ... 173
CSV optimization and cleanup export tasks ... 174
CSV security metrics export tasks ... 175
Qualys format XML vulnerability occurrences export tasks ... 176
Part II: Analyses... 178
Managing analyses ... 179
Types of analyses ... 179
Setting analysis parameters ... 181
Analysis Properties dialog box ... 181
Customizing the display of an analysis ... 181
Risk analyses ... 183
Assets analyses ... 183
Attacks analyses ... 185
Business Asset Groups analyses ... 186
Business Units analyses ... 187
Skybox View version 7.0.600 6
Networks analyses ... 189
Regulation Compliance analyses ... 191
Threat Origins analyses ... 192
Vulnerability definitions risk analyses ... 192
Vulnerability occurrences analyses ... 193
Worms analyses ... 200
Threat management analyses ... 202
Vulnerability definitions threat management analyses ... 202
Model validation analyses ... 204
Assets validation analyses ... 204
Network interfaces validation analyses ... 206
Networks validation analyses ... 209
Services validation analyses... 211
Ticket analyses... 214
Tickets analyses ... 214
Part III: Tickets, reports, and notifications ... 217
Tickets reference ... 218
Tickets ... 218
Ticket rules ... 226
Reports reference ... 237
Working with reports ... 237
Report Properties dialog box... 242
Tickets reports ... 243
Skybox Vulnerability Control and Skybox Threat Manager reports ... 245
Skybox Firewall Assurance reports ... 259
Skybox Network Assurance reports ... 270
Notifications reference ... 273
Notifications ... 273
Customizing notification templates ... 279
Selecting the correct template ... 281
Editing templates ... 283
Exportable data ... 290
CSV-exportable data ... 290
Other exports ... 292
Part IV: Tools ... 293
Access Control List Editor ... 294
Using the Access Control List Editor ... 294
Access Rule Properties dialog box ... 294
Skybox View version 7.0.600 7
Access Rule Properties with Rule Review section ... 299
Access Rule Properties dialog box (extended)... 299
Specifying routing rules ... 302
Managing routing rules ... 302
Replicating routing rules ... 305
Access Analyzer ... 306
Access Analyzer query fields for Vulnerability Control ... 306
Access Analyzer query fields for Firewall Assurance and Network Assurance ... 308
Network Map ... 311
Network Map control panel ... 311
Network Map filter toolbar ... 314
Parameters of individual maps ... 314
Layout parameters ... 315
Firewall Map ... 317
Firewall Map filter pane ... 317
Part V: Entities ... 318
Model entities... 319
Entity relationships ... 320
Locking entity parameters ... 320
Business Asset Groups ... 320
Business Units ... 322
Clouds ... 323
Assets ... 326
Asset groups ... 328
Locations ... 329
Networks ... 329
Network groups ... 331
Network interfaces ... 331
Services ... 333
Threat Origins ... 334
Vulnerability occurrences ... 336
Index ... 338
Skybox View version 7.0.600 8
Preface
Intended Audience
The Skybox View Reference Guide is the reference companion to the Skybox Firewall Assurance User’s Guide, the Skybox Network Assurance User’s Guide, the Skybox Vulnerability Control User’s Guide, and the Skybox Threat Manager User’s Guide.
The intended audience is readers of the User’s Guides who want additional technical and in-depth information.
How this manual is organized
The parts in this manual contain reference information about Skybox View, such as configuration of components and devices; supplying parameters of analyses, tasks, and model entities; and specifying access, dependency, and routing rules.
Related documentation
The following documentation is available for Skybox View:
• Skybox View Installation and Administration Guide
• Skybox View Developer’s Guide
• Skybox View Release Notes
The entire documentation set (in PDF format) is available in the <Skybox_View_Home>/docs directory.
You can access a comprehensive Help file from any location in the Skybox View Manager by using the Help menu or by pressing F1.
Technical support
You can contact Skybox Security technical support by:
• Calling 866-6-SKYBOX (866-675-9269) inside the U.S. or 1-408-441-8060 outside the U.S.
• Using the Skybox Security support portal at http://portal.skyboxsecurity.com
You must register to use the support portal. Registered users can view the knowledge base, download updates, and submit cases.
• Faxing 1-408-441-8068 (U.S. number)
• Sending an e-mail to [email protected]
When opening a case, you need the following information:
• Your contact information (telephone number and e-mail address)
• Skybox View version and build numbers
• Platform (Windows or Linux)
Skybox View version 7.0.600 9
• Any documentation or relevant logs
You can compress logs before attaching them by using the Pack Logs tool (see Packing log files for technical support, in the Skybox View Installation and Administration Guide).
This part describes the parameters of Skybox View tasks.
Skybox View version 7.0.600 11
Chapter 1
This chapter gives an overview of how to set the parameters of Skybox View tasks.
For information about running tasks, task messages, and modifying tasks, see Tasks, in the Skybox Vulnerability Control Getting Started Guide.
In this chapter
User roles and tasks ... 11
Setting task parameters ... 11
Task Properties dialog box ... 12
Device access management ... 14
Using Cyber-Ark for device password management ... 15
User roles and tasks
Only Admins and Users have access to the Operational Console where Skybox View tasks are managed.
Admins can create, manage, and run all tasks.
Users can view tasks that add information to the model, delete information from the model, or save the model. Users can create, manage, and run the following:
• All types of analysis tasks
• All types of report tasks, including CSV export tasks and XML vulnerability occurrence export tasks
• Ticket generation tasks
• Copy model tasks (which copy model data from one model to another, such as from Live to What If)
Setting task parameters
The general procedure for setting task parameters is described in this section.
The main dialog box for setting a task’s parameters is described in Task Properties dialog box (on page 12) and Schedule tab (on page 13). These sections describe parameters common to all tasks. For information about the parameters specific to each Skybox View task type, see the section relating to the task.
Tip: When you mouseover a field, a tooltip listing the values selected for that field appears. This is especially useful for fields of the Parameters pane that can hold multiple values.
To open the operational console
On the toolbar, click .
Skybox View version 7.0.600 12
To create a Skybox View task
On the Operational Console toolbar, click .
To create a Skybox View task based on an existing task
1 In the Operational Console tree, select Tasks > All Tasks. The workspace lists all tasks defined for this model. 2 Right-click a task and select Create Task Like.
A Task Properties dialog box containing a copy of the selected task appears.
To edit a Skybox View task
1 In the Operational Console tree, select Tasks > All Tasks. The workspace lists all tasks defined for this model. 2 Do one of the following:
Double-click a task.
Right-click a task and select Properties.
The Task Properties dialog box for the selected task appears.
Task Properties dialog box
The Task Properties dialog box contains the following tabs: General, Comments, and Schedule:
• General: This tab, described in General tab (on page 12), contains the fields that define the selected task type.
• Alerts: This tab, described in Alerts tab (on page 13), is used to define when and where alerts are sent for the task.
• Comments: This tab, which is the same for all tasks, contains your description of the task. Supplying a description is optional (but strongly recommended) and does not affect the task. When the Task table is displayed in the Operational Console, view comments by showing the User Comments column.
• Schedule: This tab, which is the same for all tasks, is described in Schedule tab (on page 13). It is used to schedule the automatic launching of the task.
General tab
The General tab consists of two panes:
• Parameters: This pane contains parameters specific to each task. These parameters are described in the task-specific sections.
• General: This pane, described in the following table, is the same for all tasks. Parameter Description
Name A name that you assign to the task.
Task Type The task type. Task types are grouped into folders and are
searchable.
You can modify this parameter for new tasks only.
Collector The Skybox View Collector to be used by the task.
Timeout Specifies whether the task has a timeout limit.
Skybox View version 7.0.600 13
Parameter Description
The hours portion of the task’s timeout limit.
Minutes This field is enabled only if Timeout is selected.
The minutes portion of the task’s timeout limit. Show Properties
Dialog Before Launch
Note: This field is displayed only when working with Skybox
Vulnerability Control.
Specifies whether to open the task’s Properties dialog box before the task is launched.
Enable Auto-launch Specifies whether to launch the task automatically, according to
the schedules that are specified in the Schedule tab.
Alerts tab
The Alerts tab is used to define who will get alerts for a task, and under what exit conditions. You can either use the global settings (from Tools > Options > Server Options > Task Settings > Task Alert Settings) or define specific ones.
Parameter Description
Enable Task Alerts Specifies whether task alerts are sent for this task.
E-Mail To This field is enabled only if Enable Task Alerts is selected.
Specifies to which users task alerts are sent:
• Use Global Settings: Task alerts are sent to the users specified in the global settings.
• Specific: Enables you to specify users and e-mail addresses to which task alerts from this task are sent.
Exit Codes This field is enabled only if Enable Task Alerts is selected.
Specifies on which exit codes task alerts are sent for this task.
• Use Global Settings: Task alerts are sent according to the exit codes specified in the global settings.
• Specific: Enables you to specify the exit codes for which task alerts from this task are sent.
Schedule tab
The Schedule tab is used to schedule when a task runs automatically (auto-launch). Note: Each schedule (each row) is independent of every other schedule.
You can add, modify, or delete schedules.
To add a schedule to a task
1 In the Task Properties dialog box, click the Schedule tab. 2 Click Add.
3 Select a frequency for the task.
4 Select when the task is to run according to the selected frequency.
Daily, Weekly, Monthly, Yearly
To change the time of day, click the down arrow next to the Every day at or At field. (To close the Clock dialog box, click anywhere inside the Task Schedule dialog box.)
Monthly
If you specify a day that does not exist in all months—for example, day 31—the task is not launched from this schedule in a month that does not contain that day.
Skybox View version 7.0.600 14
Yearly
If you specify a day that does not exist in the selected month—for example, November 31— the task is never launched from this schedule.
5 To specify that the task runs a limited number of times, select End After and specify how many times the task is to run automatically.
6 In the Model field, specify the model on which to run this schedule. 7 Click OK.
8 If auto-launch is disabled (Enable Auto-launch is cleared in the General tab), you are asked whether you want to enable auto-launch.
You can run a sequence of tasks on a schedule. For information about task sequences, see the Using tasks for automation chapter in the Skybox Vulnerability Control User’s Guide or the Skybox Network Assurance User’s Guide.
Device access management
For some task types, you can instruct Skybox View to take user name and password pairs from a repository instead of typing this data in fields in the Task Properties dialog box.
In many organizations, the same user name and password combination is used to access multiple devices of one type. For example, there might be one user name and password to access your
organization’s Cisco routers in London and a separate combination to access the Cisco routers in New York. Admins can configure Skybox View so that each user name and password combination is saved by Skybox View and can be used by online collection tasks for devices of the specified type and scope.
This section contains information about setting up access for multiple devices.
Creating access tokens
In Skybox View, each combination of user name and password for a specific set of devices is referred to as an access token. Only Admins can create (and manage) these access tokens, which are used by some online collection tasks.
For devices that require an administrator user name and password combination, create two access tokens; a regular one (of type <Device_type>) for the regular user name and password, and a separate one (of type <Device_type> Admin) for the administrator combination.
The types of online collection tasks that can use access tokens are listed in the following table. Collection task type Token type
Routers – Cisco IOS Cisco, Cisco Admin
Routers – Nortel Passport Nortel Passport
To create an access token
1 Select Tools > Administrative Tools > Device Access Management. 2 In the Device Access Management dialog box, click Add.
3 In the New Access Token dialog box:
a) Type a Device Name for the access token, such as London Cisco routers. b) In the Field Type field, select the type of device.
Cisco IOS routers, which require an administrator user name and password combination, require two access tokens, one for a regular user whose Type is the device name type (Cisco) and one for the administrator user name and password combination whose Type has the string Admin appended to the name (Cisco Admin).
Skybox View version 7.0.600 15 c) In the User Name field, type the user name for this set of devices. For Admin-type access
tokens, this is the administrator user name.
d) In the Password and Confirm Password fields, type the password for this set of devices. For Admin-type access tokens, this is the administrator password.
e) If necessary, click the Browse button next to the Scope field to limit the scope of the device set.
f) Click OK to save the new device access token.
How access tokens are used
After creating access tokens, you can use them in online collection tasks. Each access token type matches a specific type of collection. Admin-type access tokens are used only when required by the devices being accessed.
Note: Access tokens are only used when Use Access Tokens is selected in the Properties dialog box of the task. If this option is not selected, even if access tokens exist for the devices specified in the task, they are not used.
When Use Access Tokens is selected, Skybox View checks the access tokens to find those that match the scope and type of the task.
• Access tokens that do not match either the scope or the type of the task are not used. For example, if there is an access token for Cisco routers in London and one for Cisco firewalls in London, a router collection task uses only the router-type access token and a firewall collection task uses only the firewall-type access token.
• If two (or more) access tokens are found that match a task, the best match (the one with the most specific range) is used.
For example, you create a collection task for a device with the address 192.170.1.127; an access token with a range of 192.168.0.0-192.172.0.0 matches the task, but an access token with a range of 192.170.0.0-192.170.2.0 is a more specific match and is used by the task.
Using Cyber-Ark for device password management
Cyber-Ark is a tool that allows highly-sensitive passwords to be centrally stored, logged, and managed.
The following tasks can be authenticated with Cyber-Ark:
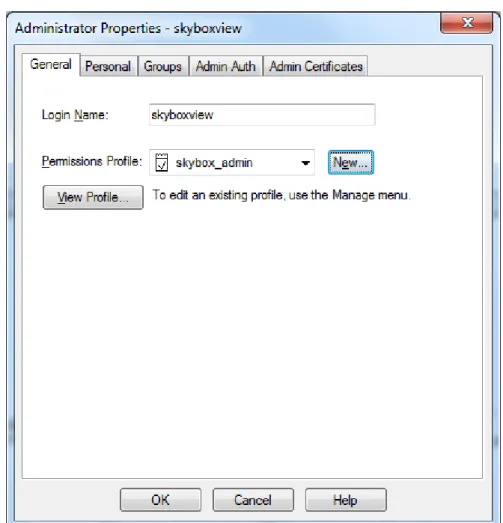
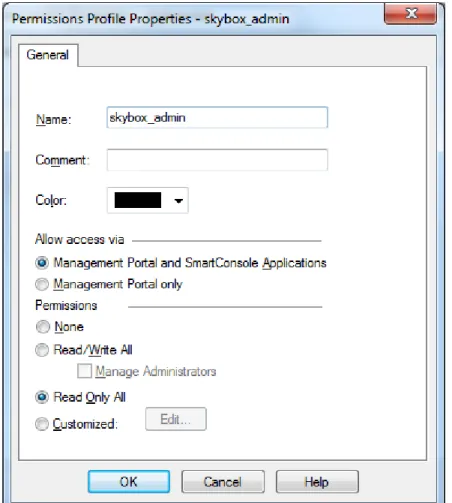
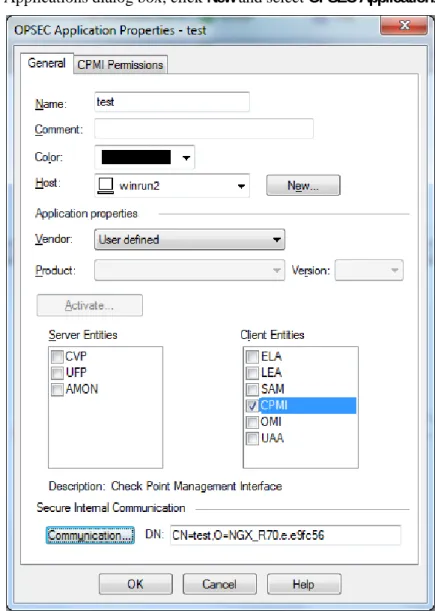
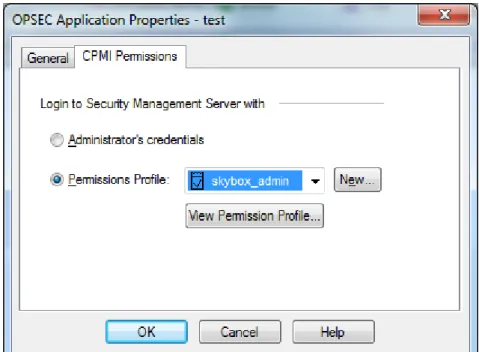
• Firewalls – Check Point FireWall-1 CPMI Collection (on page 45)
• Firewalls – Cisco PIX/ASA/FWSM Collection (on page 58)
• Firewalls – Cisco Security Manager Collection (on page 61)
• Firewalls – FortiGate Collection (on page 64)
• Firewalls – FortiManager Collection (on page 66)
• Firewalls – Junos Collection (on page 68)
• Firewalls – NetScreen Collection (on page 69)
• Firewalls – Juniper Networks NSM Collection (on page 71)
• Firewalls – McAfee Firewall Enterprise Collection (on page 73)
• Firewalls – Palo Alto Networks Collection (on page 75)
• Firewalls – Panorama Collection (on page 77)
Skybox View version 7.0.600 16
• Load Balancer – A10 Collection (on page 104)
• Load Balancer – AppDirector Collection (on page 109)
• Load Balancer – BIG-IP Collection (on page 108)
• Load Balancer – NetScaler Collection (on page 107)
• Proxy – Blue Coat Collection (on page 43)
• Routers – Cisco IOS Collection (on page 114)
• Routers – Cisco Nexus Collection (on page 118)
• Routers – HP ProCurve Collection (on page 121)
• Tools – Script Invocation (on page 40)
You must configure Cyber-Ark so that Skybox View tasks can retrieve device authentication credentials from Cyber-Ark.
Configuring Cyber-Ark for device credentials retrieval
It is recommended that you create a separate safe to contain all device authentication credentials required by Skybox View collection tasks.
It is recommended that you use one or more Cyber-Ark application security options:
• Add the IP address of the Skybox View Server
• Add the Operating System User of the Skybox View Server:
(If you installed the Server as a service): skyboxview
(If you did not install the Server as a service): The installation user
• Add the path to JBoss in the Skybox View installation: <Skybox_View_Home>\thirdparty\jboss
Note: The default folder for Cyber-Ark is Root and the default application ID for connecting from Skybox View is SkyboxSecurity. If you change these in Cyber-Ark, you must also change them in Skybox View. For additional information, see Global Task Settings, in the Skybox View Installation and Administration Guide.
Skybox View version 7.0.600 17
Chapter 2
This chapter provides a quick reference for data collection from devices supported by Skybox View. More detailed information for each device is available in the following chapters.
You can collect device data by:
• Connecting directly to the device or management system and collecting device data.
For this method, you must know the device details, such as credentials and the device IP address. Skybox View has specific collection tasks for many types of devices.
• Importing saved device files.
For this method, you must save copies of the necessary files on your file system. Skybox View includes offline file import tasks that import these data files.
In this chapter
Quick reference: firewall configuration collection ... 17
Quick reference: firewall traffic log and audit log collection ... 21
Quick reference: proxies, VPN devices, and IPS devices ... 22
Quick reference: load balancers ... 23
Quick reference: routers and LAN controllers ... 24
Quick reference: scanners ... 26
Quick reference: alert services ... 28
Quick reference: firewall configuration collection
You can collect device data by:
• Connecting directly to the device ( ) or device management system ( ) and collecting device data.
For this method, you must know the device details, such as credentials and the device IP address. Skybox View has many tasks that connect to specific types of devices.
• Importing saved device files ( ).
For this method, you must save copies of the necessary files on your file system. Skybox View includes offline file import tasks that import these data files.
Skybox View version 7.0.600 18
Device Data source
Integration requirements Barracuda Networks
(Phion) Barracuda NG Firewall
Skybox View includes a parser that creates an iXML file from Barracuda Networks Barracuda NG firewall configuration files. This iXML file can then be imported into Skybox View.
The parser is located at
<Skybox_View_Home>\intermediate\bin\pa rsers\firewalls\barracuda\barracudaNGP arser.pl.
For help using the script, run the script without any parameters.
For additional help, open a case at the Skybox
Security support portal.
Check Point Firewall-1 (on page
45)
Check Point
Provider-1 (on page
53)
The OPSEC API is used to get configurations remotely from FireWall-1 Manager or from Provider-1 CMA.
The following files are required for FireWall-1 Manager:
• objects_5_0.C: The network objects
• rulebases_5_0.fws: The rulebase
The following files are required for Provider-1 CMA:
• objects.C or objects_5_0.C: The CMA network objects
• rulebases.fws or rulebases_5_0.fws: The CMA rulebase
• g_objects.C or g_objects_5_0.C: The global network objects
The following files are optional for FireWall-1 Manager and Provider-1 CMA:
• install_statuses.C: The statuses
Note: If the Check Point configuration contains
several policies, install_statuses.C is
mandatory.
• vsx_objects.C: The VSX device objects You also need the name of the active policy on each
firewall module and the ifconfig and netstat –
rnv output from each firewall module.
Cisco
PIX/ASA/FWSM (on
page 58)
• The IP address of the firewall
• SSH or telnet access to the firewall
• An admin user with level 5 privileges
The following files are required:
• run.txt: The PIX/ASA/FWSM configuration
• (Optional) route.txt: Dump of the
PIX/ASA/FWSM routing table
Cisco Security Manager (on page
61)
• The IP address of the Security Manager
• A user name and password to access the
Skybox View version 7.0.600 19
Device Data source
Integration requirements The following file is required:
• *.xml: The Security Manager source file
CiscoWorks (on
page 145)
The following file is required:
• <device_IP_address>.cfg: The firewall configuration
Dell SonicWALL (on
page 63) • The name or IP address of the firewall
• A user name and password to access the
firewall
Fortinet FortiGate
(on page 64) • The IP address of the firewall
• SSH or telnet access to the firewall
• A user name and password to access the
firewall
The following files are required:
• config.txt: The FortiGate configuration
• (Optional) route.txt: Dump of the FortiGate
routing table
Fortinet
FortiManager (on
page 66)
• The name or IP address of the FortiManager
Security Management appliance
• A user name and password to access the
FortiManager Security Management appliance
Juniper Networks
Junos (on page 68) • The IP address of the firewall
• SSH or telnet access to the firewall
• A user name and password to access the
firewall
The following files are required:
• config.txt: The Junos configuration
• (Optional) route.txt: Dump of the Junos
routing table
Juniper Networks NetScreen (on page
69)
• The IP address of the firewall
• SSH or telnet access to the firewall
• A user name and password to access the
firewall
The following files are required:
• config.txt: The NetScreen configuration
• (Optional) route.txt: Dump of the NetScreen
routing table
Juniper Networks
NSM (on page 71) • A global domain Read-Only Administrator account.
• The name or IP address of the NSM
Skybox View version 7.0.600 20
Device Data source
Integration requirements
Linux iptables (on
page 73)
The following files are required:
• ifconfig.txt: The iptables interfaces configuration report
• filter.txt: The iptables filter table
• nat.txt: The iptables NAT table
• mangle.txt: The iptables mangle table
McAfee Firewall Enterprise (Sidewinder) (on
page 73)
• The name or IP address of the firewall
• A user name and password to access the
firewall
Palo Alto Networks
(on page 75) • The name or IP address of the firewall
• A user name and password to access the
firewall
The following files are required:
• config.xml: The Palo Alto configuration and system information
• (Optional) route.txt: Dump of the Palo Alto
Networks routing table
Palo Alto Networks Panorama (on page
77)
• The name or IP address of the Panorama
• A user name and password to access the
Panorama
Sidewinder G2 (McAfee Firewall Enterprise) (on page
78)
The following files are required:
• The interfaces file
• The ipfilter data file
• The proxy services definitions file
• The proxy rules data (ACL) file
• (Optional) Burbs definition file
• (Optional) Routing information file
The Skybox View Sidewinder G2 parser creates an iXML file from these files. This iXML file can then be imported into Skybox View.
Skybox View version 7.0.600 21
Device Data source
Integration requirements Stonesoft (McAfee)
StoneGate
Skybox View includes a collector script that
retrieves Stonesoft StoneGate firewall configuration files and a parser that creates an iXML file from these files. This iXML file can then be imported into Skybox View.
The collector script is located at
<Skybox_View_Home>\intermediate\bin\co llectors\firewalls\stonegate\stonegate Collection.pl.
The parser is located at
<Skybox_View_Home>\intermediate\bin\pa rsers\firewalls\stonegate\stonegatePar ser.pl.
For help using the scripts, run each script without any parameters.
For additional help, open a case at the Skybox
Security support portal.
Topsec Skybox View includes a parser that creates an iXML
file from Topsec firewall configuration files. This iXML file can then be imported into Skybox View. The parser is located at
<Skybox_View_Home>\intermediate\bin\pa rsers\router\topSec\topSecParser.pl. For help using the parser, run the parser without any parameters.
For additional help, open a case at the Skybox
Security support portal. WatchGuard
Technologies
Skybox View includes a collector script that retrieves WatchGuard Technologies firewall
configuration files and a parser that creates an iXML file from these files. This iXML file can then be imported into Skybox View.
The collector script is located at
<Skybox_View_Home>\intermediate\bin\co llectors\firewalls\watchguard\watchgua rdCollection.pl.
The parser is located at
<Skybox_View_Home>\intermediate\bin\pa rsers\firewalls\watchguard\WatchguardP arser.pl.
For help using the scripts, run each script without any parameters.
For additional help, open a case at the Skybox
Security support portal.
Quick reference: firewall traffic log and audit log collection
You can collect firewall traffic and audit data by:
• Connecting directly to the management system ( ) that manages the firewalls and collecting log data.
For this method, you must know the management system details, such as credentials and the device IP address. Skybox View has many tasks that connect to specific management systems.
Skybox View version 7.0.600 22
• Importing saved firewall log files ( ).
For this method, you must save copies of the necessary files on your file system. Skybox View includes offline file import tasks that import these data files.
Data Data source
Integration requirements
Check Point Firewall-1 activity log data (on page
83)
(LEA collection)
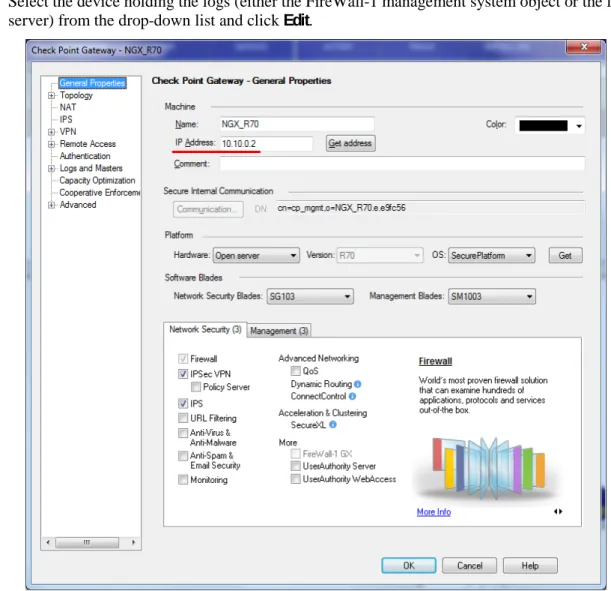
• The IP address of the FireWall-1 management
system
• A user name and password to access the
management system
• (If collecting from a log server) The IP address
of the log server
Check Point FireWall-1 change events (on page 90) (audit log data)
• The IP address of the FireWall-1 management
system
• A user name and password to access the
management system
• (If collecting from a log server) The IP address
of the log server
Syslog change
events (on page 91) • Configure the firewall or syslog server to forward the change events
• The path to the directory containing the syslog
files
Syslog traffic events
(on page 95) • Configure the firewall or syslog server to forward the traffic events
• The path to the directory containing the syslog
files
Quick reference: proxies, VPN devices, and IPS devices
You can collect device data by:
• Connecting directly to the device ( ) or device management system ( ) and collecting device data.
For this method, you must know the device details, such as credentials and the device IP address. Skybox View has many tasks that connect to specific types of devices.
• Importing saved device files ( ).
For this method, you must save copies of the necessary files on your file system. Skybox View includes offline file import tasks that import these data files.
Device Data source
Integration requirements BalaBit Shell Control
Box
Skybox View includes a parser that creates an iXML file from BalaBit Shell Control Box proxy
configuration files. This iXML file can then be imported into Skybox View.
The parser is located at
<Skybox_View_Home>\intermediate\bin\pa rsers\proxy\balabitScb\balabitScbParse r.pl.
Skybox View version 7.0.600 23
Device Data source
Integration requirements any parameters.
For additional help, open a case at the Skybox
Security support portal.
Blue Coat (on page
43) • The IP address of the proxy
• A user name and password to access the proxy
The following files are required:
• *.txt or *.log: The Blue Coat configuration
• (Optional) route.txt: Dump of the Blue Coat
routing table
HP TippingPoint (on
page 101)
+
• The name or IP address of the SMS appliance
• A super user name and password to access the
SMS appliance
• The IP address of the TippingPoint device
• A user name and password to access the
TippingPoint device
IBM ISS Proventia G
(on page 102) • The IP address of the Proventia G appliance
• A user name and password to access the
SiteProtector database
Juniper SSL Skybox View includes a parser that creates an iXML
file from Juniper SSL VPN appliance configuration files. This iXML file can then be imported into Skybox View.
The parser is located at
<Skybox_View_Home>\intermediate\bin\pa rsers\vpn\juniper\juniperSslVpnParser. pl.
For help using the parser, run the parser without any parameters.
For additional help, open a case at the Skybox
Security support portal.
Quick reference: load balancers
You can collect load balancer data by:
• Connecting directly to the load balancer ( ) and collecting device data.
For this method, you must know the load balancer details, such as credentials and the device IP address. Skybox View has many tasks that connect to specific types of load balancers.
• Importing saved load balancer files ( ).
For this method, you must save copies of the necessary files on your file system. Skybox View includes offline file import tasks that import these data files.
Device Data source
Integration requirements
A10 Networks (on
page 104) • The IP address of the load balancer
Skybox View version 7.0.600 24
Device Data source
Integration requirements balancer
The following files are required:
• *.txt or *.log: The A10 configuration
• (Optional) route.txt: Dump of the A10 routing
table
Cisco Ace Skybox View includes a parser that creates an iXML
file from Cisco Ace load balancer configuration files. This iXML file can then be imported into Skybox View.
The parser is located at
<Skybox_View_Home>\intermediate\bin\pa rsers\loadBalancers\ciscoAce\ciscoAceP arser.pl.
For help using the parser, run the parser without any parameters.
For additional help, open a case at the Skybox
Security support portal.
Cisco CSS (on page
106)
The following file is required:
• A Cisco CSS configuration file
The Skybox View Cisco CSS parser creates an iXML file from this file. This iXML file can then be imported into Skybox View.
Citrix NetScaler (on
page 107) • The IP address of the load balancer
• A user name and password to access the load
balancer
F5 BIG-IP (on page
108) • The IP address of the load balancer
• A user name and password to access the load
balancer
Radware AppDirector (on
page 109)
• The IP address of the load balancer
• A user name and password to access the load
balancer
The following files are required:
• *.*: The AppDirector configuration
• (Optional) route.txt: Dump of the
AppDirector routing table
Radware WSD (on
page 111) • The IP address of the load balancer
• The SNMP Community string to access the load
balancers
The following file is required:
• *.txt: A WSD SNMP dump file
Quick reference: routers and LAN controllers
With Skybox View, you can collect router configuration data by:
Skybox View version 7.0.600 25 For this method, you must know the router details, such as credentials and the device IP address. Skybox View has many tasks that connect to specific types of routers.
• Importing saved device files ( ).
For this method, you must save copies of the necessary files on your file system. Skybox View includes offline file import tasks that import these data files.
Device Data source
Integration requirements
Alcatel-Lucent Skybox View includes a collector script that
retrieves Alcatel-Lucent router configuration files and a parser that creates an iXML file from these files. This iXML file can then be imported into Skybox View.
The collector script is located at
<Skybox_View_Home>\intermediate\bin\co llectors\router\alcatelLucent\alcatelL ucentCollection.pl.
The parser is located at
<Skybox_View_Home>\intermediate\bin\pa rsers\router\alcatelLucent\alcatelLuce ntParser.pl.
For help using the scripts, run each script without any parameters.
For additional help, open a case at the Skybox
Security support portal. Cisco Wireless LAN
Controller
Skybox View includes a parser that creates an iXML file from Cisco Wireless LAN Controller
configuration files. This iXML file can then be imported into Skybox View.
The parser is located at
<Skybox_View_Home>\intermediate\bin\pa rsers\wireless\CiscoWLC\ciscoWlcParser .pl.
For help using the parser, run the parser without any parameters.
For additional help, open a case at the Skybox
Security support portal.
CiscoWorks (on
page 145)
The following file is required:
• <device_IP_address>.cfg: The router configuration
Brocade (Foundry Networks)
The following files are required:
• run.txt: The router’s configuration
• (Optional) route.txt: Dump of the router’s
Skybox View version 7.0.600 26
Device Data source
Integration requirements
H3C Skybox View includes a parser that creates an iXML
file from H3C router configuration files. This iXML file can then be imported into Skybox View. The parser is located at
<Skybox_View_Home>\intermediate\bin\pa rsers\router\h3c\h3cParser.pl.
For help using the parser, run the parser without any parameters.
For additional help, open a case at the Skybox
Security support portal.
HP ProCurve (on
page 121) • The IP address of the router
• A user name and password to access the router
The following files are required:
• *.*: The ProCurve configuration
• (Optional) route.txt: Dump of the ProCurve
routing table
Nortel Passport
8600 (on page 122) • The IP address of the router
• SSH or telnet access to the router
• A user name and password to access the router
The following files are required:
• run.txt: The Nortel configuration
• (Optional) route.txt: Dump of the Nortel
routing table
Quick reference: scanners
You can collect device data by:
• Connecting directly to the scanner ( ) or scanner management system ( ) and collecting device data.
For this method, you must know the scanner details, such as credentials and the device IP address. Skybox View has many tasks that connect to specific types of scanners.
• Importing saved scanner files ( ).
For this method, you must save copies of the necessary files on your file system. Skybox View includes offline file import tasks that import these data files.
Device Data source
Integration requirements
eEye Retina scanner (on page
125)
One of:
• The path to an RTD file
• The name of the DSN that is configured for the
Skybox View version 7.0.600 27
Device Data source
Integration requirements
McAfee Foundstone FoundScan scanner
(on page 126)
• The name or IP address of the database server
that hosts the FoundScan database
• A user name and password to access the
FoundScan database
HP Software & Solutions (OpenView) (on
page 145)
The following file is required:
• *.txt: HPOV topology dump
IBM SiteProtector
(on page 128) • The IP address of the scanner
• The name or IP address of the database server
that hosts the SiteProtector database
• A user name and password to access the
SiteProtector database
Nmap Use a topology discovery task (see page 151)
Use a basic file import (on page 35) or advanced file
import (on page 36) task. The following file is required:
• *.xml: Nmap XML file (output of nmap –v –sS –O –oX <out-file> <scan-range>)
Outpost24 Skybox View includes a parser that creates an iXML
file from Outpost24 scanner files. This iXML file can then be imported into Skybox View.
The parser is located at
<Skybox_View_Home>\intermediate\bin\pa rsers\scanners\outpost24\outpost24Pars er.pl.
For help using the parser, run the parser without any parameters.
For additional help, open a case at the Skybox
Security support portal.
Qualys QualysGuard scanner (on page
129)
A user name and password to access the Qualys account
The following files are required:
• scan.xml: Qualys scan
• (Optional) map.xml: Qualys map
Rapid7 Nexpose (on
page 132) • The IP address of the scanner
• A user name and password to access the
scanner
The following files are required:
• A set of *.xml: Rapid7 Nexpose audit report
files
The files can be in ns-xml, raw-xml, or qualys-xml format.
Skybox View version 7.0.600 28
Device Data source
Integration requirements
Shavlik NetChk Protect patch management tool
(on page 133)
One of:
• The path to an MDB file
• The name of the DSN that is configured for the
NetChk Protect output The following file is required:
• *.txt: Shavlik NetChk Protect Vulnerability Scanner Report
SNMP walk Use a basic file import (on page 35) or advanced file
import (on page 36) task. The following file is required:
• *.*: SNMP walk dump
Tenable Network Security Nessus (on
page 134)
• The IP address of the scanner
• A user name and password to access the
scanner
The following file is required:
• *.nessus: Nessus XML file
Tripwire nCircle scanner (on page
136)
The following files are required for nCircle XML3:
• scan.xml: nCircle export XML
• aspl.xml: nCircle ASPL XML
The following file is required for nCircle XML2:
• *.xml: nCircle export XML
Quick reference: alert services
You can collect device data by:
• Connecting directly to the <device> ( ) or management system ( ) and collecting device data.
For this method, you must know the <device> details, such as credentials and the device IP address. Skybox View has many tasks that connect to specific types of devices.
• Importing saved <device> files ( ).
For this method, you must save copies of the necessary files on your file system. Skybox View includes offline file import tasks that import these data files.
Skybox View version 7.0.600 29
Chapter 3
This chapter describes how to set the parameters of file import tasks.
Note: File import tasks can import a new model (in XML or encrypted XML format) into the current model, thus merging two models. This is useful if you must merge several models.
In this chapter
Import directory tasks ... 29 Data formats for file import tasks ... 31 Basic file import tasks ... 35 Advanced file import tasks ... 36 Collector file import tasks ... 39 Advanced collector file import tasks ... 39 Script invocation tasks... 40 Importing interface and routing configuration ... 41
Import directory tasks
Import – Directory tasks import the configuration or scan data files of multiple devices into a Skybox View model, where the files are in a specified directory located on the Skybox View Server or on a Skybox View Collector.
For a list of supported devices, scanners, and files and their file formats, see Supported devices and files for import directory tasks (on page 30).
Directory structure
Single configuration files for devices and scanner output files must be located in the specified directory (this directory can contain any number of these files, for the same or different devices); if a device has multiple configuration files, the files must be located in a first-level subdirectory of the specified directory (one subdirectory per device). You can specify up to four directories per Import – Directory task.
The specified directory can contain any of the following file types:
• A device configuration file
• A single file combines device configuration and a dump of the routing table
• A single file that combines the netstat and ifconfig data
• A scanner output file
• An iXML file
Each (first-level) subdirectory can contain one of the following sets of files:
• Device configuration and a dump of the routing table in separate files
• Check Point files:
(Mandatory) objects.C, rulesbases.fws
(Optional) global objects, statuses file
Skybox View version 7.0.600 30 Note: If the Check Point configuration contains several policies, install_statuses.C is
mandatory (it contains the information of which policy is installed on which firewall).
• netstat and ifconfig data in separate files
Note: In all cases the files can have any names: Skybox View identifies the file type.
Task parameters
The parameters that control Import – Directory tasks are described in the following table. Parameter Description
Basic tab
Run in The location of the files to import.
Modified in The age of the files to import.
• Custom: Select Specific or Relative start and end times.
Set <n> Specify up to four sets of devices (directories). (To import more
sets, use the Additional Sets field.)
If you specify Location Hint in the Advanced tab, all devices must be
at the same location.
Directory The full path to the directory containing the files (and
subdirectories) to import.
Comment Description of the contents of Directory.
Additional Sets Click the Browse button and type the directories containing the
configuration data of additional sets of devices (one per line). Optionally, specify a location hint per directory.
Advanced tab
Location Hint The location of the devices whose data is imported. (To import the
data of more than one device, the devices must be at the same location.)
Note: Use this parameter when different locations use the same set
of IP addresses, so that two devices at different locations can have the same IP address.
Merge assets by Wins name
Specifies whether to merge assets from the same network by name and not by IP address.
Select this option when assets do not have fixed IP addresses. Do not force unique
tag merging
If selected, and the firewall or router being imported has a unique tag, the task tries to match the device to devices already existing in the model according to network interfaces. If unsuccessful, the task adds the device to the model.
If cleared, the task adds the device to the model if it has a unique tag.
nCircle ASPL file (For nCircle XML3 imports) The ASPL file to use for all nCircle
imports (so that the file is only parsed once by Skybox View). If this field is left blank, the ASPL file is parsed separately for each nCircle import.
Supported devices and files for import directory tasks
Import – Directory tasks support the following devices, scanners, and files:
Skybox View version 7.0.600 31
A10 Networks load balancers
Blue Coat proxies
Check Point FireWall-1 firewalls and Provider-1 CMAs
Cisco PIX/ASA/FWSM firewalls
Cisco IOS routers
Cisco Nexus routers
F5 BIG-IP load balancers
Fortinet FortiGate firewalls
HP ProCurve routers
Juniper Networks Junos firewalls and routers
Juniper Networks NetScreen firewalls
McAfee ePolicy Orchestrator management systems
McAfee Firewall Enterprise firewalls
Palo Alto Networks firewalls
Radware AppDirector load balancers
iXML: A file containing device configuration written in Skybox View’s Integration XML (iXML)
• For information about iXML, see the Integration part of the Skybox View Developer’s Toolkit
• Scanner output
Nessus vulnerabilities scanners (XML format)
Qualys QualysGuard scanners (XML format)
Rapid7 Nexpose scanners
Tripwire nCircle scanners (XML format)
• Network state files (see Importing interface and routing configuration (on page 41))
netstat data files
ifconfig data files
Data formats for file import tasks
Note: It is recommended that you use Import – Directory tasks (see page 29) for all supported devices and file types (see page 30) (including network state files and iXML files).
The import data format types supported by Skybox View are listed in the following table. The table also gives the relevant source file or folder required for the file import. The information in this table is used by the following file import task types: Import – Basic, Import – Advanced, Import – Collector, and Import – Collector Advanced.
Note: For Import – Basic tasks, you must specify the location of each file separately and not the folder. Format name Type of import data Source file or folder
A10 A10 Folder containing the following files:
• *.txt or *.log: The A10 configuration
Skybox View version 7.0.600 32
Format name Type of import data Source file or folder A10 routing table
AppDirector APPDIRECTOR Folder containing the following files:
• *.*: The AppDirector configuration
• (Optional) route.txt: Dump of the
AppDirector routing table
BIG-IP BIGIP
BlueCoat BLUECOAT Folder containing the following files:
• *.txt or *.log: The Blue Coat configuration
• (Optional) route.txt: Dump of the
Blue Coat routing table Cisco Router
Configuration (used for Cisco IOS and Cisco Nexus routers)
IOS_CONF Folder containing the following files:
• run.txt: The Cisco router configuration
• (Optional) route.txt: Dump of the
Cisco router routing table
Note: Import – Advanced and Import – Collector tasks can import the output of selected
subcommands of the ip route vrf *
command. If route.txt is not found in the
specified folder, the tasks process all files
named route_XXX.txt.
For example, execute the command show
ip route vrf connected and save the
output in route_connected.txt.
Cisco Security Manager Configuration
CSM_CONFIG_FILE Cisco Security Manager source file (*.xml)
EPO EPO
FireWall-1 Configuration
FW1_CONF Folder containing the following files:
• objects_5_0.c: The network objects
• rulebases_5_0.fws: The rulebase
• (Optional) install_statuses.c: The
statuses
• (Optional) vsx_objects.c: The VSX
device objects (from the vsx_slot_objects table)
Note: For Import – Basic tasks, any file names
with the appropriate extensions (*.c and
*.fws) are permitted. FortiGate
Configuration file
FORTIGATE_CONFIG_ FILE
Folder containing the following files:
• config.txt: The FortiGate configuration
• (Optional) route.txt: Dump of the
Skybox View version 7.0.600 33
Format name Type of import data Source file or folder Foundry
Configuration
FOUNDRY Folder containing the following files:
• run.txt: The Foundry configuration
• (Optional) route.txt: Dump of the
Foundry routing table FWSM
Configuration
FWSM_CONF Folder containing the following files:
• run.txt: The PIX/ASA/FWSM configuration
• (Optional) route.txt: Dump of the
PIX/ASA/FWSM routing table HFNetChk
Vulnerability Scanner Report
HFNETCHK Shavlik NetChk Protect Vulnerability
Scanner Report file (*.txt)
HP ProCurve HPPROCURVE Folder containing the following files:
• *.*: The ProCurve configuration
• (Optional) route.txt: Dump of the
ProCurve routing table HPOV Topology
Dump
HPOV_TOPODUMP HP Software & Solutions (OpenView)
topology dump file (*.txt)
Intermediate Security Model XML
INTERMEDIATE_XML iXML file (*.xml)
IpTables Configuration
IPTABLES Folder containing the following files:
• ifconfig.txt: The iptables interfaces configuration report
• filter.txt: The iptables filter table
• nat.txt: The iptables NAT table
• mangle.txt: The iptables mangle table
Junos Configuration file
JUNOS_CONFIG_FILE Folder containing the following files:
• config.txt: The Junos configuration
• (Optional) route.txt: Dump of the
Junos routing table McAfee
Enterprise Firewall
MCAFEEFIREWALL
nCircle Scan NCIRCLE (nCircle XML2) nCircle export XML file
(*.xml)
(nCircle XML3) Folder containing the following files:
• nCircle export XML (scan.xml)
• nCircle ASPL XML (aspl.xml)
Nessus Scan NESSUS_XML Nessus XML file (usually *.xml or
Skybox View version 7.0.600 34
Format name Type of import data Source file or folder NetScreen
Configuration file
NETSCREEN_CONFIG _FILE
Folder containing the following files:
• config.txt: The NetScreen configuration
• (Optional) route.txt: Dump of the
NetScreen routing table NetScreen
SNMP Dump file
NETSCREEN_SNMP_D UMP
NetScreen SNMP dump file (*.txt)
Network State HOST_ROUTING_AND
_INTERFACES
Folder containing the following files:
• netstat.txt: The network status report
• ifconfig.txt: The interfaces configuration report
NMap Scan NMAP_XML Nmap XML file (*.xml)
Nortel Bay 8600 Configuration
NORTEL_BAY Folder containing the following files:
• run.txt: The Nortel configuration
• (Optional) route.txt: Dump of the
Nortel routing table Palo Alto
Firewall Configuration
PALO_ALTO Folder containing the following files:
• config.xml: The Palo Alto configuration
• (Optional) route.txt: Dump of the
Palo Alto routing table PIX
Configuration
PIX_CONF Folder containing the following files:
• run.txt: The PIX/ASA/FWSM configuration
• (Optional) route.txt: Dump of the
PIX/ASA/FWSM routing table Provider-1
Configuration
PFW1_CONF Folder containing the following files:
• objects.c or objects_5_0.c: The CMA network objects
• rulebases.fws or
rulebases_5_0.fws: The CMA rulebase
• g_objects.c or g_objects_5_0.c: The global network objects
• (Optional) install_statuses.c: The
statuses
• (Optional) vsx_objects.c: The VSX
device objects (from the vsx_slot_objects table)
Note: For Import – Basic tasks, any file names
with the appropriate extensions (*.c and
*.fws) are permitted Qualys Map and
Scan
QUALYS Folder containing the following files:
Skybox View version 7.0.600 35
Format name Type of import data Source file or folder
• (Optional) map.xml: The Qualys Map
Rapid7 RAPID_7
Skybox Netmodel
SKYBOX_XML Skybox View XML file (*.xml)
Skybox Netmodel Encrypted
SKYBOX_XML_ENC Encrypted Skybox View XML file (*.xmlx)
SnmpWalk Configuration
SNMPWALK_DUMP SNMP walk dump file (*.*)
vShield Edge WSD SNMP Dump
RADWSD_SNMP_DUM P
WSD SNMP dump file (*.txt)
Basic file import tasks
Import – Basic tasks import scan data or configuration files of selected devices (up to five) into a Skybox View model, where the files are located on the local machine.
To import data into Skybox View without a limitation on the number of devices imported per task, see
Advanced file import tasks (on page 36). To import configuration files located on a remote machine, see Collector file import tasks (on page 39) and Advanced collector file import tasks (on page 39).
Task parameters
The parameters that control Import – Basic tasks are described in the following table. Parameter Description
Basic tab
Import Data 1 A data set to import.
Open the Import Data dialog box to specify the import parameters.
For an explanation of the dialog box parameters, see Import Data
dialog box (on page 36).
Import Data 2 (Optional) An additional data set to import.
Import Data 3 (Optional) An additional data set to import.
Import Data 4 (Optional) An additional data set to import.
Import Data 5 (Optional) An additional data set to import.
Advanced tab
Location Hint The location of the devices whose data is imported. (To import the
data of more than one device, the devices must be at the same location.)
Note: Use this parameter when different locations use the same set
of IP addresses, so that two devices at different locations can have the same IP address.
Merge assets by Wins name
Specifies whether to merge assets from the same network by name and not by IP address.
Skybox View version 7.0.600 36
Import Data dialog box
The parameters of the Import Data dialog box are described in the following table. Parameter Description
Format The format type for the offline file import.
Format types are listed in the first column of the table in Data
formats for file import tasks (on page 31).
This is the only field displayed when you open the dialog box.
Once you select a Format, additional fields are displayed that allow
you to select the required file types.
• For additional information about required file types, refer to the
third column of the table in Data formats for file import tasks
(on page 31).
<file_type_1> The first file type required for the selected Format.
<file_type_2> ... <file_type_n>
Additional file types required for the selected Format.
Import Data dialog box for FireWall-1 or Provider-1 Configuration
If you select FireWall-1 Configuration or Provider-1 Configuration in the Format field of the Import Data dialog box, additional fields are displayed in the dialog box. These parameters are described in the following table.
Parameter Description
Modules List A comma-separated (or semicolon-separated) list of the names of
specific Enforcement Modules to import into Skybox View.
Rulebase The policy (rulebase) to import:
• Use active policy: If a statuses file (usually
install_statuses.c) is specified in Statuses file, the active policy as specified in the statuses file. Otherwise, the most recently edited policy as specified in the objects file.
• Use Specific: Type the name of a policy. Network Objects file
Rulebases file Global Network Objects file (Provider-1 only) Statuses file VSX Objects File
The locations of the configuration files required for the offline file import.
• For information about these files, see Importing Check Point
FireWall-1 configuration data (on page 53) or Importing Check Point Provider-1 CMA configuration data (on page 57).
Advanced file import tasks
Import – Advanced tasks import scan data or configuration files of any number of devices into a Skybox View model, where the files are located on the local machine. These tasks require a definition file – a text file that specifies, for each device, the data type to be imported, the path of the data file to be imported, and possibly some additional parameters. For information about the definition file, see
Definition file for advanced file import tasks (on page 37).