StorageCraft Recovery Environment
User Guide
StorageCraft™ Recovery Environment
Copyright (c) 2006 - 2011 StorageCraft Technology Corporation TM.
All rights reserved. This product and/or its use may be covered by one or more patents pending. Please visit www.storagecraft.com/legal for more information about StorageCraft Technology Corporation's (STC) intellectual property, trademarks, copyrights and any patents pending. StorageCraft Recovery Environment is provided by STC to licensee on an "as is" basis and "with all faults." STC specifically calls the licensee's attention to provisions of the End-User License Agreement ("License") that are intended to leave full responsibility and risk for the use or the results of use of StorageCraft Recovery Environment entirely with the licensee. These provisions include, but are not limited to, LIMITED WARRANTY, DISCLAIMER OF WARRANTIES and LIMITATION OF LIABILITY.
No part of this document may be reproduced in any means, electronic or mechanical, for any purpose, except as expressed in the accompanying License Agreement.
StorageCraft Technology Corporation
11850 S. Election Road, Suite 120
Draper, UT 84020
3 Contents
© 2006-2010 StorageCraft Technology Corporation
Table of Contents
Chapter 1: About the User Guide
5
Chapter 2: ShadowProtect Overview
6
... 6
Features and Components
2.1
... 8
Recovery Environment Usage Scenarios
2.2
Chapter 3: How ShadowProtect Works
10
... 11
Create a Backup Image
3.1
... 12
Restore a Backup Image
3.2
... 12
Backup Image Files
3.3
Chapter 4: Starting Recovery Environment
15
... 16
Requirements
4.1
... 16
Testing the Recovery Environment CD
4.2
Chapter 5: Understanding the User Interface
18
... 18
Menu Bar
5.1
... 20
Task Panel
5.2
... 21
Tabs
5.3
Chapter 6: Loading Drivers
24
Chapter 7: Using the Network Configuration Utility
25
Chapter 8: Creating a Backup Image File
27
... 28
Options
8.1
Chapter 9: Restoring a System Volume
32
... 34
Resuming a Restore Operation
9.1
... 35
HSR Volume Options
9.2
Chapter 10: Mounting a Backup Image File
40
... 41
Dismounting a Backup Image File
10.1
... 42
Backup Image File Mount Options
10.2
Chapter 11: Using Image Conversion Tool
43
Chapter 13: Using HIR
48
... 49
HIR Advanced Options
13.1
Chapter 14: Using Remote Management
51
Chapter 15: Other Operations
52
... 52
Verifying Backup Image Files
15.1
Chapter 16: Windows Boot Process
53
Chapter 17: Product Support
54
Chapter 18: Glossary
55
About the User Guide 5
Chapter 1: About the User Guide
Welcome to the StorageCraft Recovery Environment User Guide. This Guide describes using Recovery Environment to restore volume data. This Guide is divided into the following major sections:
Chapter 2: ShadowProtect Overview Chapter 3: How ShadowProtect Works Chapter 4: Starting Recovery Environment Chapter 5: Understanding the User Interface Chapter 6: Loading Drivers
Chapter 7: Using the Network Configuration Utility Chapter 8: Creating a Backup Image File
Chapter 9: Restoring a System Volume Chapter 10: Mounting a Backup Image File Chapter 11: Using Image Conversion Tool Chapter 12: Using the Boot Configuration Utility Chapter 13: Using HIR
Chapter 14: Using Remote Management Chapter 15: Other Operations
Chapter 16: Windows Boot Process Chapter 17: Product Support Chapter 18: Glossary
Chapter 19: End User License Agreement
Additional Information
For the latest information and resources:
The readme.txt file included with the StorageCraft Recovery Environment.
The StorageCraft technical support Web site at www.storagecraft.com/support.html This User Guide is also available in the ShadowProtect user interface from the Help menu. For a glossary of ShadowProtect terms and definitions, see Chapter 18: Glossary .
Documentation Conventions
This symbol designates Note or Warning text that provides important information about the configuration and/or use of ShadowProtect.
6 10 15 18 24 25 27 32 40 43 44 48 51 52 53 54 55 59 55
Chapter 2: ShadowProtect Overview
ShadowProtect provides robust and flexible disaster recovery by creating and managing backup image files. Each backup image file represents the exact state of your system at a given point-in-time. ShadowProtect provides tremendous advantages over traditional disaster recovery methods.
Table 1: Restoring a system volum e
Other Methods
ShadowProtect
1 Repair hardware if necessary 1 Repair hardware if necessary
2 Collect all necessary OS media 2 Boot from Recovery CD
3 Reload OS from CD-ROM 3 Restore entire system or selected files
4 Reboot 4 Reboot
5 Apply multiple service packs FULLY RESTORED IN MINUTES
6 Reboot (this could take several reboots) 7 Reload backup software from CD-ROM 8 Patch backup software to the latest support
level
9 Reboot
10 Load recovery tape and restore FULLY RESTORED IN HOURS
StorageCraft Recovery Environment is a critical component of the overall ShadowProtect disaster recovery solution. You should be aware of the following information before using Recovery Environment:
Features and Components Usage Scenarios
Features and Components
2.1
ShadowProtect consists of the following primary components:
Table 2: Shadow Protect com ponents
Component Features
ShadowProtect Console
A Windows-based disaster recovery environment that provides the following primary features. For more information about ShadowProtect Console, see the
StorageCraft ShadowProtect User Guide:
6
ShadowProtect Overview 7
New! VirtualBoot lets you create a VM from any backup image file that you can then boot in the VirtualBox Virtual Machine environment.
New! The Image Conversion Tool, formerly the Backup Image Tool, now provides the ability to convert backup image files into virtual file formats, including the VMWare VMDK format and the Microsoft VHD format.
New! Support for Windows 7 and Windows Server 2008 R2, including 64-bit support.
New! The Management View greatly simplifies the administration of ShadowProtect on multiple systems, including the ability to push the ShadowProtect Backup agent out to remote systems.
Microsoft Volume Shadow Copy Service (VSS) aware. Schedule live backups in the background while you work.
Backup to any accessible drive, including network storage (SAN, NAS, iSCSI), removable drives (USB, FireWire), and optical media (CD, DVD, Blu-Ray).
Verify backup images to ensure complete recovery.
An easy-to-use user interface that lets you quickly recover folders or files from a backup image.
Create compressed and encrypted backup image files for efficiency and security. Mount backup images for simple folder or file updates.
Restore your system to an exact point-in-time.
Restore images to different hardware or to virtual environments (P2P,P2V,V2P). View backup images for quick file and folder recovery.
Shrink Volume allows you to shrink an image file so you can restore to a smaller drive.
I/O throttling for each backup job.
Remotely manage system backup and recovery operations.
StorageCraft Recovery Environment
The ShadowProtect CD contains a bootable Windows environment for disaster recovery options without installing any software.
New! Resume on Interrupt lets you resume an interrupted restore operation from the point of interruption, rather than having to start the restore process over again.
New! The Image Conversion Tool, formerly the Backup Image Tool, now provides the ability to convert backup image files into virtual file formats, including the VMWare VMDK format and the Microsoft VHD format. New! HeadStart Restore lets you restore a volume while ShadowProtect continues to add Incremental backup images to the same backup image chain. This can reduce restore time from days or weeks to minutes or hours, even for very large volumes.
Access all the features of the ShadowProtect Console from a standalone disaster recovery environment.
Loads from the bootable ShadowProtect CD.
Create ExactState™ backup images without installing any software. If the system is unable to boot, ShadowProtect lets you back up the system before a destructive restore potentially destroys valuable data
Use Hardware Independent Restore (HIR) to rrestore backup image files to a different environment, either physical or virtual.
Network configuration tool to manage TCP/IP properties, domains and network resources.
Remotely recover your system and data
Perform a quick and simple bare metal system recovery.
ShadowProtect Backup Agent
The engine that creates and manages a system's point-in-time backup images. The Backup Agent also handles mounting of backup image files. You can manage the operation of the Backup Agent from the ShadowProtect Console.
To access the ShadowProtect Backup Agent, you must be a domain user with local administration rights.
ImageManager
ImageManager provides unprecedented control over your backup image files. It provides policy-driven services for managing backup image files, including:
Consolidation of Incremental backup image files into daily, weekly, and monthly consolidated image files that greatly reduce the number of files in an image chain.
Verification and re-verification of backup image files, including consolidated files.
Replication of backup image files to a local drive.
New! Purchase ImageManager Enterprise (IME) job licenses that let you extend replication support to off-site storage through LAN/WAN and FTP.
New! Purchase ImageManager Enterprise (IME) job licenses to use HeadStart Restore (HSR), which lets you restore a backup image while ShadowProtect continues to add Incremental backup images to the same backup image chain. In a world of multi-Terabyte storage, HSR lets you short-circuit the restore process, greatly limiting the down-time associated with hardware failure or migration tasks.
For more information about ImageManager features, see the StorageCraft
ShadowProtect ImageManager User Guide.
Recovery Environment Usage Scenarios
2.2
The following scenarios introduce several possible use cases for Recovery Environment:
Bare Metal Recovery
Problem: When a failure occurs, I need to be able to restore server, desktop and laptop volumes as quickly as possible to minimize user downtime. Manually re-installing operating systems and rebuilding user environments takes too much time.
ShadowProtect Overview 9
Solution: Use StorageCraft Recovery Environment to restore an entire system in minutes, and ShadowProtect restores the system to its exact state before the failure.
Bare Metal Recovery to a Different System
Problem: Due to hardware failure or other circumstances, I need to restore a system volume to partially (or completely) different hardware, or to a virtual environment.
Solution: In the StorageCraft Recovery Environment, use Hardware Independent Restore (HIR) to restore a system to different hardware, or a virtual environment. HIR supports any type of system restore (P2P, P2V, V2P and V2V). Additionally, VMWare provides support for StorageCraft Image Files in VMWare Workstation 6 and their Converter tool.
Server Migration using HeadStart Restore
Problem: You need to migrate a database server with 20TB of data to a new hardware platform, but you cannot afford to have the server offline for three days it takes to migrate the data to new hardware.
Solution: Keep the old server running, and generating incremental backups, while you begin a HeadStart Restore of the same backup image chain on the new hardware. Over time, the HSR catches up to the most current incremental from the old server, at which point you can take the old server down in off hours, apply the final incremental backup to the new server, and bring the new system on-line very quickly. You can even migrate the operating system volume by doing a Hardware Independent Restore (HIR) to make sure the migrated OS boots properly on the new server hardware.
Standby Server using HeadStart Restore
Problem: You want to have a stand-by server that can take over should your primary server fail, but you can't afford the high-priced server mirroring technology.
Solution: Your production server generates continuous incremental backups. Configure an HSR solution to automatically apply those incremental backup images to a secondary "standby" server. If your production server fails, use HSR to finalize to the last incremental to the standby server (a matter of minutes), then bring it on-line as a replacement for the failed production server.
Chapter 3: How ShadowProtect Works
ShadowProtect provides robust and flexible disaster recovery by creating and managing backup image files. Each backup image file represents the exact state of your system at a given point-in-time.
Shadow Protect Backup and Restore - How it w orks
There are two primary tasks related to data recovery with ShadowProtect: Create a Backup Image .
Restore a Backup Image
11
How ShadowProtect Works 11
Create a Backup Image
3.1
Creating a ShadowProtect backup image involves two key processes:
Create a Virtual Volume
Using Microsoft VolSnap and VSS (with Windows Server 2003, Windows XP, or later), ShadowProtect creates a point-in-time snapshot of the volume you want to backup. The entire process of taking a snapshot of a volume and creating a virtual volume takes only seconds and does not interfere with system operation.
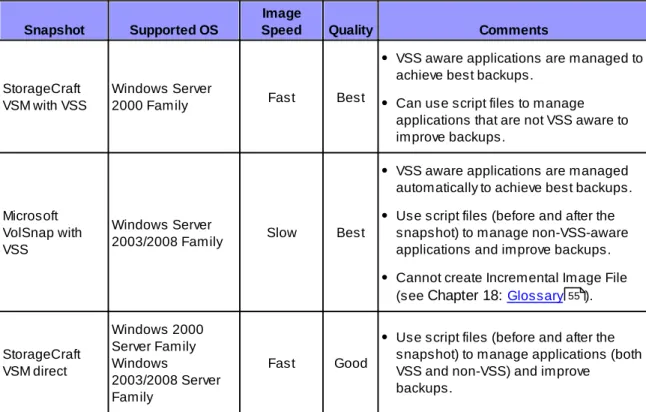
Table 3: Snapshot m ethods supported by Shadow Protect
Snapshot Supported OS
Image
Speed Quality Comments
StorageCraft VSM with VSS
Windows Server
2000 Family Fast Best
VSS aware applications are managed to achieve best backups.
Can use script files to manage applications that are not VSS aware to improve backups.
Microsoft VolSnap with VSS
Windows Server
2003/2008 Family Slow Best
VSS aware applications are managed automatically to achieve best backups. Use script files (before and after the snapshot) to manage non-VSS-aware applications and improve backups. Cannot create Incremental Image File (see Chapter 18: Glossary ).
StorageCraft VSM direct Windows 2000 Server Family Windows 2003/2008 Server Family Fast Good
Use script files (before and after the snapshot) to manage applications (both VSS and non-VSS) and improve
backups.
Additionally, ShadowProtect provides a Backup Scheduler that lets you configure automated backup jobs for protected volumes. You can schedule Full Image, Incremental Images (as often as every 15 minutes), and manage the retention of backup Image Sets. The ShadowProtect Backup Image Tool simplifies image management by letting you manage existing image files, including consolidating files in an Image Set, modifying password encryption and compression, and merging or splitting image files.
Capture the Virtual Volume
To backup the volume, ShadowProtect replicates the virtual volume to create a backup image file. A
back up image file is a sector-by-sector representation of the volume at the time the volume snapshot was taken. For more information about backup image files, see Backup Image Files .
ShadowProtect writes the backup image file to the designated storage media. Options include network storage (SAN, iSCSI, NAS, etc.), removable storage (USB / FireWire), and optical storage (CD, DVD, Blu-ray). The amount of time it takes to write the backup image file depends upon the system hardware and the size of the image file. For information about configuring and creating backup image files, see "Creating Backup Image Files" in the ShadowProtect User Guide.
55
Restore a Backup Image
3.2
Once you have created a backup image, you can use a ShadowProtect backup image to restore data in two different ways:
Recover individual files and folders
Use the ShadowProtect Mount utility to mount the backup image file as a volume using either a drive letter or a mount point. The Mount utility can efficiently mount hundreds of backup images
simultaneously, if desired. Furthermore, since the mounted backup image files preserve the Windows volume properties, users can share and access the backup image file for emergency access to backup image file data, including modifying and saving changes to the backup image file as an incremental backup file.
For more information about mounting backup image files to recover data, see "Mounting Backup Image Files" in the ShadowProtect User Guide.
Restore an entire volume
Use the ShadowProtect Restore Wizard to restore an entire volume from a backup image file. You can restore system volumes (that contains the system's operating system) using the StorageCraft
Recovery Environment, or restore non-system volumes using either Recovery Environment or while running ShadowProtect Console in Windows. For more information about recovering volumes, see "Restoring Backup Image Files" in the ShadowProtect User Guide.
Backup Image Files
3.3
A ShadowProtect backup image file is a point-in-time representation of a computer volume. It is not a standard file copy of the volume, but rather a sector-by-sector duplicate of the volume. Because of this, you can mount a backup image file (using the ShadowProtect Mount utility) and view its contents as if it were a regular volume. In the event that you need to recover data, you can recover specific files and folders from the image or you may recover the entire volume to the exact point-in-time that the backup image was taken.
ShadowProtect uses the following types of backup image files to provide a complete disaster recovery solution.
Table 4: Types of Backup Im age Files
Backup Images Description
Full (.spf) A stand-alone image file that represents a disk volume at a specific point-in-time. Full backup image files do not rely on any other files.
Incremental (.spi)
An image file that contains volume changes relative to another backup image file. You can create Incremental backup image files relative to Full backup images or other Incremental backup images.
ShadowProtect also creates an Incremental image file when an existing image file is mounted as a read/write volume and modified. Incremental backup image files let ShadowProtect offer multiple volume backup strategies, including Differential and Incremental backup options. See Chapter 18: Glossary 55 for information about
How ShadowProtect Works 13
these backup strategies.
Spanned (.sp#)
Image files that belong to a spanned image set. Spanned image sets are made by breaking a backup image file into pieces for increased portability (for example, to save the image file on multiple CDs). The actual Spanned image file replaces the pound sign (#) with a number that indicates the position of the file within the spanned image set.
ImageManager (-cd.spi, -cw.spi, -cm.spi)
Image files that have been automatically collapsed by ShadowProtect ImageManager. The suffix before the file extension indicates if the file is a daily, weekly or monthly collapsed backup files.
.spk A password key file used to encrypt backup image files.
File Naming Conventions
ShadowProtect backup image files use the following naming convention to help you identify the file and its relationship to, and dependencies on, other backup image files.
<Volume Identifier>-b<base-seq>-d<diff-seq>-i<inc-seq>.<extension> The ShadowProtect naming convention uses the following variable components:
volume identifier: Identifies the volume that the backup image file represents.
base-seq: The Base Image File sequence number. This either identifies the sequence number of this file, or identifies the Base Image File upon which this file is dependent.
diff-seq: The Differential backup sequence number. This either identifies the sequence number of this file, or identifies the Differential Image File upon which this file is dependent.
inc-seq: The Incremental backup sequence number. This either identifies the sequence number of this file, or identifies the Incremental Image File upon which this file is dependent.
extension: The file extension, which identifies if the file is a Full, Incremental, or Spanned backup image file.
Table 5: Exam ples of Backup Im age File Nam es w ith a Description of the File
File Type Extension Description
C_Vol-b001.spf Full image of the C:\ volume.
C_Vol-b001-d001-i000.spi* or
C_Vol-b001.d001.spi
Differential image of the C:\ volume with a dependency on the full backup image file C_Vol-b001.spf
This type of back up is not available in ShadowProtect IT Edition.
or
C_Vol-b001-i001.spi
full backup image file C_Vol-b001.spf
The only time ShadowProtect IT Edition creates a .spi file is when you mount a read/write back up image and save changes made to that volume. Upon dismounting that volume, the changes will be saved out to an incremental file.
C_Vol-b001-d001.i001. spi
Incremental backup image file of the C:\ volume with a
dependency on the differential backup image file C_Vol-b001-d001.i000 which in turn has a dependency on C_Vol-b001. spi.
This type of back up is not available in ShadowProtect IT Edition.
Note: Backup image file names that have a “-d000” or “-i000” segment use these name segments only as place holders, and indicate that a differential backup image or an incremental backup image are not part of the image and the backup image file has no dependency on a previous differential or incremental backup image file.
File Dependencies
By examining the name of a backup file image, ShadowProtect users can tell identify the files that it is dependent on. However, it is not possible to determine if other backup image files are dependent on this file. Because of this, it is very important to use the Backup Image Tool to review dependencies prior to moving, modifying or deleting backup images.
WARNING: Deleting a backup image file on which other files depend renders the dependent backup image files useless. You cannot browse or restore files contained by these dependent backup image files.
Note: Deleting a full image file from an active backup image job causes ShadowProtect to create a new Full image during the next scheduled backup and start a new backup image set.
Starting Recovery Environment 15
Chapter 4: Starting Recovery Environment
Recovery Environment loads automatically when you boot from the ShadowProtect CD. Before you run ShadowProtect, make sure your system meets the minimum hardware and software requirements (see Requirements ).
To load the StorageCraft Recovery Environment
1. If the backup image you wish to restore is located on a USB drive, attach that to the computer. 2. Insert the ShadowProtect CD into the computer.
3. Restart the computer.
Note: You might need to modify the boot options to have the computer boot to a CD drive. The ShadowProtect CD Boot Options include the following options:
[1] Start Recommended Recovery Environment: Option 1 is the default boot option that contains commonly distributed drivers. It uses Windows 7 PE, which lets you dynamically load drivers and hot plug disk devices even after Recovery Environment has started.
[2] Start Legacy Recovery Environment: Option 2 contains all drivers in Option 1 along with other less commonly distributed drivers. Option 2 uses Windows Server 2003. Select Option 2 if you know Option 1 does not provide the necessary storage or network drivers, or you are unable to dynamically load the drivers from Option 1.
[3] Boot from Hard Disk: Option 3 boots the system from the primary hard drive. [4] Reboot: Option 4 restarts the system.
Because of the extended driver options and operating system, Option 2 takes significantly
longer to boot into Recovery Environment than Option 1. Additionally, Option 2 requires that the ShadowProtect CD remain loaded at all times. You cannot remove the ShadowProtect CD to restore a backup image file.
4. In the Network Support dialog box, click OK to start networking.
For information about using the Network Configuration utility, see Chapter 7: Using the Network Configuration Utility .
The Netw ork Support Dialog Box
Once Recovery Environment loads, you can perform ShadowProtect tasks as needed.
Requirements
4.1
ShadowProtect Recovery Environment has the following minimum hardware requirements:
Hardware Recovery Environment (RE)
CPU
Windows 2008-based RE: 1 GHz or faster.
Windows 2008-based RE (Japan only): 1.4 GHz (x64 processor) or 1.3GHz (Dual Core).
Windows 2003-based RE: 550 MHz or faster. Supports up to four processors per system.
Memory
Windows 2008-based RE: 512 MB minimum. Windows 2003-based RE: 256 MB minimum. Hard Drive space N/A
CD-ROM or DVD drive Required.
Monitor VGA or higher resolution.
Testing the Recovery Environment CD
4.2
You should test the StorageCraft Recovery Environment to ensure that it runs properly on your computer. To do this, boot your computer with the ShadowProtect CD.
If the StorageCraft Recovery Environment boots and runs as expected, you are ready to perform ShadowProtect operations from Recovery Environment in the event of a hardware failure, system
Starting Recovery Environment 17
volume failure, or to create a cold backup.
If the StorageCraft Recovery Environment does not boot or run as expected, investigate the following issues:
You do not have the necessary network interface card (NIC) drivers to access the network. You can dynamically load NIC drivers from within Recovery Environment (Load Drivers in the Tools menu).
You do not have the necessary storage drivers to access a storage device on the computer. To resolve this, do one of the following:
Load storage drivers during boot time
1. When prompted during Recovery Environment boot sequence, press F6 to add storage drivers.
2. Browse to the appropriate storage driver files.
Load storage drivers after loading Recovery Environment 1. In the Tools menu, select Load Drivers.
2. Browse to the appropriate storage driver files.
Keep necessary storage drivers on a diskette that is available in the event you need to load Recovery Environment.
If you find it necessary to load drivers for Recovery Environment, contact StorageCraft Technical Support or send an e-mail to [email protected] so StorageCraft can include these drivers in future releases of ShadowProtect.
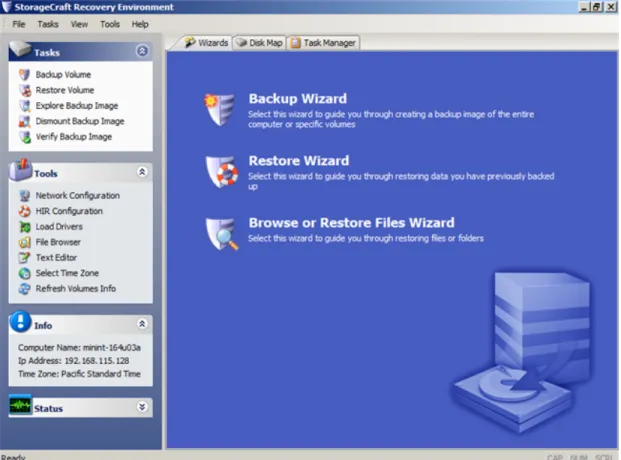
Chapter 5: Understanding the User Interface
Recovery Environm ent Main Screen
Menu Bar
5.1
The Recovery Environment menu bar provides access to following menus:
Table 5: Shadow Protect File Menu Options
Menu Description Options
File Access application-level options.
Exit: Close the Recovery Environment.
Tasks
Access ShadowProtect wizards.
Backup Volumes: Launches the Backup Wizard (see Chapter 8: Creating a Backup Image File ).
Restore Volume: Launches the Restore Wizard (see Chapter 9: Restoring a System Volume ).
Explore Backup Image: Launches the Explore Backup Image Wizard (see Chapter 10: Mounting a Backup Image File ).
Dismount Backup Image: Launches the Backup Image Dismount Wizard (see Section 10.1: Dismounting a Backup Image File ).
27
32
40
Understanding the User Interface 19
Image Conversion Tool: Launches the Image Conversion Tool Wizard (see Chapter 11: Using Image Conversion Tool ).
Verify Image: Launches the Verify Image Wizard (see Section 15.1: Verifying Backup Image Files ).
View
Create custom toolbars and manage toolbar visibility.
Toolbars: Opens the Customize Tool Bar dialog box, where you can create customized Recovery Environment tool bars.
Status Bar: Toggles a status bar at the bottom of the UI that provides application and environment status
information.
Task Panel: Toggles the Task Panel (see Task Panel ).
Show Detail Tabs: Toggles the Details tab for each active backup or restore operation.
Tools
Access Recovery Environment tools.
Network Configuration: Launches the Network
Configuration utility, where you can configure a computer's network access settings.
HIR Configuration: Launches the Hardware Independent Restore (HIR) utility, where you can restore a backup image to a different environment from which it was created.
Load Drivers: Opens the Load Drivers dialog box, where you can configure storage drivers for use in Recovery Environment.
File Browser: A simple file browser that lets you browse files and folders of a backup image file.
Text Editor: A simple text editor.
Boot Configuration Utility: Launches the Boot Configuration Utility, where you can manage the boot configuration repair process for those situations where the automated process does not work (see Chapter 12: Using the Boot Configuration Utility ).
Partition Table Editor: A simple partition table editor. UltraVNC Service: Launches the Remote Management utility, where you can configure remote access to systems running Recovery Environment.
Select Your Time Zone: Launches the Time Zone utility, where you can adjust the system's time zone information. Display Settings: Opens the Display Settings dialog box, where you can configure the resolution and color mode used to display the Recovery Environment UI.
43
52
20
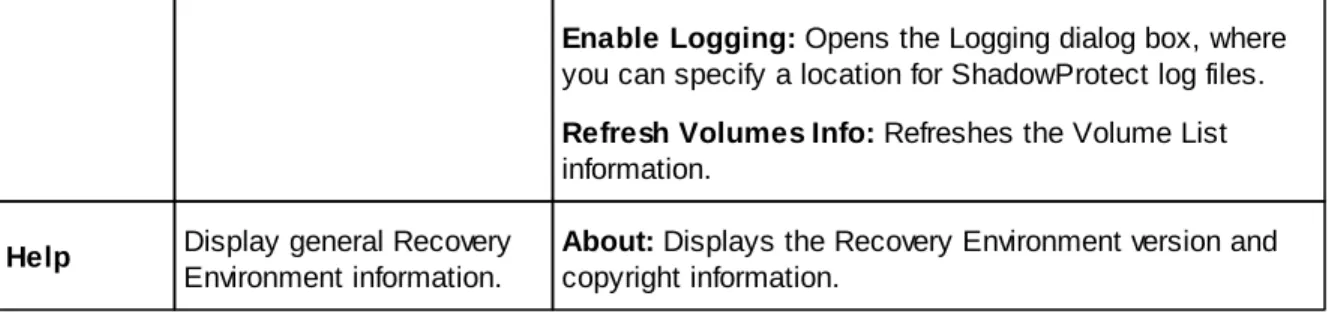
Enable Logging: Opens the Logging dialog box, where you can specify a location for ShadowProtect log files. Refresh Volumes Info: Refreshes the Volume List information.
Help Display general Recovery Environment information.
About: Displays the Recovery Environment version and copyright information.
Task Panel
5.2
The ShadowProtect Task panel provides left-side access to Recovery Environment tasks and tools. The Task panel is organized into the following categories. You can collapse and expand each category as needed.
Table 6: Shadow Protect Task Panel Options
Menu Description Options
Tasks
Access ShadowProtect wizards.
Backup Volume: Launches the Backup Wizard (see Chapter 8: Creating a Backup Image File ).
Restore Volume: Launches the Restore Wizard (see Chapter 9: Recovering a System Volume ).
Explore Backup Image: Launches the Explore Backup Image Wizard (see Chapter 10: Mounting a Backup Image File ).
Dismount Backup Image: Launches the Backup Image Dismount Wizard (see Section 10.1: Dismounting a Backup Image File ).
Verify Backup Image: Launches the Verify Image Wizard (see Section 15.2: Verifying Backup Image Files ).
Tools
Access Recovery Environment tools.
Network Configuration: Launches the Network
Configuration utility, where you can configure a computer's network access settings.
HIR Configuration: Launches the Hardware Independent Restore (HIR) utility, where you can restore a backup image to a different environment from which it was created.
Load Drivers: Opens the Load Drivers dialog box, where you can configure storage drivers for use in Recovery Environment.
File Browser: A simple file browser that lets you browse files and folders of a backup image file.
Text Editor: A simple text editor.
Select Your Time Zone: Launches the Time Zone utility,
27
32
40
41
Understanding the User Interface 21
where you can adjust the system's time zone information. Refresh Volumes Info: Refreshes the Volume List in ShadowProtect.
Info Display system
information.
A quick reference to basic system information, including Computer Name, IP Address and Time Zone information.
Status
Displays current ShadowProtect task status.
Queued Tasks: The number of queued tasks waiting to run. Running Tasks: The number of tasks currently running.
Tabs
5.3
The ShadowProtect tabs provide access to primary features and application status:
Wizards: Provides access to the three Wizards (Backup, Restore, and Explore Backup Image) that guide users through the most common Recovery Environment tasks.
Recovery Environm ent Wizards Tab
Disk Map: Provides a graphical view of the system drives. The Disk Map tab lets you access the Backup and Restore Wizards, and change partition creation policies for the selected drive. Additionally, in Recovery Environment you can also run Check Disk, format a drive and edit the selected disk's boot.ini.
Recovery Environm ent Disk Map Tab
Task Manager: Displays the status of an active task. View task details by clicking Show Details, or abort an active task by clicking Cancel.
Note: If you abort a restore operation, you can restart it again if necessary (see Section 9.1: Resuming a Restore Operation ).
Recovery Environm ent Task Manager Tab
Task Details: Displays status information about a currently active task (Volume Backup, Volume Restore, Image Maintenance). You can control the display of these tabs by clicking Show Details / Hide Details in the Task Manager tab. For example:
Understanding the User Interface 23
Chapter 6: Loading Drivers
Recovery Environment lets you dynamically load storage or network drivers.
The ability to dynamically load drivers is available only if you loaded Recovery Environment using Option 1 (see Chapter 4: Starting Recovery Environment ).
To dynamically load a driver
1. In Recovery Environment, click Load Drivers in the Tools menu.
Loading Drivers from the Recovery Environm ent
2. Click Add Path to browse to the INF files you need.
Click-and-drag the drivers to move them up and down the list in order to establish priority. 3. Select the proper driver, then click Load.
Recovery Environment loads the driver and automatically provides access to that device.
Using the Network Configuration Utility 25
Chapter 7: Using the Network Configuration Utility
The Network Configuration Utility (NCU) let's you configure a computer's Network Interface Cards (NICs), TCP/IP settings, and domain information for use in Recovery Environment.
Netw ork Configuration Utility To use the Network Configuration Utility 1. Open the Network Configuration Utility.
You can load the NCU in the following ways:
While booting Recovery Environment: Click OK when asked to start networking (see Chapter 4: Starting Recovery Environment ).
After loading Recovery Environment: Click Network Configuration in the Tools menu. 2. (Optional) Select an alternate UI language from the Language dropdown menu.
3. Select the appropriate Ethernet adapter from the dropdown list.
If necessary, select the adapter's preferred link speed and duplex mode. 4. Modify the adapter settings in the NCU interface. Available settings include:
IP Addresses: Select either Dynamic or Static IP address settings:
Obtain an IP address automatically: Specify DHCP settings, including Releasing and Renewing DHCP leases.
Use the following IP address: Specify IP address, Subnet mask, and Default gateway. You can specify multiple IP addresses and gateways, if necessary.
DNS and WINS Servers: Select either Dynamic or Static DNS and WINS configurations. When using a static configuration, click More to specify one or more IP addresses for the DNS or WINS environment.
Network Identification: Specify a computer name, Workgroup, and Primary DNS suffix. To do this, type a value in the appropriate field, then click Set. The Full Computer Name field displays the current computer name.
5. Click Network Drives to configure drive mappings and file sharing.
Brow se Netw ork and Map Drives
You can configure drive mappings manually (under Map Network Drive), or search for network resources by Domain or Computer Name (Browse Network). To browse the network, do the following:
a. Enter a domain or computer name in the field, then click Add .
The NCU browses the network and locates all resources in the specified Domain or Computer, displaying them in the Resources pane.
b. Click Expand All to view all available resources in the specified Domain or Computer. c. Select a resource to automatically populate the Network Path field in Map Network Drive. d. (Optional) Click Clear All to remove all network resources from the Resources pane.
Creating a Backup Image File 27
Chapter 8: Creating a Backup Image File
The ShadowProtect Backup Wizard guides you through the process of creating a backup of an entire system, or a specific volume on a system. The process is the same whether you are making a Hot Backup from Windows, or a Cold Backup from the StorageCraft Recovery Environment. For more information about each of these options, see Section 2.1: Features and Components . To create a backup image file
1. Start the ShadowProtect Console (see Chapter 4: Starting Recovery Environment ). 2. Open the Backup Wizard by doing one of the following:
In the Wizards tab, click Backup Wizard. In the Tasks menu, click Backup Volume.
3. In the Volumes to Back Up page, select the volumes to backup, then click Next. To backup the entire system, select all volumes.
4. In the Backup Type page, select the type of backup to perform, then click Next. Perform a Full Backup: Makes a full backup image file for the selected volumes.
Perform a Differential Backup: Makes a backup of volume changes since the last Full Backup. Note: The ability to make an Incremental backup is available only in ShadowProtect Server
Edition and ShadowProtect Desktop Edition.
5. In the Backup Name and Destination page, specify where you want to store the backup image file, then click Next.
a. Select whether you want to store the backup image file on a local or network directory, or an optical storage medium (CD/DVD/Blu-ray).
b. Browse to, or enter, the path to the location.
c. (Optional) Right-click a file name, then select Rename to change the name of the backup image file.
6. In the Options page, select the backup image file options, then click Next.
The Options page lets you set file compression, security (password and encryption), image file size (splitting), and a backup comment. For more information about each of these options, see Section 8.1: Options .
7. In the Wizard Summary page, review the backup image file configuration, then click Finish to create the backup image file.
You can monitor the progress of the backup in the Task Manager tab by clicking the Details button.
6
32
Options
8.1
The following options let you control how ShadowProtect creates a backup image file: Backup Image File Storage Location
File Compression
Backup Image File Security Splitting Backup Image Files Backup Comments
Advanced Options
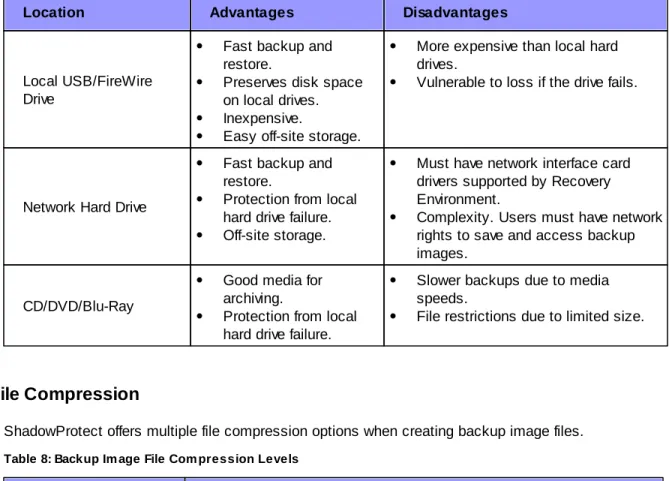
Backup Image File Storage Location
ShadowProtect lets you store backup image files on any disk device, including hard drives,
removeable USB/FireWire drives, network drives and NAS (Network Attached Storage) devices. You can also store backup images to optical media such as CDs, DVDs, or Blu-Ray discs.
Note: If you select a destination that does not have enough disk space to save the backup image, the backup job fails due to lack of destination storage space. ShadowProtect notes the reason for the failure in its log file.
Table 7: Advantages and Disadvantages for Various Storage Locations
Location Advantages Disadvantages
Local Hard Drive
Fast backup and restore.
Inexpensive.
Consumes local disk space. Vulnerable to loss if the drive fails.
28 29 29 30 30 30
Creating a Backup Image File 29
Location Advantages Disadvantages
Local USB/FireWire Drive
Fast backup and restore.
Preserves disk space on local drives. Inexpensive.
Easy off-site storage.
More expensive than local hard drives.
Vulnerable to loss if the drive fails.
Network Hard Drive
Fast backup and restore.
Protection from local hard drive failure. Off-site storage.
Must have network interface card drivers supported by Recovery Environment.
Complexity. Users must have network rights to save and access backup images.
CD/DVD/Blu-Ray
Good media for archiving.
Protection from local hard drive failure.
Slower backups due to media speeds.
File restrictions due to limited size.
File Compression
ShadowProtect offers multiple file compression options when creating backup image files.
Table 8: Backup Im age File Com pression Levels
Compression Level Description
None No file compression. This option provides faster backup where disk space is not an issue.
Standard Compresses data by about 40% on average. This option provides a balance between backup speed and disk space consumption.
High
Compresses data by about 50% on average. This option requires the most time and system resources to complete a backup, but is useful when disk space is limited.
Backup Image File Security
ShadowProtect lets you encrypt and password protect backup image files. This is particularly useful when storing backup image files on a network or off-site. To mount or restore a protected backup image file, you must provide the correct password. If you do not enter the correct password, or you forget the password, you cannot access the backup image file. Make sure the password is stored in a secure location. StorageCraft cannot bypass the encryption on a backup image files.
You may select from three methods when encrypting a backup image file. RC 4 128 bit (Fast): Faster but less secure than AES 128-bit.
AES 128 bit (More Secure): Faster but less secure than AES 256=bit. AES 256 bit (Most Secure): Slowest but most secure security option.
In addition to bit strength, the password used to secure the backup image file can affect security. Use the following password guidelines to ensure the best backup image file security:
At least eight characters
Random mixture of upper and lower case letters, characters and numbers. Do not use words found in the dictionary.
Change passwords regularly, or if you suspect your password has been compromised. Note: ShadowProtect passwords are case-sensitive and support alphanumeric characters.
Splitting Backup Image Files
ShadowProtect lets you split backup image files into multiple smaller image files, if desired. Splitting files lets you more easily move backup image files onto fixed length media such as CD or DVD. You can split backup image files when creating them (either manually or during a scheduled backup job), or after the fact with the Backup Image Utility (see Backup Image Tool ).
Note: A backup image file that has been split into multiple files is known as a Spanned image file. Spanned image files use a special file extension to indicate they are part of a file set (see Section 3.3: Backup Image Files ).
Backup Comments
You can attach backup comments to a backup image file. These comments are available for review when mounting or restoring the backup image file at a later date. By default, the time and date stamp are added as backup comments.
Advanced Options
Advanced backup image file options are available by clicking Advanced in the Options page of the Backup Wizard (see Chapter 8: Creating a Backup Image File ).
Note: StorageCraft recommends using the default advanced option settings unless you fully understand the impact of changing these features.
Lock Source Volume
Default: OffOn: ShadowProtect does not use snapshot technology to backup the volume. Instead it attempts to gain exclusive access to the volume. If it is unable to gain exclusive access, the backup fails. Off: ShadowProtect uses snapshot technology to backup the volume so that it does not need to lock volume access. You must use snapshot technology (Lock Source Volume = Off) to backup a system volume.
If snapshot technology is not available in the Windows operating system you want to backup, you
43
12
Creating a Backup Image File 31
must set Lock Source Volume = On or run ShadowProtect from the StorageCraft Recovery Environment. When running ShadowProtect from Recovery Environment, ShadowProtect automatically gets exclusive access to volumes, including the system volume.
Include Free Space
Default: OffOn: Backs up all sectors on the volume, including those in the volumes free space. Off: Backs up only sectors marked as currently containing data.
IO Throttle
Default: 100Specifies, as a percentage, how much of the system's I/O subsystem you want ShadowProtect to use. To change this value, click-and-drag the slider control to the desired setting.
Enable Write Caching
Default: OffOn: ShadowProtect uses file caching when writing the backup image file, which might slow down the imaging process.
Chapter 9: Restoring a System Volume
The primary purpose of Recovery Environment is to let you restore a system that cannot boot on its own. The Restore Wizard guides you through the process of restoring a system volume. Recovery Environment offers two ways to manage the restore of a system volume:
Finalized Restore: The finalized restore operation restores a system volume from a selected backup image file and prepares the volume for use in a single operation.
HeadStart Restore: HeadStart Restore (HSR) lets you break up the volume restore process into multiple stages. Doing this is particularly useful for large volumes where the volume restore process can take days. HSR lets you start the restoration process before a problem occurs. Then, when a restore is needed, you can finish restoring the latest Incrementals and finalize the restoration for use. Instead of days of downtime, you have just a few hours.
Regardless of the type of restore you want to perform, the initial configuration of a restore operation is nearly identical.
To restore a system volume 1. Load Recovery Environment.
For more information, see Chapter 4: Starting Recovery Environment . If you need to use Remote Management, load the UltraVNC Server. For more information, see Chapter 14: Using Remote Management .
2. In Recovery Environment, select Tasks > Restore Volume to launch the Restore Wizard. You can also select Restore Volume in the left-side Navigation panel or select Restore Wizard in the Wizards tab.
3. On the Restore Type page, select Restore, then click Next.
4. On the Backup Image to Restore page, browse to the backup image that you want to restore, then click Next.
If the backup image is encrypted, you must specify the appropriate password to access the backup image file.
The Backup Image to Restore page displays information about the selected backup image. 5. On the Backup Image Dependencies page, select the backup image file (the specific point-in-time)
that you want to restore, then click Next.
The left pane displays all backup image files in the previously selected image set. Select a backup image file to display information about that file in the right pane.
6. On the Restore Destination page, select the hard disk where you want to restore the system volume, then click Next.
7. On the Finalization Options page, specify whether to finalize the restored volume for use, then click Next.
Finalize the volume at the end of this restore
Select this option to perform a Standard restore operation, where the restored volume is ready for use when the restore operation completes. Do not select this option to perform a HeadStart Restore.
Generate a .HSR file to Note: This option is available only for HSR operations.
15
Restoring a System Volume 33
use in a future finalization
(Optional) When selected, the Restore Wizard generates an HSR file, at the location you specify, that contains metadata about the HSR volume. With this file, you can finalize the HSR volume without accessing the source backup image files.
8. (Conditional) On the Specify the Restoration Options page, select the boot parameters you want to apply to the restored volume, then click Next.
Recovery Environment displays this page only if you are finalizing the volume.
Set partition active Configures the restored volume as the active partition in the system (the drive the machine boots from).
Restore MBR Restore the master boot record (MBR) as part of the volume restore job. The master boot record is stored in the first sector of the first physical hard drive, and contains the master boot program and partition table. The master boot program uses the partition table to determine the active partition, then starts the boot program from the boot sector of the active partition. When selected, you have the following MBR restore options:
Restore MBR from the image file: Restores the MBR from the backup image file.
Restore original Windows MBR: Restores the default MBR for the version of Windows you are restoring.
Restore disk signature: Restores the original hard drive physical disk signature. Windows Server 2003, Windows 2000 Advanced Server, and Windows NT Server 4.0 Enterprise Edition (SP3 and later) require disk signatures to use the hard drive.
Restore Disk Hidden Track
Restores the first 63 sectors of a drive. Some boot loader applications require this for the system to boot.
Use Hardware Independent Restore
Instructs Recovery Environment to launch the Hardware Independent Restore (HIR) utility when finalizing the volume for use so you can configure the restore operation to properly interact with the hardware where you want to restore the volume.
For more information, see Chapter 13: Using HIR . 9. On the Summary page, review the details of the restore operation, then click Finish.
Recovery Environment begins the restore operation and opens the Task Manager so you can view its progress. Once the restore operation completes, you have the following options, depending on the type of restore operation:
Finalized Restore: Optionally, use the Boot Configuration Utility to ensure that the newly restored system volume is "bootable" (see Chapter 12: Boot Configuration Utility ). You can now reboot the system to the restored system volume.
HeadStart Restore: Because the volume is not finalized, an HSR volume is not available to users or applications, but you can continue to restore additional Incremental images to the HSR volume. When ready, you can Finalize the HSR volume to make it ready for use. At this point, the HSR volume becomes a standard system volume, and you can have the same post-restore options as described above for a Standard Restore.
48
Resuming a Restore Operation
9.1
If a restore operation is interrupted for any reason, the Restore Wizard lets you resume the interrupted restore operation.
To resume a restore operation 1. Load Recovery Environment.
For more information, see Chapter 4: Starting Recovery Environment . If you need to use Remote Management, load the UltraVNC Server. For more information, see Chapter 14: Using Remote Management .
2. In Recovery Environment, select Tasks > Restore Volume to launch the Restore Wizard. You can also select Restore Volume in the left-side Navigation panel or select Restore Wizard in the Wizards tab.
3. On the Restore Type page, select Resume Aborted Restore, then click Next.
4. On the Restore Destination page, select the hard disk where you previously started the restore operation, then click Next.
5. On the Backup Image to Restore page, browse to the backup image that you want to resume restoring, then click Next.
If the backup image is encrypted, you must specify the appropriate password to access the backup image file. The Backup Image to Restore page displays information about the selected backup image.
6. On the Finalization Options page, specify whether to finalize the restored volume for use, then click Next.
Finalize the volume at the end of this restore
Select this option to perform a standard volume restore, where the restored volume is ready for use when the restore operation completes. Do not select this option to perform a HeadStart Restore.
Generate a .HSR file to use in a future
finalization
Note: This option is available only for HSR restore operations. (Optional) When selected, the Restore Wizard generates an HSR file, at the location you specify, as part of the HSR restore operation that contains metadata about the HSR volume. With this file, you can finalize the HSR volume without accessing the source backup image files.
7. (Conditional) On the Specify the Restoration Options page, select the boot parameters you want to apply to the restored volume, then click Next.
Recovery Environment displays this page only if you are finalizing the volume as part of the restore operation.
Set partition active Configures the restored volume as the active partition in the system (the drive the machine boots from).
Restore MBR Restore the master boot record (MBR) as part of the volume restore job.
15
Restoring a System Volume 35
The master boot record is stored in the first sector of the first physical hard drive, and contains the master boot program and partition table. The master boot program uses the partition table to determine the active partition, then starts the boot program from the boot sector of the active partition. When selected, you have the following MBR restore options:
Restore MBR from the image file: Restores the MBR from the backup image file.
Restore original Windows MBR: Restores the default MBR for the version of Windows you are restoring.
Restore disk signature: Restores the original hard drive physical disk signature. Windows Server 2003, Windows 2000 Advanced Server, and Windows NT Server 4.0 Enterprise Edition (SP3 and later) require disk signatures to use the hard drive.
Restore Disk Hidden Track
Restores the first 63 sectors of a drive. Some boot loader applications require this for the system to boot.
Use Hardware Independent Restore
Instructs Recovery Environment to launch the Hardware Independent Restore (HIR) utility when finalizing the volume for use so you can configure the restore operation to properly interact with the hardware where you want to restore the volume.
For more information, see Chapter 13: Using HIR . 8. On the Summary page, review the details of the restore operation, then click Finish.
Recovery Environment resumes the restore operation using your configuration. Once the restore operation completes, you have the following options, depending on the type of restore operation: Finalized Restore: Optionally, use the Boot Configuration Utility to ensure that the newly restored system volume is "bootable" (see Chapter 12: Boot Configuration Utility ). You can now reboot the system to the restored system volume.
HeadStart Restore: Because the volume is not finalized, an HSR volume is not available to users or applications, but you can continue to restore additional Incremental images to the HSR volume. When ready, you can Finalize the HSR volume to make it ready for use. At this point, the HSR volume becomes a standard system volume, and you can have the same post-restore options as described above for a Standard Restore.
HSR Volume Options
9.2
Once you have created an HSR volume (see Recovering a System Volume ), you can either add Incremental images to the volume or finalize the volume for use.
Adding Incrementals to an HSR Volume Finalizing an HSR Volume
Adding Incrementals to an HSR Volume
If you have an HSR volume that is not finalized, you can add Incremental images to the HSR volume. Consider the following when adding files to an HSR volume:
48
44
32
35
You can only add Incremental images that are "descendants" of the last Incremental image file in the HSR volume. Descendant image files are newer Incremental images that are part of the same Image Set used to create the HSR volume.
If you skip Incremental images in the Image Set, Recovery Environment automatically applies all Incremental images necessary to add the selected Incremental image to the HSR volume. To add incremental images to an existing HSR volume
1. Load Recovery Environment.
For more information, see Chapter 4: Starting Recovery Environment . If you need to use Remote Management, load the UltraVNC Server. For more information, see Chapter 14: Using Remote Management .
2. In Recovery Environment, select Tasks > Restore Volume to launch the Restore Wizard. You can also select Restore Volume in the left-side Navigation panel or select Restore Wizard in the Wizards tab.
3. On the Restore Type page, select Restore Subsequent Incrementals, then click Next. 4. On the Restore Destination page, select the hard disk where you previously created the HSR
volume, then click Next.
5. On the Backup Image to Restore page, select the Incremental image to add to the HSR volume, then click Next.
If the backup image is encrypted, you must specify the appropriate password to access the backup image file. The Backup Image to Restore page displays information about the selected backup image.
Note: Make sure you follow the conditions, listed at the beginning of this section, for adding an Incremental backup image to an HSR volume.
6. On the Backup Image Dependencies page, select the backup image file (the specific point-in-time) that you want to restore, then click Next.
The left pane displays all backup image files in the previously selected Image Set. Select a backup image file to display information about that file in the right pane.
7. On the Finalization Options page, specify whether to finalize the volume for use now, then click Next.
Finalize the volume at the end of this restore
Select this option to finalize the HSR volume after adding the selected Incremental image file. Once finalized, the HSR volume is ready for use.
Note: Do not select this option if you want to add additional Incremental images to the HSR volume in the future.
Generate a .HSR file to use in a future
finalization
Note: This option is available only if you are not finalizing the volume.
(Optional) When selected, the Restore Wizard generates an HSR file, at the location you specify, that contains metadata about the HSR volume. With this file, you can finalize the HSR volume without accessing the source backup image files.
15
Restoring a System Volume 37
If you previously created an HSR file for the HSR volume, you must select the same HSR file.
8. (Conditional) On the Specify the Restoration Options page, select the boot parameters you want to apply to the restored volume, then click Next.
Recovery Environment displays this page only if you are finalizing the volume as part of the restore operation.
Set partition active Configures the restored volume as the active partition in the system (the drive the machine boots from).
Restore MBR Restore the master boot record (MBR) as part of the volume restore job. The master boot record is stored in the first sector of the first physical hard drive, and contains the master boot program and partition table. The master boot program uses the partition table to determine the active partition, then starts the boot program from the boot sector of the active partition. When selected, you have the following MBR restore options:
Restore MBR from the image file: Restores the MBR from the backup image file.
Restore original Windows MBR: Restores the default MBR for the version of Windows you are restoring.
Restore disk signature: Restores the original hard drive physical disk signature. Windows Server 2003, Windows 2000 Advanced Server, and Windows NT Server 4.0 Enterprise Edition (SP3 and later) require disk signatures to use the hard drive.
Restore Disk Hidden Track
Restores the first 63 sectors of a drive. Some boot loader applications require this for the system to boot.
Use Hardware Independent Restore
Instructs Recovery Environment to launch the Hardware Independent Restore (HIR) utility when finalizing the volume for use so you can configure the restore operation to properly interact with the hardware where you want to restore the volume.
For more information, see Chapter 13: Using HIR . 9. On the Summary page, review the details of the restore operation, then click Finish.
Recovery Environment begins the restore operation and opens the Task Manager so you can view its progress. Once the restore operation completes, you have the following options, depending on the type of restore operation:
Finalized Restore: Optionally, use the Boot Configuration Utility to ensure that the newly restored system volume is "bootable" (see Chapter 12: Boot Configuration Utility ). You can now reboot the system to the restored system volume.
HeadStart Restore: Because the volume is not finalized, an HSR volume is not available to users or applications, but you can continue to restore additional Incremental images to the HSR volume. When ready, you can Finalize the HSR volume to make it ready for use. At this point, the HSR volume becomes a standard system volume, and you can have the same post-restore options as described above for a Standard Restore.
48
Finalizing an HSR Volume
If you previously created an HSR volume, the Restore Wizard lets you finalize it for use when you are ready to let users and applications access the restored volume.
To finalize an HSR volume 1. Load Recovery Environment.
For more information, see Chapter 4: Starting Recovery Environment . If you need to use Remote Management, load the UltraVNC Server. For more information, see Chapter 14: Using Remote Management .
2. In Recovery Environment, select Tasks > Restore Volume to launch the Restore Wizard. You can also select Restore Volume in the left-side Navigation panel or select Restore Wizard in the Wizards tab.
3. On the Restore Type page, select Finalize an HSR Restore, then click Next.
4. On the Restore Destination page, select the hard disk where you previously created the HSR volume, then click Next.
5. On the Specify Finalization File page, select how you want to finalize the HSR volume, then click Next.
Finalize using information from the backup image file set
Uses the original Image Set files to finalize the HSR volume. The source Image Set must be accessible to Recovery Environment to finalize the volume.
Finalize using information from a .HSR File
Uses a previously created HSR file to finalize the HSR volume. The source Image Set files are not needed to finalize the HSR volume. You must specify that you want to create an HSR file when creating the HSR volume (see Restoring a System Volume ). 6. On the Specify the Restoration Options page, select the boot parameters you want to apply to the
restored volume, then click Next.
Set partition active Configures the restored volume as the active partition in the system (the drive the machine boots from).
Restore MBR Restore the master boot record (MBR) as part of the volume restore job. The master boot record is stored in the first sector of the first physical hard drive, and contains the master boot program and partition table. The master boot program uses the partition table to determine the active partition, then starts the boot program from the boot sector of the active partition. When selected, you have the following MBR restore options:
Restore MBR from the image file: Restores the MBR from the backup image file.
Restore original Windows MBR: Restores the default MBR for the version of Windows you are restoring.
Restore disk signature: Restores the original hard drive physical disk signature. Windows Server 2003, Windows 2000 Advanced Server, and Windows NT Server 4.0 Enterprise Edition (SP3 and later) require
15
51
Restoring a System Volume 39
disk signatures to use the hard drive. Restore Disk Hidden
Track
Restores the first 63 sectors of a drive. Some boot loader applications require this for the system to boot.
Use Hardware Independent Restore
Instructs Recovery Environment to launch the Hardware Independent Restore (HIR) utility when finalizing the volume for use so you can configure the restore operation to properly interact with the hardware where you want to restore the volume.
For more information, see Chapter 13: Using HIR . 7. On the Summary page, review the details of the restore operation, then click Finish.
Recovery Environment displays a "Success" message when the volume is finalized.
Optionally, you can use the Boot Configuration Utility to ensure that the newly restored system volume is "bootable". For more information, see Chapter 12: Boot Configuration Utility .
48
Chapter 10: Mounting a Backup Image File
The ShadowProtect Explore Backup Wizard guides you through the process of mounting a backup image file to browse and restore files and folders. ShadowProtect automatically associates the files required to browse and restore a specific backup image file. You need only select the backup image you want to explore.
For information about mount options, see Backup Image File Mount Options . To restore files and folders
1. Start Recovery Environment (see Chapter 4: Starting Recovery Environment ). 2. Open the Explore Backup Wizard by doing one of the following:
In the Wizards tab, click Browse and Restore Files Wizard. In the Tasks menu, click Explore Backup Image.
3. In the Backup Image File Name page, browse to the image file you want to browse, then click Next.
If the backup image is encrypted you must provide the appropriate password.
The Explore Backup Image Wizard displays a categorized list of information about the backup image file.
4. (Conditional) In the Backup Image Dependencies page, select the desired point-in-time image from the selected backup image set, then click Next.
Recovery Environment displays this page if you select an Incremental image (.spi) to explore. 5. In the Explore Options page, select how you want to mount the backup image.
You can mount the backup image as a Drive Letter or Mount Point. For more information about these options, see Backup Image File Mount Options .
Assign the following Drive Letter
Mounts the backup image as the selected drive letter.
Mount in the Following Empty NTFS Folder
Mounts the backup image as a Mount Point. You must specify how you want to name the mount point sub-folder:
Time/Date: Uses the backup image's creation date and time as the sub-folder name (for example, 7-12-2008 10.19.24 AM).
File Name: Uses the backup image file name as the sub-folder name (for example, E_VOL b001).
Custom: Lets you specify a custom sub-folder name. Mount Backup as
Read-Only
Mounts the backup image as read-only.
6. In the Wizard Summary page, review the mount information, then click Finish.
ShadowProtect mounts the backup image file, then automatically launches an Explorer window and displays the mounted volume.
42
15