The development of Viscous Material (Chocolate) 3D Printer/ Food 3D
Printer
Himanshu Singh
1, Mayank Agrawal
2, Guru Ratan Satsangee
3, Sarthak Agrawal
4, Sachin
Sharma
5, Gopal Gautam
61,3,4,5,6Students, Department Of Mechanical Engineering, Dayalbagh Educational Institute, Agra, India 2Lecturer, Department of Mechanical Engineering, Dayalbagh Educational Institute, Agra, India
---***---Abstract –
This research paper is an attempt to enlist thevarious issues, problems and challenges a specialist might encounter during his course of building a viscous material 3D printing machine. The paper also discusses the possible solutions to counter these problems and issues. Building a viscous material based 3D printing machine can be a challenging task and might require troubleshooting of issues in the temperature control of material or machine components, developing an efficient syringe extrusion mechanism, tweaking the software based parameters in the firmware, designing the machine components. These issues might arise as a result of high dimensional precision and accuracy required in the framework design including printer components and extruder parts. Proper care has also to be taken in selection of material on the basis of physical properties for suitability for three dimensional printing operations. Theoretical calculations have also been involved in the determination of the printing parameters including printing speed, material composition, pressure applied over syringe, flow rate of material, temperature required during operation. Although a wide range of viscous materials can be printed using this machine, but for now, in this research paper we have primarily focused our attention on generation of 3D objects using chocolate as a raw material. Minimal changes in the existing framework might be required to substitute chocolate by any other viscous materials. Certain areas of application and future scope which require further research have also been discussed upon in this research paper.
Key Words: Chocolate 3D printer, Wax 3D printer, Concrete 3D printer, 3D printing, syringe extruder, Additive manufacturing, Confectionary industry, Food Printer
1.INTRODUCTION
A viscous material 3D printer is one in which a raw material is fed into the printer and the printer then follows sequential steps of operation to give a 3D object as output. The motion and printing mechanism of our machine is governed by four programmable stepper motors (Nema-17[1]). The efficient framework design of our 3D printer
machine enables smooth motion of the printing head in 3 directions (X, Y, Z). The motors receive their instructions for required magnitude and direction of motion speed from a MKS Base 1.4[2] board. In order to achieve 3D
printing using chocolate, wax, cement paste and other
viscous materials, certain changes have to be made in the design and working concept of the existing 3D printers currently available in the market. The challenges faced during the development of viscous material printer are a result of lack of availability of documentation and literature on the related topics.
The materials in use (chocolate) are difficult to deal with due to their physical properties. Different set of control parameters are required to print 3D objects, when using different materials. Due to limitations in the physical properties, only few viscous materials including chocolate, concrete, cement paste, porcelain, wax, silicone or clay can be utilised for three dimensional printing. The set of physical properties that determine the effectiveness of a viscous material for 3D printing include easy to attain melting and freezing point temperatures, ease of melting, ease of solidification upon cooling or drying, viscosity lying between a suitable range allowing material to flow through nozzle when under pressure and viscous enough to be able to hold in a syringe in absence of pressure, chemically inertness.
1.1 Specifications and Operation procedure
The selection of material is done such that it has minimal presence of lumps or impurities within it. The material should be free from any air voids as well. Speeds of printing should be maintained slow to ensure smother operations.
The printer receives its instructions from a G-Code uploaded to it.[3] The firmware present on the printer
1.2 Mechanisms in place
The material is heated by a heating mechanism consisting of thermistor, heating element and metal cylinder. The thermistor[4] serves the purpose of sensing
the temperature. Heating coil is present to heat the contents of syringe when temperature falls down below the operation temperature. Metal cylinder is designed to maintain uniform temperature within the syringe and to prevent any heat losses. The heating mechanism should be effective enough to heat down the material till the tip of nozzle. The heating mechanism has to be well insulated from the cooled regions on the bed of printer to ensure proper operation of printer.
The heating mechanism is coupled by a extrusion mechanism which is responsible for creating uniform pressure within the syringe so as to push its content during the extrusion process. This mechanism utilises a stepper motor, a gear drive and a threaded rod. This mechanism converts the rotatory motion of the shaft of the stepper motor into linear motion. This linear motion is transferred to the top of plunger, which is pushed down and helps in pushing material out from the syringe. At the opening of the syringe is placed a nozzle which directs the material on to the printer bed.
A cooling mechanism is present at the printer bed and is based on the use of multiple Peltier cells.[5] A certain value
of electric current, when supplied to the Peltier cells results in lowering down of temperature of one side of the Peltier cells. This drop in temperature is utilised to solidify the layers of material which have been extruded by the nozzle.
The motion of the printing head is possible in two directions (X and Z). The motion in third direction (Y) is made possible by movement of printer bed. These movements are achieved by three stepper motors which are controlled by the printer circuit board. The motors receive their instructions from the G-Codes uploaded to the printer.
The LCD panel acts as a control device for the machine and in connected to the printer circuit board. It has a knob to choose any of the available settings menus on the display and change its parameter. The display informs us about the printing speed, flow rate, print status, temperature and estimating time remaining.
1.3 Need for a chocolate 3D printer
A 3D printing using chocolate as raw material may be useful in multiple situations requiring need for personalised and customised items without use of moulds or similar techniques. User can design his chocolate on a CAD software and this machine helps in converting the design concept to reality by utilising various mechanisms in place.
2. CHALLENGES FACED
Chocolate is extremely difficult to work with, and presented a lot of a challenge to the team. However, after considerable research and testing, we somehow managed to achieve it.
These challenges include the following.
2.1 Temperature control
Adequate temperature control measures are required for both, melting [6] the raw material and solidifying the
item printed.
2.2 Preventing hardening of chocolate due to overheating
In case of a faulty thermistor, or when thermistor accidentally breaks off its contact with the surface of metal cylinder, the coil may be receiving its supply for durations longer than required. This may lead to rapid rise in the temperature in syringe which will cause hardening of chocolate, blocking the nozzle and will leaving the chocolate useless for any further purpose. To avoid this, low ranges of operational temperature (maximum: 50 C, for chocolate) should be used and thermistor should be properly secured in its place such that maximum area is in contact with the metal cylinder.
2.3 Enursing quick solidification to prevent shape distortion
A new layer should be layed down on an existing layer only when it has cooled down enough to bear the weight of new layers. The existing layer of material should be capable of absorbing the heat and cooling down the newly layed down layer as well. The shape of the object might get distorted when the initial layers haven’t solidified and are in liquid state.
2.4 Effective refrigeration and conditioning system to obtain objects of certain height without collapsing
Objects with certain height in Z direction are only possible to obtain when the initial layers have solidified satisfactorily. Otherwise, the layers of material will get runny and may flow down to the print bed. This may be achieved by an effective cooling system based on Peltier cells and other cooling mechanisms.
2.5 Maintaining uniform temperature of material by preventing heat losses
In case of loss of heat from the syringe to the surroundings, the material in the syringe may be heated up unevenly. This will lead to higher temperatures in the
temperatures at the top of syringe. This may be avoided by insulating the metal cylinder completely using multiple layers of Kaplan Tape.
2.6 Preventing blockage of extruder nozzle due to lumps in chocolate
Lumps may be formed in the chocolate due to inadequate heating during the external heating (aided at melting of material). This issue can be addressed by using indirect method of heating, where a bag containing chocolate may be placed in a vessel of warm water. It should be continued till entire material has melted followed up by manual inspection of chocolate for any lumps in the bag.
2.7 Prevention of solidification of chocolate in the extended extruder nozzle
The nozzle is not in direct contact with the heated metal cylinder. This often leads to solidification of material in the nozzle, hence, blocking it. It can be prevented by wrapping a thin conductive metal foil in between the space between nozzle and cylinder. Now, the heat will reach the nozzle and material won’t be solidified.
2.8 Replacing blocked nozzles
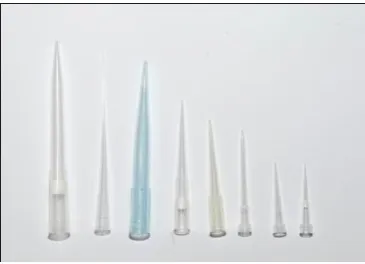
Some syringe nozzle tips were destroyed and harmed during printing operation. To change these, we had to change entire needles of nozzle. To tackle this, we replaced the stock nozzle with cheap disposable pipette tip. These tips are easy to insert and replace in the syringe and prevents leakage of material as well.
Fig -1: Cheap disposable pipette tips of varying dimensions
2.9 Obtaining varying dimension of nozzle diameter
The dimensions (height and opening diameter) of the nozzle could be varied by suitable machining of the tip prior to the initialising of printing operation. Large diameters are used for large prints which require higher volume of material. Smaller diameter was adopted for small prints requiring higher degree of detailing.
2.10 To ensure extrusion at the beginning of the print
At times, the material would reach the tip of the nozzle and the print bed a lot later after the printing had begun. This could be avoided by setting the syringe on pre-heat to a certain temperature as specified in the printer firmware. Before initialising the print, we would also perform manual extrusion till the chocolate started flowing from the nozzle.
2.11 To counter under-extrusion and over-extrusion
In case of under extrusion, the flow speed should be increased and printing speed should be decreased from the LCD panel. Similarly, in case of over-extrusion, flow speed should be decreased and printing speed must be increased.
2.12 Corrective measures adopted to counter the situations when extruder breaks its contact with printing region or bumps into printed material
At times, the practical layer height might not be as same as the layer height desired and given to printer. This will lead to nozzle tip being at incorrect position in Z direction. This can be solved by manually disabling the Z-axis motor temporarily and turning the lead screw in required direction.
2.13 Prevention of overflow of chocolate at a point
The problem of overflow of chocolate on the print bed was solved by either increasing the printing operation speed or decreasing the flow rate from the LCD control unit.
2.14 Maintenance of consistency of layer height
Towards the end of printing, the layer height would often reduce. This was because lesser amount of chocolate was present in the syringe. This was solved by pausing the print and replacing the syringe with a fully filled syringe.
2.15 Increasing work time of chocolate
It was observed that the chocolate posed difficulty in extruding after 3-4 minutes of melting and began to form lumps. This was solved either by dipping the syringe containing feed chocolate in a bowl of warm water or by setting the syringe on pre-heat in the printer to a duration of about 5 minutes before start of print.
2.16 Determining optimum composition of chocolate
[image:3.595.77.260.496.628.2]The prescribed composition is 10-15 parts of cocoa butter mixed with 30-35 parts of sugar and 55 parts of cocoa solids. The resulting chocolate was darker chocolate as no parts of milk solids were utilised.
Any deviation from this composition might not lead to desired results.
2.17 Smoother movement of extruder head to prevent any jerks
The values of maximum acceleration and velocity are limited to smaller values to prevent any accidental splashing of the chocolate filled in the syringe and jerks in the printer operation.
2.18 Prevention of contamination of printed objects
The syringe containing feed chocolate is isolated from the mechanical linkages and is made self-sufficient. So, operation of the printer has no harm on the chocolate. The syringe is removable from the printer assembly allowing it to be stored in proper conditions when the printer is non-operational. Multiple sets of interchangeable syringe are used to ensure continuous operation of printer in case of exhaustion of material in one syringe. Multiple sets also allow cleaning of syringe in sterilisers before being filled with chocolate again and inserted into printer.
2.19 Easy removal of printed object from bed
Before starting the printing operation, a conductive harmless film is placed on top of bed and fixed in its place using suitable fasteners. Aluminium foil is best suited for the purpose and the same may also be used to wrap up the chocolate made, thus, preventing it from contamination.
2.20 Increasing the load carrying capacity in Z axis
As compared to a conventional 3D printer, the viscous material 3D printer exerts higher load on Z-axis stepper motor due to presence of syringe filled with feed chocolate along with the entire plunger pushing mechanical assembly on the top of it. This issue was addressed by mounting an additional smooth rod in the direction of motion of Z-axis rail to support it. This also prevents the axis from bending in the direction of load.
2.21 Tweaking the firmware
The firmware uploaded to the printer board (MKS Base 1.4) is Marlin Easyconfig. It is a Arduino Mega2560 based program. Certain tweaks and changes are made in the firmware to meet the requirement of the viscous material printer.[3]
The operational temperature is lowered down to prevent overheating of the feed material. The MINTEMP function prevents the extruder motor to be operational before attaining a set temperature. This value is bought
down to allow the printer to run at lower temperature.[7]
To prevent the object from collapsing by ensuring proper solidification at slow operational speeds, value of steps/mm for motion is reduced by a factor of 0.1.
2.22 Parameters to be changed in Slicing Software
To prevent extrusion gaps in the printing operation, retraction has been turned off in slicing software.
To prevent deposition of excess material at printer bed, rafts and supports have also been turned off by setting the values to zero.
2.23 Design Challenges
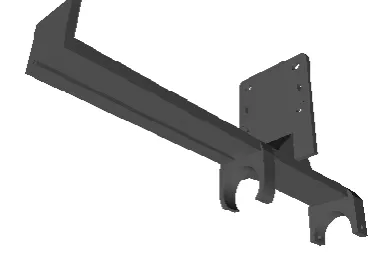
Constructing a sturdy and stable frame was a challenge and was achieved by designing required parts of either acrylic or 3D printed PLA/ABS. The entire housing for syringe extrusion mechanism was designed by the team in CAD software and was 3D printed.
Fig -2: 3D printed (ABS) syringe holder (designed by the research team)
2.24 Removing air bubbles from syringe
The syringe containing chocolate in molten of softened form is inverted upside down. Continue shaking the syringe so that all the air present in the material reaches the top of syringe, towards its top. Now continue pushing the plunger manually till entire air has been pushed out and material starts flowing from nozzle.
3. APPLICATIONS BASED CHALLENGES
3.1 Personalised Cake Toppings
[image:4.595.332.518.420.548.2]or frosting or a similar viscous material in the feed syringe. The process involves placing the cake over the bed and manually pressing the Z-axis mechanical end stop switch when the extruder is about to reach at a suitable printing distance from the top of cake. This will enable to generate fancy designs with better accuracy and repeatability as compared to manual processes.
3.2 Printing over a cookie/bread
Certain food items, which pose difficulty in solidifying, could be used to make designs via printing on bread or cookies, which are placed under the extruder in a manner similar to cake topping. A wide variety of materials including peanut butter or cheese could be used for the purpose.
4. SCOPE AND AREAS OF FURTHER RESEARCH
4.1 Scope
Refinement of the printing mechanism, material composition, temperature control means will lead to better result output from the machine and hence enhance the reputation of practicability achieved by 3D printer.
Further development of this technique will lead to the printer being more economical and will reach the masses.
Introduction of industrial-size 3D printer will give rise to a new industry which caters to the personalised need of consumers where consumers can give their designs over the internet and the company will print their concept with specified material, followed by professional refinement of the print produced and eventually delivering it to the consumer’s footstep.
Other viscous materials printing may be achieved by varying these parameters: Temperature control of extruder and conditioned region (depending on the melting and solidification points of material), extruder nozzle diameter (depending on viscosity of material to be printed).
4.2 Areas of further research
Printing speed is limited to slower ranges to allow the individual layers of chocolate to cool down before laying down the next layer. Development of improvised cooling system aided at quicker solidification of chocolate as soon as it comes out of extruder will result in achieving higher speeds of operations.
Oil based food colouring could be used to give different colours to chocolate, which can be incorporated in a single print by using exchangeable feed syringes with real time switch mechanism.
5. CONCLUSIONS
Preparing a Chocolate printer is a challenging task and may require extensive knowledge of basics of engineering to solve the numerous problems that come along in the way. These issues can be easily resolved if we follow the scientific methodology of problem solving. Chocolate 3D printer has multiple advantages over traditional and conventional processes involved in manufacturing of chocolate items. It allows us to create personalized and customized items. It has several applications in confectionary industry. Other viscous materials can also be used in the same framework with minimal changes.
ACKNOWLEDGEMENT
We would like to express our gratitude towards Prof. P.K. Kalra (Director, Dayalbagh Educational Institute) who allowed us to utilise the 3D printing labs and facilities of the institute. We acknowledge the efforts and hard work by the experts who have contributed towards development of this project. We take this opportunity to express our profound gratitude and deep regards towards Prof. Soami Pyara Satsange (Incharge, USIC, Dayalbagh Educational Institute) and Hardik Chadda (Director, Hankernest Technologies) for their exemplary guidance, monitoring and constant encouragement throughout the course of troubleshooting the challenges of this project.
REFERENCES
reprap.org/wiki/NEMA_17_Stepper_motor
http://osoyoo.com/2016/06/30/mks-1-4-3d-printer-board-marlin-firmware-installation-guide/
https://3dprinterchat.com/2016/02/3d-printer-g-codes/ reprap.org/wiki/Thermistor
https://en.wikipedia.org/wiki/Thermoelectric_coolingM. Young, the Technical Writer’s Handbook. Mill Valley, CA: University Science, 1989.
Afoakwa, Emmanuel Ohene, Alistair Paterson, and Mark Fowler. "Factors influencing rheological and textural qualities in chocolate–a review." Trends in Food Science & Technology 18.6 (2007): 290-298.
http://forums.reprap.org/read.php?146,237827
BIOGRAPHIES
Mayank Agrawal
Born on 10th April 1987, he received degree of B. Tech. in Mechanical
Engineering from Dayalbagh
first degree students of the institute. As an assistant manager, he acquired three years of industrial experience in a leading automobile manufacturer of the country. Since March’13 he has dedicated himself to endow his time as a Lecturer in the department of Mechanical Engineering, Technical College, DEI, Agra. His research
interest includes workshop
technology, Manufacturing Process and Industrial Management. His experience in production, planning
and control was useful in
development of this machine.
Himanshu Singh
Born on 29th June 1997, he is a final
year student of Diploma in
Mechanical engineering. He was introduced to the concept of 3D printing in Winter Camp (December, 2016) at Dayalbagh Educational Institute. He acquired knowledge of working of 3D printers and related concepts during his internship at
Hankernest Technologies (June
2017). His key areas of strength include Computer Aided Designing, Machine Design, Basic Electronics, Manufacturing Process, Refrigeration and Air Conditioning, Thermal Engineering. He has an analytical mind and is committed to his research. His systematic approach, innovative ideas, knowledge, problem solving skills and dedication were key
contributing factors towards
competition of this machine.
Guru Ratan Satsangee
Born on 26 Nov 1999, he is a final
year student of Diploma in
Mechanical Engineering. He did his internship at Romsons Scientfic and Surgical Industries Pvt Ltd and Mondelez International (Cadbury India Private Ltd) where he acquired knowledge about refrigeration and air
conditioning systems, chocolate
properties, etc. His interest areas
include machine design and
refrigeration and air conditioning. He is a student member of system society of India.
Sarthak Agrawal
Born on 7 January 1996, he is a final
year student of Diploma in
Mechanical Engineering at Dayalbagh Educational Institute, Agra, India. He did his internship at UNO Minda Group, Gurgaon, Haryana, India. There he acquired knowledge about various manufacturing processes carried out at industrial scale. His
area of interest includes
Manufacturing Process.
Sachin Sharma
Born on 13 June 1999, he is a final
year student of Diploma in
Mechanical Engineering at Dayalbagh Educational Institute, Agra, India. He did his internship at Uttar Pradesh State Road Transport Corporation, Agra, Uttar Pradesh, India. There he
learnt about the mechanical
functioning of the heavy vehicles. His areas of strength include Thermal Engineering and Refrigeration.
Gopal Gautam
Born on 13 March 1997, he is a final
year student of Diploma in
Mechanical Engineering at Dayalbagh Educational Institute, Agra, India. He did his internship at Jay Bharat Maruti Ltd, Gurugram, Haryana, India. During his internship, he learnt about the
various mechanical processes
involved in manufacturing of
automobile components. His areas of
interest include production