Sitecore Commerce Connect
The Commerce Connect
Integration Guide
Table of Contents
Chapter 1 Introduction... 4
Chapter 2 Integrating with Commerce Connect ... 5
2.1 Overview ... 6
2.1.1 A Customizable Domain Model ... 6
2.1.2 Service Layer API ... 7
Service Methods ... 7
Request Parameters ... 7
Re sult objects ... 8
2.1.3 Pipelines... 8
2.1.4 Passing Data between Pipeline Components ... 14
2.1.5 System Message s ... 14 2.1.6 Success... 14 2.1.7 Configuration ... 14 2.1.8 EntityFactory ... 15 2.1.9 EaPlanProvider... 16 2.1.10 ContactFactory ... 16 2.1.11 ItemClassificationService ... 16 2.1.12 CommerceContext... 16 2.1.13 ServiceProviders ... 16
2.2 Service Layer Specifics ... 18
2.2.1 Cart Service Layer ... 18
Different ways to work with an ECS... 18
Configuration ... 18
Entities... 18
Storing a copy of the cart locally... 19
Abandoned Cart Engagement Automation plan ... 19
2.2.2 Orders Service Layer ... 19
Configuration ... 19
Entities... 19
New Order Placed Engagement Automation Plan... 20
Pipelines ... 20
2.2.3 Inventory Service Layer ... 20
Pipelines ... 20
Configuration ... 21
Entities... 21
StockStatu s and StockDetailsLevel Entities ... 21
Extending the InventoryProduct Entity ... 22
2.2.4 Cu stomers and Users ... 23
What is the difference between a User and a Customer... 23
Different ways to work with an ECS... 23
Configuration ... 23
Entities... 23
Pipelines ... 24
Chapter 3 Product Synchronization ... 25
3.1 The basics of product synchronization ... 26
3.1.4 Integrating with Connect... Error! Bookmark not defined. 3.1.1 Repository design pattern ... Error! Bookmark not defined. 3.1.2 2-way synchronization ... 26
3.1.3 Pipeline pattern... 27
3.1.5 Repository design pattern ... 32
3.1.6 ID Mapping ... 33
3.1.7 Indexing... 33
The default index ... 34
The product index ... 34
3.2 The Connect product data model... 37
3.2.1 Minimum product concepts ... 38
3.3 Item templates and structure ... 40
3.3.1 Item Templates used in the Product Data Model ... 40
Rule of Thumb and Naming Conventions ... 40
Item templates ... 40
Branch templates ... 44
3.3.2 Main product data in one product repository bucket ... 45
Product Variants ... 46
3.3.3 Product relations, resource s and specifications ... 46
3.3.4 Specifications ... 47
Specification ... 48
Specification values ... 49
3.4 The Object Domain Model ... 50
3.5 How to Implement a Custom Product Entity ... 51
3.6 How to Create a Cu stom ResolveChangesP roce ssor ... 53
3.7 How to Create a Cu stom Synchronization Strategy... 55
3.8 How to Implement a Custom ID Generator... 57
3.9 Performance tuning ... 59
Chapter 1
Introduction
Commerce Connect is an e-commerce framework designed to integrate Sitecore with different external commerce systems and at the same time incorporate customer engagement functionality provided in the Sitecore Customer Engagement Platform (CEP).
Commerce Connect consists of an integration API that incorporates customer tracking by triggering goals and pageevents, and uses engagement automation plans for following -up on customer interaction. In addition, Commerce Connect comes with e-commerce specific rendering rule conditions for acting on the customer interactions, cart content an d orders placed etc.
For a general introduction and overview of the components in Commerce Connect, see the Commerce Connect Overview document.
This guide describes the architecture, API and configuration of Commerce Connect for API developers who create connectors for integration with external commerce systems. If you are a developer who create Sitecore solutions and are looking for information about how to use Commerce Connect for creating B2C or B2B shops with e -commerce
functionality, see the Commerce Connect developer’s guide
Chapter 1 — Introduction
This chapter contains an introduction for this guide.
Chapter 2 — Integrating w ith Commerce Connect
This chapter describes the Commerce Connect Connector architecture and how to customize it as a backend developer creating integration with an external commerce system.
Chapter 2
Integrating with Commerce Connect
A Commerce Connect connector is needed to integrate Commerce Connect with an external commerce system (ECS). The typical connector consists of a number of custom processors inserted in the Commerce Connect defined pipelines, and works with the ECS, either directly or through a web service .
Different service layers work independently of each other and can therefore be integrated independently. For example, products, carts and prices could be integrated from three different systems.
There are common features and unique features for each ECS and typically data is stored in different ways.
2.1 Overview
All of the Commerce Connect integration service layers are based on:
A customizable domain model .
An API exposed as a service layer with the methods accepting customizable request objects and returning customizable result objects.
A number of pipelines, one or more per service method.
The following sections describe each of the above bullet points in more details.
2.1.1
A Customizable Domain Model
Each service layer contains a set of entity classes reflecting the domain model. The domain model objects are used when operating with the APIs. The API s accepts the objects as part of the input parameters and return objects.
The domain model has purposely been kept at a minimum, knowing that all vendors to some degree store different information and one model will not fit all. However the domain models include enough
information, domain objects and parameters to cover the common scenarios that are used in all shops. It is expected that some of the domain model objects are customized for each integration with a different ECS. Commerce Connect might contain domain objects that have no corresponding implementation in the ECS and in those cases it is OK to leave them as-is. For more information see the detail s in the corresponding section for each service layer.
With product synchronization there is in addition to the domain model objects also a corresponding item domain model matching the entity classes. The entities can be customized by changing the configuration section. For more information see the next section and section 2.1.8.
The domain models are customizable so that:
All domain model objects can be inherited and extended with custom properties
o All nested objects can be inherited and extended with custom properties
o All service methods keep the existing defined signature, even when used with customized domain objects
It’s recommended to create an abstraction layer on top of the ECS that extracts and manage the information to be exchanged with Commerce Connect. The approach is similar to the Bridge design pattern used in computer science and makes it easier to continuously manage the integration as both Commerce Connect and the ECS evolves over time. It also makes it easier to exchange the information, if the Commerce Connect domain model and the ECS abstraction layer objects have corresponding and similar object signatures.
Some of the service layers save data in Sitecore , as well as pass the data on to the ECS. Whenever data is persisted in Sitecore, the Repository pattern is used to manage loading and saving data. This makes it easy to replace the actual repository whe re data is persisted. For more information see the Service Layer API section as well as MSDN and Fowler.
2.1.2
Service Layer API
Every service layer API contains a number of abstract and generic methods for communicating with the ECS. Information flows in both directions. Product information, prices, and stock information needs to be read from the ECS so that it can be presented to the visitor on the UI. Shopping Cart content, customer account information and shipping information must be parsed over to the ECS so that an order can be created.
The default service layers should be sufficient in most cases, but they can be customized and substituted. For more information, see the appropriate sub system in the following section.
Each method on the service layers accepts a single Request object and returns a single Result object. Both the Request and Result objects can be customized indiv idually for each method for maximum flexibility. The service layer interface remains the same, even when the domain model objects are customers, in addition to the parameters going in and the returned results.
If you have customized the Request or Resul t object for a method, then you can use the corresponding extension method, which accepts generics.
Example:
The default method signature for adding a line to a shopping cart looks like this:
public virtual CartResult AddCartLines([NotNull] AddCartLinesRequest request) and the generic version of the same method looks like this:
public static TAddCartLinesResult AddCartLines<TAddCartLinesResult>([NotNull] this CartServiceProvider cartProvider, [NotNull] AddCartLinesRequest request)
Service Methods
If possible, the following naming convention should be used for all methods on a service provider:
CreateEntityName (e.g. CreateCart)
GetEntityName (e.g. GetCart)
DeleteEntityName (e.g. DeleteCart)
UpdateEntityName (e.g. UpdateCart)
If possible, the following naming convention should be used for all methods that manipulate related items on an entity:
AddRelatedEntityName (e.g. AddLineItem)
RemoveRelatedEntityName (e.g. RemoveLineItem)
UpdateRelatedEntityName (e.g. UpdateLineItem)
Request Parameters
A service method should take only a single request object as a parameter and that request object must inherit from a ServiceProviderRequest. By using a single request object instead of multiple parameters, the same service methods remain usable regardless of the customization. As service methods require additional data to function, simply extending the request object with new parameters will expose the newly required data to the presentation tier without ha ving to modify the service method.
Customizing request objects
There are two options when extending a request ob ject to handle more parameters. The first option is to simply extend the appropriate request class, similar to the following example :
public class CustomLoadCartRequest : LoadCartRequest {
public CustomLoadCartRequest(string shopName, string cartId, string userId, string customProperty)
:base(shopName, cartId, userId) {
this.customProperty = customProperty; }
public string customProperty { get; protected set; } }
In some cases you will not be able to extend a request , instead, you can use the property bag on the request to pass down any properties you want:
request.Properties["customProperty"] = "customValue";
Result objects
Result objects generally mirror request objects, with the difference that they inherit from
ServiceProviderResult and have a collection for system messages. If possible, always return system messages instead of throwing exceptions.. There will be times where it makes sense to throw an exception, but graceful recovery and exceptions are expensive actions.
You can set messages on a result by using the following pattern:
var message = (SystemMessage)this.entityFactory.Create("SystemMessage"); message.Message = “your custom error message goes here”;
args.Result.SystemMessages.Add(message);
2.1.3
Pipelines
Each service method launches a pipeline with the same name. As part of the initial pipeline being executed, one or more additional or shared pipelines may be called and executed. For example,
SaveCart or SynchronizeProductArtifacts.
In Sitecore, the defaul t pipeline arguments contain Request and Result properties, which have
Properties of type dictionary, and can contain arbitrary data to be used by pipeline processors. Commerce Connect uses the Request.Properties dictionary to store data that you need to synchronize. There are processors that read and write the custom data.
Values that are stored in Request.Properties are internal temporary data used to carry information between the processors in the pipeline. For example, the CreateOrResumePipeline includes the
FindCartInEAState processor that stores the ID of the cart. This ID is then used the RunLoadCart
processor to specify the ID of the cart to be loaded.
Data read and stored in the Request.Properties dictionary is visible between processors within the pipeline.
The following table contains the data of the cart related the pipelines stored in the pipeline arguments
Request.Properties:
Pipeline
Pipeline
Property Name Data Description
CreateOrResumeCart CartId Holds the ID of the cart found in the writer processor and consumed by the reader processor in order to load the cart from the external system.
Writer processor
FindCartInEaState
Reader processor
RunLoadCart
ResumeCart CartSourceStateId Holds the ID of the cart state that the
MoveVisitorToInitialState
processor moves visitors from. Writer processor:
CheckCanBeResumed
Reader processor:
MoveVisitorToInitialState PreviousStateName Holds the name of state that the
TriggerCartResumedPageEvent
processor uses to resume a cart from. Writer processor CheckCanBeResumed Reader processor TriggerCartResumedPageEvent CartDestinationState Id
Holds the ID of the cart state that the
MoveVisitorToInitialState
processor moves visitors to. Writer processor
CheckCanBeResumed
Reader processor
MoveVisitorToInitialState
The following table contains the data of the product related pipelines: Pipeline
Property Name Custom Data Description
GetSitecoreProductLis t
SitecoreProductIds Holds a list of the product IDs of Sitecore. Writer processor GetSitecoreProductList Reader processor EvaluateProductListUnionToSync hronize
Pipeline
Property Name Custom Data Description
SynchronizeClassifica tions
SitecoreClassificati onGroups
Holds the classification groups in Sitecore to be synchronized. Writer processor:
ReadSitecoreClassifications
Reader processor
ResolveClassificationsChanges ClassificationGroups Holds the classification groups in the
external commerce system to be synchronized. Writer processor: ReadExternalCommerceSystemClas sifications Reader processors: ResolveClassificationsCh anges SaveProductClassificatio nsToSitecore SynchronizeClassifica tionsSpecifications ProductClassificatio nGroups
Holds the product classification groups to be synchronized. Writer processor: ReadExternalCommerceSystemClas sificationsSpecifications Reader processor: SaveClassificationsSpecificati onsToSitecore
SynchronizeDivisions SitecoreDivisions Holds product divisions in Sitecore to be synchronized.
Writer processor
ReadSitecoreDivisions
Reader Processor
ResolveDivisionsChanges Divisions Holds the product divisions in the
external commerce system to be synchronized. Writer processors: ResolveManufacturersChan ges ReadExternalCommerceSyst emManufacturers Reader processor: ResolveDivisionsChanges
Pipeline
Property Name Custom Data Description
SynchronizeManufactur ers
SitecoreManufacturer s
Holds the Sitecore manufacturer to be synchronized.
Writer processor
ReadSitecoreManufacturers
Reader processor
ResolveManufacturersChanges Manufacturers Holds a list of the manufacturers in the
external commerce system to be synchronized. Writer processor: ReadExternalCommerceSystemManu facturers Reader processors: ResolveManufacturersChan ges SaveManufacturersToSitec ore SynchronizeProductEnt ity
ProductFromSitecore Holds the products in Sitecore to be synchronized with the external commerce system.
Writer processor:
ReadProductFromSitecore
Reader processor:
ResolveProductChanges Product Holds a product from the external
commerce system with Sitecore. Writer processor: ReadExternalCommerceSyst emProduct ResolveProductChanges Reader processor: ResolveProductChanges
SynchronizeTypes SitecoreProductTypes Holds the product types in Sitecore to be synchronized with the external
commerce systems. Writer processor:
ReadSitecoreTypes
Reader processor:
Pipeline
Property Name Custom Data Description
ProductTypes Holds the product types in the external commerce systems to be synchronized with Sitecore. Writer processor: ReadExternalCommerceSystemType s Reader processors: ResolveTypesChanges SaveTypesToSitecore SynchronizeGlobalSpec ifications
Specifications Holds the product specifications to be synchronized. Writer processor: ReadExternalCommerceSystemGlob alSpecifications Reader processor: SaveGlobalSpecificationsToSite core SynchronizeProductDiv isions
DivisionIds Holds the division IDs to be synchronized. Write processor: ReadExternalCommerceSystemProd uctDivisions Reader processor: SaveProductDivisionsToSitecore SynchronizeProductMan ufacturers
ManufacturerIds Holds the manufacturer IDs to be synchronized. Writer processor: ReadExternalCommerceSystemProd uctManufacturers Reader processor: SaveProductManufacturersToSite core SynchronizeProductRes ources
ProductResources Holds the product resources to be synchronized. Writer processor: ReadExternalCommerceSystemProd uctResourceBase Reader processor: SaveProductResourcesToSitecore
Pipeline
Property Name Custom Data Description
SynchronizeProducts ExternalCommerceSyst emProductIds
Holds the product IDs in the external commerce systems to be synchronized. Writer processor: GetExternalCommerceSystemProdu ctList (pipeline: GetExternalCommerceSystemProdu ctList ) Reader processor: EvaluateProductListUnionToSync hronize SynchronizeProductTyp es
ProductTypeIds Holds the product type IDs to be synchronized. Writer processor: ReadExternalCommerceSystemProd uctTypes Reader processor: SaveProductTypesToSitecore SynchronizeResources Resources Holds the product resources to be
synchronized. Writer processor: ReadExternalCommerceSystemReso urces Reader processor: SaveResourcesToSitecore SynchronizeProductRel ations RelatedProducts
Holds the related products to be synchronized. Writer processor: ReadExternalCommerceSystemProd uctRelationsBase Reader processor: SaveProductRelationsToSitecore SynchronizeTypeSpecif ications SpecificationCollect ion
Holds the specification collection to be synchronized. Writer processor: ReadSitecoreTypeSpecifications Reader processor: SaveTypeSpecificationsToExtern alCommerceSystem
2.1.4
Passing Data between Pipeline Components
While all pipeline components in a pipeline should operate independently without knowledge of what other components have done, there are going to be occasions, where information will need to passed between components to avoid repeating the same action over and over again.
In these situations, use the RequestContext property of the base request object. This is a property bag where you can store any information you need to pass between components.
request.RequestContext.Properties["componentSensitiveData"] = "customValue";
2.1.5
System M essages
The base result object returned from all pipeline requests contains a SystemMessages collection, which should be used by all pipeline processors to communicate any messages from the ECS to the
presentation tier.
2.1.6
Success
The base result object returned from all pipeline requests contains a Boolean property called Success. This property should be used to indicate if the initial request passed down to the pipeline was executed successfully. It is recommended that in addition to setting the Success property to false, add a failure message to the SystemMessages collection.
2.1.7
Configuration
Each service layer has an associated configuration stored in a separate include configuration file:
Cart Service Layer - /App_Config/Include/Sitecore.Commerce.Carts.Config
Orders Service Layer - /App_Config/Include/Sitecore.Commerce.Orders.Config
Inventory Service Layer -
/App_Config/Include/Sitecore.Commerce.Inventory.Config
Customers and Users Service Layer -
/App_Config/Include/Sitecore.Commerce.Customers.Config
Pricing Service Layer - /App_Config/Include/Sitecore.Commerce.Prices.Config
Product Synchronization Service Layer -
/App_Config/Include/Sitecore.Commerce.Products.Config
An additional configuration file,
Sitecore.Commerce.Products.DelayedSyncProductRepository.config.disable ,
can be enabled if the synchronization of products into the Bucket occurs at the end of Commerce Connect synchronization instead of immediately.
The Sitecore.Commerce.Config file contains the global configuration of Commerce Connect:
EntityFactory
EaPlanProvider
ContactFactory
ItemClassificationService
CommereContext
2.1.8
EntityFactory
All entities used in Commerce Connect can be customized through configuration using an entity factory. The Entity Factory is based on the Factory design pattern , and the default implementation is based on the standard Sitecore Factory.
If another factory, Dependency Injection (DI) or Inversion of Control (IOC) implementation is preferred, the default implementation can be replaced.
Follow these steps to use a custom factory:
1. Create new custom factory class and implement IEntityFactory interface.
The interface has one Create method that accepts a string containing the name of the entity to be instantiated
namespace Sitecore.Commerce.Entities {
/// <summary>
/// Creates an entity by entity name. The IEnityFactiry allows to substitute the default entity with the extended one.
/// </summary>
public interface IEntityFactory {
/// <summary>
/// Creates the specified entity by name. /// </summary>
/// <param name="entityName">Name of the entity.</param> /// <returns>The entity.</returns>
[NotNull]
object Create([NotNull] string entityName); }
}
2. Register custom EntityFactory class in Sitecore.Commerce.config.
To do this, change the type attribute value of “entityFactory” element to the custom EntityFactory type.
<!-- ENTITY FACTORY
Creates an entity by entity name. Allows to substitute default entity with extended one.
-->
<entityFactory type=" Sitecore.Commerce.Entities.EntityFactory, Sitecore.Commerce” singleInstance="true" />
The default implementation looks up the actual type to instantiate in the configuration. Each service layer has its own section called <commerce.Entities>. Below are the default entities for Carts:
<!-- COMMERCE ENTITIES
Contains all the Commerce Connect cart entities.
The configuration can be used to substitute the default entity implementation with extended one.
-->
<commerce.Entities>
<CartBase type="Sitecore.Commerce.Entities.Carts.CartBase, Sitecore.Commerce” /> <Cart type="Sitecore.Commerce.Entities.Carts.Cart, Sitecore.Commerce” />
<CartAdjustment type="Sitecore.Commerce.Entities.Carts.CartAdjustment, Sitecore.Commerce” />
<CartLine type="Sitecore.Commerce.Entities.Carts.CartLine, Sitecore.Commerce” /> <CartProduct type="Sitecore.Commerce.Entities.Carts.CartProduct, Sitecore.Commerce” />
<CartOption type="Sitecore.Commerce.Entities.Carts.CartOption, Sitecore.Commerce” />
</commerce.Entities>
In order to use a custom entity it is necessary to perform the following two steps: 1. Create a new Entity class
2. Register the custom Entity class in the configuration section <commerce.Entities>. To do this, change type attribute value of “entityFactory” element to the custom EntityFactory type.
2.1.9
EaPlanProvider
This class is used to figure out an engagement plan name based on the current store name in
combination with and engagement plan name or state name. It is possible to implement your own version of this by implementing IEaPlanProvider and registering that class name in the eaPlanProvider
section of the Sitecore.Commerce.config .
2.1.10 ContactFactory
This class is used to get the id of the current runtime user. The default implementation is dependent on Sitecore Analytics for tracking; if this does not suit your needs you can change it by extendi ng the
ContactFactory class and overriding the GetContact method.
Below is a copy of how the default instance works. Once you get the id of your user from the ECS you should identify the Tracker.Current.Contact with that id (using the
Tracker.Current.Session.Identify()method),and from that point on this id will be returned by the ContactFactory. If no id is available from the external user then the id created by Sitecore Analytics will be used instead.
public virtual string GetVisitor() {
var user = Tracker.Current.Contact.Identifiers.Identifier; if (string.IsNullOrEmpty(user)) { user = Tracker.Current.Contact.ContactId.ToString(); } return user; }
2.1.11 ItemClassificationService
This is a simple class that is used to help determine what type somethin g is, the current version is used to verify if an item is a product, if a template is a product template, and to get the product id from an item.
2.1.12 CommerceContext
The CommerceContext class is used to determine the current product and inventory location that is the focus of the site. This class is currently only used by the inventory rule conditions when no stock location or product id is provided to calculate against.
2.1.13 ServiceProviders
Each service layer has its own interface which can be customized , these providers contain the service methods for interacting with the appropriate sub system . All service providers should inherit from
ServiceProvider and it is recommended to have a generics version of the class in which each service method is generics based.
Sample service method:
public virtual GetCartsResult GetCarts([NotNull] GetCartsRequest request) {
return this.RunPipeline<GetCartsRequest, GetCartsResult>(PipelineName.GetCarts, request); }
Generics extension method example:
public static TGetCartsResult GetCarts<TGetCartsRequest, TGetCartsResult>([NotNull] this CartServiceProvider cartProvider, [NotNull] TGetCartsRequest request)
where TGetCartsRequest : GetCartsRequest where TGetCartsResult : GetCartsResult, new() {
return cartProvider.RunPipeline<GetCartsRequest, TGetCartsResult>(PipelineName.GetCarts, request);
}
If an existing service provider required a new service method, consider extend ing the service provider and adding the new method instead of creating a whole new service provider. The various sub systems and their service providers are listed below.
Shopping Cart
Sitecore.Commerce.Services.Carts.CartServiceProviderOrders
Sitecore.Commerce.Services.Orders.OrderServiceProviderPricing
Sitecore.Commerce.Services.Prices.PricingServiceProviderProduct Synchronization
Sitecore.Commerce.Services.Products.ProductSynchronizationProviderCustomers and Users
Sitecore.Commerce.Services.Customers.CustomerServiceProvider
Inventory
2.2 Service Layer Specifics
Each service layer in Commerce Connect follows the same design pattern, in the sections below the specific properties and configuration options unique to each service layer are described.
2.2.1
Cart Service Layer
Different ways to work with an ECS
The cart integration can be done in four different ways:
1. The cart is only passed to the external commerce system when submitting an order. If the integration is made against an ERP system, shopping cart functionality is typically not provided and needs to be handled elsewhere, in this case in Commerce Connect.
In this case the cart related pipelines only contain the default Commerce Connect provided processors. This is very easy to setup as no work is involved in creating the integration other than adding a pipeline in the Orders service layer, which will take the shopping cart as input for
creating an order.
2. The cart is only ”saved” in the external commerce system after each change (OnSave) This option will minimize the number of calls to the external commerce system and thereby improve performance. It will however be more difficult for the external commerce system t o act upon updates made to the cart in Sitecore, like making changes to cart lines when products are added to the cart e.g.:
There might be a discount that needs to be added due to a sale or due to adding a bundled product or a certain combination of produ cts triggering a discount.
There might be an additional “free” product that needs to be added due to a sale.
3. All cart actions are forwarded to the external commerce system (AddLine, UpdateCart, etc.). This option provides the most flexibility for advanced scenarios as explained in #2, but it also makes more calls to the external commerce system decreasing performance.
4. Cart data is only persisted in the external commerce system. In order to do so, the Commerce Connect specific processors LoadCartFromEAState (LoadCart), SaveCartToEAState (SaveCart), FindCartInEAState & RunResumeCart (CreateOrResumeCart), DeleteCartFromEaState (deleteCart) and BuildQuery + ExecuteQuery (GetCarts) must be removed from the pipelines mentioned in parentheses. The default is option number 2.
Configuration
All configuration for the cart subsystem can be found in the Sitecore.Commerce.Carts.config file. Here you will find all details for the entities, pipelines, and repositories used by the cart system.
Entities
The default cart entities for Commerce Connect only assume some of the basic cart information that will be used across all commerce systems, it is expected that you will need to extend these entities. When you need to extend any of the default entities you can achieve this by c reating a new class that inherits from the appropriate type, and then patching the appropriate entity under <commerce.Entities> in the Sitecore.Commerce.Carts.config file. You can read more about individual entities in the Developer Guide.
Storing a copy of the cart locally
Commerce Connect gives you the option of storing a copy of your cart locally to help reduce round trips to your ECS or implement functionality that the destination ECS might now support. You are not required to use this functionality, and you will not miss out on any functionality by not using it.
If you are not going to make use of this functionality the Commerce Connect specific processors
LoadCartFromEAState (LoadCart), SaveCartToEAState (SaveCart), FindCartInEAState & RunResumeCart (CreateOrResumeCart), DeleteCartFromEaState (deleteCart) and
BuildQuery + ExecuteQuery (GetCarts) must be removed from the pipelines mentioned in parentheses.
To store the data locally you must create a class that implements
Sitecore.Commerce.Data.Carts.ICartRepository and patch the eaStateCartRepository
element in the Sitecore.Commerce.Carts.config with the new full class name. Commerce Connect ships with two sample repositories called EaStateSqlBasedCartRepository and
EaStateCartRepository, these are only sample repositories and should not be used in a production scenario.
Abandoned Cart Engagement Automation plan
The plan is provided as a branch template and multiple instances can be created. There should be one instance per shop. The default plan can be customized wi th different or more states as is needed. To make the plan work, two Sitecore Commerce specific conditions and an action has been provided:
Condition: Has Empty Cart?
The condition will retrieve the cart of the current visitor and check if it’s empty or n ot, e.g. if there are any cart lines in it. By default this will on work with one cart per user.
Condition: Has Provided E-mail?
The condition will retrieve an e -mail for the current visitor if they have one.
Action: Set Cart Status
The status of the cart itself is also set to “abandoned”. It is reflected when searching for carts across all visitors using the GetCarts method on the service layer.
The plan also uses the standard Send E -Mail Message action, which is provided with CEP, to send out the notifi cation e-mail informing the user about the abandoned cart an encouraging him/her to return and complete the purchase.
2.2.2
Orders Service Layer
The orders service layer is essentially an extension of the cart service layer.
Configuration
All configuration for the order subsystem can be found in the Sitecore.Commerce.Orders.config file. Here you will find all details for the entities, pipelines, and repositories used by the cart system.
Entities
For the most part the default order entities for Commerce Connect are the same classes used by cart with the exception of Order and OrderHeader, it is expected that you will need to extend these entities. The
Order entity simply extends Cart and adds an OrderId property, and OrderHeader extends from CartBase which simple services as a class with some basic info about an Order. When you need to
extend any of the default entities you can achieve this by creating a new class that inherits from the appropriate type, and then patching the appropriate entity under <commerce.Entities> in the Sitecore.Commerce.Orders.config file. You can read more about individual entities in the Developer Guide.
New Order Placed Engagement Automation Plan
The plan is provided as a branch template and multiple instances can be created. There should be one instance per shop. The default plan only comes with an initial state and can be customized with different or more states as is needed.
Pipelines
The order layer only ships with four pipelines submitVisitorOrder, getVisitorOrder,
getVisitorOrders, and visitorCancelOrder. By default all that these pipelines will do is trigger a goal, except for submitVisitorOrder, which will also add the order to an Engagement Automation Plan. Each of these pipelines must be filled in with an appropriate processor that knows how to communicate to an ECS. For more details on the requests and results used by these pipelines please check out the Developer Guide.
2.2.3
Inventory Service Layer
The inventory service layer provides read -only integration with inventory / stock information from an ECS. However, this service layer can be extended to support read -write integration if desired.
Pipelines
The pipelines of the inventory service layer can be split into four categories: 1. Runtime Integration a. commerce.inventory.getStockInformation b. commerce.inventory.getPreOrderableInformation c. commerce.inventory.getBackOrderableInformation 2. Search Integration a. commerce.inventory.stockStatusForIndexing 3. Event Raising a. commerce.inventory.visitedProductStockStatus b. commerce.inventory.productsAreBackInStock c. commerce.carts.addCartLines
4. Products Back In Stock Engagement Plan
a. commerce.inventory.visitorSignUpForStockNotification b. commerce.inventory.removeVisitorFrom StockNotification c. commerce.inventory.getBackInStockInformation
Of these pipelines, only the following require integration with the ECS:
commerce.inventory.getStockInformation
commerce.inventory.stockStatusForIndexing
commerce.inventory.getPreOrderableInformation
commerce.inventory.getBackOrderableInformation
commerce.inventory.getBackInStockInformation Extending the other pipelines is purely optional.
Configuration
All configuration for the inventory service layer can be found in the Sitecore.Commerce.Inventory.config file. Here you will find all details for the entities, pipelines, and repositories used by the inventory system. It is highly recommend that you do not modify this file when adding your ECS connector components to the pipelines, overriding entity definitions, etc. Instead, use Sitecore configuration patching, and include all of your ECS configuration in a separate file named {ECSName}.Connectors.Inventory.config.
Entities
In the stock inventory system, there is no inheritance hierarchy for entitie s, and all of the connect pipelines treat them as read-only entities. If you wish to support updating stock information through the inventory system, you will need to extend the system with your own pipelines and service provider methods.
StockStatus and StockDetailsLevel Entities
The StockStatus and StockDetailsLevel entities are slightly different from traditional entities, in that they are intended to represent enumeration values. StockStatus represents a standard
enumeration, and StockDetailsLevel represents a flags enumeration. If either of these entities need to be extended for an ECS, the extended entities should also expose constants / read -only properties that represent the possible values for the entity. For example, if extending StockStatus to contain a new
Downloadable value, then the extended EcsStockStatus entity should expose a staticreadonly
field that represents the Downloadable value (i.e. public static StockStatus Downloadable = new EcsStockStatus(5, “Downloadable);)
The InventoryProductBuilder
The InventoryProductBuilder is a helper class used in the inventory system to build
InventoryProduct entities based on the current site context, compare InventoryProduct entities, etc. If you extend the InventoryProduct entity, thi s class will also need to be extended. Configuration for the InventoryProductBuilder is located in configuration at sitecore/inventoryProductBuilder
The InventoryAutomaionProvider
The InventoryAutomationProvider is a helper class used by the conditions an actions in the “Products Back in Stock” engagement automation plan to access automation state data as strongly -typed classes. Automation state data in the inventory system is stored as JSON serialized strings. The
InventoryAutomationProvider is responsible for serializing and deserializing information stored in the automation state data row.
Products Back in Stock Engagement Automation Plan
The plan is provided as a branch template and multiple instances can be created. There should be one instance per shop. The default plan can be customized with different or more states as is needed. Its purpose is to notify customers by email when a product they are interested in is back in stock and available for order.
This automation plan maintains state data that i s serialized in JSON format. The following values are used to track customer ‘back in stock’ notification requests, all of which represent a list of
StockNotificationRequest objects:
commerce.productNotifications
Contains the list of valid notification re quests that the customer is interested in.
commerce.expiredNotifications
commerce.backInStockProducts
Contains the list of products that are back in stock.
To support this automation plan, two new conditions and two actions have been created.
Action: Remove Expired Back In Stock Notifications
This action will update the automation plan state data, and remove ‘back in stock’ notification requests that have past their interest date. The default interest date is 180 days after the day the customer requested to be notified when a product is back in stock.
Action: Send Back In Stock Notification Email
This action sends email to the customers when a product they are interested has become back in stock. This action should be customized for each shop to contain the correct email address and email body branding.
Condition: Are Products Back In Stock Condition
This condition checks if any products that customers are interested in have become back in stock. If at least one product is back in stock, this condition will evaluate as true.
Condition: Has List Of Visitor Notifications Expired Condition
This condition checks if the customer still has any valid ‘back in stock’ notification requests. If at least one ‘back in stock’ notification request exists that has not expired, this condition will evaluate to false.
All of these conditions and actions rely on the InventoryAutomationProvider to access automation state data and perform notification compari sons. So, customizing the conditions and actions directly should not be necessary. Instead, the InventoryAutomationProvider should be updated to extend any functionality needed in this automation plan.
Extending the InventoryProduct Entity
The InventoryProduct is used to uniquely identify a product / stock information in the ECS. If the default InventoryProduct is not sufficient to identify stock information, you will need to extend this entity, as well as a few provider classes in the inventory system, using the following steps:
1. Create an EcsInventoryProduct class that derives from InventoryProduct that contains the information required to identify stock information in your ECS
2. Create an EcsCommerceContext that derives from CommerceContextBase that exposes properties that represent the additional information required to identify stock information in your ECS. It will be the responsibility of the client site / application to set these properties based on client state.
3. Create an EcsInventoryProductBuilder class that derives from
InventoryProductBuilder, and override all methods of the base class to properly handle your EcsInventoryProduct. In particular, you will need to use the new
EcsCommerceContext inside CreateInventoryProduct() to populate the additional properties of you EcsInventoryProduct. For example:
var ecsProductInfo = ((EcsCommerceContext)this.CommerceContext).EcsProductInfo; 4. Create an EcsInventoryAutomationProvider class that derives from
InventoryAutomationProvider, and override the GetProductNotifications,
GetExpiredNotifications, and GetProductsBackInStock methods. These methods will need to return an EcsInventoryProduct for the StockNotificationRequest.Product
property. Automation state data in the inventory system is stored as JSON seri alized strings, so this will usually require some custom deserialization code.
5. Register your EcsInventoryProduct entity at sitecore/commerce.Entities/InventoryProduct 6. Register your EcsCommmerceContext at sitecore/commerceContext
7. Register your EcsInventoryProductBuilder at sitecore/inventoryProductBuilder
8. Register your EcsInventoryAutomationProvider at sitecore/inventoryAutomationProvider
2.2.4
Customers and Users
What is the difference between a User and a Customer
Both of these entities are consumers of your ECS webshop. The User (CommerceUser) account is primarily for authentication purposes and exposing the user to DMS. T he customer
(CommerceCustomer) account is for representing the customer in the ECS who will receive and pay for the submitted orders. In si mple B2C scenarios the CommerceUser and the CommerceCustomer
represent two aspects of the customer, where in B2B scenarios the CommerceUser represents the person acting on behalf of the customer, which typically represents an organization or company. There is a many-to-many relationship between customers and users and there could be customers without users (anonymous checkout, without registration for example), but normally users would not be without customers.
Different ways to work with an ECS
There are multiple scenarios to use Connect to work with an ECS for customers and users. Some usage examples of the domain model are:
To pass customer and user information between the external commerce system and Sitecore
To set and/or get customer information during checkout
To register accounts for new users
To authenticate, e.g. login or logout registered users
To enter a user into an EA plan when creating a user account and trigger goals when logging in You can read more about the domain model for customers and users in the Connect Developer Guide.
Configuration
All configuration for the customer subsystem can be found in the Sitecore.Commerce.Customers.config file. Here you will find all details for the entities, pipelines, and repositories used by the customer and user system.
Entities
The default customer entities for Commerce Connect only assume some of the basic customer and user information that will be used across all commerce systems, it is expected that you will need to extend these entities.
There are five (5) entities defined in the Connect system for customers and users, all of which you may choose to extend to suite your needs.
Co mme rc e Cu s t o me r
The concept of a customer is determined by the integrated commerce system and the e -shop solution. In B2C solutions, the customer typically represents a person whereas in B2B scenarios a customer typically represents a company.
The CommerceCustomer entity will always be extended to include custom information particular to the ECS.
Co mme rc e Us e r
The CommerceUser class is responsible for representing a user account. A user resembles a visitor of a webshop (website) who has identified him - or herself explicitly by creating a login account by which the person can be (re-)authorized.
The CommerceUser entity can be extended to include custom information particular to the ECS, but the default implementation will work if users are stored in Sitecore only for authentication purposes.
Cu s t o me rP a rt y
CustomerParty is used to represent the type and 0 -to-many relationship between the customer and a list of parties, where parties are of type Party.
Cu s t o me rP a rt y Ty p e
CommercePartyType is used to indicate the type of relationship between the customer and party. The class is introduced as an extensible enum. In order to extend and customize the
CustomerPartyTypes options. Connect has two different party types, AccountingParty and
BuyerParty.
P a rt y
Party is a shared entity between carts service layer and customer and users service layer. This entity stores party information for example: address information.
When you need to extend any of the se default entities you can achieve this by creating a new class that inherits from the appropriate type, and then patching the appropriate entity under
<commerce.Entities> in the Sitecore.Commerce.Customers.config file. You can read more about individual entities in the Developer Guide .
Pipelines
There are numerous pipelines for Customers and Users allow most basic functionality. Some example of the pipelines allow for:
Creation of Customer and Users via CreateCustomer and CreateUser.
Updating of Customers and Users via UpdateCustomer and UpdateUser.
Deletions via DeleteCustomer and DeleteUser.
Associating Customer to Users via AddCustomers and AddUsers.
Adding of Party information via AddParties.
Chapter 3
Product Synchronization
Sitecore Connect contains a service layer for synchronizing product data between Sitecore and one or more external commerce systems.
Having access to product data is essential for any shop, but using the product synchronization layer is optional with Connect. By design, the service layers work independently and all the other service layers only care about a product ID, whi ch is typically provided in parameters.
Note
For more information about benefits and drawbacks for using product synchronization compared to other approaches like use of data providers, see the Connect Overview document.
Note
For a description of the service layer methods, pipelines and domain objects, see the Sitecore Commerce Connect Developer Guide
The following sections describe:
1. The basics of product synchronization 2. The Connect product data model 3. The item data structure
4. The object domain model
3.1
The basics of product synchronization
There are a couple of different ways to synchronize one or more products ranging from explicit to implicit specification of the products to synchronize:
Synchronize All Products
The service method SynchronizeProducts synchronizes all products and related product
repositories (a.k.a. artifacts), that needs to be synchronized. A part of the logic, retrieves a list of updated products from the external commerce system and a list from Sitecore and compares them to implicitly determine which products to synchronize and which to delete.
After determining which products to synchronize, due to being newly added, updated or deleted, the next method SynchronizeProductList is called, specifying the list of products to synchronize. Before calling Synchronize Product List, all the related product repositories are synchronized.
Synchronize Product List
The service method SynchronizeProductList accepts a list of product IDs which it iterates over and calls the Synchronize Product method.
No related product repositories are synchronized as part of this, but are assumed to be up -2-date.
Synchronize Product
The service method SynchronizeProduct accepts a single product ID for which the data is synchronized.
No related product repositories are synchronized as part of this, but are assumed to be up -2-date.
Synchronize Artifacts
The related product repositories like Manufacturers, Product Types, Classifica tions (categories) and global specifications are referred to as product artifacts.
The service method SynchronizeArtifacts will synchronize all the repositories separately. While synchronizing all or a list of products, a number of Sitecore Disablers are t emporarily activated to speed up performance, like EventDisabler, SecurityDisabler etc.
Note
The item IDs generated in Sitecore, for the product data in the external system, are based on a direct mapping of external IDs to Sitecore Item IDs. That means the same specific item ID is always generated for a specific external ID. The implication is, that product data can be synchronized, even if the related product repositories are not up to date. When the related product data is synchronized the connection i s automatically established because the Sitecore item ID was already known and configured. For more information see section
3.1.1
2-way synchronization
The synchronization provided with Connect is designed to work in both directions. However, the most common scenario is to synchronize only one way, from the external commerce system to Sitecore content.
The logic that determines whether an entity is updat ed in the ECS, CMS, or both is based on a Direction parameter and the configured strategy. Each synchronization method takes an optional Direction parameter. If not provided the default direction value is Direction.Inbound, which means the product data is taken from the ECS and imported into CMS. The possible Direction values are:
Direction.Inbound, e.g. one-way synchronization from ECS to CMS. This is the default value.
Direction.Outbound, e.g. one-way synchronization from CMS->ECS.
Direction.Both, e.g. 2-way synchronization based on the configured synchronization strategy The default synchronization strategy is based on timestamps for when the entity was last updated and the last one (newest date and time) wins, meaning if the entity was last updated in t he external system, then it gets overwritten in Sitecore and vice versa. Only when specifying 2 -way synchronize with Direction.Both will the synchronization strategy be evaluated to determine which way data flows. The strategy is
executed per product and all its constituent entities. For more information on customizing the synchronization strategy, see section 3.7 How to Create a Custom Synchronization Strategy
3.1.2
Pipeline pattern
Each type of item that makes of the product domain model is managed individually by following the divide and conquer strategy. As with all other service l ayers in Connect, the logic is implemented using
pipelines. It means that there are one or more pipelines associated with every product entity in the model, where the entity can be product, manufacturer, division, classification etc.
Connect uses a pattern similar to the Bridge Design Pattern for the processors in the pipelines for each type of entity. The product domain model serves as the data abstraction that hides its implementation in the ECS as well as in Sitecore. Each entity is read from both the ECS and Sitecore.
A comparison of the values between identical instances is executed and the result is written back to both the ECS and Sitecore. This means that each pipeline has the same pattern of processors for each entity, where the entity can be product, manufacturer, division, or classification.
The two-way synchronization takes place in the following order: 1. The entity is read from the ECS.
Naming convention: “Read[TypeOfEntity]FromSC” 2. The entity is read entity from the CMS.
Naming convention: “Read[TypeOfEntity]FromECS”
3. The entities are compared and the differences are resolv ed. Naming convention: “Resolve[TypeOfEntity]Changes”
4. The results are w ritten to the ECS.
Naming convention: “Save[TypeOfEntity]FromECS” 5. The results are w ritten to the CMS.
Naming convention: “Save[T7ypeOfEntity]FromSC”
When implementing integration with an external system, it is processors number 1 and 4, which are relevant to implement. The others come with Connect. There needs to be a custom version of processor number 3, but a base processor is provided which provides most of the logic needed.
Depending on the value of the Direction parameter, some of the previously listed processors skip execution. For example, if the Direction parameter is set to inbound (ECS->CMS), there is no need to read the entity from CMS or write it back to the ECS.
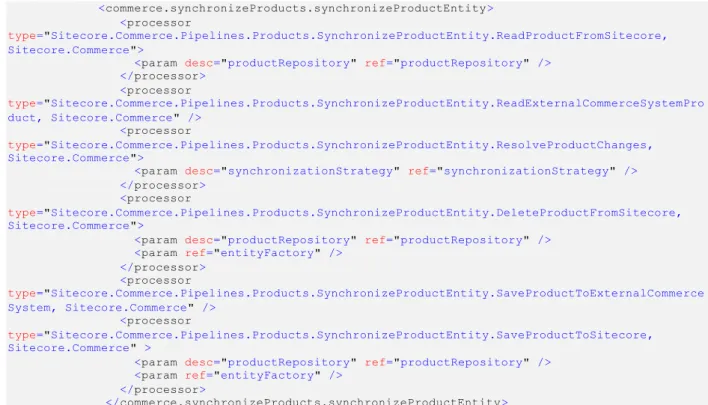
The following snippet shows the default configuration for synchronizing the main product item (a.k.a. ProductEntity). The basic pattern handles the cases of creating and updating. For product, an additional
processor is injected to delete a product if it no longer exists in the external commerce system and must be removed from content.
<commerce.synchronizeProducts.synchronizeProductEntity> <processor
type="Sitecore.Commerce.Pipelines.Products.SynchronizeProductEntity.ReadProductFromSitecore, Sitecore.Commerce">
<param desc="productRepository" ref="productRepository" /> </processor> <processor type="Sitecore.Commerce.Pipelines.Products.SynchronizeProductEntity.ReadExternalCommerceSystemPro duct, Sitecore.Commerce" /> <processor type="Sitecore.Commerce.Pipelines.Products.SynchronizeProductEntity.ResolveProductChanges, Sitecore.Commerce">
<param desc="synchronizationStrategy" ref="synchronizationStrategy" /> </processor>
<processor
type="Sitecore.Commerce.Pipelines.Products.SynchronizeProductEntity.DeleteProductFromSitecore, Sitecore.Commerce">
<param desc="productRepository" ref="productRepository" /> <param ref="entityFactory" />
</processor> <processor type="Sitecore.Commerce.Pipelines.Products.SynchronizeProductEntity.SaveProductToExternalCommerce System, Sitecore.Commerce" /> <processor type="Sitecore.Commerce.Pipelines.Products.SynchronizeProductEntity.SaveProductToSitecore, Sitecore.Commerce" >
<param desc="productRepository" ref="productRepository" /> <param ref="entityFactory" />
</processor>
</commerce.synchronizeProducts.synchronizeProductEntity>
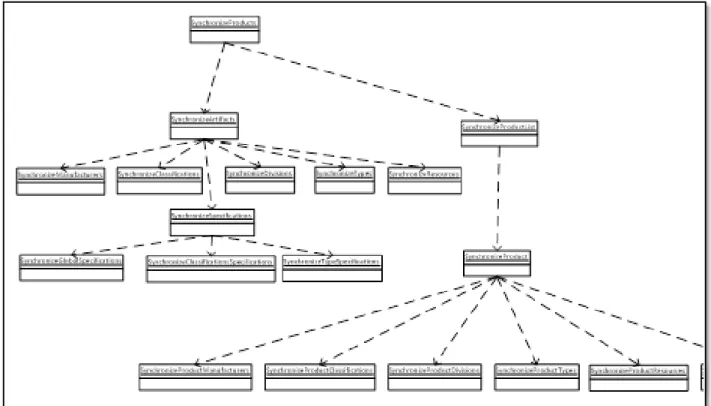
Figure 1 illustrates how the main pipeline SynchronizeProducts are executing other pipelines internally to do a full synchronization.
Pipelines and nam ing convention Pipelines are generally split into two types:
Pipelines that operate on related product repositories, separate from the actual product repository.
These separate repositories are used as references from the product repository. There are repositories for Manufacturers, Classifications, Types, Divisions, Resources and specifications. The pipeline names are prefixed with “Synchronize”. An example is SynchronizeManufacturers, which is responsible for synchronizing all manufacturers.
Pipelines that operate on individual products and synchronize references from products to the separate repositories.
The pipeline names are prefixed with “SynchronizeProduct ”, having the word product added to signal that they are dealing with individual products as opposed to entire repositories. An example is SynchronizeProductManufacturers, which is responsible for synchronizing the
connections/references between a specific product and its related manufacturers stored in the separate Manufacturers repository.
Processors that begins with the word Run are responsible for calling a separate pipeline and transfer the needed parameters. An example is RunSynchronizeManufacturers, which executes the
SynchronizeManufacturers pipeline.
3.1.3
Integrating with Connect
Integrating products with Sitecore Commerce Connect via product synchronization requires:
Potentially customizing the product domain model, although the default model will cove r most scenarios and carry the needed information for presentation purposes. For more information on customizing the domain model, see section 3.4, The Object Domain Model
The object diagram below visualizes the object domain model. For more information, see the Sitecore Commerce Connect Developer Guide.
How to Implement a Custom Product Entity. The domain model consists of a list of Sitecore product template and corresponding object types.
1. Creating a custom processor for each pipeline that reads data externally and stores it in an instance of the corresponding domain model object type, for which the pipeline is responsible. 2. If the synchronization needs to go both ways, two additional processor must be create d for each
pipeline
o A processor which stores the product data externally. The product data will be given in a an instance of the corresponding domain model object type, for which the pipeline is responsible
o A processor, which resolves the differences and d etermines the resulting output. For more information, see section 3.7 How to Create a Custom Synchronization Strategy.
Note
When reading data in the external system and populating an instance of a domain model entity (step #2), it’s important to provide unique names for entities of the same type so that it will result in unique item names in Sitecore. If not, it cannot be guaranteed that the items can be accessed. An example is
resources, where two images with identical names for the same produ ct, will result in only one of them being shown on the website, because Sitecore always picks the first item with a given name
3.1.4
Repository design pattern
Each Connect processor that writes data to Sitecore content is based on the Repository design pattern and has an associated configuration entry in the Sitecore.Commerce.Products.config file.
In the following snippet, the default configuration for the ManufacturerRepository is displayed.
<manufacturerRepository type="Sitecore.Commerce.Data.Products.ManufacturerRepository, Sitecore.Commerce" singleInstance="true">
<path ref="paths/manufacturers" />
<template>{8ECDC0A6-3A85-4F89-8F49-8A53AA75595E}</template> <prefix>Manufacturer_</prefix>
</manufacturerRepository>
All repository configuration have the following in common
A name and a type attribute that refers to the implementation. The name is the element name and the naming scheme is: [entity name in singular] + “Repository”, like “manufacturerRepository”.
A <path> parameter element which refers to the main <paths> element, to specify where the root of the repository is located.
A <template> parameter element that contains the ID of the template that the repository operates on. The template is used when creating new instances of the given item type.
A <prefix> parameter element containing an arbitrary but fixed prefix, which is used as input to the IDGenerator along with external ID, to ensure the outcome is a unique GUID ID, which can be used as a unique item ID. For more informa tion see section 3.8 How to Implement a Custom ID Generator.
There is a special kind of repository types, whose names start with “product”, that doesn’t actually store data in a separate repository, but augment the main product entity with references to the separate repositories. An example is productManufacturerRepository that has the responsibility of managing the references between the product item and the related manufacturer items. The configuration for
productManufacturerRepository is shown below.
Instead of a template and path element, it has a couple of <param> elements, specifying the name of the field on the product item that holds the references (e.g. item IDs) to the related manufacturers. As these types of repositories needs to generate the right item IDs, they need to know the same prefix as was used in the configuration for the <manufacturerRepository>.
<productManufacturerRepository
type="Sitecore.Commerce.Data.Products.ProductFieldRepository, Sitecore.Commerce" singleInstance="true">
<param desc="productFieldName">Manufacturer</param> <param desc="productPrefix">Product_</param>
<path ref="paths/manufacturers" /> <prefix>Manufacturer_</prefix> </productManufacturerRepository>
Note
Apart from being used in the pipelines to store entities in Sitecore, the repositories can be used to obtain an object instance of the given type by providing an ID.
All repositories provides a method that takes an ID as input and returns an instance of the given entity type:
public virtual TEntity Get(string entityKey)
Retrieving a specific product looks like this:
var product = this.productRepository.Get("external id");
3.1.5
ID M apping
By design, the remote product repository is always regarded as the main repository, which by default owns the products. That makes the ID of the products and artifacts in the external system the primary key.
In Sitecore, the IDs of the corresponding items for products and artifacts are generated by Connect instead of relying on the default Sitecore implementation that automatically generates a new GUID for each new item created.
By using a hash algorithm, it is possible to generate a direct mapping between the IDs coming from the external system and the item IDs in Sitecore. It has the following benefits:
No need for mapping tables taking up space.
It becomes very fast to get the ID of the corresponding item.
There is no need for searching for the items in Sitecore if the external ID is provided. The default implementation is based on the MD5 hash algorithm and has the following format:
Item.ID = MD5.ComputeHash(Prefix + ExternalID);
For more information on creating a custom ID mapping implementation, see se ction 3.8 How to Implement a Custom ID Generator
3.1.6
Indexing
When Connect is installed the default index is patched to exclude all product data and a separate product index is created, which contains extended product data.
While synchronizing all products or a list of products, the indexing is stopped. After synchronization finishes the indexes are rebuilt. This is done for performance reasons. The configuration snippet below shows the default configuration of the SynchronizeProductList pipeline containing the processors related to indexing. <commerce.synchronizeProducts.synchronizeProductList> <processor type="Sitecore.Commerce.Pipelines.Products.SynchronizeProductList.PauseSearchIndexing, Sitecore.Commerce" /> <processor type="Sitecore.Commerce.Pipelines.Products.SynchronizeProductList.SynchronizeProductList, Sitecore.Commerce" /> <processor type="Sitecore.Commerce.Pipelines.Products.SynchronizeProductList.ResumeSearchIndexing, Sitecore.Commerce" /> <processor type="Sitecore.Commerce.Pipelines.Products.SynchronizeProductList.RebuildSearchIndexes, Sitecore.Commerce" /> </commerce.synchronizeProducts.synchronizeProductList>
In the Sitecore.Commerce.Products.Config file, the setting ProductSynchronization.ProductIndexes contains a comma separated list of index names that are stopped and re-started during product synchronization
<!-- PRODUCT INDEXES.
The indexes used to store synchronized products.
Can be stopped, resumed and rebuild automatically during product synchronization. -->
<setting name="ProductSynchronization.ProductIndexes" value="sitecore_master_index, commerce_products_master_index" />
Note
If additional indexes are created, the setting should be updated to include the name of the indexes. If not, indexing will continue during synchronization resulting in performance degradation
Note
If new or custom product templates are introduced, both the DefaultIndexConfiguration and the Product index configurations must be updated. For more information, see the following sections.
The default index
By design, the default master and web indexes are configured, not to include the items stored in the product repositories.. The default index configuration is patched with an Exclude section with an entry for each product template:
<exclude hint="list:ExcludeTemplate">
<ProductRepositoryTemplateId >{F599BF48-D6FE-40DC-9F78-CF2D56BFB657}</ProductRepositoryTemplateId>
<ProductTemplateId>{47D1A39E-3B4B-4428-A9F8-B446256C9581}</ProductTemplateId> …
</exclude>
For the full configuration see the configuration file
“Sitecore.Commerce.Products.Lucene.DefaultIndexConfiguration.config“
The product index
Connect comes with its own product index for both the master and the web database. The index serves several purposes:
To separate content from data in two separate indexes
The product index is used, when searching the product repository bucket from within the Content Editor. This is achieved by patching the getContextIndex pipeline:
<contentSearch.getContextIndex>
<processor type="Sitecore.Commerce.Pipelines.ContentIndex.CustomIndex.FetchCustomIndex, Sitecore.Commerce"
patch:before="processor[@type='Sitecore.ContentSearch.Pipelines.GetContextIndex.FetchIndex
, Sitecore.ContentSearch']"/> </contentSearch.getContextIndex>
To include extended product data.
A pipeline “commerce.inventory.stockStatusForIndexing” reads inventory data per product from the external commerce system and populates the index. Computed fields are used to include the inventory data. The configuration can be found in file
Sitecore.Commerce.Products.Lucene.Index.Common.config .