Wireless Internet
Online User Guide
Wireless Internet
Online User Guide ii
NOTICE
This user guide is published and copyrighted by Cingular Wireless, L.L.C. Every effort has been made to ensure technical accuracy; information contained in this document is subject to change without notice and does not represent a commitment on the part of Cingular Wireless, L.L.C.
TRADEMARKS
Cingular is a service mark of Cingular Wireless, L.L.C. All other trademarks and service marks contained herein are the property of their respective owners.
2001 Cingular Wireless, L.L.C.
All Rights Reserved. (Rev. 09/2002) DOC 090102WI1000
5565 Glenridge Connector Atlanta, GA 30342
Wireless Internet
Online User Guide iii
Table of Contents
Using Text messaging... 2
Optional Setup from Your PC ... 5
Setting Up Your My Wireless Window Web Portal Account ... 6
Using Your My Wireless Window Web Portal Account... 8
Describing My Info ... 9
View My Info... 10
View My Info – Weather Content... 11
View My Info - News Headlines Content ... 12
View My Info – Sports Content ... 13
View My Info - Stock Quotes Content... 14
View My Info - Lottery Results Content... 15
View My Info - Search Center Content... 16
View My Info – Horoscope Content ... 17
View My Info - Wireless Bookmarks Content... 18
View My Info - Web Bookmarks Content ... 19
View My Info - Local Information Content ... 20
My Info Alerts... 21
My Info Alerts - Configuring Alerts ... 22
My Info Alerts - Editing Alerts ... 26
Update Registration... 27 Personalize ... 28 Describing Messaging ... 29 Email - Inbox ... 30 Email - Compose... 31 Email - Folders... 32
Email - Get POP Mail ... 33
Email - Options ... 34
Instant Messaging... 36
Describing the Planner ... 38
Planner - Calendar... 39
Planner - Address Book... 42
Planner - To–Do Lists ... 44
Planner - Download SyncNow... 46
Describing Fun & Games ... 47
Fun & Games - Ringtones... 48
Fun & Games - Games ... 49
Describing Shopping ... 50
Shopping – Introduction... 51
Shopping – Shopping ... 52
Shopping – Wallet... 53
Describing Find It... 54
Describing Cool Wireless Sites ... 55
Wireless Internet
Online User Guide 1
Cingular Wireless Internet Service About this
Online
User’s Guide
This Online User’s Guide describes the features and capabilities of Cingular Wireless Internet service at the time of publication. Like most Internet
services, Wireless Internet will be updated and enhanced on a continual basis. You can download a copy of this guide by going to
www.mywirelesswindow.com and clicking user information under wireless internet. Follow the online instructions to download the guide.
Because all Internet-ready phones don’t have the same screen size, feature capability, and functionality, user experiences may vary. Wireless Internet service is subject to normal risks and problems experienced with Internet services and may not be available in some geographic areas.
The instructions in this guide assume you are familiar with your Internet-ready wireless phone, its operation, and convenient features.
Feature
Suite Now your wireless phone can bring you the best the Internet has to offer. Getnews, shop online, and check e-mail from almost anywhere, anytime. You can view Feature information by clicking service description under wireless internet on the www.mywirelesswindow.com web portal.
You can also view information on: • Pricing
• Availability of service in geographical areas • Phone devices offered and supported
• Content providers
• User information, such as an Online User’s Guide and Getting Started guides
Wireless Internet
Online User Guide 2
Using Text messaging
Introduction With Cingular Wireless Text messaging included in your Wireless Internet service, you can use your wireless phone to receive short messages directly on your phone’s display screen, without establishing a dial-up browser session.
It’s simple. Anyone with Internet access can send you a short message using the direct Text messaging address of your phone, and there are no airtime charges! And, if your phone is turned off or out of the digital service area, Cingular Wireless stores and attempts to deliver your messages for up to seven days. Because many alerts like daily horoscopes or a weather announcement are time sensitive, the “My Info Alerts” will automatically expire in 24 hours.
Text messaging e-mail addresses vary based on your home geographical area (See list of states and corresponding IM email address below). Visit
www.cingular.com to pick your state and city for Text messaging details.
Geographic Areas Text messaging E-mail Address
Arkansas, California, Connecticut, Delaware, Idaho, Illinois, Kansas, Maryland,
Massachusetts, Michigan, New Jersey, New York, Nevada, Ohio, Oklahoma,
Pennsylvania, Rhode Island, Texas (except Houston), Virginia, Washington DC, West Virginia, Washington, Wisconsin
10 digit [email protected]
Alabama, Florida, Georgia, Indiana, Kentucky, Louisiana, Mississippi, North Carolina, South Carolina, Tennessee, Houston Texas
Wireless Internet
Online User Guide 3
Testing Your
Service We recommend that you send yourself test messages to help you instructothers on how to send you messages.
Step Action
1 Ensure that your digital wireless phone is on and that you are within the digital service delivery area.
2 Send yourself an Internet e-mail addressed to your Text messaging address.
Note: You will see an envelope symbol on your phone’s screen when a message is delivered. Cingular Text messaging service works with many manufacturers’ digital phones. Consult your phone's user’s guide if you have questions about reading, deleting, and storing text messages on your phone.
3 Read your messages and practice deleting and saving them. Your phone can only store a limited number of messages, so remember to erase old messages to make room for new ones.
Wireless Internet
Online User Guide 4
Text
messaging E-Mail Service Option
It’s easy for the important people in your life to reach you with Cingular Wireless Text messaging. The following steps describe this process.
Step Description
1 Using a desktop or personal computer with Internet access, the message sender opens the Internet e-mail program on his or her computer.
2 The sender enters your Cingular Wireless Text messaging address (after To: in most e-mail programs).
3 The sender enters a short message and sends it like any other Internet e-mail message.
4 Your message is promptly delivered to your digital wireless phone, and you read it at your convenience. Online Message Center Service Option
Message senders can use the Cingular Wireless Online Message Center to send messages using a Web browser.
The following steps describe how someone will send you a message using the Online Message Center service option.
Step Description
1 The message sender reaches the Online Messaging Center by visiting
www.cingular.com and selecting your state and city.
2 On the next page, click on Send a Digital Text Message.
3 The sender enters your Cingular Wireless subscriber mobile number, fills in the appropriate boxes, and then clicks Send.
4 The message is promptly delivered to your digital wireless phone, and you read it at your convenience.
Wireless Internet
Online User Guide 5
Optional Setup from Your PC
Introduction Before navigating and using your new Internet-ready wireless phone and the Cingular Wireless Internet service, you may want to set up and personalize some of the features and capabilities, using your PC and a regular landline Internet connection (not provided with Wireless Internet service).
From your PC, you can use the Web to set up your My Wireless Window web portal account.
Wireless Internet
Online User Guide 6
Setting Up Your My Wireless Window Web Portal Account
New User
Registration To personalize your My Wireless Window web site for use from your phonebrowser, you need to register the first time you enter the web site. If you are an existing Text messaging customer and currently use this web site for Text messaging, contact Cingular customer service at 1-866-463-6272 or 611 from your wireless phone to have your web site account upgraded to support the personalized browser content.
You can register as a new user by following these steps:
Step Action
1 Ensure that your wireless phone is powered on.
Note:You will receive an authorization code in a later step. You will need this code to complete your registration.
2 From your PC, open your browser and enter the following URL address:
www.mywirelesswindow.com.
3 Under wireless internet, click the register link.
4 In Username, enter a username and click Continue.
Note: The username must start with three alpha characters and be
no more than 30 characters long; only letters, numbers, and an _ (underscore) can be used.
5 Follow the prompts that appear until you can click the Accept button.
Note: If your username is already in use, you can accept a suggested username or you can type another username and click Try Again. If your username is not in use and it is a valid username, you can click the Accept button.
6 Click the Accept button to view Step 2: Create your user profile.
7 Create your user profile by typing your personal information in the fields displayed.
Note: Required fields appear with an asterisk (*). You must complete all required fields before continuing.
8 Click Submitwhen you are done.
Note: Information appears next to the Submit button that describes how an authorization code will be sent and billed to your phone.
9 View your authorization code on your wireless phone by accessing Text Messages, and click Continue to continue with your registration.
Refer to “Haven’t Received Your Authorization Code?” on page 7 if you cannot find your authorization code.
10 Enter your authorization code from your wireless phone on the Step 2: Create your user profile page.
Note: You enter the authorization code to validate your wireless phone number for the My Wireless Window portal.
Wireless Internet
Online User Guide 7
Step Action
12 Follow the prompts on the screen to create your Cingular DirectBill account OR
click Continue to skip this step.
Important: It is very important that you set up your Cingular DirectBill account to purchase products, such as ringtones for your wireless phone from Cingular-preferred merchants. You should following these steps:
A. Select a PIN (Personal Identification Number).
Note: Create a PIN code between 5 and 16 numerical characters. You will need to enter this PIN each time you make a Cingular DirectBill purchase.
B. Confirm your PIN by retyping it. C. Select a secret question.
Note: If you forget your PIN, we will ask you to answer a unique question to reset it. Please select a hint that will be easy for you to remember, but not easy for someone else to answer for you. D. Enter an answer for the secret question.
E. Click the Submit button.
13 Ensure that you see the following message: Registration Complete.
Congratulations! You have successfully registered yourself for My Wireless Window and/or Cingular DirectBill. You will receive a confirmation e-mail at your desktop e-mail address that you provided during registration.
You can begin using the My Wireless Window portal or set up your e-wallet for Shopping by pressing Click here under either section.
Haven’t Received Your
Authorization Code?
If you have waited 5 minutes and still have not received your Authorization Code, then try the following options:
• Ensure that your phone is powered on, and click the Resend button. • If you still have not received your Authorization Code, press the click
here link to confirm that you entered your wireless phone number
correctly. Click the Resend button when you return to the “Validate your wireless device continued” page.
If you correctly entered your wireless phone number and still have not received the Authorization Code, then please contact Cingular Wireless customer service at 1-866-463-6272 or 611 from your wireless phone.
Wireless Internet
Online User Guide 8
Using Your My Wireless Window Web Portal Account
Using Your
Account The My Wireless Window web portal allows you direct and quick access tomaintain your personalized account. This section describes how to set up and use the services of Wireless Internet and the My Wireless Window portal.
Tabs on the
Home Page Once you have completed the self-registration process and have logged intothe mywirelesswindow.com site, the home page displays a series of tabs: • My Info
• Messaging • Planner • Fun & Games • Shopping • Find it
• Cool Wireless Sites
When you click any of these tabs, you will see additional links and information. The rest of this User’s Guide describes these links and
information in detail, including detailed steps on performing tasks from each tab.
Wireless Internet
Online User Guide 9
Describing My Info
Available
Links When you click the My Info tab, the following links appear:• View My Info • My Info Alerts
• Update Registration • Personalize
Each of these links enables you to perform certain tasks. This section describes each link in detail.
Wireless Internet
Online User Guide 10
View My Info
Types ofInformation When you click the View My Info link, you can views alerts on the followingtypes of information: • Weather • News Headlines • Sports • Stock Quotes • Lottery • Horoscope • Search Center • Wireless Bookmarks • Local Information • Web Bookmarks
You create these alerts from the My Info Alerts link. We discuss this information in “My Info Alerts” later in this guide.
Wireless Internet
Online User Guide 11
View My Info – Weather Content
DescribingWeather Content
This section identifies the weather for the city that you defined in your profile. It is also the starting point for obtaining weather information about other cities and towns around the United States.
The weather is shown with the following information:
• Current weather conditions, including temperature and weather observation (for example: sunny, cloudy, etc.)
• Five-day forecast for the city specified in your profile
• Icons indicating the type of weather (for example: sunny, showers, etc.) • Link to check weather in other cities
Editing Weather Content
You can edit your weather content by following these steps:
Step Action
1 Click the Edit button.
2 Type the US city and select the state that you want OR type the zip code of the city you want.
For an international location, click the Select an international city here link.
Wireless Internet
Online User Guide 12
View My Info - News Headlines Content
DescribingNews Headlines Content
This section allows you access to as much or as little information as you want. You get the top headlines for the topic identified, and then you can click a link to view details about the displayed headline. You can also click on the topic headline link for additional headlines.
You can view news headlines that cover the following topics: • Top News • Politics • Money • Science • Entertainment • Sports Editing News Headlines Content
You can edit your News Headlines content by following these steps:
Step Action
1 Click the Edit button in the upper right-hand corner.
2 Select the check boxes for the news topic you want to monitor.
3 In the Change Number of Headlines to display drop-down list, select the number of headlines per topic you wish to view.
Note: If you select No Topics, the News Headlines section will be empty.
Wireless Internet
Online User Guide 13
View My Info – Sports Content
DescribingSports Content
This section displays information for specific leagues or individual teams that you specify in your profile. You can request results for all contests or
customize the information for a specific league.
Editing Sports Content
You can edit your Sports content by following these steps:
Step Action
1 Click the Edit button in the upper right-hand corner.
2 Click the Add League button to add a league.
3 Select the leagues that you want to view on your My Wireless Window home page. Click the Return to Edit Sports button when you are done.
4 If you want to track specific teams within a league, click the Add Team button next to the league with teams you want to track. Click the Return to Edit Sports button when you are done.
Wireless Internet
Online User Guide 14
View My Info - Stock Quotes Content
DescribingStock Quotes Content
This section lists those stock quotes that you defined in your profile. It provides a current quote of the stock price, the change from the close of business yesterday, direction (up or down) of the stock price, and the percentage of the gain or loss for the day.
Additionally, market indexes are also reported with the same level of detail. This detail includes the current value of the index, the movement relative to yesterday's closing level, and the percentage increase or decrease of the index.
Note: All stock information is delayed by 15 minutes for the NASDAQ and 20
minutes for all other markets. Editing
Stock Quotes Content
You can edit your stock quotes content by following these steps.
Step Action
1 Click the Edit button in the upper right-hand corner to open the Stocks page.
2 In the Ticker Symbols box, type the ticker symbol of the stocks you want to track. Separate each entry with a comma.
3 Click the Save Changes button.
Note: If a problem occurs with the Ticker Symbol, an error message appears in the Quote window.
Wireless Internet
Online User Guide 15
View My Info - Lottery Results Content
DescribingLottery Content
This section displays lottery information for the state that you defined in your profile. You can check the lottery results for your home state and any other state that has a lottery. You can also request lotto numbers to be generated for you so you won’t have to think about which numbers to pick.
Editing Lottery Content
You can edit your Lottery content by following these steps:
Step Action
1 Click the Edit button in the upper right-hand corner.
2 Select the state for which you want to track the lottery.
Wireless Internet
Online User Guide 16
View My Info - Search Center Content
DescribingSearch Center Content
This section allows you to locate people, places, and things that are in a variety of databases. The content for this page does not come from your profile.
Those individuals whose information is not stored within any database will not turn up in the search. For example, individuals who have unlisted phone numbers will not be found in this search.
Editing the Search Center Content
You can edit the Search Center content by following these steps:
Step Action
1 Click the Edit button in the upper right-hand corner.
2 Select one of the search criteria you wish to use.
3 Click the Save Changes button.
Searching for a Person, Place, or Thing
You can search for a person, place, or thing by following these steps:
Step Action
1 Click the Edit button in the upper right-hand corner.
2 Select one of the search criteria you wish to use.
Wireless Internet
Online User Guide 17
View My Info – Horoscope Content
DescribingHoroscope Content
This section displays horoscope information for the birth date that you defined in your profile. You can receive your daily horoscope or look up the daily horoscope for another zodiac sign.
Editing the Horoscope Content
You can edit the Horoscope content by following these steps:
Step Action
1 Click the Edit button in the upper right-hand corner.
2 Select an astrological sign.
3 Click the Save Changes button.
Looking Up a Sign
You can select a specific astrological sign, other than your default one, by selecting the sign in the Look up a sign drop-down list, and clicking Find.
Wireless Internet
Online User Guide 18
View My Info - Wireless Bookmarks Content
Setting UpBookmarks This section displays bookmarks that you set up for your wireless phone.These bookmarks are http links to web sites.
Note: Only Internet web pages that are written in Wireless Mark-up Language
(WML) complying with the Wireless Application Protocol (WAP) that is used by Cingular Wireless can be viewed on your wireless device. If you feel you have received an error message on a site that you believe is WML/WAP compliant, contact the webmaster at that site. Customers or developers with questions about the Cingular Wireless Application Developers Program or those with issues concerning the interface of applications to our various data networks should visit the developers web site at
http://alliance.cingularinteractive.com. Editing Your
Bookmarks
You can edit your wireless bookmarks by following these steps:
Step Action
1 Click the Edit button.
2 In the link URL fields, enter the URL for the link(s) with which you wish to connect to from your wireless phone.
3 Repeat the process until you have entered all of the URLs.
Wireless Internet
Online User Guide 19
View My Info - Web Bookmarks Content
Setting UpWeb
Bookmarks
This section displays bookmarks that you set up for your PC. These bookmarks are http links to web sites.
Editing Your Bookmarks
You can edit your web bookmarks by following these steps:
Step Action
1 Click the Edit button.
2 In the link URL fields, enter the URL for the link(s) with which you wish to connect while using your PC.
3 Repeat the process until you have entered all of the URLs.
Wireless Internet
Online User Guide 20
View My Info - Local Information Content
DescribingLocal
Information Content
This section provides links to a variety of information. Almost any kind of information about your local area can be found.
Wireless Internet
Online User Guide 21
My Info Alerts
Alerts You can have information sent to your wireless phone in the form of alerts. Alerts are also called feeds. These alerts include:
• News Headlines • Timed Stocks • Stock Events • Sports • Weather • Horoscope • Lottery
Wireless Internet
Online User Guide 22
My Info Alerts - Configuring Alerts
NewsHeadlines Alerts
You can configure News Headlines alerts by following these steps:
Step Action
1 Click the My Info tab→My Info Alerts link, then click the News Headlines link.
2 Select a category to have matching news stories delivered to your handset.
3 In the Time drop-down lists, select the time for the alert to be transmitted.
4 In the Day area, select when you want the alert to run.
5 In the Time zone drop-down list, select the time zone of your location.
6 Click the Save Alert button.
Timed
Stocks Alert You can configure Timed Stocks alerts that enable you to track the change inand price of one or more stocks by following these steps:
Step Action
1 Click the My Info tab→My Info Alerts link, then click the Timed Stocks link.
2 In the Time drop-down lists, select the time to run the alert.
3 In the Day area, select when you want the alert to run.
4 In the Time zone drop-down list, select the time zone for your location.
5 In the Ticker Symbols fields, enter up to six ticker symbols of the stocks for which you want to receive alerts.
Wireless Internet
Online User Guide 23
Stock Events
Alerts You can configure Stock Events alerts that enable you to track the price of astock by following these steps:
Step Action
1 Click the My Info tab→My Info Alerts link, then click the Stock Events link.
2 In the Symbol field, type one stock symbol.
3 In the Alert On drop-down list, select the condition on which you want an alert sent to your handset.
4 In the Value field, type a numeric amount of change to trigger the alert.
5 Click the Save Alert button.
Sports Alerts You can configure Sports alerts by following these steps:
Step Action
1 Click the My Info tab→My Info Alerts link, then click the Sports link.
2 In the League drop-down list, select a Sports league that you want.
3 Click the Select League button.
Note: The Select Teams and Alert Type fields appear, as well as the Save Alert button.
4 In the Select Teams drop-down list, select the teams that you want to track. Press and hold the Shift key to select multiple teams.
5 In the Alert Type field, select the type of alert that you want.
Wireless Internet
Online User Guide 24
Weather
Alert You can configure a Weather alert for viewing the weather of a specific cityby following these steps:
Step Action
1 Click the My Info tab→My Info Alerts link, then click the Weather link.
2 In the Country field, click the change country link to change the country.
3 In the State field, click the change state link to change the state.
4 In the City field, select the first letter of the city you want. A drop-down list appears containing all cities starting with the letter that you selected. Select one of the cities in the drop-down list.
Note: When you click a letter in the city field, the Time, Day, and Time zone fields also display.
5 In the Time drop-down list, select the time that you want the alert to run.
6 In the Day area, select when you want the alert to run.
7 In the Time zone drop-down list, select the time zone for your location.
8 Click the Save Alert button.
Horoscope
Alerts You can configure Horoscope alerts by following these steps:
Step Action
1 Click the My Info tab→My Info Alerts link, then click the Horoscope link.
2 In the Symbol area, select the horoscope sign that you want to track.
3 In the Time drop-down lists, select the time that you want the alert to run.
4 In the Day area, select when you want the alert to run.
5 In the Time zone drop-down list, select the time zone for your location.
Wireless Internet
Online User Guide 25
Lottery
Alerts You can configure Lottery alerts, also called Lotto alerts, by following thesesteps:
Step Action
1 Click the My Info tab→My Info Alerts link, then click the Lottery link.
2 In the State field, click the change state link to change the state.
3 In the Game drop-down list, select the games you want to track. Hold down the Shift key to select multiple games.
Note: We recommend that you select no more than three games.
4 In the Time drop-down lists, select the time to run the alert.
5 In the Day area, select when you want the alert to run.
6 In the Time zone drop-down list, select the time zone for your location.
7 Click the Save Alert button.
Viewing a Summary of Configured Alerts
You can view a summary of your configured alerts, and delete, disable, or enable each alert listed. When you click the My Info tab→My Info Alerts link, then click the My Info Alerts List link, you will view a list of all of the alerts you have configured.
Wireless Internet
Online User Guide 26
My Info Alerts - Editing Alerts
How to EditAlerts You can modify alerts by following these steps:
Step Action
1 Click the My Info tab→My Info Alerts link, then click the My Info Alerts List link (see “Viewing a Summary of Configured Alerts” on page 25).
2 Select one of the following:
• To modify an alert, select its description.
• To remove an alert from your phone, select Delete next to the alert that you do not want
• To make an alert inactive, but still accessible, select Disable next to the alert that you want to make inactive
• To enable an alert that you want to view on your phone, select On next to the alert that you want
Note:Disabled alerts can be reactivated at any time by enabling them. Some alerts disable automatically after being sent. Others continue to be sent whenever specified conditions are met unless you manually disable or delete them.
Wireless Internet
Online User Guide 27
Update Registration
Update yourRegistration Information
You can update your registration information using these steps:
Step Action
1 Click the My Info tab→Update Registration link.
Note: You might be requested to log in again. If you are, log in again and repeat Step 1.
2 Modify the information in the fields displayed.
See “New User Registration” on page 6 for more information on this page.
Note: The zip code that you enter during registration is used to pre-populate some of the services that you interact with from your handset. This is helpful in location-based services, such as “Find the nearest…” or “Get directions.”
Wireless Internet
Online User Guide 28
Personalize
PersonalizeYour View You can personalize the way you view information on the View My Info linkby following these steps:
Step Action
1 Click the My Info tab→Personalize link.
2 In the Narrow Column list, select the types of information you want to view.
3 In the Wide Column list, select the types of information you want to view.
4 (Optional) Click the Swap Columns button to swap column locations.
Note: Perform this step only if you want to swap the location of the columns.
5 Click the Save Changes button.
Wireless Internet
Online User Guide 29
Describing Messaging
E-mail Messages and Instant Messaging
Messaging contains a personalized, Web-based e-mail and Instant Messaging features. The following section is broken into Email and Instant Messaging with detailed information for each.
The Email section contains these links: • Inbox
• Compose • Folders • Get POP Mail • Options
The Instant Messaging section contains these links: • User Menu
• My Groups • My Devices • Help
Wireless Internet
Online User Guide 30
Email - Inbox
Using theInbox When you click the Messaging tab on the My Wireless Window web page thefirst option is Inbox. You should know that: • New messages appear in bold text.
• Each folder (Inbox, Deleted Items, etc.,) displays its contents as shown. You can determine which folder you are in by looking at the folder name in the bar under the Mail label.
• Clicking the Messaging tab takes you to your personalized Inbox page. • Each user has a unique My Wireless Window e-mail address.
• Links on the horizontal navigation bar provide you with quick access to other features within Messaging.
• Clicking the Delete button enables you to delete a selected message. • Clicking the Save As New button enables you to mark a selected message
as being unread.
• Selecting a folder from the pull-down menu and then clicking the Move button enables you to transfer selected messages from one folder to another.
• Selecting a message’s corresponding link enables you to view its contents. • Your Wireless Internet Email address (the address used by the browser on
your phone and the mywirelesswindow.com web site) is [email protected].
Wireless Internet
Online User Guide 31
Email - Compose
Composinga Message Click the Messaging tabmessage. You can create a message by:→Email link, then click the Compose link to create a • Selecting the To:, cc:, or bcc: links to select contacts from your address
book
• Typing text in the To:, cc:, or bcc: fields
You can type a subject for your e-mail and type a message in the Message text box. You can also attach a file to your message, and preview your message before sending it.
Adding
Attachments You can add attachments to your message by following these steps:
Step Action
1 Click the Upload button.
2 Click the Browse button to locate and select the file that you want to attach to your message.
3 Click the Upload button.
4 Repeat Steps 2-3 to attach additional files.
5 Click the Done button when you are finished attaching files.
Previewing
Messages You can preview the message to ensure that all recipients are properlyaddressed and that all file attachments are added. Preview your message by following these steps:
Step Action
1 Click the Preview button.
2 If you want to edit the message, click the Edit button.
3 When you are done, click the Cancel button to return to the Create Message Web Page.
Wireless Internet
Online User Guide 32
Email - Folders
AccessingFolders Click the Messaging tabfolders. You four default folders:→Email link, then click the Folders link to view your • Inbox
• Drafts
• Deleted Items • Sent Items You can:
• Create a new folder
• Edit a folder that you created • Delete a folder that you created Creating a
Folder You can create a folder by clicking the New Folder link. To create a newfolder, type a title, and click the Update button.
Editing, Deleting, or Emptying a Folder
You can edit, delete, or empty a folder that you created by selecting the edit, delete, or empty links next to the folder you want to edit. Then you can follow the prompts to perform the selected edit.
Wireless Internet
Online User Guide 33
Email - Get POP Mail
RetrievingPOP Mail When you click the Messaging tab, then click the Get POP Mail link, theservice checks for new mail on the mail server, and places any new mail in your Inbox or other user-defined area.
See “POP/IMAP Mail Settings” on page 34 for information on configuring your POP mail settings.
Wireless Internet
Online User Guide 34
Email - Options
PersonalizeYour Mailbox Mail options enable you to personalize your mailbox by changing your userpreferences, creating group lists, and a signature. You can also enable POP Mail retrieval, and create message filters with mail options.
User
Preferences You can configure the following preferences in User Preferences:• Show message preview when browsing
• View bcc: field when composing messages • Save sent messages to Sent Items folder • Display confirmation page for sent messages
Select the options that you want. Then click the Update button.
Mailing Lists You can create a mailing list to send an e-mail to multiple recipients. When you click the Messaging tab→Options link, then the Mailing Lists link. Signature You can personalize your messages by creating a signature add-on. When you
click the Messaging tab→Options link, then the Signature link.
Type the information you want for your signature in the box, select the Add this signature to the end of new messages checkbox, and then click the Update button to save your signature.
POP/IMAP
Mail Settings You can enable your mailbox to retrieve e-mail messages from otherPOP/IMAP mail accounts by entering the required information: • Server—This must be a POP3 server name usually
pop.companyname.com or mail.companyname.com.
• Login Name—This is usually the first part of the e-mail address based on the user login name. Sometimes this will be the entire e-mail address. • Password—Enter the e-mail password here.
• Port—This is usually 110, if you are not sure you will need to check with technical support for the ISP.
You can get this information from your ISP, LAN Administrator, or administrator hosting your e-mail service. When you configure a POP mail account, you can click the Get POP Mail link to retrieve messages from the appropriate server.
Wireless Internet
Online User Guide 35
Message Filters or Email Alerts
Message filters can be used to route certain e-mail addresses and domains to specific folders. Message filters can also be used to create e-mail alerts.
Creating
Email Alerts You can create an alert for incoming e-mail by following these steps.
Step Action
1 Click the Messasge Filters link.
2 Click the New Filter to create a new filter.
3 In the Filter Type drop-down list, select “Alert on all emails”.
4 In the Send to folder drop-down list, select the folder to which you want to send these e-mail messages (generally the inbox).
5 Select the Enable filter checkbox to enable this filter.
6 Click the Update button.
Creating Message Filters
You can create message filters for specific e-mail addresses and general domains by following these steps.
Step Action
1 Click the Message Filters link.
2 Click the New Filter to create a new filter.
3 Enter the e-mail address from which you want to filter e-mail messages.
4 In the Filter Type drop-down list, select a filter type.
5 In the Send to folder drop-down list, select the folder to which you want to send these e-mail messages.
6 Select the Enable filter checkbox to enable this filter.
7 Click the Update button.
Editing Message Filters
You can edit message filters by selecting the filter that you created. Modify the information in the displayed fields, and click the Update button. If you want to delete the filter, click the Delete link to the right of the filter.
Wireless Internet
Online User Guide 36
Instant Messaging
DesktopPortal The Desktop Portal is your Instant Messaging navigation tool. It downloadsto your desktop PC and allows quick access to many of the features of My Wireless Window and to Instant Messaging. When you click the Messaging tab→Instant Messaging link you can use the following main category links to manage your Instant Messaging service:
• My Groups • My Devices • Help
• My Cingular Wireless Homepage
Each of these links contains additional links to information pertaining to the main category.
My Groups Click the My Groups link to create, edit, or join, public or private groups. Also, click this link to view the online status and contact information for group members.
When you click the My Groups link, the following links appear: • Group List—Displays groups you have already set up
• Create Private Group—Enables you to create private groups and password protections
• Create Public Group—Enables you to create public groups
• Edit Groups—Enables group administrators to edit and manage the groups
• Join Group—Enables you to enter and join a group that you have been invited to join
• Leave Group—Enables you to leave groups you are currently a member in
• Public Groups—Enables you to view and join public groups
You can click any of these links and follow the online prompts to configure, edit, or delete information pertaining to your groups.
Wireless Internet
Online User Guide 37
My Devices Your Instant Messaging email address is your
[email protected]. The My Device link allows you to route communication of Instant Messages to the devices of your preference. Click this link to add, edit, or delete your communications devices, including e-mail, pagers, phone numbers, URLs, and wireless appliances.
When you click the My Devices link, the following links appear:
• Device List—Displays devices and enables you to set public or private rights permissions
• Add a Device—Enables you to add a device • Edit User—Enables you to edit a user
You can click any of these links and follow the online prompts to add, edit, or delete your communications devices.
Help Click this link to submit a help question or access Frequently Asked Questions (FAQ).
When you click this link, the following links appear: • Help—Contains a list of FAQ and Answers • Terms and Conditions—Contains terms of use • Download Desktop Portal–Instant Messaging
You can click any of these links and follow the online prompts to access additional information.
My Cingular Wireless Homepage
When you click the Messaging tab→Instant Messaging link, then the My Cingular Wireless Homepage link, you can edit your personalized
information content.
Wireless Internet
Online User Guide 38
Describing the Planner
Personal Information Management
The Planner function provides you with a Personal Information Management (PIM) tool and contains the following links:
• Calendar • Address Book • To-Do List
• Download SyncNow
Each of these links contains additional links. The following sections discuss this information in detail.
Wireless Internet
Online User Guide 39
Planner - Calendar
AccessingYour Calendar Functions
When you click the Planner tab you can schedule appointments, keep track of meetings, birthdays, and other events by using the Calendar page.
Calendar
Features You can share your calendar with other users. With the calendar, you canhave: • Multiple views of the calendar (day, week, month, and list)
• Color-coded appointment types
• Links to time-sensitive events, such as television movie listings • Access to a card shop for sending cards to meet timely messages • Inclusion of online events on your calendar
• Page greetings Selecting
Views for Your Calendar
You can view your calendar by:
• Day by clicking the Day View link • Week by clicking the Week View link • Month by clicking the Month View link
You can also view a list of events that you configured by clicking the List View link. When you want to view a list of options that are available through the calendar, you can click the Options link.
Adding an
Event You can add an event to your calendar by following these steps:
Step Action
1 Click the Add Event link.
2 Enter the event’s associated information.
Wireless Internet
Online User Guide 40
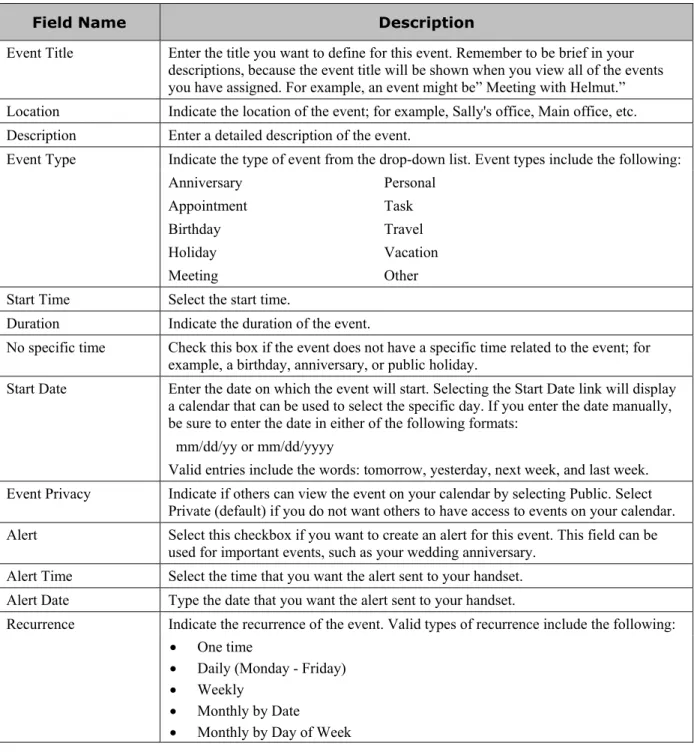
Table 1 Field Descriptions
Field Name Description
Event Title Enter the title you want to define for this event. Remember to be brief in your descriptions, because the event title will be shown when you view all of the events you have assigned. For example, an event might be” Meeting with Helmut.” Location Indicate the location of the event; for example, Sally's office, Main office, etc. Description Enter a detailed description of the event.
Event Type Indicate the type of event from the drop-down list. Event types include the following: Anniversary Appointment Birthday Holiday Meeting Personal Task Travel Vacation Other Start Time Select the start time.
Duration Indicate the duration of the event.
No specific time Check this box if the event does not have a specific time related to the event; for example, a birthday, anniversary, or public holiday.
Start Date Enter the date on which the event will start. Selecting the Start Date link will display a calendar that can be used to select the specific day. If you enter the date manually, be sure to enter the date in either of the following formats:
mm/dd/yy or mm/dd/yyyy
Valid entries include the words: tomorrow, yesterday, next week, and last week. Event Privacy Indicate if others can view the event on your calendar by selecting Public. Select
Private (default) if you do not want others to have access to events on your calendar. Alert Select this checkbox if you want to create an alert for this event. This field can be
used for important events, such as your wedding anniversary. Alert Time Select the time that you want the alert sent to your handset. Alert Date Type the date that you want the alert sent to your handset.
Recurrence Indicate the recurrence of the event. Valid types of recurrence include the following:
• One time
• Daily (Monday - Friday)
• Weekly
• Monthly by Date
Wireless Internet
Online User Guide 41
Modifying an Event
You can modify an event by:
• Selecting the event on your calendar • Selecting the event in your list of events
Follow the prompts appearing on the page to edit or delete the event. Configuring
Calendar Options
You can configure your calendar to meet your particular needs by following these steps:
Step Action
1 Click the Options link.
2 Click one of the following links:
• Calendar Properties link to change the title, description, owner, and view of the calendar
• Event Categories link to create color-coded event categories
• External Access link to set up read-only access (other users can only read your calendar) or read-write access (other users can edit your calendar) for your calendar
• View External link to view another user’s calendar
3 Follow the prompts appearing on the page, depending on which link you click in Step 2.
Wireless Internet
Online User Guide 42
Planner - Address Book
AccessingYour Address Book
The Address Book allows you to track all of your friends and contacts in a single, easy-to-manage interface. You can:
• Maintain an electronic address book of your contacts • Create groups
• Maintain an alphabetical listing of names • Maintain people and businesses lists separately Adding a
Contact You can add a contact to your address book by following these steps:
Step Action
1 Click the Planner tab→Address Book link to view your address book, then click the Add Contact link.
2 Enter the contact’s information in the fields on this page.
3 Click the Add button when you are done.
Editing a
Contact You can edit a contact in your address book, either modify it or delete it, byfollowing these steps:
Step Action
1 Click the Planner tab→Address Book link, then click the View Contacts link.
2 Select one of the following:
• Click the pencil and paper icon to the right of the contact that you want to modify. Click the Update button when you are done.
• Click the trashcan icon to the right of the contact that you want to delete. Click the Delete button to delete the contact.
Note: If no contacts appear, you have not created any. You must first create a contact before you can edit it.
Viewing
Group Lists When you click the Planner tabyou can view group mailing lists that you have created. If you have not→Address Book, then the Group Lists link, created any group lists, you will see “You have no group mailing lists defined.”
Wireless Internet
Online User Guide 43
Adding a
New Group You can add group lists to your address book by following these steps:
Step Action
1 Click the Planner tab→Address Book link, then click the New Group link.
2 In Title, type a title for your mailing list. This title will appear in your group list.
3
In the Contacts list, select the user you want to add to your list, and click the button to add the user to the List Members list.
OR
In the enter an email address field, you can enter the e-mail address of the individual that you want to add to the group, and click the button. When you select the user in the Contacts list, the e-mail address appears in the List
Members list. Only contacts with an e-mail address will appear in Contacts list.
4 Repeat Steps 2-3 to add additional users to the List Members list.
5 Select the Save List button when you are done.
Editing
Group Lists You can edit a group, either modify it or delete it, by following these steps:
Step Action
1 Click the Planner tab→Address Book link to view your group list.
2 Select one of the following:
• Click the pencil and paper icon to the right of the group list that you want to modify. Click the Update button when you are done.
• Click the trashcan icon to the right of the group list that you want to delete. Click the Delete button to delete the group list.
Note: If no group lists appear, you have not created any. You must first create a group list before you can edit it.
Wireless Internet
Online User Guide 44
Planner - To–Do Lists
AccessingYour To-Do List
When you click the Planner tab→To-Do List link, you can view you list of tasks. The To-Do List function:
• Enables you to prioritize your tasks and assign a completion value to them • Displays active tasks
• Color-codes those tasks in progress and those that are completed • Enables you to select column headings and sort them
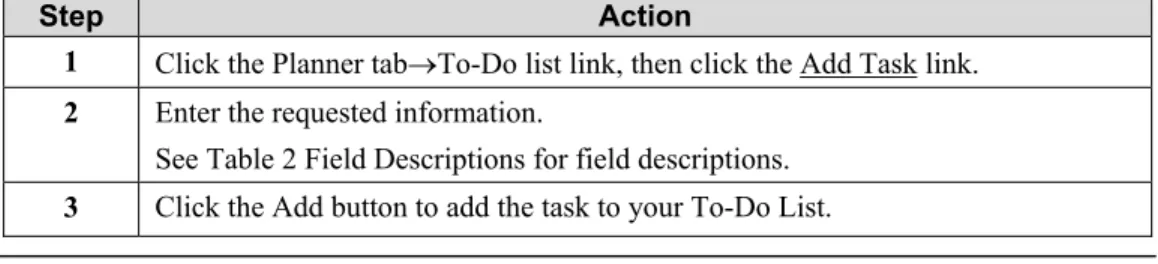
Adding a Task
You can add a task to the To-Do List by following these steps:
Step Action
1 Click the Planner tab→To-Do list link, then click the Add Task link.
2 Enter the requested information.
See Table 2 Field Descriptions for field descriptions.
3 Click the Add button to add the task to your To-Do List.
Table 2 Field Descriptions
Field Name Description
Title Type the title you want for this task. Remember to be brief in your descriptions, because the task title will appear when you view all the tasks you have assigned. For example, a task might be “Write Memo to Helmut.”
Description Type a detailed description of the task.
Start Date Select the date on which the task will start. Selecting the Start Date link will display a calendar for you to select the specific day. If you enter the date manually, be sure to enter the date in either of the following formats:
mm/dd/yy or mm/dd/yyyy
Also note that valid entries include the words: tomorrow, yesterday, next week, and last week.
Due Date Enter the date on which the task is estimated to end. Selecting the Due Date link will display a calendar for you to select the specific day.
mm/dd/yy or mm/dd/yyyy
Also note that valid entries include the words: tomorrow, yesterday, next week, and last week
Alert Select this checkbox if you want to create an alert for this event. This field can be used for important events, such as your wedding
Wireless Internet
Online User Guide 45
Field Name Description
Alert Time Select the time that you want the alert sent to your handset. Alert Date Type the date that you want the alert sent to your handset. Priority Select the priority of the task. Values: low, normal, or high. Status Enter the percentage of the task’s completion that you want the
system to use to initiate a status update. Values: 0%, 25%, 50%, 75%, and 100%.
Customized values are not supported.
Editing Tasks on Your To-Do List
You can edit a task on your To-Do list, either modify it or delete it, by following these steps:
Step Action
1 Click the Planner tab→To-Do list link to view your To-Do list.
2 Select one of the following:
• Click the pencil and paper icon to the right of the task that you want to modify. Click the Update button when you are done.
• Click the trashcan icon to the right of the task that you want to delete. Click the Delete button to delete the group list.
Note: If no tasks appear, you have not created any. You must first create a task in your To-Do list before you can edit it.
Viewing a Task on Your To-Do List
When you click a task in your To-Do list, you can view all of the details concerning that task. You can also modify the task from this view.
Wireless Internet
Online User Guide 46
Planner - Download SyncNow
SynchronizeYour Desktop
Synchronizing your wireless phone with your PC is very useful. You might be flying from city to city while using your laptop remotely (not logged on to the Web) to schedule appointments with Microsoft Outlook. However, when you return to your office, you will want to synchronize your laptop’s schedule with your wireless phone.
You can synchronize your laptop (or PC) and phone using SyncNow. SyncNow is a Microsoft Outlook add-in, which retrieves and sends data between your phone and your laptop or PC. You install this software on your computer, and it loads commands to Outlook, which allow you to share calendar and contact information between Outlook and the Web.
Synchronization is fully automatic. User intervention is only required when conflicts arise.
Note: SyncNow may not work correctly if your computer is protected by a
firewall. Contact your network administrator for assistance, if necessary. Installing
SyncNow Follow the prompts on the SyncNow Web page to install SyncNow.
Using
SyncNow After SyncNow is downloaded to your desktop, open Microsoft Outlook andfollow these steps:
Step Action
1 Navigate to the Tools drop-down menu.
2 Select SyncNow from the list. Typically, SyncNow is the last entry in the drop-down menu.
Note: The first time you access SyncNow, you will be asked for your username and password. The user name and password are your Wireless Internet user name and password. Enter the information and proceed.
3 Select the application from the list that you want to synchronize. Your choices are: calendars, contacts, and tasks.
Synchronization begins.
Note: Synchronization is a multi-step process. The synchronization engine verifies data already stored on the iPIM (Internet PIM) and compares it to the information stored in MS Outlook. When the two do not match, the missing information is uploaded to the iPIM.
4 Resolve any conflicts that are found during the synchronization. An error message displays when conflicts exist between the iPIM and MS Outlook.
Wireless Internet
Online User Guide 47
Describing Fun & Games
Ringtones
and Games When you click the Fun & Games tab, the following links appear:• Ringtones • Games
The following sections describe the additional links that appear when you access Ringtones and Games.
Wireless Internet
Online User Guide 48
Fun & Games - Ringtones
AccessingRingtones When you click the Fun & Games tabinformation about the different ringtones that are supported and how to→Ringtones link, you can view download those ringtones to your wireless phone. Ringtones allow you to add personality to your phone by having it play a song or special tones when it rings.
Note: To enjoy this feature, you must be set up for DirectBill.
You can also view the Signup for DirectBill link to sign up for this service. See “Setting Up Your My Wireless Window Web Portal Account” for more information on DirectBill.
Download
Ringtones You can download Ringtones by following these steps:
Step Action
1 Click the Download Ringtones link.
2 Search and select one of the ringtones listed or locate a Ringtone by using the search capabilities in the top-left corner of the Ringtones Web site.
3 Once you have located the Ringtone, press the to send it to your wireless phone.
4 Select the Phone Model, confirm your mobile number, and press Buy.
Wireless Internet
Online User Guide 49
Fun & Games - Games
AccessingGames When you click the Fun & Games tabinformation about the different games you can download for your wireless→Games link, you can view phone.
Downloading
Games Click the Click here link to learn more about the games that are available foryour wireless phone. The page that appears when you click Click here describes how you can view all of the games available for download and how you can download them. Follow the online instructions.
Wireless Internet
Online User Guide 50
Describing Shopping
Setting Up Your Shopping Profile and Going ShoppingWhen you click the Shopping tab, the Shopping page appears with the following links:
• Introduction • Shopping • Wallet
The following sections describe the additional information that appears when you click each of these links.
Wireless Internet
Online User Guide 51
Shopping – Introduction
AccessingIntroduction When you click the Shopping tabappear: →Introduction link, the following links • Get Started—Enables you to personalize your My Wireless Window
Wallet and begin shopping
• Go Shopping—Enables you to compare prices, and ensure that you are getting the best deal; anytime, anyplace.
Shop online or on the go! My Wireless Window Shopping lets you compare prices and ensure that you're getting the best deals; anytime, anyplace. Search for products and make purchases using your wireless phone or computer. You can enter UPC codes or product information while you're in the store for instant comparison-shopping. When you like a price you see, you can buy directly from your phone.
Using Get
Started When you click the Shopping tablink, you can view Wallet information. See “Something” for more→Introduction link, then the Get Started information on the Wallet link and the information it contains.
Using Go
Shopping When you click the Shopping tablink, you can view Shopping information. See “Shopping – Shopping" on→Introduction link, then the Go Shopping page 52 for more information on the Shopping link and the information it contains.
Wireless Internet
Online User Guide 52
Shopping – Shopping
Shopping,Products, Account, and Orders
When you click the Shopping tab→Shopping link, you can view the following links: • Find a Product • Shopping Cart • Account • Orders Finding a
Product When you click the Shopping tablink, you can enter a product to find or you can select another product→Shopping link, then the Find a Product category to search.
When you enter a product to find, you can select a keyword or phrase in the Keyword or Phrase drop-down list, then click the Go button. The results of the search will display.
When you select one of the other product categories, follow the online instructions.
Viewing Your Shopping Cart
When you click the Shopping tab→Shopping link, then the Shopping Cart link, you can view and modify your shopping cart items. You can also click the Continue Shopping link to return to shopping.
Follow the online prompts to modify your shopping cart items. Viewing
Your Account
When you click the Shopping tab→Shopping link, then the Account link, you can view your account information pertaining to your credit card. See
“Something” for more information. Viewing
Your Orders When you click the Shopping tabcan view your orders, current and past due orders. See “Something” for more→Shopping link, then the Orders link, you information.
Wireless Internet
Online User Guide 53
Shopping – Wallet
AccessingWallet When you click the Shopping tablinks: →Wallet link, you can view the following • DirectBill
• Credit Card
To shop using the Shopping feature, you must have a DirectBill account set up for billing purposes. DirectBill requires a credit card account to be set up. Accessing
DirectBill When you click the Shopping tabcan view information on the DirectBill feature. You can: →Wallet link, then the DirectBill link, you • Learn more about DirectBill by clicking the Tell Me More link
• Sign up for it by clicking the Sign Up for DirectBill link
• Review and modify your existing DirectBill account by clicking the Review My Account link
• Get your password when you have forgotten it by clicking the Forgot My PIN link
• Review the terms and conditions for DirectBill by clicking the Terms & Conditions link
Accessing
Credit Card When you click the Shopping tablink; you can view your credit card account. You can: →Wallet link, then click the Credit Card • See the status of your orders
• See all shipping locations • See all credit cards • Add a credit card
You can also set up the Quick Click feature by clicking the Setup Quick Click link. This feature enables you to define a ship address and a new credit card. You can follow the online prompts to set up this feature.
Note: You will need to set up Click Quick if you intend to make purchases from your handset with your credit card.
Wireless Internet
Online User Guide 54
Describing Find It
Finding People, Places, and Things
You can use the links on the Find It tab to find people, places, and things. When you click the Find It tab, the following links appear:
• Find People • Find Places • Find Things • City Guide
Using Find It You will click one of the following links, depending on the type of information for which you are searching:
• Click the Find People link when you want to find a person.
• Click the Find Places link when you want to find a place, such as a city, business, etc.
• Click the Find Things link when you want to find information about a category, such as entertainment, computing, sports, etc.
• Click the City Guide link when you want to find information specific to a city, such as classifieds, government, new car prices, etc.
These links function similarly to the links described in “View My Info -Search Center” on page 16. Refer to this page for more information.
Wireless Internet
Online User Guide 55
Describing Cool Wireless Sites
Using Cool
Links You can use the links from the Cool Wireless Sites tab to set up youraccounts at the listed Cingular partner sites for ease of use on your wireless handset. When you click the Cool Wireless Sites tab, the following links appear: • Shopping Mall • Entertainment • Travel • Finance • Search
When you click these links, follow the online prompts to set up accounts with related Cingular partner sites.
Wireless Internet
Online User Guide 56
Troubleshooting
Having
Problems? If you experience trouble connecting to the Cingular Wireless Internetservice, use the following table to troubleshoot certain messages or problems that may appear on your Internet-ready wireless phone:
If you… Then…
Receive a “Busy, Try Later” or
similar message on your display Wait a few seconds and try again.
Receive a “Network not
available” Try to connect again, normally just by hitting retry key.If the error still persists, contact Cingular Customer Service at 1-866-463-6272 or *611 from your wireless phone.
Receive a “Cannot connect to service”
Try again later, or contact Cingular Customer Service Customer Care at 1-866-463-6272 or *611 from your wireless phone if the problem persists.
Frequently Asked Questions (FAQs)
Use the www.mywirelesswindow.com Web site to access a complete list of Frequently Asked Questions. Click user information under wireless internet. Scroll down on the User Information page until you see the Frequently Asked Questions section.
Wireless Internet