Troubleshooting Guide
Mitel Communications Director Release 4.0
MITEL
by Mitel Networks™ Corporation (MITEL®). The information is subject to change without notice and should
not be construed in any way as a commitment by Mitel or any of its affiliates or subsidiaries. Mitel and its affiliates and subsidiaries assume no responsibility for any errors or omissions in this document. Revisions of this document or new editions of it may be issued to incorporate such changes.
No part of this document can be reproduced or transmitted in any form or by any means - electronic or mechanical - for any purpose without written permission from Mitel Networks Corporation.
Trademarks
Mitel, SX-200, and SUPERSET are trademarks of Mitel Networks Corporation. Adobe Acrobat Reader is a registered trademark of Adobe Systems Incorporated.
Other product names mentioned in this document may be trademarks of their respective companies and are hereby acknowledged.
Troubleshooting Guide
Mitel Communications Director (MCD) Release 4.0
June 2009
®,™ Trademark of Mitel Networks Corporation © Copyright 2009, Mitel Networks Corporation
Table of Contents
Chapter 1: Introduction
About this Guide . . . 3
Supporting Documentation . . . 3
Accessing Mitel OnLine . . . 3
Access eDocs for the Latest Documentation . . . 3
Resolving Technical Issues . . . 5
TSN: Your Technical Support Network . . . 8
Registering for Services . . . 9
What Services are Available? . . . 9
What Products are Supported? . . . 11
Summary of Service Charges . . . 12
Self Help Solutions . . . 12
Checking the Knowledge Base . . . 12
Using the Online Service Desk (OSD) . . . 13
Checking for Fixes in Software Patches . . . 13
Fixed in Latest Software Patch? . . . 13
Fixed in Previous Software Patch? . . . 14
Fixed in Software Update? . . . 14
Accessing Product Support . . . 15
Before You Call . . . 15
Making a Support Call . . . 19
What are Normal Business Hours? . . . 19
What are After-Hours Calls? . . . 19
Emergency Calls are Not Charged . . . 20
Returning Faulty Hardware . . . 21
Chapter 2: Initial Setup
Initial Setup Troubleshooting Tips . . . 25AX, MXe, CX, or CXi Controller . . . 25
MXe Server Setup . . . 27
Chapter 3: Hardware
Hardware Troubleshooting Tips. . . 33
Hardware Alarms . . . 34 Controllers . . . 37 LX Controller . . . 37 MXe Controller . . . 37 CX/CXi Controller . . . 38 MXe Server . . . 39 Service Units . . . 42 Gateways. . . 45 Peripheral Cabinets . . . 45 Embedded Modules. . . 48 Phones. . . 51
General Phone Issues . . . 51
Issues with Specific Models . . . 58
IP Phone Power . . . 63
IP Phone Registration . . . 67
Phone Connection . . . 75
Phone Audio Quality . . . 76
IP Console . . . 80
Chapter 4: Software
Software Troubleshooting Tips . . . 85System Software . . . 85
Software Installation and Upgrade. . . 86
Backups and Restores. . . 88
Chapter 5: System Features
System Feature Troubleshooting Tips. . . 93Features A to B . . . 94
Table of Contents Features D to G . . . 100 Features H to L . . . 102 Features M to O. . . 103 Features P to R . . . 105 Features S to V . . . 106
Chapter 6: Trunking
Trunk Troubleshooting Tips . . . 109Analog Trunks . . . 109
Digital Trunks. . . 113
MSDN/DPNSS Links . . . 120
XNET . . . 123
IP Trunking (IP Networking). . . 125
SIP Trunking . . . 126
Chapter 7: Tools and Embedded Applications
System Management Tools . . . 128Automatic Call Distribution. . . 134
Hot Desking . . . 135
Emergency Call (E911) Support . . . 135
Embedded Voice Mail . . . 136
Networked Voice Mail . . . 143
Station Message Detail Recording . . . 145
Unified IP Client for Sun Ray . . . 145
Chapter 8:
Voice Networking
Voice Networking Troubleshooting Tips . . . 149IP Networking . . . 149
Multi-Node Management . . . 150
MNM Fault Management . . . 150
MNM Backup and Restore . . . 150
MNM Application Reach Through . . . 151
Resiliency . . . 153
IP Device Resiliency . . . 153
IP Console Resiliency . . . 159
Voice Mail Resiliency . . . 160
Telephone Directories . . . 161
T1/E1 Trunk Resiliency . . . 162
Embedded Resilient Device Support . . . 163
SIP . . . 163
System Data Synchronization . . . . 164
Sharing Operations . . . 164
Sync Operations . . . 169
Hunt Group or Ring Group Data Distribution Errors . . . 171
RDN Synchronization . . . 172
Chapter 9: Local Area Network
LAN Troubleshooting Tips . . . 177LAN Troubleshooting . . . 178
Using Layer 2 Statistics . . . 179
Shared versus Switched LANs . . . 179
Collisions . . . 180
Shared LANs . . . 180
Switched LANs . . . 180
CRC/FCS & Alignment Errors . . . 180
Frame Length Errors . . . 180
Chapter 10: Diagnosing Problems
Diagnostic Tools . . . 187Phones. . . 189
Table of Contents
No Dial Tone - IP Phone . . . 191
Viewing Settings and Network Parameters on IP Phones . . . 191
Access Configuration Menu on Single-Mode IP Phones . . . 192
Access Configuration Menu on Dual Mode Phones and 5235 IP Phones . . . 192
Viewing/Modifying Network Parameters . . . 193
Configuring Hardware Components . . . 194
Setting the Phone Mode . . . 195
Using Tools and Features . . . 195
IEEE 802.1X Authentication for IP Phones . . . 197
Configuring an Authentication Username and Password . . . 197
Erasing an Authentication Username and Password . . . 198
Enabling or Disabling 802.1X Authentication . . . 199
IP Phone Boot Sequence . . . 199
Checking the IP Phone Resiliency Progress Display . . . 203
Diagnosing SIP Device Issues . . . 203
Trunks . . . 205
Diagnosing Digital Trunk Issues . . . 205
Hardware . . . 207
Using LEDs to Diagnose Faults . . . 207
R2 Card Debugging . . . 207
Reading E2T Card Statistics . . . 208
Diagnosing DSP Module Related Issues . . . 210
Diagnosing Formatter Card Problems . . . 210
Diagnosing MSDN/DPNSS Link Problems . . . 210
Loopback Testing on Digital Trunks . . . 211
Resiliency . . . 213
Locating Resilient Devices . . . 213
Locate Extension . . . 213
Locate Feature . . . 215
Locate Remote . . . 215
Locating Resilient Hunt Groups . . . 216
Identifying the Status of a Resilient Device . . . 217
State Extension . . . 217
State XNET ICP . . . 217
Checking T1/E1 Resiliency Alarms . . . 219
Checking the T1/E1 Combo MMC Indicators . . . 220
Chapter 11: Using Logs
Logs . . . 225Software Logs for System Features . . . 225
Hot Desking Error Logs . . . 226
Voice Mail System Logs . . . 227
Chapter 1
Introduction
About this Guide
About this Guide
This guide provides troubleshooting information for the Mitel® 3300 IP Communications
Platform (ICP). This guide is intended for use by Mitel certified 3300 ICP technicians.
The troubleshooting information has been grouped by topic (Initial Setup, System Features, Devices, and so forth) and then organized into tables using the following structure:
• Symptom,
• Probable Cause, and
• Corrective Action.
To locate help on a on a specific problem
• use the Adobe Acrobat search functionality to search on key words associated with the problem symptoms, or
• go to the table that contains troubleshooting information related to the problem and scan the symptoms column for a possible match.
Supporting Documentation
This guide references other documents that are available on Mitel Online and on the Mitel Customer Documentation web site.
Accessing Mitel OnLine
To access Mitel OnLine1. Go to the following URL: http://www.mitel.com 2. Click Login.
3. Enter your Mitel Online username and password.
4. Click Login.
Access eDocs for the Latest Documentation
The Mitel Customer Documentation (eDocs) site on Mitel OnLine provides the latest customer documentation.
Note: To fully utilize Mitel OnLine including the available training and documentation, you will require high-speed internet access and Internet Explorer 5.5 or later. As well, you should have Adobe Acrobat Reader 4.0 or later and Microsoft Word 97 or later.
The documentation for the current and previous product release are available from the main page. The documentation for other past releases are available from the Documentation Library link.
To view the available documentation, you will require
• Internet access (high-speed is recommended) • Internet Explorer 5.5 or later
• Adobe Acrobat Reader 4.0 or later • Microsoft Word 97 or later
• Folio (for SX-200 ICP, SX-200 EL/ML, or SX-2000 LIGHT)
• your Mitel OnLine user name and password (required to access technical documentation; user documentation is not password protected)
To access a technical document
1. Log onto Mitel OnLine.
2. Click Support and then click Product Documentation.
3. Bookmark this URL.
4. In the left frame, select the product.
5. In the right frame, click the document.
6. If you click a technical document, you will be prompted for your Mitel OnLine username and password. Enter your username and password and click Login.
7. To access a generic user guide or quick reference card, click User Guides, click the desired language at the top of the frame, and then click the desired guide or quick reference card.
Resolving Technical Issues
Resolving Technical Issues
Use the following flowchart to resolve technical issues:
A
Check Knowledge Base to determine if a software update is available that remedies the problem. See “Checking the Knowledge Base” on page 12.
Refer to the "Check System" section in the Technician’s Handbook for instructions. Ask a technician in your organization who is certified on the product and release to resolve the problem.
Start No No No Yes Yes Are you certified on the product and release? Checked maintenance and software logs? Yes Have you checked the Knowledge Base?
Check the troubleshooting charts in this guide for a solution to the problem. No Yes Have you checked the troubleshooting charts?
A B See “Supporting Documentation” on page 3. No No No Yes Yes Have you checked Have you checked the TBs and RNs? Yes Is the problem related to a 3300 networking issue? Go to http://edocs.mitel.com
See the 3300 ICP Engineering Guidelines.
Go to http://edocs.mitel.com
Installation - See Technician’s Handbook
Programming - See online help or Technical Documentation
Feature functionality - See online help and user guides
No Yes Is it a known problem with an existing fix?
Check Mitel Online to determine if a software update is available that remedies the problem. See “Checking for Fixes in Software Patches” on page 13.
other related documents?
Resolving Technical Issues
B
Access the Online Services Desk to determine if you have credits. See “Checking for Fixes in Software Patches” on page 13. To purchase technical consultation credits, send in a purchase order.
Before you call Mitel technical support, ensure that the problem isn’t being caused by another manufacturer’s equipment.
Before making a call collect the information specified in Table 2, “Problem Details,” on page 16.
See “Making a Support Call” on page 19. Yes Yes Yes No No No Are there other non-Mitel components involved? Do you have technical consultation credits in your account? Have you collected all the problem details? C
TSN: Your Technical Support Network
The Mitel Technical Support Network (TSN) provides authorized channel partners with the following services:
• access through the Mitel OnLine website to - up-to-date customer documentation - the Mitel Knowledge Base
- the Online Service Desk (OSD) allowing you to view and update your Technical Support Tickets
• standard telephone support with current product releases during normal business hours • after-hours emergency telephone support
• e-mail notification of new and updated technical documentation. Yes C Resolution Software Design Service Solutions Consult with Support Technician Ticket logged.
Access the Online Services Desk and update your ticket with any new information. Do you have
new information regarding the problem?
Access the Online Services Desk to determine the status of your ticket.
TSN: Your Technical Support Network
Before you can become a registered user, you must purchase a minimum of five technical consultation credits. Your technical consultation credits can be used to purchase telephone support (standard and emergency).
Registering for Services
To register for access to TSN services
1. Complete a Technical Consultation Order form and fax the form to Mitel Customer Services at 613-591-2308.
2. After the Mitel Customer Services receives your purchase order, we will fax a Technical Support Identification (TSID) code to the fax number that you included with your order form.
3. Distribute the TSID code to staff who require access to TSN services, including staff that may need to call Mitel Technical Support.
4. Instruct your staff to obtain a Mitel OnLine username and password by submitting a request online. All requests are confirmed with the designated channel partner. After a request is confirmed, a username and password is e-mailed to the individual.
5. Instruct your staff to register for the Online Service Desk. From Mitel OnLine, click Technical Support, then click Online Service Desk under Related Links. Complete and submit the form. Registrations will be processed within 2 business days (a return email will confirm activation).
What Services are Available?
• Mitel Knowledge Base: provides access through the Mitel Online website to the latest product information. The Knowledge base provides
- Technical Bulletins (TBs):provide information on the installation and service of Mitel products. TBs are issued to introduce new software support tools, provide support information on discontinued products, identify product issues and describe TSN
Note: If you have questions about the Technical Support Network Program or your access to Technical Support, please call 1-613-592-2122 ext. 5140 or e-mail your question to [email protected].
Note: To access TSN services, you must have a positive balance of technical consultation credits in your account.
Note: Online Service Desk (OSD) response time is three business days. The OSD should not be used to obtain emergency support services.
Note: Change your TSID code whenever you experience staff turnovers. You can change your TSID code at any time by contacting the Mitel TSN Co-ordinator:
Phone: 613-592-2122 extension 5140 E-mail: [email protected]
- Troubleshooting Articles: provide troubleshooting procedures to help identify and solve issues.
- Known Product Issues: describe product issues that are know by Mitel and are in the process of being resolved.
- Release Notes (RNs): provide software upgrade procedures, describe documentation and hardware requirements, summarize the new enhancements in a release, identify improvements that have been made in the product in response to customer reported issues, and include last-minute product changes that are not described in the latest documentation. RNs are published for each new software release.
• E-mail Notification of new and updated TBs and RNs: sends you an e-mail twice a month that identifies all the new and updated TBs and RNs. The e-mail includes URLs to each document. You can register for this optional service through Mitel OnLine. Log into Mitel OnLine, click Technical, and then click Register/Cancel Email Notifications. • Standard telephone support: allows certified channel partner technicians to consult Mitel
Network’s Technical Support Specialists on current products during normal business hours. For details see “Making a Support Call” on page 19.
Caution:You will be charged for support calls if the technician making the call is not certified up to the software release of the system or if the call pertains to a product or software version that has been manufacture discontinued.
• After-hours emergency telephone support: outside of normal business hours, certified technicians can consult with a Technical Support Specialist or a Support Manager for as-sistance with resolving an emergency situation or with restoring service for an essential services site. See “What are After-Hours Calls?” on page 19 for details.
• Online Service Desk (OSD): allows you to view the status of your active Technical Support Tickets and your technical credit statement. Whenever changes are submitted against your account, you will be sent a confirmation email.To register for OSD notification updates, log into Mitel OnLine, click Technical, and then click Register/Cancel Email Notifications. • Password Resets: if you lose your password or if your password is not available, Mitel can
attempt to reset it for you. Password resets are chargeable and are subject to approval of our legal counsel. The end-customer must sign a Mitel approved form letter authorizing the reset. To obtain the required form letter, access Mitel Online, click Support, click System Password Rests. At the bottom of the web page, under Resources, click Password Reset
and download the form letter. Complete a written request based on the form letter and email it to [email protected].
• Software Releases: you can download the latest product software releases from Mitel Online. To access the available software downloads on Mitel Online, click Technical Support and then click Software Downloads.
• Software Patches: between major releases, you can download major system software patches from Mitel OnLine that include fixes for field-found problems (see “Checking for Fixes in Software Patches” on page 13). Note that minor software patches are only available from Technical Support via a Mitel FTP site.
TSN: Your Technical Support Network
• Replacement of failed (out-of-box) system: if a system fails within the first 72 hours of service it will be replaced by Mitel. Direct requests for replacement of failed systems to Mitel Customer Service Group. Replacements of defective software, complete systems, or three or more components of a system must be authorized by Mitel Technical Support.
What Products are Supported?
For an up-to-date list of the products that are supported, see the Technical Support Network Program Guide. You can access this guide through Mitel OnLine. From Mitel OnLine, click Technical Support, and then click Technical Support Network Program Guide under Downloads.
Telephone support falls into one of the following categories:
Current Products: Telephone support is provided at no charge during normal business hours to Mitel certified technicians for the currently supported products.
Manufactured Discontinued - Supported: Telephone support is chargeable for the manufacture discontinued products.
Manufactured Discontinued - Unsupported: Telephone support is not available for
manufactured discontinued products. Access to all existing technical support bulletins for these products remains available through Mitel Online.
Summary of Service Charges
Self Help Solutions
Checking the Knowledge Base
The Knowledge Base is your source for product information covering a large range of technical support methods. All new Technical Bulletins (TBs), Release Notes (RNs), How to Guides and Troubleshooting guides will be posted in the Knowledge Base. Access to the Knowledge Base is given with access to MOL.
To access the Knowledge Base:
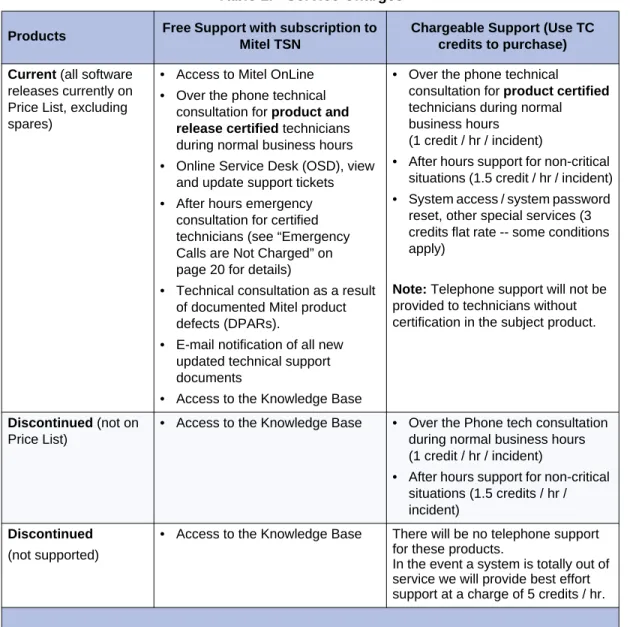
Table 1: Service Charges
Products Free Support with subscription to
Mitel TSN
Chargeable Support (Use TC credits to purchase) Current (all software
releases currently on Price List, excluding spares)
• Access to Mitel OnLine • Over the phone technical
consultation for product and release certified technicians during normal business hours • Online Service Desk (OSD), view
and update support tickets • After hours emergency
consultation for certified technicians (see “Emergency Calls are Not Charged” on page 20 for details)
• Technical consultation as a result of documented Mitel product defects (DPARs).
• E-mail notification of all new updated technical support documents
• Access to the Knowledge Base
• Over the phone technical
consultation for product certified
technicians during normal business hours
(1 credit / hr / incident)
• After hours support for non-critical situations (1.5 credit / hr / incident) • System access / system password
reset, other special services (3 credits flat rate -- some conditions apply)
Note: Telephone support will not be provided to technicians without certification in the subject product.
Discontinued (not on Price List)
• Access to the Knowledge Base • Over the Phone tech consultation during normal business hours (1 credit / hr / incident)
• After hours support for non-critical situations (1.5 credits / hr / incident)
Discontinued
(not supported)
• Access to the Knowledge Base There will be no telephone support for these products.
In the event a system is totally out of service we will provide best effort support at a charge of 5 credits / hr.
Self Help Solutions
2. From Mitel OnLine, click Technical and thenclick Knowledge Base.
3. Select the product name (for example, 3300 Integrated Communications Platform).
4. Select the type of article you are looking for or choose All.
5. Click Search.
Using the Online Service Desk (OSD)
The Online Service Desk provides up-to-date information on your Support Notifications and Technical Credit balance. This portal lets you view the status of your open tickets, update Support Notifications with new information for our technical support team, and check your technical credit usage. Once the issue has been resolved your ticket will be updated. OSD will automatically display all active support notifications when you log in.
To access the Online Service Desk:
1. Log into Mitel OnLine.
2. From Mitel OnLine, click Support, then click Online Service Desk.
3. The first time you log in you will be asked for your company’s Technical Support ID.
4. Choose your channel partner location.
5. View your open and closed tickets.
6. Update your open tickets with any new information and the Mitel technical support specialist will be notified of your updates by email.
7. Display a summary of your technical credits (depending on your access privileges).
Checking for Fixes in Software Patches
Before calling technical support with a problem, check to see if there is a software update available on Mitel Online that includes a fix for the problem.
- Major software patches are provided on Mitel Online.
- Minor software updates are available from Technical Support via a Mitel FTP site. The Known Product Issue (KPI) fixes that are contained in minor software updates are listed in the "KPI fixed lists" articles. The "KPI fixed lists" are Mitel Knowledge Base articles.
If an update is available with the required fix, you can download the software patch or update and install it on the system.
Fixed in Latest Software Patch?
Note: Online Service Desk (OSD) response time is three business days. The OSD should not be used to obtain emergency support services.
1. Log into Mitel OnLine.
2. Click click Technical and then click Software Downloads.
3. Click the product name (for example, 3300 Integrated Communications Platform).
4. Click the latest software update.
5. Open the Release Notes (RN).
6. In the RN, review the list of problems (DPARs) that are resolved in this software update. If your required fix is listed, read the RN carefully to ensure that the update is appropriate, download the update, and then install it on the system. See the Technician’s Handbook for software installation instructions.
Fixed in Previous Software Patch?
If the software version on your system is a few releases old, the fix may have been provided in a previous software patch. To check the problems that have been fixed in previous software patches
1. Log into Mitel OnLine.
2. From Mitel OnLine, click Technical, and thenclick Knowledge Base.
3. Select the product name (for example, 3300 Integrated Communications Platform).
4. Set the Article Type to Release Notes (RN) and then click Start Search.
5. Open the RNs that have been issued since the release of your system’s current software and check the list of problems (DPARs) that have been fixed.
6. If you find a fix to your problem, download and install the latest software patch. See the Technician’s Handbook for software installation instructions.
Fixed in Software Update?
To determine if a problem has been fixed in a minor software update:
1. Log into Mitel OnLine.
2. From Mitel OnLine, click Technical, and thenclick Knowledge Base.
3. Select the product name (for example, 3300 Integrated Communications Platform).
4. Enter "KPI" and then click Start Search.
5. Open and review the Known Product Issues (KPI) fixed lists.
Accessing Product Support
Accessing Product Support
Before You Call
1. Are you certified on the product in question?
2. Have you searched the tables in this Troubleshooting Guide for a solution?
3. Have you checked the Mitel Customer Documentation site, Knowledge Base and training materials for a solution to the issue?
4. Is the product supported (see “What Products are Supported?” on page 11)?
5. Do you have technical consultation credits available in your account (see “Summary of Service Charges” on page 12)? You can check your technical credit usage through the Online Service Desk (see “Using the Online Service Desk (OSD)” on page 13).
6. Do you have your valid TSID code at hand?
7. Are you calling within normal business hours or after hours? See “What are Normal Busi-ness Hours?” on page 19 and “What are After-Hours Calls?” on page 19.
8. Is it an emergency call? See “Emergency Calls are Not Charged” on page 20.
Table 2: Problem Details
Required Information Details
Site information Name, address, and phone number of end-user site
Product What system or application is exhibiting the problem? What is the system or application variant (for example: 3300 100-user controller)?
Country variant What country variant is selected for the controller?
Software version What software version is the system running (for example, 3300 Release 4.1 version 4.1.5.1)?
System Identifier or Hardware Identifier
SysID code of system
Serial number(s) Serial numbers of the hardware and software.
System platform If the problem involves a Mitel application that runs on a PC or server, what is the platform operating system, and what service packs, security software, firewall software, and browser version are installed?
Grounding What grounding schemes are being employed for all Mitel equipment?
Problem symptoms Detailed description of the problem symptoms. What is the problem? When did the problem first appear? Have you made any changes to the system programming, hardware
configuration or network setup that coincide with the appearance of the problem? Does the problem occur sporadically or only under specific conditions?
Try to narrow the scope of the problem down as much as possible. For example, if the system is dropping calls, are only IP Phone to IP Phone calls affected? TDM to TDM calls? IP to TDM calls? or TDM to trunk calls?
Troubleshooting steps What troubleshooting steps have you taken? Have you been able to eliminate any possible causes of the problem? Call scenarios Is the problem occurring between IP to IP devices, IP and
remote IP devices, remote IP to IP devices, IP to TDM devices, and so forth?
Network configuration Do you have a network diagram available?
• What is the DHCP configuration and settings in the network? • IP Addressing scheme?
• VLAN configuration and settings? • Layer 2 switch configuration and settings
• Layer 2 switch port statistics for FCS, collision, and duplex mismatch
• Router configuration and settings. Is there a common denominator (router, only one side of subnet, etc.)?
LED status If hardware, for example a controller or NSU, is affected, what is the status of the LEDs?
Accessing Product Support
Maintenance and software logs Collect the logs associated with the problem. For example, collect errors on the maintenance port of the NSU.
Collect the Alarm log details.
On 3300 ICP systems, collect the PSTSWLOG and XRTC logs in a file. See MKB article 04-1000-00011for instructions. Phone types What type of phones are on the system? Is there a specific
phone type that is exhibiting the problem? What is the firmware version?
Trunking What types of trunks (PRI, BRI, LS, DID, XNET/IP, and so forth) are on the system?
How are trunk hunt groups set up?
How are the LS trunk descriptors programmed?
FAX Support What type of Fax machines are installed, model number
and make?
Contact telephone number and e-mail address
Be prepared to provide the Mitel Technical Support technician with a telephone number and e-mail address so that the technician can contact you or provide your contact number to other support specialists. If your call concerns an emergency problem, ensure that you can be reached at the telephone number at any time. Don’t provide a number that will forward the technician to voice mail. Don’t provide a cell phone number that is likely to be unreachable (out-of-range).
Table 2: Problem Details (continued)
Required Information Details
10. If the problem is with an IP Phone, have you collected the following information?
Table 3: IP Phone Information
Question Answer Comment
Is there a PC attached to the IP Phone? If yes, please have the Network Interface Card (NIC) settings of the PC ready. It is recommended that NO power saving options and NO flow control options be enabled.
Have there been broadcast storms? You can observe a broadcast storm using a packet analyzer (sniffer). A packet analyzer intercepts and logs packet traffic passing over a network.
Is your cabling CAT 5 or better? CAT 5 or better is recommended for Ethernet connections.
Do your L2 or L3 switch statistics show any issues such as Runts, etc.?
Runs/Collision/Frame error may indicate an issue with NIC or a duplex mismatch. What is the L2 port setting for IP phone and
controller?
For IP phones, we recommend access ports that can handle both tagged and untagged packets to and from specific VLANs.
How is the IP phone powered? Power over Ethernet (PoE) or from a power adaptor (transformer) that is plugged into a power outlet..
If powered over Ethernet which L2 PoE switch is being used?
Does your L2 switch have CDP enabled, spanning tree enabled, or Port Fast enabled?
None
What is your speed setting? (10/100, Full/Half, Auto, Fixed?)
None Do the symptoms improve if the IP phone is
set to “auto and lock” ?
For controllers, we recommend Access Port. Mitel recommends setting “Auto” on phones. In some unique PC/network, the IP phone may require to hard coding or setting to “auto and lock” mode. Do the symptoms appear in hands free
mode only or do they also occur via the handset?
None
Do you have the assert information from the debug (Configuration) menu?
Assert value is saved in the debug mode and reports the last reason that the phone rebooted.
What type of phones are you using (for example 5020, 5220, 5220 Dual Mode)? How many display phones are connected to the system? Do any of the phones have PC applications associated with them?
These factors impact system perfomance.
Accessing Product Support
Making a Support Call
1. Ensure that you have collected as much information as possible (see Table 2).
2. If possible, establish local or remote access to the system (for example, the 3300 System Administration Tool) that you require support for before you call.
3. Call Mitel Technical Support:
- From within Canada and the United States, dial the following toll-free number: 1-800-561-0860
- From outside Canada and the United States, dial the following long-distance number: 1-613-592-7849
4. Describe the nature of the problem to the technician.
5. Record your problem ticket information.
What are Normal Business Hours?
• 8:30 am EST to 5:00 pm LOCAL time (local to North American customer site), Monday to Friday, excluding public holidays.
What are After-Hours Calls?
• Calls originating outside normal business hours (as defined above).
• For example, for customers in the Eastern Time Zone, “after-hours” is defined as 5:00 pm
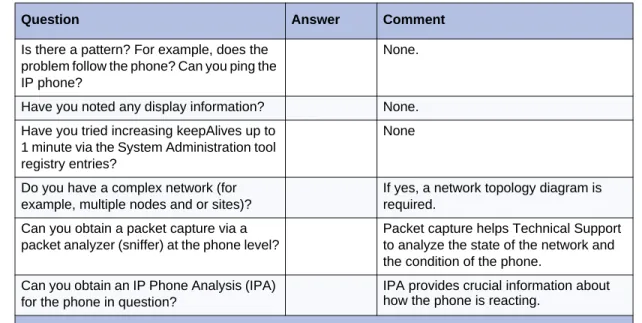
Is there a pattern? For example, does the problem follow the phone? Can you ping the IP phone?
None.
Have you noted any display information? None. Have you tried increasing keepAlives up to
1 minute via the System Administration tool registry entries?
None
Do you have a complex network (for example, multiple nodes and or sites)?
If yes, a network topology diagram is required.
Can you obtain a packet capture via a packet analyzer (sniffer) at the phone level?
Packet capture helps Technical Support to analyze the state of the network and the condition of the phone.
Can you obtain an IP Phone Analysis (IPA) for the phone in question?
IPA provides crucial information about how the phone is reacting.
Table 3: IP Phone Information
Question Answer Comment
Caution:Mitel Technical Support will not provide password resets or changes to system options during after-hours support.
Caution:After hours calls are charged at a higher rate.
Emergency Calls are Not Charged
If a technician is certified on the current product, phone consultation support is free for emergency calls. However, if a technician is not certified, emergency calls are charged at a higher rate per hour per incident.
The following situations are considered valid emergency calls
• Loss of redundancy in essential environments (see “Definition of Essential Environments” on page 20)
• Loss of essential services (see “Definition of Loss of Essential Services” on page 20)
Definition of Essential Environments
• Hospitals and facilities dedicated to the relief of sickness and suffering
• Emergency response organizations, such as Police, Fire, Ambulance, and Coast Guard • Defense or military installations
• Penal institutions
• Public utilities such as power or communications facilities
Definition of Loss of Essential Services • Total system outage
• Total trunk outage
• Greater than 20% of in service system ports are out of service
• Between one and three resets per day
Note: A Mitel technical support technician will consult their manager if there is a disagreement as to whether a call should be considered an emergency after-hours call.
Returning Faulty Hardware
Returning Faulty Hardware
Any Field Replaceable Unit (FRU) that is found to be faulty must be returned with a repair tag containing the following information:
The date the device is returned
The site where the unit was installed
The company name
The product name
The system serial number
The software generic
The software revision
The assembly part number of the item being returned
The assembly serial number of the item being returned (this is a white sticker located on the card itself)
Any pertinent alarm/error displays. This may include circuit alarm LEDs, console or main-tenance error messages, or mainmain-tenance log messages.
A brief description of the symptoms of the problem.
Indicate whether the fault occurred during installation, or while the system was in service.
Chapter 2
Initial Setup
Initial Setup Troubleshooting Tips
Initial Setup Troubleshooting Tips
; Refer to the Techician’s Handbook for instructions on how to install and set up a 3300 ICP controller.
; For hardware related issues, also see See “Controllers” on page 37.
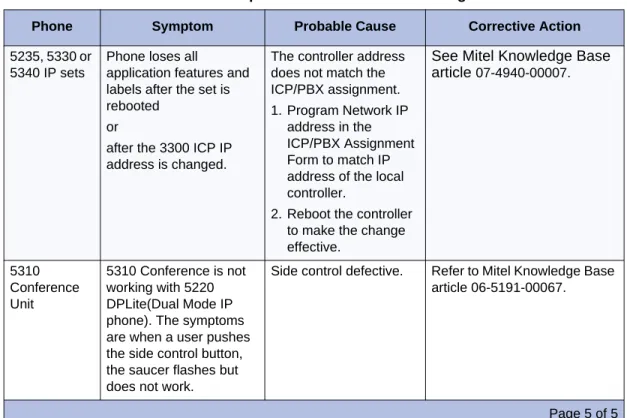
AX, MXe, CX, or CXi Controller
Table 4: AX, MXe, CX, or CXi Controller Setup Troubleshooting
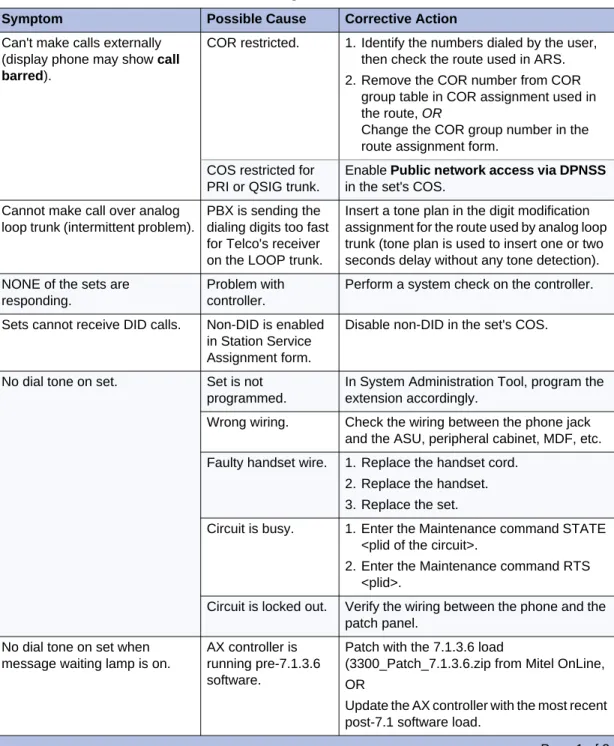
Symptom Possible Cause Corrective Action
Controller not powering up. Power cable is not securely plugged into the controller and/or power source.
Ensure power cable connections are secure.
Both power switches on a redundant power supply controller are not on.
Ensure that both power switches are turned on.
Unable to establish
communication with controller via maintenance PC
Controller has not finished starting up.
The controller can take up to 15 minutes to start up.
PC communication
application (for example VT 100 emulator program) serial port settings incorrect.
See "Connect to PC" in the "Initial Setup" chapter of the Technician’s Handbook for correct settings. Crossover Ethernet cable
used to PC to controller.
Use a straight-through Ethernet cable.
PC Network Interface Card IP address not programmed.
Program the PC’s NIC with the following settings:
• IP Address: 192.168.1.n (where n is a value between 30 and 254) • Subnet Mask: 255.255.255.0
Maintenance PC on different subnet.
Configure maintenance PC on same the same subnet as controller. IP address and subnet mask
for RTC entered incorrectly.
Enter IP addresses without leading zeros. For example, 192.168.1.2; not 192.168.001.002
E2T does not come up even though inet on ethernet is programmed and the flag is set to 0x40.
ET2 was hard coded with an IP address and then later changed to request an IP address from the DHCP server. This change is made by changing the flags (f)
parameter in the bootline of the E2T from 0x0 (hardcode) to 0x40 (DHCP). If any IP addresses remain on the E2T (at “inet on ethernet”, “host inet” or “gateway inet”), the E2T will use them and will obtain the rest of its parameters from the DHCP server.
When changing the flag from 0x0 to 0x40 on E2T, ensure that you blank out ALL IP addresses in the bootline of E2T.
Refer to "Programming the E2T via a Debug Cable or Secure Telnet" in the Technician’s Handbook.
RTC is set up with a different virtual LAN (vlan).
From the RTC shell, remove the vlan using the cv command:
When adding subnets to the internal DHCP server you receive the error message “No more room for records”.
Number of available subnets exceeded.
Refer to Mitel Knowledge Base article 06-5157-00008 for details.
After a new install, the internal DHCP server is not supplying addresses to IP devices.
Internal DHCP server is not activated.
The internal DHCP server is not activated by default. If your system relies on the internal DHCP server, you must turn the flag on by issuing the DBMS SAVE command. Issuing the close command
during a secure Telnet session to the RTC results in an error message.
When you issue the close
command inside Telnet, the Telnet shell interprets it as a close(0) command and sends it to VxWorks.
Refer to Mitel Knowledge Base article 04-3849-00290.
Table 4: AX, MXe, CX, or CXi Controller Setup Troubleshooting
MXe Server Setup
MXe Server Setup
Table 5: General Setup Troubleshooting
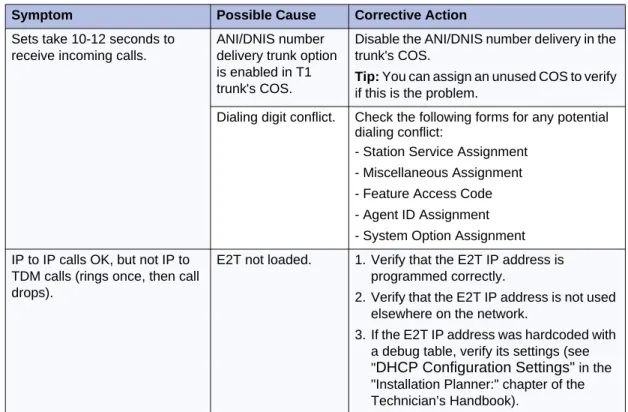
Symptom Possible Cause Corrective Action
Unable to access the Server Console screen on the MXe Server.
You are replacing an existing 3300 ICP controller with an MXe Server and trying to use the same system IP address for the MXe Server from a PC on a different subnet.
Initially, you can only connect to the MXe Server from the local subnet. Before you can connect to the MXe Server from other subnets, you must manually clear the router ARP cache or wait until the router ARP cache is automatically updated. Refer to the latest 3300 ICP Release Notes for instructions
Communication application (for example, Hyperterminal) connection parameters set incorrectly.
See the table "Communication Connection Parameters" in the "Initial Setup" chapter of the Technician’s Handbook for the correct settings. MXe Server has not enabled
the printer ports yet.
Ensure that you wait 3 minutes before attempting to connect. The MXe Server takes approximately 3 minutes before the software enables the printer port.
Unable to access Server Manager screen.
Crossover Ethernet cable used to connect PC Network Interface Card to controller
Use a straight-through Ethernet cable.
NIC IP address not set correctly.
Set NIC IP address to 192.168.1.20
Unable to login to Managed Application Server Manager application.
Using wrong password. You must enter the Linux admin password that you set through the Server Console.
Unable to access system from MCD Software Installer or other tools such as OPS Manager, Enterprise Manager, or System Administration Tool client stations.
Tools reside on different network.
Add the network through the Server Manager. Under Security, click Local Networks and add the Network IP Address, Subnet Mask , and Router IP Address.
Unable to set system date and time for the system tools.
The Managed Application Server application date and time setting does not apply to the.3300 ICP.
Set the system date and time from the Group Administration Tool.
Licensing
Table 6: Troubleshooting Licensing and Optioning
Symptom Possible Cause Corrective Action
License and Option Selection error: “Password does not match the purchased options you selected”.
The System ID or i-Button has not been installed.
Install the SysID module or i-Button. Note that the MXe Server does not have a SysID module or an i-Button. If you still can’t fix the problem, call Technical Support. Make sure you have the following information on hand before calling:
• The controller’s VxWorks parameters (bootdevice, host file, inet on ethernet, host IP address). • The error message(s) in the RTC
shell. Unable to communicate with
the Application Management Center (AMC).
• Inability to communicate with the AMC because unable to find the AMC server(s) via a DNS lookup.
• Inability to communicate with the AMC because of network/system
configuration.
• Inability to communicate with the AMC using specific protocols or ports due to router or firewall configuration
Refer to Mitel Knowledge Base Article 06-3849-01067.
Cannot move licenses after manual upgrade.
There is a specific procedure that you must follow to move licenses after a manual upgrade.
Refer to Mitel Knowledge Base Article 06-9999-00013.
Licensing
You receive an email that indicates that the evaluation period for the Management Access Point (MAP) will expire soon. Sample email output from Management Access Point related to 3300: Message 12345 from Mitel_7100 Date: 02/07/05 Time: 17:01:36 Type: 1 SubType: 300
Description: License reminder Data: Application
m3300snmp.app - Evaluation period expires in 2 day(s)
If the activation key was not entered on the Management Access Point (MAP) during installation, a license reminder email is sent from the Management Access Point to remind you that the evaluation period will soon expire.
Note: This condition does not cause any service outage on the 3300 ICP. The email is just a reminder that the Management Access Point does not have the proper key activation code.
Install the Management Access Point with the proper key activation code. Table 6: Troubleshooting Licensing and Optioning
Chapter 3
Hardware
Hardware Troubleshooting Tips
Hardware Troubleshooting Tips
; Only change one setting at a time (either a hardware or software setting).
; Observe carefully and document all observations (for example, feature programming, call states, time of day, problem symptoms and so forth).
; If all the functionality supported by a module or card is out of service, it is likely defective. If possible, swap the module or card with a known working module or card to confirm.
; Check the Alarm logs in the System Administration tool for hardware alarms.
; Check the LEDs on the hardware. Refer to "Appendix D: Status LEDs" in the Technician’s Handbook for LED state information.
; Verify that the IP addresses reserved for the hardware units are not used elsewhere on the system. See the "Installation Planner" chapter in the Technician’s Handbook for a list of the IP addresses that are reserved for the Analog Main Board (AMB) and the CIMs on the ASU and ASU IIs.
; For phone related issues, is the problem occurring - on a single phone?
- on a group of phones of a specific type (for example IP Phones only)?
- on a group of phones within a specific Class of Service only (indicates a potential programming conflict in COS assignment form)?
- during local-to-local calls only or local-to-external calls only?
; For phone or trunk related issues, if you don’t find the solution in this chapter, you should also check the troubleshooting tables in
- Chapter 5: “System Features” on page 91 - Chapter 6: “Trunking” on page 107
; Use the IP Phone Analyzer Tool to help you troubleshoot IP phone problems
; In the System Administration Tool use the following Maintenance and Diagnostic forms: - System Hardware Compute form: displays details of the Real Time Controller (RTC)
card and Ethernet-to-TDM (E2T) card
- System Hardware Modules form: displays the Mitel Mezzanine Card (MMC) modules that are installed in the system.
- IP Telephone forms: displays all IP phones in the system and their status.
; For help with diagnosing hardware problems, see “Hardware” on page 207.
Hardware Alarms
Table 7: Hardware Alarms Troubleshooting
Alarm Probable Cause Corrective Action
ICP Comms E2T card has no IP address. If you are using the controller’s internal DHCP server for the E2T: ensure you assigned a static IP address to the E2T using the correct MAC address (see "Configure the Layer 2 Switch" in the "Initial Setup" chapter or the Technician’s Handbook for instructions).
If you are using an external DHCP server for the system: verify that options are programmed correctly (see "Configuring External DHCP Settings for E2T" in the "Installation Planner" chapter of the Technician’s Handbook for instructions).
DHCP is corrupted. Rebuild the DHCP scope. Incorrectly programmed E2T IP
address or incorrect setup of debug cable.
Verify that E2T VxWorks parameters are correct (see “Controller Configuration Settings (RTC)” in the "Installation Planner" chapter of the Technician’s Handbook for instructions).
RTC is set up with a different virtual LAN (vlan).
From the RTC shell, remove the vlan using the cv command:
If the alarm is occurring on a CX/CXi controller that is running pre-release 9.0 UR2 software, it is a false alarm.
To clear the alarm without a reboot: 1. From the RTC shell enter the following
-> lkup "ClearAlarm"
2. This command Identifies the Hex code associated with the ClearAlarm. Note that this code is software load dependent. The system response will be similar to the following:
ClearAlarm (void) 0x0033763c text <======= this is what I need
LicenseManagerImpl : : ClearAlarm(void) 0x00fc99 ac text
ClearAlarm 0x001136c8 text value = 0 = 0x0
3. Enter the ClearAlarm(void) hex code. For example:
--> 0x0033763c( )
E2T card is defective. Check the System Hardware Compute Cards form in the System Administration Tool. If the IP Address for Slot 2 displays “Not Responding”, replace the E2T card. Page 1 of 3
Hardware Alarms
Media Gateway (MG) Comms (MXe Server only)
IP configuration is incorrect or duplicated
Check that the IP addresses are correct by checking the System IP Configuration form on the System Administration Tool. RTC (Media Gateway) card has no IP
address..
Refer to Mitel Knowledge Base article 09-5157-00026 for instructions on how to set the IP address..
Incorrectly programmed RTC IP address.
Plug into the RS-232 port on the MXe Server and verify that RTC VxWorks parameters are correct (see "Controller Configuration Settings (RTC)" in the "Installation Planner" chapter of the Technician’s Handbook for instructions). Watching the activity via the VxWorks console may also help by showing the stage at which the problems are starting. Network Gateway The Network Gateway Security Access
Module associated with a legacy ISDN Gateway has been tampered with or has failed.
Replace module.
DSP Status A percentage of DSP resources are unavailable. The failure of one or more, but not all, DSPs results in a Minor alarm. Critical alarm indicates that all DSPs have failed. In the event of an alarm, reset the system as soon as possible. If the DSP continues to fail, replace the module.
Use the Show StatusDSP maintenance command to identify status of DSPs in the controller.
Install required DSP module(s). See "Increasing DSP Resources" in the "Installation Planner" chapter of the Technician’s Handbook for instructions. DSP licenses are enabled but not
enough DSP resources are available to support compression requirements
Install required DSP module(s). See "Increasing DSP Resources" in the Installation Planner chapter of the Technician’s Handbook for instructions. Faulty circuit on DSP module Replace DSP module.
DSP Card Status DSP card is defective. For a defective DSP module, ensure that the module is seated securely.
For an embedded DSP failure, replace the controller. Use Show StatusDSP to identify the location of the defective module.
Fan Fan is defective (AX/MXe/MXe Server).
Replace the fan (see Note below).
One PSU Power supply unit is defective (AX/MXe/MXe Server).
Replace the PSU (see Note below). Two PSU Power supply unit is defective
(AX/MXe/MXe Server).
Replace the PSU (see Note below).
RAID Hard Disk Hard disk has a fault (MXe/MXe Server).
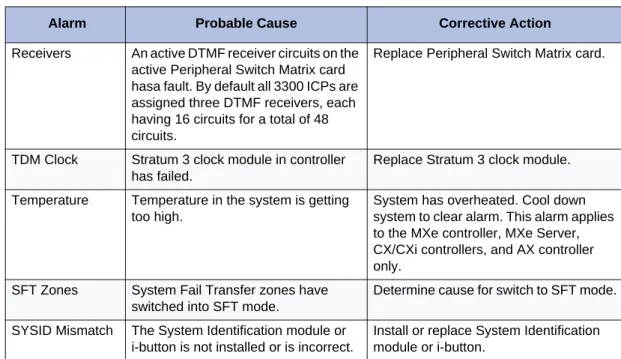
Replace the hard disk (see Note below). Table 7: Hardware Alarms Troubleshooting
Receivers An active DTMF receiver circuits on the active Peripheral Switch Matrix card hasa fault. By default all 3300 ICPs are assigned three DTMF receivers, each having 16 circuits for a total of 48 circuits.
Replace Peripheral Switch Matrix card.
TDM Clock Stratum 3 clock module in controller has failed.
Replace Stratum 3 clock module.
Temperature Temperature in the system is getting too high.
System has overheated. Cool down system to clear alarm. This alarm applies to the MXe controller, MXe Server, CX/CXi controllers, and AX controller only.
SFT Zones System Fail Transfer zones have switched into SFT mode.
Determine cause for switch to SFT mode. SYSID Mismatch The System Identification module or
i-button is not installed or is incorrect.
Install or replace System Identification module or i-button.
Note: Enter the Show Status Redundant maintenance command to identified the failed component. A minor Fan, Power Supply, or RAID alarm in the MXe or MXe Server means that only one of the components has failed. A major alarm means that more than one component has failed.
See the Technician’s Handbook for hardware replacement procedures. Table 7: Hardware Alarms Troubleshooting
Alarm Probable Cause Corrective Action
Controllers
Controllers
LX Controller
MXe Controller
Table 8: LX Controller Troubleshooting
Symptom Probable Cause Corrective Action
No audio across network. E2T is unable to
communicate with devices off its subnet.
Program a gateway IP address.
Table 9: MXe Controller Troubleshooting
Symptom Probable Cause Corrective Action
E2T fails to initialize. Changing from a hard coded E2T IP address to requesting one from the DHCP server. (If
any IP addresses remain on the E2T (at “inet on ethernet”, “host inet”, or “gateway inet”), the E2T will use them and will obtain the rest of its
parameters from the DHCP server.)
1. Secure telnet to <RTC IP Address> port 2007 (E2T serial port on the MXe).
2. Secure telnet to <RTC IP Address> port 2002 (VxWorks shell on the RTC).
3. At the VxWorks shell enter "ToggleCpu 1" to reset the E2T card. Note that if the RTC was able to communicate with the E2T prior to the initialization failure, this command will reboot the controller. 4. Watch the port 2007 (E2T) telnet
session.
5. Hit 3 spaces to interrupt the boot process.
6. Verify the bootline parameters. E2T card defective. Check the System Hardware
Compute Cards form in the System Administration Tool. If the IP Address for Slot 2 displays “Not Responding”, replace the E2T card.
RTC is set up with a different virtual LAN (vlan).
From the RTC shell, remove the vlan using the cv command:
Unable to communicate with MXe
You are attempting to use port 2 to access the MXe contorller but the Layer 2 IP address is not programmed.
Use port 1 to access the MXe controller. Then launch the System Administration Tool and program the Layer 2 IP address.
Soft fault reported intermittently by RAID
Soft fault comes indirectly from the hard drive itself.
Refer to Mitel Knowledge Base article 07-5191-00092.
CX/CXi Controller
Symptom Probable Cause Corrective Action
Unable to connect to the controller.
Database being used is from a system that had
dual-VLANs enabled, so the management PC, untagged on VLAN 1, cannot reach the controller on the Voice VLAN.
Run vlan_off command from the RTC console (through the RS-232 serial port) to reset the controller and disable the VLANs.
Run vlan_on to enable the VLANs. The commands will cause the controller to reboot, so wait a couple minutes before trying to connect with your PC, attached to CX port 17. IP Phones on third-party Layer
2 switch cannot connect with the CXi.
System has VLAN enabled but the “tagging” is being removed prior to connecting with Port 17.
The CXi must receive VLAN tags (if VLAN enabled) to allow an IP phone to connect with the CXi. The third-party L2 switch needs to pass the Q and P tags to Port 17. Unable to connect to the DSL
modem.
Bad connection, incorrect password, incorrect
username, or wrong protocol.
Review Maintenance Logs for: • Wan_port: state=down,
• proto=pppoe, cause=wan=start. Review ISP information sheet and make sure that the username, pw and protocol are correct.
Disable and Enable the WAN Access in Internet Gateway/Wan Settings. CXi ports 1-16 not functioning. Layer 2 port IP Address is not
programmed.
Ensure IP Network Configuration is programmed properly.
Connection failures: ISP, IP trunks, or IP phones.
Network configuration programming problem.
Verify programming in the following forms:
1. System IP Configuration The address cannot conflict with the L2 Switch IP Address, and it must be on a different subnet than the WAN Ethernet IP Address. 2. Layer 2 Switch form
To program global settings and configure the Ethernet ports for the Layer 2 switch.
3. IP Routing form
Lists routes to destination networks on the LAN. 4. WAN Settings form
To enable the WAN interface and provide internet connectivity settings for Static IP, DHCP, or PPPoE.
5. Remote Access (PPTP) 6. Firewall Control 7. Port Forward Table
Controllers
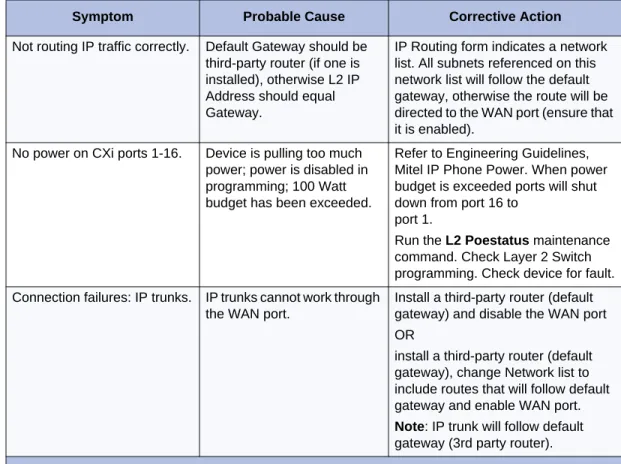
MXe Server
Not routing IP traffic correctly. Default Gateway should be third-party router (if one is installed), otherwise L2 IP Address should equal Gateway.
IP Routing form indicates a network list. All subnets referenced on this network list will follow the default gateway, otherwise the route will be directed to the WAN port (ensure that it is enabled).
No power on CXi ports 1-16. Device is pulling too much power; power is disabled in programming; 100 Watt budget has been exceeded.
Refer to Engineering Guidelines, Mitel IP Phone Power. When power budget is exceeded ports will shut down from port 16 to
port 1.
Run the L2 Poestatus maintenance command. Check Layer 2 Switch programming. Check device for fault. Connection failures: IP trunks. IP trunks cannot work through
the WAN port.
Install a third-party router (default gateway) and disable the WAN port OR
install a third-party router (default gateway), change Network list to include routes that will follow default gateway and enable WAN port.
Note: IP trunk will follow default gateway (3rd party router).
Table 10: MXe Server
Symptom Probable Cause Corrective Action
New MXe fails to boot after drive is mirrored.
“Error auto-loading file: errno = 0x850001”
The firmware being shipped on the RTC flash is not the current version.
Reinstall the software to update the RTC to the proper load.
OR
Issue the UpgradeBootrom ALL
maintenance command from the System Administration Tool.
Page 1 of 3
Symptom Probable Cause Corrective Action
Suspected APC failure. APC might be faulty. Remove and replace the APC-MXe battery. Seethe "Application Processor Card" section in the "Install and Replace Units" chapter of the Technician’s Handbook for intructions.
If that doesn’t fix the problem, ping the APC IP (System IP) address. If the ping is successful, ssh to the APC IP address and type a few basic commands like:
>ll >ls >cd
If these commands succeed, the problem is likely not the APC. Ping to APC failed. APC is faulty. Remove and replace the APC-MXe
battery. Seethe "Application Processor Card" section in the "Install and Replace Units" chapter of the Technician’s Handbook for intructions.
If that doesn’t fix the problem, make a serial connection to the printer port (38400 8N1).
<Enter> to login to Linux, and issue some basic commands:
>ll >ls >cd
If these commands succeed, APC is not faulty. See Network connectivity is broken, below.
Network connectivity is broken.
Recheck network connections and fix.
RTC has wrong bootrom. Replace RTC with a new MMC-C card.
OR
Reprogram flash memory on the RTC and the midplane.
Atlas licensing error. RTC has wrong bootrom. Replace RTC with a new MMC-C card.
OR
Reprogram flash memory on the RTC and the midplane.
Table 10: MXe Server
Symptom Probable Cause Corrective Action
Controllers
Login via the serial connection fails
APC is faulty Check the battery and replace it. If that doesn’t fix the problem, reset the switch using the reset button on the front panel of the MXe Server. Connect to the printer port to see the - system initialization
- BIOS output
If you don’t see any BIOS output, recheck the cables and make sure the APC is properly seated.
If you still don’t see any BIOS output, replace the APC-MXe. Seethe "Application Processor Card" section in the "Install and Replace Units" chapter of the Technician’s Handbook for intructions.
“Operating System not found”: No operating system image has been found on the hard disk.
Installation error. Reinstall the software.
RAID Controller is faulty. Replace the RAID controller. See the "MXe/MXe Server RAID
Controller" section in the "Install and Replace Units" chapter of the Technician’s Handbook.
Hard disk has crashed. Replace the hard drive. Refer to the
"Install and Replace Units" chapter of the Technician’s Handbook.
“GRUB loading...” Problem with the Hard drive master boot record.
Reformat the hard drive.
If this doesn’t solve the problem, replace the hard drive using the instructions in the "Install and Replace Units" chapter of the Technician’s Handbook. Table 10: MXe Server
Symptom Probable Cause Corrective Action
Service Units
Table 11: Service Unit Troubleshooting
Symptom Probable Cause Corrective Action
Network Service Units
NSU not functioning correctly. Issue with external equipment.
Check external equipment. Faulty fiber connection
between NSU and controller.
Fix the fiber connection, and ensure that the LEDs of both FIMs are solid green.
Programming error. Check the programming in the following forms:
• MSDN/DPNSS/DASS2 Trunk Circuit Descriptor Assignment • Miscellaneous Assignment (for
NSU-BRI only)
• Link Descriptor Assignment. NSU fails to come up after
upgrade or new installation (Both the red and amber LEDs, or just the amber LED, are alternating between L0/L1).
Automatic NSU upgrade is in progress.
Wait 15–20 minutes for the NSU upgrade to complete.
CAUTION: Do not power down when the amber LED is alternat-ing between L0/L1. Poweralternat-ing down the NSU may corrupt the NSU software.
The LEDs are flashing green and amber for more than 30 minutes during an NSU upgrade.
Corrupted NSU software. Refer to Technical Bulletin 58004932 for information on flashing the NSU.
NSU fails to come up after upgrade or new installation. NSU continues to reset on a regular interval and/or the LEDs on L0 and L1 continue in alternating flash cycle longer than 30 minutes.
NSU flash is corrupted. Refer to Mitel Knowledge Base article 04-1000-00026_2 for instructions.
NSU fails to load after upgrade or install with "Unexpected database error"
Database version is unsupported (incompatible).
Refer to Mitel Knowledge Base article 04-5115-00002 for instructions.
NSU or PRI card fail to load after upgrade or database restore.
NSU and PRI cards fail to load because the database version does not match the current software load on the card.
Refer to Mitel Knowledge Base article 05-5134-00023.
NSU keeps resetting with no IMAT db error message.
No IMAT database is saved to the NSU (PRI/QSIG).
Use IMAT to save the corresponding database to NSU (PRI/QSIG).
Service Units
After changing NSU from T1 to E1, NSU remains unassigned.
NSU does not reflash. • Flash the NSU (refer to Technical Bulletin 58004932)
OR
• Delete datetag.txt via ftp
OR
• From the debug terminal, issue force dl for the NSU.
NSU fails to boot, with an error message.
Boot line timeout.
Universal NSU programming is not complete.
1. Ensure that the NSU is
programmed as a Universal T1 or E1 (not T1 or CEPT).
2. Program the proper link descriptor with the proper integrated access, and assign to the corresponding NSU unit (for example: ISDN node for PRI protocol, T1D4 for T1D4, DPNSS for MSDN).
3. Program at least one trunk. PRI/QSIG NSU fails to boot. Database not compatible with
new load.
1. Connect IMAT to the PRI NSU and start IMAT.
2. Download the database from the NSU to IMAT.
3. Save the database from IMAT to the NSU.
4. A message appears asking if you want to convert the database. Select Yes.
5. When the database has finished saving, reset the NSU.
Unable to FTP into the NSU. Release 4.1 and later requires a username and password to login.
Enter:
username, mitel
password, passwd1
NSU is up, but L0 or L1 LED is solid red.
No physical connection to far end.
1. Verify and fix wiring.
2. Check DIP Switch 6. If it is UP, set it to DOWN to see if this makes any difference (see "Universal and R2 NSU DIP Switch Settings" in the "Hardware Reference" chapter of the Technician’s Handbook). NSU is up, but L0 or L1 LED is
flashing green.
Layer 2 protocol mismatch. Change protocol through IMAT Distorted voice or loud noise
on NSU trunks.
Voice encoding is not set properly.
Change Voice encoding in the link descriptor to invert for T1, and ADI invert for CEPT (this does not apply to Embedded PRI).
Set termination impedance switch correctly (75 ohms or 120 ohms).. Table 11: Service Unit Troubleshooting
Symptom Probable Cause Corrective Action
Unable to connect to NSU trunks
No fiber connection between the controller and NSU.
Fix the fiber connection, and ensure that the LEDs of both FIMs are solid green.
Universal NSU programming is not complete.
1. Ensure that the NSU is
programmed as a Universal T1 or E1 (not T1 or CEPT).
2. Program the proper link descriptor with the proper integrated access, and assign to the corresponding NSU unit (for example: ISDN node for PRI protocol, T1D4 for T1D4, DPNSS for MSDN).
3. Program at least one trunk.. Layer 2 is not up.
Layer 2 protocol mismatch.
1. Check your IMAT database and verify with your Telco which protocol you should use.
2. Check the DSU wiring.
Set jumpers correctly.
IMAT fails to collect database files from the NSU.
When using IMAT to retrieve the database from the Universal NSU the database files do not appear to have been downloaded. The IMAT application simply does not provide information to identify success or failure to
download the database. At the bottom left hand corner of the IMAT application, you will see “please select a menu option”. The maintenance logs can be downloaded, you will get the IMAT indication that the maintenance logs have been received.
Ensure that the NSU is actually running as ISDN node in the link descriptor under the integrated digital access field. If it is not, there are no DBA files, which represent the IMAT database. Maintenance logs are maintained on NSUs, which is why they can be downloaded.
Analog Service Unit
User can hear clicking sound while on a call on an external ASU ONS circuits.
Message Waiting voltage cycling.
Refer to Mitel Knowledge Base article 05-4409-00008.
Voice calls on ASU have an echo.
Faulty programming. Ensure that the Call Progress Tone Detection Plan Assignment form for the analogue trunks is programmed correctly and ensure that the Tone to Detect entry is left blank (i.e. no tone to detect). If the Tone To Detect
entry is set to detect a tone, it may cause echo.
Table 11: Service Unit Troubleshooting
Symptom Probable Cause Corrective Action