© Copyright XBLUE Networks, LLC 2006
XBLUE Networks reserves the right to make changes in specifications at any time without notice. All of the information in this document is believed to be accurate and reliable, but is not warranted to be true in all cases.
TOC
Introduction ... 5
Feature Codes ... 5
Feature Code Operation ... 7
Accessing Specific CO Lines... 7
Account Code ... 8
Authority Code (Traveling Class of Service) ... 8
Call Attendant (Operator) ... 8
Call Back – Extension... 9
Call Forward Extension... 10
Call Pickup Group ... 11
Do Not Disturb... 12
Extension Password / Phone Lock ... 12
Extension Pickup Groups... 13
Extension Reminder ... 13
Flash – Telephone Company Line... 13
Forced Intercom Tone Ring... 14
Group Call Pickup ... 14
Hold ... 14
Last Number Redial ... 15
Least Cost Routing... 15
Message Waiting ... 15
Page ... 16
Page (Meet Me) ... 16
Phone Lock / Unlock... 16
Pulse to Tone (DTMF) Conversion... 17
Recall ... 17
Reminder Tones... 18
Single Line Telephone - Flash... 18
Speed Dial (ABBR) – Extension /System ... 19
Transfer ... 19
Warning Tone / CO Line Call Limiter... 20
Voice Processing System... 21
Using your Mailbox ... 21
1 Single Line Telephone
User Guide
Introduction
Single Line or Analog telephones, like you use at home, have not changed significantly in many years. Generally, Analog telephones are basic in design and have very few features. However, when attached to a business PBX system, like this one, you will find that Single Line Tele-phones (SLT) has access to many of the same features that the digital teleTele-phones.
Feature
Codes
Fe atu re C od es .
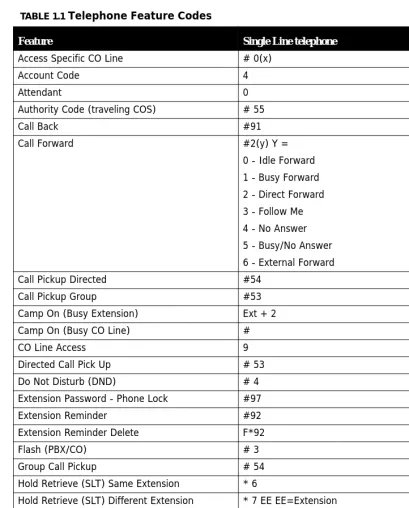
TABLE 1.1 Telephone Feature Codes
Feature Single Line telephone
Access Specific CO Line # 0(x)
Account Code 4
Attendant 0
Authority Code (traveling COS) # 55
Call Back #91
Call Forward #2(y) Y =
0 - Idle Forward 1 - Busy Forward 2 - Direct Forward 3 - Follow Me 4 - No Answer 5 - Busy/No Answer 6 - External Forward Call Pickup Directed #54
Call Pickup Group #53
Camp On (Busy Extension) Ext + 2 Camp On (Busy CO Line) #
CO Line Access 9
Directed Call Pick Up # 53 Do Not Disturb (DND) # 4 Extension Password - Phone Lock #97
Extension Reminder #92
Extension Reminder Delete F*92
Flash (PBX/CO) # 3
Group Call Pickup # 54
Hold Retrieve (SLT) Same Extension * 6
Hold Retrieve (SLT) Different Extension * 7 EE EE=Extension
Hot Line # #4
Last Number Redial #8
Accessing
Speci
fic CO Lines
Feature
Code
Operation
Accessing
Specific
CO
Lines
#0
(x)
To access an available line, dial 9 or to access a specific line or Dial # followed by 0(x), where (x) = the Line 1 - 9. This allows both Single Line and Digital Key telephones the abil-ity to access specific outside Lines rather than dialing the line group code.
Conditions:
1. The telephone company Line must be connected to the telephone company facility or error tone will be heard.
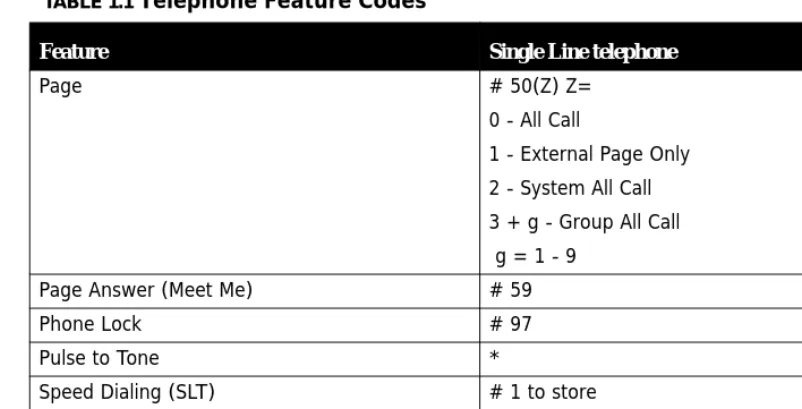
Page # 50(Z) Z=
0 - All Call
1 - External Page Only 2 - System All Call 3 + g - Group All Call g = 1 - 9
Page Answer (Meet Me) # 59
Phone Lock # 97
Pulse to Tone *
Speed Dialing (SLT) # 1 to store * 1 to Dial
Voice Mail #64
TABLE 1.1 Telephone Feature Codes
Accou
nt
Cod
e
Account
Code
4
Account codes are passwords that are verified in the database, which are used for two dif-ferent reasons. One reason is to grant difdif-ferent dialing privileges, when a valid account code is entered, for example, it may temporarily grant access to long distance dialing. The second reason is to create a record, with the use of Station Message Detail Recording (SMDR). Extensions may be forced to use account codes before dialing out on any tele-phone company line or it can be voluntary. All Account codes are verified.
Authority
Code
(Traveling
Class
of
Service)
#55
Authority Codes are used to bring a more privileged Class of Service to an extension with a less privileged Class of Service. When using Authority Codes, the extension password must be entered.
1. Enter #55
2. Enter your extension number
3. Press Save
4. Enter your extension password
5. Press Save
Conditions:
1. Error tone is heard when an invalid account code is entered, and the telephone will return to an idle state.
2. When a valid account code is dialed, the extension is connected to a CO Line, and the Account Code’s Class of Service is verified before a call is placed.
Call
Attendant
(Operator)
0
Call Bac
k –
Ex
ten
sion
Conditions:
1. The Operator Code (0) is in addition to the default assigned two-digit intercom number for the extension.
2. The attendant two-digit extension number can be assigned to any feature button.
Call
Back
–
Extension
#91
This feature allows the user to queue an extension, which is busy, in Do Not Disturb (DND) or idle. When a user sends a Call Back to a busy extension, the Call Back process will begin when the busy extension hangs up. When Call Back is sent to an idle extension, the Call Back process will begin once the user performs an operation at that extension and then hangs up.
Digital Telephone Operation:
When the Call Back process begins the user will hear bursts of tone signaling them to pick up the handset or press the LCD soft key under 'reply'. Then the queued extension begins ringing.
Conditions:
1. To invoke a Call Back at an extension that is in the Voice Announce mode, the user must press Force Tone Ringing (*).
2. When a Call Back alert is not answered at the extension that invoked the Call Back, the display message “CBCK TO Ext xx (xx=extension number) be displayed until either they [reply] or [del].
Call F orw ar d Extension
Call
Forward
Extension
#2
There are several call forward options to choice from, so that each extension user can cus-tomize their own call forwarding.
•
“Idle” Forward all calls,•
“Busy” Forward calls only when the extension is busy.•
“Follow Me” Use the follow me feature to receive calls at a temporary loca-tion and activate the feature remotely from another extension.•
“No Answer” Forward calls that go unanswered at an extension.•
“External” Forward incoming calls to another location or different telephone number. (This feature must be enabled for your extension in database administration.)Forward conditions may be set as follows for each call forward type:
•
Intercom calls only.•
Intercom and CO Line (including transferred CO Lines) calls.•
CO Line calls only.1. Press #2
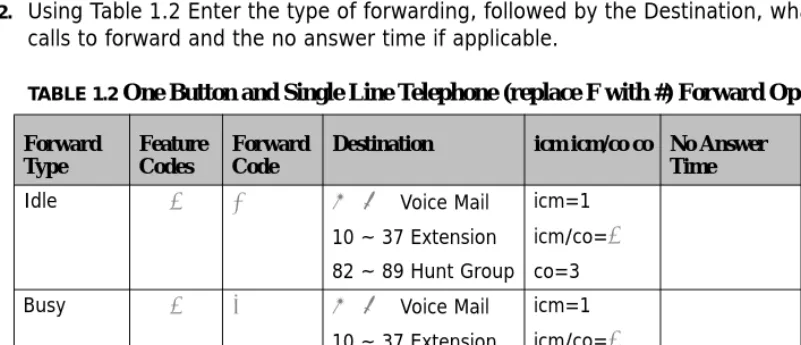
2. Using Table 1.2 Enter the type of forwarding, followed by the Destination, what type of calls to forward and the no answer time if applicable.
TABLE 1.2 One Button and Single Line Telephone (replace F with #) Forward Operations
Forward Type Feature Codes Forward Code
Destination icm icm/co co No Answer Time
Entry Code
Idle #2 0 87 Voice Mail 10 ~ 37 Extension 82 ~ 89 Hunt Group
icm=1 icm/co=2
co=3
#20872
Busy #2 1 87 Voice Mail 10 ~ 37 Extension 82 ~ 89 Hunt Group
icm=1 icm/co=2
co=3
#21872
Direct #2 2 87 Voice Mail 10 ~ 37 Extension 82 ~ 89 Hunt Group
icm=1 icm/co=2
co=3
Cal
l Pickup Gr
oup
Conditions:
1. Intercom calls to a forwarded extension will receive a special tone signifying that the extension called is forwarded.
Call
Pickup
Group
#53
/
#54
An extension can answer calls ringing at another extension by using the Call Pick Up Group feature. This feature allows users to easily access calls ringing within a group by dialing the pickup code or pressing the preprogrammed button.
If multiple calls are ringing at an extension, a priority list determines which call will be answered first.
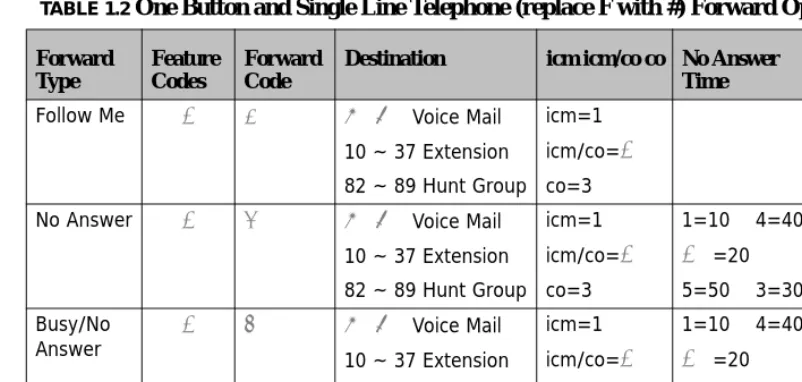
Follow Me #2 3 87 Voice Mail 10 ~ 37 Extension 82 ~ 89 Hunt Group
icm=1 icm/co=2
co=3
#238722
No Answer #2 4 87 Voice Mail 10 ~ 37 Extension 82 ~ 89 Hunt Group
icm=1 icm/co=2
co=3
1=10 4=40
2=20 5=50 3=30
#24872
Busy/No
Answer #2 5 8710 ~ 37 Extension Voice Mail 82 ~ 89 Hunt Group
icm=1 icm/co=2
co=3
1=10 4=40
2=20 5=50 3=30
#258722
External #2 6 Telephone Number*
* External Call forward requires a Pause at the beginning of the number. To enter a Pause, Press Feature 70, which is replaced with a “P”
TABLE 1.2 One Button and Single Line Telephone (replace F with #) Forward Operations
Forward Type Feature Codes Forward Code
Destination icm icm/co co No Answer Time
Do Not
Disturb
•
Tone Ringing Intercom CallsConditions:
1. If the call at the dialed extension has stopped ringing, before the call is picked up, the user will hear error tone.
2. The Call Pick Up feature code may be programmed on any programmable feature but-ton.
3. If several calls of the same priority are ringing at the extension, the calls are answered in the order they are received.
Do
Not
Disturb
#4
Extension users may, have the ability to place their extension in Do Not Disturb. When invoked, Do-Not-Disturb (DND) prevents all calls, intercom or CO Line, from ringing at an extension in Do Not Disturb. Some extensions with a more privileged Class of Service (COS) may have the ability to override an extension’s DND setting.
A short stutter tone is audible when DND is active. A digital telephone is capable of having the DND feature assigned to a programmable button, which will light whenever DND is active. Other extensions with a programmed DSS/BLF button of the extension that is in Do Not Disturb, will flash indicating that the extension is in DND.
Conditions:
1. Do Not Disturb cannot be enabled if any form of Station Call Forward is active
2. To redirect a ringing call to the attendant, press the preprogrammed “DND” feature but-ton while the call is ringing.
3. When an extension is in DND, all other extensions with a DSS/BLF of that extension, will flash indicating that the extension is in DND.
Extension
Password
/
Phone
Lock
#97
Ext
en
sion P
ickup
Gr
oup
s
Conditions
1. Each extension can customize their password at any time.
Extension
Pickup
Groups
#54
Extension pickup groups allow you to dial a code and pick up an actively ringing call within your group.
Conditions
1. Extensions may be assigned to only one Extension Pick Up Group.
2. The pick up priority of a ringing call is: CO Lines and then intercom calls, CO Line call priority is Camped-On, Recalling, Transferred, and Incoming.
3. Intercom call priority is Ringing then Voice Call.
Extension
Reminder
#92
Each extension has a private alarm that can be used to remind them of special appoint-ments, events, etc. When the alarm activates the user will hear ring tone for a programma-ble period of time ranging from 10 to 60 seconds. After the programmed period the alarm is automatically canceled. The extension user can program the alarm to be activated once or always (repeated). When programmed for always, the alarm will sound at the same time everyday.
Conditions:
Fo
rce
d In
te
rc
om
T
on
e Ri
ng
requirement when the system is installed “behind” Centrex or PBX system. For easy access it is recommended, in these two cases, the Flash feature code should be programmed onto a Flexible Feature Button.
If Call Waiting service is provided, by the telephone company, the Flash feature to answer a second incoming call while connected to another outside party.
Conditions
1. The Flash code may be stored in any speed dial bin.
2. The Flash code may be stored in the Last Number Redial buffer.
3. Single line extensions must generate a hook-flash on the analog port then dial #3 to generate a hook-flash on a CO Line.
Forced
Intercom
Tone
Ring
*
When an extension is in Hands Free - Voice Announce mode, intercom calls will not for-ward, so the system allows callers to dial “*” to activate Forced Intercom Tone Ring which allows callers to ring the extension.
Conditions
1. When an extension leaves a Callback, the alert signal will ring.
Group
Call
Pickup
#54
See Call Pickup
Hold
Last Number
R
edial
Last
Number
Redial
#8
or fixed redial buttonLast Number Redial (LNR) allows the user to automatically dial the last number dialed from your telephone. The LNR feature will retain up to twenty 20 digits for each extension.
Conditions
1. Last Number Redial only works with CO Line calls.
2. LNR will repeat a hook-flash in the same sequence as it was first dialed. If a speed dial number was first dialed LNR will dial the speed dial number and any subsequent manu-ally dialed digits.
Least
Cost
Routing
#68
Least cost routing allows the system to evaluate each telephone number dialed to ensure that it is using the correct trunk route.
Conditions
1. This must be enabled in Database Programming
Message
Waiting
#96
Pa
ge
Page
#50
Extension users may initiate various one-way page announcements:
•
All Paging - All paging zones internal and external.•
External Paging - Only external ancillary paging equipment.•
Internal Paging - Specific page groups•
Internal Paging - A system-wide internal page.Conditions
1. Only one page will work at a time, if a second page is attempted, Error tone is heard.
2. Single Line Telephone may initiate a Page, and use the Meet Me Page feature, but they will not receive a page announcement.
Page
(Meet
Me)
#59
Meet me page allows the user to locate a person that is away from their desk or have no office location. Once paged, the party can answer the page, using any telephone in the system, by entering the “Meet Me” (#59) code. Once the code is entered, the system creates a private intercom call and releases the page port.
Conditions
1. A page may be answered at any telephone, by dialing Meet Me Page code, even if the page announcement is not heard over the telephone speaker.
2. The page may be a zone page or a system wide “all page”.
Phone
Lock
/
Unlock
Pulse to
To
ne (D
TMF) Con
version
The Phone Lock/Unlock feature allows a user to prevent ANY outgoing CO Line calls from their extension. The extension password is used to lock/unlock the telephone. This feature code is also used to program your private four-digit extension password.
The use of the feature (Phone Lock) will block all CO Line calls, including emergency calls such as “911”. Therefore, it is not recommended that any telephone be locked.
Conditions
1. When an extension is locked it can only make intercom calls; answer and retrieve calls on hold are not affected.
2. If a user forgets their password it may be retrieved via the system database administra-tion.
3. The programmed Attendant’s Private Password is used to enter Attendant Administra-tion.
4. If a CO Line or CO Line call is attempted from a locked telephone, error tone will be heard.
Pulse
to
Tone
(DTMF)
Conversion
*
The Pulse to Touch Tone (DTMF) conversion feature enables the system to use Dial Pulse (rotary) outgoing telephone company lines and access special services which require DTMF tones. A limited number of applications may still only support Pulse dialing for outgoing calls, but after reaching an outside party the use of Touch Tone mode may be required.
Conditions
1. The dialing conversion can only be from pulse mode to tone DTMF mode, not from DTMF back to pulse mode.
2. The Pulse to Tone code can be programmed in any speed dial bin.
Re
m
in
de
r T
on
es
“recalled” to the extension which initiated the park, hold or transfer. Recall reduces the possibility that a call will go unattended.
Conditions
1. Recalling telephone company lines will follow Call Forward destination settings.
2. Recalls are not directed to the programmed Alternate Attendant extension.
3. When a holding or transferred call begins to recall, the outside party will hear transfer ring-back tone.
4. During recall, the CO line returns to System Hold allowing any extension with normal CO Line receive privileges to retrieve the recalling line.
Reminder
Tones
Reminder Tones are heard when accessing an intercom dial tone from an extension that has Call Forward or Do Not Disturb is enabled. This “stutter” dial tone is actually a rapid, recurring break in the intercom dial tone which reminds the user of the current extension availability status. If Call Forward or Do Not Disturb is activated, this reminder tone will be heard when the extension user places an intercom call.
Conditions
1. Once a digit is dialed the reminder tone is removed until the next time intercom dial tone is heard.
Single
Line
Telephone
‐
Flash
Single Line Telephones and similar analog devices uses a Hook-switch Flash or Flash button to administer call-processing operations like transfer and hold. This fundamental call con-trol is handled in the form of specific hook-switch operations. These are known as Hook-switch Flash or just Flash commands.
Conditions
Sp
eed
Dial
(ABBR
) –
Ex
ten
sion /S
yst
em
Speed
Dial
(ABBR)
–
Extension
/System
#1
The Speed Dial feature allows users to store frequently dialed numbers. Each extension may store up to twenty (20) personal numbers 00 - 19 in the speed dial directory. Digital Telephones enter and store their speed dial number using #1, to dial a stored number, press a CO Line and enter #1, followed by the bin number 00 - 19.
Single Line Telephones can also store up to 20 station speed bins using the #1 feature code. To dial a speed bin a Single Line Telephone uses the *1 feature code.
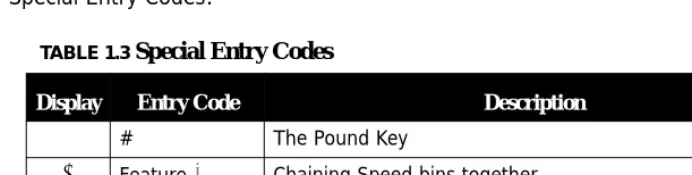
Special Entry Codes:
Conditions
1. A maximum of 16 digits can be entered into any one speed bin.
2. The system can be programmed to allow System Speed Dial Numbers to override Toll Restriction settings both CO Line and Extension Classes of Service.
Transfer
Transfer is used to deliver calls at one extension to another extension while maintaining the privacy of the connection. This means that calls can be routed to system destinations (Extensions, Hunt Group, Voicemail Group, etc.) in such a way that the wrong party cannot
TABLE 1.3 Special Entry Codes
Display Entry Code Description
# # The Pound Key
@ Feature 1 Chaining Speed bins together
/ Feature 3 Flash command to insert a flash in the dialing string
W
arning
To
ne / CO Line
Cal
l Limiter
ring party with the option to reroute the call being transferred if the selected destina-tion is determined not appropriate.
Unscreened Transfer – simply delivers the call to the destination selected regardless of the destination readiness to accept the call.
Until the transfer is complete, the outside line is placed on Exclusive Hold and can only be retrieved by the transferring telephone or the receiving telephone.
Calls that are transferred are subject to a unique transfer recall time. Transferred calls that go unanswered at the destination will recall (ring) to the transferring party when this timer expires. There are two recall timers that affect transferred calls; Transfer Busy Recall Time and Transfer Idle Recall Time. Idle and Busy represent the status of an extension for unsu-pervised transfer scenarios. (If the extension destination is busy the Transfer-Busy Timer is used. If the extension destination is idle the Transfer-Idle Timer is used.)
Conditions
1. Transferred CO Lines that recall are placed on system hold at the time the recall occurs.
2. When a transferred CO Line recalls, the line number and extension number where the call was transferred will be displayed.
3. The transferred connection party will hear back tone while the call is transfer ring-ing.
4. CO Line calls and intercom calls may be transferred.
5. In screened transfer, if the destination extension answers the intercom call in Voice Announce Hands-free mode and does not go off hook, the transferred connection will transfer ring at that extension.
6. In screened transfers, if the destination extension answers the intercom call by lifting the handset, the transferred connection is connected to the destination extension immediately when the transfer operation is complete.
Warning
Tone
/
CO
Line
Call
Limiter
Using y
our Mail
bo
x
Conditions
1. This feature is not recommended as a “Toll Saver” option and should be used only for specific applications.
2. Additional calls can be made at the extension following the expiration of the Warning Tone/Drop Call operation.
Voice
Processing
System
The optional voice processing system is designed to assist you in your daily tasks. Your voice mailbox becomes your primary assistant which can call you when you have a new message, as well as emailing you a copy of each message.
Using
your
Mailbox
Set
up
The following steps are used to set up your mailbox:
1. Dial the voice mail hunt group 87 or dial #64
2. Enter your password - Default password is 0000.
3. Press 3 to change your password from the default 0000.
4. Press 4 to record a personal greeting.
5. Press 5 to record the name that will be associated with this mailbox.
Set up
Press 1 to listen to any new messages in your mailbox.
2 - Send a new message
Press 2 to send a message to another subscriber in the voice processing system.
3 - Change password
Press 3 to change your password. At default the password is 0000, and should be changed to something that you will remember, but is not easy for others to figure out. Try to avoid numbers like 1234 or 1111 because they may be easy to figure out.
4 - Record Greetings
Press 4 to customize your mailbox, you should record a personal greeting, that is informa-tive to the caller. For example, “Hi, you’ve reached Ken, today Monday May first, I will be out of the office, but I will be checking my messages, so please leave me a message that includes the time of day that you called, and anything that you would like to verify before calling you back. Thank you for calling.”
5 - Record Name
Press 5 to record your name. This is used whenever is transferred to your mailbox from the auto attendant. The name should only include your first and sometimes your last name. For example, you may say “Ken” or “Ken Williams”.
6 - Set Pager Notification
Press 6 to activate and enter a pager telephone number. Once activated, the pager will be notified each time a new message is received. Enter the pager telephone number, any delay needed after the telephone number is dialed, any numbers needed before sending the pager information, and finally enter the pager information that will be sent.
7 - Remote Notification (Cell Phone)
Press 7 to activate and enter the remote telephone number to be dialed when a new sage is left in your mailbox. Your mailbox will dial this number and it begin to play the mes-sage that indicates that you have a new voice mail mesmes-sage, and to enter your password to retrieve the message. This message begins to play as soon as it dials your remote tele-phone number, so when you answer your teletele-phone it may not be at the beginning of the messages. Just input your password and you will be able to retrieve your messages.
Lis
tening to Messages
Press 8 to set up an assistant extension. A caller will have the option to be transferred to the assistant extension rather than leaving a message in your mailbox.
9 - Direct Message Delivery
Press 9 to activate direct message delivery which will send callers that are in the auto attendant directly to your mailbox, without ringing your extension first.
0 - Reroute Caller to another Extension
Press 0 and input a new extension number where callers should be routed to when they enter your mailbox number. This can be very helpful when another extension is covering for you while you are on an extended absents.
* - Clipboard Recording (One Touch Record)
All messages that are recorded while on a telephone call are placed into the “Clipboard” area. These messages do not send any type of message notification to the extension, pager or remote telephone numbers.
Listening
to
Messages
When you have a new message, your mailbox will notify you at your extension, in the dis-play and with a visual flashing LED indication.
Li
stening to Messages
2 - Save
Press 2 after listening to a new message if you would like to save the message. Messages are saved for up to 30 days. Messages that are stored for longer then 30 days will be deleted.
3 - Delete
Press 3 to delete the message that you have just listened to; you must press 1 to confirm deletion of the message.
4 - Reply
Press 4 to reply to the message. This only works when a subscriber sends you a message from their mailbox.
5 - Envelope Information
Press 5 to listen to the header or envelope information such as the time and date that the message was received.
6 - Copy the message to another subscriber
Press 6 to copy or forward the message to another subscriber. The message can be copied with or without comments, and to multiple subscribers. To copy to multiple subscribers, enter the first mailbox number then press #, and then enter the next mailbox number and press #, continue unit all mailboxes are entered. Press ## when you are done copying the message.
* - Skip to the next message
Account Code 6, 8
Assistant Extension 23
Attendant 6
Authority Code 8
Authority Code (traveling COS) 6
B
Busy Forward 10
C
Call Back 6, 9
Call Forward 6
Busy
10
CO Line only
10
External
10
Follow Me
10
Idle
10
Intercom10
Intercom and CO Line
10
No Answer
10
One Button
10
Call Pick Up 11
Call Pickup Directed 6
Call Pickup Group 6
Camp On (Busy CO Line) 6
Camp On (Busy Extension) 6
Change Mailbox Password 22
Clipboard 23
CO Line
Specific Line Access
7
E
Envelope Information 24
Extension Alarm 13
Extension Password - Phone Lock 6
Extension Pick Up Groups 13
Extension Reminder 6, 13
Extension Reminder Delete 6
Extension Speed Dial 19
Extension User Password 12
External Forward 10
F
Feature Codes 5
Flash
Single Line Telephone
18
Flash – Telephone Company Line 13
Flash (PBX/CO) 6
Follow Me Forward 10
Forced Intercom Tone Ring 14
G
Group Call Pickup 6
H
Header Information 24
Hold Retrieve (SLT) Different Extension 6
Hold Retrieve (SLT) Same Extension 6
Hot Line 6
I
Idle Forward 10
L
Last Number Redial 6, 15
Least Cost Routing 15
listen 21
M
Mailbox Password
Message Menu 23
Message Waiting 6, 15
N
No Answer Forward 10
O
One Button Call Forward 10
Operator Code 8
P
Page 7, 16
Meet Me