585-215-822
Comcode 108501867
Issue 2
Printed in U.S.A. Notice
Every effort was made to ensure that the information in this book was complete and accurate at the time of printing. However, information is subject to change.
Your Responsibility for Your System’s Security
Toll fraud is the unauthorized use of your telecommunications system by an unauthorized party, for example, persons other than your com-pany’s employees, agents, subcontractors, or persons working on your company’s behalf. Note that there may be a risk of toll fraud associated with your telecommunications system and, if toll fraud occurs, it can result in substantial additional charges for your telecommunications services.
You and your system manager are responsible for the security of your system, such as programming and configuring your equipment to pre-vent unauthorized use. The system manager is also responsible for reading all installation, instruction, and system administration docu-ments provided with this product in order to fully understand the fea-tures that can introduce risk of toll fraud and the steps that can be taken to reduce that risk. Lucent Technologies does not warrant that this product is immune from or will prevent unauthorized use of com-mon-carrier telecommunication services or facilities accessed through or connected to it. Lucent Technologies will not be responsible for any charges that result from such unauthorized use.
Lucent Technologies Fraud Intervention
If you suspect that you are being victimized by toll fraud and you need technical support or assistance, call Technical Service Center Toll Fraud Intervention Hotline at 1 800 643-2353.
Trademarks
CentreVu is a trademark of Lucent Technologies.
DEFINITY is a registered trademark of Lucent Technologies. INFORMIX is a registered trademark of Informix Software, Inc. SPARC trademarks, including SPARCserver are trademarks or regis-tered trademarks of SPARC International Inc. SPARCserver is licensed exclusively to Sun Microsystems, Inc. Products bearing SPARC trade-marks are based upon an acrhitecture developed by Sun Microsystems, Inc.
Sun, Sun Microsystems, Sun Microsystems Computer Corporation, the Sunlogo, the SMCC logo, SunLink, SunSelect, Solaris, and Solstice DiskSuite are trademarks or registered trademarks of Sun Microsys-tems, Inc.
UNIX is a registered trademark in the United States and other coun-tries, licensed exclusively through X/Open Corporation.
All other product names mentioned herein are the trademarks of their respective owners.
Ordering Information
Call: Lucent Technologies Publications Center
Voice 1 800 457-1235 International Voice 317 361-5353 Fax 1 800 457-1764 International Fax 317 361-5355
Write: Lucent Technologies Publications Center P.O. Box 4100
Crawfordsville, IN 47933
Order: Document No. 585-215-822 Comcode 108501867 Issue 2, December 1999
receive updated versions of individual documents or document sets, billed to account information that you provide. For more information on Standing Orders, or to be put on a list to receive future issues of this document, please contact the Lucent Technologies Publications Center.
Lucent Technologies National Customer Care Center
Lucent Technologies provides a telephone number for you to use to report problems or to ask questions about your call center. The support telephone number is 1-800-242-2121. For technical support, customers outside the United States should call their Lucent Technologies Repre-sentative or Distributor.
European Union Declaration of Conformity
Lucent Technologies Business Communications Systems declares that the equipment specified in this document conforms to the referenced European Union (EU) Directives and Harmonized Standards listed below:
EMC Directive 89/336/EEC Low Voltage Directive 73/23/EEC
The “CE” mark affixed to the equipment means that it conforms to the above Directives.
Heritage Statement
Lucent Technologies—formed as a result of AT&T’s planned restruc-turing—designs, builds, and delivers a wide range of public and private networks, communication systems and software, consumer and busi-ness telephone systems, and microelectronics components. The world-renowned Bell Laboratories is the research and development arm for the company.
Comments
To comment on this document, return the comment card at the front of the document.
Acknowledgment
Table of Contents
CentreVu®
Call Management System
Custom Reports
iii
iv
Step 6: Define the Report as
v
vi
Highlighting Fields. . . . 5-1 Defining Stationary (No-Scroll) Areas . . . . 5-4
Changing a
No-Scroll Area . . . . 5-6 Saving the Report Design . . . . 5-7 Testing the Report Design . . . . 5-8 Test Design Error Messages . . . . 5-10 Phase 1 Error Messages . . . . 5-10 Phase 2 Historical Error Codes . . . . 5-14 Phase 2 Real-Time Error Codes . . . . 5-19 Running Custom Reports . . . . 5-20 Advanced Report Design . . . . 6-1 Creating a Custom Data Table . . . . 6-1 Step 1: Access the CentreVu CMS Database in INFORMIX . . . 6-3 Step 2: Build the Table . . . . 6-4 Step 3: Add Data to the Table . . . . 6-11 Modifying a Table. . . . 6-14 Adding a Column . . . . 6-14 Changing a Column . . . . 6-14 Deleting a Column . . . . 6-14 Changing Data in a Table . . . . 6-16 Adding Rows of Data to a Table . . . . 6-16 Changing Rows of Data in a Table . . . . 6-17 Deleting Rows of Data From a Table . . . . 6-17 Including Forecast Data in a Custom Report . . . . 6-18 Including Exceptions Data in a Custom Report . . . . 6-21 Selecting Rows from More Than One Table . . . . 6-25 Alternative Row Search Conditions . . . . 6-29 Selecting Rows Based on a Range of Values . . . . 6-29 Using Apostrophes for Some Database Item Values . . . . . 6-30 Using
General Information P-1
Preface
General Information
0Audience
0 This book is written for all CentreVu Call Management System (CentreVuCMS) Release 3 Version 5 (R3V5) administrators and split/skill supervisors who are interested in creating custom reports.
Introduction
0 The CentreVu CMS R3V5 Custom Reports (585-215-822) document wasOrganization and Use of This Document P-2
Organization and Use of This Document
0This document takes you through creating a custom report from beginning to
end, starting with Chapter 2, "Getting Started" and ending with Chapter 6,
"Advanced Report Design".
For a first-time user of the Custom Reports subsystem, start at the beginning of
the document and read the Preface and Chapter 1, "Introduction to CentreVu
CMS Custom Reports", to become familiar with the content and structure of the book.
Organization
of Document
0The following list describes the contents of each chapter and appendix in this document.
Chapter 1 Introduction to CentreVu CMS Custom Reports
Chapter 1 gives the following information:
● Defines a custom report, the Screen Painter, and
how CentreVu CMS stores and retrieves data
● Gives the tasks for creating a custom report
● Lists the standard CentreVu CMS reports that
cannot be customized
● Lists the CentreVu CMS database items that are
not in any standard reports but can be used in custom reports.
Chapter 2 Getting Started
Chapter 2 shows you how to:
● Define a custom report’s name, access, and type
● Change a custom report’s access or description
Organization and Use of This Document P-3
Chapter 3 Using Screen Painter Editing Tools
Chapter 3 shows you how to:
● Access the Screen Painter
● Copy an existing report
● Edit a report with blocks
● Enter report text
● Save your work.
Chapter 4 Defining the Data for a Custom Report
Chapter 4 shows you how to:
● Define fields for the report input window
● Define report fields
● Define bars in a report
● Define the rows of data for a report
● Define fields on the report to show when the
report was run and what items the report covers.
Chapter 5 Completing Your Custom Report
Chapter 5 shows you how to:
● Highlight fields
● Define no-scroll areas
● Save and test a report design
● Understand test design error messages
● Run a custom report.
Chapter 6 Advanced Report Design
Chapter 6 shows you how to:
● Create a custom data table
● Include forecast data in a custom report
● Select rows from more than one table
● Do other alternative row search conditions
● Repeat aggregate function values in historical
reports.
Glossary Defines Custom Reports terms and some
Organization and Use of This Document P-4
Use of
Document
0Use this document to step you through the process of creating CMS custom reports. It includes all of the information needed to learn how to create the reports.
Note For a description of the CentreVu CMS system, see the
CentreVu CMS R3V5 Administration (585-215-820) document.
For examples and explanations of standard reports, see the
CentreVu CMS R3V5 Reports (585-215-821) document.
If you have the Forecast feature of CentreVu CMS, refer to the
CentreVu CMS R3V5 Forecast (585-215-825) document to
Conventions Used in This Document P-5
Conventions Used in This Document
0The following conventions are used consistently throughout this document:
____________________________________
* INFORMIX is a registered trademark of Informix Software, Inc. Related document callouts
Includes the document number (if a publication) and the book title, in italic. For example, ... See the CentreVu™ CMS R3V5 Custom Reports (585-215-822) document for more information.
Courier font Designates a word or phrase quoted directly from the CentreVu CMS system. For example, the Report destination: field.
Also designates an INFORMIX* table name. For
example, the csplit table.
Courier bold font Designates something you type into the system.
For example, type an x next to Printer,
Terminal, or File.
“Chapter Names” Are always in quotes.
italic Highlights references to file names and
directories. For example, /cms.
Subsystem References Are always initial capitalized. For example, ... set access permissions for CentreVu CMS users from the User Permissions subsystem.
Terminology P-6
Terminology
0The following terms are used throughout this book. For additional CMS definitions, please refer to the Glossary.
Current Interval Represents the current intrahour interval which can be 15, 30, or 60 minutes. The current interval is part of the real-time database.
Daily Data Interval data that has been converted to a 1-day summary.
Exception Reports Display occurrences of unusual call-handling events.
Historical Database Contains intrahour records for up to 62 days in the past, daily records for up to 5 years in the past, and weekly/monthly records for up to 10 years for each CMS-measured agent, split/skill, trunk, trunk group, vector, and VDN. Exceptions, call records, agent trace, agent login/logout, and forecast records are stored by the number of records (as defined in Data Storage Allocation).
Historical Reports Display past ACD data for various agent, split/skill, trunk, trunk group, vector, or VDN activities.
Monthly Data Daily data that has been converted to a monthly summary.
Multiuser Mode Any administered CMS user can log into CMS. Data continues to be collected if data collection is “on.”
Previous Interval One intrahour interval. At the end of each intrahour interval, the contents of the current intrahour interval are copied to the previous intrahour interval portion of the real-time database.
Real-Time Database Current and previous intrahour data on each CMS-measured agent, split/skill, trunk, trunk group, vector, and Vector Directory Number (VDN).
Terminology P-7
Single-User Mode Only one person can log into CMS. Data continues to be collected if data collection is “on.” This mode is required to change some CMS administration.
Subsystem Each CMS Main Menu selection (for example,
Reports, Dictionary, System Setup, Exceptions, along with Timetable and Shortcut, are referred to as subsystems.)
Related Documents P-8
Related Documents
0There are many documents that can help you use the CentreVu CMS software to its maximum capability. The most important ones are listed below.
CentreVu
CMS
Publications
0The following documents, relevant to CentreVu CMS, have also been published.
● CentreVu Call Management System Release 3 Version 5
Administration (585-215-820)
● CentreVu Call Management System Release 3 Version 5 Real-Time
and Historical Reports (585-215-821)
● CentreVu Call Management System Release 3 Version 5 Change
Description (585-215-823)
● CentreVu Call Management System Release 3 Version 5 External Call
History Interface (585-215-824)
● CentreVu Call Management System Release 3 Version 5 Forecast
(585-215-825)
● CentreVu Call Management System Release 3 Version 5 Upgrades
and Migration (585-215-826)
● CentreVu Call Management System Release 3 Version 5 Sun*
SPARCserver† Computers Installation and Maintenance
(585-215-827)
● CentreVu Call Management System Release 3 Version 5 Sun
SPARCserver Computers Connectivity Diagram (585-215-828)
● CentreVu Supervisor Version 5 User Guide (585-215-829)
● CentreVu Supervisor Version 5 Installation and Getting Started
(585-215-830)
● CentreVu Supervisor Version 5 Report Designer (585-215-831)
● CentreVu Supervisor and Report Designer Version 5 Change
Description (585-215-832)
● CentreVu CMS R3V8 Database Items and Calculations (585-210-939).
Related Documents P-9
Other Useful
Publications
0At times you may need to reference other documents. You need to know where the documentation that was sent with the following is kept:
● Switch
● Terminals
● Printers
● UNIX*/Solaris† system.
*UNIX is a registered trademark of Novell, Inc.
General Information 1-1
1
Introduction to
CentreVu CMS Custom
Reports
General Information
1This chapter provides the following CentreVu Call Management System
(CentreVu CMS) information:
● Definition of a custom report
● Definition of the Screen Painter
● Tasks to create a custom report
● Standard CentreVu CMS reports that cannot be customized
● CentreVu CMS database items that are not in any standard reports, but
can be used in custom reports
Custom Reports and the Screen Painter 1-2
Custom Reports and the Screen Painter
1What Is a
Custom
Report?
1A custom report is a report that you create and design using the Custom Reports subsystem. Like standard CentreVu CMS reports, a custom report displays information about Automatic Call Distribution (ACD) activity in your call center. For a custom report, you determine what specific ACD
information is displayed and how it is displayed.
Like standard reports, custom reports fall into two categories: real-time and historical. A single custom report can contain either real-time data or historical data, but not both.
Also, you run a custom report via the Custom Reports subsystem, not from the Reports subsystem.
The Screen
Painter
1You design custom reports with a tool called the Screen Painter.
When creating historical and real-time custom reports, the Screen Painter tool lets you:
● Copy existing report designs, including standard report designs
● Edit reports using block moves, copies, and deletions
● Define ACD data for report fields
● Define ACD data for bar graphs (if you have the CentreVu CMS
Graphics feature)
● Arrange report fields and bars
● Enter text for field labels, column headers, row headers, or special
instructions
● Emphasize text and fields with highlighting options
Custom Reports and the Screen Painter 1-3
For historical custom reports only, the Screen Painter lets you:
● Merge data in a report field to include data from different ACD entities
(for example, defining a field that represents the percentage of calls an agent answered compared to all calls handled by that agent’s split or skill)
● Merge data in a report field to include data with different time frames (for
example, defining a field that represents the percentage of calls
answered in an intrahour interval compared to all calls answered in the day)
● Include data from custom data tables that you create and populate
within the CentreVu CMS database. If you want to create custom data
tables. See Chapter 6, "Advanced Report Design".
Caution If you create custom data tables, then you need to make sure there is enough disk space available to store the data.
CentreVu CMS does not automatically check the available space. If you fill up your disk with custom data, then you will lose or damage stored custom and ACD data.
See the CentreVu CMS R3V5 Administration (585-215-820)
document for more information about disk storage.
Warning
Do not tamper with standard ACD data in the CentreVu CMS database. If you do, then you will lose stored data.
Tasks to Create a Custom Report 1-4
Tasks to Create a Custom Report
1There are 14 tasks you need to complete to create a custom report. If you consistently do all of these tasks for each report you create, then your reports will run properly and you will be able to create them efficiently. The 14 tasks are:
1. Defining a Report’s Name, Access, and Type (Chapter 2).
Define the name that you use both to run the report and to access the report design if you want to change the design. Define access to determine whether other users can run the report and copy the report’s design to create their own custom reports. Define the type as either real-time or historical.
2. Accessing the Screen Painter (Chapter 3).
Access the Screen Painter so that you can design the report. You can access the Screen Painter only after defining the report’s name, access, and type.
3. Copying an Existing Report Design (Chapter 3). (optional)
Copy an existing design so that you start with existing report
headings, data fields, bars, and other report features. While this is an optional step, you normally save a lot of time and trouble by copying and modifying an existing report design. Both standard and custom report designs can be copied.
4. Editing a Report with Blocks (Chapter 3).
Edit a report design using block moves, copies, and deletions. Editing with blocks lets you rearrange and delete sections of a report design quickly and easily. Block editing is particularly convenient when you have just copied an existing report design.
5. Entering Report Text (Chapter 3).
Enter text to provide headings for the data fields in the report. Entering report text should be one of the first things you do so that:
● The text provides a skeleton layout for positioning data fields.
● The text helps you remember what data is supposed to go in the
data fields.
Tasks to Create a Custom Report 1-5
6. Defining Fields for the Report Input Window (Chapter 4).
Define fields for the report input window so that users can run the report using parameters they choose (that is, what split, agent, time, date, and so on, the report is for).
If you copy a report design, the definition of that report’s input window is copied. You can then modify the input fields as required.
7. Defining Report Fields and Defining Bars in a Report
(Chapter 4).
Define the location of fields and bars in the report, as well as the field length, bar height/length, and the data that should appear in the fields/bars. Defining data consists primarily of specifying which database items supply data to the fields/bars. Your definition of report data is not complete, however, until you complete Task 8.
If you copy a report design, the definition of that report’s data fields/bars is copied. You can then modify the data fields/bars as required.
8. Defining the Rows of Data for a Report (Chapter 4).
Define which rows of data in a table will supply data for the fields and bars you defined in Task 7.
If you copy a report design, the definition of that report’s rows of data will be copied. You can then modify the selection of rows as required.
9. Defining Fields to Show Run Time/Date and User Inputs
(Chapter 4).
Define fields on the report to show when the report was run and what items the report covers (as defined in the report input window).
If you copy a report design these fields are copied. You can modify them as required.
10. Highlighting Fields (Chapter 5).
Emphasize or de-emphasize individual fields and text in the report by changing brightness levels (or color if you have a color terminal) and by using underlines and reverse video.
Reports That Cannot Be Customized 1-6
Reports That Cannot Be Customized
1The following standard CentreVu CMS reports cannot be customized:
● Real-time: Multi-ACD report
● Real-time: Multi-ACD Top Agent report
● Historical: Split/Skill: Status report
● Historical: VDN: Status report
● Historical: System: Multi-ACD by Split/Skill report (daily, weekly,
monthly)
● Historical: System: Multi-ACD Call Flow by VDN report
● Historical: Trunk Group: Busy Hour report
● Historical: VDN: Busy Hour report.
11. Defining Stationary (No-Scroll) Areas (Chapter 5).
Define parts of the report that will stay in the same place in the report window even when you are scrolling up and down or right and left. You will normally define no-scroll areas for column headers, column totals, and row identifiers.
If you copy a report design, no-scroll areas are copied. You can then modify them as required.
12. Saving the Report Design (Chapter 5).
Save any work on the design of a custom report. Otherwise, any work you did will be lost.
13. Testing the Report Design (Chapter 5).
Test your report immediately after designing and saving it. Testing helps eliminate wasted time in running a report whose design still has errors.
Database Items Not in Standard Reports 1-7
Database Items Not in Standard Reports
1There are many more database items than are shown in the standard CMS reports. For a complete list and the definitions of all database items, see the CentreVu CMS R3V8 Database Items and Calculations (585-210-939) document.
The CentreVu™ CMS Release 3 Version 5 Real-Time and Historical (585-215-821) document describes the database items associated with each real-time or historical report.
How CentreVu CMS Stores and Retrieves Data
1The most important and difficult part of designing a custom report is defining the data that goes in the report. To define custom report data, you must first understand how CentreVu CMS stores and retrieves data.
How
CentreVu
CMS Stores
Data
1CentreVu CMS stores data in the CentreVu CMS database. The database is divided into 54 different tables that can be used in custom reports. A table is an array of columns and rows that stores data for a type of ACD element (split/skill, agent, trunk, trunk group, VDN, vector, call work code, forecasting, agent trace, call record, or exceptions) and for a specific time frame (for the current intrahour interval, for past intrahour intervals, for past day -
summarized by day, and so on). Figure 1-1 shows how a small piece of a
How CentreVu CMS Stores and Retrieves Data 1-8
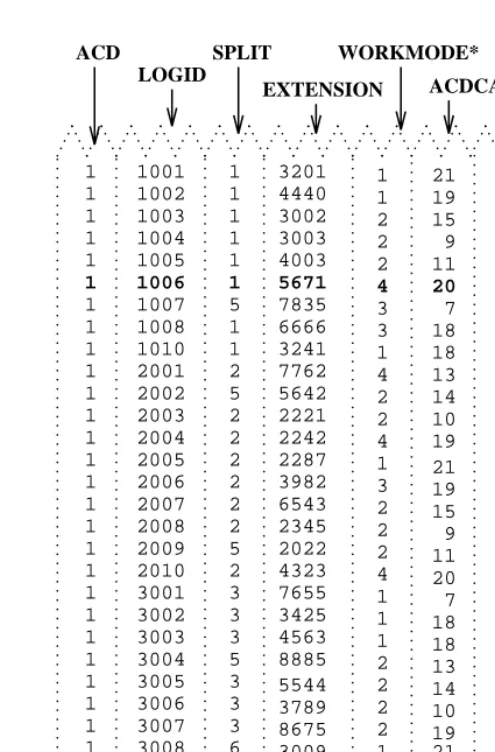
Figure 1-1: Sample CentreVu CMS Table (Current Interval Agent Table)
.. .. ... . .. .... . .... . . ... ... . . . . ... ... . . . . ... ... . . . . ... ... . . . . ... ... . . . . ... ... . . . . ... ... . . . . ... ... . .. represent WORKMODE for values numeric The example, For reports. in appear that states agent AUX. = 4 and ACW, = 3 ACD, = 2 AVAIL, = 1 * .. .. ... . . . . ... ... . .. .... . . ... ... . . . . .. .. ... .. .. ... . . . . ... ... . . . . ... ... . .. ACD 5544 3789 8675 3009 4477 ACDTIME 3002 3003 4003 21 19 15 9 11 20 7 18 18 13 14 10 19 . . . . . . . . . . . . . . . . . . . . . . . . . . . . . . . . . . . . . . . . . . . . . . . . . . . . . . . . . . . . . . . . . . . . . 400 777 988 851 901 688 299 340 589 980 256 704 188 322 367 109 745 569 616 452 402 549 789 203 603 245 644 58 . . . . . . . . . . . . . . . . . . . . . . . . . . . . . . . . . . . . . . . . . . . . . . . . . . . . . . . . . . . . . . . . . . . . . 21 19 15 9 11 20 7 18 18 13 14 10 19 19 21 . . . . . . . . . . . . . . . . . . . . . . . . . . . . . . . . . . . . . . . . . . . . . . . . . . . . . . . . . . . . . . . . . . . . . ACDCALLS SPLIT . . . . . . . . . . . . . . . . . . . . . . . . . . . . . . . . . . . . . . . . . . . . . . . . . . . . . . . . . . . . . . . . . . . . . 3009 3008 3007 3006 3005 3004 3003 3002 3001 2010 2009 2008 2007 2006 2005 2004 2003 2002 2001 1010 1008 1007 1006 1005 1004 1003 1002 1001 ....
. . . . . . . . . . . . . . . . . . . . . . . . . . . . . . . . . . . . . . . . . . . . . . . . . . . . . . . . . . . . . . . . . . . . . . . . . . . . . . . . . . . . . . . . . . . . . . . . . . . . . . . . . . . . . . . . . . . . . . . . . . . . . . . . . . . . . . 3201 7835 6666 3241 7762 5642 4440 5671 2221 2242 2287 3982 6543 2345 2022 4323 7655 3425 4563 8885 . . . . . . . . . . . . . . . . . . . . . . . . . . . . . . . . . . . . . . . . . . . . . . . . . . . . . . . . . . . . . . . . . . . . . 2 5 2 2 2 2 2 2 5 2 1 1 1 1 1 1 5 1 1 1 1 2 2 2 4 3 3 1 4 2 2 4 1 3 2 2 2 4 1 1 1 2 2 2 2 1 2 WORKMODE* EXTENSION 3 6 3 3 3 5 3 3 3 LOGID . . . . . . . . . . . . . . . . . . . . . . . . . . . . . . . . . . . . . . . . . . . . . . . . . . . . . . . . . . . . . . . . . . . . . .... ... .......... ... ... .......... ... ... .......... ... ... .......... ... ... .......... ... ... .......... ... ... ........ .... ... .......... ... ... .......... . . . . . . . . . . . . . . . . . . . . . . . . . . . . . . . . . . . . . . . . . . . 1 1 1 1 1 1 1 1 1 1 1 1 1 1 1 1 1 1 1 1 1 1 1 1 1 1 1 1
Note The example in Figure 1-1 shows data for the current intrahour
How CentreVu CMS Stores and Retrieves Data 1-9
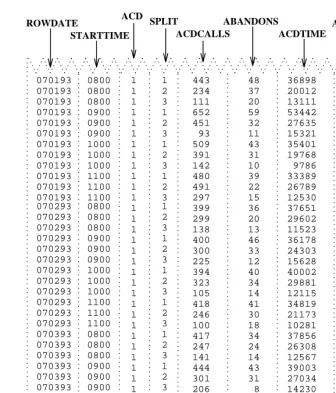
Figure 1-2 shows how a small piece of the Historical Intrahour Interval Split table looks. (See the seventh line from the top of the table, 509 ACDCALLS.)
Figure 1-2: Sample CentreVu CMS Table (Historical Intrahour Interval Split Table)
Note The example in Figure 1-2 shows data from July 1 to July 3, 1993,
and simulates data for an ACD that has only three splits, 60-minute intrahour intervals, and activity each day from 8:00 a.m. to 12:00 p.m. only.
43 35401
070193 1000 1 851
How CentreVu CMS Stores and Retrieves Data 1-10
The CentreVu CMS database uses names to refer to columns of data in a table. These names are called database items in CentreVu CMS. In
Figure 1-1 and Figure 1-2, database items are indicated with arrows pointing to their associated columns. The Current Interval Agent and Intrahour Interval Split tables actually contain many more columns (and hence many more database items) than are shown in the figures. For a complete listing of database items, see the CentreVu CMS R3V8 Database Items and
Calculations (585-210-939) document.
Each row in a table contains data that is related by the value(s) of one or
more of the columns. In Figure 1-1, each row in the Current Interval Agent
table contains data related by agent login ID. If you look at the row for login ID 1006 (displayed in bold), you see that the agent is logged into Split 1 on extension 5671 and is currently in AUX work mode. In addition, up to this point in the current interval, the agent has had:
● 20 ACD calls (ACDCALLS)
● 245 seconds of ACD talk time (ACDTIME).
A column or a set of columns that cause the values in a row to be related is called an index. An index stores data sequentially and adds structure for the storage of data in the other columns. For each value in an index column, the remaining values in the corresponding row are related to that value. Thus, in Figure 1-1, the LOGID database item is an index.
In Figure 1-2, each row in the Intrahour Interval Split table contains data related by date, interval, and split. If you look at the row for Split 1 for the 10 o’clock interval on July 1, 1993 (displayed in bold), you see that Split 1 had:
● 509 ACD calls (ACDCALLS)
● 43 abandoned calls (ABANDONS)
● 35,401 cumulative seconds of ACD talk time for all ACD
calls (ACDTIME)
● 851 cumulative seconds of wait time for all calls that abandoned before
How CentreVu CMS Stores and Retrieves Data 1-11
How
CentreVu
CMS Retrieves
Data
1CentreVu CMS retrieves data from the database based on three types of information you supply when you design a custom report:
● The name of the table(s)
● The database items in the table(s)
● The rows of data in the table(s).
For example, if you want a custom real-time agent report that lists the agents
in a split, then the report design might appear as shown in Figure 1-3:
Figure 1-3: Sample 1 Custom Report Design
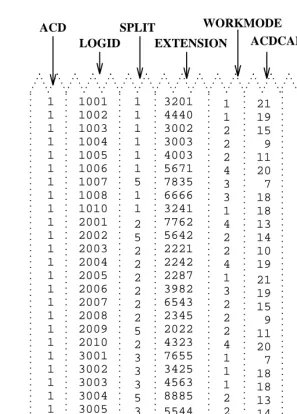
To tell CentreVu CMS how to retrieve data, you must tell CentreVu CMS to
access the cagent (Current Interval Agent) table. Then, for each report
field, you assign the appropriate database items. When you run the report,
CentreVu CMS will find, in the cagent table, the columns of data
associated with the database items (columns 2, 5, 6, and 7 in Figure 1-4).
Note Each series of v’s in the illustration represents a report field for
which it is expected that CentreVu CMS will find multiple values (in this case, values for more than one agent) and will display the values vertically in a column.
The x’s by the Split: label represent the fact that only one value
(in this case, a single split’s name or number) is expected for the field.
Note For the report field Average Talk Time, you actually assign a
calculation, ACDTIME/ACDCALLS.
Split: xxxxxxxxxx
Current ACD ACD Average
Agent ID: State Calls Time Talk Time
How CentreVu CMS Stores and Retrieves Data 1-12
Figure 1-4: Sample 1 of Selection of Database Item
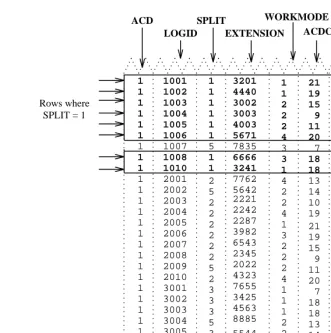
Next, you identify the appropriate rows that supply data. If you want agents in Split 1, you must tell CentreVu CMS to find rows that have the value 1 for the SPLIT database item. When you run the report, CentreVu CMS finds the
appropriate rows of data in the cagent table (see rows with arrows in
Figure 1-5).
. . . . . . . . . . . . . . . . . . . . . . . . . . . . . . . . . . . . . . . . . . . . . 1 1 1 1 1 1 1 1 1 1 1 1 1 1 1 1 1 1 1 1 1 1 1 1 1 1 1 1 ACD 5544 3789 8675 3009 4477 ACDTIME 3002 3003 4003 21 19 15 9 11 20 7 18 18 13 14 10 19 . . . . . . . . . . . . . . . . . . . . . . . . . . . . . . . . . . . . . . . . . . . . . . . . . . . . . . . . . . . . . . . . . . . . 400 777 988 851 901 688 299 340 589 980 256 704 188 322 367 109 745 569 616 452 402 549 789 203 603 245 644 58 . . . . . . . . . . . . . . . . . . . . . . . . . . . . . . . . . . . . . . . . . . . . . . . . . . . . . . . . . . . . . . . . . . . . . 21 19 15 9 11 20 7 18 18 13 14 10 19 19 21 . . . . . . . . . . . . . . . . . . . . . . . . . . . . . . . . . . . . . . . . . . . . . . . . . . . . . . . . . . . . . . . . . . . . . ACDCALLS SPLIT . . . . . . . . . . . . . . . . . . . . . . . . . . . . . . . . . . . . . . . . . . . . . . . . . . . . . . . . . . . . . . . . . . . . . 3009 3008 3007 3006 3005 3004 3003 3002 3001 2010 2009 2008 2007 2006 2005 2004 2003 2002 2001 1010 1008 1007 1006 1005 1004 1003 1002 1001 ....
How CentreVu CMS Stores and Retrieves Data 1-13
Figure 1-5: Sample 1 of Selection of Table Rows
The data that CentreVu CMS plugs into the report is the data found in the intersection of the selected database items and rows. Therefore, the report
shows data as shown in Figure 1-6:
Figure 1-6: Sample Custom Report 1
203 789 549 402 452 616 569 745 109 367 322 188 704 256 980 589 340 299 688 901 851 . . . . . . . . . . . . . . . . . . . . . . . . . . . . . . . . . . . . . . . . . . . . . . . . . . . . . . . . . . . . . . . . . . . . 21 19 15 9 11 20 7 18 18 13 14 10 19 ACDTIME 4477 3009 8675 3789 5544 ACD 1 1 1 1 1 1 1 1 1 1 1 1 1 1 1 1 1 1 1 1 1 1 . . . . . . . . . . . . . . . . . . . . . . . . . . . . . . . . . . . . . . . . . . . . . where Rows 1 = SPLIT .. .. ... . . . . ... ... . . . . ... ... . . . . ... ... . .. .... . . ... ... . . . . ... ... . . . . ... ... . . . . ... ... . . . . ... ... . . . . ... ... . . . . ... ... . . . . ... ... . . . . ... ... . . . . ... ... . . . . ... ... . . . . ... ... . . . . ... ... . .. . . . . . . . . . . . . . . . . . . . . . . . . . . . . . . . . . . . . . . . . . . . . . . . . . . . . . . . . . . . . . . . . . . . . .... ... .......... ... ... .......... . . ... ... .......... ... ... ........ .... . .... ... .......... ... ... .......... . .. ... .. .......... ... . .... ... .......... . LOGID 3 3 3 5 3 3 3 6 3 EXTENSION WORKMODE 2 1 2 2 2 2 1 1 1 4 2 2 2 3 1 4 2 2 4 1 3 3 1 1 1 1 5671 4440 1001 3201 1002 1003 1004 1005 1006 20 11 9 15 19 21 58 644 245 988 777 400 4003 3003 3002 1 1 1 1 1 1 4 2 2 2 1 1 1 1 1 1 5 2 5 2 2 2 2 2 2 5 2 . . . . . . . . . . . . . . . . . . . . . . . . . . . . . . . . . . . . . . . . . . . . . . . . . . . . . . . . . . . . . . . . . . . . . 2221 2242 2287 3982 6543 2345 2022 4323 7655 3425 4563 8885 5642 7762 3241 6666 7835 . . . . . . . . . . . . . . . . . . . . . . . . . . . . . . . . . . . . . . . . . . . . . . . . . . . . . . . . . . . . . . . . . . . . . . . . . . . . . . . . . . . . . . . . . . . . . . . . . . . . . . . . . . . . . . . . . . . . . . . . . . . . . . . . . . . . . . . . . . 1007 1008 1010 2001 2002 2003 2004 2005 2006 2007 2008 2009 2010 3001 3002 3003 3004 3005 3006 3007 3008 3009 . . . . . . . . . . . . . . . . . . . . . . . . . . . . . . . . . . . . . . . . . . . . . . . . . . . . . . . . . . . . . . . . . . . . . SPLIT ACDCALLS . . . . . . . . . . . . . . . . . . . . . . . . . . . . . . . . . . . . . . . . . . . . . . . . . . . . . . . . . . . . . . . . . . . . . 21 19 19 10 14 13 18 18 7 . . . . . . . . . . . . . . . . . . . . . . . . . . . . . . . . . . . . . . . . . . . . . . . . . . . . . . . . . . . . . . . . . . . . . 603 Split: 1
Current ACD ACD Average
Agent ID: State Calls Time Talk Time
1001 AVAIL 21 988 47:00
1002 AVAIL 19 777 40:09
1003 ACD 15 400 26:07
1004 ACD 9 58 6:44
1005 ACD 11 644 58:54
1006 AUX 20 245 12:25
1008 ACW 18 603 33:50
How CentreVu CMS Stores and Retrieves Data 1-14
As mentioned earlier, CentreVu CMS uses indexes to create a structure for storing data. Similarly, CentreVu CMS uses these indexes to search for data. Indexes allow CentreVu CMS to find data much faster than if data were stored more randomly. Therefore, when you design a custom report, the rows of data for the report should be defined on the basis of index values. See “Defining Fields for the Report Input Window” in Chapter 4 of this manual.
As another example of how CentreVu CMS retrieves report data is shown in Figure 1-7, which is an example of a report design for a custom intrahour interval split report that lists, by intrahour interval, data for a split in a single day.
Figure 1-7: Sample 2 Custom Report Design
To tell CentreVu CMS how to retrieve data, you must tell CentreVu CMS to
access the hsplit (Intrahour Interval Split) table. You must then assign the
appropriate database items to the fields. When you run the report, CentreVu CMS finds the columns of data associated with the database items in the hsplit table (see Figure 1-8).
_________________________
INFORMIX is a registered trademark of Informix Software, Inc.
Note Actually, when you design a custom report, you normally set up the
row selection so that the users running the report can choose the rows in the report's input window. For example, to run the report in Figure 1-6, you would set up the row selection so users would fill out a Report Input window that asked them for a Split number. See Defining Fields for the Report Input Window in Chapter 4 of this manual for more information.
Note The indexes for each standard table are fixed and cannot be
changed, deleted or added to. However, if you define a custom table in the CentreVu CMS database via INFORMIX* SQL, you can define any indexes desired for that new table.
Split: xxxxxxxxxxx
ACD
Interval Calls Abandons
vvvvvvv vvvv vvvv
How CentreVu CMS Stores and Retrieves Data 1-15
Figure 1-8: Sample 2 of Database Item Selection
Next, you must identify the appropriate rows that supply data. You might want data for the following:
● Split 1, which means you must identify rows that have the value 1 for the
SPLIT database item.
● The date 07/02/93, which means you must identify rows with the value
070293 for the ROWDATE database item.
● The intrahour intervals 8:00 a.m. to 11:00 a.m., which means you must
identify rows with the values 0800 through 1100 for the one database item.
43 35401
070193 1000 1 851
How CentreVu CMS Stores and Retrieves Data 1-16
CentreVu CMS then finds the appropriate rows of data (see the boxed rows in Figure 1-9).
Figure 1-9: Sample 2 of Selection of Table Rows
where Rows 1, = SPLIT 07/02/93, = ROWDATE from STARTTIME and 11:00am. to 08:00 1256 980 589 1340 1299 688 1001 809 445 1733 1303 899 1812 904 587 1 2 3 1 2 3 1 2 3 1 2 3 1 2 3 1 2 3 2 3 1 2 3 3 2 1 3 2 1 3 2 1 3 2 1 ABNTIME . . . . . . . . . . . . . . . . . . . . . . . . . . . . . . . . . . . . . . . . . . . . . . . . . . . . . . . . . . . . . . . . . . . . . . . . . . . . . . . . . . . . . . . . . . . . . . . . . . . . . . . . . . . . . . . . . . . . . . . . . . . . . . . . . . . . . . . . . . . . . . . . . . . . . . . . . . . . . . . . . . . . . . . . . . . . . . . . . . . . . . . . . . . . . . . . . . . . . . . . . . . . . . . . . . . . . . . . . . . . . . . . . . . . . . . . . . . . . . . . . . . . . . . . . . . . . . . . . . . . . . . . . . . . . . . . . . . . . . . . . . . . . . . . . . . . . . . . . . . . . . . . . . . . . . . . . . . . . . . . . . . . . . . . . . . . . . . . . . . . . . . . . . . . . . . . . . . . . . . . . . . . . . . . . . . . . . . . . . . . . . . . . . . . . . . . . . . . . . . . . . . . . . . . . . . . . . . . . . . . . . . . . . . . . . . . . . . . . . . . . . . . . . . . . . . . . . . . . . . . . . . . . . . . . . . . . . . . . . . . . . . . . . . . . . . . . 443 234 111 652 451 93 391 142 480 491 297 399 299 138 400 300 225 394 323 105 418 246 100 417 247 141 444 301 206 420 299 198 403 320 99 SPLIT ACDCALLS . . . . . . . . . . . . . . . . . . . . . . . . . . . . . . . . . . . . . . . . . . . . . . . . . . . . . . . . . . . . . . . . . . . . . . . . . . . . . . . . . . . . . . . 48 37 20 59 32 11 31 10 39 22 15 36 20 13 46 33 12 40 34 14 41 30 18 34 24 14 43 31 8 51 39 24 50 31 21 ABANDONS 36898 20012 13111 53442 27635 15321 19768 9786 33389 26789 12530 37651 29602 11523 36178 24303 15628 40002 29881 12115 34819 21173 10281 37856 26308 12567 39003 27034 14230 39045 29562 12400 30990 25410 10222 . . . . . . . . . . . . . . . . . . . . . . . . . . . . . . . . . . . . . . . . . . . . . . . . . . . . . . . . . . . . . . . . . . . . . . . . . . . . . . . . . . . . . . . ACDTIME . . . . . . . . . . . . . . . . . . . . . . . . . . . . . . . . . . . . . . . . . . . . . . . . . . . . . . . . . . . . . . . . . . . . . . . . . . . . . . . . . . . . . . . . . . . 070393 070393 070393 070393 070393 070393 070393 070393 070393 070393 070393 070393 070193 070193 070193 070193 070193 070193 070193 070193 070193 070193 070193 ACD 1 1 1 1 1 1 1 1 1 1 1 1 1 1 1 1 1 1 1 1 1 1 1 1 1 1 1 1 1 1 1 1 1 1 1 070293 070293 070293 070293 070293 070293 070293 070293 070293 070293 070293 070293 0800 0800 0800 0900 0900 0900 1000 1000 1000 1100 1100 1100 0800 0800 0800 0900 0900 0900 1000 1000 1100 1100 1100 1100 1100 1100 1000 1000 1000 0900 0900 0900 0800 0800 0800 .. .......... ... ... .......... ... ... .......... ... ... .......... ... ... .......... ... ... .......... ... ... .......... ... ... ....... . . .. ... ... .......... ... ... .......... ... ... .......... ... . .. .. ... . . . . ... ... . . . . ... ... . . . . ... ... . . . . ... ... . . . . ... ... . . . . ... ... . . . . .. .. ... ... .......... ... ... ........ .. .......... ... . .... . . ... ... . . . . ... ... . . . . ... ... . . . . ... ... . . . . ... ... . . . . ... ... . . . . ... ... . . . . ... ... . . . . ... ... . . . . ... ... . . . . ... ... . . . . ... ... . . . . ... ... . .. . . . . . . . . . . . . . . . . . . . . . . . . . . . . . . . . . . . . . . . . . . . . . . . . . . . . . . . . . . . . . . . . . . . . . . . . . . . . . . . . . . . . . . . ROWDATE INTERVAL 851 1000 1
070193 1 509 43 35401
How CentreVu CMS Stores and Retrieves Data 1-17
The data that CentreVu CMS plugs into the report is the data found in the intersection of the selected database items and columns. Thus, the report shows data as follows:
Figure 1-10: Sample Custom Report 2
Defining data is the central task of creating and designing a custom report. However, you must do many other tasks to create a custom report.
Chapter 2, "Getting Started", walks you through these tasks. Split: 1
ACD
Interval Calls Abandons
8:00am 399 36
Date: 07/02/93
9:00am 400 46
10:00am 394 40
General Information 2-1
2
Getting Started
General Information
2This chapter tells you how to perform the following tasks in CentreVu Call
Management System (CentreVu CMS):
● Define a custom report’s name, access, and type (the first task in
designing a custom report)
● Change a custom report’s access or description
● Delete a custom report.
You do these tasks via the Edit Report: Report Select window.
To complete the design of a custom report, you must also follow the
procedures in Chapter 3, Chapter 4, and Chapter 5, and, optionally,
Chapter 6.
Defining a Report’s Name, Access, and Type 2-2
Defining a Report’s Name, Access, and Type
2Use the steps in this section to define a new custom report’s:
● Name
● Access
● Type.
These are the first steps in designing a new custom report.
Step 1: Access
the Report
Select Window
2Figure 2-1: Custom Reports Main Menu
Note If you are a CentreVu CMS administrator, you can also specify the
owner of the report you are defining (see "Step 4: Define the User ID"
in this procedure). If you are not a CentreVu CMS administrator, you can define a report with only you as the owner.
You cannot define a custom report with a timetable.
1a. Select the Custom Reports option on the Main Menu and
press the key.
→ The Custom Reports submenu
displays.
Return
1b. Select the Edit Reports submenu option.
→ The Report Select window
Defining a Report’s Name, Access, and Type 2-3
Figure 2-2: The Report Select Window
Step 2: Assign
a Name to the
Report
2Enter a name for your report in the Report name field. The name can have
up to 20 characters, including blanks. Because the name you give your report must be unique, you may want to look at existing custom report names before entering a name for your report.
Use the following steps to list existing report names.
2a. Clear the fields.
2b. Enter an x to select a report
access—global or private.
2c. Enter an x to select a report
type—Historical or
Real-time.
2d. Press the key, select List all, and press the key again.
→ The List All window displays all
global or private custom report names for the specified report type.
Return
Defining a Report’s Name, Access, and Type 2-4
Step 3: Enter a
Report
Description
2If desired, enter a description of the report in the Description field. The
description can have up to 50 characters, including blanks.
2d. Check the list to ensure that the
name you want to give your report has not already been used. If you are creating a global report, its name must be different from any name in the list. If you are creating a private report, its name must be different from names of any existing global or private reports you have created.
Note Your private report names can be the same as another user’s
private report names.
2e. Press the key to return to the Report Select window
→ The List All window
disappears, and the cursor returns to the Report Select window.
2f. Enter the name you want for your
report. Exit
Note You can List all reports based on different combinations of
field entries. You must always select a report type, Historical
Defining a Report’s Name, Access, and Type 2-5
Your description should be detailed enough to describe the report’s contents accurately.
Step 4: Define
the User ID
2Enter the user ID of the owner of the report. The default is your user ID. If you are a CentreVu CMS administrator, you can enter another user’s ID if you wish to create a custom report for that user. This might be the case if you want only that user to be able to run the report.
Step 5: Define
Access to the
Report
2Enter an x to select a report access option, either global or private.
Global access to the report gives other users the following capabilities:
● Other users can run the report.
● Other users can copy the report design when designing their own
custom report (see "Copying an Existing Report Design" in Chapter 3 of
this document). Warning
Do not use the following characters:
\ backslash
; semicolon
’ grave accent
~ tilde
“ double quotes
| pipe
* asterisk
? question mark
Note If you want to list another user’s existing custom reports, you can
enter that user’s ID and do a List All. You do not have to be an
administrator to list other users’ custom reports.
Note It is a good idea initially to make your reports private until they have
Defining a Report’s Name, Access, and Type 2-6
If you select global, your report’s name must be different from the name of
any other custom report — global or private.
Private access to the report means that only you (and the CentreVu CMS administrator(s)) can run the report. In addition, no other users, except for CentreVu CMS administrators, can copy or run the report design for use in their own custom reports.
If you select private, your report's name must be different from the names
of the following:
● Any other private report you have created of the same type
● Any user's global custom report of the same type.
Step 6: Define
the Report as
Real-Time or
Historical
2Enter an x to select a report type option, Real-time or Historical.
When you design the report on the Screen Painter, you are able to access
data only for the category you select here. For example, if you select
Real-time, you are not able to specify historical data in the report design.
Also, when you go to run the report, CentreVu CMS lists the report under the
appropriate submenu, Real-time or Historical.
You must select the Historical option if you want to include:
● Exceptions data
● Forecast data
● Call work code data
● Agent trace data
● Call record data.
Note No other CentreVu CMS user other than a CentreVu CMS
administrator can modify a report design you create, regardless of whether the report is global or private. A CentreVu CMS
Defining a Report’s Name, Access, and Type 2-7
Step 7: Save
the Report
Name
2After you have added the report name, you can access the Screen Painter to
begin designing the report (see Chapter 3).
1. Press the key, select Add,
and press the key again.
→ Successful appears on the status line. If CentreVu CMS will not add the report name because the name is not
unique, List all to see
what names already exist, and
go back to "Step 2: Assign a
Name to the Report" in this procedure.
Changing a Report’s Access or Description 2-8
Changing a Report’s Access or Description
2Note You cannot change a report’s name, type, or owner once you have
added the report. Instead, you must create a new report with the desired name, type, or owner, and then copy the design of the old report to the new report.
1. On the Report Select window,
complete the fields you wish to
search on. (Report type is a
required field for CentreVu
CMS.) Press the key, and
select List all. Press the
key again.
→ A List All window displays a list
of all custom reports for the specified type and user ID.
Return
Return
Note You can change the User ID field to list another user’s
custom reports. You cannot change the user ID of a report that already exists.
2. Find the report you want to
change, and press to return
to the Report Select window.
→ The cursor returns to the
previously selected field of the Report Select window.
3. In the Report name field on the Report Select window, enter the name of the report whose description or access you want to change.
4. If necessary, change the default
Report type selection. Then,
press the key, select
Find one, and press the key again.
→ CentreVu CMS fills in all fields
with the report’s characteristics.
5. Change the description or report
access as desired. Then press
the key, select Modify,
and press the key again.
→ Successful appears on the status line.
Exit
Return
Return
Return
Return
Note You cannot change a report’s name or user ID using Modify.
Deleting a Custom Report 2-9
Deleting a Custom Report
2Note You cannot delete another user’s custom reports unless you are a
CentreVu CMS administrator.
1. On the Report Select window,
complete the fields you wish to
search on, and select List all.
(Report type is a required field for CentreVu CMS.)
→ A List All window displays a list
of all global and private custom reports for the specified type and user ID.
Note You can change the User ID field to list another user’s
custom reports. However, you cannot delete another user’s report unless you are a CentreVu CMS administrator.
2. In the List All window, find the
report you want to delete, and
press to return to the Report
Select window
→ The List all window disappears,
and the cursor returns to the first field of the Report Select window.
3. In the Report name field on the Report Select window, enter the name of the report you want to delete.
4. Press the key, select Find one, and press the key again.
→ CentreVu CMS fills in all fields
with the report’s characteristics.
Note If more than one report has the same name, you may have to
use Next to find the report you want.
5. Press the key, select Delete, and press the key again.
→ Successful appears on the status line.
Exit
Return
Return
Return
Accessing the Screen Painter 3-1
3
Using Screen Painter Editing Tools
Accessing the Screen Painter
3To design your CentreVu Call Management System (CentreVu CMS)
custom report, use the Screen Painter (Figure 3-1). On the Screen Painter,
you can enter report text, data fields, and data bars in a layout that closely resembles the layout of the actual report.
You must define the report name and its select characteristics in the Edit Report: Report Select window before you can access the Screen Painter for that report.
Access the Screen Painter using the following steps.
Figure 3-1: The Screen Painter
Note You can access the Screen Painter for a report that someone else
designed only if you are a CentreVu CMS administrator. However, if another user’s report has global access, you can add your own report name and then copy that user’s report design on the Screen Painter
(see the “Copying an Existing Report Design” section in this chapter).
1. On the Report Select window,
enter the name of the report in the Report name field, and
select Find one.
→ The select characteristics of
the report appear.
2. Select the Screen painter action list option.
Accessing the Screen Painter 3-2
Special
Properties of
the Screen
Painter
3On the Screen Painter, cursor movement, scrolling, and data entry all differ from those operations in normal CentreVu CMS windows.
Moving the
Cursor on the
Screen Painter
3Since the Screen Painter has no predefined fields, you can freely move the cursor around the interior of the Screen Painter with the following keys:
Arrow keys (↓, ↑, →, ←)
Move the cursor one space in the direction of the arrow.
Moves the cursor eight spaces to the right. You can also
use when you are defining blocks (see the “Editing
a Report with Blocks” section in this chapter).
This means you must press and hold the key;
then press the key. This convention applies
throughout this document when any set of two keys are shown side by side.
Moves the cursor eight spaces to the left. You can also
use when you are defining blocks (see the
“Editing a Report with Blocks” section in this chapter).
may not be available on some terminals.
Moves the cursor one space to the left.
(Forward) Moves the cursor to the far right edge (132nd column) of the Screen Painter.
(Back) Moves the cursor to the left edge (1st column) of the Screen Painter.
(Down) Moves the cursor to the bottom (Line 25) of the Screen Painter.
(Up) Moves the cursor to the top (Line 1) of the Screen Painter.
Tab
Tab
Shift Tab Shift
Tab
Shift Tab
Shift Tab
Back Space
Ctrl f
Ctrl b
Ctrl d
Accessing the Screen Painter 3-3
The Screen
Painter Size
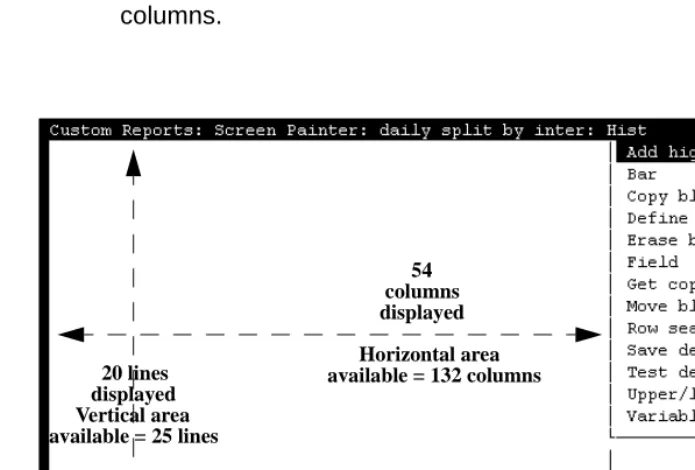
3The Screen Painter allows you to create a report design with maximum dimensions as follows:
● A horizontal size of 132 columns (character spaces)
● A vertical size of 25 lines.
For most terminals, CentreVu CMS displays (in the lower right border of the Screen Painter) the exact position of the cursor within the Screen Painter’s
25 column by 132 column grid (see Figure 3-2). However, because the
interior of the Screen Painter window is only 54 columns wide and 20 lines high, you may need to scroll the Screen Painter horizontally or vertically to access areas that do not fit within the window.
Figure 3-2: Screen Painter Size and Cursor Position
Note The widest custom report that you can display on your terminal
without scrolling is 78 columns wide. The terminal actually displays 80 columns, but the side borders of the report window use two of the columns.
54 columns displayed
Horizontal area available = 132 columns 20 lines
displayed Vertical area available = 25 lines
Copying an Existing Report Design 3-4
Scrolling the
Screen Painter
3The Screen Painter scrolls automatically when the cursor hits the left, right, top, or bottom border. The Screen Painter scrolls one column or one line at a time when you use the arrow keys, but scrolls eight columns at a time when
you use for horizontal scrolling. Right scrolling beeps when the 132nd
column appears. Left scrolling beeps when the first column reappears. Down scrolling stops when the 25th line appears. Up scrolling stops when the top line reappears.
Properties of
Secondary
Windows
3For most tasks on the Screen Painter, you must complete a secondary window. These secondary windows pop up after you select an action list option. Some secondary windows automatically disappear when you are finished entering data and select an action list option. However, for some
secondary windows, you must press the Screen Labeled Key (SLK) to
close the window and return to the Screen Painter.
If you use the SLK to leave a secondary window and return to the
Screen Painter, the secondary window remains open. However, until you close the secondary window, the Screen Painter is locked and you cannot enter text or select any other action list options.
Editing Keys in
Secondary
Windows
3In the secondary windows only, you can use the standard field editing keys. These keys, which offer you considerable convenience, are as follows:
Copying an Existing Report Design
3In the majority of cases, you should begin your design of a custom report by copying an existing report design, then making desired changes. Copying,
Tab
Exit
Current
Turns insert mode on or off. With insert mode on, you insert characters at the cursor’s current position in the field.
Erases characters in a field from the current position to the end of the field.
Erases all characters in a field.
Erases inputs in all fields in a window.
Note These keys are not available on the Screen Painter itself.
Ctrl e
Ctrl x
Ctrl y
Copying an Existing Report Design 3-5
then modifying, an existing report design is usually the quickest, easiest method for designing a custom report.
You can copy standard report designs or custom report designs. You can also copy more than one report design into a single custom report. However, if your report is a historical report, you cannot copy a real-time report onto the Screen Painter. Likewise, if your report is a real-time report, you cannot copy a historical report onto the Screen Painter.
To copy an existing report design, do the following:
Caution Run test design on a report copy before modifying it. This ensures the copy is working before you do any modification to it.
Note Items in the report you are copying may overlap text, fields, or bars
you previously entered on the Screen Painter. If items in the copied report overlap existing items, CentreVu CMS copies to the Screen Painter only those parts of the report that do not overlap.
To prevent overlapping, you may need to clear the area in the upper left portion of the Screen Painter before copying a report design. You can clear the area easily by moving or deleting all data as a block (see
the “Editing a Report with Blocks” section in this chapter). Be sure the
cleared space is large enough to contain the report design you are copying.
Note You cannot copy the following standard reports:
● Real-time: Multi-ACD report
● Real-time: Multi-ACD Top Agent report
● Historical: Split/Skill: Status report
● Historical: VDN: Status report
● Historical: System: Multi-ACD by Split/Skill report
● Historical: System: Multi-ACD Call Flow by VDN report
● Historical: Trunk Group: Busy Hour report
Copying an Existing Report Design 3-6
Step 1: Access
the Get Copy
Window
3Figure 3-3: The Get Copy Window
Step 2: Enter a
Report Name
3In the Report name field, enter the name of the report you want to copy.
You can copy standard report designs, global report designs, and private report designs. However, you cannot copy another user’s private report designs unless you are a CentreVu CMS administrator.
If you do not know the report name, first select List all. For List all,
you can leave the Report name blank, but you must complete the
Report type field, described later. After you List all, you can go back and enter the report name.
On the Screen Painter, select the Get
copy of design action list option.
→ The Get Copy window
appears.
Note Because of the need to shorten names of standard reports for this
Copying an Existing Report Design 3-7
Step 3: Enter a
User ID
3In the User ID field, enter a user ID only if one of the following is true:
● You are a CentreVu CMS administrator and you want to copy another
user’s private report.
● You want to list the custom reports of a specific user only.
Step 4: Select
a Report Type
3Enter x to select the Report type option (either standard or
custom) for the type of report you want to copy. If the wrong option is selected, CentreVu CMS may not find or copy the report you actually want.
Step 5: Verify
the Report
3Step 6: Copy
the Report
3If you want to copy another report design, clear the upper-left area by
deleting or moving any existing block of text and fields (see the “Editing a
Report with Blocks” section in this chapter). Then repeat Steps 1 through 5.
Select Find one to verify that the
report is the one you want to copy.
→ The user ID appears in the
User ID field and, if it exists, the report description appears in the
Description field.
Select Copy to copy the report's
design to the Screen Painter.
→ The Get Copy window
Editing a Report with Blocks 3-8
Figure 3-4: Case Study Sample — Copy of a Report Design (Using Get copy)
Editing a Report with Blocks
3A block is a rectangular area on the Screen Painter that you define and use to quickly rearrange fields and text. You can erase blocks, copy blocks, or move blocks.
You define a block with the cursor by marking two opposite corners of a rectangle. When you define a block CentreVu CMS highlights the defined area. A block can contain a single character of text, a single field or bar, several words of text, several fields/bars, a combination of fields/bars and text, or a whole report design.
You can edit a report in blocks using the steps described in the following pages.
Note If part of the report you are copying overlaps existing text or fields on
the Screen Painter, CentreVu CMS does not copy that part of the report to the Screen Painter.
Note If a block includes any part of a field/bar, then CentreVu CMS
Editing a Report with Blocks 3-9
Erasing a
Block
3Figure 3-5: Sample Case Study — Defining a Block to Erase
Note Prior to completing a block erase, you can press to cancel the
erasure.
1. On the Screen Painter, place the
cursor in a position where you want one corner of the block to
be, and select Erase block.
→ The cursor returns to its
original position, and the following message appears on
the status line: Move cursor
to define opposite corner of block, press RETURN.
2. Move the cursor to a position
where you want the opposite corner of the block to be. The block should include all fields and text you want to erase.
→ The block is highlighted as
you move the cursor. Ctrl c
Note In our case study sample, we want to erase the middle section of the
copied report design. Therefore, in Figure 3-5, we have scrolled
horizontally to the middle section and defined the block we want to erase.
3. Press . → An Acknowledgment window
Editing a Report with Blocks 3-10
Figure 3-6: Sample Case Study — Erasing the Block
Moving a
Block
34. Enter y, and press . → All fields and text within the block disappear.
Return
Note Prior to completing a block move, you can press to cancel the
move.
1. On the Screen Painter, place the
cursor in a position where you want one corner of the block to
be, and select Move block.
→ The cursor returns to its
original position, and the following message appears on