USER
'
S GUIDE
•
INTEGRATED ENVIRONMENT
•
OPTIMIZATION
•
COMMAND
·
lINE COMP
I
LER
•
IN
S
TALLATION
BorlancP
c++
Version 3.0
User's Guide
Rl
Copyright © 1991 by Borland International. All rights reseNed. All Borland products are trademarks or registered trademarks of Borland International, Inc. Other brand and product names are trademarks or registered trademarks of their respective holders. Windows, as used in this manual, refers to Microsoft's
implementation of a windows system.
c
o
N
T
Introduction 1
What's in Borland C++ . . . .. 1
Hardware and software requirements ... 4
The Borland C++ implementation ... 4
The Borland C++ package . . . .. 5
The User's Guide. . . .. 5
Tools and Utilities Guide ... 6
The Programmer's Guide ... 7
The Library Reference . . . .. 8
Using the manuals ... 8
Programmers learning C or C++ ... 9
Experienced C and C++ programmers . 9 Typefaces and icons used in these books . 9 How to contact Borland ... 10
Resources in your package ... 11
Borland resources . . . .. 11
Chapter 1 Installing Borland C++ 13 Using INSTALL ... 14
Protected mode and memory ... 15
DPMIINST . . . .. 15
DPMIMEM ... 16
DPMIRES ... 16
Extended and expanded memory .. 17
Running BC . . . .. 18
Laptop systems ... 18
The README file . . . .. 18
The HELPMELDOC file ... 19
Example programs ... 19
Customizing the IDE ... 19
Chapter 2 IDE basics 21 Starting and exiting ... 22
Command-line options ... 22
The Ib option ... 22
The
I
d option ... 22The
I
e option ... 23E
N
T
s
The Ih option ... 23The 11 option . . . .. 23
The
I
m option . . . .. 23The
I
p option ... 24The
I
r option. . . .. 24The Is option. . . .. 24
The
I
x option ... 24Exiting Borland C++ ... 24
The components ... 25
The menu bar and menus ... 25
Shortcuts ... 26
Command sets ... 26
Borland C++ windows. . . .. 30
Window management . . . .. 32
The status line ... 33
Dialog boxes ... 33
Check boxes and radio buttons .... 34
Input boxes and lists ... 35
Configuration and project files . . . .. 36
The configuration file . . . .. 36
Project files. . . .. 37
The project directory ... 38
Desktop files ... 38
Changing project files ... 38
Default files ... 38
The Turbo C++ for Windows IDE ... 39
Starting Turbo C++ for Windows .... 39
Command-line options ... 40
Command sets ... 40
Configuration and project files ... 41
Using the SpeedBar ... 42
Chapter 3 Menus and options reference 45 == (System) menu . . . .. 46
Transfer items ... 46
File menu . . . .. 47
New ... 47
Open ... 47
Using the File list box ... 48
Save ... 49
Save As ... 49
Save All ... 49
Change Dir ... 50
Print ... 51
Printer Setup ... 51
DOS Shell . . . .. 51
Exit ... 52
Closed File Listing ... 52
Edit menu ... 52
Undo ... 53
Redo ... 53
Cut ... 54
Copy ... 54
Paste ... 54
Clear ... 54
Copy Example . . . .. 55
Show Clipboard ... 55
Search menu ... 56
Find ... 56
Replace ... 58
Search Again . . . .. 58
Go to Line Number ... 59
Previous Error . . . .. 59
N ext Error ... 59
Locate Function. . . .. 59
Runmenu ... 59
Run ... 59
Source code the same . . . .. 60
Source code modified . . . .. 60
Program Reset . . . .. 61
Go to Cursor ... 61
Trace Into. . . .. 61
Step Over . . . .. 62
Arguments ... 63
Debugger . . . .. 63
Debugger Options ... 64
Compile menu. . . .. 64
Compile ... 64
Make ... 64
Link ... 65
Build ... : ... 65
Information ... . Remove Messages ... . Debug menu Borland C++ only Inspect ... . Ordinal Inspector windows ... . Pointer Inspector windows ... . Array Inspector windows ... . Structure and union Inspector windows ... . Function Inspector windows ... . Class Inspector windows ... . Constant Inspector window ... . Type Inspector window ... . Evaluate/Modify ... . Call Stack ... . 65 66 66 66 67 68 68 69 69 69 69 70 70 71 Watches ... 73
Add Watch. . . .. 73
Delete Watch ... 73
Edit Watch ... 73
Remove All Watches ... . Toggle Breakpoint ... . Breakpoints ... . Project menu ... . Open Project ... . Close Project ... . Add Item ... . 74 74 74 76 76 77 77 Delete Item ... 77
Local Options ... 77
Include Files ... 78
Browse menu Turbo C++ only 79 Classes ... 80
Functions ... . Variables ... . Symbols ... . Rewind ... . 80 80 81 81 Overview ... 81
Inspect ... 81
Goto ... 81
Options menu ... . . . .. 81
Compiler ... 84
Code Generation ... 84
Advanced Code Generation ... 86
Entry /Exit Code . . . .. 88
C++ Options ... 90
Advanced C++ Options ... 92
Optimizations (Turbo C++ for Windows) . . . .. 94
Optimizations (Borland C++) ... 96
Source ... 98
Messages ... 99
Names ... 100
Transfer ... 100
Transfer macros ... 102
Make ... 103
Linker .... " ... 104
Librarian ... 107
Debugger. " ... 108
Directories ... 110
Environment ... 111
Preferences . . . .. 111
Editor ... " ... 113
Mouse ... 114
Desktop ... 116
Startup ... 116
Colors .. " ... 117
Save ... " ... 118
Window menu ... 118
Size/Move ... 119
Zoom ... 119
Tile ... 119
Cascade ... 119
Arrange Icons ... 119
Next ... 120
Close ... 120
Close All . . . .. 120
Message ... 120
Output ... 120
Watch .... " ... 121
User Screen ... 121
Register ... 121
Project. . . .. 122
Project Notes ... 122
List All ... 122
iii Help menu . . . .. 122
Contents . . . .. 123
Index ... 124
Topic Search ... 124
Previous Topic ... 124
Help on Help . . . .. 124
Active File ... 125
About ... 125
Chapter 4 Managing multi-file projects 127 Sampling the project manager ... 128
Error tracking ... 131
Stopping a make ... 131
Syntax errors in multiple source files . 132 Saving or deleting messages . . . .. 133
Autodependency checking ... 133
Using different file translators ... 134
Overriding libraries ... 136
More Project Manager features ... 137
Looking at files in a project . . . .. 139
Notes for your project ... 139
Chapter 5 The command-line com-piler 141 Using the command-line compiler ... 141
DPMIINST . . . .. 142
Running BCC ... 142
Using the options ... 142
Option precedence rules ... 143
Syntax and file names ... 146
Response files ... 147
Configuration files ... 147
Option precedence rules ... 148
Compiler options ... 148
Memory model . . . .. 149
Macro definitions ... 150
Code-generation options ... 151
The -v and -vi options . . . .. 155
Optimization options ... 156
Source code options .... . . .. 156
Error-reporting options ... 157
ANSI violations. . . .. 157
Portability warnings ... 158
C++ warnings ... 158
Segment-naming control . . . .. 159
Compilation control options ... 161
EMS and expanded memory options . 163 C++ virtual tables. . . .. 164
C++ member pointers ... 165
Template generation options ... 166
Linker options . . . .. 167
Environment options ... 167
Backward compatibility options ... 168
Searching for include and library files ... 169
File-search algorithms ... 170
An annotated example ... 171
Appendix A The Optimizer 173 What is optimization? ... 173
When should you use the optimizer? ... 173
Optimization options ... 174
Backward compatibility . . . .. 175
A closer look at the Borland C++ Optimizer . . . .. 176
Global register allocation. . . .. 176
Dead code elimination. . . .. 176
Common subexpression elimination . . . .. 177
Loop invariant code motion ... 177
Copy propagation. . . .. 178
Pointer aliasing ... 178
iv Induction variable analysis and strength reduction ... 180
Loop compaction ... 180
Code size versus speed optimizations ... 181
Structure copy inlining ... 181
Code compaction ... 181
Redundant load suppresion ... 182
Intrinsic function inlining ... 182
Register parameter passing ... 183
_fastcall modifier ... 183
Parameter rules ... 184
Function naming ... 184
Appendix 8 Editor reference 185 Block commands ... 187
Other editing commands ... 189
Appendix C Using EasyWin 191 DOS to Windows made easy ... 191
_InitEasyWin() .. . . .. 192
Added functions . . . .. 193
Appendix D Precompiled headers 195 How they work . . . .. 195
Drawbacks . . . .. 196
Using precompiled headers ... 196
Setting file names ... 197
Establishing identity ... 197
Optimizing precompiled headers 198
T
A
B
L
E
s
2.1: General hot keys ... 27 3.1: Information settings ... 66
2.2: Menu hot keys ... 27 3.2: Format specifiers recognized in 2.3: Editing hot keys ... 28 de bugger expressions " ... 72
2.4: Window management hot keys ... 28 5.1: Command-line options summary ... 143
2.5: Online Help hot keys ... 28 A.1: Optimization options summary .... 174
2.6: Debugging/Running hot keys ... 29 A.2: Parameter types and possible registers 2.7: Manipulating windows ... 32 used ... 184
2.8: General hot keys ... 40 B.1: Editing commands ... 185
2.9: Editing hot keys ... 40 B.2: Block commands in depth ... 188
2.10: Online Help hot keys ... .41 B.3: Borland-style block commands ... 189
2.11: Compiling/Running hot keys ... 41 B.4: Other editor commands in depth ... 189
F
G
u
2.1: A typical window ... 31
2.2: A typical status line ... 33
2.3: A sample dialog box ... 34
3.1: The Open a File dialog box ... 47
3.2: The Save File As dialog box ... 49
3.3: The Change Directory dialog box .... 50
3.4: The Find Text dialog box ... 56
3.5: The Replace Text dialog box ... 58
3.6: The Breakpoints dialog box ... 74
3.7: The Breakpoint Modify/New dialog box ... 75
3.8: The Override Options dialog box .... 77
3.9: The Include Files dialog box ... 78
3.10: Set Application Options ... 82
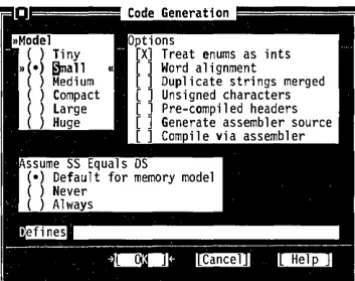
3.11: The Code Generation dialog box .... 84
3.12: The Advanced Code Generation dialog box ... 86
vi
R
E
s
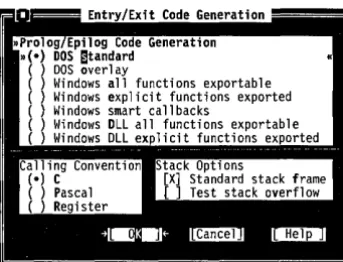
3.13: The Entry/Exit Code Generation dialog box ... 883.14: The C++ options dialog box ... 90
3.15: Advanced C++ Options ... 92
3.16: The Turbo C++ for Windows Optimization Options dialog box ... 95
3.17: The Borland C++ Optimization Options dialog box ... 96
3.18: The Transfer dialog box ... 101
3.19: The Modify INew Transfer Item dialog box ... 101
3.20: The Make dialog box ... 103
3.21: The Linker dialog box ... 104
3.22: The Libraries dialog box ... 106
3.23: The Librarian Options dialog box .. 107
3.24: The Debugger dialog box ... 108
3.25: The Startup Options dialog box ... 116
N T R
o
Du
c
To
NBorland C++ is a professional optimizing compiler for C++ and C
developers. With Borland C++, you get both C++ (AT&T v.2.1 compliant) and ANSI C. It is a powerful, fast, and efficient com-piler with which you can create practically any application, including Microsoft Windows applications.
C++ is an object-oriented programming (OOP) language, and
allows you to take advantage of OOP's advanced design methodology and labor-saving features. It's the next step in the natural evolution of C. It is portable, so you can easily transfer application programs written in C++ from one system to another.
You can use C++ for almost any programming task, anywhere.
What's in Borland C++
Chapter 1 tells you how to install Borland C++. This Introduction tells you where you can find out more about each of these features.
Introduction
Borland c++ includes the latest features programmers have asked for:
• C and C++: Borland C++ offers you the full power of C and
C++ programming, with a complete implementation of the
AT&T v. 2.1 specification as well as a 100 % ANSI C compiler. Borland C++ 3.0 also provides a number of useful C++ class libraries, plus the first complete commercial implementation of templates, which allow efficient collection classes to be built using parameterized types.
• Global Optimization: a full suite of state-of-the-art optimization options gives you complete control over code generation, so you can program in the style you find most convenient, yet still produce small, fast, highly efficient code.
2
Optimizations are also performed at high speed, so you don't have to wait for high quality code.
• DPMI Compiler: Compile huge programs limited only by the memory on your system. Borland C++ 3.0 now uses the industry-standard DPMI protected mode protocol that allows the compiler (as well as the IDE, the linker, and other programs) to be run in protected mode under DOS or Windows 386 enhanced mode.
• Microsoft Windows programming: Borland C++ 3.0 provides complete support for developing Windows applications, including dynamic link libraries (DLLs) and EXEs. Added support for Windows programming includes the Resource Compiler, the Help Compiler, and the Resource Workshop. We've also included many sample C and C++ Windows applications to help get you going.
• EasyWin: Automatic Windows-conversion feature lets you turn standard DOS applications using printf, scanf, and other standard I/O functions into Windows applications without changing a single line of code. Just set a single compiler switch (or select "Windows application" in the IDE), and your DOS program runs in a window!
• Programmer's Platform: Borland C++ 3.0 comes with an improved version of the Programmer's Platform, Borland's open-architecture IDE that gives you access to a full range of programming tools and utilities, including
• a multi-file editor, featuring both an industry-standard Common User Access (CUA) interface and a familiar alternate interface that is compatible with previous versions of Borland C++
• advanced Turbo Editor Macro Language (TEML) and compiler
• multiple overlapping windows with full mouse support • integrated resource linking, making it easy to develop
Windows applications in a single environment
• fully integrated debugger running in DPMI, for debugging large applications
• a built-in assembler and support for inline assembler code • complete undo and redo capability with an extensive buffer
and much more.
Introduction
• Windows-hosted IDE: The included Turbo C++ for Windows IDE lets you edit, compile, and run your programs under Windows, so you don't have to task switch between Windows and a DOS compatibility box to create Windows programs. This greatly increases your productivity by allowing you to
program, compile, link, debug and execute completely within the Windows environment.The Turbo C++ for Windows IDE also includes
• built-in ObjectBrowser that lets you visually explore your class hierarchies, functions and variables, locate inherited function and data members, and instantly browse the source code of any element you select
• visual SpeedBar for instant point-and-click access to frequently-used menu selections
• WinSight: Windows message-tracing utility lets you see inside your program's interaction with Windows.
• VROOMM: Borland C++'s Virtual Run-time Object-Oriented Memory Manager lets you overlay your code without complexity. You select the code segments for overlaying; VROOMM takes care of the rest, doing the work needed to fit your code into 640K.
• Help: Online context-sensitive hypertext help, with copy-and-paste program examples for practically every function.
• Streams: Borland C++ includes full support for C++ iostreams, plus special Borland extensions to the streams library that allow you to position text, set screen attributes, and perform other manipulations to streams within the Windows environment.
• Container classes: Advanced container class libraries giving you sets, bags, lists, arrays, B-trees and other reusable data structures, implemented both as templates and as object-based containers for maximum flexibility.
• Windows API: The complete Windows API documentation in online help.
Other features:
• Over 200 new library functions for maximum flexibility and compatibility.
• Complex and BCD math, fast huge arithmetic.
• Heap checking and memory management functions, with far
objects and huge arrays.
• Run-time library in a DLL for Windows applications.
• New BCI fonts and BCI support for the full ASCII character set.
II Shared project, configuration, and desktop files to let
programmers work with the same environment whether they use the Programmer's Platform or the Windows-hosted IDE. • Response files for the command-line compiler.
• NMAKE compatibility for easy transition from Microsoft C.
Hardware and software requirements
Borland C++ runs on the IBM PC compatible family of computers, including the AT and PS/2, along with all true IBM compatible 286,386 or 486 computers. Borland C++ requires DOS 3.31 or higher, a hard disk, a floppy drive, and at least 640K plus 1MB of extended memory; it runs on any 80-column monitor. The Turbo C++ for Windows IDE requires protected mode Windows 3.0 or higher, at least 2MB of extended memory and a Windows-compatible monitor).
Borland C++ includes floating-point routines that let your pro-grams make use of an 80x87 math coprocessor chip. It emulates the chip if it is not available. Though it is not required to run Borland C++, the 80x87 chip can significantly enhance the performance of your programs that use floating point math operations.
Borland C++ also supports (but does not require) any Windows-compatible mouse. The Resource Workshop requires a mouse.
The Borland C++ implementation
4
Borland C++ is a full implementation of the AT&T C++ version 2.1. It also supports the American National Standards Institute (ANSI) C standard. In addition, Borland C++ includes certain extensions for mixed-language and mixed-model programming that let you exploit your PC's capabilities. See Chapters 1 through 4 in the Programmer's Guide for a complete formal description of Borland C++.
The Borland C++ package
The User's Guide tells you how to use this product; the Programmer's Guide and the Library Reference focus on programming in C and C++. the Tools and Utilities Guide describes and gives you instructions for using specialized programming tools.
The
User's Guide
Introduction
Your Borland C++ package consists of a set of disks and nine manuals:
• Borland C++ User's Guide (this manual)
• Borland C++ Tools and Utilities Guide • Borland C++ Programmer's Guide • Borland C++ Library Reference • Resource Workshop User's Guide • Turbo Debugger User's Guide • Turbo Profiler User's Guide • Turbo Assembler User's Guide • Turbo Assembler Quick Reference
In addition to these manuals, you'll find a convenient Quick Reference card. The disks contain all the programs, files, and libraries you need to create, compile, link, and run your Borland C++ programs; they also contain sample programs, many standalone utilities, a context-sensitive help file, an integrated debugger, and additional C and C++ documentation not covered in these guides.
The User's Guide introduces you to Borland C++ and shows you how to create and run both C and C++ programs. It consists of in-formation you'll need to get up and running quickly, and
provides reference chapters on the features of Borland C++: Borland's Programmer's Platform, including the editor and Project Manager, as well as details on using the command-line compiler. These are the chapters in this manual:
Introduction introduces you to Borland C++ and tells you where to look for more information about each feature and option.
Chapter 1: Installing Borland C++ tells you how to install Borland C++ on your system; it also tells you how to customize the colors, defaults, and many other aspects of Borland C++.
Chapter 2: IDE Basics introduces the features of the
Programmer's Platform, giving information and examples of how
6
Tools and Utilities
Guide
to use the IDE to full advantage. It includes information on how to start up and exit from the IDE.
Chapter 3: Menus and options reference provides a complete reference to the menus and options in the Programmer's Platform.
Chapter 4: Managing multi-file projects introduces you to Borland C++'s built-in project manager and shows you how to build and update large projects from within the IDE.
Chapter 5: The command-line compiler tells how to use the command-line compiler. It also explains configuration files.
Appendix A: The Optimizer introduces the concepts of compiler optimization, and describes the specific optimization strategies and techniques available in Borland C++.
Appendix B: Editor reference provides a convenient command reference to using the editor with both the CVA command interface and the Borland C++ alternate interface.
Appendix C: Using EasyWin provides a guide to using the EasyWin functions to quickly and easily turn your DOS programs into applications that run under Microsoft Windows.
Appendix D: Precompiled headers tells you how to use Borland C++'s exclusive precompiled headers feature to save substantial time when recompiling large projects, especially Windows applications.
This volume introduces you to the many programming tools and utility programs provided with Borland C++. It contains informa-tion you'll need to make full use of the Borland C++ program-ming environment, including the Make utility, the Turbo Librarian and Linker, the WinSight program and special utilities for Microsoft Windows programming.
Chapter 1: Import library tools tells you how to use the IMPDEF, IMPLIB, and IMPLIBW utilities to define and specify import libraries.
Chapter 2: Make: The program manager introduces the Borland C++ MAKE utility, describes its features and syntax, and presents some examples of usage.
The
Programmer's
Guide
Introduction
Chapter 3: TUB: The Turbo librarian tells you how to use the Borland C++ Turbo Librarian to combine object files into integrated library (.LIB) files.
Chapter 4: TUNK: The Turbo linker is a complete reference to the features and functions of the Turbo Linker (TLINK).
Chapter 5: Using WinSight provides instructions for using Win-Sight to inspect your programs running under Microsoft Windows.
Chapter 6: RC: The Windows resource compiler tells you how to use the Resource Compiler to compile .RC scripts into .RES resource files for your Windows programs.
Chapter 7: HC: The Windows Help compiler contains instructions for using the Help Compiler to create help systems for your Microsoft Windows programs.
Chapter A: Error messages lists and explains run-time, compile-time, linker, librarian, and Help compiler errors and warnings, with suggested solutions.
The Programmer's Guide provides useful material for the experi-enced C user: a complete language reference for C and C++, writing Windows applications, a cross-reference to the run-time library, C++ streams, memory models, mixed-model program-ming, video functions, floating-point issues, and overlays, plus error messages.
Chapters 1 through 4: Lexical elements, Language structure, C++ specifics, and The preprocessor, describe the Borland C++ language.
Chapter 5: Using C++ streams tells you how to use the C++ iostreams library, as well as special Borland C++ extensions for Windows.
Chapter 6: The container class library tells you how to use the Borland C++ container class library in your programs.
Chapter 7: Converting from Microsoft C provides some
guidelines on converting your Microsoft C programs to Borland C++.
The
Library
Reference
Chapter 8: Building a Windows application introduces you to the concepts and techniques of writing applications for Microsoft Windows using Borland C++.
Chapter 9: DOS memory management covers memory models, mixed-model programming, and overlays.
Chapter 10: Math covers floating-point and BCD math.
Chapter 11: Video functions is devoted to handling text and graphics in Borland C++.
Chapter 12: BASM and inline assembly tells how to write inline assembly language functions that can be assembled with the built-in assembler (BASM) and used within your Borland C++ program.
Appendix A: ANSI implementation-specific standards describes those aspects of the ANSI C standard that have been left loosely defined or undefined by ANSI, and how Borland has chosen to implement them.
The Library Reference contains a detailed list and explanation of Borland C ++'s extensive library functions and global variables.
Chapter 1: The main function describes the main function.
Chapter 2: The run-time library is an alphabetically arranged reference to all Borland C++ library functions.
Chapter 3: Global variables defines and discusses Borland C++'s global variables.
Appendix A: Library cross-reference provides a complete indexed locator reference to all Borland C++ library functions.
Using the manuals
8
The manuals are arranged so that you can pick and choose among the books and chapters to find exactly what you need to know at the time you need to know it. The User's Guide provides informa-tion on how to use Borland C++ as a product; the Programmer's Guide and the Library Reference provide material on programming issues in C and C++.
Programmers
learning C or C++
Experienced
C
and C++
programmers
Chapter 1 of this manual (the User's Guide) tells you how to install Borland C++ and how to customize Borland C++'s defaults. The remaining chapters of the User's Guide are for use as reference chapters to using Borland C++'s IDE, editor, project manager, command-line compiler, precompiled headers, and online utilities.
If you don't know C or C++, there are many good products on the market that can get you going in these languages. You can use Chapters 1 through 5 in the Programmer's Guide for reference on specific technical aspects of Borland C++.
Your next step is to start programming in C and C++. You'll find Chapter 2, "The run-time library" in the Library Reference to be a valuable reference on how to use each function. Chapter 1, "The main function," provides information on aspects of the main
function that is seldom found elsewhere. Or, you might prefer to use the online help; it contains much of the same information as the Library Reference, and includes programming examples that you can copy into your own programs. Once you have grown comfortable with programming, you may want to move into the more advanced issues covered in the Programmer's Guide.
If you are an experienced C or C++ programmer and you've
already installed Borland C++, you'll probably want to jump immediately to the Programmer's Guide and to the Library Reference.
The Programmer's Guide covers certain useful programming issues, such as C++ streams, assembly language interface, memory models, video functions, overlays, and far and huge pointers. If
you are interested in writing a Windows application in C++, Chapter 8, "Building a Windows application," provides an overview.
Typefaces and icons used in these books
Introduction
All typefaces and icons used in this manual were produced by Borland's Sprint: The Professional Word Processor, on a PostScript laser printer.
Monospace type
ALL CAPS
()
<>
Boldface
Italics
Keycaps
This typeface represents text as it appears onscreen or in a pro-gram. It is also used for anything you must type literally (such as
Be to start up Borland C++).
We use all capital letters for the names of constants and files.
Square brackets [ ] in text or DOS command lines enclose optional items that depend on your system. Text of this sort should not be typed verbatim.
Angle brackets in the function reference section enclose the names of include files.
Borland C++ function names (such as printf), class, and structure names are shown in boldface when they appear in text (but not in program examples). This typeface is also used in text for Borland C++ reserved words (such as char, switch, near, and cdecl), for format specifiers and escape sequences (%d, \t), and for
command-line options (fA).
Italics indicate variable names (identifiers) that appear in text. They can represent terms that you can use as is, or that you can think up new names for (your choice, usually). They are also used to emphasize certain words, such as new terms.
This typeface indicates a key on your keyboard. For example, "Press Esc to exit a menu."
This icon indicates keyboard actions.
This icon indicates mouse actions.
~ This icon indicates language items that are specific to C++. It is used primarily in the Programmer's Guide.
01
This icon indicates material that applies to Turbo C++ for~ Windows, or which relates specifically to writing a Windows
program.
How to contact Borland
10
Borland offers a variety of services to answer your questions about this product. Be sure to send in the registration card;
Resources in your
registered owners are entitled to technical support and may receive information on upgrades and supplementary products.
package
This product contains many resources to help you:Borland resources
800-822-4269 (voice) Tech fax
408-439-9096 (modem) File Download BBS
2400 Baud
Online information services
408-438-5300 (voice) Technical Support 6 a.m. to 5 p.m. PST
Introduction
• The manuals provide information on every aspect of the program. Use them as your main information source . • While using the program, you can press F1 for help.
II Many common questions are answered in the DOC files listed
in the README file located in the program directory.
Borland Technical Support publishes technical information sheets on a variety of topics and is available to answer your questions.
TechFax is a 24-hour automated service that sends free technical information to your fax machine. You can use your touch-tone phone to request up to three documents per call.
The Borland File Download BBS has sample files, applications, and technical information you can download with your modem. No special setup is required.
Subscribers to the CompuServe, GEnie, or BIX information services can receive technical support by modem. Use the commands in the following table to contact Borland while accessing an information service.
Service Command
CompuServe GO BORLAND
BIX JOIN BORLAND
GEnie BORLAND
Address electronic messages to Sysop or All. Don't include your serial number; messages are in public view unless sent by a service's private mail system. Include as much information on the question as possible; the support staff will reply to the message within one working day.
Borland Technical Support is available weekdays from 6:00 a.m. to 5:00 p.m. Pacific time to answer any technical questions you have about Borland products. Please call from a telephone near
12
408-438-5300 (voice) Customer Service
7 a.m. to 5 p.m. PST
your computer, and have the program running. Keep the following information handy to help process your call:
• Product name, serial number, and version number. • The brand and model of any hardware in your system.
• Operating system and version number. (Use the DOS command
VER to find the version number.)
• Contents of your AUTOEXEC.BAT and CONFIG.SYS files (located in the root directory (\) of your computer's boot disk). • The contents of your WIN.lNI and SYSTEM.lNI files (located in
your Windows directory).
• A daytime phone number where you can be contacted.
• If the call concerns a problem, the steps to reproduce the problem.
Borland Customer Service is available weekdays from 7:00 a.m. to 5:00 a.m. Pacific time to answer any non-technical questions you have'about Borland products, including pricing information, upgrades, and order status.
c
HYour Borland C++ package includes two different versions of Borland C++: the IDE (Programmer's Platform) the DOS command line version. It also includes Turbo C++ for Windows, which runs as a true Windows application. If you don't already know how to use DOS commands, refer to your DOS reference manual before setting up Borland C++ on your system.
A p T E R
1
Installing Borland C++
Borland C++ comes with an automatic installation program called INSTALL. Because we used file-compression techniques, you must use this program; you can't just copy the Borland C++ files onto your hard disk. Instead, INSTALL automatically copies and uncompresses the Borland C++ and Turbo C++ for Windows files. For reference, the README file on the installation disk includes a list of the distribution files.
We assume you are already familiar with DOS commands. For example, you'll need the DISKCOPY command to make backup copies of your distribution disks. Make a complete working copy of your distribution disks when you receive them, then store the original disks away in a safe place.
None of Borland's products use copy protection schemes. If you are not familiar with Borland's No-Nonsense License Statement, read the agreement included with your Borland C++ package. Be sure to mail us your filled-in product registration card; this guar-antees that you'll be among the first to hear about the hottest new upgrades and versions of Borland C++.
This chapter contains the following information:
• installing Borland C++ and Turbo C++ for Windows on your system
• accessing the README file • accessing the HELPME! file
• a pointer to more information on Borland's example programs
Using INSTALL
We recommend that you read the README file before installing.
• information about customizing Borland C++ (set or change defaults, colors, and so on)
Once you have installed Borland C++, you'll be ready to start digging into Borland C++. But certain chapters and manuals were written with particular programming needs in mind. The
Introduction tells where to find out more about Borland C++'s features in the documentation set.
Among other things, INSTALL detects what hardware you are using and configures Borland C++ appropriately. It also creates directories as needed and transfers files from your distribution disks (the disks you bought) to your hard disk. Its actions are self-explanatory; the following text tells you all you need to know.
To install Borland C++:
1. Insert the installation disk (disk 1) into drive A. Type the following command, then press Enter.
A: INSTALL
2. Press Enter at the installation screen. 3. Follow the prompts.
4. At the end of installation, you may want to add this line to your CONFIG.SYS file:
FILES = 20
and this line to your AUTOEXEC.BAT file (or modify your existing PATH statement, if you already have one):
PATH = C:\BORLANDC\BIN
Important! When it is finished, INSTALL allows you to read the latest about Borland C++ in the README file, which contains important, last-minute information about Borland C++. The HELPME!.DOC file also answers many common technical support questions.
14
The next time you start Microsoft Windows (after you exit from the README file viewer) a Borland C++ program group will be created and installed in Program Manager. The program group will contain icons for the following Borland C++ programs and utilities:
• Borland C++
• Turbo Profiler
• Turbo Debugger for Windows • Turbo C++ for Windows • Resource Workshop .WinSight
• 1m port Librarian • Fconvert utility
Important! INSTALL assumes that Microsoft Windows is installed in the directory you specified as your Windows directory during installation. It also assumes that the Program Manager starts up automatically as your Windows "shell" when you start Windows.
If you normally use a different command shell from Program Manager, should edit the SYSTEM.INI file in your Windows directory to include the line
Protected mode
SHELL=PROGMAN.EXE
otherwise you may get a message saying "cannot communicate with Program Manager" when you first open Windows and Borland C++ tries to create a new Program Manager group. Once Turbo C++ for Windows and the other tools are installed in a Program Manager group, you can examine their settings, then reinstall them in your alternate command shell if you want.
and memory
Borland C++ utilizes the DPMI (Dos Protected Mode Interface) to run the compiler in protected mode, giving you access to all your computer's memory without swapping. The protected mode interface is completely transparent to the user, and you should never have to even think about it, with a few possible exceptions.DPMIINST Once such exception may be when you run Borland C++ for the very first time. Borland C++ uses an internal database of various machine characteristics to determine how to enable protected mode on your machine, and configures itself accordingly. If your machine is not recognized by Borland C++, you will receive an error message saying
Machine not in database (RUN DPMIINST)
If you get this message, simply run the DPMIINST program by
typing (at the DOS prompt)
16
DPMIINST
and following the program's instructions. DPMIINST runs your machine through a series of tests to determine the best way of enabling protected mode, and automatically configures Borland C++ accordingly. Once you have run DPMIINST, you will not have to run it again.
DPMIMEM By default, the Borland C++ DPMI interface will allocate all available extended and expanded memory for its own use. If you don't want all of the available memory to be taken by the DPMI kernel, an environment variable must be set which specifies a maximum amount of memory to use. This variable can be entered directly at the DOS prompt or inserted as a line in your
AUTOEXEC.BAT file, using the syntax
DPMIMEM=MAXMEM nnnn
where nnnn is the amount of memory in kilobytes.
For example, if a user has a system with 4MB and wants the DPMI kernel to use 2MB of it, leaving the other 2MB alone, the DPMIMEM variable would be set as follows:
c:> set DPMIMEM=MAXMEM 2000
When running under Windows 3.0 in 386 enhanced mode, it is not necessary to set the DPIMEM variable; instead, you should use a Windows PIF file to configure the memory usage of Borland C++.
Under Windows standard mode, we suggest that the Borland DPMI kernel be pre-loaded prior to running windows. This is done by running DPMIRES.EXE (see the discussion of DPMIRES which follows). When using DPMIRES is conjunction with Windows, you should always set the DPMIMEM variable to less than the maximum available memory to insure that Windows will have enough physical memory to operate.
DPMIRES DPMIRES is a Borland utility that can be used with BC 3.0 to increase performance of some of the Borland language tools under certain conditions. In particular, the performance of the following tools can be enhanced through its use:
.BCC
.TASMX
Extended and expanded memory
.TLINK
When run, DPMIRES will enable the Dos Protected Mode interface and spawn a DOS command shell. The applications mentioned above will load faster into this shell. Typing 'EXIT' to the shell will remove it.
DPMIRES is especially useful if you are compiling with MAKER (the real mode MAKE) or with batch files, instead of using the protected mode MAKE. In this situation, it will be more efficient to run DPMIRES and then run MAKER or the batch file, since the compiler will load faster on each invocation.
NOTE: If you are running under DPMIRES, you may not run Windows 3.0 in enhanced mode. You must first exit to DOS and then run Windows 3.0.
Once the DPMI kernel is loaded (either by running BC or through the DPMIRES utility), the Borland C++ integrated development environment interacts directly with the DPMI server to allocate its memory, both to load and while operating. By default, the IDE will use all the extended memory reserved by the DPMI kernel and all available EMS (expanded) memory, the EMS memory being used as a swap device.
The Options I Environment I Startup ... dialog and the IX and IE
command line switches can be used to change this behavior. These setting do not affect the memory reserved by the kernel itself, only how much of it is used by the IDE.
The Use Extended Memory dialog item (and the IX command line
option) can be used to tell BC how much of the memory reserved by the DPMI kernel to use. The main reason for limiting BC's use of the kernel's memory is to allow running of other DPMI
applications from within the IDE's (using the Transfer capability), or from a DOS shell opened from the IDE.
The Use EMS Memory dialog item (and the IE command line
option) are used to tell the IDE how many 16K EMS pages to use as a swap device. Unless the kernel has been instructed to leave aside some available memory, there will be no EMS pages available to the IDE.
Running
Be
Laptop systems
The README file
18
Once you have installed Borland C++, and if you're anxious to get up and running, change to the Borland C++ \BIN directory, type
Be and press Enter. Or, you may wish to run Turbo C++ for Windows, by clicking on the Turbo C++ for Windows icon in the Program Manager. Otherwise, continue reading this chapter and the next for important start-up information.
After you have tried out the IDE, you may want to permanently customize some of the options. The Options I Environment I
Startup and Options I Environment I Colors selections in the IDE make this easy to do; see page 19 for more information.
If you have a laptop computer (one with an LCD or plasma display), in addition to carrying out the procedures given in the previous sections, you need to set your screen parameters before using Borland C++. The IDE works best if you type MODE BW80 at the DOS command line before running Borland C++.
Although you could create a batch file to take care of this for you, you can also easily install Borland C++ for a black-and-white screen from within the IDE, using the Options I Environment I
Startup option. Choose "Black and White / LCD" from the Video options group.
The README file contains last-minute information that may not be in the manuals.
Borland C++ automatically places you in the README file when you run the INSTALL program. To access the README file at a later time you can use the Borland C++ README program by typing at the DOS command line:
README
The HELPME!.DOC file
Your installation disk also contains a file called FILELIST.DOC, which lists every file on the distribution disks, with a brief description of what each one contains, and HELPME!.DOC, which contains answers to problems that users commonly run into. Consult it if you find yourself having difficulties. You can use the README program to look at HELPME!.DOC. Type this at the command line:
README HELPME!.DOC
Example programs
Your Borland C++ package includes the source code for a large number of example programs in C and C++ for both DOS and Windows, including a complete spreadsheet program called Turbo Calc. These programs are located in the .. \EXAMPLES directory (and subdirectories) created by INSTALL. The .. \
EXAMPLES directory also contains subdirectories for examples of the other tools and utilities that come with Borland C++ (like the Turbo Assembler, Debugger and Resource Workshop). Before you compile any of these example programs, you should read the printed or online documentation for them.
Customizing the IDE
For detailed information on the menus and options in the IDE see Chapter 2, "IDE Basics, " and Chapter 3, "Menus and options reference. "
Borland C++ version 3.0 allows you completely customize your installation from within the IDE itself, using the various options that appear under the Options I Environment menu. These options allow you to specify the video mode, editing modes, menu colors, and default directories, among others.
c
HChapter 2, IDE basics
A p T E R
2
IDE basics
Borland's Programmer's Platform, also known as the integrated development environment or IDE, has everything you need to write, edit, compile, link, and debug your programs. It provides
• multiple, movable, resizable windows • mouse support
• dialog boxes
• cut, paste, and copy commands that use the Clipboard • full editor undo and redo
• examples ready to copy and paste from Help • a built-in assembler
• quick transfer to other programs (like Turbo Assembler) and back again
• an editor macro language
This chapter explains how to start up and exit the Borland C++ IDE, discusses its generic components, and explains how configuration and project files work. Since the Turbo C++ for Windows IDE comes in this package, the last section describes its environment. Most of the features of the Borland C++ IDE are in the Turbo C++ for Windows IDE also.
Starting and exiting
Borland C++ runs only in protected mode.
Command-line
To start the IDE, type BC at the DOS prompt. You can follow it with one or more command-line options.
options
The command-line options for Borland C++'s IDE are Ib,/d,/e,/h, II, 1m, Ip, Irx, Is, and Ix which use this syntax:BC [option [option ... J] [sourcename I projectname [sourcenameJ]
where option can be one or more of the options, sourcename is any ASCII file (default extension assumed), and projectname is your project file (it must have the .PRJ extension).
To turn an option off, follow the option with a minus sign. For example,
Be
le-turns off the default swap to expanded memory option.
The /b option The Ib option causes Borland C++ to recompile and link all the files in your project, print the compiler messages to the standard output device, and then return to the operating system. This option allows you to start Borland C++ from a batch file so you can automate project builds. Borland C++ determines what .EXE to build based on the project file you specified on the command line or the file loaded in the active edit window if no project file is found.
To specify a project file, enter the BC command followed by Ib and then the project file name. For example,
Be
Ib
myproj.prjThis command loads a file in the editor and then compiles and links it:
Be
myprogIb
The /d option The Id option causes Borland C++ to work in dual monitor mode
if it detects appropriate hardware (for example, a monochrome card and a color card); otherwise, the Id option is ignored. Using dual monitor mode makes it easier to watch a program's output while you are debugging the program.
If your system has two monitors, DOS treats one monitor as the active monitor. Use the DOS MODE command to switch between the two monitors (MODE C080, for example, or MODE MONO). In dual monitor mode, the normal Borland C++ screen appears on the inactive monitor, and program output will go to the active monitor. So when you type BC I d at the DOS prompt on one monitor, Borland C++ comes up on the other monitor. When you want to test your program on a particular monitor, exit Borland C++, switch the active monitor to the one you want to test with, and then issue the BC I d command again. Program output then goes to the monitor where you typed the BC command.
Keep the following in mind when using the Id option:
• Don't change the active monitor (by using the DOS MODE command, for example) while you are in a DOS shell (File I DOS Shell) .
• User programs that directly access ports on the inactive moni-tor's video card are not supported, and can cause unpredictable results.
iii When you run or debug programs that explicitly make use of
dual monitors, do not use the Borland C++ dual monitor option
(ld).
The /e option The
Ie
option tells Borland C++ to swap to expanded memory ifnecessary; it is on by default. The syntax for this option is as follows:
Ie[=n]
where n equals the number of pages of expanded memory that
you want the IDE to use for swapping. A page is 16K.
The /h option If you type BC/h on the command line, you get a list of all the command-line options available. Their default values are also shown.
The /1 option Use the /I option if you're running Borland C++ on an LCD screen.
The /m option The 1m option lets you do a make rather than a build (that is, only outdated source files in your project are recompiled and linked). Follow the instructions for the Ib option, but use 1m instead.
24
The
Ip
option If your program modifies the EGA palette registers, use the Ipoption, which controls palette swapping on EGA video adapters. The EGA palette is restored each time the screen is swapped.
In general, you don't need to use this option unless your program modifies the EGA palette registers or unless your program uses BGI to change the palette.
The
Ir
option Irx specifies the swap drive. If all your virtual memory fills up, you can have Borland C++ swap to a drive you specify, usually a RAM disk. The x in Irxis the letter of the fast swap drive. For example, Ird will use drive D as the swap drive.The
Is
option Using the Is option, the compiler allows the majority of available memory to be allocated for its internal tables while compiling. If it is compiling large modules,little memory may remain for the needed overlays; therefore, the compiler may spend a long time "thrashing," that is, swapping overlays in and out of memory.If you specify Is-, the compiler won't permit its internal tables to severely restrict the overlay space in memory. As a result, if you are compiling very large modules, the compilation may fail and you'll get an out-of-memory error, but the compiler won't thrash excessively.
The
Ix
option Use the Ix switch to tell Borland C++ how much of the available extended memory to use for its heap space.Exiting Borland
C++
Ix
uses all available memory.
Ix[=n]
where n equals the amount of memory in kilobytes, let's you specify how much extended memory should be used.
There are three ways to leave the IDE .
• Choose File I Exit to leave the IDE completely; you have to type
Be again to reenter it. You'll be prompted to save your programs before exiting, if you haven't already done so.
You return to the IDE after you exit the program you transferred to.
• Choose File I DOS Shell to shell out from the IDE to enter commands at the DOS command line. When you're ready to return to the IDE, type EXIT at the command line and press Enter. The IDE reappears just as you left it.
• Choose a program from the System menu (=) to temporarily transfer to another program without leaving the IDE. You can add new Transfer programs with the Options I Transfer command.
The components
The menu bar
and menus
To cancel an action, press Esc.
Chapter 2, IDE basics
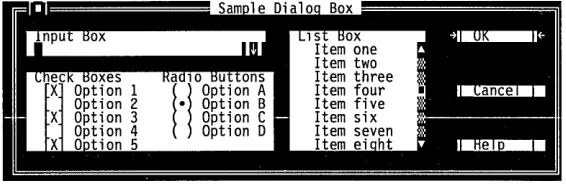
There are three visible components to the IDE: the menu bar at the top, the window area in the middle, and the status line at the bot-tom. Many menu items also offer dialog boxes. Before we describe each menu item in the IDE, we'll explain these more generic components.
The menu bar is your primary access to all the menu commands. The menu bar is always visible except when you're viewing your program's output or transferring to another program.
If a menu command is followed by an ellipsis ( ... ), choosing the command displays a dialog box. If the command is followed by an arrow (~), the command leads to another menu (a pop-up menu). If the command has neither an ellipsis nor an arrow, the action occurs as soon as you choose the command.
Here is how you choose menu commands using the keyboard:
1. Press F10. This makes the menu bar active; the next thing you type will relate to the items on the menu bar.
2. Use the arrow keys to select the menu you want to display. Then press Enter.
As a shortcut for this step, you can just press the highlighted letter of the menu title. For example, from the menu bar, press
E to move to and display the Edit menu. From anywhere, press Alt and the highlighted letter (such as Alt+E) to display the menu you want.
3. Use the arrow keys again to select a command from the menu you've opened. Then press Enter.
Borland C++ uses only the left mouse button. You can, however, customize the right button and make other mouse option changes, by choosing Options I Environment I Mouse.
At this point, Borland C++ either carries out the command, displays a dialog box, or displays another menu.
There are two ways to choose commands with a mouse:
• Click the desired menu title to display the menu and click the desired command.
• Or, drag straight from the menu title down to the menu command. Release the mouse button on the command you want. (If you change your mind, just drag off the menu; no command will be chosen.)
Note that some menu commands are unavailable when it would make no sense to choose them. However, you can always get Online Help about currently unavailable commands.
Shortcuts Borland C++ offers a number of quick ways to choose menu commands. The click-drag method for mouse users is an example. From the keyboard, you can use a number of keyboard shortcuts (or hot keys) to access the menu bar and choose commands. Short-cuts for dialog boxes work just as they do in a menu. (But be aware that you need to hold down Altwhile pressing the high-lighted letter when moving from an input box to a group of buttons or boxes.) Here's a list of the shortcuts available:
Do this ...
Press Aft plus the highlighted letter of the command (just press the highlighted letter in a dialog box). For the :: menu, press Alt+Spacebar.
Type the keystrokes next to a menu command.
To accomplish this ...
Display the menu or carry out the command.
Carry out the command.
For example, to cut selected text, press Alt+E T (for Edit I Cut) or you can just press Shift+Del, the shortcut displayed next to it.
Many menu items have corresponding hot keys; one- or two-key shortcuts that immediately activate that command or dialog box.
Command sets Borland C++ has two command sets: the Common User Access (CUA) command set, the standard used by most Windows programs and the Alternate command set popularized in previous Borland products. The shortcuts available to you differ depending on which command set you use. You can select a
command set by choosing Options I Environment I Preferences and then selecting the command set you prefer in the Preferences dialog box.
If you are a long-time Borland language user, you may prefer the Alternate command set.
The following tables list the most-used Borland C++ hot keys in both command sets.
Table 2.1: General hot keys
CUA Alternate Menu item
F1 Ctrl+F6 F7 FB F9 F10 F1 F2 F3 F4 F5 F6 F7 FB F9 F10 Help File I Save File I Open Run I Go to Cursor
Window I Zoom Window I Next Run I Trace Into
Run I Step Over
Compile I Make (none)
Table 2.2: Menu hot keys
CUA Alt+Spacebar AIt+C Alt+D Alt+E Alt+F AIt+H AIt+O Alt+P Alt+R Alt+S AIt+W Alt+F4 Alternate AIt+Spacebar AIt+C AIt+D Alt+E Alt+F AIt+H Alt+O Alt+P Alt+R Alt+S AIt+W AIt+X
Chapter 2, IDE basics
Menu item ==menu Compile menu Debug menu Edit menu File menu Help menu Options menu Project menu Run menu Search menu Window menu File I Exit
Function
Displays a help screen.
Saves the file that's in the active edit window. Brings up a dialog box so you can open a file. Runs your program to the line where the cursor is positioned.
Zooms the active window. Cycles through all open windows.
Runs your program in debug mode, tracing into functions.
Runs your program in debug mode, stepping over function calls.
Invokes the Project Manager to make an .EXE file. Takes you to the menu bar.
Function
Takes you to the == (System) menu Takes you to the Compile menu Takes you to the Debug menu Takes you to the Edit menu Takes you to the File menu Takes you to the Help menu Takes you to the Options menu Takes you to the Project menu Takes you to the Run menu Takes you to the Search menu Takes you to the Window menu Exits Borland C++ to DOS
Table 2.3: Editing hot keys
CUA Alternate Menu item
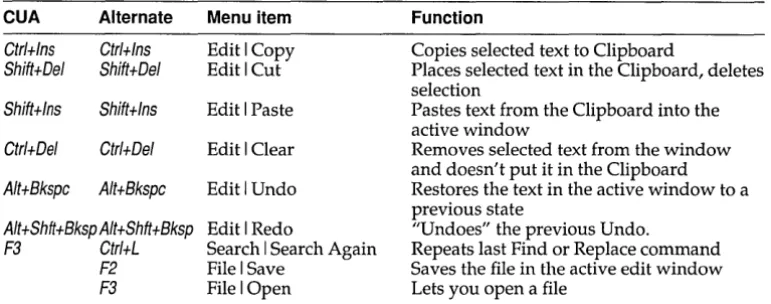
Ctrl+lns Ctrl+lns Edit I Copy Shift+Del Shift+Del Edit I Cut
Shift+lns Shift+lns Edit I Paste
Ctrl+Del Ctrl+Del Edit I Clear
Alt+Bkspc Alt+Bkspc Edit I Undo
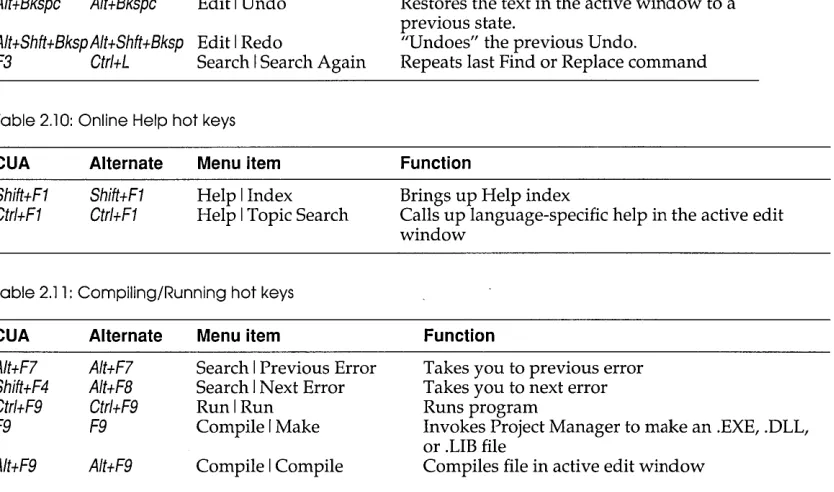
Alt+Shft+Bksp Alt+Shft+Bksp Edit I Redo
F3 Ctrl+L Search I Search Again F2 File I Save
[image:37.489.38.436.264.387.2]F3 File I Open
Table 2.4: Window management hot keys
CUA Alternate Menu item
Alt+# AIt+#
Alt+O Alt+O Window I List Ctrl+F4 Alt+F3 Window I Close Shift+F5 Window I Tile Alt+F5 AIt+F4 Debug I Inspect Shift+F5 Alt+F5 Window I User Screen
F5 Window I Zoom
Ctrl+F6 F6 Window I Next Ctrl+F5
Table 2.5: Online Help hot keys
CUA Alternate Menu item
F1 F1 Help I Contents
F1 F1 F1 F1
Shift+F1 Shift+F1 Help I Index
Alt+F1 Alt+F1 Help I Previous Topic Ctrl+F1 Ctrl+F1 Help I Topic Search
28
Function
Copies selected text to Clipboard
Places selected text in the Clipboard, deletes selection
Pastes text from the Clipboard into the active window
Removes selected text from the window and doesn't put it in the Clipboard Restores the text in the active window to a previous state
"Undoes" the previous Undo.
Repeats last Find or Replace command Saves the file in the active edit window Lets you open a file
Function
Displays a window, where # is the number of the window you want to view
Displays a list of open windows Closes the active window Tiles all open windows Opens an Inspector window Displays User Screen
Zooms/unzooms the active window Switches the active window
Changes size or position of active window
Function
Opens a context-sensitive help screen Brings up Help on Help. (Just press F1 when you're already in the help system.) Brings up Help index
Displays previous Help screen
Calls up language-specific help in the active edit window
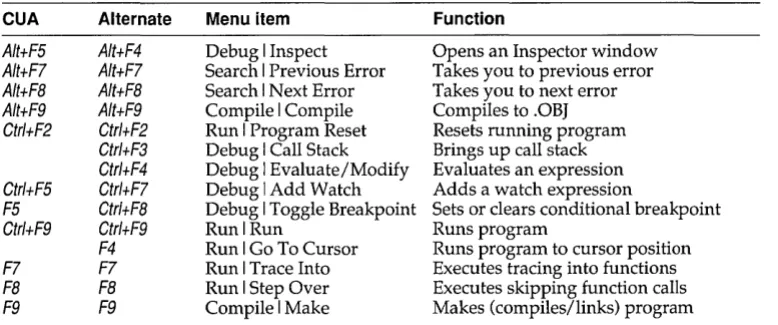
[image:37.489.40.422.419.511.2]Table 2.6: Debugging/Running hot keys CUA AIt+FS Alt+F7 AIt+FB Alt+F9 Ctrl+F2 Ctr/+FS FS Ctrl+F9 F7 FB F9 Alternate Alt+F4 Alt+F7 Alt+FB Alt+F9 Ctr/+F2 Ctr/+F3 Ctrl+F4 Ctrl+F7 Ctr/+FB Ctr/+F9 F4 F7 FB F9 Menu item
Debug I Inspect Search I Previous Error Search I Next Error Compile I Compile Run I Program Reset Debug I Call Stack Debug I Evaluate/Modify Debug I Add Watch Debug I Toggle Breakpoint Run I Run
Run I Go To Cursor Run I Trace Into Run I Step Over Compile I Make
Function
Opens an Inspector window Takes you to previous error Takes you to next error Compiles to .OB] Resets running program Brings up call stack Evaluates an expression Adds a watch expression
Sets or clears conditional breakpoint Runs program
Runs program to cursor position Executes tracing into functions Executes skipping function calls Makes (compiles/links) program
Native makes the Alternate command set the default for Borland C++, the DOS-hosted IDE, and the CUA command set the default for Turbo C++ for Windows.
If you choose Options I Preferences to display the Preferences dialog box, you'll notice a third command set option: Native. This is the default setting.
If you write applications for Windows, you may do some of your development with Borland C++ and some with Turbo C++ for Windows. Both IDEs use the same configuration file,
TCCONFIG.TC, which determines which command set is in effect. Therefore, if you have selected the CUA command set for Turbo C++, that will be the one in effect the next time you start up the Borland C++.
Chapter 2, IDE basics
But maybe this is not what you want. When you are working with the DOS product, Borland C++, you might prefer the Alternate command set, and when you use Turbo C++ for Windows, you might want to use the CUA command set. The Native option lets this happen.
With Native selected, Borland C++ uses the Alternate command set automatically, and Turbo C++ uses the CVA command set.
If you change the command set in either Borland C++ or Turbo C++, you change it for both products.
While Native seems to imply that the default command set for Borland C++ is Alternate, we recommend you choose the CUA command set.
Borland C++
windows
If you exit Borland C++ with a file open in a window, you are returned to your desktop, open file and all, when you next use Borland C++.
30
Which command set you choose also determines which keys you use within the editor, and, to some extent, how the editor works. See more about using command sets in the editor in Appendix B.
Most of what you see and do in the IDE happens in a window. A window is a screen area that you can open, close, move, resize, zoom, tile, and overlap.
You can have many windows open in the IDE, but only one window can be active at any time. The active window is the one that you're currently working in. Any command you choose or text you type generally applies only to the active window. (If you have the same file open in several windows, the action will apply to the file everywhere that it's open.)
You can spot the active window easily: It's the one with the double-lined border around it. The active window always has a close box, a zoom box, and scroll bars. If your windows are over-lapping, the active window is always the one on top of all the others (the frontmost one).
There are several types of windows, but most of them have these things in common:
• a title bar • a close box
1:1 scroll bars
.a
zoom box• a window number (1 to 9)
A edit window also displays the current line and column num-bers in the lower left corner. If you've modified your file, an aste-risk (*) will appear to the left of the column and line numbers. The following figure shows a typical window:
Figure 2.1 A typical window
Shortcut: Double-click the title bar of a window to zoom
or restore it.
Alt+O gives you a list of 01/
windows you have open.
Chapter 2, IDE basics
Cl ick the
~to
quickly close the window.
I
T
The mI!Imli contains the name of the wi ndow.
T T
[ 1 ] = = = = = = = Window Title = = = = = = : =[t]~
I
...
The fi rst ni ne open
r - -_ _ _ _ _ _ m_t:_n:_,
~_:~__,;:r:} ,~
I
:::::::::=::=:::=m=m:::,::::=:::=::~::::'::::::i=:l::':;:::::':'::::,:::.::::=::::::=:::=::=J
.6. .6.
L - I _ _ _ _ _ _ _ _ _ I Drag any corner to make
wi ndows 1 arger or sma 11 er
The close box of a window is the box in the upper left corner. Click this box to quickly close the window. (Or choose Window I Close.) The Inspector and Help windows are considered temporary; you can close them by pressing Esc.
The title bar, the topmost horizontal bar of a window, contains the name of the window and the window number. Double-clicking the title bar zooms the window. You can also drag the title bar to move the window around.
The zoom box of a window appears in the upper right corner. If the icon in that corner is an up arrow (t), you can click the arrow to enlarge the window to the largest size possible. If the icon is a doubleheaded arrow (0, the window is already at its maximum size. In that case, clicking it returns the window to its previous
size. To zoom a window from the keyboard, choose Window I
Zoom.
The first nine windows you open in Borland C++ have a window
number in the upper right border. You can make a window active
Scroll bars also show you where you are in your file.
N.
(and thereby bring it to the top of the heap) by pressing Alt in combination with the window number. For example, if the Help window is #5 but has gotten buried under the other windows, AIt+5 brings it to the front.
Scroll bars are horizontal or vertical bars that look like this:
g
"'III"'''III''''''III''''''III'''''III'''''''''''''III'''C'''III'''''''', .. , .. ,"""', .. " .. ,', .... , ... " .. ,", .. ' .. ' .. 11111111111111111111 . . . 111111111111111 . . 111111 . . . 1111 . . . . 11 11.111111.111111111111111111111111111.111111111111111111111111111111111 . . 1 . . 1111111111111111 '111"' .... "", ... , .. "~111 . . . 111 . . . . 1111111 . . . 1111 . . . 11.11 . . . 11111111.11111 . . 111 11111111111111111.11111111111111111111111111111111111111111111111111111 . . 11111111 . . . 111111"
You use these bars with a mouse to scroll the contents of the window. Click the arrow at either end to scroll one line at a time. (Keep the mouse button pressed to scroll continuously.) You can click the shaded area to either side of the scroll box to scroll a page at a time. Finally, you can drag the scroll box to any spot on the bar to quickly move to a spot in the window relative to the position of the scroll box.
You can drag any corner to make a window larger or smaller. To resize using the keyboard, choose Size/Move from the Window menu.
Window management Table 2.7 gives you a quick rundown of how to handle windows in Borland C++. Note that you don't need a mouse to perform these actions-a keyboard works just fine.
32
Table 2.7
Manipulating windows To accomplish this:
Open an edit window
Open other windows
Close a window
Activate a window
Move the active window
Use one of these me