HP Security Modules
Software Upgrade Guide
Part number:5998-2259
Legal and notice information
© Copyright 2013 Hewlett-Packard Development Company, L.P.
No part of this documentation may be reproduced or transmitted in any form or by any means without prior written consent of Hewlett-Packard Development Company, L.P.
The information contained herein is subject to change without notice.
HEWLETT-PACKARD COMPANY MAKES NO WARRANTY OF ANY KIND WITH REGARD TO THIS MATERIAL, INCLUDING, BUT NOT LIMITED TO, THE IMPLIED WARRANTIES OF MERCHANTABILITY AND FITNESS FOR A PARTICULAR PURPOSE. Hewlett-Packard shall not be liable for errors contained herein or for incidental or consequential damages in connection with the furnishing, performance, or use of this material.
The only warranties for HP products and services are set forth in the express warranty statements accompanying such products and services. Nothing herein should be construed as constituting an additional warranty. HP shall not be liable for technical or editorial errors or omissions contained herein.
Contents
Introduction to Software Upgrade ··· 1
Overview ··· 1
Introduction to HP Security Modules ··· 1
Types of Security Modules ··· 1
Files ··· 2
Upgrade Methods and Flow ··· 4
Upgrade Methods ··· 4
Upgrade Flow ··· 5
Specifying Files ··· 5
Application Upgrade on the Web Interface ··· 7
Preparations for Software Upgrade ··· 7
Software Upgrade ··· 8
Software Upgrade in Conventional Methods ··· 10
Preparations for Software Upgrade ··· 10
Introduction to the BootWare Menu ··· 14
Main Menu··· 14
Serial Submenu ··· 16
Ethernet Submenu ··· 16
File Control Submenu ··· 17
BootWare Operation Submenu ··· 18
Storage Device Operation Submenu ··· 18
Upgrading the BootWare Program and Applications Through the Serial Interface ··· 19
Introduction to Xmodem ··· 19
Modifying Serial Interface Parameters ··· 19
Upgrading Applications ··· 22
Upgrading the BootWare Program ··· 23
Upgrading Applications with TFTP ··· 25
Upgrading Applications with TFTP on the BootWare Menu ··· 25
Upgrading Application Files with TFTP at the CLI ··· 27
Upgrading Applications with FTP ··· 29
Upgrading Applications with FTP on the BootWare Menu ··· 29
Upgrading Applications with FTP at the CLI ··· 30
Maintaining Files ··· 33
Maintaining Files on the File Control Submenu ··· 33
Maintaining Files at the CLI ··· 35
Dealing With Password Loss ··· 36
User Password Loss ··· 36
BootWare Password Loss ··· 36
Super Password Loss ··· 37
Backing Up and Restoring the BootWare Program File ··· 38
Backing Up the Entire BootWare Program File ··· 38
Restoring the BootWare Program File ··· 38
Support and other resources ··· 40
Contacting HP ··· 40
Subscription service ··· 40
Related information ··· 40
Websites ··· 40
Conventions ··· 41 Index ··· 43
Introduction to Software Upgrade
Overview
Introduction to HP Security Modules
Security modules are a new generation of specialized security devices developed by HP. for large enterprises. Network devices installed with Security modules can improve their security capability while forwarding data. The software on Security modules can be upgraded on the console interface or an Ethernet interface.
Types of Security Modules
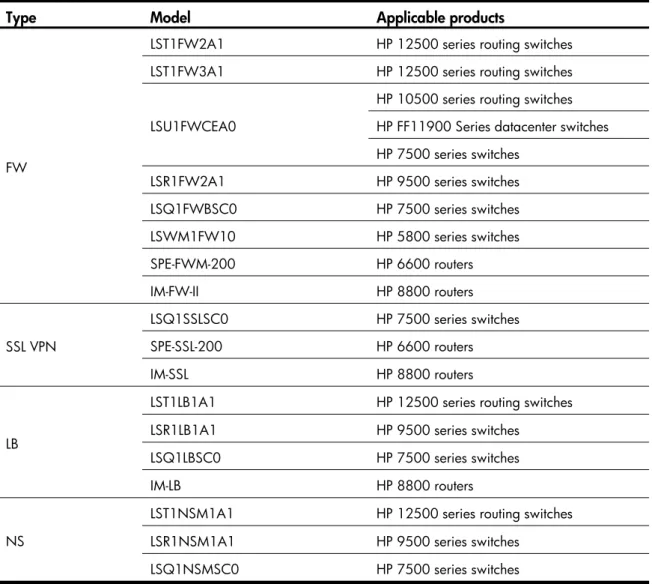
Currently, available Security modules include firewall (FW) modules, security socket layer virtual private network (SSL VPN) modules, load balance (LB) modules, and NetStream (NS) modules.
Table 1List of Security modules
Type Model Applicable products
FW
LST1FW2A1 HP 12500 series routing switches
LST1FW3A1 HP 12500 series routing switches
LSU1FWCEA0
HP 10500 series routing switches HP FF11900 Series datacenter switches HP 7500 series switches
LSR1FW2A1 HP 9500 series switches
LSQ1FWBSC0 HP 7500 series switches
LSWM1FW10 HP 5800 series switches
SPE-FWM-200 HP 6600 routers
IM-FW-II HP 8800 routers
SSL VPN
LSQ1SSLSC0 HP 7500 series switches
SPE-SSL-200 HP 6600 routers
IM-SSL HP 8800 routers
LB
LST1LB1A1 HP 12500 series routing switches
LSR1LB1A1 HP 9500 series switches
LSQ1LBSC0 HP 7500 series switches
IM-LB HP 8800 routers
NS
LST1NSM1A1 HP 12500 series routing switches
LSR1NSM1A1 HP 9500 series switches
Files
To upgrade the software on Security modules, you need to upgrade and maintain the following three categories of files:
• BootWare program file • Application files • Configuration files BootWare program file
The BootWare program file on a Security module is used for booting application files and is saved on the Flash of the Security module.
The entire BootWare program file contains a basic segment and an extended segment.
• The basic segment is used for the basic initialization of the Security module. After the basic initialization, the network interfaces and the CF card are still unavailable.
• After the Security module runs the extended segment, the network interfaces and the CF card are available. The extended segment provides diversified human-computer interaction (HCI) functions to upgrade the applications and the boot system.
• After the basic segment is booted, the extended segment can be upgraded on the menu of the basic segment.
Application files
Currently, the application files on a Security module usually refer to the boot files. A boot file is an application file used to boot the Security module. By default, a Security module defines three application files for boot.
• Main application file (main file for short): The default name is main.bin and the file type is M. It is the default application file used for the Security module boot.
• Backup application file (backup file for short): The default file name is backup.bin and the file type is B. When booting with the main application file fails, the Security module uses the backup application file to boot.
• Secure application file (secure file for short): The file name is secure.bin and the file type is S. When booting with the main and backup application files fails, the Security module uses the secure application file to boot. When booting with the secure application file fails, boot failure will be prompted.
These three types of files are stored on the CF card for all Security modules except the SSL VPN modules. For an SSL VPN module, the files are stored on the flash memory by default.
If you have loaded the three application files into the CF card, the Security module will boot using these three files in sequence. To change the sequence or a file type, see “Maintaining Files”.
Note that:
• The application files for booting the Security module can be type M, B, and S, but not type N/A (type other than M, B, or S).
• You can modify the name of application files using the rename command after the Security module boots. If you changed the name of the secure application file, there is no secure application file on the CF card and you need to download a secure application file to the CF card again.
• You can modify the type of application files of type M, B or N/A except type S on the BootWare menu, or at the CLI after the Security module boots.
• The secure application file is the last resort for the Security module boot. You cannot change the type of the secure application file, or change other types of files to the secure application file. You can only download it using the BootWare menu.
• There is only one application file of the same type (M, B, or S) on the CF card. Configuration files
The configuration files store configuration information of Security modules. By default, three configuration files are defined to load configuration information at the Security module boot.
• Main configuration file: The file type is M and the file extension is .cfg. By default, the Security module uses the main configuration file to load configuration information.
• Backup configuration file: The file type is B and the file extension is .cfg. When loading with the main configuration file fails, the Security module uses the backup configuration file to load configuration information.
• Default configuration file: The file type can be M, B, or N/A, and the file extension is .cfg or .xml. When loading the main and backup configuration files fails, the Security module uses the default configuration file (startup.cfg or system.xml) to load configuration information. If loading the default configuration file fails, the Security module boots without any configuration information.
These three types of files are stored on the CF card for all Security modules except the SSL VPN modules. For an SSL VPN module, the files are stored on the flash memory by default.
If you have loaded the three configuration files into the CF card, the Security module will boot using these three files in sequence. To change the type of a configuration file, see “Specifying a configuration file”.
NOTE:
• The configuration file name containing a drive identifier and a string terminator cannot be longer than
64 characters. For example, if the drive identifier is “CF:/”, the file name excluding the drive identifier and string terminator can be at most [ 64 – 1 – 4 ] = 59 characters in length. Typically, a file name excluding drive identifier and string terminator is recommended to contain no more than 16 characters.
• A configuration file name cannot contain extended ASCII characters (ASCII greater than or equal to
128), invisible characters (ASCII less than 33), “, ‘, ?, \, space, *, |, <, /, :, >, or -.
• The dot “.” can appear in a file name, but not at the beginning or end of the file name. In addition, the
file name cannot contain two consecutive dots.
• A configuration file downloaded through the WEB is still stored on the CF card.
CAUTION:
• The configuration files for Security module configuration at boot time can be a file of type M or B, or a
default configuration file of type N/A, but not non-default configuration files of type N/A.
• You can modify the name of a configuration file in the CF card using a command after the Security
module boots. You can modify the type of a configuration file of type M, B, or N on the BootWare menu or the command line interface (CLI) after the Security module boots, but you cannot modify the type of the default configuration file.
Upgrade Methods and Flow
Upgrade Methods
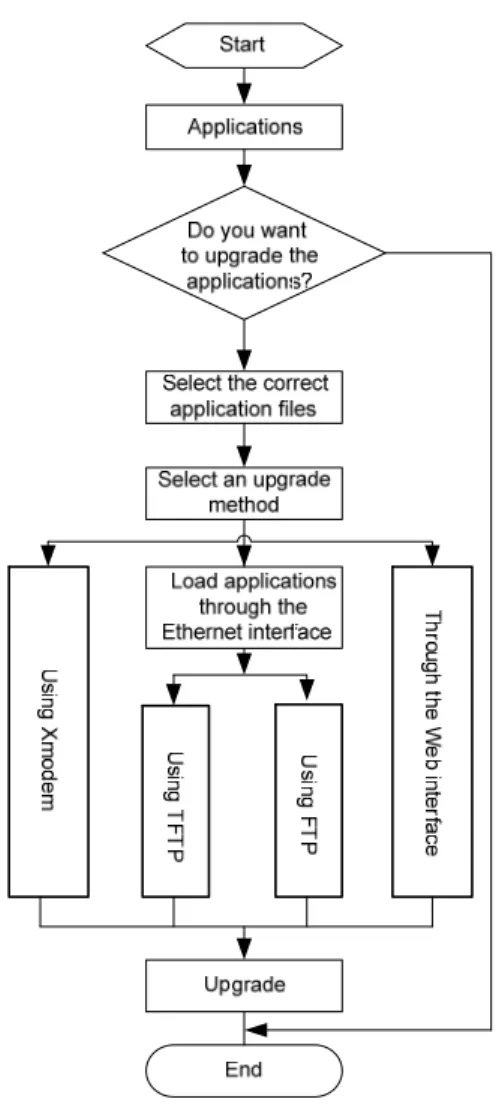
You can upgrade software in one of the following three ways:
• Upgrade software on the Web interface. For the upgrade procedure, see “Application Upgrade on the Web Interface”.
• Upgrade the BootWare program and an application using Xmodem through the serial interface. For the upgrade procedure, see “Upgrading the BootWare Program and Applications Through the Serial Interface”.
• Upgrade applications using TFTP/FTP through an Ethernet interface. For the upgrade procedure, see “Upgrading Applications with TFTP” and “Upgrading Applications with FTP”.
The second and third are called conventional software upgrade methods. NOTE:
• The BootWare program is automatically upgraded when applications are upgraded, that is, you do not
need to upgrade the BootWare separately.
• Before software upgrade, check the current versions of the BootWare program and applications so as to
use the correct files for upgrading.
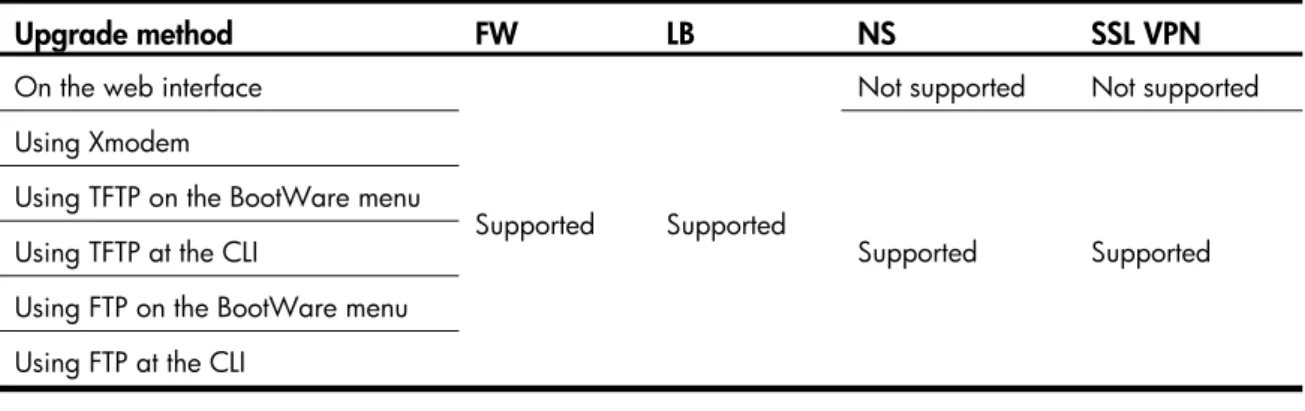
Table 2 lists the software upgrade methods supported by different models of Security modules. Table 2Software upgrade methods supported by different models of Security modules
Upgrade method FW LB NS SSL VPN
On the web interface
Supported Supported
Not supported Not supported Using Xmodem
Supported Supported Using TFTP on the BootWare menu
Using TFTP at the CLI
Using FTP on the BootWare menu Using FTP at the CLI
NOTE:
Upgrade Flow
Figure 1Software upgrade flow
Specifying Files
Specifying a boot fileNo matter how you upgrade software, use the boot-loader file file-url { main | backup } command in user view to specify a new boot file for the Security module and then restart the switch or router. In the command,
• file file-url: Name of the boot file, consisting of 1 to 64 characters. • main: Main application file.
NOTE:
• A boot file is an application file used to boot the Security module. When there are multiple application
files on the CF card, you can use the boot-loader command to specify an application file for the next
boot. The main application file is used to boot the Security module. The backup application file is used to boot the Security module when the main application file is unavailable.
• The SSL VPN modules do not support the boot-loader command. You can specify an application file for
the next boot by configuring the attribute of the application file to M on the BootWare menu.
Specifying a configuration file
Use the startupsaved-configuration cfgfile command in user view to specify a configuration file for the next boot and then restart the device. In the command, cfgfile is the name of the configuration file.
Application Upgrade on the Web Interface
Security modules support Web-based network management. The network administrator can conveniently, visually manage, maintain, and upgrade the modules on the Web interface. Default Web login information is set for Security modules before delivery and you can use the default information to log in to the Web interface.
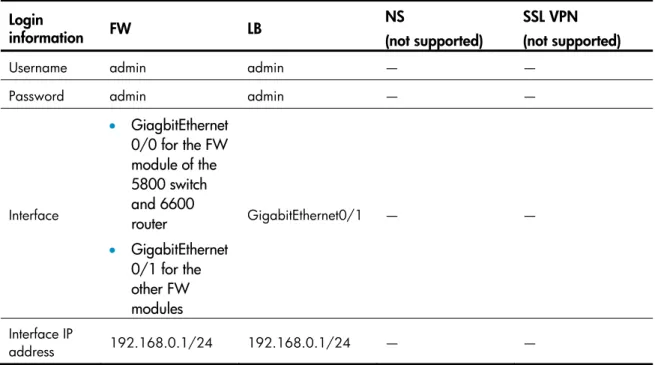
Table 3Default Web login information for Security modules (I) Login
information FW LB
NS
(not supported)
SSL VPN (not supported)
Username admin admin — —
Password admin admin — —
Interface
• GiagbitEthernet
0/0 for the FW module of the 5800 switch and 6600 router
• GigabitEthernet
0/1 for the other FW modules
GigabitEthernet0/1 — —
Interface IP
address 192.168.0.1/24 192.168.0.1/24 — —
NOTE:
• This chapter illustrates how to upgrade the software of an LSR1FW2A1 on the 9500. In a similar way,
you can upgrade the software of other Security modules that support software upgrade on the Web interface.
• The NetStream modules and SSL VPN modules do not support software upgrade on the Web interface.
Preparations for Software Upgrade
Before software upgrade on the Web interface, connect a terminal (usually a PC) to an interface (for example, GigabitEthernet 0/1) on the Security module LSR1FW2A1 and configure a route between them as follows:
Step1 Install the Security module in the 9500 series in the way you install an LPU and ensure that the switch works normally. For more information about the installation, see HP 9500 Series Routing Switches Installation Guide.
Step2 Connect a PC to interface GigabitEthernet 0/1 of the Security module with a crossover Ethernet cable. Step3 Configure an IP address for the PC and ensure that the PC and the interface are on the same network
Step4 Launch the Internet Explorer 6.0 or above on the PC, type the IP address 192.168.0.1 in the address bar and press Enter to enter the Web user login page shown in Figure 2. Enter the username admin, password admin, and verify code, select a language, and click login to log in to the Web interface. Figure 2Web user login interface
Software Upgrade
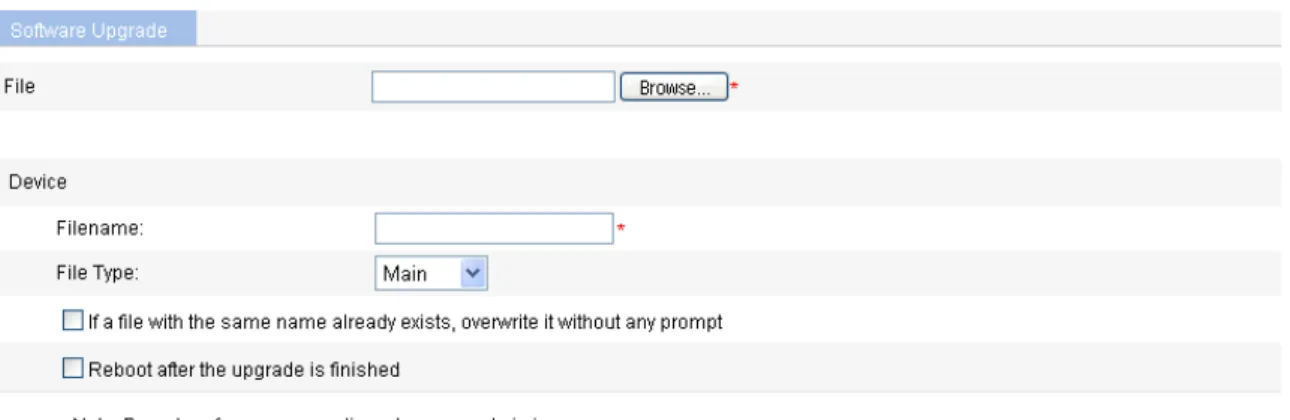
After login, select System Management > Software Upgrade from the navigation tree to enter the page shown in Figure 3.
Figure 3Software upgrade page
Make settings as described in Table 4 to upgrade software. Table 4Make settings for upgrading software
Field Action
File Click Browse to select the application file saved locally
Filename:
Enter a file name to save the downloaded file to the Security module. The file extension must be .bin or .app.
If you want the Security module to use the downloaded file, you need to specify the file for the next boot. For related information, see “Specifying Files”.
If a file with the same name exists,
Field Action
Software Upgrade in Conventional Methods
Security modules provide the BootWare menu and a CLI, through either of which you can configure, manage, and upgrade the modules.
NOTE:
The upgrade procedures of FW, SSL VPN, LB, and NS modules are similar unless otherwise specified in this chapter. This chapter illustrates the procedures for upgrading the software of an LSR1FW2A1 on the 9500.
Preparations for Software Upgrade
Before upgrading the software in conventional methods, set up a configuration environment. Installing a Security module in the switch
Install a Security module (LSR1FW2A1) in the 9500 in the way you install an LPU. For more information about the installation, see HP 9500 Series Routing Switches Installation Guide.
Connecting the console interface to a configuration terminal (usually a PC)
Plug the DB-9 connector of the console cable into the serial interface on the PC and the RJ-45 connector into the console interface on the Security module.
For the Security module of the 5800 series switch, you need to connect the RJ-45 connector of the console cable to the console port of the switch, and then execute the oap connect slot slot-number system system-name command to redirect from the switch side to the Security module.
Setting HyperTerminal parameters
The following describes how to set HyperTerminal parameters on the PC running Windows XP:
Step1 Select Start > Programs/All Programs > Accessories > Communications > HyperTerminal to establish a HyperTerminal connection.
Step2 In the Connection Description dialog box, enter a name for the connection and click OK, as shown in Figure 4.
Figure 4Establish a HyperTerminal connection.
Step3 From the Connect using dropdown list shown in Figure 5, select the serial interface to which the console cable is connected.
Figure 5Select the serial interface for the HyperTerminal connection
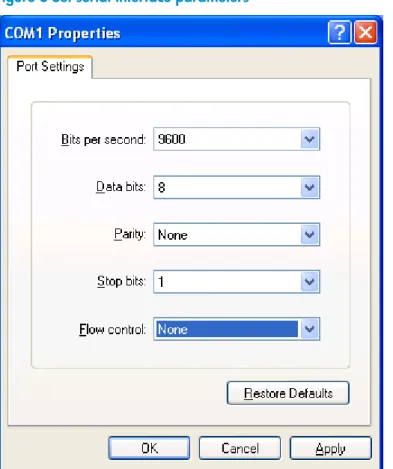
Step4 Set serial interface parameters.
In the COM1 Properties dialog box shown in Figure 6, set the default serial interface properties listed in Table 5.
Table 5Default serial interface properties
Property Value
Property Value
Data bits 8
Parity None
Stop bits 1
Flow control None
Figure 6Set serial interface parameters
Figure 7HyperTerminal window
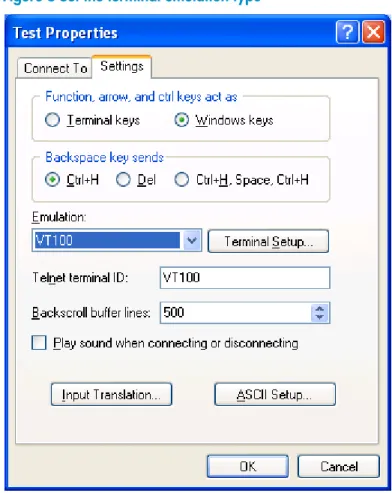
Step6 In the HyperTerminal window, select File > Properties > Settings to enter the dialog box shown in Figure 8.
Step7 Set the terminal emulation to VT100 or autodetect and click OK to return to the HyperTerminal window. Figure 8Set the terminal emulation type
Introduction to the BootWare Menu
Main Menu
After the above configurations are completed and the Security module is powered on, the module first performs system initialization. After system initialization, the following information is displayed on the configuration terminal:
NOTE:
For different Security modules or different versions of BootWare programs, the information displayed on the configuration terminal may slightly differ.
System start booting...
Booting Normal Extend BootWare....
**************************************************************************** * * * HP SecBlade FW BootWare, Version 1.35 * * * **************************************************************************** Copyright (c) 2004-2010 Hewlett-Packard Development Company, L.P. Compiled Date : Sep 17 2010 CPU Type : XLR732 CPU L1 Cache : 32KB CPU Clock Speed : 1000MHz Memory Type : DDR2 SDRAM Memory Size : 2048MB Memory Speed : 533MHz BootWare Size : 1536KB Flash Size : 4MB cfa0 Size : 247MB CPLD Version : 3.0 PCB Version : Ver.A
BootWare Validating...
Press Ctrl+B to enter extended boot menu...
Press Ctrl+B to enter the extended boot menu. Otherwise, the Security module will enter the application file decompression process.
NOTE:
• You must press Ctrl+B in four seconds after “Press Ctrl+B to enter extended boot menu” appears.
Otherwise, the Security module will enter the application file decompression process.
• After the Security module enters the application decompression process, if you want to enter the
extended boot menu, you need to reboot the Security module.
Press Ctrl+B when “Press Ctrl+B to enter extended boot menu...” appears, and the Security module prompts:
Please input BootWare password:
You are required to enter the BootWare password. (Note: The initial BootWare password is null. You have three attempts to enter the correct BootWare password. A fourth attempt will make the module halt and you need to restart the module to enter the correct password.) After you type the correct BootWare password, the current operating device and the main menu are displayed. On the main menu, you can select 9 to choose a storage device.
Note: The current operating device is cfa0
Enter < Storage Device Operation > to select device.
==================<EXTEND-BootWare MENU>===================== | <1> Boot System | | <2> Enter Serial SubMenu | | <3> Enter Ethernet SubMenu | | <4> File Control | | <5> Modify BootWare Password | | <6> Skip Current System Configuration | | <7> BootWare Operation Menu | | <8> Clear Super Password | | <9> Storage Device Operation | | <0> Reboot | ============================================================= Enter your choice(0-9):
The main menu is described in Table 6. Table 6Main menu
Menu item Description
<1> Boot System Boot an application from the CF card. <2> Enter Serial SubMenu Enter the serial submenu.
For more information, see “Serial Submenu”. <3> Enter Ethernet SubMenu Enter the Ethernet submenu.
For more information, see “Ethernet Submenu”. <4> File Control Enter the file control submenu.
For more information, see “File Control Submenu”. <5> Modify BootWare Password Modify the BootWare password.
<6> Skip Current System Configuration
Ignore the current system configuration.
The operation is one-off valid for the current boot. If you want the Security module to ignore the current configuration at the next boot, you need to perform this operation.
<7> BootWare Operation Menu Enter the BootWare operation submenu.
Menu item Description
<8> Clear Super Password
Clear the super user password.
The super user password is required in user level switching. By default, no super user password is set.
The setting is valid only for the first reboot of the Security module and the super user password will be restored next time the Security module reboots.
<9> Storage Device Operation Enter the storage device operation submenu to select applications from a storage device to boot the Security module. <0> Reboot Reboot the Security module.
Serial Submenu
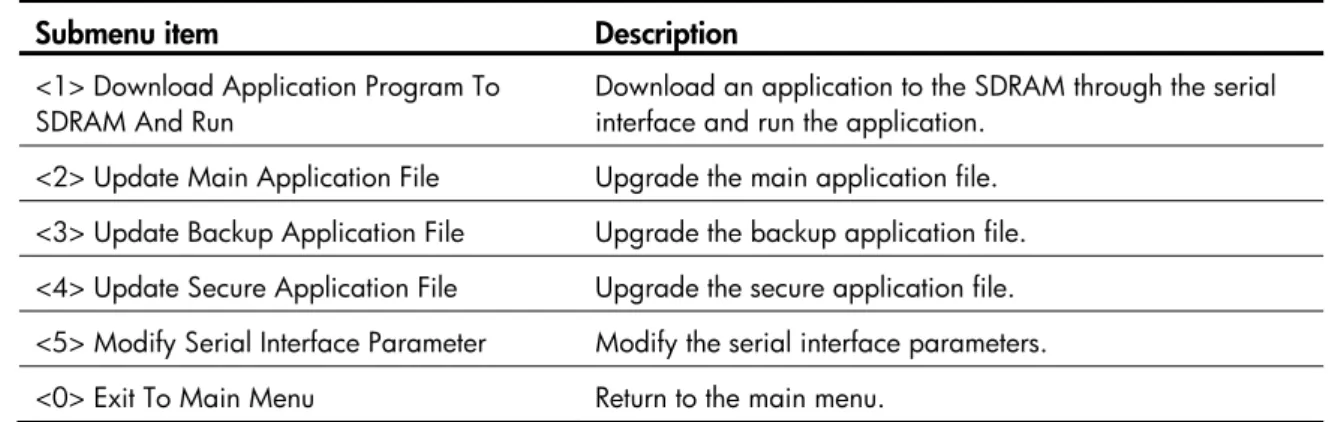
Select 2 on the main menu to enter the serial submenu, where you can upgrade applications using Xmodem. The serial submenu is as follows:
======================<SERIAL SUB-MENU>====================== |Note:the operating device is cfa0 | | <1> Download Application Program To SDRAM And Run | | <2> Update Main Application File | | <3> Update Backup Application File | | <4> Update Secure Application File | | <5> Modify Serial Interface Parameter | | <0> Exit To Main Menu | ============================================================= Enter your choice(0-5):
Table 7 describes the serial submenu items. Table 7Serial submenu
Submenu item Description
<1> Download Application Program To
SDRAM And Run Download an application to the SDRAM through the serial interface and run the application. <2> Update Main Application File Upgrade the main application file.
<3> Update Backup Application File Upgrade the backup application file. <4> Update Secure Application File Upgrade the secure application file. <5> Modify Serial Interface Parameter Modify the serial interface parameters. <0> Exit To Main Menu Return to the main menu.
Ethernet Submenu
Select 3 on the main menu to enter the Ethernet submenu, where you can upgrade applications using FTP/TFTP. The Ethernet submenu is as follows:
| <2> Update Main Application File | | <3> Update Backup Application File | | <4> Update Secure Application File | | <5> Modify Ethernet Parameter | | <0> Exit To Main Menu | | < Ensure The Parameter Be Modified Before Downloading! > | ============================================================= Enter your choice(0-5):
Table 8 describes the Ethernet submenu items. Table 8Ethernet submenu
Submenu item Description
<1> Download Application Program To
SDRAM and Run Download an application to the SDRAM and run the application. <2> Update Main Application File Upgrade the main application file.
<3> Update Backup Application File Upgrade the backup application file. <4> Update Secure Application File Upgrade the secure application file. <5> Modify Ethernet Parameter Modify Ethernet interface parameters. <0> Exit To Main Menu Return to the main menu.
File Control Submenu
Select 4 on the main menu to enter the file control submenu, where you can view, modify, and delete application files stored in a storage device. The file control submenu is as follows:
========================<File CONTROL>======================= |Note:the operating device is cfa0 | | <1> Display All File(s) | | <2> Set Application File type | | <3> Delete File | | <0> Exit To Main Menu | ============================================================= Enter your choice(0-3):
Table 9 describes the file control submenu items. Table 9File control submenu
Submenu items Description
<1> Display All File(s) Display all files.
<2> Set Application File type Set the type of an application file. <3> Delete File Delete an application file. <0> Exit To Main Menu Return to the main menu.
BootWare Operation Submenu
Select 7 on the main menu to enter the BootWare operation submenu.
=====================<BOOTWARE OPERATION>==================== |Note:the operating device is cfa0 | | <1> Backup Full BootWare | | <2> Restore Full BootWare | | <3> Update BootWare By Serial | | <4> Update BootWare By Ethernet | | <0> Exit To Main Menu | ============================================================= Enter your choice(0-4):
Table 10 describes the BootWare operation submenu items. Table 10BootWare operation submenu
Submenu items Description
<1> Backup Full BootWare Back up the entire BootWare program file. <2> Restore Full BootWare Restore the entire BootWare program file.
<3> Update BootWare By Serial Upgrade the BootWare program file through the serial interface. <4> Update BootWare By Ethernet Upgrade the BootWare program file through an Ethernet interface. <0> Exit To Main Menu Return to the main menu.
Storage Device Operation Submenu
Select 9 on the main menu to enter the storage device operation submenu.
====================<DEVICE CONTROL>========================= | <1> Display All Available Nonvolatile Storage Device(s) | | <2> Set The Operating Device | | <3> Set The Default Boot Device | | <0> Exit To Main Menu | ============================================================= Enter your choice(0-3):
Table 11 describes the storage device operation submenu items. Table 11Storage device operation submenu
Submenu item Description
<1> Display All Available Nonvolatile
Storage Device(s) Display all available storage devices. <2> Set The Operating Device Configure the current operating device. <3> Set The Default Boot Device Set the default boot device.
Upgrading the BootWare Program and
Applications Through the Serial Interface
NOTE:
The Security modules for the 5800 series switches do not support upgrading the BootWare program and applications through the serial interface.
Introduction to Xmodem
You need to use the Xmodem protocol when upgrading the BootWare program and applications through the serial interface (console interface).
Xmodem is a file transfer protocol widely used for its simplicity and good performance. Modem transfers files through serial interfaces. It supports transmission of packets in 128 bytes and 1024 bytes, error check (checksum and CRC), and error retransmission (generally the maximum number of retransmission attempts is 10).
XModem transmission is completed by the cooperation of a receiver and a sender. The receiver sends a negotiation message to the sender to negotiate an error check method. After the negotiation, the sender starts to transmit data packets. After a complete packet is received, the receiver checks the packet using the agreed method.
• If the check is passed, the receiver sends an acknowledgement message to the sender. Upon receiving the message, the sender continues to send the next packet.
• If the check fails, the receiver sends a negative acknowledgement message to the sender. Upon receiving the message, the sender retransmits the packet.
Modifying Serial Interface Parameters
In practice, on the one hand, you need to improve the baud rate of the serial interface to save the upgrade time, and on the other hand, you need to lower it to guarantee the transmission reliability. This section introduces how to modify the baud rate of the serial interface.
Step1 Select 2 on the main menu to enter the serial submenu.
Step2 Select 5 on the serial submenu to enter the baud rate setting menu as follows:
========================<BAUDRATE SET>======================= |Note:'*'indicates the current baudrate | | Change The HyperTerminal's Baudrate Accordingly | | Press 'Enter' to exit with things untouched. | |---<Baudrate Avaliable>---| | <1> 9600(Default) * | | <2> 19200 | | <3> 38400 | | <4> 57600 | | <5> 115200 | | <0> Exit | ============================================================= Enter Your Choice(0-5):
Step3 Select a proper baud rate, 5 for example for the baud rate of 115200 bps. The following information is displayed:
Baudrate has been changed to 115200 bps.
Please change the terminal's baudrate to 115200 bps, press ENTER when ready.
At this time, the baud rate of the serial interface on the Security module is modified to 115200 bps, while that of the HyperTerminal is still 9600 bps. Therefore, the Security module and the HyperTerminal cannot communicate with each other. You need to change the baud rate on the HyperTerminal and make it consistent with that of the serial interface on the Security module so that they can communicate with each other.
Perform the following operations on the HyperTerminal:
Step4 Select Call > Disconnect to disconnect the HyperTerminal connection. Figure 9Disconnect the HyperTerminal connection
Step5 Select File > Properties. Click Configure (F)… in the test Properties dialog box and change the bits per second to 115200.
Figure 10Modify the baud rate on the HyperTerminal
Step6 Select Call > Call to re-establish a call connection. Figure 11Re-establish a call connection
Step7 Press Enter. You can see the current baud rate and return to the upper level menu. The current baud rate is displayed:
NOTE:
After you download files at the modified baud rate to upgrade applications, restore the baud rate on the HyperTerminal to 9600 bps in time, so as to ensure the normal display on the screen when the Security module boots or reboots.
Upgrading Applications
You can upgrade applications on the serial submenu when upgrading them through the serial interface. Step1 Select 2 on the main menu to enter the serial submenu. For more information about the serial submenu,
see “Serial Submenu”.
The following example shows how to upgrade the main application main.bin:
To improve the upgrade speed, you can modify the baud rate of the serial interface before upgrading the main application file. For more information, see “Modifying Serial Interface Parameters”.
Step2 Select 2 on the serial submenu. The following information is displayed:
Please Start To Transfer File, Press <Ctrl+C> To Exit. Waiting ...C
Step3 Select Transfer > Send File in the HyperTerminal window. The following dialog box appears: Figure 12Send File dialog box
Step4 Click Browse… to select the application file to be downloaded, and select Xmodem from the Protocol dropdown list. Then click Send and the following dialog box appears:
Figure 13Sending file dialog box
After the file is downloaded, the following information is displayed on the configuration terminal:
Download successfully! 10129792 bytes downloaded!
NOTE:
• The size of an application is often over 10 MB. Even if the baud rate is set to 115200 bps, it usually takes
about 30 minutes to upgrade the application through the serial interface. Therefore, you are recommended to upgrade applications through an Ethernet interface.
• If you want the Security module to use the downloaded file, you need to specify the file for the next boot.
For related information, see “Specifying Files”..
Upgrading the BootWare Program
Select 7 on the main menu (see “Main Menu”) to enter the BootWare operation submenu, where you can perform all operations related to the BootWare program. For more information about the BootWare operation submenu, see “BootWare Operation Submenu”.
The following example shows how to upgrade the entire BootWare program:
Step1 Modify the baud rate of the serial interface to improve the upgrade speed (for more information, see “Modifying Serial Interface Parameters”) and then select 3 on the BootWare operation submenu. The following information is displayed:
===========<BOOTWARE OPERATION SERIAL SUB-MENU>============== | <1> Update Full BootWare | | <2> Update Extended BootWare | | <3> Update Basic BootWare | | <4> Modify Serial Interface Parameter | | <0> Exit To Main Menu | ============================================================= Enter your choice(0-4):
Step2 Select 1. The following information is displayed:
Waiting ...CCCCCCCCCCCCCCCCCCCCCCCCC...
Step3 Select Transfer > Send file in the HyperTerminal window. The following dialog box appears: Figure 14Send File dialog box
Step4 Click Browse… to select the application file to be downloaded, and select Xmodem from the Protocol dropdown list. Then click Send and the following dialog box appears:
Figure 15Sending file dialog box
After the file is downloaded, the following information is displayed on the configuration terminal:
Download successfully! 10129792 bytes downloaded!
NOTE:
• The BootWare program is automatically upgraded when applications are upgraded, that is, you do not
need to upgrade the BootWare program separately.
• The file name, size, and path in the above figures may vary. Check the current BootWare and
application versions before upgrading them.
• If you upgraded the extended segment, you only upgrade part of the BootWare program. Once an error
occurs, you can start the BootWare upgrade process again.
Upgrading Applications with TFTP
When application files are large, you can upgrade them using the Trivial File Transfer Protocol (TFTP) to greatly shorten the upgrade and maintenance time.
TFTP, a protocol in the TCP/IP suite, is used for trivial file transfer between client and server to provide simple, low-overhead file transfer services. TFTP provides unreliable data transfer services over the User Datagram Protocol (UDP) and does not provide any access authorization or authentication mechanism. It employs timeout and retransmission to guarantee data delivery.
The Security module serves as the TFTP client while the file server serves as the TFTP server. You can upload/download applications to/from the file server by entering a corresponding command on the configuration terminal.
You can upgrade application files using TFTP in the following two ways: • On the BootWare menu
• At the CLI
Upgrading Applications with TFTP on the BootWare Menu
Step1 Set up a TFTP upgrade environment.• The Security module serves as the TFTP client while the PC serves as the TFTP server.
• Use a crossover Ethernet cable to connect default management Ethernet interface GigabitEthernet 0/2 on the Security module to the PC and ensure the connectivity between the Security module and the PC. Different modules have different default management Ethernet ports. For specific
information, see Table 3.
• Enable the TFTP server on the PC and set the path where the application files are stored. CAUTION:
• The TFTP server program is not shipped with the Security module and you need to purchase and install
it.
• When you upgrade application files using TFTP on the BootWare menu, use Ethernet interface
GigabitEthernet 0/2 on the Security modules (except the SSL VPN modules).
• For the SSL VPN module, because the module does not provide service ports on its panel, you need to
use a crossover Ethernet cable to connect the service port (such as GigabitEthernet 3/0/1) of the switch or router to the PC, and guarantee that the Security SSL VPN module can communicate with the PC.
Step2 Configure Ethernet interface parameters on the BootWare menu.
Select 3 on the main menu to enter the Ethernet submenu, where you can select 5 to enter the Ethernet parameter setting interface to configure the Ethernet interface parameters.
==================<ETHERNET PARAMETER SET>=================== Note: '.' = Clear field.
'-' = Go to previous field. Ctrl+D = Quit.
============================================================= Protocol (FTP or TFTP):tftp
Load File Name :main.bin :main.bin Target File Name :main.bin :main.bin Server IP Address :192.168.80.200 Local IP Address :192.168.80.10 Gateway IP Address :
FTP User Name : FTP User Password :
Table 12Description of display information about Ethernet interface parameter configuration Field Description
'.' = Clear field To clear the current field, input a (.) and then press Enter.
'-' = Go to previous field To go to the previous field, input a hyphen (-) and then press Enter.
Ctrl+D = Quit The shortcut key combination for quitting the Ethernet parameter setting interface is Ctrl+D. Protocol (FTP or TFTP) Select TFTP or FTP to upgrade applications.
Load File Name
Select the file to be downloaded.
Set the path where the file is stored on the TFTP server. NOTE:
• The first “main.bin” is the file name automatically remembered by the system at the last update; the second “main.bin” is the source file name set by the user. • An application file name including the extension such as .bin, cannot exceed 50
characters.
Target File Name
Set a name for the target file to be saved to the Security module and the extension of the target file needs to be the same as that of the downloaded file.
NOTE:
• The first “main.bin” is the target file name automatically remembered by the system at the last update.
• The second “main.bin” is the target file name set by the user for this update. If you want the Security module to use the downloaded file, you need to specify the file for the next boot. For related information, see “Specifying Files”.
Server IP Address IP address of the TFTP server
Local IP Address IP address of the interface connecting the TFTP server Gateway IP Address IP address of the gateway. You do not need to configure it.
FTP User Name FTP username, which will be used for FTP downloading, but not for TFTP downloading. FTP User Password FTP password, which will be used for FTP downloading, but not for TFTP
NOTE:
• To use the default parameter after a colon, press Enter directly.
• If the Ethernet port parameter settings fail to pass CRC check, the system adopts the default settings and
displays “Check net params crc error, use the default value.”
Step3 After the above configurations, you will return to the Ethernet submenu, where you can select 2 to upgrade the main application file.
Loading... done 10129712 bytes downloaded!
Updating File cfa0:/main.bin ...
Update Success!
CAUTION:
• If the application file name you entered already exists on the CF card, “The file exists, will you overwrite
it? [Y/N]” will be prompted. If you enter Y, the application file on the CF card will be directly overwritten. The upgraded application file will become the only main application file.
• Make sure that the available space on the CF card is enough. Otherwise, “The free space isn’t enough”
will be prompted.
• If you want the Security module to use the downloaded file, you need to specify the file for the next boot.
For related information, see “Specifying Files”.
Step4 After the main application file is upgraded, select 0 to return to the main menu, where you can select 1 on the main menu to reboot the Security module from the CF card.
Upgrading Application Files with TFTP at the CLI
Step1 Set up an upgrade environment.Connect the PC to an Ethernet interface (for example, GigabitEthernet 0/1) on a Security and ensure the connectivity between them.
• The Security module serves as the TFTP client while the PC serves as the TFTP server.
• Use a crossover Ethernet cable to connect Ethernet interface GigabitEthernet 0/1 on the Security module to the PC.
• Configure IP addresses for the TFTP server and client and ensure that they are on the same network segment. In this example, the IP address of the TFTP server (PC) is 192.168.80.200 and that of the TFTP client (GigabitEthernet 0/1) is 192.168.80.10. Use the ping command to check the
connectivity between them.
• Enable the terminal emulation program on the PC. NOTE:
• For a Security module except SSL VPN modules, to upgrade application files using the CLI, you need to
only directly connect the PC to the Security module.
• For the SSL VPN module, because the module does not provide service ports on its panel, you need to
use a crossover Ethernet cable to connect the service port (such as GigabitEthernet 3/0/1) of the switch or router to the PC, and guarantee that the Security SSL VPN module can communicate with the PC.
Use the dir command to query the files in the current file system and the available space on the CF card to prepare for application upgrade.
<HP> dir
Directory of cfa0:/
0 -rw- 10867848 Jun 13 2007 13:21:20 main.bin 1 -rw- 4722 Jun 26 2007 12:55:42 config.cfg 2 -rw- 1128 Jun 27 2007 11:07:24 startup.cfg 3 -rw- 10129712 Jun 27 2007 10:26:02 update.bin 4 drw- - Jun 02 2007 18:28:14 logfile 62472 KB total (41855.5 KB free)
File system type of cfa0: FAT16 <HP>
Table 13dir command output information Field Description
Directory of cfa0:/ Name of the current directory
62472 KB total (41855.5 KB free) Used space on the CF card (available space on the CF card) File system type of cfa0 File system type that the CF card supports
Step3 Upgrade applications.
Using TFTP, you can download application files from the TFTP server to overwrite existing application files on the Security module to implement application upgrade. The upgraded application files take effect at the next boot.
# Download the main.bin file from the TFTP server to the Security module.
<HP> tftp 192.168.80.200 get main.bin main.bin The file main.bin exists. Overwrite it? [Y/N]:y Verifying server file...
Deleting the old file, please wait... File will be transferred in binary mode
Downloading file from remote TFTP server, please wait...| TFTP: 10867848 bytes received in 512.615 second(s) File downloaded successfully.
NOTE:
• When you download an application file, if the file name already exists on the Security module, you will
be prompted whether to overwrite the existing file. You need to enter Y or N to make a confirmation.
• You can upgrade configuration files in the way you upgrade application files. You can use a text editor
to modify a configuration file. You can download the modified configuration file to the Security module and the modified configuration file takes effect at the next boot.
• If you want the Security module to use the downloaded file, you need to specify the file for the next boot.
Step4 Back up application files.
Using TFTP, you can upload application files from the Security module to the TFTP server for the backup purpose.
# Upload the main.bin file from the Security module to the TFTP server and save it as main.bin.
<HP> tftp 192.168.80.200 put main.bin main.bin File will be transferred in binary mode
Sending file to01 remote tftp server. Please wait... TFTP: 10867848 bytes sent in 0.01 second(s). File uploaded successfully.
NOTE:
• When you back up an application file, if the file name already exists on the TFTP server, the existing file
will directly be overwritten.
• You can back up configuration files in the way you back up application files.
Upgrading Applications with FTP
When application files are large, you can also upgrade them using the File Transfer Protocol (FTP) to greatly shorten the upgrade and maintenance time.
As an application layer protocol in the TCP/IP suite, FTP is mainly used for file transfer between remote hosts. FTP provides reliable and connection-oriented data transfer services over TCP. FTP does not provide any access authorization or authentication mechanism. The FTP program file is much larger than the TFTP program file.
You can upgrade application files using FTP on the BootWare menu or at the CLI.
No matter how you upgrade applications, a Security module can serve as the FTP server or FTP client.
Upgrading Applications with FTP on the BootWare Menu
Step1 Set up an upgrade environment.
• The Security module serves as the FTP client and the PC serves as the FTP server.
• Use a crossover Ethernet cable to connect default management Ethernet interface GigabitEthernet 0/2 on the Security module to the PC and ensure the connectivity between the Security module and the PC. Different modules have different default management Ethernet ports. For specific
information, see Table 3.
• Enable the FTP server on the PC and set the path where the application files are stored. • Set the FTP username and password.
WARNING!
• The FTP server program is not shipped with the Security module and you need to purchase and install
it.
• When you upgrade application files using FTP on the BootWare menu, use Ethernet interface
GigabitEthernet 0/2 on the Security module except the SSL VPN module.
• For the SSL VPN module, because the module does not provide service ports on its panel, you need to
use a crossover Ethernet cable to connect the service port (such as GigabitEthernet 3/0/1) of the switch or router to the PC, and guarantee that the Security SSL VPN module can communicate with the PC.
For step 2 to step 4, see the corresponding steps in “Upgrading Applications with TFTP on the BootWare Menu”.
Upgrading Applications with FTP at the CLI
The Security module serving as the FTP client and the PC serving as the FTP server Step1 Set up an upgrade environment.
Connect the PC to an Ethernet interface (for example, GigabitEthernet 0/1) on the Security module and ensure the connectivity between them.
• Use a crossover Ethernet cable to connect Ethernet interface GigabitEthernet 0/1 on the Security module to the PC.
• Configure IP addresses for the FTP server and client and ensure that they are on the same network segment. In this example, the IP address of the FTP server (PC) is 192.168.80.200 and that of the FTP client (GigabitEthernet 0/1) is 192.168.80.10. Use the ping command to check the connectivity between them.
• Enable the terminal emulation program on the PC. NOTE:
• For modules except SSL VPN modules, to upgrade using the CLI, you need only directly connect the PC
to the Security module.
• For the SSL VPN module, because the module does not provide service ports on its panel, you need to
use a crossover Ethernet cable to connect the service port (such as GigabitEthernet 3/0/1) of the switch or router to the PC, and guarantee that the Security SSL VPN module can communicate with the PC.
Step2 Use the dir command to query the files in the current file system and the available space on the CF card to prepare for application upgrade. For the query method, see step 2 in “Upgrading Application Files with TFTP at the CLI”.
Step3 Log in to the FTP server.
<HP> ftp 192.168.80.200 Trying 192.168.80.200 ... Press CTRL+K to abort
Connected to 192.168.80.200.
220 3Com 3CDaemon FTP Server Version 2.0 User(192.168.80.200:(none)):guest
331 User name ok, need password Password:
[ftp]
Step4 Upgrade applications.
Using FTP, you can download application files from the FTP server to overwrite existing application files on the Security module to implement application upgrade. The upgraded application files take effect at the next boot.
# Download the main.bin file from the FTP server to the Security module.
[ftp] get main.bin main.bin
cfa0:/main.bin has been existing. Overwrite it? [Y/N]:y 227 Entering passive mode (192,168,80,200,5,33)
125 Using existing data connection
226 Closing data connection; File transfer successful.
FTP: 10867848 byte(s) received in 472.515 second(s), 23.00K byte(s)/sec
NOTE:
• When you download an application file, if the file name already exists on the Security module, you will
be prompted whether to overwrite the existing file. You need to enter Y or N to make a confirmation.
• You can upgrade configuration files in the way you upgrade application files. You can use a text editor
to modify a configuration file. You can download the modified configuration file to the Security module and the modified configuration file takes effect at the next boot.
• If you want the Security module to use the downloaded file, you need to specify the file for the next boot.
For related information, see “Specifying Files”.
Step5 Back up application files.
Using FTP, you can upload application files from the Security module to the FTP server for the backup purpose.
# Upload the main.bin file from the Security module to the FTP server and save it as main.bin.
[ftp] put main.bin main.bin
227 Entering passive mode (192,168,80,200,5,34) 125 Using existing data connection
226 Closing data connection; File transfer successful.
FTP: 10867848 byte(s) sent in 172.505 second(s), 63.00Kbyte(s)/sec [ftp] quit
221 Service closing control connection
NOTE:
• When you back up an application file, if the file name already exists on the FTP server, the existing file
will directly be overwritten.
• You can back up configuration files in the way you back up application files.
The Security module serving as the FTP server and the PC serving as the FTP client Step1 Set up an upgrade environment.
Connect the PC to an Ethernet interface (for example, GigabitEthernet 0/1) on the Security module and ensure the connectivity between them.
• Use a crossover Ethernet cable to connect Ethernet interface GigabitEthernet 0/1 on the Security module to the PC.
• Configure IP addresses for the Security module and the PC and ensure that they are on the same network segment. In this example, the IP address of Ethernet interface GigabitEthernet 0/1 on the Security module is 192.168.80.10 and that of the PC is 192.168.80.200.
• Use the ping command to check the connectivity between them. Step2 Enable the FTP service.
# Enable the FTP server.
[HP] ftp server enable
# Configure an FTP username and password.
[HP] local-user guest
[HP-luser- guest] service-type ftp [HP-luser- guest] password simple 123456 [HP-luser-guest] level 3
NOTE:
• You can use the FTP service after you have configured authorization and authentication on the FTP
server. Multiple clients can simultaneously access the FTP server. A remote FTP client sends a request to the FTP server. The FTP server executes an action accordingly and returns the execution result to the FTP client.
• After you have configured authentication and authorization on the FTP server, you need to set the user
level to 3. Otherwise, when you use the backup files to restore those on the Security module, “You have
no rights to store files” will be prompted.
Step3 Enable the FTP client program on the PC.
In the following example, Windows XP’s built-in FTP client program is illustrated. Enter ftp in the DOS window.
C:\Documents and Settings\Administrator>ftp ftp>
ftp> open 192.168.80.10 Connected to 192.168.80.10. 220 FTP service ready.
User (192.168.80.10:(none)): guest 331 Password required for guest Password:
230 User logged in.
Step4 Upgrade applications.
Using FTP, you can upload application files from the client to overwrite the existing application files on the server (Security module) to implement application upgrade. The upgraded application files take effect at the next boot.
# Upload the main_bac.bin file from the PC to the Security module and save it as main.bin.
ftp> binary
200 Type set to I. ftp> lcd d:\update
Local directory now D:\update. ftp> put main_bac.bin main.bin
150 Opening BINARY mode data connection for main.bin. 226 Transfer complete.
FTP: 11673608 byte(s) sent in 7.648 second(s), 1526.00Kbyte(s)/sec
NOTE:
• When you upgrade an application file, if the file name already exists on the FTP server, the existing file
will directly be overwritten.
• You can upgrade configuration files in the way you upgrade application files. You can use a text editor
to modify a configuration file. You can download the modified configuration file to the Security module and the modified configuration file takes effect at the next boot.
Step5 Back up application files.
Using FTP, you can download application files from the FTP server (Security module) to the FTP client (the PC) for the backup purpose.
# Download the main.bin file from the Security module to the PC and save it as main_bac.bin.
ftp> get main.bin main_bac.bin 200 Port command okay.
150 Opening BINARY mode data connection for main.bin. 226 Transfer complete.
FTP: 11673608 byte(s) received in 12.735 second(s), 916.00K byte(s)/sec ftp> quit
NOTE:
• When you download an application file, if the file name already exists on the PC, you will be prompted
whether to overwrite the existing file. You need to enter Y or N to make a confirmation.
• You can back up configuration files in the way you back up application files.
Maintaining Files
You can maintain files on the file control submenu or at the CLI.
Maintaining Files on the File Control Submenu
You can modify the type of an application file, display all files, and delete a file on the file control submenu.
Select 4 on the main menu to enter the file control submenu as follows:
========================<File CONTROL>======================= |Note:the operating device is cfa0 | | <1> Display All File(s) | | <2> Set Application File type | | <3> Delete File | | <0> Exit To Main Menu | ============================================================= Enter your choice(0-3):
Displaying all files
Select 1 on the file control submenu. The following information is displayed:
Display all file(s) in cfa0:
'M' = MAIN 'B' = BACKUP 'S' = SECURE 'N/A' = NOT ASSIGNED ============================================================= NO. Size(B) Time Type Name
1 10129712 Apr/11/2007 05:39:50 B cfa0:/main.bin 2 1227 May/11/2007 16:25:52 N/A cfa0:/startup.cfg 3 2294 May/11/2007 14:47:32 N/A cfa0:/~/startup.cfg 4 2094 May/11/2007 13:47:34 N/A cfa0:/~/startup_bac.cfg
Modifying a file type
You can modify the type of application files of type M, B or N/A except type S on the file control submenu, or at the CLI after the Security module boots.
Step1 Select 2 on the file control submenu. The following information is displayed:
'M' = MAIN 'B' = BACKUP 'S' = SECURE 'N/A' = NOT ASSIGNED ============================================================= NO. Size(B) Time Type Name
1 10129712 Jun/11/2007 05:39:50 B cfa0:/main.bin 0 Exit
============================================================= Enter file no:
Step2 Enter a file number (for example, 1) and press Enter. The following information is displayed.
Modify the file attribute:
| <1> +Main | | <2> -Main | | <3> +Backup | | <4> -Backup | | <0> Exit | Enter your choice(0-4):
You can add/remove a type attribute, M (main) or B (backup), to/from a file by selecting a choice 1 to 4. For more information of each type of files, see “Files”.
Deleting a file
Step1 Select 3 on the file control submenu. The following information is displayed:
Deleting the file in cfa0:
'M' = MAIN 'B' = BACKUP 'S' = SECURE 'N/A' = NOT ASSIGNED ============================================================= NO. Size(B) Time Type Name
1 10129712 Apr/11/2007 05:39:50 B cfa0:/main.bin 2 1227 May/11/2007 16:25:52 N/A cfa0:/startup.cfg 3 2294 May/11/2007 14:47:32 N/A cfa0:/~/startup.cfg 4 2094 May/11/2007 13:47:34 N/A cfa0:/~/startup_bac.cfg 0 Exit
============================================================= Enter file no:
The file you selected is cfa0:/~/startup_bac.cfg,Delete it? [Y/N]
Step3 Enter Y. The following information appears, indicating the file is successfully deleted.
Deleting... Done!
Maintaining Files at the CLI
Displaying all filesUse the dir command to display all files on a Security module.
<HP> dir
Directory of cfa0:/
0 drw- - Jun 11 2007 19:09:42 logfile 1 -rw- 10867848 Jun 13 2007 13:21:20 main.bin 2 -rw- 1128 Jun 27 2007 11:07:24 startup.cfg 3 -rw- 558 Jun 11 2007 20:20:38 config.cfg 4 -rw- 558 Jun 11 2007 20:23:10 config_bac.cfg 506336 KB total (506272 KB free)
File system type of cfa0: FAT16
Modifying a file type
# Change the main.bin file from type B to type M+B.
<HP> boot-loader file main.bin main
This command will set the boot file. Continue? [Y/N]:y
The specified file will be used as the main boot file at the next reboot!
By now, the original main.bin file has become type M+B and it will be used as the main boot file at the next boot.
If a file of type M already exists on the Security module, it will automatically be changed from type M to type N/A.
Deleting a file
You can use the delete [ /unreserved ] file-url command in user view to delete a file. In the command, the /unreserved keyword deletes a file, and the file-url argument specifies the file to be deleted.
# Delete the startup.cfg file from the root directory.
<HP> delete startup.cfg
Delete cfa0:/startup.cfg?[Y/N]:y %Delete file cfa0:/startup.cfg...Done.
At this time, the startup.cfg file is moved to the recycle bin. If you want to restore the file, you can use the undelete command.
# Restore the startup.cfg file in the recycle bin.
<HP> undelete startup.cfg
Undelete cfa0:/startup.cfg? [Y/N]:y % Undeleted file cfa0:/startup.cfg.
Dealing With Password Loss
This section tells you what to do if you forget the BootWare password, user password, or super password of a Security module.
User Password Loss
If you forget your user password, you will be refused to log in to the Security module. In this case, you can ignore the current configuration to boot the Security module and set a new user password as follows: Step1 Select 6 on the main menu to ignore the current configuration in Security module boot.
The following information is displayed:
Flag Set Successfully.
Step2 When the main menu appears again, select 0 to reboot the Security module.
System is rebooting now. System start booting...
Booting Normal Extend BootWare....
Step3 Set a new user password in system view.
<HP> system-view
[HP] user-interface console 0
[HP-ui-console0] authentication-mode password
[HP-ui-console0] set authentication password simple 123456
The above information indicates that the password authentication is adopted on the console interface and that the password is set to 123456 and stored in plain text.
NOTE:
• After reboot, the Security module runs the default configuration, but the original configuration file is still
kept in the CF card. To restore the original configuration, you can first use the display
saved-configuration command to locate it and then copy and run it.
• If the user password is stored in plain text, you can use the display current-configuration command to
view the password in the current configuration. If you use the set authentication password cipher
123456 command to set your user password, the password will be stored in cipher text.
Step4 Save your new user password.
[HP] save
NOTE:
• After you set a new user password, use the save command to save the password.
• You are recommended to save the new user password in the default configuration file.
BootWare Password Loss
Contact your local dealer or HP technical support if you forget the BootWare password of the Security module.
Step1 Select 5 on the main menu to modify the BootWare password as prompted. The following information is displayed:
please input old password:
Step2 Enter the old BootWare password:
please input old password: ******
NOTE:
• If you enter the old BootWare password incorrectly, “Wrong password, Please input password again:”
appears.
• After three attempts to enter the correct old BootWare password, “Wrong password, system halt.”
appears and the Security module halts.
Step3 Enter a new BootWare password twice at the prompt.
Please input new password: ****** Please input new password again: ******
If the following information appears, the BootWare password is successfully modified. Password Set Successfully.
Super Password Loss
The super password enables you to switch between four super levels. If you forget the super password, you are unable to perform higher level operations.
Follow these steps to bypass the super password: Step1 Select 8 on the main menu to clear the super password.
==================<EXTEND-BOOTWARE MENU>===================== | <1> Boot System | | <2> Enter Serial SubMenu | | <3> Enter Ethernet SubMenu | | <4> File Control | | <5> Modify BootWare Password | | <6> Skip Current System Configuration | | <7> BootWare Operation Menu | | <8> Clear Super Password | | <9> Storage Device Operation | | <0> Reboot | ============================================================= Enter your choice(0-9):8
If the following information appears, the super password is successfully cleared.
Clear Application Password Success
Step2 Exit from the main menu and reboot the Security module to directly enter the system view. NOTE:
This setting works only once. The super password will be restored when the Security module is rebooted for a second time.
Backing Up and Restoring the BootWare Program
File
Select 7 on the main menu to enter the BootWare operation submenu. For more information, see “BootWare Operation Submenu”.
Backing Up the Entire BootWare Program File
Backing up the entire BootWare program file on the BootWare menuTo back up the entire BootWare program file, you need to first back up the basic segment and then the extended segment as follows:
Step1 Select 1 on the BootWare operation submenu. The following information is displayed:
Will you backup the Basic BootWare? [Y/N]
Step2 Enter Y.
Begin to backup the Basic BootWare... Done!
By now, the basic segment has been backed up. Then, the following information is displayed: Will you backup the Extend BootWare? [Y/N]
Step3 Enter Y.
Begin to backup the Extend BootWare... Done!
By now, the extended segment has been backed up. Backing up the entire BootWare program file at the CLI
You can also use the following command to back up the BootWare program file.
<HP> bootrom backup
Now backuping bootrom, please wait... Backup bootrom! Please wait...
Read normal basic bootrom completed! Backup normal basic bootrom completed! Read normal extend bootrom completed! Backup normal extend bootrom completed! Backup bootrom completed!
Restoring the BootWare Program File
Restoring the entire BootWare program file on the BootWare menuTo restore the entire BootWare program file, first restore the basic segment and then the extended segment.
Will you restore the Basic BootWare? [Y/N]
Step2 Enter Y.
Begin to restore Normal Basic BootWare... Done!
By now, the basic segment has been restored. Then, a question is displayed:
Will you restore the Extend BootWare? [Y/N]
Step3 Enter Y.
Begin to restore Normal Extend BootWare... Done!
By now, the extended segment has been restored. Restoring the entire BootWare program file at the CLI
You can use the following command to restore the entire BootWare program file.
<HP> bootrom restore
This command will restore bootrom file, Continue? [Y/N]:y Now restoring bootrom, please wait...
Restore bootrom! Please wait... Read backup basic bootrom completed! Restore basic bootrom completed! Read backup extend bootrom completed! Restore extend bootrom completed! Restore bootrom completed!
Support and other resources
Contacting HP
For worldwide technical support information, see the HP support website:
Before contacting HP, collect the following information: • Product model names and numbers
• Technical support registration number (if applicable) • Product serial numbers
• Error messages
• Operating system type and revision level • Detailed questions
Subscription service
HP recommends that you register your product at the Subscriber's Choice for Business website:
After registering, you will receive email notification of product enhancements, new driver versions, firmware updates, and other product resources.
Related information
Documents
To find related documents, browse to the Manuals page of the HP Business Support Center website:
• For related documentation, navigate to the Networking section, and select a networking category. • For a complete list of acronyms and their definitions, see HP FlexNetwork Technology Acronyms.
Websites
• HP
• HP Networking
• HP manuals
• HP download drivers and software
• HP software depot