^^^
IGEL Remote Manager
IGEL Remote Manager
express written permission of IGEL Technology GmbH.
•
Disclaimer
The information in this document is subject to change without notice. IGEL Technology GmbH makes no representations or warranties with respect to the contents hereof, and specifically disclaims any implied warranties of merchantability or fitness for any particular purpose. Further, IGEL Technology GmbH reserves the right to revise this publication and to make changes from time to time in the content hereof without obligation of IGEL Technology GmbH to notify any person of such revision or changes.
•
Trademark Recognition
IGEL
is a registered trademark of IGEL Technology GmbH. SAP DB is a trademark of SAP AG.Windows, Windows 95, Windows NT, Windows 2000, Windows XP and Windows 2003 are either registered trademarks or trademarks of Microsoft Corporation.
Java is a registered trademark of Sun Microsystems, Inc.
All other products and corporate names appearing in this manual may or may not be registered trademarks or copyrights of their respective companies, and are used only for identification or explanation and to the owner’s benefit.
Specifications and information contained in this manual are furnished
for informational use only, and are subject to change at any time without
notice, and should not be construed as a commitment by IGEL
Technology GmbH.
IGEL Technology GmbH assumes no responsibility or liability for any
errors or inaccuracies that may appear in this manual, including the
products and software described in it.
Table of Contents
Inhaltsverzeichnis
1INTRODUCTION...5 2PREREQUISITES...5 3THE COMPONENTS...5 4FIRST STEPS...64.1Connecting to an IGEL Remote Management Server...6
4.2Scanning for Thin Clients...7
4.3Launching the Remote Manager Console via Java Web Start...9
4.4Changing the Locale of Remote Manager Console...10
5THE USER INTERFACE...11
5.1Main Screen...11
5.2Main Menu Bar...13
5.3Thin Client Content Panel...16
5.4Thin Client Directory Content Panel...18
5.5Profile Content Panel...18
5.6Profile Directory Content Panel...19
5.7Context Menus...20
5.8Search Menus...21
5.9Shortcuts...24
6MANAGING THIN CLIENTS...25
6.1Modifying Thin Client Configuration...25
6.2Send Configuration...26
6.3Retrieve Configuration...27
6.4Thin Client Codecs...27
6.5Registering from the Thin Client ...27
6.6Thin Client Mass – Import...28
6.7Automatic Remote Manager Server Detection...30
6.8Shadowing...30
7GROUPING THIN CLIENTS...33
7.1Creating new Directories...33
7.2Moving Thin Clients...34
7.3Default Directory Rules...34
7.3.1Add a default directory rule...35
7.3.2Modify a default directory rule...37
7.3.3Default directory with netmask criterium...38
7.3.4Apply Rule on Boot...38
8VIEWS...39
9PROFILES...41
9.1Organizing Profiles...41
9.2Creating Profiles...43
9.3Renaming Profiles...44
9.4Edit Profile Settings...44
9.5Assigning Profiles...45
9.6Precedence of Profiles ...48
9.7Removing Profiles from Thin Client...49
9.8Deleting Profiles...49
9.9Examples on how to use Profiles...49
9.9.1Same Display but different Sessions...50
9.9.2Copy a session from one Thin Client to another...50
9.10Exporting Profiles...51
12.2Remote Manager Accounts...61
12.3Administrator-Account...63
12.3.1Description...63
12.4Defining Access Rights...64
12.5Mandatory Access Rights for RM-Functions...66
12.6Use Cases...67
13USER LOGGING...70
13.1General...70
13.2Administration...70
13.3Open the logging dialogues...71
13.4Filter settings – general information...71
13.5Filter settings – Messages...72
13.6Filter settings - Events...73
13.7Log message view...74
13.8Event message view...76
13.9Command Categories...76
13.10 Annotations...77
14THE IGEL REMOTE MANAGER ADMINISTRATOR...78
14.1Settings Panel...78
14.2Windows XP Embedded Images...80
14.2.1Creating a Web Resource...80
14.2.2Assign and manage Web Resources...81
14.2.3Orphaned Web Resource definitions...82
14.3Database Manager Operations...83
14.4Backup and Restore Database contents...84
14.5The Database Panel...85
14.6The database management tool igelsapdbm...85
14.7 Configuring Data sources...86
14.7.1Defining a data source...86
14.7.2Setting an active Data source...87
14.7.3Setting a Failover Data source...87
14.7.4Copy Data source...88
14.8Cache...88
15ACTIVE DIRECTORY...90
15.1Purpose...90
15.2Server configuration...90
15.3IGEL servlet configuration...90
15.4Importing Users from the Active Directory ...92
15.5Login to the Active Directory...93
15.6Active Directory Browser...93
15.7Searching the Active Directory...97
15.8Result of an import from the active directory...98
15.9Annotations...98
1 Introduction
This document contains information about the usage of IGEL Remote Manager.
For the installation of the product, please refer to the IGEL Remote Manager Installation Guide. Detailed descriptions of the Thin Client parameters are described in the Thin Client’s User Guide.
2 Prerequisites
This document assumes a working installation of the IGEL Remote Manager and at least one IGEL Thin Client that can be administered.
3 The Components
The IGEL Remote Manager consists of a database system (the embedded database system
Apache Derby will be installed with the IGEL Remote Manager), the IGEL Remote Manager Server and the IGEL Remote Manager Console. The IGEL Remote Manager Server is split up into two parts, the TC Server and the GUI Server. The TC Server provides the configuration data to the Thin Clients while the GUI Server communicates with the IGEL Remote Manager Console; the data transfer between TC Server and Thin Clients or GUI Server and Remote Manager Console is encrypted. As you can see in the figure below, the Remote Manager Console may be installed on a different computer than the IGEL Remote Manager Server.
Figure 1 IGEL Remote Manager Components
Every configuration of the managed Thin Clients is stored in the database. Changes in the configuration are made in the database and transferred to the Thin Client on demand. The Thin Client can retrieve its information from the database at boot time or you can manually send the new configuration to a set of Thin Clients.
The IGEL Remote Manager Console is the interface to the Remote Management Server. It connects to the GUI, executes all the database accesses and provides data encryption. The following chapters give you detailed information on the usage of the IGEL Remote Manager
Figure 2 First screen after start
After launching IGEL Remote Manager Console, you need to connect to an IGEL Remote Manager server. Click to the Connect to ... button in the middle of the screen or choose connect from the menu bar and select Connect to ….
Enter the login data into the popup window as follows:
Figure 3 Connect window
Remote Management Server: If you have installed the IGEL Remote Manager Console and Server on the same machine, you can use the hostname localhost. If you only installed the IGEL Remote Manager Console, enter the hostname of the server you wish to connect to.
Port: The port on which the IGEL Remote Manager GUI server accepts connections is set to 8443 by default but may be altered using the IGEL Remote Manager Administration tool.
User name and Password: Fill in the user name and password of the database user account that was created during installation of the IGEL Remote Manager Server. After pressing the Connect button, you will be connected to your IGEL Remote Manager Server.
Note: The server name, the port and the user name that are entered here are stored for future connect procedures. When connecting next time, you just enter the password.
4.2 Scanning for Thin Clients
Click the Scan for Thin Clients button or select it from the menu bar via the Connect to…
dialog. A window pops up - select the network you want to scan. You can use either your local network or an IP range (depending on your network structure). In order to save time, the use of IP ranges is restricted to class B network ranges. For larger networks and scanning ranges in different networks you can specify a list of network ranges.
Figure 4 Scan window
The scan options are:
• Local Network of the RM Server
This sends a broadcast through the network, in which the IGEL Remote Manager Server is located. (Please remember that this might be a different network segment to that of the IGEL Remote Manager Console!) If the server on which IGEL Remote Manager Server is installed has multiple network interfaces, only the first is used to send out the broadcast.
• IP Range
Every IP in the defined range is contacted by sending a message to it, even if routers prevent broadcast messages.
• List of IP Ranges
If multiple network segments need to be scanned, you may set a list of ranges. Use the Edit List button and add ranges via the Add… button this window:
Figure 5 IP Range Edit Window • Use TCP for scanning
Choose this option to use TCP instead of UDP for scanning. With TCP scanning works more reliable in some networks, on the other hand it will take a longer time. Once you have selected the options, click the Scan button in the scan window.
Figure 6 Scan result window
After scanning has finished, the detected Thin Clients are displayed in the scan result window. In the first column, you can see if a Thin Client already has a certificate from an IGEL Remote Manager Server. You need the correct certificate to access this Thin Client (see chapter 9). When the Thin Client is registered in the IGEL Remote Manager database, the certificate of this server is stored on the Thin Client. Future access to this Thin Client will be validated against this certificate. Only the holder of the other private part of the certificate is allowed to control the Thin Client. (For details on certificates, see chapter 9)
Columns 2-5 contain information that allows easier identification of the Thin Clients (MAC address, terminal name, IP address and the product name).
Use the checkboxes in the last column to select which Thin Clients you want to register in your IGEL Remote Manager database. The button Select New Ones will select all Thin Clients without certificate. After confirming your choice by clicking OK, the Thin Clients will be
registered to your database. (This may take a while, depending on the performance of the IGEL Remote Manager Server machine.)
After registration, a new window shows the result of the operation and any error messages. Closing this window takes you back to the main screen.
4.3 Launching the Remote Manager Console via Java Web Start
If you have installed Java Runtim Environment 5 on your computer, you can launch the IGEL Remote Manager Console without having it installed previously. Just enter the url
http://hostname:9080/start_rm.html
in your browser or in the Java Web Start manager (hostname is name of the computer where you have installed the Remote Manager Server).You can change the port number 9080 with the Remote Manager Administrator tool
Figure 8 Starting from Java Web Start Manager
Figure 9 Starting from the browser
Two links to applications appear. Click on the link Start IGEL Remote Manager Console to launch the Console. The second link launches an application which enables to shadow Thin Clients (or PCs with a VNC server) via VNC (see section 6.8 Shadowing).
When you click on the link the application is downloaded to your local PC. Then you get a warning, that the application requires full access to your PC and that you should not start it, but start it nevertheless.
Next your are asked, if you want to integrate the application into your desktop environment, that means if you want to have an icon on the desktop which you can use for launching the
application in the future. Now the IGEL Remote Manager Console is started and you can connect to the Remote Manager Server. If you do so, you get again a security warning and you have to confirm again.
Figure 10 Changing the localization
Open the registry editor and go to folder rmadminconfig. Add the string locale with value en or
locale=de for the English or the German locale respectively. To change the language of the RM Console you have to change the value of locale in rmconsoleconfig.
5 The User Interface
This chapter gives you an overview of the graphical user interface to IGEL Remote Manager. The functionality is described in detail in the following chapters.
5.1 Main Screen
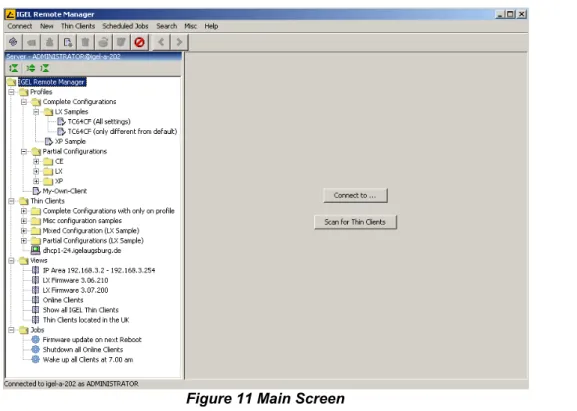
Figure 11 Main Screen
The main screen consists of two areas, the Remote Manager Tree panel on the left and a content panel on the right. Depending on the selection in the tree, the content panel shows either the content of the directory, information about a single Thin Client, or information on a profile or view. The Remote Manager Tree is divided into four subtrees: Profiles, Thin Clients, Views and Jobs. All subtrees may contain directories. The three buttons atop the content panel allow following actions: Collapse all nodes, Recursive Expansion, Collapse selected node.
Client the first time. Any name need not be unique and can be used multiple times. The color of the Thin Clients in the Remote Manager Tree shows two states:
• Green if it is online and
• Red if it is currently offline.
Detection is performed automatically by frequently sending UDP packets to the Thin Clients which are currently shown in the Remote Manager Console. You can refresh manually in the menu bar and you can set the request interval for the Online Check with the Remote Manager Administrator.
The Profiles subtree allows you to manage your profiles. You can create directories to store profiles and you can add, remove or modify the profiles in this part of the tree.
In the Remote Manager Tree you can use drag and drop as well as the keyboard shortcuts Ctrl +X and Ctrl+V to perform the following actions:
• Select a number of Thin Clients, drag and drop them on a Thin Client Directory (or equivalently select the Thin Clients press Ctrl+X, select a Thin Client Directory and press Ctrl+V) to move the Thin Clients to a different directory
• You can do the analogous with profiles.
• Select a directory drag and drop it on another (of the same type). So the first becomes a subdirectory of the second.
• Select a number of Thin Clients and Thin Client Directories drag and drop them on a
profile. This results that the profile is assigned to the selected Thin Clients and Thin Client directories
If you press the Del key the last selected item will be deleted.
The Views tree lists all defined views of Thin Clients. You can create new views, edit or delete existing views and export the view’s result as XML file. This tree can also have sub folders to organize your views.
The Jobs tree shows all defined jobs, you can create new scheduled jobs, edit or delete listed jobs. This tree as well can have sub folders to organize the jobs.
5.2 Main Menu Bar
The main menu bar contains these menu items:
• Connect
- Connect to ...: Allows you to establish a connection to an IGEL Remote Manager Server
- Refresh: Reconnects you to the previously used Server and refreshes all data.
- Disconnect: Disconnects you from the Server without closing the Console application.
- Scan for Thin Clients: Allows you to scan for Thin Clients in the network.
- Exit: Exit and close IGEL Remote Manger Console
• New
- Directory: Depending on the selection in the Remote Manager Tree, you can create a new directory for Thin Clients, profiles or views.
- Import Directories: Allows the import of a directory structure from a CSV file.
- Profile: Creates a new profile in the profile subtree. If no profile directory is currently selected, the new profile will be placed directly below the profiles node in the Remote Manager Tree.
- Import Profile: Import a profile from an external profile – XML file.
- Thin Client:Opens a dialog to create manually a Thin Client. You have to enter the MAC address and select a firmware version of the Thin Client. Then you can configure the Thin Client. If automatic detection of the Remote Manager is set up, the Thin Client with the entered MAC address fetches its configuration the next time it is started.
- Import Thin Clients: Provides the possibility to import multiple Thin Clients at once from a CSV list
- Scheduled Job: Creates a new job to be executed in the future.
- View: Creates a new view to display Thin Clients meeting the specified criteria.
• Thin Clients
- Reboot: Send reboot command to the selected Thin Clients.
- Shutdown: Send shutdown command to the selected Thin Clients.
- Update: Send an update command to the selected Thin Clients.
- Wake up: Send wakeup packets to the selected Thin Clients.
This does not work well in networks with multiple network segments, because the packet is a broadcast packet that is not routed in other subnets.
- Reset to Factory Defaults:The selected Thin Clients are reset to factory defaults and removed from the database (certificates will be deleted on database and Thin Clients).
embedded devices. The target server for the snapshot is defined the Thin Client’s settings.
- XPe Download Firmware Snapshot: Assigns the Windows XPe-Thin Client to download a firmware snapshot from the server defined in its settings.
- XPe Snapshots: Displays all snapshots stored on your server.
- Shadow:The desktop of the selected Thin Clients is shadowed via VNC
- Settings RM -> TC: Send all settings from the Remote Manager to selected Thin Clients. If the configuration has been changed, the values will be merged into the current settings of the Thin Clients into the database.
- Settings TC -> RM: Read settings from the selected Thin Clients into the Remote Manager database. This operation modifies Thin Client’s settings in the database; profiles are not affected.
- Store Certificate: Send the server certificate to the Thin Clients. This enables
authorization of the IGEL Remote Manager Server to those Thin Clients. Every subsequent access to the Thin Client will be validated against this certificate. This prevents other IGEL Remote Mangers from reading or altering the Thin Client configuration. After registration of the Thin Client, the certificate is automatically stored on it locally, so this command makes only sense if you have removed the certificate.
- Remove Certificate: Causes the selected Thin Clients to erase the server certificates. This allows any IGEL Remote Manager to take over control of your Thin Clients.
- Remove: This operation completely removes the selected Thin Clients from the database. If a Thin Client is offline, you get an error message at first, but you can remove it nevertheless by clicking on the Remove offline TCs button, but be aware that then it still tries to get settings from the Remote Manager at every reboot time and it keeps the certificate .
- Take over settings from ...: With this function you can copy the settings of a profile (with the same firmware) to the selected Thin Clients. You can choose, if you want to copy only active settings and if you want to add the sessions to the existing ones or delete the existing ones.
- Show Configuration: Shows the configuration page of the selected Thin Client or profile. Only one client or profile at a time may be configured. If you select multiple profiles or Thin Clients and choose this option, only the element last activated will be configured.
- Logging -> Event Messages: Allows the logging of Thin Client device actions within the Remote Manager TC server – such as update or reboot process.
• Scheduled Jobs
- Host Assingnment: Define the Remote Manager installation that controls the scheduled jobs.
- Manage Public Holidays:Define public holidays for use in the job schedule.
• Search
- Thin Clients: Allows to search for Thin Clients by data such as name, IP address, MAC address and other.
- Profiles: Allows to search for profiles by data such as name or firmware version.
- Views: Allows to search for views that have been defined before (see chapter Thin Client Views).
• Misc
- Default Directories: Configure rules to automatically move Thin Clients to certain directories when they get registered.
- Online Check:Configure if and how often it is checked, if the displayed Thin Clients are online
- Look and Feel: Change the look and feel of the application. There are several skins available that can be selected here. The default style is System.
- Remember Window Sizes: If activated the Remote Manager starts with last used window size.
- Firmware Statistics: Get an overview how many Thin Clients and profiles have the different firmware versions
- Remove Unused Firmwares: Remove firmware versions currently not used from the database (better performance!)
- Export/Import Firmware: Allows to exchange or backup firmware versions by export and import.
- Change Password: The currently logged in user can change his own password.
- Administrator Accounts: Create new RM Administrator users and groups.
- SQL Console: Query directly the Remote Manager database (if you are familiar with SQL). NOTE – doing so can damage the Remote Manager database!
- Logging -> Log Messages: Allows the logging of administrative actions within the Remote Manager GUI server – such as changes in a Thin Client's profile or creating a view of Thin Clients.
- Logging -> Event Messages: Allows the logging of Thin Client device actions within the Remote Manager TC server – such as update or reboot process.
Remove will query the local user, if the command should be executed immediately or during next boot. If the user does not answer the query within a certain time, the command will be carried out anyhow. The default delay is 20 seconds, but may be manipulated via the Client’s registry: userinterface.rmagent.enable_usermessage allows you to turn off the query and
userinterface.rmagent.message_timeout is responsible for.
5.3 Thin Client Content Panel
When you select a Thin Client in the IGEL Remote Manager Tree, the right side of the main screen displays the Thin Client Content Panel. This panel shows information about the selected Thin Client and allows you to modify the settings.
• MAC Address: This is the hardware address of the Thin Client.
All operations in the database use this string to refer to the Thin Client.
• Product: The product name of the Thin Client.
• Firmware: Current firmware version of the Thin Client.
• Last boot time: Date and time of the Thin Clients' last boot process.
• Name: You may enter an arbitrary string to identify the Thin Client. This string is then displayed in the IGEL Remote Manager Tree and should be self explanatory. When the Thin Client is registered in the database, the currently set name of the Thin Client will be used. (Further scanning will not overwrite this set name!)
• Last IP: The last known IP of the Thin Client.
This address is always updated if the Thin Client gets in contact with the IGEL Remote Manager Server again.
(You may manually edit this value, if for some reason the Thin Client has a different IP address since the last access and thus is not reachable for the IGEL Remote Manager.)
The other strings (Site, Department,Comment,Asset ID,In Service DateandSerial Number) can be freely chosen to ease identification of your clients.
On the right side of the Thin Client Content Panel the Assigned Profiles and Indirect Assigned Profiles are listed. You can assign new profiles or remove profile assignments to the Thin Client by using the Add respectively the Remove button below the list of Assigned Profiles.
The list of Indirect Assigned Profiles is for information only. This list shows profiles that are assigned to directories that contain the specific Thin Client in the IGEL Remote Manager Tree. If the Thin Client resides in a subdirectory, all the profiles assigned to this subdirectory and the profiles assigned to the parent directory will be listed.
Change the profile assignments of the parent directory or move the Thin Client into another location in order to change the indirect assigned profiles.
Double clicking on an entry in the profile list has selects this profile in the Remote Manager Tree. If you point on an entry, a tool tip appears which shows the complete path where the profile is stored and the internal id of the profile.
The profiles are sorted according to there precedence, that means a profile prior in the list overrides settings of subsequent profiles. The precedence of a direct assigned profile is always higher than a indirect assigned profile (see 9.5 Assigning Profiles for details).
On the bottom of the panel is the Edit Configuration button. This button leads you to the Thin Client configuration that will pop up in a separate window. This window allows you to configure the Thin Client settings (see 6.1 Modifying Thin Client Configuration).
Figure 13 Thin Client Directory Content Panel
The panel contains the tabs Content and Assigned Profiles. Using these tabs you can toggle between the content and the profile view of the directory.
The Content view shows all objects located directly below the directory in the IGEL Remote Manager Tree. Objects can either be Thin Clients or directories.
You can choose the columns to be displayed by clicking on the ellipsis in the upper right corner. Double clicking an object will make this the active object in the IGEL Remote Manager Tree
and the content panel will change according to the selection.
You can also right click an object to make the corresponding context menu appear. If you activate the Assigned Profiles, the profiles dedicated to this directory will be listed. Once you activated the profile view, all the directories will show the profile unless you toggle the view back to the context view. Use the Add and Remove button to alter the profile assignments. Double clicking on the profile has the effect, that this profile is selected in the Remote Manager Tree.
Note: Modifying the assignment affects the whole subtree below the current directory!
5.5 Profile Content Panel
Select a profile from the Profiles subtree in the IGEL Remote Manager Tree to display the
Profile Content Panel.
This panel allows you to change the profile assignments from the profile view. Here, you add or remove Thin Clients or directories to the list of Assigned Objects. This operation has the same effect as if you assign the profile to the object directly.
If you double click on an assigned object to it becomes selected in the Remote Manager Tree. The string below Optimized for indicates the original firmware version for the profile.
If you have different Thin Client models in your environment or your Thin Clients have different firmware versions, they might have different features.
For example, if you created a profile based on Winestra, a browser session cannot be
configured. The configuration page of the profile will only provide configuration options that the firmware version offers. Anyway, you can assign the profile to every Thin Client regardless its firmware version.
If you want to change the firmware version on which the profile is based, click on the Change
button. Then you can select from the firmware versions which are available in the database. Note that settings of parameters which are not present in the new firmware version are lost. Below the firmware version is the button Edit Configuration. Pressing this button brings up the configuration page of the profile.
Refer to section 9.4 Edit Profile Settings for more information about modifying profile configurations.
5.6 Profile Directory Content Panel
Directories in the Profiles subtree of the IGEL Remote Manager Tree are used only for structural reasons. They have the same function as folders on a hard disk. You can have an arbitrary number and levels of directories.
Figure 15 Profile Directory Content Panel
If you activate such a directory in the IGELRemote Manager Tree, the Profile Directory Content Panel will appear in the content panel. The string in the upper left shows the name of the current directory name.
Below the name is the content list of the selected directory. This list contains directories and profiles that are located directly below the directory in the IGEL Remote Manager Tree. If you double click an object, it will become the active object. The content page will change according to the object type. Right clicking an object will give you access to the object’s context menu.
On the right side of the content panel are several buttons. The buttons provide the following functions:
• New Profile: The new profile page will pop up. This operation creates a new profile in the selected directory. Please refer to section 9.2 for detailed information about creating profiles.
• Delete Profile: This option will only be available, if you have previously selected one or more profiles from the list. When deleting the profile, all profile assignments will be deleted as well.
5.7 Context Menus
The IGEL Remote Manager Console provides context menus for directories, profiles and Thin Clients (reachable by right mouse click).
The context menu for directories contains these entries:
Figure 16 Context menu of a directory
• Move Thin Clients here: You can move Thin Clients into the current directory by using this item and selecting a single or a set of Thin Clients afterwards. Depending on what is selected, it may also be Move profiles here or Move objects here.
• Rename: Modify the name of the current directory.
• New Sub Directory: Create a new directory inside of the currently selected directory.
• Delete: Delete the marked directory.
Note: When deleting a directory, the Thin Clients inside the directory will be moved to the
Thin Clients node. This automatically means that the Thin Client will lose all settings of profiles that are associated with the deleted directory and possible mother directories! Profiles will be moved to the Profiles node, but unchanged.
Objects will be treated intuitively as Thin Clients or profiles. The context menu of profiles offers these options:
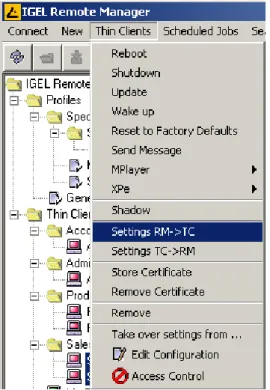
Figure 18 Thin Client context menu
The context menu of Thin Clients has the same items as the Thin Clients menu of the main menu bar. The difference is that only a single Thin Client can be affected by an operation.
5.8 Search Menus
Menu points Search Thin Clients, Search Profiles and Search Views provide search and filter functionality.
Regular expressions can be used in the text search (see http://www.regular-expressions.info for more information about regular expressions)
The data panel gives the ability to search for a singe date, a date range or all elements that are below or above a specified date (use the date range fields with only one date specified to perform this search).
Figure 20 Search Menu
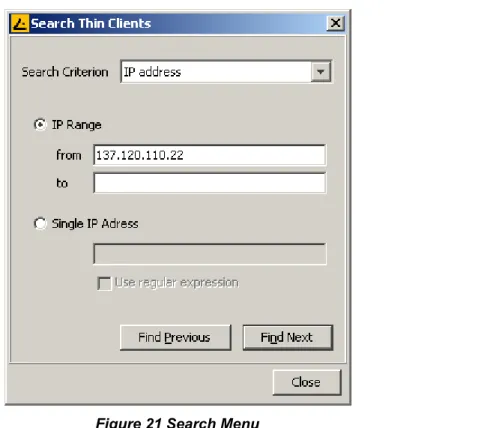
The IP address panel provides the same possibilities as the date panel: single IP search and IP range search (with closed or open range).
Regular expressions can be used in the IP address search (see
Figure 21 Search Menu
The firmware version panel allows a search for a single firmware version or all versions above or below a specified firmware version.
Figure 22 Search Menu
Note: Since the search dialog is not blocking input to the main panel actions in the management tree can bee performed while the search dialog stays open!
From left to right they perform the following operations:
• Refresh: Reloads the view and updates the Thin Client online status.
• New Sub Directory: Create a new directory inside of the currently selected directory.
• Move Objects here: Move Thin Clients or profiles into this directory by selecting Thin Clients after clicking this icon.
• New Profile: Creates a new profile in the profile subtree. If no profile directory is currently selected, the new profile is situated directly below the Profiles node in the
Remote Manager Tree.
• Delete: Deletes the selected object in the Remote Manger Tree.
• Export Profile: Exports existing profiles to a text file.
• Edit Configuration: Takes you to the profile’s or the Thin Client’s configuration page.
• Access Control: Loads the user permission dialog.
• Back: Return to the last shown dialog.
6 Managing Thin Clients
6.1 Modifying Thin Client Configuration
In order to modify the configuration of a Thin Client, select the desired Thin Client in the
Remote Manager Tree and click the shortcut symbol or choose Edit configuration from the main menu item Thin Clients. You can also click on the Thin Client with the right mouse button and choose Edit configuration from the context menu.
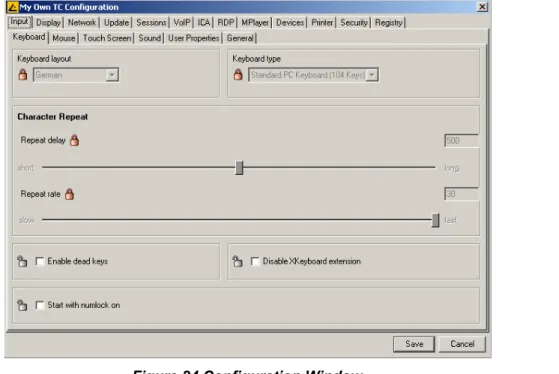
Figure 24 Configuration Window
The configuration page of the Thin Client will pop up enabling you to modify the entries. Please refer to the Thin Client’s manual for detailed information about the configuration pages. Each parameter in a configuration page contains either an open or closed lock. The open lock
means that the parameter can be modified here. A closed lock indicates that this
parameter is defined in a profile assigned to the Thin Client itself or a directory that contains the Thin Client. If you point on the lock, you get a tool tip, from which profile the value originates.
Note: Each parameter has two types of values, the values defined by the Thin Client and the values defined by the profiles. They exist in parallel and the rule is that the profile settings always have precedence. If you assign a profile with a value for a parameter and remove the assignment, the value of the parameter changes back to its previous state. The profile value does not get copied into the Thin Client settings!
After you have changed the configuration and pressed the Save button, you get asked whether the settings take should take effect after next boot of the Thin Clients or now. In both cases at first the settings are stored in the database. If you choose Next Reboot nothing else is done, because at every boot the Thin Client fetches its settings automatically. If you choose Now the new settings are transferred to the Thin Client immediately. If the Thin Client is currently offline, this operation fails and the Thin Client gets its setting as recently as it boots again.
Figure 25 Update data popup
Note:If you have chosen Now,the user in front of the Thin Client is asked, if the new settings should apply immediately. As in the case with commands sent to the Thin Client (see 5.2 Main Menu Bar), you can change this behavior by means of the registry parameters
userinterface.rmagent.enable_usermessage and
userinterface.rmagent.message_timeout.
6.2 Send Configuration
Configuration changes are done in the database and transferred regularly to the Thin Client on system boot. If you want to update the configuration of the Thin Client instantly, you need to initiate the data transfer manually. This can be achieved by selecting a Thin Client, a directory or a group of Thin Clients and choosing Settings RM -> TC from the Thin Client menu. Keep the Ctrl key pressed if you want to select multiple items. Use the Shift key if you want to select a range of Thin Clients.
Figure 27 Settings RM -> TC popup
After choosing the command, the above list of selected Thin Clients will appear.
You can now cancel the operation or click on Settings RM -> TC. The local settings of the Thin Client will then be updated to the settings from the database. Again, on the Thin Client, a message will pop up which informs the user about the new configuration and asks, if the new configuration should take immediate effect or not. You can change this behavior as described above.
6.3 Retrieve Configuration
When changing the configuration locally by using the Thin Clients built-in setup utility, the configuration changes are usually transferred to the IGEL Remote Managers database. In case of network failures or if the IGEL Remote Manager server was down, the configuration changes might not be stored successfully. For such cases, perform the read out of the local settings from the Thin Clients manually here.
Select the Thin Clients that you want to access and choose Settings TC -> RM from the
Thin Clients menu. Click Settings TC -> RMin the popup window that shows the selected Thin Clients. Now the local settings will be gathered and the database will be updated accordingly.
Note: This operation is an exception and rarely required.
6.4 Thin Client Codecs
This functionality only affects Thin Client models with Mplayer software installed. By default there is just a basic package of codecs delivered as a component of the Thin Clients firmware. Additional codecs can either be installed locally by the Thin Client’s user or remotely by the RM Administrator. The codec source file can be configured in a profile or directly for Thin Client. To advise a Thin Client to download additional Mplayer codecs select menu point Download Codecs from the Thin Client menu. Note that a Thin Client must be online to receive this command ( eventually first wake them up). Now the selected Thin Clients will reboot and start with the download and installation process.
Use menu point Thin Clients Remove Codecs to remove the additional codecs. Codecs integrated in the Thin Clients firmware are not affected by this command.
6.5 Registering from the Thin Client
Besides the way described in section 4.2 Scanning for Thin Clients there is another way to register a Thin Client at the IGEL Remote Manager. In order to use this second method you have to be in front of the Thin Client you want to register. If the application Register Client at RM is not already present in the Application Launcher, selectRegister Client at RMon the
Config tab of theApplication Launcher, select Register Client at RM, click on Edit and check
Enable in Application Launcher. Now start the Register Client at RM application from the
Figure 28 Register Client at RM
Enter the Remote Manager Server and the server port (default 30001). Optionally choose a directory of the Remote Manager Tree where the Thin Client is put. Finally enter the password (initially it is the same as the Remote Manager user password, but you can specify a different one with the Remote Manager Admin tool.) and click on OK.
6.6 Thin Client Mass – Import
Apart from the functionality described in section 4.2 and 6.2 there is another procedure for RM Administrators to create Thin Client instances, without even having connected any of them. You can create new Thin Clients by importing CSV (Comma Separated Values) files containing all necessary data, in particular MAC-address, the Thin Client’s name, and firmware information. These files could be built by any external tool, like spreadsheet editors or simple text editors, that enable you to save tabular data with an “;” as delimiter.
Short Format:
In short format import files, each column is composed of
• MAC-address
• Thin Client name
• Firmware – ID
Administrators can get this firmware id from the information the Firmware Statistics dialog provides.
Long Format:
In long format import files there can by provided a target directory where the Thin Client instances are created and some additional Thin Client data as well.
Each column is composed of
• target directory
• MAC-address
• Product
• firmware
• Thin Client name
• site • department • comment • assetid • inservice date • serial number
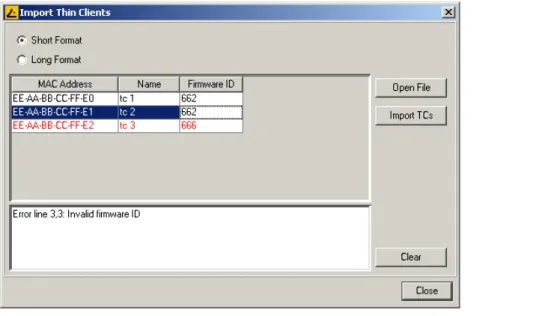
Select menu point New Import Thin Clients from the Remote Manager menu and the Thin Client Import dialog will appear:
Figure 29 Thin Client Import Dialog (Short Format)
You can choose the short column - format for your CSV file or the long, more verbose format containing additional data. In the example above a short format CSV file has already been opened (Open File – button). Its content would have looked like this:
EE-AA-BB-CC-FF-E0;tc 1;662 EE-AA-BB-CC-FF-E1;tc 2;662 EE-AA-BB-CC-FF-E2;tc 3;666
If there is any invalid data like a non existing firmware id (see Figure 29), or an error appeared during the import process, an appropriate message is displayed in the message screen in the lower part of the dialog and the line of the affected Thin Client is marked red.
Button Clear removes all messages from the screen.
Button Import TCs starts the import process. Successfully imported Thin Clients are marked green.
When Long Format is selected the Thin Client Import will appear like this:
Figure 30 Thin Client Import Dialog (Long Format)
The import dialog also provides some basic editor functionality to do some final changes:
• use Ctrl-C to copy a marked line
• use Shift – Insert to insert a line marked for copying
• use Delete to remove a marked line
Remote Manager database (see 5.2 Main Menu Bar), otherwise the Thin Client cannot connect to the server in this case.
6.8 Shadowing
With the IGEL Remote Manager Console you can shadow the desktop of a Thin Client on your local PC using VNC. In order to enable shadowing choose the Security – Shadow tab of the configuration dialog.
Figure 31 Configure shadowing
Now select the Thin Client in the Remote Manager tree and select Thin Client – Shadow from the main menu. A connection dialog appears where you have to enter the password if you have defined one.
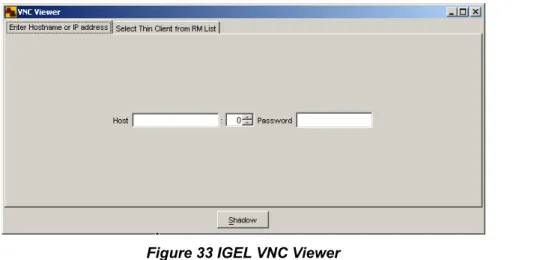
Furthermore we provide the application IGEL VNC Viewer for the purpose of shadowing. Use this application if you do not have the right to use the Remote Manager Console or if you want to shadow a device which is not present in the Remote Manager database.
Figure 33 IGEL VNC Viewer
You can specify manually a hostname or IP address on the first tab. On the second tab you can select a Thin Client from the Remote Manager tree. If you want to use this second feature you must have a user account to connect to the Remote Manager server.
When the VNC session is established, the remote desktop appears in the following window:
Figure 34 Remote Desktop
o Send Ctrl-Alt-Del: Sends the Ctrl-Alt-Del key combination to the currently shown remote host.
o Refresh: Updates the content of the window.
o Screenshot: Writes a screenshot of the window content to the local disk.
o Options: Opens an dialog where you can specify some options (see below).
o Close: Closes the currently selected tab.
• Help
o About: Shows the software version of the IGEL VNC Viewer.
Figure 35 Overview Window
In the options dialog (see Figure 36 Options dialog) you can specify the following options:
• Preferred Encoding: The encoding used for image data send from the Thin Client to your PC. The Tight encoding is especially useful on a network with low bandwidth. It has two additional parameters, the Compression Level (the higher the compression level the higher is the computing time!) and the JPEG Quality (if you choose Off, no JPEG data is sent).
• Use “Draw Rectangle” mode: This option increases performance (but you may see artifacts).
• Color Depth: 8 or 24 bits per pixel
• Refresh Period: The VNC Viewer requests an update from the remote host after this period has been elapsed since the last update. A longer time period reduces network traffic but the update is less smooth. Note that if you move the mouse or type a key inside the VNC Viewer (and so this event is sent to the remote host), an update request is sent immediately.
• Save properties as defaults: Saves the current settings as defaults for future VNC sessions.
Figure 36 Options Dialog
7 Grouping Thin Clients
7.1 Creating new Directories
IGEL Remote Manager allows you to set up groups of Thin Clients. Using this feature enables you to link profiles to any group member without changing the individual configurations. It is also useful to separate Thin Clients from each other and visualize their organizational structure. Grouping of Thin Clients is done by creating directories and moving Thin Clients that belong to the same group into the same directory. You may create as many directories and subdirectories as needed. If you create subdirectories, the profiles assigned to the top directories will also affect the subdirectories. This means that you can even group groups of Thin Clients. In order to create a directory or a subdirectory, select either the subtree Thin Clients or any directory in this subtree. Now click New -> Directory in the main menu bar, use the shortcut for new directory or choose New Sub Directory from the context menu of the selected directory.
Figure 37 New directory popup
Now enter the name for the new directory and click OK. The new directory will appear directly below the selected directory or below Thin Clients. You can now move Thin Clients into this new directory.
In the first column you have to specify one of the predefined root directories: Profiles, Thin clients, Views and Jobs.
To create the directory structure, click on Import Directories. Then the result of the import is shown in the following dialog:
The underlined part of the each path indicates the subdirectories, which have been created new because of the appropriate line in the CVS list.
The CSV list from the example above will create the following directory structure:
7.3 Moving Thin Clients
The simplest way to move Thin Clients from one directory to another is to use drag and drop on the Remote Manager Tree. Keep the Ctrl key pressed if you want to select multiple clients. Use the Shift key if you want to select a range of Thin Clients.
If your tree as a lot of entries, the second provided method may be more comfortable. Choose the option Move Thin Clients here from the context menu of the directory, or click on the Move Objects here shortcut. You will get a selection window that allows you to choose which Thin Clients shall be moved to the currently selected directory. After pressing OK the selected Thin Clients will be moved to their new location.
Figure 38 Selection window
Note: This operation does not send anything to the Thin Clients. The Thin Client does not get information about profiles that might be already assigned to the directory. The Thin Clients will get the new profile assignments on next boot or if the new settings are sent manually.
7.4 Default Directory Rules
You may define default directory rules so that Thin Clients are moved automatically to certain directories (according to those rules), when they are registered. If you have assigned profiles to those directories, the Thin Clients get their appropriate settings then, so the only thing you have to do, is to register the Thin Clients.
To define such rules, select Default Directories from the Misc menu. The following dialog appears:
Figure 40 Rule dialog
First you have to choose the directory where the Thin Clients are to be put, if they comply with this rule.
Then you may check the option Overrides existing directory membership. If you check this option, a Thin Client that has been registered already and is now registered again, is moved to the target directory of the rule, although it resides already in another directory.
Next you have to define the conditions which must be fulfilled, so that this rule is applied. The conditions are defined in the next tree steps of the wizard dialog.
Figure 42 Define constraint value
In this step the constraint value for the criterion is specified. The input panels differ depending on the selected criterion (see chapter Search Menu for more details on the different input panels). Press Next to proceed.
Figure 43 Create default directory
Here you see a summery of the defined default directory.
Use Narrow search criterion or Create additional search criterions to specify further criterions for the current directory. If you do so, the wizard will proceed with the Select criterion page.
By pressing Finish the new default directory rule is created and listed in the default directory dialog.
Figure 44 Rule dialog
Here you are able to change the directory (in the tree on the left side of the dialog) where the Thin Clients are to be put, if they comply with this rule.
You may also change the option Overrides existing directory membership.
Next you can change the conditions which must be fulfilled, so that this rule is applied. The conditions are shown in the table on right side of the dialog. In the first row you see the criterions. The criterion refers to the column below. In this column you see the constraints of the chosen criterion, e.g. the IP address is greater as 192.168.0.0.
A Thin Client fulfills a rule, if all constraints in the first row are met or all constraints in the second row are met or all constraints in the second row are met or all in the third row are met … Consider the following example:
Figure 45 Rule example
7.4.3 Default directory with netmask criterium Purpose
Whenever a TC is registered with the IGEL Remotemanager, it is moved to a folder, defined by the netmask criterium. If the resulting folder does not exist, it will be created.
Since this rule will always match, it does not make sense, to define any further rule. Here are some examples:
IP-Adress
Netmask
Resulting Folder
130.094.122.195
255.255.255.224
130.094.122.192
172.16.232.15
255.255.0.0
172.16.0.0
192.168.1.1
255.255.255.0
192.168.1.0
The resulting folder could be calculated by the following operation
folder = ip-adress AND netmask 7.4.4 Apply Rule on Boot
Any default directory rule could be applied, when a TC is fetching its settings during its boot process.
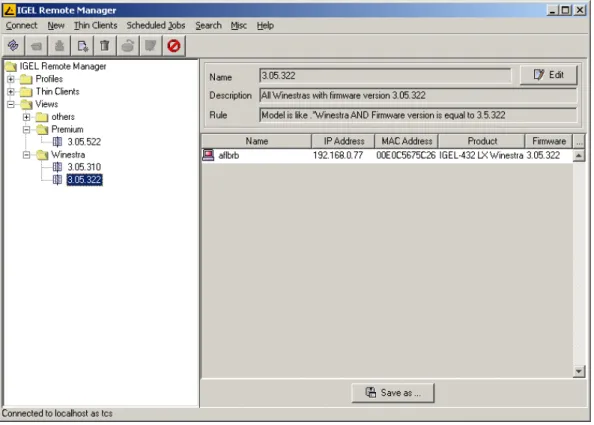
Figure 46 The View Panel
To illustrate this definition we show how to create a new view. Select New -> View from the menu. Then the following dialog appears:
You have to choose the criterion type form the Criterion dropdown box. The following criterion types are available:
- IP address - Name - Product name - Firmware version - Online - Directory - Asset ID - Comment - Department - In service date - Mac address - Serial number - Site
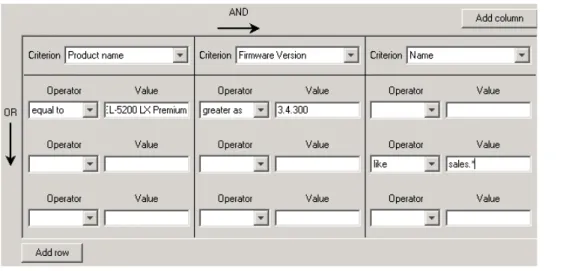
In the example shown in the figure above there are to criterions, Product Name and Firmware Version. If you need more than two criterions to define your rule you can click on the Add Column button. Then an additional criterion column is added to the panel.
Now you may define the constraints. The constraints refer to the criterion on top of the column. Each constraint consists of an operator and a value. The list of available operators depends on the chosen criterion type. Most criterions provide the following operators:
- Like
- Greater than
- Less than
- Equal to
If you choose the like operator the value must be a regular expression. A Thin Client fulfills this constraint if its appropriate property matches this regular expression (in the example shown in Figure 47 all Thin Clients which product name ends with Winestra match the regular
expression .*Winestra (‘.’ means any character and ‘*’ means the repetition). Some simple examples for regular expressions:
- .*abc - string ends with abc - abc.* - string begins with abc - .*abc.* - string contains abc
A special type is the Directory criterion. It has the two operators in and beneath and needs as value the id of a directory (if you point on a directory you will get a tool tip including its id). The
in operator means the Thin Client must reside directly in the specified directory, the beneath
operator means the Thin Client must reside in the directory or one of its sub directories. If the specified value does not fit to the criterion type (e.g. it is no IP address) or the operator (e.g. it is no regular expression) this value is tagged with a red symbol:
Figure 48 Illegal value
A Thin Client fulfills a rule if all constraints in the first row are met or all constraints in the second row are met or all constraints in the third row are met …
Figure 49 XML export of a view
Note: A view does not make any changes to the Thin Client settings or to the directory structure of the Remote Manager tree – it only provides a special sight onto the Thin Client devices registered at the Remote Manager.
9 Profiles
9.1 Organizing Profiles
The profiles reside under the Profiles node in the Remote Manager Tree. You can create a hierarchy of subdirectories to organize your profiles.
If you select the Profiles node or a subdirectory of it in the Remote Manager Tree, the Profile Directory Panelis shown on the right side (see Figure 50).
• Select the Profiles nodeor a sub directory of it in the Remote Manager Tree and press the New Sub Directoryof the toolbar(see Figure 50).
• Right click the Profiles node or a subdirectory of it in the Remote Manager Treeand choose New Sub Directory
You can rename the directory by right clicking it and selecting Rename. Moving profiles from one directory to another can be done by
• Drag and drop in the Remote Manager Tree,
• With the hotkey combinations Ctrl X, Ctrl V (cut & paste) in the Remote Manager Tree • Right clicking a profile directory and choosing Move Profiles here
• Pressing the Move Objects herebutton on the tool bar
In the latter two cases a dialog pops up (see Figure below) where you select the profiles you want to move.
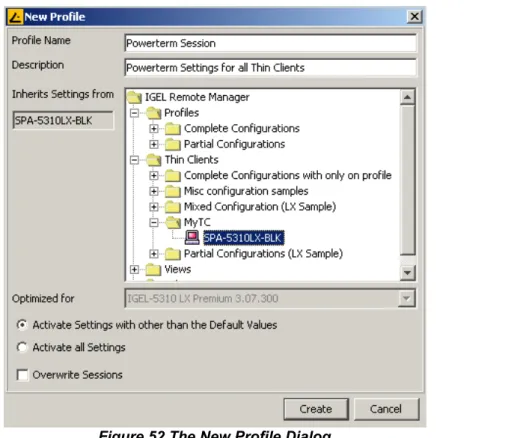
Figure 52 The New Profile Dialog
The first thing to do here is to enter a name for the profile, so that you can identify it. Next you have to choose, if the new profile should inherit settings from an existing profile or a Thin Client. If you want to have an “empty profile” which should not inherit any settings, do not select an object from the tree. In this case you must select a firmware version for this profile (this means, that that this profile has the same set of configurable parameters and sessions as a Thin Client with this firmware version, nevertheless you can assign any profile to any Thin Client). Now choose one option provided by the radio buttons. The first option means here, that initially no setting is active and you have to activate the desired settings when editing the configuration of the profile. The second option means, that initially all settings are active. This option makes only sense, if you want that all settings of a Thin Client are controlled by this profile.
The second possibility is, that you want, that the profile inherits settings. In this case the profile inherits the firmware version too. Inheritance of settings means, that the settings of the profile have the same values as the setting from the object it inherits the settings. In this case you can choose, if settings whose values differ from the default value (every parameter has a default value, e.g. Reset to Factory Defaults sets parameters to its default value) should be activated or if all settings should be activated. Usually you will choose the first option (for instance you have configured a ICA session on a Thin Client and you want to have this session in the profile too).
If you want the profiles' sessions to overwrite Thin Clients' sessions, you have to activate the
Overwrite Sessions button. If the checkbox is empty, sessions defined within the profile will be added to the sessions defined for the Thin Client before.
In order to finish, click on Create and the new profile is completed.
Note: If no Thin Client is registered, profiles cannot be created as information about the settings to be assigned to the profile is required. You can only create profiles with a firmware version which is registered in the Remote Manager database yet.
9.3 Renaming Profiles
If you want to rename a profile, just right click on it in the Remote Manager Tree or in the
Profile Directory Panel and select Renameand enter the desired name.
9.4 Edit Profile Settings
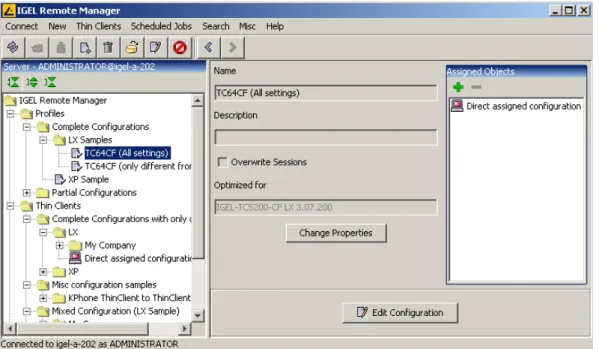
If you select a profile node in the Remote Manager Tree, the Profile Panel is shown on the right side of the screen.
Figure 53 The Profile Panel
On this panel you can add or remove object from the list of Assigned Objects by clicking on the Add or Remove button respectively.
The next feature is to change the firmware version of the profile. For example if you have updated your Thin Clients you may want to update your profile too. Just click on Change button and select a new firmware. Note that settings which are not supported in the new firmware are lost.
In order to edit the settings of the profile
• Right click on a profile in the Remote Manager Tree or in the Profile Directory Panel
and select Edit Configuration
• Select a profile in the Remote Manager Tree and press the Edit Configurationbutton in the toolbar or in Profilepanel on the right side
Now the Profile Configuration Dialogis displayed (see Figure 54). This dialog mimics the dialog where you can edit the configuration of a Thin Client. The main difference is that there is
Figure 54 The Profile Configuration Dialog
When finished, click on the Savebutton. You will be asked when the new settings should take effect. Choose between Next RebootandNow.
In both cases, the new settings are stored in the database.
• With Next Reboot, the Thin Clients to which the profile is assigned will apply the new settings at their next reboot.
• With Now, the settings are sent immediately to all Thin Clients affected by the profile. If they are currently not powered on, the settings will be applied at their next reboot.
Note: This feature is not available for Windows CE devices. You always have to apply the settings while they are running.
9.5 Assigning Profiles
After creating a profile and adjusting its settings, you now can assign it to some Thin Clients. (You can assign an arbitrary number of profiles to each Thin Client.)
Basically there are two modes to do this, direct or indirect. Indirect means, that you do not assign the profile to a single Thin Client but to a Thin Client directory.
If you assign a profile to a directory, it is indirectly assigned to every Thin Client in this directory (including its subdirectories).
If you move a Thin Client into this directory afterwards, this Thin Client is also affected by the directory profile. If you move a Thin Client out of this directory, the profile no longer affects it.
There are several possibilities to assign a profile or a Thin Client to a Thin Client directory:
• Select the profile you want to assign and click the green button Addon the Profile
panel (see Figure 53). The following dialog is shown:
Figure 55 The Profile Receiver Selection Dialog
Now select the Thin Clients and Thin Client directories to assign the profile to.
• Select Thin Clients and Thin Clients Directories in the Remote Manager Tree and either drag & drop the selection on a profile or use Ctrl X and Ctrl V to cut & paste them.
• Select a Thin Client in the Remote Manager Tree and click the Add button on the Thin Client Panel(see Figure 56). Within the upcoming Profile Selection Dialog, select the profile to assign and press Ok.
Figure 56 The Thin Client Panel
• Select a Thin Client directory in the Remote Manager Tree and click on the Assigned Profilestab in the Thin Client Directory Panel(see Figure 57).
Press the Addbutton. Again the Profile Selection Dialog is shown (see Figure 51).
Figure 57 The Assigned Profiles Tab of the Thin Client Directory Panel
After you have assigned a profile (directly or indirectly) to a Thin Client, check the results: Select the Thin Client and choose Edit Configuration(from the Thin Client Panel, from the tool bar, from the Thin Clientmenu or the context menu of the Remote Manager Tree).
Clicking on the Sessions tab of the Thin Client Configuration Dialog (see Figure 59) shows the sessions assigned to the Thin Client by profiles. These sessions are also locked. You cannot remove these sessions or edit settings in this dialog.
You may only edit these locked settings in the configuration of the overwriting profile itself. (Remember that this will affect all Thin Clients to which the profile has been assigned!)
Figure 59 The Sessions tab of the configuration dialog
9.6 Precedence of Profiles
If you have assigned more than one profile to a Thin Client and you have activated a certain setting in all these profiles you might want to know, which profile provides the effective value for this setting or in other words, which profile overrides the others.
First of all, in general you should avoid this situation by defining disjoint sets of active parameters for the different profiles.
If you cannot avoid this situation, there is the following figurative rule:
”The nearer by the object, to which the profile is assigned, is to the Thin Client, the higher is its precedence”.
In exact words the rule is the following:
A profile assigned to a subdirectory overrides settings of a profile which is assigned to the parent directory. A profile which is assigned directly overrides the settings of a indirectly assigned profile.If more than one profile is assigned to a single directory or is assigned directly respectively the newer profile (with a higher profile id) overrides the settings.
You get a tool tip with a the profile id if you point on a profile in the list of assigned profiles. To clarify this rule have a look at Figure 60.
9.7 Removing Profiles from Thin Client
You can remove assigned profiles from a Thin Client or a Thin Client directory:
• In the Profile panel select a Thin Client or a Thin Client directoryand click on Remove • On the Assigned Profiles tab on the Thin Client Directory Panel(see Figure 57) or on the Thin Client Panel: Select an assigned profile from the list and press the red
Remove button.
Now the single Thin Client or the Thin Clients under the Thin Client directory respectively are no longer affected by this profile. The value of the settings which had been overwritten is set back to the value before the profile had been assigned.
9.8 Deleting Profiles
When you wish to remove a profile, it can be removed in one of the following options:
• Select the profile in the Remote Manager Tree and press the Deletebutton on tool bar or the Del key
• Right click on the profile and select Delete
• Select the profile in the Profile Directory Panel and press the Delete Profilebutton If you delete a profile it is removed from every Thin Client or Thin Client directoryit had been assigned to and the values of the affected settings are set back to their previous state. Furthermore all settings of the profile are erased from the database.
9.9 Examples on how to use Profiles
For both examples, we assume that the Thin Clients are already registered in the IGEL Remote Manager database.