A
VOCENT
® HMX M
ANAGER
VERSION
6.X
Avocent® HMX Manager
Version 6.X
Installer/User Guide
Emerson, Emerson Network Power and the Emerson Network Power logo are trademarks or service marks of Emerson Electric Co. Avocent, the Avocent logo and DSView are trademarks or service marks of Avocent Corporation or its affiliates in the U.S. and other countries. All other marks are the property of their respective owners. This document may contain confidential and/or proprietary information of Avocent Corporation, and its receipt or possession does not convey any right to reproduce, disclose its contents, or to manufacture or sell anything that it may describe. Reproduction, disclosure, or use without specific authorization from Avocent Corporation is strictly prohibited. ©2013 Avocent Corporation. All rights reserved.
NOTE:This document supports versions up to and including release 6.X.
T A B L E O F C O N T E N T S
Product Overview
1
Introduction
1
Features and benefits
1
System Components
2
Upgrading the HMX Manager
2
Safety precautions
3
Installation and Setup
5
Installing the Appliance
5
Rack mounting the HMX Manager appliance 5
Connecting the HMX Manager appliance 5
Configuring Network Settings 6
Launching the HMX Manager Appliance Web Interface
7
The HMX Manager Explorer window 7
Configuring HMX Manager Servers
9
Server properties 9
Server certificates 9
Email 11
Unit status polling 12
Backing up and Restoring Hub Servers Manually
12
Spoke Servers
12
Replication
15
Initial load 16
Incremental updates 16
Modify Push and Pull task periods of time 18
Fast Switch Enable
18
Next Steps
18
Units View Windows
21
Types of Units View Windows
21
Showing and Hiding Units
22
Units View Windows Fields
22
Multiple Unit Operations from a Units View Window
23
Unit Overview Windows
24
Unit Status Window
24
Managing Units
27
Using the Units Tab in the Explorer Window
27
Deleting units 27
Ease of Installation
27
The Units All Window
27
Adding units via the Add Unit Wizard 28
Adding units from a range of IP addresses 29
Adding units on an IP subnet 30
The Unit Overview Window
30
Changing unit properties 31
Configuring network settings for a transmitter or user station 31
Enabling Auto Login Mode for a user station 32
Viewing version information 32
Rebooting a unit 33
Setting the Operating Mode for a user station 33
Share Mode 33
Managing firmware upgrades 34
Viewing/changing target computer overview information 34
Managing user access to target computers 34
Changing target computer properties 35
Departments and Locations Windows
35
Importing HMX Manager databases 37
Active media sessions 38
All active media sessions 38
Performing a forced log-out 38
Unit Sessions and Connections
41
Force and Follow Modes
41
Regular Follow Mode 41
View Only Mode 42
Multi-video Follow Mode 42
Force Mode 43
Active Sessions
43
All active sessions 43
Active sessions on a target device 44
Grouping Units
47
Site, Department and Location Groups
47
Custom Fields
49
Unit Groups
50
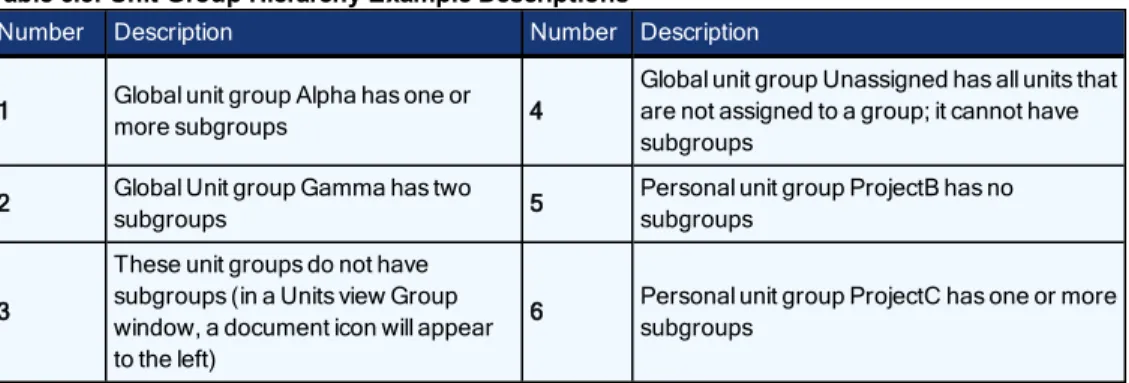
Unit group hierarchy 51
Changing the unit group properties 53
Authentication Services
57
Supported Authentication Services
57
HMX Manager internal authentication service 58
Active Directory external authentication service 59
Windows NT external authentication service 64
LDAP external authentication service 66
RADIUS external authentication service 70
TACACS+ external authentication service 71
RSA SecurID external authentication service
74
User Authentication Services Window
76
Managing User Accounts
79
User Accounts Windows
79
Adding User Accounts
80
Deleting User Accounts
82
Unlocking User Accounts
82
Resetting a User Account Password
83
Changing User Account Properties
83
Username 83
User password 84
User account restrictions and expiration settings 84
User group membership 85
Address 85
Phone contact 85
Email contact 86
User notes 86
Custom field properties 86
User Access Rights
86
User Groups
89
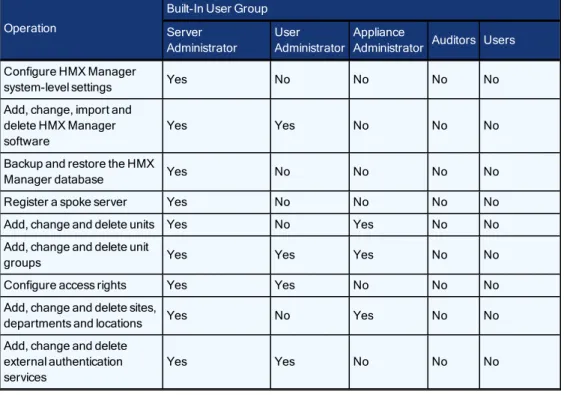
Built-in User Groups
90
Adding User-defined User Groups
91
Deleting User-defined User Groups
93
User Group Properties
93
Changing User Group Members
93
User Group Access Rights
94
Events and Event Logs
97
Email Notifications
97
Changing the Event Log Retention Period
99
Appendix A: Technical Support
101
Appendix B: Technical Specifications
102
Product Overview
1
1
Introduction
The Avocent®HMX Manager is a secure, web browser-based, centralized enterprise management solution that
allows users to remotely manage and monitor multiple HMX extender systems. The HMX extender system, which includes a transmitter and a user station, provides users with a full computer desktop experience from anywhere on the corporate TCP/IP network, while maintaining the computers securely housed in a corporate data center. The addition of the HMX Manager appliance allows the user stations and transmitters that comprise the HMX system to operate in Desktop Mode. This mode allows a user to log in to any HMX user station and the system will connect automatically to the transmitter that has been assigned to that user. Through Desktop Mode, the HMX Manager appliance allows administrators to remotely manage and monitor the networks of user stations and transmitters that comprise the HMX system.
NOTE:There are several types of HMX user stations and transmitters, but not all of them can communicate across platforms. For example, the HMX 1050 user station can only communicate with its corresponding HMIQDI transmitter. However, the HMX 1070 and 2050 user stations and their corresponding transmitters can communicate across both platforms. For more information on HMX user stations and transmitters, see the HMX System Installer/User Guide.
Features and benefits
Web-based access and control
As a web browser-based management solution, the HMX Manager appliance provides the operations, administration and maintenance interface for the HMX system. It also manages authentication, authorization, initiation and removal of media sessions between the user station and transmitter. The HMX Manager appliance provides a centralized database for storing configuration, user, unit and system information, allowing administrators to add, remove, delete and change settings for managed appliances and users. In addition, the HMX Manager enables authentication, access control, logging events and monitoring of target computers.
Security
Secure Socket Layer (SSL) encryption is used to encrypt HMX Manager system data. Users are authenticated using the HMX Manager internal database or one of the external authentication methods available. SeeSupported Authentication Serviceson page 57 for more information. For management functions, the HMX Manager uses HTTPS (Hypertext Transfer Protocol with SSL encryption) to interact with the HMX system.
NOTE:To access the HMX Manager through a firewall, you must ensure that the firewall uses the default HTTPS port 443.
HMX extender system support
The transmitter connects externally to the video, audio and USB ports of the target computer and is attached directly to the target computer. It captures, compresses and encrypts the computer’s media stream and transmits it to the user station over a standard TCP/IP network. The user station enables the desktop user’s keyboard, video, mouse and audio devices to connect to the HMX system.
System Components
The HMX Manager software system contains the following components.
NOTE:This product contains certain free and/or open source components. To request an open source software kit for the open source components used in this product, please complete a FOSS Request Form at http://www.avocent.com/x_For_The_ User/Policies/Open_Source_Policy.aspx.
HMX Manager software
The HMX Manager software resides on the HMX Manager server (hub or spoke) and provides a web gateway and services for managing units (appliances and target devices) using a web browser. The gateway allows for web browser access. Administrators and users may connect to the HMX Manager server from HMX Manager software clients and use the HMX Manager Explorer windows to communicate with the system.
HMX Manager server
The HMX Manager server contains the HMX Manager software. The server provides a centralized database for storing configuration, user, unit and system information. It also provides services for authentication, access control and logging events.
You may configure one or more spoke (backup) servers in addition to the hub server. The hub server is responsible for maintaining the master copy of the database in an HMX Manager software system. Only one server in an HMX Manager software system may be configured as the hub server.
Spoke servers perform database replication with the hub server. The hub server acts as the coordinator for database replication between itself and all of the other spoke servers in an HMX Manager software system. A hub server and a spoke server both offer the same HMX Manager software functionality to a user. The distinction of hub or spoke refers only to the database replication role that the server plays and not the functionality that the server provides. Adding one or more spoke servers to an HMX Manager software system provides redundancy. After the hub server and optional spoke server(s) are configured, you may create and configure the type of access levels for users within your network environment. You may also set up event logs to record full details of user access and other events.
HMX Manager software client
An HMX Manager software client is a computer with a web browser that can access the HMX Manager software installed on the HMX Manager server.
Upgrading the HMX Manager
When upgrading to a newer version of the HMX Manager, all HMX Manager servers should be upgraded at the same time. The HMX Manager hub server should be upgraded first, followed by each spoke server.
Before upgrading, a replication should be performed, then a backup immediately before and after upgrading the HMX Manager (seeBacking up and Restoring Hub Servers Manuallyon page 12).
The firmware for the appliances may also need to be upgraded in order to support new functionality in the HMX Manager. The HMX Manager should work with the existing firmware revisions, but in cases where new
functionality is not supported until the firmware is upgraded, the HMX Manager will indicate this in the graphical user interface (GUI).
Safety precautions
To avoid potentially a fatal shock hazard and possible damage to equipment, please observe the following precautions:
• Do not use a 2-wire power cord in any product configuration.
• Test AC outlets at the target computer and monitor for proper polarity and grounding. • Use only with grounded outlets.
NOTE:The AC inlet is the main power disconnect.
CAUTION:Failure to observe the precautions in this section may result in personal injury or damage to equipment.
Observe the following general safety precautions when setting up and using Avocent equipment. • Follow all cautions and instructions marked on the equipment.
• Follow all cautions and instructions in the installation documentation or on any cautionary cards shipped with the product.
• Do not push objects through the openings in the equipment. Dangerous voltages may be present. Objects with conductive properties can cause fire, electric shock or damage to the equipment.
• Do not make mechanical or electrical modifications to the equipment. • Do not block or cover openings on the equipment.
• Choose a location that avoids excessive heat, direct sunlight, dust or chemical exposure, all of which can cause the product to fail. For example, do not place an Avocent product near a radiator or heat register, which can cause overheating.
• Ensure that the voltage and frequency of the power source match the voltage and frequency on the label on the equipment.
• AC power supplies have grounding type 3-wire power cords. Make sure the power cords are plugged into single phase power systems that have a neutral ground.
• Do not use household extension power cords with Avocent equipment because household extension cords are not designed for use with computer systems and do not have overload protection.
• Ensure that air flow is sufficient to prevent extreme operating temperatures. Provide a minimum space of 6 inches (15 cm) in front and back for adequate airflow.
• Keep power and interface cables clear of foot traffic. Route cables inside walls, under the floor, through the ceiling or in protective channels or raceways.
• Route interface cables away from motors and other sources of magnetic or radio frequency interference. • Stay within specified cable length limitations.
• Leave enough space in front and back of the equipment to allow access for servicing.
When installing Avocent equipment in a rack or cabinet, observe the following precautions: • Ensure that the floor’s surface is level.
• Load equipment starting at the bottom first and fill the rack or cabinet from the bottom to the top. • Exercise caution to ensure that the rack or cabinet does not tip during installation and use an anti-tilt bar. When using a desk or table, observe the following precautions:
• Choose a desk or table sturdy enough to hold the equipment.
• Place the equipment so that at least 50% of the equipment is inside the table or desk’s leg support area to avoid tipping of the table or desk.
• This device is not intended for use in the direct field of view at visual display workplaces. To avoid incommoding reflexions at visual display workplaces, this device must not be placed in the direct field of view.
Cabling installation, maintenance and safety tips
The following is a list of important safety considerations that should be reviewed prior to installing or maintaining your cables:
• Maintain the twists of the pairs all the way to the point of termination, or no more that 1/2 inch untwisted. Do not cut off more than 1inch of jacket while terminating.
• If bending the cable is necessary, make it gradual with no bend sharper than a 1-inch radius. Allowing the cable to be sharply bent or kinked can permanently damage the cable’s interior.
• Dress the cables neatly with cable ties, using low to moderate pressure. Do not over tighten ties. • Cross-connect cables where necessary, using rated punch blocks, patch panels and components. Do not
splice or bridge cable at any point.
• Keep CAT 5 cable as far away as possible from potential sources of EMI, such as electrical cables, transformers and light fixtures. Do not tie cables to electrical conduits or lay cables on electrical fixtures. • Always test every installed segment with a cable tester. “Toning” alone is not an acceptable test.
• Always install jacks so as to prevent dust and other contaminants from settling on the contacts. The contacts of the jack should face up on the flush mounted plates, or left/right/down on surface mount boxes.
• Always leave extra slack on the cables, neatly coiled in the ceiling or nearest concealed location. Leave at least five feet at the work outlet side and 10 feet at the patch panel side.
• Choose either 568A or 568B wiring standard before beginning. Wire all jacks and patch panels for the same wiring scheme. Do not mix 568A and 568B wiring in the same installation.
• Always obey all local and national fire and building codes. Be sure to firestop all cables that penetrate a firewall. Use plenum rated cable where it is required.
Installation and Setup
2
5
The following sections will help you install and set up your HMX Manager appliance. Helpful topics in this chapter include the following:
• Installing the Appliance(below)
• Launching the HMX Manager Appliance Web Interfaceon page 7 • Replicationon page 15
• Next Stepson page 18
Installing the Appliance
Rack mounting the HMX Manager appliance
Rack mount safety considerations
• Elevated Ambient Temperature: If installed in a closed rack assembly, the operating temperature of the rack environment may be greater than room ambient. Use care not to exceed the rated maximum ambient temperature of the switch.
• Reduced Air Flow: Installation of the equipment in a rack should be such that the amount of airflow required for safe operation of the equipment is not compromised.
• Mechanical Loading: Mounting of the equipment in the rack should be such that a hazardous condition does not exist due to uneven mechanical loading.
• Circuit Overloading: Consideration should be given to the connection of the equipment to the supply circuit and the effect that overloading of circuits might have on overcurrent protection and supply wiring. Consider equipment nameplate ratings for maximum current.
• Reliable Earthing: Reliable earthing of rack mounted equipment should be maintained. Pay particular attention to supply connections other than direct connections to the branch circuit (for example, use of power strips).
NOTE:The HMX Manager appliance may be rack mounted in a 1U configuration.
Connecting the HMX Manager appliance
A typical HMX Manager configuration includes the appliance, transmitters and user stations connected to the local area network (LAN). A terminal, or a computer running a terminal emulation program, is connected to the serial port for configuring basic network settings. The HMX Manager appliance, transmitters and user stations, as well as user accounts, are then configured from the browser interface to the HMX Manager appliance.
To connect the HMX Manager appliance:
WARNING:To reduce the risk of electric shock or damage to your equipment:
- Do not disable the power cord grounding plug. The grounding plug is an important safety feature. - Plug the power cord into a grounded (earthed) outlet that is easily accessible at all times.
- Disconnect the power from the target computer by unplugging the power cord from either the electrical outlet or the target computer.
1. Attach one end of the supplied power cord into the back panel of the HMX Manager appliance and attach the other end to an appropriate AC power source. The HMX Manager appliance has a power control button on the front panel.
2. Connect the LAN Port 1 Ethernet port on the back panel of the HMX Manager appliance to the LAN to which the transmitters and user stations are connected using standard UTP cables.
NOTE:The transmitters and user stations must be connected to LAN port 1. However, you can access the HMX Manager appliance using the browser on a computer connected to either LAN port 1 or LAN port 2.
Configuring Network Settings
To assign an IP address to the HMX Manager appliance, you must establish a connection to the serial menu first, then use the options on the serial console menu to configure the network settings for each of the LAN ports on the HMX Manager appliance.
NOTE:If you are connecting to only one LAN, only LAN port 1 needs to be configured.
To configure the network settings of the HMX Manager appliance:
1. Connect a terminal or a computer that is running a terminal emulation program to the serial port on the back panel of the HMX Manager appliance.
2. Start a session with the following port settings: • Serial speed: 9600 bps
• Data length: 8 data bits • Parity: None
• Stop Bits: 1
• Flow Control: None
3. Once a connection is established, a serial console menu appears. 4. Type2to configure any of the following network settings:
• Set eth speed
• Choose using DHCP or defining an IP address • Type subnet mask
• Type gateway IP address • Select default gateway
NOTE:The IP address on LAN port 1 must not change during operation of the appliance. Always configure LAN port 1 with a static IP address or, if using DHCP, ensure that the IP addresses are assigned with unlimited lease times. There is no restriction on how LAN port 2 can be configured. It is also possible to configure DNS on the HMX Manager appliance if it is required for administrator access through a web browser.
NOTE:If DHCP is selected, the HMX Manager appliance must be rebooted for the change to take effect.
5. Type3to set the time and date.
a. Select the appropriate timezone. Determine the offset in hours between your local time and Coordinated Universal Time (UTC). A negative offset indicates that the time zone is west of UTC and a positive offset indicates that the time zone is east of UTC. For example, Eastern Standard Time would be -5. b. Input the year, month, day, hour, minute and seconds. The year requires four digits, while the rest of the
digits can be either one or two digits. 6. Type0 and pressEnterto exit.
Launching the HMX Manager Appliance Web Interface
The HMX Manager appliance operates using default Internet Explorer settings. In the event that the default Internet Explorer settings have been altered, SSL and Javascript must be enabled to successfully access the HMX Manager appliance.
To launch the HMX Manager Appliance web interface: 1. Launch Microsoft® Internet Explorer.
2. In the address field of the browser, enter the IP address assigned to the HMX Manager appliance LAN port 1. Use https://xxx.xx.xx.xx as the format.
NOTE:If DNS is enabled, the address is the fully qualified host name assigned to the HMX Manager appliance.
3. PressEnter. The HMX Manager appliance login screen appears.
4. Enter the login username and password. The first time you access the HMX Manager appliance, enteradmin
as the username andAdmin1as the password. For security reasons, you should change the default admin password. The admin account is authorized to perform all configuration and access all managed devices and cannot be removed or renamed. Click Login and the HMX Manager Explorer window appears.
The HMX Manager Explorer window
Once a user has been logged in and authenticated, the Explorer window is displayed. From the Explorer window, you can view, access and manage units and users via the HMX Manager appliance.
Figure 2.1: Explorer Window Areas
Letter Description
A Top option bar - Use the top option bar to log out of a software session, or to access online help. The name of the logged in user is displayed on the left side of the top option bar.
B Tab bar - Use the tab bar to display and manage units, user accounts, system settings and reports.
C Top navigation bar - The options in the top navigation bar vary depending on the active tab in the tab bar. Topics relevant to each selection display in the side navigation bar.
D Side navigation bar - Use the side navigation bar to select system information to display or edit in the contenarea.
E Content area - The information specified by the tab bar, top navigation bar and side navigation bar selections is displayed and changed in the content area.
Table 2.1: Explorer Windows Area Descriptions
Using the side navigation bar
Use the side navigation bar to display windows or perform operations. The contents of the side navigation bar vary, depending on the tab and top navigation bar options that are in use.
The arrows displayed in the side navigation bar indicate where sub-options are available. You can display these items by clicking the main link. Where no arrow is displayed, clicking the link brings you directly to the option you have selected.
Displaying pages
Multiple page windows contain menu options that may be used to navigate from one display to another. You can click the Select All checkbox to select all items on a page. Enabling this checkbox selects all the items
listed on a page regardless of whether the entire page is visible. However, for multi-page displays, items listed on other pages will not be included in the selection. All screens that show lists, units, sessions and target computers automatically refresh every 10 seconds.
Using keyboard commands
In addition to using a mouse, you can use keyboard commands to select and change items in windows.
Key Description
Tab Transfers focus to the next control in the window, including the calendar Shift-Tab Transfers focus to the previous HTML control
Table 2.2: General Keyboard Commands
Configuring HMX Manager Servers
This section describes how to configure HMX Manager server properties, backup and restore hub servers and manage spoke servers. This can be done from the System tab in the HMX Manager Explorer window. It is recommended to configure your HMX Manager server before adding users and units.
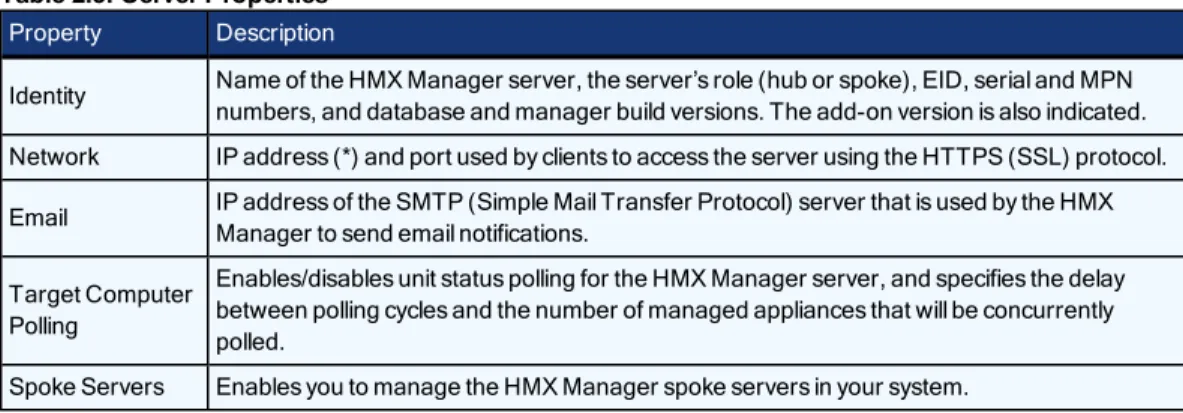
Server properties
To display server properties:
Click the System tab. Click on HMX Manager in the top navigation bar and Identity will automatically be selected in the side navigation bar. The Server Identification Properties window will open. The top of the side navigation bar will indicate the name of the HMX Manager server.
Property Description
Identity Name of the HMX Manager server, the server’s role (hub or spoke), EID, serial and MPN numbers, and database and manager build versions. The add-on version is also indicated. Network IP address (*) and port used by clients to access the server using the HTTPS (SSL) protocol. Email IP address of the SMTP (Simple Mail Transfer Protocol) server that is used by the HMX
Manager to send email notifications. Target Computer
Polling
Enables/disables unit status polling for the HMX Manager server, and specifies the delay between polling cycles and the number of managed appliances that will be concurrently polled.
Spoke Servers Enables you to manage the HMX Manager spoke servers in your system.
Table 2.3: Server Properties
Server certificates
HMX Manager administrators manage server certificates.
Security alerts
The HMX Manager uses SSL (Secure Sockets Layer) to securely communicate between the HMX Manager hub server and HMX Manager clients. SSL provides secure authentication using certificates, which is data that identifies the PC with which communication will occur. A certificate is typically verified by another certificate from a trusted certificate authority.
NOTE:When the Fast Switch option is enabled, security protocols will be disabled and data will not be encrypted.
When the HMX Manager is initially installed, it generates a self-signed certificate for use with HMX Manager clients. To replace this, an HMX Manager administrator may create a Certificate Signing Request (CSR) to submit to a trusted third party Certificate Authority (CA) for signature. The administrator may then replace the generated certificate with the new one. If the generated certificate is not replaced, the web browser will prompt a user whether to trust the generated certificate when an HMX Manager client session is started.
Three tests are performed on a certificate each time an HMX Manager client connects to the HMX Manager hub server:
• Does the client web browser trust the certificate issuer? • Has the certificate expired?
• Does the name on the HMX Manager server certificate match the name the HMX Manager client used to access the HMX Manager server?
A Security Alert dialog box will appear if the answer to any of the three questions is No. To prevent the Security Alert message box from appearing when you connect to the HMX Manager hub server, all three questions must be answered Yes. When a Security Alert dialog box appears, you have the following choices: • If you click Yes, a connection will be made with the HMX Manager hub server and the HMX Manager
login window will appear, but the Security Alert dialog box will continue to appear each time you connect to the hub server.
• If you click No, a connection will not be made with the HMX Manager hub server. • If you click View Certificate, you may install the certificate; see below.
To correct certificate security alerts for client and hub server connections:
1. From the HMX Manager client, open a client session. The Security Alert dialog box will appear. 2. ClickView Certificate. The Certificate dialog box will appear.
3. ClickInstall Certificate. See the Internet Explorer documentation for more information.
4. Once the certificate is installed, ensure that the time setting on the HMX Manager client PC is within the Valid from...to... dates and that the Issued to and Issued by fields exactly match.
Invalid to...from dates typically occur when the HMX Manager is installed on a server that is set to an invalid time. When an HMX Manager client that is set to a valid time connects to the HMX Manager server that is set to an invalid time, the following warning will appear in the Security Alert dialog box:
The security certificate date is invalid.
To create a CSR: 1. Click theSystemtab.
2. ClickHMX Managerin the top navigation bar.
3. ClickCertificatein the side navigation bar. The HMX Manager Server Certificate Properties window will open.
4. ClickGet CSR. A File Download dialog box will appear.
5. ClickOpen. The CSR is downloaded and displays in the configured text editor.
-or-ClickSave. The Save As dialog box will appear. Select a directory and filename and clickSaveto save the CSR.
6. Submit the CSR generated request to a CA to obtain a signed server certificate. 7. Update the HMX Manager server to use the certificate created by the CA.
Managing hub and spoke server certificates
When a spoke server is registered with a hub server, a certificate trust relationship is established between the two servers. Certificate information must match on the hub server and the spoke servers for communication to take place between the servers. If the spoke server certificate is subsequently changed, a certificate mismatch will occur.
To update the certificate of a spoke server on the hub server:
NOTE:Certificates may only be viewed by HMX Manager administrators and user administrators.
1. On the hub server, click theSystemtab.
2. ClickHMX Managerin the top navigation bar.The name of the HMX Manager hub server will appear at the top of the side navigation bar and the Server Identification Properties window will open.
3. ClickSpoke Serversin the side navigation bar. The Spoke Servers window will open.
4. Click the name of the spoke server to be updated. The Spoke Server Network Properties window will open. 5. ClickCertificatein the side navigation bar. The Spoke Server Certificate window will open, displaying
information about the spoke server certificate (Actual Certificate) and the certificate registered for this spoke server on the hub server (Registered Certificate).
6. The window displays the certificate on the spoke server and the certificate registered on the hub server. If the HMX Manager cannot obtain the certificate information from the spoke server, a message will appear at the bottom of the Server Certificate - Spoke Server window. The message states:Remote server is not responding. Information displayed may not match remote side.
• If the certificate information does not match, go to step 7. • If the certificate information matches, go to step 8.
7. ClickUpdate. The spoke server certificate information will be updated on the hub server. 8. ClickClose. The Spoke Servers window will open.
To specify email properties: 1. Click theSystemtab.
2. ClickHMX Managerin the top navigation bar.
3. ClickEmailin the side navigation bar. The Server Email Server Properties window will open.
4. Type a new address for the SMTP server that sends email notifications as a domain name or an IP address in standard dot notation (xxx.xxx.xxx.xxx).
5. If your SMTP server requires login credentials, selectLogin required to access SMTP serverand type a username and password, then confirm the password.
6. ClickSaveto store HMX Manager email property information in the HMX Manager database on the host. Chapter 2: Installation and Setup 11
Unit status polling
To use unit status polling: 1. Click theSystemtab.
2. ClickHMX Managerin the top navigation bar
3. ClickUnit Status Pollingin the side navigation bar. The Server Unit Status Polling Properties window will open.
4. SelectEnable unit status polling.
5. Type the number of seconds to wait between polling cycles (from 30-999 seconds). The default is 900 seconds (15 minutes). A smaller value results in greater accuracy.
6. Type the number of managed appliances that may simultaneously be polled to obtain status information (from 1-25 units). The default is 5. A larger number results in faster speed.
7. ClickSaveto store unit status information in the HMX Manager database on the host.
Backing up and Restoring Hub Servers Manually
To manually backup or restore your hub server:
NOTE:Manual backup and restore procedures require HMX Manager administrator privileges.
1. Click theSystemtab.
2. ClickHMX Managerin the top navigation menu. 3. ClickToolsin the side navigation bar.
4. If you are manually backing up your hub server, click theBackup Systemicon.
-or-If you are restoring a 3.0.0 or greater database backup, click theRestore Systemicon. 5. Follow the wizard and pop-up instructions.
Spoke Servers
Information on the hub server is replicated on one or more spoke servers. Information about each spoke server, such as the IP address, port number and certificate, is stored in the hub server’s database. You may specify up to 15 HMX Manager servers as spoke servers.
NOTE:HMX Manager versions of the spoke server and hub server must match in order to register a spoke server. For example, you may not register a spoke server running HMX Manager version 3.1 with a hub server running HMX Manager version 3.2.
A spoke server may be created by converting a hub server. To do this, register the hub server as a spoke to another HMX Manager hub server. The HMX Manager system data on the hub server being converted will be lost and the converted hub server will replicate the data of the new specified hub server.
To display a list of spoke servers:
NOTE:The Spoke Servers window is only available on the hub server.
1. Click theSystemtab.
2. ClickHMX Managerin the top navigation bar. The side navigation bar will include the name of the server to which you are logged in.
3. ClickPropertiesin the side navigation bar, and then clickSpoke Servers. The Spoke Servers window will open.
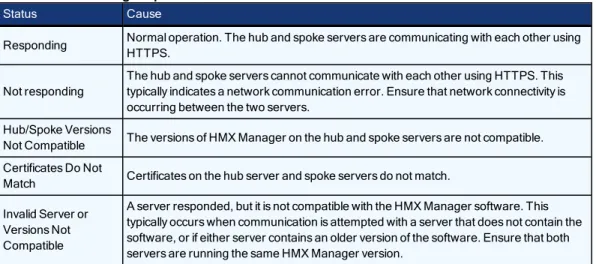
You may change the fields that display by using the Customize link. Each spoke server in the list includes status.
Status Cause
Responding Normal operation. The hub and spoke servers are communicating with each other using HTTPS.
Not responding
The hub and spoke servers cannot communicate with each other using HTTPS. This typically indicates a network communication error. Ensure that network connectivity is occurring between the two servers.
Hub/Spoke Versions
Not Compatible The versions of HMX Manager on the hub and spoke servers are not compatible. Certificates Do Not
Match Certificates on the hub server and spoke servers do not match. Invalid Server or
Versions Not Compatible
A server responded, but it is not compatible with the HMX Manager software. This typically occurs when communication is attempted with a server that does not contain the software, or if either server contains an older version of the software. Ensure that both servers are running the same HMX Manager version.
Table 2.4: HMX Manager Spoke Server Status
To add a spoke server:
1. Install the HMX Manager on the computer that will be used as a spoke server. 2. Configure the computer as a spoke server.
To register a hub server as a spoke server:
Only HMX Manager administrators may access this procedure.
NOTE:When registering a hub server as a spoke server on another HMX Manager system, the information on the hub server being registered will be lost. Its database will be updated to match the new hub server to which it is being registered.
1. Click theSystemtab.
2. ClickHMX Managerin the top navigation bar. The side navigation bar will include the name of the server to which you are logged in.
3. SelectToolsin the side navigation bar. The Server Tools window will open.
4. Click theRegister as Spoke Servericon. The Register Spoke Server Wizard will appear. Click Next. 5. The Type in Hub Server Address window will open.
a. Type the IP address of the hub server in standard dot notation (xxx.xxx.xxx.xxx) or the domain name of the hub server.
b. Type the port number for the hub server.
If the default hub server port value (443) is modified, you must specify it when registering a spoke server so that register requests will be sent to the correct port on the hub server. For example, if the IP address of the hub server is 10.0.0.1 and the port number is changed to 444, typehttps://10.0.0.1:444/dtviewin the Address field of the Register Spoke Server Wizard. c. ClickNext.
6. The Operation in Progress window will open briefly, followed by the Accept Hub Server Certificate window. ClickNext.
7. The Type in Hub Server Administrator Credentials window will open. ClickNext.
8. Type the name of a user with HMX Manager administrator privileges on the hub server. Type a password for the user. ClickNext.
9. The Operation In Progress window will open. The configuration of the spoke server will be saved to the database of the hub server and the spoke server’s certificates will be installed on the hub server.
10. The Completed Successful window will open when the spoke server has been added. 11. ClickFinish.
To change spoke server network properties:
NOTE:Spoke server network settings may need to be changed by HMX Manager administrators when network settings are changed and the hub server did not automatically detect the changes. When changing the network settings, ensure that a port mismatch does not occur between the hub server and the spoke server.
1. On the hub server, click theSystemtab.
2. ClickHMX Managerin the top navigation bar. The side navigation bar will include the name of the server to which you are logged in.
3. ClickPropertiesin the side navigation bar, and then clickSpoke Servers. The Spoke Servers window will open.
4. Click on the name of the spoke server whose network properties you wish to change. The Spoke Server Network Properties window will open.
5. Change any of the following network settings:
• Type a new computer name to use as the spoke server.
• Type a new address in standard dot notation (xxx.xxx.xxx.xxx) for the spoke server. • Type a new port number for the spoke server.
6. ClickSaveand then clickClose. The Spoke Servers window will open. To delete a spoke server:
1. On the hub server, click theSystemtab.
2. ClickHMX Managerin the top navigation bar. The side navigation bar will include the name of the server to which you are logged in.
3. ClickPropertiesin the side navigation bar, and then clickSpoke Servers. The Spoke Servers window will open.
4. Click the checkbox to the left of the spoke servers you wish to delete. To delete all spoke servers, click the checkbox to the left of Name at the top of the list.
5. ClickDelete. A confirmation dialog box will appear. 6. Confirm or cancel the deletion.
NOTE:When a spoke server is deleted, it is no longer allowed to communicate with the hub server. Only spoke servers that are no longer active should be deleted. If a spoke server is still active, it may be re-registered using the Register Spoke Server wizard.
Promoting spoke servers
Promoting a spoke server to be a hub server is usually done only if the current hub server is no longer operational and will not be brought back into service. (For less severe problems with a hub server, the backup and restore operations can be used.)
If a spoke server must be promoted, be sure to run the replication task, if possible, on all other spoke servers, then on the spoke server being promoted, immediately before the promotion. This will prevent loss of data from the other spoke servers. SeeReplicationon page 15 for more information.
(After the promotion of a spoke server to a hub, if the server that was originally the hub becomes operational again, it will have to register as a spoke server, since a system can have only one hub server.)
To promote a spoke server to be a hub server: 1. On the spoke server, click theSystemtab.
2. ClickHMX Managerin the top navigation bar. The side navigation bar will include the name of the server to which you are logged in.
3. ClickToolsin the side navigation bar.
4. Click thePromote to hub servericon. The Promote Hub Server Wizard will appear.
5. Follow the prompts and heed the cautionary warnings in the wizard. The spoke server on which the wizard is running will become the hub server, and the other spoke servers will be advised of the changed
configuration.
Replication
Replication is a task that synchronizes the hub and spoke server databases. By default, replication runs every 12 hours on each spoke server. A spoke server’s first replication occurs automatically when the spoke server is added to the HMX Manager system. You may change the interval that the replication task runs on each spoke server, or you may initiate an immediate replication.
During replication, the spoke server sends all of its database changes since the last replication to the hub server. The hub server then incorporates those changes and sends all of its database changes since the last replication to the spoke server (excluding the changes that spoke server just sent to the hub server).
If an item is added on a spoke server, and another item with the same name (but perhaps with different configuration parameters) is added on the hub server, then after replication, both items will appear on both the hub and spoke servers, with a tilde (~) and a number added to one of the names. The administrator should handle
the issue appropriately - in some cases, the duplicate item may need to be renamed; in others, the duplicate item should be deleted.
When different changes are made to one existing item, two outcomes are possible. For example, assume an item is added and configured on the hub server and is then replicated to the spoke server. Later, an administrator changes something about the item on the spoke server. Another administrator then changes something about the item on the hub server. When the replication task runs, two things may happen.
In a few instances where no conflict occurs, both changes will be incorporated and replicated. For example, if the hub server’s administrator adds username JaneDoe to the existing user-defined user group Accounting and the spoke server’s administrator adds username JohnDoe to the Accounting user group, both names will be added and replicated.
In most other instances where the changes are mutually exclusive or some other conflict occurs, the most recent change will be the only change accepted and replicated. For example, if the hub server’s administrator associates a unit with the Miami site, and the spoke server’s administrator associates the same unit with the Chicago site, the change that was made closest to the time of replication (that is, the most recent change) will be accepted and replicated.
This emphasizes the importance of ensuring the hub and spoke servers’ clocks are synchronized.
The exception to the last-change rule is when one of the actions deletes an item - in that case, the deletion is accepted and replicated, regardless of timing. For example, if a unit was deleted on the hub server, and then the contact information for the same unit was changed on the spoke server a minute later, the unit will be deleted when the replication task is run.
On a spoke server, you may enable a replication task property that forces the spoke server to retrieve a snapshot of the hub database rather than synchronizing changes back and forth. The snapshot is a copy of the hub at the time of the operation. This feature is not normally used; it is intended to help recover a system when replication has failed.
Initial load
NOTE:The HMX Manager appliance is configured as hub by default.
When an HMX Manager appliance is registered as spoke server into another HMX Manager appliance, all the data in the spoke is deleted and overwritten with the data from the hub. This process is called initial load. Once the initial load is completed, both HMX Manager appliances have the same information.
Incremental updates
The incremental updates are done by the pull and push tasks which are executed every period of time (by default 1 minute) by each spoke. The push task takes care of sending all the changes to the hub, while the pull task retrieves changes from the hub.
If communication between the hub and a spoke is broken, changes are queued in both sides. Upon
communication being reestablished, the push and pull tasks send and retrieve all the changes made since the last time the replication was successful.
To register an HMX Manager appliance as a spoke server:
NOTE:Because the spoke database gets deleted in this operation, Avocent recommends making a backup copy of the spoke database first.
1. Click theSystemtab.
2. ClickHMX Managerin the top navigation bar. The side navigation bar will include the name of the server to which you are logged in.
3. ClickToolsin the side navigation bar.
4. Click theRegister as Spoke Servericon. The Register Spoke Server Wizard will appear. ClickNext. 5. Type the hub's IP address and port (default is 443) and clickNext.
6. On the Accept Hub Server Certificate Page, clickNextto accept the hub certificate. 7. Enter the hub administrator username and password and clickNext.
8. Wait until the registration process ends. In this step, all the data in the spoke is deleted and overwritten with the data from the hub.
9. After the registration process is complete, clickFinishto exit the wizard. To promote an HMX Manager from spoke to hub:
Once an HMX Manager has been registered as spoke of another HMX Manager Hub, you can promote spokes to work as a hub. The old hub will become a new spoke of the promoted HMX Manager.
In the spoke HMX Manager:
1. On the spoke server, click theSystemtab.
2. ClickHMX Managerin the top navigation bar. The side navigation bar will include the name of the server to which you are logged in.
3. ClickToolsin the side navigation bar.
4. Click thePromote to Hub Servericon. The Promote to Hub Server Wizard will appear. 5. ClickNext.
6. ClickNexton the Confirm Server Promotion page.
7. Wait until the promotion process ends. In this step the spoke is promoted to hub and sends request to all the other servers to become spokes.
8. ClickFinishto exit the wizard and go to the Server Tools page. To delete a spoke server registration using the Spoke Server view
You can delete a spoke registration using the Spoke Server view. If the spoke is deleted, the pull and push tasks will still run in the spoke, but the requests are not accepted by the hub.
1. In the hub HMX Manager, click theSystemtab.
2. ClickHMX Managerin the top navigation bar. The side navigation bar will include the name of the server to which you are logged in.
3. ClickPropertiesin the side navigation bar, and then clickSpoke Servers. The Spoke Servers window will open.
4. Check the box of the spoke server registration to be deleted.
5. Click theDeletebutton and confirm the operation. The spoke server is no longer listed in the Spoke Server view. Any change in the spoke database will not be replicated to the hub, and any change in the hub or the other spokes will not be replicated to that spoke.
NOTE:You can register the spoke with the hub again using the Register as Spoke Server wizard.
Modify Push and Pull task periods of time
The Pull and Push tasks are executed during specific periods of time.
To change the default time values using the Database Replication Properties page: 1. In the Spoke HMX Manager, click on theSystem tab.
2. ClickHMX Manager in the top navigation bar. The side navigation bar will include the name of the server to which you are logged in.
3. Click DB Replicationin the side navigation bar. The Database Replication Properties page will open. 4. Edit the time values.
5. ClickSave. You must restart the server to allow the changes take effect.
NOTE:These properties are only used by the spoke server.
Fast Switch Enable
The Fast Switch Enable system option results in shorter connection times.
NOTE:When the Fast Switch option is enabled, security protocols will be disabled and data will not be encrypted.
To enable the Fast Switch Enable system option: 1. Click theSystemtab.
2. ClickHMX Managerin the top navigation menu, then clickFast Switchin the side navigation bar. 3. Click theFast Switchcheckbox to enable or disable the option. All appliances will be rebooted for the
change to take effect.
NOTE:Fast Switch Enable is disabled in the HMX Manager factory default settings.
NOTE:When the HMX Manager discovers a new unit that you've added to the system, it will automatically enable or disable the Fast Switch Enable system option to match the current system settings.
Next Steps
At this point, only the administrator can log in to the HMX Manager. Now the administrator may choose to add and manage units or set up additional user accounts. Users can also add and manage units if they are assigned access rights by the administrator.
To add and manage units, see: • Units View Windowson page 21 • Managing Unitson page 27
• Unit Sessions and Connectionson page 41 • Grouping Unitson page 47
To configure authentication services and units, see: • Authentication Serviceson page 57
• Managing User Accountson page 79 • User Groupson page 89
Units View Windows
3
21
Units View windows display list of units that have been added to the HMX Manager database.
A user must have unit view access rights to open Units View windows. Also, units will not display if they are hidden.
Each Units View window contains one or more information fields.
Units are displayed in a table format with column headings. Click the checkbox to the left of each unit name to select/deselect the unit for an operation. To select all the units on a page, click the checkbox at the left of all the column headings at the top of the list. To deselect items that were previously selected, click the checkbox again. If the list of units spans more than one page, units on subsequent pages will not be selected. ClickCustomizeto specify how many units appear on a Units View page.
Types of Units View Windows
There are four types of Units View windows, which are accessed by clicking tabs and side navigation bar links. Any Units View window that contains managed appliances may also be viewed using the topology feature, which displays a hierarchical structure.
• All Appliances: The Appliances - All window lists all managed appliances.
• Appliance Type: Appliance Type windows list all managed appliances of a particular type. The Appliance Type links in the side navigation bar are listed under Appliances - All.
An appliance type will only be listed in the side navigation bar if an appliance of that type has been added to the HMX Manager database and the user has access to it.
• Target Devices: If target device types have been created, their links in the side navigation bar are listed under Target Devices - All.
• Mixed Views: Mixed view windows may contain managed appliances, target devices or both. Several links in the side navigation bar will open mixed view Units View windows.
• Recently Accessed - Units that the user has accessed most recently. • Groups - Units that have been assigned to a personal or global unit group. • Sites - Units that have been assigned to a site.
• Departments - Units that have been assigned to a department. • Locations - Units that have been assigned to a location.
• Custom fields - Units that have been assigned to custom groups. These group names may also have custom field labels.
Showing and Hiding Units
Hiding turns off the display of units in the window, but does not remove the units from the HMX Manager system.
To hide a unit:
1. In a Units View window, clickCustomize. The Units View Customization window will open.
2. ClickVisibilityin the Available Fields column and then clickAdd. Visibility will be moved to the Fields to Show column.
3. Enable theShow hidden itemscheckbox if you wish to display hidden units in the Units View Customization window with a transparent icon.
4. ClickSaveand then clickClose. The window will open, containing the Visibility column. The Visibility column will display Hide for each unit.
5. ClickHidefor each unit.
The display of the selected unit will be turned off in the Units View window ifShow hidden itemswas not selected in the Units View Customization window.
IfShow hidden itemswas selected, the hidden unit will appear with a transparent icon. To hide multiple units with one operation:
1. In a Units View window, click the checkbox next to the units you want to hide from display. To select all units on the page, click the checkbox to the left of Name at the top of the list.
2. ClickOperations, then selectHide Unitsfrom the drop-down menu. To show hidden units:
1. In a Units View window clickCustomize. The Units View Customization window will open.
2. ClickVisibilityin the Available Fields column and then clickAdd. Visibility will be moved to the Fields to Show column.
3. ClickShow hidden items.
4. ClickSaveand then clickClose. The Units View window will open, containing the hidden items and the Visibility column. Hidden items will have a transparent icon and the Visibility field will contain Show. 5. ClickShowin the Visibility column for the unit(s) you want to display. The unit will be made visible, the
icon will no longer be transparent and the Visibility field will change to Hide.
Units View Windows Fields
The following fields may appear in Units View windows.
• Name in HMX Manager - Name of the unit as defined in the HMX Manager database. Click on the name to display or change unit information.
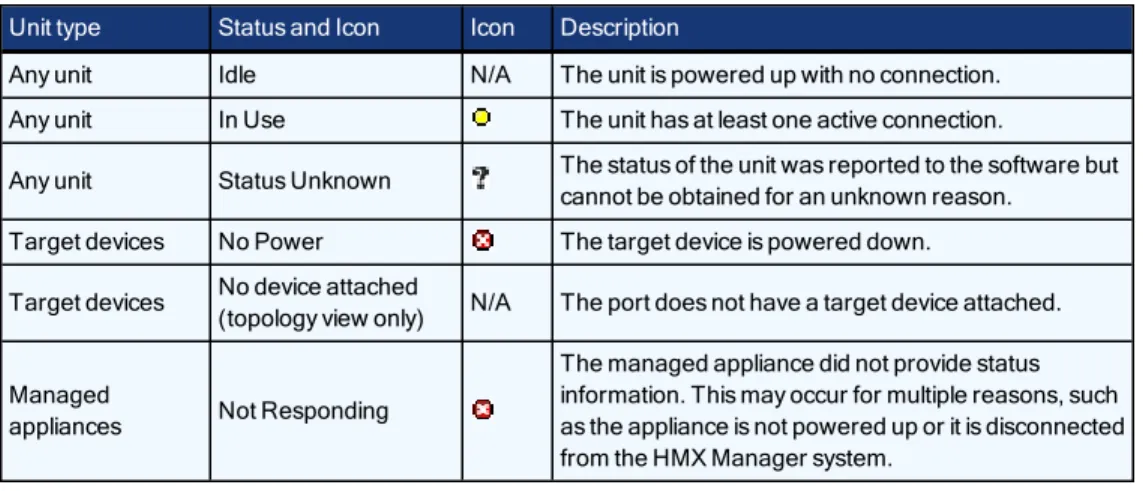
• Type - Type of target device or managed appliance model. Managed appliance types cannot be changed; to assign a type to a target device.
Unit type Status and Icon Icon Description
Any unit Idle N/A The unit is powered up with no connection. Any unit In Use The unit has at least one active connection.
Any unit Status Unknown The status of the unit was reported to the software but cannot be obtained for an unknown reason.
Target devices No Power The target device is powered down. Target devices No device attached
(topology view only) N/A The port does not have a target device attached. Managed
appliances Not Responding
The managed appliance did not provide status information. This may occur for multiple reasons, such as the appliance is not powered up or it is disconnected from the HMX Manager system.
Table 3.1: Unit Status Values
Multiple Unit Operations from a Units View Window
From a Units View window, you may delete one or more units or assign access rights for one or more units. You may also use the Operations button/menu to initiate certain actions on one or more units.
• Hiding units from view • Reboot
• Show version
• Change unit properties
Custom operations defined in plug-ins may also be listed in the Operations menu.
A given action will be available only if at least one of the selected units supports the action. If a selected unit does not support the operation, it will be reported as such in the results window.
When one of these multiple unit operations is initiated and confirmed (if needed), a system task is created that will perform the operation on each unit. The Multiple Unit Operation window will open, indicating the operation has been submitted. This window contains a link that directs the user to the Operations Results window for the task.
To initiate and view results from multiple unit operations from a Units View window:
1. In a Units View window, initiate the multiple unit operation as described in the procedures referenced above. If prompted, confirm the operation.
2. The Multiple Unit Operation window will open, indicating the operation has been submitted.
If you do not want to view the results of the operation, clickCloseand skip the rest of this procedure. To view the results of the operation, clickClick here to view results.
3. The Operations Results window will open, listing all multiple unit operations and any unit tasks that have been initiated. The entry for each operation includes:
• Name of the operation • When the operation started
• When the operation finished (blank if not yet complete)
• Status or result of the operation
You may also access this window at any time by clicking theUnitstab, then clickingOperation Resultsin the side navigation bar.
4. To view the results for an individual operation, click on the name. The Operation Results window for that operation type will open, indicating:
• Status - Current status of the task
• Summary - Number of successful/failed/total unit operations (for example, the summary of an operation with a status of ‘Rebooting the unit(s)’ might contain a 2/0/3 summary - 2 successful, 0 failed and 3 total units)
• Name of the operation • Type of unit
• When the operation started • How long the operation took
• Status or result of the operation on the unit 5. ClickClose.
Unit Overview Windows
You may change the overview information for one target device from a Unit Overview window. From a Units View window, you can change the type or icon for several target devices in one operation. This may be helpful when you want to assign the same values to several units.
To change overview information for a target device:
1. In a Units View window containing target devices, click on the name of a target device. The Unit Overview window will open.
2. Enter a name for the target device. 3. Enter a type for the target device.
4. Select a new icon for the target device using the arrows.
5. ClickSaveand then clickClose. The Units View window will open. If you added a type that was not previously defined, it will appear under Target Devices in the side navigation bar.
To change the name of a managed appliance from the Unit Overview window:
1. UnderUnit Settings-Summary, click on the name of an appliance. The Unit Overview window will open. 2. Type a name for the managed appliance. (You cannot change the type.)
3. ClickSaveand then clickClose. The Units View window will open.
Unit Status Window
To use the Unit Status window:
1. Click theUnitstab, then click Unit Statusin the side navigation bar. 2. The Unit Status window opens.
3. You can filter what units are displayed by selecting a status from the Filter menu. Each unit status is color-coded. The default filtered status is Active Status which displays only currently active units.
4. You can select how often the Unit Status is updated by selecting a time from the Interval menu.
5. You can view the Unit Overview window by double-clicking the unit name, or right-clicking the unit name and selectingShow Unit Overview.
Managing Units
4
27
This chapter describes how to manage unit properties and settings, access rights and local account settings, and how to view unit asset and usage reports.
Using the Units Tab in the Explorer Window
From the Units tab in the HMX Manager Explorer, you can manage user operations such as adding and deleting units, changing unit properties and upgrading your firmware. When you click theUnitstab, the Units - All window displays.
NOTE:In the HMX Manager Explorer, the term “units” refers to transmitters and/or user stations.
Deleting units
To delete a unit:
1. In a Units - All window, click to select the checkbox next to the unit name you want to delete. To delete all units on the page, click to select the checkbox to the left of the Name field at the top of the list.
2. ClickDelete. The unit(s) is immediately removed from the HMX Manager appliance database and disappears from the list.
Ease of Installation
The Ease of Installation feature removes the need to manually update transmitters and receivers via the local serial port, allowing parameters to be configured from within the HMX Manager.
To change device parameters:
1. Click theUnitstab. Select the device to be configured.
2. SelectPropertiesin the side navigation bar, then selectDevice Configuration. The Device Configuration window will open, listing all configurable options for the unit.
3. Make the desired changes in the settings. SelectSave, thenClose.
The Units All Window
The Units - All window displays the list of units added to the HMX Manager appliance database. You can use the checkbox to the left of each unit name to select/deselect the unit for an operation. The following fields will appear in Units - All window.
• Name - Name of the unit as defined in the HMX Manager appliance database. Click the name to display or change unit information.
• Type - Type of unit or session. Unit and session types cannot be changed. • Status - Current operating status of a unit.
The table below lists and describes the possible values in the status field.
Type Status and Icon Description
Managed Units Idle Unit is turned on, can be communicated with and is not associated with an active media session.
Managed Units In Use Unit is associated with a session.
Managed Units Upgrading Unit firmware is being upgraded.
Managed Units Not Responding The HMX Manager appliance cannot contact the unit.
Target Computers Idle Target computer is not associated with an active media session.
Target Computers In Use Target computer is associated with an active media session.
Active Session Active The active session is running and the units are responding.
Active Session Not Responding The units involved in the active session are not responding. If an active session does not respond for more than 20 minutes, it will be deleted.
Table 4.1: Unit Status Values
• IP Address - The IP address of a managed unit.
• Department - The name of the department to which a managed unit has been assigned. • Location - The name of the location to which a managed unit has been assigned. • Revision - The current firmware version that is installed on a managed unit.
Commonly used Units windows
In the side navigation bar of the Units - All window is a list of Units windows. The most commonly accessed windows are:
• All: ClickUnitsin the side navigation bar to display the managed units. The Units - All window will re-open. You can click on a link in the side navigation bar to view a summary of all units, all user stations or all transmitters.
• Target Computers: ClickTarget Computersin the side navigation bar to see a list of all target computers in the system.
• Active Sessions: ClickActive Sessionsin the side navigation bar to view a list of all the users that are accessing user stations, and which transmitters are being accessed by which users. The Active Sessions window also displays start times and session duration. An active session starts when a connection is made between a transmitter and a user station.
NOTE:An authorized pair is a pairing of a transmitter and a target computer that has been accepted by the administrator; an unauthorized pair has not been accepted by the administrator as a desired pairing. An unauthorized pairing can occur after initial discovery of a device pair, or if the transmitter was inserted into the wrong target computer.
Adding units via the Add Unit Wizard
Before you can manage units in the HMX Manager appliance, you must first add them to the HMX Manager appliance database. You can add units to the HMX Manager appliance database by clicking onAddin the Units
- All window. The Add Unit Wizard will appear, allowing you to: • Add a single unit
• Discover units within an IP address range • Discover units on an IP subnet address
Adding a single appliance
This procedure is valid for transmitters and user stations.
NOTE:A unit can only be added to the HMX Manager appliance database if it is turned on and attached to the network.
To add a single unit that already has an IP address:
1. In a Units - All window containing managed units, clickAdd. The Add Unit Wizard Welcome Window will open. ClickNext.
2. The Select Add Unit Procedure window will open. ClickAdd a single unit, then clickNext. 3. The Select Unit Type window will open. Select a unit from the product list, then clickNext.
4. The Select Address Configuration of Unit window will open. SelectYes,the <Managed Unit Type> does have an addressand type the address of the unit. ClickNext.
5. The Search Results window will open. The name and MAC address of the discovered unit will be displayed. ClickNext.
6. The Completed Successfully window will open. To exit the Add Unit Wizard, clickFinish. To add a single unit that does not have an IP address:
1. In a Units - All window containing managed units, clickAdd. The Add Unit Wizard Welcome Window will open. ClickNext.
2. The Select Add Unit Procedure window will open. ClickAdd a single unit, then clickNext. 3. The Select Unit Type window will open. Select a unit from the product list, then clickNext.
4. The Select Address Configuration of Unit window will open. SelectNo,the <Managed Unit Type> does not have an addressand clickNext.
5. The Configure Unit Network Settingswindow will open.
a. Type the IP address and subnet mask, in standard dot notation (xxx.xxx.xxx.xxx), for the managed unit. b. Optionally, type a gateway in standard dot notation (xxx.xxx.xxx.xxx).
c. ClickNext.
6. The Add Discovered Unit window will open. Select the discovered unit from the list, then clickNext. 7. The Completed Successfully window will open. To exit the Add Unit Wizard, clickFinish.
Adding units from a range of IP addresses
This procedure is valid for transmitters and user stations.