Contents
1 GWT Tutorial for Beginners 1
1.1 Overview . . . 1
1.2 Sample Web Application using GWT . . . 1
1.2.1 Download Eclipse, install Google plugin and GWT SDK . . . 1
1.2.2 Steps to install Eclipse plugin for GWT development . . . 1
1.2.3 Creating Sample Web Application in GWT . . . 7
1.2.3.1 Create a new project using GWT Development toolkit . . . 7
1.2.3.2 GWT Web Application Project Structure . . . 11
1.3 Debugging GWT Web Application . . . 18
1.4 Project References . . . 19
1.5 Conclusion . . . 19
1.6 Download Eclipse Project. . . 19
2 GWT Sample Application Example 20 2.1 Introduction . . . 20
2.2 GWT SDK . . . 20
2.3 Installing Eclipse GWT Plugin . . . 21
2.4 Creating GWT project . . . 22
2.5 Development Mode . . . 25
2.6 Testing the default project configuration . . . 25
2.7 Project components . . . 26
2.7.1 GWT Configuration file . . . 26
2.7.2 Landing page . . . 27
2.7.3 Stylesheet . . . 28
2.7.4 Java code . . . 28
3 GWT Interview Questions and Answers 29
3.1 What is GWT? . . . 29
3.2 What is a module descriptor in GWT application? . . . 29
3.3 What is a GWT Module? . . . 29
3.4 What is an entry point class? . . . 29
3.5 Which method of the Entry point class is called when the GWT application is loaded? What happens if there are multiple Entry point classes? . . . 30
3.6 How do I enable assertions? . . . 30
3.7 What is the default style name of any GWT widget? . . . 30
3.8 What is internationalization? . . . 30
3.9 What is the difference betweenTextResourceandExternalTextResource . . . 30
3.10 How can you set Browser targeted Compilation in GWT? . . . 30
3.11 Why doesn’t GWT provide a synchronous server connection option? . . . 30
3.12 What is GWTClientBundle? . . . 31
3.13 What isDataResourcein GWT? . . . 31
3.14 How to create custom widgets in GWT? . . . 31
3.15 What is aUiBinder? . . . 31
3.16 What is the Same Origin Policy, and how does it affect GWT? . . . 31
3.17 Which class is the superclass of all UI widgets? . . . 31
3.18 What is GWT RPC . . . 32
3.19 What are Layout Panels? . . . 32
3.20 How is GWT different from other frameworks? . . . 32
3.21 What are the features of GWT . . . 32
3.22 What can I do to make images and borders appear to load more quickly the first time they are used? . . . 32
3.23 What is Deferred Binding? . . . 32
3.24 How do I create an app that fills the page vertically when the browser window resizes? . . . 33
3.25 How do you make a call to the server if you are not using GWT RPC? . . . 33
3.26 How can I dynamically fetch JSON feeds from other web domains? . . . 33
3.27 Conclusion . . . 33
4 GWT AsyncCallback Example 34 4.1 Introduction . . . 34
4.2 GWT RPC Mechanism . . . 34
4.3 Creating Service. . . 35
4.3.1 Define service Interface . . . 35
4.3.2 Define Async Service Interface . . . 36
4.3.3 Implementing AsynchCallback and handling its Failure. . . 36
4.4 Implementing Service. . . 36
4.4.1 Define Service Interface Implementation . . . 36
4.4.2 Update entry of Service inside web.xml . . . 37
4.5 Example . . . 37
4.6 Project References . . . 38
5.4 Basic Panels. . . 39
5.4.1 RootPanel. . . 39
5.4.2 FlowPanel. . . 41
5.4.3 HTMLPanel . . . 43
5.4.4 FormPanel . . . 45
5.4.5 ScrollPanel . . . 48
5.4.6 Grid . . . 50
5.4.7 FlexTable . . . 52
5.5 LayoutPanels . . . 54
5.5.1 RootLayoutPanel . . . 54
5.5.2 DockLayoutPanel. . . 55
5.5.3 SplitLayoutPanel . . . 57
5.5.4 StackLayoutPanel . . . 59
5.5.5 TabLayoutPanel . . . 61
5.6 Project References . . . 63
5.7 Download Eclipse Project. . . 64
6 GWT HTMLPanel Example 65 6.1 Introduction . . . 65
6.2 Class Declaration . . . 65
6.3 Constructors. . . 65
6.3.1 HTMLPanel(String html). . . 65
6.3.2 HTMLPanel(SafeHtml safeHtml) . . . 67
6.3.3 HTMLPanel(String tag, String html). . . 69
6.4 Method Summary . . . 71
6.5 Examples . . . 72
6.5.1 Login Page using HTMLPanel . . . 72
6.5.2 Error Dialog Page using HTMLPanel . . . 73
6.6 Project References . . . 75
7 GWT Scroll Panel Example 76
7.1 Introduction . . . 76
7.1.1 Constructors . . . 76
7.2 Creating GWT project . . . 77
7.3 Entry point class . . . 79
7.4 Compile . . . 79
7.5 Running the application. . . 80
7.6 Custom Scroll Panel . . . 80
7.7 Download the source file . . . 81
8 GWT Calendar Example 82 8.1 Creating GWT project . . . 82
8.2 Setup . . . 85
8.3 Add widget . . . 85
8.4 Compile . . . 86
8.5 Running the application. . . 86
8.6 Download the source file . . . 87
9 GWT Dialogbox Example 88 9.1 Introduction . . . 88
9.2 Class Declaration . . . 88
9.3 Constructors. . . 88
9.3.1 DialogBox() . . . 88
9.3.2 DialogBox(boolean autoHide) . . . 89
9.3.3 DialogBox(Caption captionWidget) . . . 89
9.3.4 DialogBox(boolean autoHide, boolean modal) . . . 89
9.3.5 DialogBox(boolean autoHide, boolean modal, Caption captionWidget) . . . 89
9.4 Method Summary . . . 89
9.5 Examples . . . 89
9.5.1 Custom Dialogbox Example 1 . . . 89
9.5.2 Custom Dialogbox Example 2 . . . 92
9.6 Project References . . . 93
9.7 Download Eclipse Project. . . 93
10 GWT Dialogbox Example 94 10.1 Introduction . . . 94
10.2 Creating GWT project . . . 94
10.3 Java classes . . . 97
10.4 Difference . . . 99
10.5 Compile . . . 99
10.6 Running the application . . . 100
Copyright (c) Exelixis Media P.C., 2016
All rights reserved. Without limiting the rights under copyright reserved above, no part of this publication
Preface
Google Web Toolkit, or GWT Web Toolkit, is an open source set of tools that allows web developers to create and maintain complex JavaScript front-end applications in Java. Other than a few native libraries, everything is Java source that can be built on any supported platform with the included GWT Ant build files. It is licensed under the Apache License version 2.0.
GWT emphasizes reusable approaches to common web development tasks, namely asynchronous remote procedure calls, history management, bookmarking, UI abstraction, internationalization, and cross-browser portability. (Source: https://en.wikipedia.org/-wiki/Google_Web_Toolkit)
About the Author
JCGs (Java Code Geeks) is an independent online community focused on creating the ultimate Java to Java developers resource center; targeted at the technical architect, technical team lead (senior developer), project manager and junior developers alike. JCGs serve the Java, SOA, Agile and Telecom communities with daily news written by domain experts, articles, tutorials, reviews, announcements, code snippets and open source projects.
Chapter 1
GWT Tutorial for Beginners
1.1
Overview
In this tutorial, we will get to know aboutGoogle Web Toolkit (GWT). GWT is a development toolkit for creating optimized web application while programming in Java.
GWT allows you to build a complete web application in Java.Eclipse IDEsupports its development using pluginGoogle Plugin. GWT compiler compiles Java code into optimizedJava Scriptscompatible for multiple browsers. GWT allows easy development ofAJAXbased web application and provides a rich library ofUI widgetsto support faster development.
GWT Web Application can be customized usingCSSfiles. GWT widgets provides the Java APIs for styling widgets. GWT provides its ownRPC (Remote Procedure Call) framework to communicate between client and server. The implementation of GWT RPC service is based on Java Servletarchitecture that enables exchange of Java object overHTTP. GWT handles serializationof the Java objects passing back and forth & the arguments in the method calls and the return value.
Pre-requisite: The readers are expected to know the basics of Java Programming (SE & EE).
1.2
Sample Web Application using GWT
1.2.1
Download Eclipse, install Google plugin and GWT SDK
For the GWT development, Google provides Eclipse plugin and that can be downlodaded fromhere. If you don’t have Eclipse installed yet, go to the Eclipse Download section and get it done. As part of this article, we will be usingEclipse 4.5 (marsh).
1.2.2
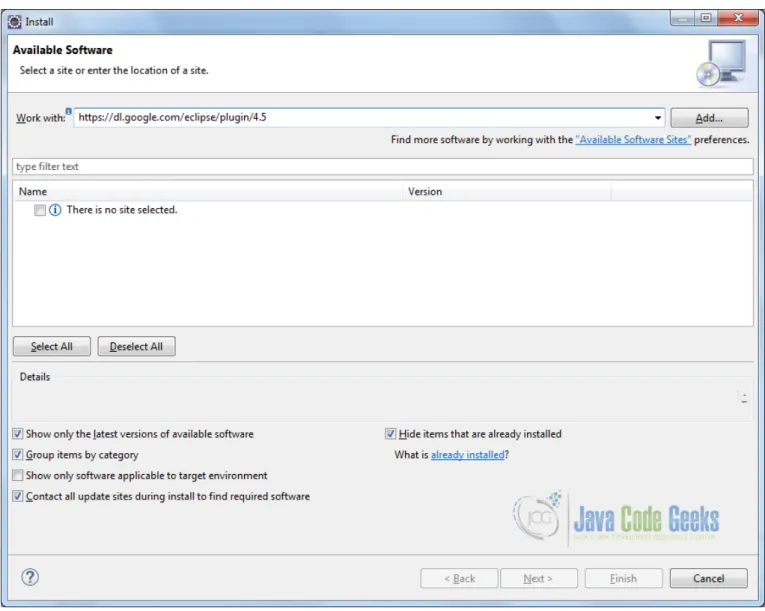
Steps to install Eclipse plugin for GWT development
Figure 1.1: Installing Google Plugin - Step 1
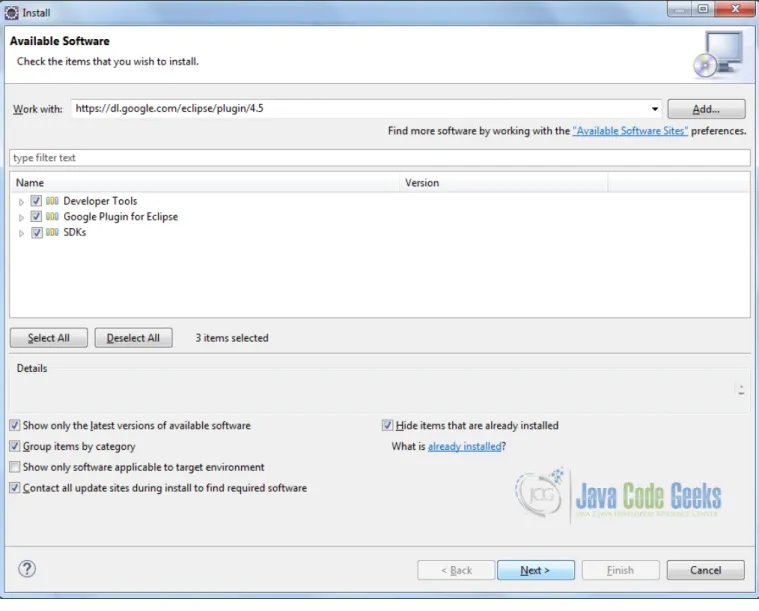
Figure 1.2: Installing Google Plugin - Step 2
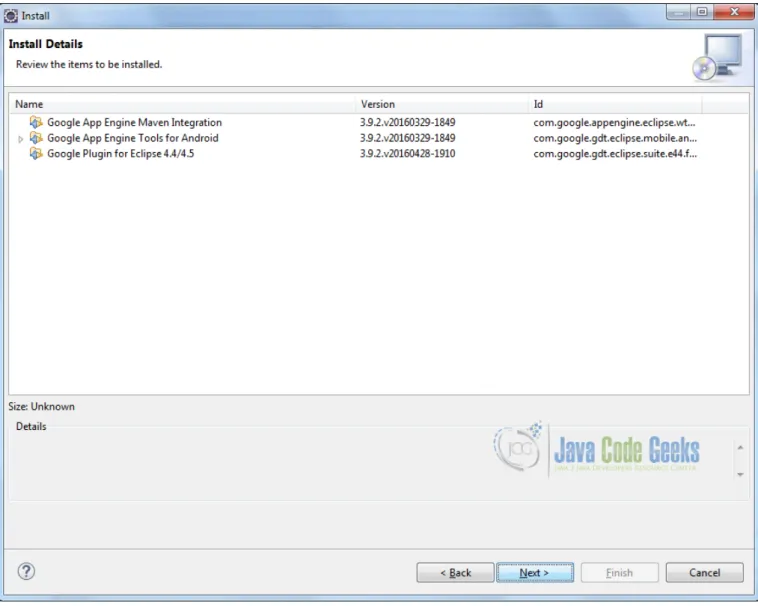
Figure 1.3: Installing Google Plugin - Step 3
Figure 1.4: Installing Google Plugin - Step 4
Figure 1.5: Installing Google Plugin - Step 5
Figure 1.6: Installing Google Plugin - Step Final
1.2.3
Creating Sample Web Application in GWT
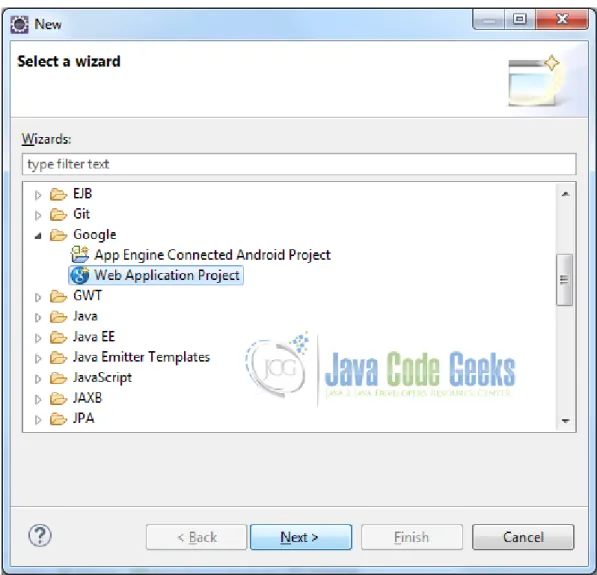
1.2.3.1 Create a new project using GWT Development toolkit
Figure 1.7: Creating GWT Web App Project - Step 1
Figure 1.8: Creating GWT Web App Project - Step 2
Provide project name and package name. Make sure that you have selected the checkbox to ‘Use GWT’. Here my intention is not using the Google App Engine that may slow down Eclipse significantly. Moreover, if you have created a Google Web Toolkit project you don’t necessarily need to deploy it to Google App Engine. For example, you can deploy the web application on Tomcat or Jboss or any other java based web container.
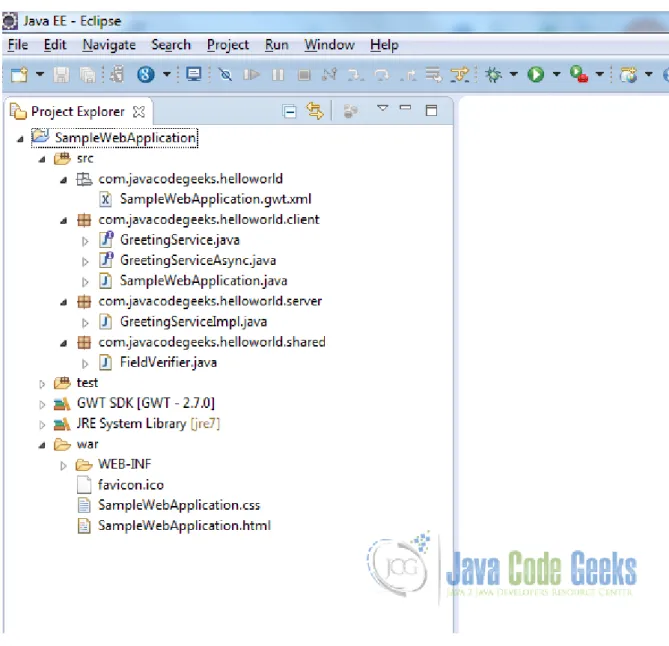
1.2.3.2 GWT Web Application Project Structure
Client and Source packages
Now when you open the source package you can see a client package that basically contains GUI code, a server package that contains server-side implementation and a shared package which basically for shared classes between various parts of the project.
Figure 1.10: Creating GWT Web App Project - Step Final
Entry Point Class
Considering the scope of this tutorial, I am not bothered to server side implementation, so I am going to delete shared package and classes inside server package. There are references to server-side code inside client package named asGreetingService. javaandGreetingServiceAsynch.java, these classes are also need to be deleted. There is a classSampleWebAppl ication.javaI am going to keep this file because the isEntry Pointfor a GWT application.
Although this file required to be cleaned as there are many references to server-side code inside it. There is a methodonM oduleLoad(), this is theEntry Point of the program or the very first method that gets executed when running the GWT Web Application. This is very similar topublic static void main(String args[])method in a conventional java program.
*/
public class SampleWebApplication implements EntryPoint {
/**
* This is the entry point method. */
public void onModuleLoad() {
// TODO
} }
Deployment Descriptor
If you are familiar with J2EE programming you will be aware ofweb.xmlthat isdeployment descriptorfor theServlet-based Java Web Applicationand used for configuration. As we defineservlet’sentry inweb.xml, now for this autogenerated code, GWT created servlets are also defined here. As we have deleted server-side code, now these entries inweb.xmlare redundant specification tags. These tags need to be removed as well.
I am going to keep thewelcome filethat isSampleWebApplication.html, as this is going to be start page for our GWT Web Application.
web.xml
<?xml version="1.0" encoding="UTF-8"?>
<web-app xmlns:xsi="https://www.w3.org/2001/XMLSchema-instance"
xsi:schemaLocation="https://java.sun.com/xml/ns/javaee https://java.sun.com/xml/ns/javaee/web-app_2_5.xsd"
version="2.5"
xmlns="https://java.sun.com/xml/ns/javaee"> <!-- Servlets -->
<!-- Default page to serve --> <welcome-file-list>
<welcome-file>SampleWebApplication.html</welcome-file> </welcome-file-list>
</web-app>
Module Descriptor
FileSampleWebApplication.gwt.xml under packagecom.javacodegeeks.helloworldis GWT specific con-figuration file. Let’s have a close look intotagsdefined into this file.
Taginheritsincludes library from core GWT. If we are willing to add any third party library we can add here using tag inharits. It references a default style which is based on how GWT control looks.
Tagentry-pointdefines the entry point class that contains the entry point of the GWT Web Application; in this case it is SampleWebApplication.java. Besides these, as GWT needs to know which code need to be converted into Java Scripts from Java code, it also contains the references ofclient packageandshared package.
SampleWebApplication.gwt.xml
<?xml version="1.0" encoding="UTF-8"?> <!
so that your app can take advantage of the latest GWT module capabilities. -->
<!DOCTYPE module PUBLIC "-//Google Inc.//DTD Google Web Toolkit 2.7.0//EN" "https://gwtproject.org/doctype/2.7.0/gwt-module.dtd">
<module rename-to=’samplewebapplication’>
<!-- Inherit the core Web Toolkit stuff. --> <inherits name=’com.google.gwt.user.User’/>
<!-- Inherit the default GWT style sheet. You can change --> <!-- the theme of your GWT application by uncommenting --> <!-- any one of the following lines. --> <inherits name=’com.google.gwt.user.theme.clean.Clean’/>
<!-- <inherits name=’com.google.gwt.user.theme.standard.Standard’/> --> <!-- <inherits name=’com.google.gwt.user.theme.chrome.Chrome’/> --> <!-- <inherits name=’com.google.gwt.user.theme.dark.Dark’/> --> <!-- Other module inherits --> <!-- Specify the app entry point class. -->
<entry-point class=’com.javacodegeeks.helloworld.client.SampleWebApplication’/> <!-- Specify the paths for translatable code -->
<source path=’client’/> <source path=’shared’/> <!-- allow Super Dev Mode --> <add-linker name="xsiframe"/> </module>
Welcome file
Now let’s have a close look intoSampleWebApplication.html. We will discuss about several tags and its importance in reference with GWT application.
There is aCSSfile reference using taglinkintended for styling. There isSampleWebApplication.cssfile as part of auto-generated files with some default values. The tagtitle Web Application Starter Projectwhere you can mention anything that you want to be displayed astitleon you web application GUI.
You can see the tag scripts. This tag is responsible for including the java scripts code generated from java code after compilation intoHTMLfile. When we compile java code using GWT compiler, the java code gets converted into optimized Java Scripts and this tag includes the generated Java Scripts intoHTMLfile. If this tag is not here, the GWT code is not going to be included into your web application project.
At the end of the file there is body tag that contains some markups to render HTML file, I am going to delete that. SampleWebApplication.html
<!doctype html>
<!-- The DOCTYPE declaration above will set the --> <!-- browser’s rendering engine into --> <!-- "Standards Mode". Replacing this declaration --> <!-- with a "Quirks Mode" doctype is not supported. -->
<html> <head>
<meta http-equiv="content-type" content="text/html; charset=UTF-8">
<!-- -->
<!-- Consider inlining CSS to reduce the number of requested files -->
<!-- -->
<link type="text/css" rel="stylesheet" href="SampleWebApplication.css">
<!-- be added before this line. -->
<!-- -->
<script type="text/javascript" language="javascript" src="samplewebapplication/ ←
-samplewebapplication.nocache.js"></script> </head>
<!-- -->
<!-- The body can have arbitrary html, or --> <!-- you can leave the body empty if you want --> <!-- to create a completely dynamic UI. -->
<!-- -->
<body>
<!-- RECOMMENDED if your web app will not function without JavaScript enabled --> <noscript>
Your web browser must have JavaScript enabled in order for this application to display correctly.
</noscript>
</body> </html>
Adding UI components into GWT Web Application Project
Before going through this section I will suggest to look intoGWT Showcasewhere you will get familiar with available widgets to develop GUI.
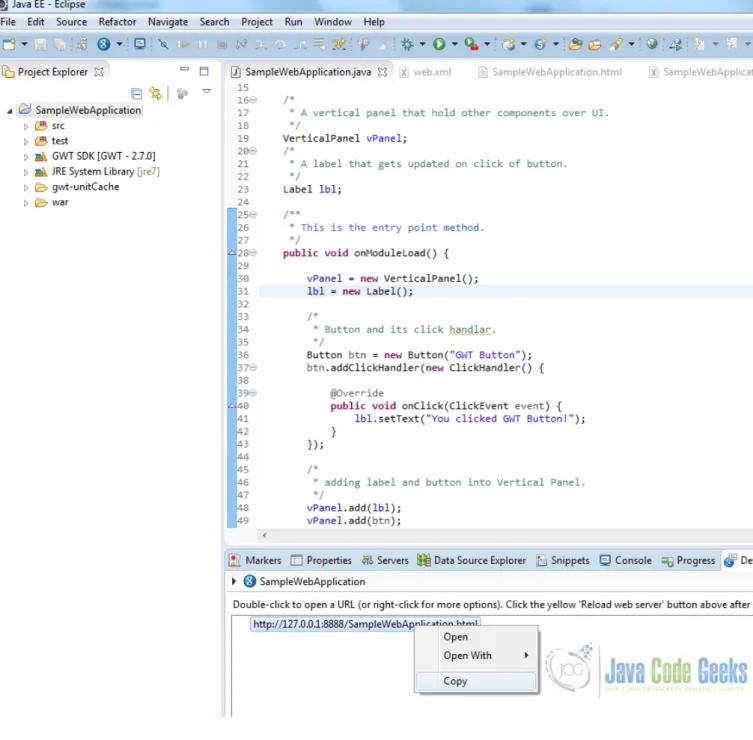
Now we can move to ourEntry Point Classand will do some coding for UI development. Here we have developed a very basic GWT Web Application GUI that shows a button and a label and that label gets updated on click of the button. Here is the GWT Web Application code that comprises very basicUI Widgets: aGWT Labeland aGWT Button.GWT Labelis getting updated on click ofGWT Button. All these widgets are added into aGWT Vertical Paneland this panel is added intoRoot PanelofWelcome HTML page.
SampleWebApplication.java package com.javacodegeeks.helloworld.client; import com.google.gwt.core.client.EntryPoint; import com.google.gwt.event.dom.client.ClickEvent; import com.google.gwt.event.dom.client.ClickHandler; import com.google.gwt.user.client.ui.Button; import com.google.gwt.user.client.ui.Label; import com.google.gwt.user.client.ui.RootPanel; import com.google.gwt.user.client.ui.VerticalPanel; /**
* Entry point classes define ‘onModuleLoad()‘.
*/
public class SampleWebApplication implements EntryPoint {
/*
* A vertical panel that hold other components over UI. */
/*
* A label that gets updated on click of button.
*/
Label lbl;
/**
* This is the entry point method. */
public void onModuleLoad() {
vPanel = new VerticalPanel(); lbl = new Label();
/*
* Button and its click handlar. */
Button btn = new Button("GWT Button"); btn.addClickHandler(new ClickHandler() {
@Override
public void onClick(ClickEvent event) {
lbl.setText("You clicked GWT Button!"); }
});
/*
* adding label and button into Vertical Panel.
*/
vPanel.add(lbl); vPanel.add(btn);
/*
* Adding vertical panel into HTML page. */
RootPanel.get().add(vPanel); }
}
Running GWT Web Application
GWT Web Application can run into two modes, Development mode and Production mode. In development mode java code runs on JVM whereas in production mode GWT compiler compiles java code and creates java scripts that run on browser.
Figure 1.11: Running GWT App - Step 1
Figure 1.12: Running GWT Web App - Step 2
Figure 1.13: Running GWT App - Step Final
1.3
Debugging GWT Web Application
With newer Chrome version, you will not able to run GWT Web Application in classic development mode as its support is now closed from Google. This is because of newer chrome version provides support for ‘Super Dev Mode’ and enable user to debug using asserts, console logging and error messages.
1.4
Project References
GWT Overview
GWT Getting Started
GWT Latest Tutorial
GWT Product Release Notes
GWT Sample Showcase
1.5
Conclusion
This tutorial covers the development of Client side of a GWT Web Application. I would suggest to explore more about UI development and hands on GWT Widgets.
We can explore more on Server communication in following tutorial.
1.6
Download Eclipse Project
Download
Chapter 2
GWT Sample Application Example
In this example we will learn how to build a simple GWT application from scratch. Google Web Toolkit is a development framework for creating Ajax-enabled web applications in Java. It’s open source, completely free. Tools and technologies used in this example are Java 1.8, Eclipse Luna 4.4.2, Eclipse GWT Plugin 2.6
2.1
Introduction
The GWT SDK provides a set of core Java APIs and Widgets. These allow us to write AJAX applications in Java and then compile the source to highly optimized JavaScript that runs across all browsers, including mobile browsers for Android and the iPhone. The GWT SDK contains the Java API libraries, compiler, and development server. It lets us write client-side applications in Java and deploy them as JavaScript.
Constructing AJAX applications in this manner is more productive thanks to a higher level of abstraction on top of common concepts like DOM manipulation and XHR communication. We aren’t limited to pre-canned widgets either. Anything we can do with the browser’s DOM and JavaScript can be done in GWT, including interacting with hand-written JavaScript.
We can debug AJAX applications in our favorite IDE just like we would a desktop application, and in our favorite browser just like we would if you were coding JavaScript. The GWT developer plugin spans the gap between Java bytecode in the debugger and the browser’s JavaScript. Thanks to the GWT developer plugin, there’s no compiling of code to JavaScript to view it in the browser. We can use the same edit-refresh-view cycle we’re used to with JavaScript, while at the same time inspect variables, set breakpoints, and utilize all the other debugger tools available to us with Java. And because GWT’s development mode is now in the browser itself, we can use tools like Firebug and Inspector as we code in Java.
GWT contains two powerful tools for creating optimized web applications. The GWT compiler performs comprehensive opti-mizations across your codebase - in-lining methods, removing dead code, optimizing strings, and more. By setting split-points in the code, it can also segment your download into multiple JavaScript fragments, splitting up large applications for faster startup time. Performance bottlenecks aren’t limited to JavaScript. Browser layout and CSS often behave in strange ways that are hard to diagnose. Speed Tracer is a new Chrome Extension in GWT that enables you to diagnose performance problems in the browser. When you’re ready to deploy, GWT compiles your Java source code into optimized, stand-alone JavaScript files that automatically run on all major browsers, as well as mobile browsers for Android and the iPhone.
2.2
GWT SDK
Unlike JavaScript minifiers that work only at a textual level, the GWT compiler performs comprehensive static analysis and optimizations across your entire GWT codebase, often producing JavaScript that loads and executes faster than equivalent hand-written JavaScript. For example, the GWT compiler safely eliminates dead code - aggressively pruning unused classes, methods, fields, and even method parameters - to ensure that your compiled script is the smallest it can possibly be. Another example: the GWT compiler selectively inlines methods, eliminating the performance overhead of method calls.
2.3
Installing Eclipse GWT Plugin
You can install the Google Plugin for Eclipse using the software update feature of Eclipse. Below we describe the steps for installing this plugin:
• Start Eclipse
Figure 2.1: GWT Plugin
• The required component is Google Plugin for Eclipse. Select the checkbox next to Google Plugin for Eclipse(required). Click Next.
• Review the features that you are about to install. Click Next.
• Read the license agreements and then select I accept the terms of the license agreements. Click Finish. • Click OK on the Security Warning.
• You will then be asked be asked if you would like to restart Eclipse. Click Restart Now.
2.4
Creating GWT project
GWT is that we can leverage the tools, such as refactoring, code completion, and debugging, available in a Java IDE. Below are the steps needed to create a new GWT project using Eclipse.
• Open Eclipse. Click File⇒New⇒Web Application Project. If we don’t findWeb Application Projectoption in the list, click onOtherand in the Wizards search box writeWeb Application Project.
• Ensure that theUse default SDK {$GWT-version}option is selected.
• (Optional) If you are using Google App Engine, make sure Use Google App Engine is checked and that Use default SDK (App Engine) is selected.
• If you did not install the SDKs when you installed the Google Plugin for Eclipse, you should click Configure SDKs. . . to specify the directory where GWT (and the App Engine SDK if necessary) was unzipped.
• Make sure the check box under Sample Code (Generate project sample code) is selected. • ClickFinishbutton.
2.5
Development Mode
We can run the GWT application in a development mode which is a very useful feature. This feature can be used to diagnose any UI issues. To start a GWT application in development mode Right click on the GWT project and chooseDebug As⇒’Web Application’. This creates a Web Application launch configuration for you and launches it. The web application launch configu-ration will start a local web server and GWT development mode server. You will find a Web Application view next to the console window. Inside you will find the URL for the development mode server. Paste this URL into Firefox, Internet Explorer, Chrome, or Safari. If this is your first time using that browser with the development mode server, it will prompt you to install the GWT Developer Plugin. Follow the instructions in the browser to install.
Once the application is running in a development mode you can make some changes (client-side) and can immediately see the result when refreshing the browser page.
2.6
Testing the default project configuration
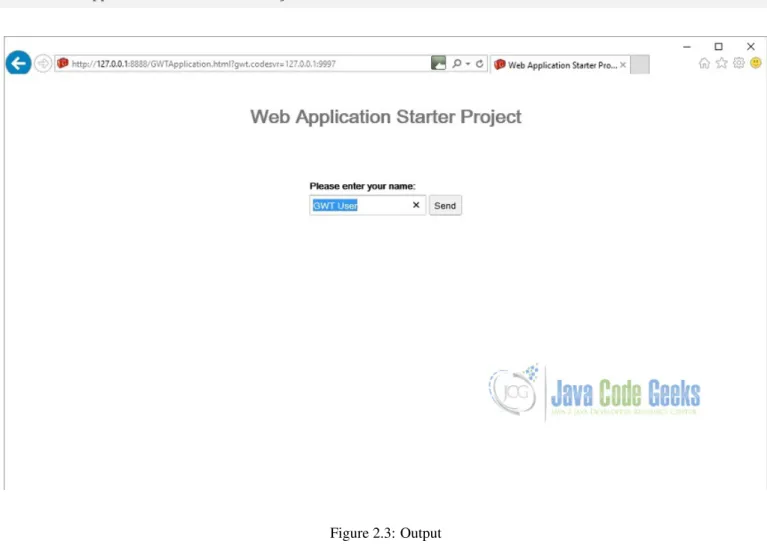
In this section we will see how we can test that the project setup is done correctly. To check that all the project components were created, run the starter application in development mode. In development mode, you can interact with the application in a browser just as you would when it’s eventually deployed.
• In the Package Explorer window right click on the Project. • Select Run As⇒Web Application (GWT Classic Dev Mode)
• Copy the URL displayed in the Development Mode window and paste it in the browser and press Enter. Below is what gets output in the Console window when we run the application:
Initializing App Engine server
Feb 26, 2016 12:23:59 PM com.google.apphosting.utils.config.AppEngineWebXmlReader ←
-readAppEngineWebXml
INFO: Successfully processed E:\meraj\study\eclipse-workspace\GWTApplication\war\WEB-INF/ ←
-appengine-web.xml
Feb 26, 2016 12:23:59 PM com.google.apphosting.utils.config.AbstractConfigXmlReader ←
-readConfigXml
INFO: Successfully processed E:\meraj\study\eclipse-workspace\GWTApplication\war\WEB-INF/ ←
-web.xml
Feb 26, 2016 12:23:59 PM com.google.appengine.tools.development.SystemPropertiesManager ←
-setSystemProperties
INFO: Overwriting system property key ’java.util.logging.config.file’, value ’E:\meraj\ ←
-study\eclipse\plugins\com.google.appengine.eclipse.sdkbundle_1.9.19\appengine-java-sdk ←
--1.9.19\config\sdk\logging.properties’ with value ’WEB-INF/logging.properties’ from ’E:\ ←
-meraj\study\eclipse-workspace\GWTApplication\war\WEB-INF\appengine-web.xml’
Feb 26, 2016 12:24:00 PM com.google.apphosting.utils.jetty.JettyLogger info
INFO: Logging to JettyLogger(null) via com.google.apphosting.utils.jetty.JettyLogger Feb 26, 2016 12:24:00 PM com.google.appengine.tools.development.DevAppServerImpl ←
Feb 26, 2016 12:24:02 PM com.google.appengine.tools.development.AbstractModule startup INFO: The admin console is running at https://localhost:8888/_ah/admin
Feb 26, 2016 12:24:02 PM com.google.appengine.tools.development.DevAppServerImpl doStart INFO: Dev App Server is now running
Figure 2.3: Output
Once you have started the development mode and entered the URL into the browser, the browser will attempt to connect. If this is your first time running a GWT application in development mode, you may be prompted to install the Google Web Toolkit Developer Plugin. Follow the instructions on the page to install the plugin, then restart the browser and return to the same URL.
2.7
Project components
Let’s examine some of the generated files and see how they fit together to form a GWT project.
2.7.1
GWT Configuration file
<?xml version="1.0" encoding="UTF-8"?> <!
--When updating your version of GWT, you should also update this DTD reference, so that your app can take advantage of the latest GWT module capabilities.
-->
<!DOCTYPE module PUBLIC "-//Google Inc.//DTD Google Web Toolkit 2.6.0//EN"
"https://google-web-toolkit.googlecode.com/svn/tags/2.6.0/distro-source/core/src/gwt-module ←
-.dtd">
<module rename-to=’gwtapplication’>
<!-- Inherit the core Web Toolkit stuff. --> <inherits name=’com.google.gwt.user.User’/>
<!-- Inherit the default GWT style sheet. You can change --> <!-- the theme of your GWT application by uncommenting --> <!-- any one of the following lines. -->
<inherits name=’com.google.gwt.user.theme.clean.Clean’/>
<!-- <inherits name=’com.google.gwt.user.theme.standard.Standard’/> --> <!-- <inherits name=’com.google.gwt.user.theme.chrome.Chrome’/> --> <!-- <inherits name=’com.google.gwt.user.theme.dark.Dark’/> --> <!-- Other module inherits -->
<!-- Specify the app entry point class. -->
<entry-point class=’com.javacodegeeks.client.GWTApplication’/> <!-- Specify the paths for translatable code -->
<source path=’client’/> <source path=’shared’/> <!-- allow Super Dev Mode --> <add-linker name="xsiframe"/> </module>
In the module XML file, you specify your application’s entry point class. In order to compile, a GWT module must specify an entry point. If a GWT module has no entry point, then it can only be inherited by other modules. It is possible to include other modules that have entry points specified in their module XML files. If so, then your module would have multiple entry points. Each entry point is executed in sequence.
By default, the application uses two style sheets: the default GWT style sheet, standard.css (which is referenced via the inherited theme), and the application style sheet, GSTApplication.css which was generated by Eclipse GWT plugin.
2.7.2
Landing page
The code for a web application executes within an HTML document. In GWT, we call this the host page. For example, the host page for the GWTApplication project is GWTApplication.html. The host page references the application style sheet, GW-TApplication.css. The host page references the path of JavaScript source code (generated by GWT) responsible for the dynamic elements on the page. The contents of the entire body element can be generated dynamically, for example, as it is with starter application. However, when you implement the StockWatcher application, you will use a mix of static and dynamic elements. You’ll create an HTML element to use as placeholder for the dynamically generated portions of the page.
2.7.4
Java code
Currently, GWTApplication.java contains the Java source for the starter application. The GWTApplication class implements the GWT interfaceEntryPoint. It contains the methodonModuleLoad(). Because the GWTApplication class is specified as the entry point class in GWTApplication’s module definition, when you launch GWTApplication theonModuleLoad() method is called.
The GWTApplication class inherits functionality via other GWT modules you included in GWTApplication’s module definition (GWTApplication.gwt.xml). For example, when building the user interface, you’ll be able to include types and resources from the packagecom.google.gwt.user.client.uibecause it is part of the GWT core functionality included in the GWT modulecom.google.gwt.user.User.
2.8
Download the source file
This was an example of developing a GWT application. Download
Chapter 3
GWT Interview Questions and Answers
In this article we will learn about the most common interview questions asked in GWT domain. We will start with the basic ones then move on to more tricky ones.
3.1
What is GWT?
Google Web Toolkit (GWT) is a development toolkit for building ajax applications using Java. The programmer writes code in Java then GWT compiler converts this code to JavaScript. With GWT, we can develop and debug AJAX applications in the Java language using the Java development tools of our choice
GWT provides two modes:
• Development Mode: allows to debug the Java code of the application directly via the standard Java debugger. • Web mode: the application is translated into HTML and Javascript code and can be deployed to a webserver.
3.2
What is a module descriptor in GWT application?
A module descriptor is a configuration file used to set-up a GWT application.
3.3
What is a GWT Module?
A GWT module is simply an encapsulation of functionality. It shares some similarities with a Java package but is not the same thing. A GWT module is named similarly to a Java package in that it follows the usual dotted-path naming convention. For example, most of the standard GWT modules are located underneath “com.google.gwt” However, the similarity between GWT modules and Java packages ends with this naming convention.
A module is defined by an XML descriptor file ending with the extension “.gwt.xml”, and the name of that file determines the name of the module. For example, if we have a file namedsrc/com/mycompany/apps/MyApplication.gwt.xml, then that will create a GWT module namedcom.mycompany.apps.MyApplication. The contents of the .gwt.xml file specify the precise list of Java classes and other resources that are included in the GWT module.
3.4
What is an entry point class?
3.6
How do I enable assertions?
The GWT compiler recognizes the -ea flag to generate code for assertions in the compiled JavaScript. Only use assertions for debugging purposes, not production logic because assertions will only work under GWT’s development mode. By default, they are compiled away by the GWT compiler so do not have any effect in production mode unless we explicitly enable them.
3.7
What is the default style name of any GWT widget?
By default, the class name for each component is gwt-<classname>. For example, theButtonwidget has a default style of gwt-Buttonand similar wayTextBoxwidgest has a default style ofgwt-TextBox.
3.8
What is internationalization?
Internationalization is changing the language of the text based on the locale. For example the browser should display the website content in Hindi for a user sitting in India and in French for the user accessing the website from France.
3.9
What is the difference between
TextResource
and
ExternalTextResou
rce
The related resource typesTextResourceandExternalTextResourceprovide access to static text content. The main difference between these two types is that the former interns the text into the compiled JavaScript, while the latter bundles related text resources into a single file, which is accessed asynchronously.
3.10
How can you set Browser targeted Compilation in GWT?
To reduce the compilation time, choose favorite browser and add theuser.agentproperty in the module configuration file.
3.11
Why doesn’t GWT provide a synchronous server connection option?
3.12
What is GWT
ClientBundle
?
The resources in a deployed GWT application can be roughly categorized into resources to never cache (.nocache.js), to cache forever (.cache.html), and everything else (myapp.css). TheClientBundleinterface moves entries from the everything-else category into the cache-forever category.
3.13
What is
DataResource
in GWT?
ADataResourceis the simplest of the resource types, offering a URL by which the contents of a file can be retrieved at runtime. The main optimization offered is to automatically rename files based on their contents in order to make the resulting URL strongly-cacheable by the browser. Very small files may be converted into data: URLs on those browsers that support them.
3.14
How to create custom widgets in GWT?
There are three general strategies to follow:
Create a widget that is a composite of existing widgets. The most effective way to create new widgets is to extend the Compositeclass. A composite is a specialized widget that can contain another component (typically, aPanel) but behaves as if it were its contained widget. We can easily combine groups of existing widgets into a composite that is itself a reusable widget. Some of the UI components provided in GWT are composites: for example, theTabPanel(a composite of aTabBar and aDeckPanel) and theSuggestBox. Rather than create complex widgets by subclassingPanelor another Widget type, it’s better to create a composite because a composite usually wants to control which methods are publicly accessible without exposing those methods that it would inherit from itsPanelsuperclass.
Create an entirely new widget written in the Java language. It is also possible to create a widget from scratch, although it is trickier since we have to write code at a lower level. Many of the basic widgets are written this way, such asButtonand TextBox.
Create a widget that wraps JavaScript using JSNI methods. When implementing a custom widget that derives directly from theWidgetbase class, we may also write some of the widget’s methods using JavaScript. This should generally only be done as a last resort, as it becomes necessary to consider the cross-browser implications of the native methods that we write, and also becomes more difficult to debug.
3.15
What is a
UiBinder
?
UiBinderprovides a declarative way of defining User Interface. It helps to separate the programming logic from the UI.
3.16
What is the Same Origin Policy, and how does it affect GWT?
Modern browsers implement a security model known as the Same Origin Policy (SOP). Conceptually, it is very simple, but the limitations it applies to JavaScript applications can be quite subtle. Simply stated, the SOP states that JavaScript code running on a web page may not interact with any resource not originating from the same web site. The reason this security policy exists is to prevent malicious web coders from creating pages that steal web users’ information or compromise their privacy. While very necessary, this policy also has the side effect of making web developers’ lives difficult.
It’s important to note that the SOP issues are not specific to GWT; they are true of any AJAX application or framework.
3.17
Which class is the superclass of all UI widgets?
3.19
What are Layout Panels?
Layout Panels can contain other widgets. These panels controls the way widget is displayed on User Interface. Every Panel widget inherits properties fromPanelclass which in turn inherits properties fromWidgetclass and which in turn inherits properties fromUIObjectclass.
3.20
How is GWT different from other frameworks?
GWT provides a set of ready-to-use user interface widgets that we can immediately utilize to create new applications. It also provides a simple way to create innovative widgets by combining the existing ones. We can use IDE to create, debug, and unit-test our AJAX applications. We can build RPC services to provide certain functionalities that can be accessed asynchronously from the web applications easily using the GWT RPC framework.
GWT enables us to integrate easily with servers written in other languages, so we can quickly enhance our applications to provide a much better user experience by utilizing the AJAX framework. GWT has the Java-to-JavaScript compiler to distill our application into a set of JavaScript and HTML files that we can serve with any web server. This gives us a great feature browser compatibility.
3.21
What are the features of GWT
Google Web Toolkit (GWT) is a development toolkit to create RICH Internet Application. GWT provides developers option to write client side application in Java. Application written in GWT is cross-browser compliant. GWT automatically generates javascript code suitable for each browser
3.22
What can I do to make images and borders appear to load more quickly the
first time they are used?
UseImage.prefetch()
3.23
What is Deferred Binding?
Deferred Binding is GWT’s answer to Java reflection. Every web browser has its own idiosyncrasies, usually lots of them. The standard Java way of dealing with idiosyncrasies would be to encapsulate the custom code into subclasses, with one subclass for each supported browser. At runtime, the application would use reflection and dynamic classloading to select the appropriate subclass for the current environment, load the class, create an instance, and then use that instance as the service provider for the duration of the program.
must support, and generates a separate, tightly streamlined version of the application for that specific configuration. For example, it generates a different version of the application file for Firefox than it does for Opera.
The GWT Compiler uses Deferred Binding to generate a completely separate version of the application for each language.
3.24
How do I create an app that fills the page vertically when the browser window
resizes?
As of GWT 2.0, creating an application that fills the browser is easy using Layout Panels.LayoutPanelssuch asDockLay outPanelandSplitLayoutPanelautomatically resize to the size of the window when the browser resizes.
3.25
How do you make a call to the server if you are not using GWT RPC?
To communicate with the server from the browser without using GWT RPC:
• Create a connection to the server, using the browser’sXMLHTTPRequestfeature. • Construct a payload, convert it to a string, and send it to the server over the connection. • Receive the server’s response payload, and parse it according to the protocol.
3.26
How can I dynamically fetch JSON feeds from other web domains?
Like all AJAX tools, GWT’s HTTP client and RPC libraries are restricted to only accessing data from the same site where the application was loaded, due to the browser Same Origin Policy. If the application is using JSON, there is a work around to this limitation using a <script> tag (aka JSON-P).
First, we need an external JSON service which can invoke user defined callback functions with the JSON data as argument. An example of such a service is GData’s “alt=json-in-script& callback=myCallback” support. Then, we can useJsonpRequestB uilderto make our call, in a way similar to aRequestBuilderwhen we’re not making a cross-site request.
3.27
Conclusion
Chapter 4
GWT AsyncCallback Example
In previous GWT tutorials we have seenhow to setup basic project,how to create GUI using GWT Widgetsand few more GUI related chapters. As part of this tutorial we are going to look into how GWT Web Application interacts with a backend server. GWT provides a couple of different ways to communicate with a server via HTTP. We can use the GWT Remote Procedure Call (RPC) framework to transparently make calls to Java servlets. GWT AsynchCAllbackis the primary interface that a caller must implement to receive a response from a RPC.
Here we are usingGWT 2.7integrated withEclipse Mars 4.5.
4.1
Introduction
Typically Client communicates with server uses RPC (Remote Procedure Call). RPC is essentially a way of invoking a method in a class, however the only difference is that the class is located on a server, not actually the part of client program you are running. There is a problem with RPC, asJavascriptsruns in web browser and the RPC call from browser hangs browser until the response is received. To avoid the browser hanging, GWT RPC call is made "Asynchronous" and the browser does not hang while waiting for the response.
4.2
GWT RPC Mechanism
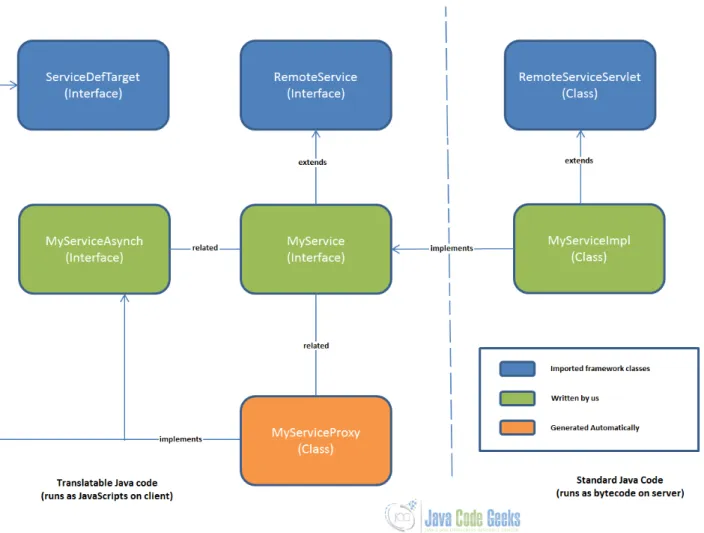
Figure 4.1: GWT RPC Mechanism
4.3
Creating Service
An interface at client-side that defines all service methods and the only way to communicate between client and server. The service is available at client-side, therefore it must be placed in the client package.
4.3.1
Define service Interface
To develop a new service interface, we will be creating a client-side Java interface that extends theRemoteServiceinterface. SampleService.java
import com.google.gwt.user.client.rpc.RemoteService;
import com.google.gwt.user.client.rpc.RemoteServiceRelativePath; @RemoteServiceRelativePath("sampleservice")
public interface SampleService extends RemoteService{ String sayHello(String name);
import com.google.gwt.user.client.rpc.AsyncCallback;
public interface SampleServiceAsync {
void sayHello(String name, AsyncCallback callback); }
4.3.3
Implementing AsynchCallback and handling its Failure
The interface AsyncCallback defines two methods OnSuccessandOnFailure. A class needs to be implemented to receive a callback from server and provide functionality on failure/success in the communication.
SampleCallback.java
import com.google.gwt.user.client.Window;
import com.google.gwt.user.client.rpc.AsyncCallback;
/**
* Class which handles the asynchronous callback from the server *
* Need to react on server communication failure and success
*/
public class SampleCallback implements AsyncCallback { @Override
public void onFailure(Throwable caught) {
// handle failure from server.
Window.alert("Not able to process client reuest. Exception occured at ←
-server: " + caught); }
@Override
public void onSuccess(String result) {
// handle the successful scenario.
Window.alert("Client request processed sucessfully. Result from server: " + ←
-result); }
}
4.4
Implementing Service
Services are responsible to perform some processing to respond to client requests. Such server-side processing occurs in the service implementation, which is based on the well-known servlet architecture.
4.4.1
Define Service Interface Implementation
let.RemoteServiceServletautomatically handles serialization of the data being passed between the client and the server and invoking the intended method in your service implementation.
SampleServiceImpl.java
import com.google.gwt.user.server.rpc.RemoteServiceServlet;
import com.javacodegeeks.helloworld.client.service.SampleService;
public class SampleServiceImpl extends RemoteServiceServlet implements SampleService { @Override
public String sayHello(String name) {
return "Hello " + name; }
}
4.4.2
Update entry of Service inside web.xml
Define the servlet and map the URL to particular service by using the short-cute name of the service or fully qualified name of the service.
web.xml
<!-- Servlets --> <servlet> <servlet-name>sampleServlet</servlet-name> <servlet-class<com.javacodegeeks.helloworld.server.SampleServiceImpl</servlet-class> </servlet> <servlet-mapping> <servlet-name>sampleServlet>/servlet-name> <url-pattern>/samplewebapplication/sampleservice</url-pattern> </servlet-mapping> </pre>
4.5
Example
This shows that the user enters value inside and test box and clicks on button and a client request goes to server and response is getting handled on GUI. On successful completion, the label gets updated otherwise an alert windows apeears.
SampleWebApplication.java
/**
* Entry point classes define ‘onModuleLoad()‘. */
public class SampleWebApplication implements EntryPoint, ClickHandler{
/**
* Instantiates service. */
SampleServiceAsync sampleServiceAsync = GWT.create(SampleService.class);
/**
* Label & Text Box. */
Label lbl; TextBox textBox;
/**
* This is the entry point method. */
);
lbl = new Label("The text will be updated here."); Image image = new Image();
image.setUrl("https://www.javacodegeeks.com/wp-content/uploads/2012/12/ ←
-JavaCodeGeeks-logo.png");
verticalPanel.add(textBox); verticalPanel.add(btn); verticalPanel.add(lbl); verticalPanel.add(image);
RootLayoutPanel.get().add(verticalPanel); }
@Override
public void onClick(ClickEvent event) {
sampleServiceAsync.sayHello(textBox.getText(), new AsyncCallback() { @Override
public void onFailure(Throwable caught) {
// handle failure from server.
Window.alert("Exception Received from server."); }
@Override
public void onSuccess(String result) { lbl.setText(result); } }); } } Output:
Check Video Output
4.6
Project References
Using GWT RPC
GWT API Reference
4.7
Download Eclipse Project
Download
Chapter 5
GWT Panel Example
5.1
Overview
In this tutorial, we will get to know about Google Web Toolkit (GWT) Panels and we shall see how to use GWT Panels in a GWT Web Application to design user interface. In our previous tutorialGWT Tutorial for Beginners, we explained how to create a GWT Web Application project using eclipse and we have seen the basic steps to develop user interface using widgets. In this tutorial we shall see how to use different type ofPanelsto develop user interface.
5.2
Introduction
Panels in aGWT Web Applicationare used to set the layout of the Application.GWT PanelsuseHTMP elementsuch asDIVand TABLEto layout their childWidgets. It is similar to useLayoutManagersin desktopJava Application. PanelscontainWidgets and otherPanels. They are used to define the layout of the user interface in the browser.
Here we are usingGWT 2.7integrated withEclipse Mars 4.5.
5.3
Layout of a GWT Web Application UI
Layout design of user interface can be controlled viaHTMLandJava. A typical user interface comprises of Top-level panel and simple panels. Top-level panels are usuallyDeckLayoutPanel,TabLaypitPanel,StacklayoutPaneletc. Simple Panels or Basic Panels areFlowPanel,HTMLPanel,FormPanel,ScrollPanel,Grid,FlexTableetc. Each panel can contain other panels.
5.4
Basic Panels
5.4.1
RootPanel
RootPanelis the top most Panel to which all otherWidgetsare ultimately attached. RootPanelsare never created directly. On the other hand, they are accessed viaRootPanel.get(). It returns asingleton panelthat wraps the GWT Web Application’s welcomeHTMLpage’sbody element. To achieve more control over user interface viaHTML, we can useRootPanel.get(S tring argument)that returns a panel for any otherelementon theHTMLpage against provided argument.
ReferRootPanel Javadocfor detailed api description. SampleRootPanel.java
/**
* This is the entry point method. */
public void onModuleLoad() {
Label lbl = new Label("This Label is added to Root Panel.");
/*
* Adding label into HTML page.
*/
RootPanel.get().add(lbl); }
Figure 5.1: Example RootPanel.
5.4.2
FlowPanel
A FlowPanel is the simplest panel that formats its child widgets using the defaultHTMLlayout behavior. AFlowPanelis rendered as anHTML divand attaches children directly to it without modification. Use it in cases where you want the natural HTMLflow to determine the layout of child widgets.
Frequently used methods:
Method Name Description
public voidadd(Widget w) Adds a new child widget to the panel.
for(int i = 1; i <= 8; i++){
Button btn = new Button("Button " + i); flowPanel.add(btn);
}
// Add the Flow Panel to the root panel.
RootPanel.get().add(flowPanel); }
Figure 5.2: Example FlowPanel
5.4.3
HTMLPanel
AnHTMLPanelrendered with the specifiedHTMLcontents. Child widgets can be added into identified elements within that HTMLcontents.
Frequently used methods:
Method Name Description
// Add buttons to html Panel
String htmlString = "This HTMLPanel contains"
+" html contents. This shows sample text inside HTMLPanel."; HTMLPanel htmlPanel = new HTMLPanel(htmlString);
// Add the HTML Panel to the root panel.
RootPanel.get().add(htmlPanel); }
Figure 5.3: Example HTMLPanel
5.4.4
FormPanel
The panel provides the behavior of anHTML FORMelement. Any widgets added to this panel will be wrapped insideHTML form element. The panel can be used to achieve interoperability with servers that accept traditionalHTML formencoding. Frequently used methods:
ReferFormPanel Javadocfor detailed api description. SampleFormPanel.java
/**
* This is the entry point method.
*/
public void onModuleLoad() {
// Create a FormPanel and point it at a service.
final FormPanel form = new FormPanel(); form.setAction("/myFormHandler");
// Because we’re going to add a FileUpload widget, we’ll need to set the
// form to use the POST method, and multipart MIME encoding.
form.setEncoding(FormPanel.ENCODING_MULTIPART); form.setMethod(FormPanel.METHOD_POST);
// Create a panel to contains all of the form widgets.
VerticalPanel panel = new VerticalPanel(); panel.setBorderWidth(1);
panel.setSpacing(4); form.setWidget(panel);
// Create a TextBox, giving it a name so that it will be submitted. final TextBox tb = new TextBox();
tb.setName("textBoxForm"); panel.add(tb);
// Create a ListBox, giving it a name and some values to be associated with
// its options.
ListBox lb = new ListBox(); lb.setName("listBoxForm");
lb.addItem("list1", "List1 Value"); lb.addItem("list2", "List2 Value"); lb.addItem("list3", "List3 Value"); panel.add(lb);
// Create a FileUpload widget.
FileUpload upload = new FileUpload(); upload.setName("uploadForm");
panel.add(upload);
// Adding a submit button.
panel.add(new Button("Submit", new ClickHandler() { @Override
public void onClick(ClickEvent event) { form.submit();
} }));
// Adding an event handler to the form.
form.addSubmitHandler(new FormPanel.SubmitHandler() {
public void onSubmit(SubmitEvent event) {
// This event is fired just before the form is submitted.
Window.alert("Text box must not be empty"); event.cancel();
} }
});
form.addSubmitCompleteHandler(new FormPanel.SubmitCompleteHandler() {
public void onSubmitComplete(SubmitCompleteEvent event) {
// This event fired after the form submission is successfully ← -completed.
// Assuming the service returned a response of type text/html,
// we can get the result text here.
Window.alert(event.getResults()); }
});
RootPanel.get().add(form); }
Figure 5.4: Example FormPanel
5.4.5
ScrollPanel
A Simple panel that wraps its contents into a scrollable area. Using constructorscrollPanle()andscrolPanle(Widget w)we can create empty scroll panel and scroll panel with given widget.
Frequently used methods:
publicScrollPanel(Widget child) Creates a new scroll panel with the given child widget. public voidsetSize(String width, String height) Sets the object’s size.
ReferScrollPanel Javadocfor detailed api description. SampleScrollPanel.java
/**
* This is the entry point method.
*/
public void onModuleLoad() {
// scrollable text
HTML htmlString = new HTML("This *HTMLPanel* contains"
+"This is sample text inside the scrollable panel. "
+ "This content should be big enough to enable the scrolling. "
+ "We added the same content here again and again to make the "
+ "content large enough. This is text inside the scrollable panel."
+ " This content should be big enough to enable the scrolling."
+ " This is text inside the scrollable panel. This content should "
+ "be big enough to enable the scrolling. This is text inside the "
+ "scrollable panel. This content should be big enough to enable"
+ " the scrolling. This is text inside the scrollable panel."
+ " This content should be big enough to enable the scrolling."
+ " This is text inside the scrollable panel. This content "
+ "should be big enough to enable the scrolling.");
// scrollpanel with text
ScrollPanel scrollPanel = new ScrollPanel(htmlString); scrollPanel.setSize("400px", "150px");
// Adding the scroll panel to the root panel.
RootPanel.get().add(scrollPanel); }
Figure 5.5: Example ScrollPanel
5.4.6
Grid
A Grid is used to create traditionalHTML table. It extendsHTMLTable.Gridwhich can contain text,HTML, or a child Widget within its cells. It can be configured as per required number of rows and columns.
Frequently used methods:
Method Name Description
public voidsetWidget(int row, int column, Widget widget) Sets the widget within the specified cell. It belongs to it’s parent class HTMLTable.
ReferGrid Javadocfor detailed api description. SampleGrid.java
/**
* This is the entry point method.
*/
public void onModuleLoad() {
// Create a grid
Grid grid = new Grid(2, 2); grid.setBorderWidth(1);
// Add buttons, checkboxes to the grid int rows = grid.getRowCount();
int columns = grid.getColumnCount();
for (int row = 0; row < rows; row++) {
for (int col = 0; col < columns; col++) {
if (row == 0) {
grid.setWidget(row, col, new Button("Button " + row + col)) ←
-; } else {
grid.setWidget(row, col, new CheckBox("CheckBox " + row + ←
-col)); }
} }
// Adding grid to the root panel.
RootPanel.get().add(grid); }
Figure 5.6: Example Grid
5.4.7
FlexTable
FlexTablealso extendsHTMLTablelikeGrid. This table creates cells on demand. Individual cells inside the table can be set to span multiple rows or columns based on indexes.
Frequently used methods:
Method Name Description
public voidremoveRow(int row) Removes the specified row from the table.
ReferFlexTable Javadocfor detailed api description. SampleFlexTable.java
/**
* This is the entry point method.
*/
public void onModuleLoad() {
// Create a Flex Table
final FlexTable flexTable = new FlexTable();
// Add button that will add more rows to the table
Button addBtn = new Button(" Add Button ", new ClickHandler() { @Override
public void onClick(ClickEvent event) { addRow(flexTable);
} });
addBtn.setWidth("120px");
// Remove button that will add more rows to the table
Button removeBtn = new Button("Remove Button", new ClickHandler() { @Override
public void onClick(ClickEvent event) { removeRow(flexTable);
} });
removeBtn.setWidth("120px");
VerticalPanel buttonPanel = new VerticalPanel(); buttonPanel.add(addBtn);
buttonPanel.add(removeBtn);
flexTable.setWidget(0, 2, buttonPanel);
// Add two rows to start
addRow(flexTable); addRow(flexTable);
RootPanel.get().add(flexTable); }
/**
* Add a row to the flex table. */
private void addRow(FlexTable flexTable) {
int numRows = flexTable.getRowCount();
flexTable.setWidget(numRows, 0, new Button("Button at column " + "0")); flexTable.setWidget(numRows, 1, new Button("Button at column " + "1")); }
/**
* Remove a row from the flex table. */
private void removeRow(FlexTable flexTable) {
int numRows = flexTable.getRowCount();
if (numRows > 1) {
flexTable.removeRow(numRows - 1); }
LayoutPanelis the most general approach to design layout. Mostly other layouts are built upon it. LayoutPanelalways tries to fill all the available size in the window, so the content inside of the panel will perfectly fit the browser window size.LayoutPanel follows the size of the browser window, and try to resizes child elements accordingly. WhereasPanel’schild widgets are not automatically resized when the browser window resizes.
It is notable that this panel works in standard mode, which requires that the HTML page in which it is run has an explicit !DOCTYPEdeclaration.
5.5.1
RootLayoutPanel
A singleton implementation of LayoutPanel always attaches itself to the element ofGWT Web Application Welcome HTML Page. You can’t choose whichHTMLelement on the welcome page will become a starting point unlikeRootPanel. This panel automatically callsRequiresResize.onResize()on itself when initially created, and whenever the window is resized. Frequently used methods:
Method Name Description
public staticRootLayoutPanel get() Gets the singleton instance of RootLayoutPanel. This instance will always be attached to the document body.
ReferRootLayoutPanel Javadocfor detailed api description. SampleRootLayoutPanel.java
/**
* This is the entry point method. */
public void onModuleLoad() {
// Attach two child widgets to a LayoutPanel, laying them out horizontally, // splitting at 50%.
Widget childOne = new HTML("left"); Widget childTwo = new HTML("right"); LayoutPanel p = new LayoutPanel(); p.add(childOne);
p.add(childTwo);
p.setWidgetLeftWidth(childOne, 0, Unit.PCT, 50, Unit.PCT); p.setWidgetRightWidth(childTwo, 0, Unit.PCT, 50, Unit.PCT);
// Attach the LayoutPanel to the RootLayoutPanel.
RootLayoutPanel.get().add(p); }
Figure 5.7: Example RootLayoutPanel
5.5.2
DockLayoutPanel
A panel that lays its child widgets at its outer edges, and allows its last widget to take up the remaining space in its center.This widget will also work only in standards mode, which requires that GWT Web Application welcomeHTMLpage contains !DOC-TYPEdeclaration.
public voidaddNorth(Widget widget, double size) Adds a widget to the north edge of the dock. public voidaddSouth(Widget widget, double size) Adds a widget to the south edge of the dock. public voidaddWest(Widget widget, double size) Adds a widget to the west edge of the dock.
ReferDockLayoutPanel Javadocfor detailed api description. SampleDockLayoutPanel.java
/**
* This is the entry point method.
*/
public void onModuleLoad() {
// Attach five widgets to a DockLayoutPanel, one in each direction. Lay
// them out in ’em’ units.
DockLayoutPanel p = new DockLayoutPanel(Unit.EM); p.addNorth(new HTML("north"), 8);
p.addSouth(new HTML("south"), 8); p.addEast(new HTML("east"),8); p.addWest(new HTML("west"), 8); p.add(new HTML("center"));
// Attach the DockLayoutPanel to the RootLayoutPanel.
RootLayoutPanel rp = RootLayoutPanel.get(); rp.add(p);
}
Figure 5.8: Example DockLayoutPanel
5.5.3
SplitLayoutPanel
This panel extends DockLayoutPanel. The panel is used in the same way as DockLayoutPanel, except that its children’s sizes are always specified in absolute value, and each pair of child widget has a splitter between them, that the user can drag.
SampleSplitLayoutPanel.java
/**
* This is the entry point method. */
public void onModuleLoad() {
// Create a three-pane layout with splitters.
SplitLayoutPanel p = new SplitLayoutPanel(); p.addWest(new HTML("Navigation Tree"), 128); p.addNorth(new HTML("Panel 1"), 384);
p.add(new HTML("Panel 2"));
// Attach the LayoutPanel to the RootLayoutPanel.
RootLayoutPanel rp = RootLayoutPanel.get(); rp.add(p);
}
Figure 5.9: Example SplitLayoutPanel
5.5.4
StackLayoutPanel
The panel stacks its children vertically, displaying only one at a time, with a header for each child which the user can click to display.
ReferStackLayoutPanel Javadocfor detailed api description. SampleStackLayoutPanel.java
/**
* This is the entry point method. */
public void onModuleLoad() {
// Create a three-item stack, with headers sized in EMs.
StackLayoutPanel p = new StackLayoutPanel(Unit.EM); p.add(new HTML("this"), new HTML("[this]"), 4); p.add(new HTML("that"), new HTML("[that]"), 4);
p.add(new HTML("the other"), new HTML("[the other]"), 4);
// Attach the StackLayoutPanelto the RootLayoutPanel.
RootLayoutPanel rp = RootLayoutPanel.get(); rp.add(p);
}
Figure 5.10: Example StackLayoutPanel
5.5.5
TabLayoutPanel
A panel represents a tabbed set of pages, each of which contains another widget. It’s child widgets are shown as the user selects the various tabs associated with them. The tabs can contain arbitrary text,HTML, or widgets. This widget will only work in standards mode as well.
ReferTabLayoutPanel Javadocfor detailed api description. SampleTabLayoutPanel.java
/**
* This is the entry point method. */
public void onModuleLoad() {
// Create a three-item tab panel, with the tab area 1.5em tall.
TabLayoutPanel p = new TabLayoutPanel(1.5, Unit.EM); p.add(new HTML("tab1 content"), "TAB1");
p.add(new HTML("tab2 content"), "TAB2"); p.add(new HTML("tab3 content"), "TAB3");
// Attach the TabLayoutPanel to the RootLayoutPanel.
RootLayoutPanel rp = RootLayoutPanel.get(); rp.add(p);
}
Figure 5.11: Example TabLayoutPanel
5.6
Project References
GWT UIPanels
GWT API Reference


![catena Poly[[triphenyltin(IV)] μ N (4 acetylphenyl)maleamato]](data:image/gif;base64,R0lGODlhAQABAIAAAP///wAAACH5BAEAAAAALAAAAAABAAEAAAICRAEAOw==)