Theses
Thesis/Dissertation Collections
6-8-1968
Ceramic planters
Robert Forrest Garren
Follow this and additional works at:
http://scholarworks.rit.edu/theses
This Thesis is brought to you for free and open access by the Thesis/Dissertation Collections at RIT Scholar Works. It has been accepted for inclusion
in Theses by an authorized administrator of RIT Scholar Works. For more information, please contact
.
Recommended Citation
CERAMIC
PLANTERS
Robert Forrest
Garren
Candidate for
the Master
ofFine
Arts
in the School for American Craftsmen
ofthe
Rochester
Institute
ofTechnology
June
8,
1968
Advisors:
Frans
Wildenhain
TABLE
OF CONTENTS
Introduction
1
Planters
2
Clay
Bodies
9
Glazes
13
Conclusion
20
Illustrations
21
Appendix
38
several reasons.
In
working
with plantersI
wouldbe
challenged
in
the
area ofsize,
learning
to
throw
large
pots
using
methodsI have
long
wishedto
explore.I
would also encounter much
variety in
size,
form,
anddesign,
producinglarge,
standing
planters andsmaller,
hanging
plantersin
variousdesigns.
A
mostimportant
motivation was
my
greatinterest
in
plants.This
inter
est channeledmy
researchinto
the
basic
biological
requirements of plants as well as
the
aesthetic values ofvide
the
physical environmentnecessary
for
plants,
but
require
further decoration in the form
ofmurals,
plants,
and
furniture
to
enhancethe
structures.I
choseto
workwith plants
in
plantersfor
this
thesis.
Much variety
existsin
these
plants and planters.Planters may
be
large
orsmall,
standing
orhanging,
glazed or unglazed.Plants may be
trailing, leafy, bushy,
orflowering.
An
advantage of movable planters
is
that
plantsmay
be
placed
in
a conspicuous position while attheir
peak andremoved
during
their dormant
period.Also
watering,
ferti
lizing,
andweeding
are accomplishedbetter
in
containers.Then
too,
a plantin
a movable planter whichhas become
infested
canbe
easily
isolated
for
treatment.
A
plantin
a gardentends
to
blend
in
withthe
othersthat
surroundit
andmay
neverbe
studied well ortruly
appreciated*Iso
lated
in
a planterit
takes
on a newbeauty.
Once
the
iso
lated
plantis
brought
into
aroom,
it
changesit
by
break
ing
up
space andcentering
attention uponitself.
Hence
both the
plant andthe
room areimproved
by
the
plantsisolation*
There
are sixbasic
requirements of plants which mustbe
considered whenraising
plantsin
pots:2.
protection againstinsects
and diseases3*
cleaning
4.
feeding
5.
watering
6.
soil mixtureOut
ofthese
six,
watering
andfeeding
weremy
main concernsin
designing
my
planters.My
concernin
the
execution ofstanding
plantersis
that
the
planthas
properdrainage
with some means of
keeping
the
water offthe
floor.
There
are several methods of
watering
plants,
some authoritiesfeel
the
best
way
is
to
water sometypes
of plantsfrom
the
bottom
eachday
allowing
the
plantsto
soakup
as muchwater as
they
requirein
a morning.Others
feel
the
plantfares
best
if
wateredfrom
the
top
whenthe
soilis
dry
andcrumbly.
Most feel
that
in
additionto
these,
submerging
the
planterin
waterto
withintwo inches
ofthe
top
untilthe
top
soilis
moistenedis
beneficial
when carried outevery
sixto
eight weeks.When
this
methodis
usedthe
container must
be
quite porous orhave
ahole
in the
bottom.
When
a planthas
reached adesirable
size and one wishesto
slow
its
growththe
plant canbe
trained
to
useless
waterwhich results
in
retarded growth.This
is
done
by
alternating
watering
from
the
top
andfrom the
bottom.
Plants
in
glazed pots requireless
waterthan
those
in
unglazedwater of
any
potted plantbecause
ofthe
enormous amount ofevaporation.
Large
clay
pots used outside will absorb agreat
deal
ofheat
and scorchthe
roots ofthe
plant.For
this
reasonit
is
important
that
a woodenbarrel
or a potpacked with moss
be
placedinside
the
clay
pot.The
planters executedfor my
thesis
project weremostly
designed for
usein the
home,
patio,
or garden as roomdi
viders,
traffic
directors,
and conversation pieces.Since
one ofmy
aims wasto
improve my
throwing
tech
nique,
my
first
planter waslarge,
thrown from
coils.See
figure
1.
First
the
bottom
ofthe
pot wasthrown
onthe
potter's wheel and allowed
to
stiffen.Then
I
rolled outa coil which was
long
enoughto
go aroundthe
pot and wasabout
two
inches
in diameter.
My
nextstep
wasto
scratcha cross
hatch
onthe
rim ofthe
potI
had
thrown.
Placing
the
coil onthe
rimI
sealedthe
coilto
both
the
outsideand
inside
ofthe
potby
pressing
down
withmy
thumbs.
I
squeezed
the
coilflat
andthen
by
using
regularthrowing
methods
I
was ableto
get sixto
eightinches
ofheight
out of each coil.
I
decorated
it
withlarge
bumps
whichwere
actually
thrown
bowls.
These had
adual
purposein
that
they
were alsohelpful
in moving the
pot.I designed
petunias,
geraniums,
and marigolds.I
think it
would alsobe
suitablefor
larger
tree-like
plants.After
this
planter wasbisque
fired
someone mentionedthat
its
basic
shape wasthat
of abig
teacup.
This
bothered
meconsiderably
andI
let
it
standfor
weeks notknowing
whatto
do
withit.
Finally
I
decided
to
take
slip
and paint aswirly
patternconnecting
the
bumps
whichI feel
unified
the
design ofthe
planter.From
this
planterI
learned
that
design
is
asimportant
as sizein
making
alarge
planter.In
this
caseI
had
used a smalldesign
-that
of ateacup
and enlargedit
many
times.
The
planterwould
have
been
more effectiveif
a more monumentalde
signhad
been
used.At
this
time
I
startedusing
my
newclay
body
whichre-suit of
the
combination andquickly destroyed
the base.
I designed
differenttypes
offeet
that
it
could standon - even
trying
the
eagle's claw on aball
whichis
sometimes seen on old
bathtubs,
finally
repeating
the
horns
from the rim,
letting
the
planter stand onfive
horns.
The
result was quite pleasing.At
this
time
I
addedbentonite
to
my
clay
andfound
that
it
wasthrowing
better
so wentback
to
throwing
onthe
wheel.One
day
in
conversation,
Professor
Wildenhain
told
me about a planter which
he
had
seen atAmerica House
which was shapedlike
a millstone with aflat
top
withabout a six-
inch
hole
in
the
middle.I
thought
it
wouldbe
goodfor
growing
a castorbean
which growsfast,
is
alarge
plant,
andhas
a small root system.This
influenced
me
to
make a similar planter shaped muchlike
anink-well*
See
figure
4*
I
addedlarge
pulledhandles
with obviousfinger
grooves.I
was quitefond
ofthese large
handles
and used avariation of
them
onmy
next pot.See
figure
5*
On
this
planterI
pulledthe
ends ofthe
handle
around untilthey
met.
I
added alump
ofclay
and pressedit
down
leaving
an abstract seal atthe
base.
This
potdeveloped
alarge
crack
in
the
bottom
causedby
notturning
it
over soon enough:to dry.
After
bisqueing
it
I
tried
crack with
kiln
cement.I
glazedthe
bottom both inside
and out
to
coverthe
mending
job,
glazedthe
handles,
andfired
it
upsidedown.
Unfortunately
the
crack re-openedin
the
glazefiring.
My
nextlarge
planter alsodeveloped
a crack and atthis
time
I became
ratherdiscouraged
withlarge
plantersand started
to
work onsmaller,
standing
planters.The
reason
for
these
cracksI
concluded was one or a combinationof
these;
not enoughgrog,
notturning
the
pot over soonenough when
drying,
or atoo
rapidfiring.
In
this
series of plantersI
became
concerned withthe
saucer,
anintegral
part ofthe
pot,
the
top
to
fit
into
the
base
leaving
enough spacefor
drainage.
At
this
time Professor Wildenhain felt
I
should explorethe
tra
ditional
shape ofthe
flower
pot and saucer.I
worked withthis
in
variousshapes,
short,
tall, full,
and narrow.See
figure
6
for
one example.Hanging
plantershave
alwaysbeen
popular,
probably
reaching
their
zenithin
the Victorian
era* Atthis
time
the
plants were arrangedvery
formally
andthe
hanging
basket usually
consistedto
upright plants surroundedby
spreading
plants surroundedby
trailing
plants.My
first
hanging
planters werethrown
onthe
potter'swheel.
On
the
first
two
plantersI
squeezedthe
sidesto
run
through
these
loops
andheld
in
placeby
groovesalong
the
side ofthe
planter sothat
the
whole planter washeld
by
one rope.See
figure 17.
The
next series of planters werebowl
shaped with aheavy
protruding
rim.I
pulledlips
in
three
places andran a rope around
the
rim. At eachlip,
aloop
wasformed
and
the
rope was runthrough
sothat
eachloop
supportedanother.
See
figure
14.
The
next planters were madein
molds -first
of plasterand when
I
realizedthe
plasterdried
the
clay
outtoo
fast
to
work with -I
usedbisque
bowls
asmolds.
Planters
were made
using
coils and slabsin
adecorative
patternin
these
forms.
These
formed
hanging
baskets
in
whichI
could pack sphagnum
moss,
then
soil,
andthen
plantthe
plant.
See
figures
10, 11, 12,
and13.
On
onebisque
bowl
I
formed
grooves andthis
gave one plantertwo
designs,
one
from
the
coils onthe
outside and onefrom
the
bisque
bo\^l
onthe
inside.
See figure
9.
I
liked
the
basket
type
of planterbut
thought
perhaps
the
time
couldbe
reducedif
the
planter werethrown
and
then
the
pieces were cut out.I
found
that
this
methodtook
far
moretime.
In
additionit
looked
too
labored.
See
figure
18.
At
this
time
I
startedusing
aclay
body
with pearlitepearl-ite
madethe
clay
not goodfor
throwing,
the
nextgroup
oflarge
planters were slabbuilt.
The
first
planter wasDe-bum
by laying
a slab over aslump
mold.Then
I
startedadding
two
inch
strips.I
added aheavier
rim atthe
top.
This
planter wastriangular
with rounded off corners.On
each of
the
three
sides were arms with open ends whichheld
the
planter.A
hole
in the
bottom
ofthe
planterallowed
for
drainage.
The
water couldtljen drain into
the
base
and evaporatethrough
the
openings atthe
ends ofthe
arms.The
next planter was alarge
thrown bowl
whichI
built up
by
adding
two
inch
strips.The
planterhad
aheavy
rim whichin
some places was2%
to
3
inches
thick.
I
paddledit
into
shape with a wooden paddle.The
deco
ration on
the
side was made withfurther
strips and paddling.See
figure
7*
I
used a sack of sawdust as a moldfor
the
last
planter
I
made withSAC
stoneware withthe
pearlitead-dition.
I
wrapped strips ofclay
around one side untilit had
reachedthe
desired height
and allowedit
to
stiffen.When
it had hardened
I
set onits
bottom
and added stripsto
the
other side untilthey
joined.
I
addedlarge
slabhandles
to
the
top.
See
figure
8.
The
bisque
firing
9
My
aimin clay
research wasto find
anddevelop
aclay
body
that
would give a good orange colorin
aheavily
reducing,
conefive
to
ninefiring.
I
had
tried
a recipefor
abody
used atAlfred
which consisted ofthe
following:
Jordan
25
Tenn.
#5
Ball
clay
25
A. P.
Green Fire
clay
20
Cedar
Heights
Redart
10
Flint
10
Custer
Spar
10
20m
Grog
10
I found
that
the
firing
schedule used atthe
School
for
American Craftsmen
did
not producethe
orange color.With
the
help
ofProfessor
Cowles
I
setup
atri-axial
blend.
In
the
A
positionI
had:
Tenn.
#5
Ball
clay
25
Cedar
Heights
Goldart
25
A. P.
Green Fire
clay
25
Cedar
Heights
Redart
25
Since
I had heard
rumorsthat
Kentucky
"Special"Ball
clay
would not produce an orangeclay
body,
I
usedTenn.
#5
because
I
needed aball
clay
to
giveit
the
required plasticity.
To
give methe
color,
I
usedtwo
fire
clays,
Gold-art and
A.
P.
Green.
The
Redart
was usedto
givethe
body
more
iron
andto
lower
the maturing
temperature.
In
the
B
positionI
used:Kentucky
"Special"Ball
clay
25
A. P.
Green
Fire
clay
25
Cedar Heights
Redart
25
I
usedKentucky
"Special"in
this
positionbecause
it
is
more plastic
than Tenn.
#5.
using
50$
fire
clay
I
coulduse as much
plasticity
asI
could get.Also,
Professor
Cowles
saw no reasonwhy
Kentucky
"Special" wouldhinder
the development
ofthe
orange color.I
used#6
Plastic
Fire
clay in
place ofGoldart.
In
the
C
positionI
used:Kentucky
"Special"Ball
clay
25
Cedar
Heights
Goldart
25
A. P.
Green Fire
clay
25
Petalite
15
Flint
10
Red
Iron
Oxide
2
In
Ron
Myers' researchon
flameware
bodies
he
produced anorange cast
to
his
clay
body
whenusing
ahigh
percentageof petalite.
Having
noticedthis
resultin Ron's
test
I
decided
to
seeif
petalite wouldhelp
develop
the
colorin
my clay
body.
Noticing
that
the
Alfred
body
used10$
free
flint
I
decided
to
useflint
in
this
position.At
the
conclusion ofthis
test
I
was satisified withthe
colorin
the
C
point.At
that
time
I
mixedup
ahundred
pound
batch.
In
useI
discovered
that
it
was not plasticenough,
It
would split open whenthrowing
withit.
I
first
added
three
percentbentonite
whichimproved
the plasticity
greatly but
also grayedthe
color.Then
I
mixed abatch
withtwo
percentbentonite.
This
alsohurt
the
color.When
I
used one percent
bentonite
I found that
I
gotthe
good11
bentonite*
I
wantedto find
out alittle
more aboutthis
clay
body
andI
was alsovery
muchinterested
to
learn
if
changing
the
Kentucky
"Special"to
Tenn.
#5
would changeit
in any
way.It did.
It
produced adull
brown.
I
made a
further
change.I
eliminatedthe
rediron
oxideand used
North
American
fire
clay
in
place ofthe A.
P.
Green
fire
clay
which produced agray
body
withtan
speckles.
Pat
Rafoss
washaving
goodluck
with an orangebody
which consisted of:Fine
Grog
(60
Mesh)
20
Cedar
Heights
Goldart
63
M&D
clay
12
Elbrook
felspar
5
After
looking
ather
recipesI
was curiousto find
outwhat
the
M
andD
clay
woulddo
in
my
recipein
place ofthe
Kentucky
"Special"Ball
clay.The
results were a smallamount of orange
in
a red-brownbody.
My
conclusionis
that
the
C
position with one percentbentonite
produces aconsistently
orangebody,
slightly
brighter
at conefive
than
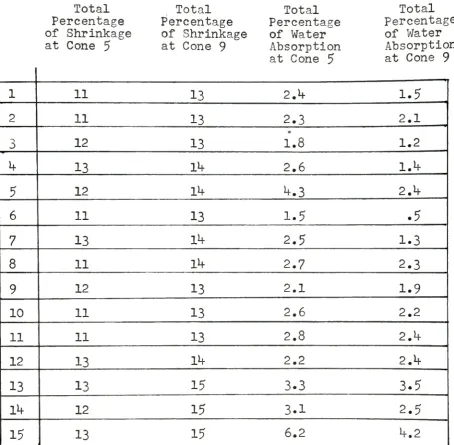
cone nine.The
shrinkage and absorption ofthese
tests
are reported
in
table
1
ofthe
appendix.I
originally
startedworking
on aclay
body
with additions
of pearlitefor
usein
murals.I
wantedthe
clay
to
be
lightweight
andI
wantedto
useit
in
greatthick
de-cided
to
usethis
in
building
planters wasthat
whenthe
clay
had
reachedits maturity it
was stillvery
porous whenthe
pearlitehad
melted out.I
rantwo
tests,
the
first
one50%
SAC
stoneware:Kentucky
"Special"100
lbs.
XX Sagger
100
lbs.
North American fire
clay
25
lbs.
Cedar
Heights
Redart
50 lbs.
Bentonite
3
lbs.
Red
Iron Oxide
6 lbs.
and
50%
by
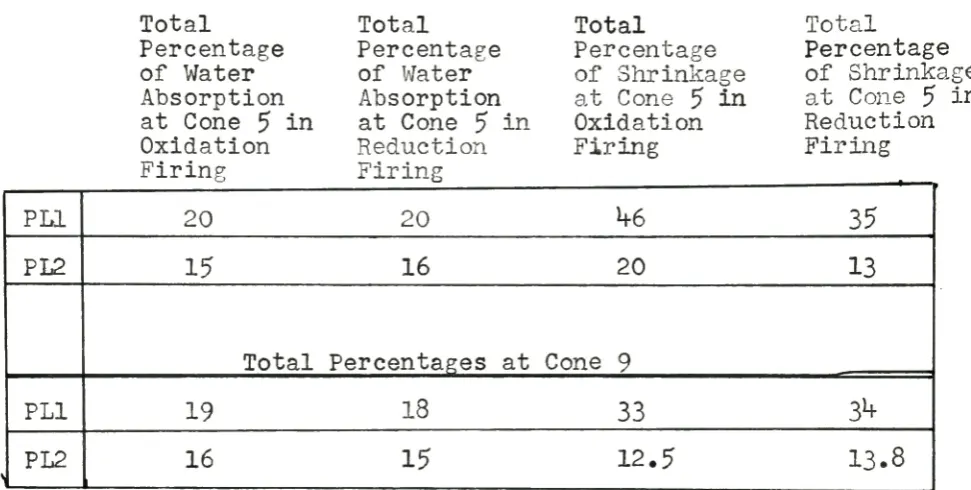
volume of pearlite.The
table
*of
shrinkage and absorption are shown ontable
II.
I
also madetwo
My
aimin
glaze research wasto
x-rork withbarium
matteglazes.
My
first
experiment wasfor
a cone9
glaze.I
started with
this
formula:
Barium
Carbonate
25
Nepheline
Syenite
25
Clinchfield Felspar
25
Zinc
Oxide
15
The
results ofthis
glazetest
showedit
would need an addition
offlint,
soto
the
above recipeI
addedfive
additions
offive
grams offlint.
The
first
five
gram addition
produced afairly
good matte surface.The
secondcaused some
bubbling
along the
edge ofthe
test
tile.
The
third
addition produced anincreased
amount ofbubbling.
The
last
two
produced ashiny
glaze.I
decided
to
use apoint
midway
(7.5
gms.)between
the
first
and second additions
offlint
andtest
for
color.My
first
test
waswith copper oxide
using
four
additions of one gram each ofcopper.
The
lower
part ofthe
tile
whichhad
one application of glaze was a
dark brownish
green whichindicated
a
strong
reactionto
the
clay body.
The
top
portion whichhad
adouble
application of glaze showed speckles ofblue-green.
In
allfour
tests
the
amount of copperdid
notchange
the
appearance ofthe
tests.
ad-ih
ditions
ofBall
clay to
seeif
this
would cutdown
the
reaction of
the
body
withthe glaze,
andthus
releasethe
color
to
the
surface.I
found
that
a2%
addition ofKentucky
"Special"Ball
clay
cutdown
the
clay
body-glaze
reaction and
I
was ableto
produce good colors.This
glazewhich
I
namedRC2B
consists ofthe
following:
Barium Carbonate
25
Flint
7.5
Nepheline
Syenite
25
Clinchfield
Felspar
25
Zinc
Oxide
15
Kentucky
"Special"Ball
clay
2
From
this
glazeI
eliminatedthe
zinc and replacedit
by increasing
the
barium
carbonate,
nepheline.syenite,
andadding
spodumene.The
formula
for
this
is:
Barium
Carbonate
37=5
Flint
7,5
Nepheline
Syenite
55.0
Clinchfield
Felspar
25.0
Spodumene
25.0
The
result ofthis
test
wasthat
the
glaze shivered offthe
clay body.
The
nexttest
wasto
addthree
additionsof
five
grams each offlint.
The
results ofthis
werethat
all
three
shivered off andthe
third
addition offlint
alsocaused pinholing.
From
this
I decided
that
this
glazewould not
take
this
large
amount of spodumene soI
increased
the
amount of nepheline syeniteto
65
andlowered
the
spodumene
to
15.
I
retainedthe
22.5
offlint.
The
resultsI
addedkaolin,
three
additions offive
gramseach,
andthen to
this
I
addedtwo
additions offlint,
five
gramseach.
The
first
addition ofkaolin
correctedthe
shivering
but
left
pinholing.The
third
addition ofkaolin
left
asmooth matte glaze
free
ofboth
shivering
and pinholing.With
the
two
additions offlint
the
pinholing
reappeared.The
formula
for
the
successful glaze whichI
callRC3D3
consists of:
Barium Carbonate
37^5
Flint
22.5
Nepheline
Syenite
65*0
Clinchfield Felspar
25.0
Spodumene
15.0
At
this
time
I
decided
to
try
to
develope
a cone5
glaze.
Taking
a recipethat
I had
found
which consistedof:
Felspar
60.9
Whiting
13*2
Barium
Carbonate
25*9
I
decided
to
try
four
different
felspars
in
place ofthe
felspar.
I
usedClinchfield
to
whichI
gavethe
letter
K,
because
it
is
ahigh
potash;
Nepheline
Syenite
to
whichI
gave
the
letter
L,
I
usedbecause
ofits
high
sodacontent;
Bainbridge,
to
whichI
gavethe
letter
M,
I
usedbecause
it
has
ahigher
percentage ofsoda;
andCornwall
stone,
to
which
I
gavethe
letter
N,
I
usedbecause
it has
equal partsof potash and soda.
The
K
test
produced avery
opaque smoothpro-16
duced
a good matte.The N
test
formed
a whiter mattebut
was not quite as opaque as
the
others.I
choseto
workwith
the
K
test.
I
found
that
it
produced good color withalmost all of
the
colorants and an exceptional blue-purplewith
the
addition ofh%
copper when appliedheavily
in
acone
5.
light
reductionfiring.
I found that
the
glazetests
withClinchfield,
whiting,
and
barium
wereworking
so wellI
decided
to see whatinter
esting
glazes couldbe
developed
whenthese
materials wereused
in
atri-axial
blend.
At
the
A
pointI
used100
gramsof
Clinchfield
felspar.
At
the
B
point,
50
grams ofClinch-field
and50
grams of whiting.At
the
C
point,
50
grams ofClinchfield
and50
grams ofbarium
carbonate.From
this
I
made a
15
pointtri-axial.
Point
5
is
asuitable,
usable,
gray,
matte glaze.Points
5 6,
and10
are good matteglazes
but
pickup
some colorfrom
the
clay
body.
Points
3
and5
seemto
pickup
a pinkish overcast whichI've
noticedin
otherhigh barium
felspar
glazetests.
Professor Cowles
and
I have been
unableto
discover
wherethis
comesfrom.
The
other glazes crazethough
several seemto have
possibilities.
With
additions offlint
I feel
they
couldbe
Bright
Matte
whenheavy
Bright
whenthin
if
Dry
matteColor
from
body
Pink overcast
Matte
always when
heavy
The
glazes usedfor
this
thesis
arelisted
below.
SMITH SPODUMENE
Cone
9
Clinchfield
Felspar
30
Spodumene
20
Edgar
Plastic
Kaolin
25
Dolomite
22
Whiting
3
Tin Oxide
5
Black
Colorants
Cobalt
Oxide
Red
Iron
Oxide
Manganese
Dioxide
18
SHANNER RED
Edgar
Plastic
Kaolin
Clinchfield
Felspar
Whiting
Talc
Bone
Ash
Red
Iron
Oxide
Rutile
Cone
9
24.3
51.1
20.7
3.9
10
4
2
R01
Cone
9,
10
Clinchfield
Felspar
?96
Cornwall
Stone
3^
Whiting
3^
Kentucky
"Special"Ball
Clay
18
Kaolin
12
Zinc
Oxide
6
Red
Iron
Oxide
12
Rutile
8
MG5
Clinchfield Felspar
Petalite
Dolomite
Kaolin
Flint
Plus
8%
Tin
Cone
9
15
15
25
25
25
CBG8
Cone
9
Nepheline
Syenite
Barium
Carbonate
Kl
Cone
5
Clinchfield Felspar
60.9
Whiting
13
#2
Barium
Carbonate
2
5! 9
Bentonite
2
Professor
Cowles'Puddle
Glaze
Cone
08-5
Lithium Carbonate
60
Raw Borax
iqq
Kaolin
Joo
CONCLUSION
In
working
withlarge
plantersI have
learned
to
throw
larger
than
I
everhave
before
andlearned
a greatdeal
from
the
problemsI have
encountered.A
major problemis
executing
adesign large
enoughto
fit
the concept,
designing
aplanter which maintains
its
size evenin
a small photographand never
looks
asthough it
were a small pot whichhad
been
enlargedmany
times.
Another
problemis
cracking.I
feel
I
have
learned
how to
handle
the
potthrough
the
stagesof
drying
andfiring
sothat
cracks areless
likely
to
occur,In
working
withsmaller,
hanging
plantersI
have
encountered
the
problem ofactually
hanging
the
pot,
oftrying
to
usethe kind
ofstring
whichbest
suitsthe
design
ofthe
pot,
andtrying
to
solvethe
problem ofmaking
something
heavy
appearlight
when suspended.I have
not solvedthese
problems;
I
have
reached some reasonable conclusions.In
the
area ofclay
and glaze researchI have
learned
much
but
in
each casemy
studieshave
provided astarting
place rather
than
afinal
solution.From this
starting
place
I
feel
better
preparedto
cope withfuture
problemswithout
the
professional guidanceI
have
had
atthe
School
for
American
Craftsmen.
For
this
reasonmy
studieshere
Partially
Outside
glazed withROl.
Inside
glazed white withTable
ofShrinkage
andWater
Absorption
of
Tri-axial Blend
ofPage
9.
Total
Percentage
ofShrinkage
atCone
5
Total
Percentage
ofShrinkage
atCone
9
Total
Percentage
of
Water
Absorption
at
Cone
5
Total
Percentageof
Water
Absorption
at
Cone
9
1
11
13
2.4
1.5
2
11
13
2.3
2.1
3
12
13
1.8
1.2
4
13
14
2.6
1.4
5
12
14
k.3
2.4
6
11
13
1*5
.57
13
14
2.5
1.3
8
11
14
2.7
2.3
9
12
13
2.1
1.9
10
11
13
2.6
2.2
11
11
13
2.8
2.4
12
13
14
2.2
2.4
13
13
15
3.3
3.5
14
12
15
3.1
2.5
[image:67.542.49.504.129.574.2]39
Table
ofShrinkage
andAbsorption
of
Clay
Tests
onPage
12.
50%
SAC
Stoneware
with50%
by
volume of petaliteis
representedby
PL1.
75%
SAC
Stoneware
with25% by
volume of petaliteis
representedby
PL2.
Total
Percentage
of
Water
Absorption
at
Cone
5
in
Oxidation
Firing
Total
Percentage
ofWater
Absorption
at
Cone
5
in
Reduction
Firing
Total
Percentage
of
Shrinkage
atCone
5
in
Oxidation
Firing
Total
Percentage
of Shrinkage at
Cone
5
in
Reduction
Firing
PL1
20
20
46
35
PL2
15
16
20
13
Total
Percentages
atCone
9
PL1
19
18
33
3^
[image:68.542.32.518.189.434.2]Little,
Brown
andCompany,
1953*
Free,
Montague.
All
About
House
Plants.
New
York:
Doubleday
&
Company,
1946.
Parmelee,
Cullen
W.
Ceramic
Glazes.
Chicago:
Cahners
Publishing
Company, Inc.,
1951.
Rhodes,
Daniel.
Clay
andGlazes
for
the Potter.
Philadelphia:
Chilton
Books,
1957.
Rhodes,
Daniel.
Stoneware
andPorcelain.
Philadelphia:
Chilton
Books,
1959.
Scharff,
Robert.
The
Book
ofPlanters.
New
York:
M.
Barrows
andCompany, Inc.,
I960.
Taloumis,
George.
Outdoor
Gardening
in
Pots
and
Boxes.
Princeton:D.
Van Nostrand
Company